How to set up software RAID1
服务器安装RAID1问题解析

服务器安装RAID1问题解析: 安装RAID1遇到的问题 [2008-01-09 15:25:58]-- INTEL SERVER BOARD SE7221BA1-E SATA RAID1 安装配置过程一、开启BIOS的RAID设置开机时,按F4进入BIOS设置,在『ADVANCED』的『Drive Configuration』中的『Intel(R)RAID Technology』中,将[disabled]改成[enabled],执行完这项操作之后,BIOS中的RAID支持就已经打开。
二、配置RAID1、开机时,按ctrl+E,进入Intel 的RAID配置页面,在【configure】项目中,选择【new configuration】项,回车之后,系统询问『proceed』,选择『yes』,在打开的ARRAY SELECTION 页面中,用空格键依次选定物理硬盘,然后回车,结束选择过程;接着,按下F10,在打开的【select configurable Arrays】页面中按空格键,再按F10,选定RAID 1或者RAID 0,修改其它参数如果需要的话,一般保持不变,然后在这个页面中下滑到『ACCEPT』项,按下回车键,在SAVE CONFIGURATION询问中选择YES,此时保存配置,回车,此时RAID1已经配置完成;2、在这个页面中,移到【Initialize】中,在Logical Drive 0中空格键选定,按下F10键,开始初始化逻辑盘,在弹出的询问页中选择YES,执行初始化,完成之后按页面提示按下ESC,此时初始化完成;3、按系统提示重新启动。
三、安装操作系统1、RAID已经配置完成,准备软驱和RAID的驱动程序,拷贝于软盘中;注意:RAID的驱动程序在主板附带光盘中有,标记为RAID 文件夹;2、执行安装,在windows初始窗口按下F6,表示需要安装RAID驱动;3、安装过程中,系统会提示找不到设备驱动,此时请按下S键;4、放入驱动盘,回车,系统寻找到驱动,选择第一个驱动,拷贝完成之后,将软盘弹出,按下回车键,继续执行安装。
Raid1教程

Raid教程:全程图解手把手教你做RAID(1)分类:技术文章2007.2.12 08:51 作者:小石| 评论:0 | 阅读:200独家特稿】说到磁盘阵列(RAID,Redundant Array of Independent Disks),现在几乎成了网管员所必须掌握的一门技术之一,特别是中小型企业,因为磁盘阵列应用非常广泛,它是当前数据备份的主要方案之一。
然而,许多网管员只是在各种媒体上看到相关的理论知识介绍,却并没有看到一些实际的磁盘阵列配置方法,所以仍只是一知半解,到自己真正配置时,却无从下手。
本文要以一个具体的磁盘阵列配置方法为例向大家介绍磁盘阵列的一些基本配置方法,给出一些关键界面,使各位对磁盘阵列的配置有一个理性认识。
当然为了使各位对磁盘阵列有一个较全面的介绍,还是先来简要回顾一下有关磁盘阵列的理论知识,这样可以为实际的配置找到理论依据。
一、磁盘阵列实现方式磁盘阵列有两种方式可以实现,那就是“软件阵列”与“硬件阵列”。
软件阵列是指通过网络操作系统自身提供的磁盘管理功能将连接的普通SCSI卡上的多块硬盘配置成逻辑盘,组成阵列。
如微软的Windows NT/2000 Server/Server 2003和NetVoll 的NetWare两种操作系统都可以提供软件阵列功能,其中Windows NT/2000 Server/Server 2003可以提供RAID 0、RAID 1、RAID 5;NetWare操作系统可以实现RAID 1功能。
软件阵列可以提供数据冗余功能,但是磁盘子系统的性能会有所降低,有的降代还比较大,达30%左右。
硬件阵列是使用专门的磁盘阵列卡来实现的,这就是本文要介绍的对象。
现在的非入门级服务器几乎都提供磁盘阵列卡,不管是集成在主板上或非集成的都能轻松实现阵列功能。
硬件阵列能够提供在线扩容、动态修改阵列级别、自动数据恢复、驱动器漫游、超高速缓冲等功能。
它能提供性能、数据保护、可靠性、可用性和可管理性的解决方案。
DISK配置服务器软RAID工作任务(RAID1+BITLOCKER)-winserver4

赛题
2.4.3、DISK配置服务器软RAID工作任务
1.添加磁盘
2.·在服务器上为创建一个RAID-1 阵列;格式化该磁盘挂载为I 盘,名称为:RAID1;
3.· I盘开启BITLOCKER;加密整个数据盘。
密码为:“Skills46!”
赛题
2.4.3、DISK配置服务器软RAID工作任务
安装及配置 RAID
·配置系统软RAID;添加两块10G磁盘;
·在服务器上为创建一个RAID-1 阵列;
·格式化该磁盘挂载为I 盘,名称为:RAID1;
· I盘开启BITLOCKER;加密整个数据盘。
密码为:“Skills46!”
1.添加磁盘
2.·在服务器上为创建一个RAID-1 阵列;格式化该磁盘挂载为
I 盘,名称为:RAID1;
带区卷(RAID-0) 镜像卷(RAID-1)
3.· I盘开启BITLOCKER;加密整个数据盘。
密码为:“Skills46!”
确认的时候,自动重启服务勾上。
配置raid1+raid5和raid5的热备

配置raid1+raid5和raid5的热备进入配置界面
选择“Add Configuration”点击“next”
这个下一步
选择要做raid1的盘,在这里我是选择前面两个300g的来做raid1
【选择300g的硬盘---点击“Add To Array”移到右边的去---选择完确认点击“Accept DG”】
右边已有要做riad的盘卷----点击“next”会有个界面提示yes&no!选择yes!
选择要做raid的卷,----点击“Add to SPAn”
确认要做raid的----点击“next”
在RAID level 选择要做的RAID1,----如果在select size 上没有显示硬盘的大小-----点击“update size刷新”---再点击“accept”
出现VD 0----点击“next”,ok!raid配置成功。
回到home,可以看到做好的raid1.
接下来raid5,一样的做发,选择硬盘
确认要做raid5的---下一步!
选择raid5,确认
做好raid5 回到home –选择选择要做热备的盘双击
选择“drive Group1”(这个是raid5),在选择“make dedicated hsp”点击“go”
点击yes
好了提示是drive Group1的热备。
配置raid+raid5和raid5的热备已完成。
THANKS !!!
致力为企业和个人提供合同协议,策划案计划书,学习课件等等
打造全网一站式需求
欢迎您的下载,资料仅供参考。
浪潮服务器RAID配置方法
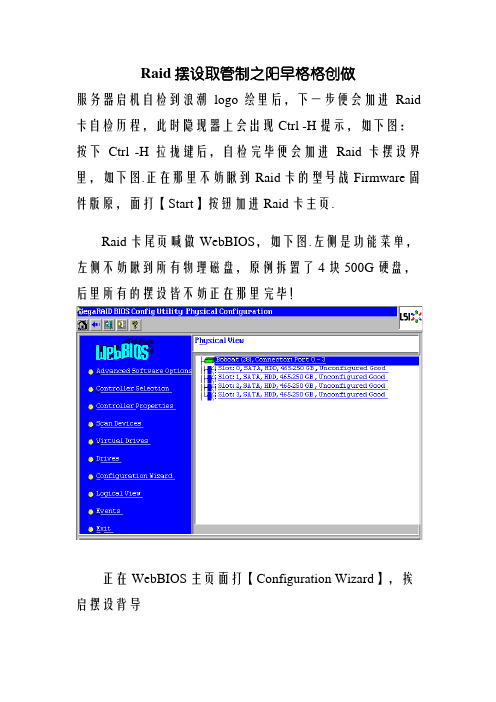
Raid摆设取管制之阳早格格创做服务器启机自检到浪潮logo绘里后,下一步便会加进Raid 卡自检历程,此时隐现器上会出现Ctrl -H提示,如下图:按下Ctrl -H拉拢键后,自检完毕便会加进Raid卡摆设界里,如下图.正在那里不妨瞅到Raid卡的型号战Firmware固件版原,面打【Start】按钮加进Raid卡主页.Raid卡尾页喊做WebBIOS,如下图.左侧是功能菜单,左侧不妨瞅到所有物理磁盘,原例拆置了4块500G硬盘,后里所有的摆设皆不妨正在那里完毕!正在WebBIOS主页面打【Configuration Wizard】,挨启摆设背导采用【Add Configuration】,面打【Next】下一步采用【Manual Configuration】,面打【Next】下一步左侧圆框内不妨瞅到所有已使用的硬盘.果为要干Raid1,咱们采用前二块,而后面打下圆的【Add to Array】将其加进到左侧圆框内.面打【Accept DG】,创修磁盘组面打【Next】下一步面打【Add to SPAN】,将刚刚才创修佳的磁盘组加进到左侧圆框内面打【Next】下一步阵列参数摆设:第一个参数“Raid Level”采用Raid1,其余脆持默认末尾一个参数“Select Size”输进阵列容量大小,最大值可参照左侧绿字提示(其中R0代表干Raid0最大容量,R1代表干Raid1最大容量),完毕后面打【Accept】弹出的所有提示均采用【yes】回到摆设页里,面打【Next】下一步面打【Accept】摆设完毕!提示保存,采用【yes】(依Raid卡型号分歧,有些大概不此功能,如不请跳过此步)提示SSD慢存,采用【Cancel】提示初初化,采用【yes】正正在初初化,能瞅到百分比进度条(速度较快,大概一闪而过)初初化完毕!面打【Home】返回尾页阵列摆设完毕! Raid1状态隐现“Optimal”表示平常,Drives 隐现二块硬盘绿色Online平常,如果另有其余已使用的硬盘,会正在unconfigured Drives底下蓝色隐现.。
linux服务器RAID1使用指导
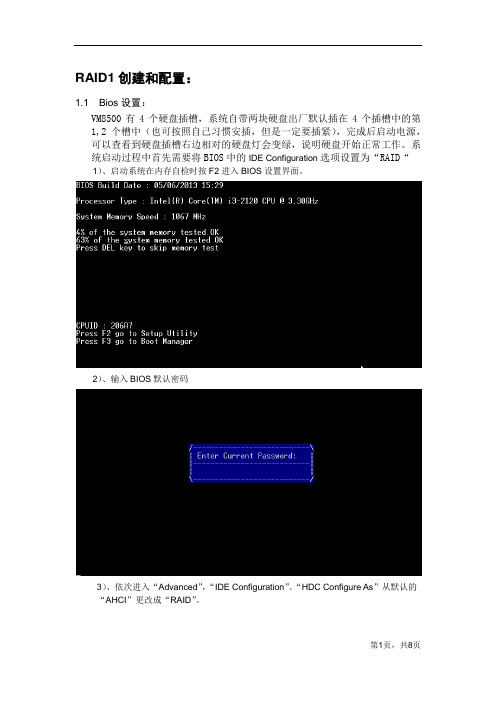
RAID1创建和配置:1.1 Bios设置:VM8500有4个硬盘插槽,系统自带两块硬盘出厂默认插在4个插槽中的第1,2个槽中(也可按照自己习惯安插,但是一定要插紧),完成后启动电源,可以查看到硬盘插槽右边相对的硬盘灯会变绿,说明硬盘开始正常工作。
系统启动过程中首先需要将BIOS中的IDE Configuration选项设置为“RAID“1)、启动系统在内存自检时按F2进入BIOS设置界面。
2)、输入BIOS默认密码3)、依次进入“Advanced”,“IDE Configuration”。
“HDC Configure As”从默认的“AHCI”更改成“RAID”。
4)、保存设置并退出BIOS,系统自动重启。
5)、重启后在“Rapid Storage T echnology(RST)Option ROM”界面按Ctrl+I键进入RAID配置界面。
注意,此后步骤必须通过USB键盘操作,通过串口不能正常操作。
1.2 配置RAID1:1、选择“1.Create RAID Volume”,然后按回车,出现创建RAID的页面,其中“Name”填写RAID的名称,默认为“Volume0”;“RAID Level”选择RAID的等级,我们这里要选择“RAID1”;“Disks”是选择两块硬盘做RAID1,如果只有两块硬盘那就默认为NA;“Strip Size”即为条带大小, RAID1就直接使用默认值NA;“Capacity”填写RAID的容量,按照两块硬盘的实际大小填写,如果两块硬盘大小一致那么默认填写单块硬盘的最大容量,如果两块硬盘大小不一致那么填写的容量不能超过容量小的硬盘的最大容量。
全部确认填写完毕后选择“Create Volume“按回车。
注意,使用TAB键下跳选项,方向上下键调整选项,SPACE键选中/清除选项。
2、跳出对话框,输入“Y”,系统会自动重启:1.3 注意事项1、安装系统前请先确认系统是否支持配置RAID1,需要查看BIOS版本是否为V106及以上,在BIOS界面可以直接看到BIOS版本,或进入系统在命令行输入“dmidecode 2.2”,查看BIOS Information,为VS01VMCU-V106,如果低于此版本请升级至V106,具体升级步骤如下:在服务器中找到bios的目录,一般在/usr/local/hstor/driver/bios下,然后将升级的文件中VS01VMCU02106.bin 拷进去,然后删了老的升级文件,比如VS01VMCU02102.bin文件,最后执行./update_bios即可(升级文件请查看附件);2、安装完系统后请进入操作系统,因为阵列只有在进入系统才开始初始化,否则阵列会一直处于initialize状态;1. 操作系统安装:2.1光盘安装过程1、插入系统盘进行安装,在选择安装目的时,注意选择RAID盘,其余步骤与正常安装操作系统一致(详见附件)。
Raid1方法

华硕PXL-S30 RAID 1创建和修复快速索引不能发图片门槛不明白别怪我RAID 1创建和修复快速索引(以两个36G IBM硬盘为例)1开机,根据屏幕提示,按CTRL+C进入SCSI Setup Utility;回车,进入子菜单,选<RAID Properties>,回车,显示所有硬盘。
2.将光标移动到一个硬盘(在这里是ID 3),按“-”键一次,出现以下对话框,按F3。
随即该硬盘Array Disk状态为YES,状态变为Primary。
3.将光标移动到下一个硬盘(ID 4), 按“-”键一次,出现以下对话框,按Delete键。
随即该硬盘Array Disk状态为YES。
4.按ESC键退出到以下界面。
然后选<Save changes then exit this menu> 退出。
显示以下界面。
可以看到RAID 1状态(RAID Status)为Resyncing 。
表明系统正在初始化RAID 1。
5.按ESC键,然后选<Exit the configuration utility>,回车退出。
系统自动重启,开机系统显示ID 3为36G的LSILOGIC RAID。
如下图判断RAID1是否损坏当RAID1当中有一个硬盘损坏时候,没有声音报警,重启也没有任何信息提示。
以下两种情况只要有一种存在就表明RAID1损坏。
1.在进行读写操作时该硬盘的活动指示灯不闪烁。
2. 开机,根据屏幕提示,按CTRL+C进入SCSI Setup Utility,屏幕显示RAID status为“Degrade”。
请注意:如发现有硬盘损坏,请尽快按以下方法修复RAID 1。
修复有一个硬盘损坏的RAID11.换上好的硬盘。
2.开机,根据屏幕提示,按CTRL+C进入SCSI Setup Utility3.回车,进入子菜单,选<Synchronize whole Mirror>,回车。
raid1配置

raid1配置此文档为自行整理,非官方提供资料,仅供参考。
疏漏之处敬请反馈。
对RAID进行操作很可能会导致数据丢失,请在操作之前务必将重要数据妥善备份在按完Ctrl+C 后进入的下一个屏幕,可以查看H200 的固件版本号和启动的顺序,按+/- 号可以更改启动顺序,ins/del 键可以更改启动列表,直接按回车进入H200 的配置界面在这个H200 的界面中可以查看/设置RAID (RAID Properties )查看/设置 SAS 拓朴( SAS Topology )或是查看/设置适配卡的高级属性先查看 SAS 的拓朴,在这里面可以查看到H200 阵列卡中一共插了八块硬盘(Advanced Adapter Properties )按Alt+D 可以查看设备的具体属性(包括对此块硬盘进行 Verify !)第二部份配置RAID 1在主界面选择 RAID Properties 进行阵列卡配置在RAID 配置界面中有三个选择项查看已经存在的阵列配置(此选项只有在已经存在阵列配置的情况下才出会现)通常在第一次配置阵列时,只会出现下面三项做RAID 1 (最多只允许两块硬盘做RAID1)做RAID 0 (最少2块,最多4块硬盘做RAID0)做RAID10(只允许4快硬盘做RAID10)我们以raid1为例,选Create RAID 1 Volume选项将光标移动到第一块硬盘的RAID Disk 栏上,按空格键选中这块磁盘,这时驱动器状态变成Primary (主盘)系统会自动提示是否需要保存RAID 的配置,选择保存退出如果需要对刚刚创建的RAID 1 进行管理,可以选择View Existing Array在这里面可以查看到逻辑驱动器的状态和物理驱动器的状态在管理VD的选项中,可以选择“管理热备”“一致性检查”“激活容量”“删除虚拟磁盘”PERC H200 配置手册。
- 1、下载文档前请自行甄别文档内容的完整性,平台不提供额外的编辑、内容补充、找答案等附加服务。
- 2、"仅部分预览"的文档,不可在线预览部分如存在完整性等问题,可反馈申请退款(可完整预览的文档不适用该条件!)。
- 3、如文档侵犯您的权益,请联系客服反馈,我们会尽快为您处理(人工客服工作时间:9:00-18:30)。
Version 1.0 Author: Falko Timme <ft [at] falkotimme [dot] com> Last edited 11/26/2007This guide explains how to set up software RAID1 on an already running Debian Etch system. The GRUB bootloader will be configured in such a way that the system will still be able to boot if one of the hard drives fails (no matter which one).I do not issue any guarantee that this will work for you!1 Preliminary NoteIn this tutorial I'm using a Debian Etch system with two hard drives, /dev/sda and /dev/sdb which are identical in size. /dev/sdb is currently unused, and /dev/sda has the following partitions:• /dev/sda1: /boot partition, ext3; • /dev/sda2: swap; • /dev/sda3: / partition, ext3In the end I want to have the following situation:• /dev/md0 (made up of /dev/sda1 and /dev/sdb1): /boot partition, ext3; • /dev/md1 (made up of /dev/sda2 and /dev/sdb2): swap; • /dev/md2 (made up of /dev/sda3 and /dev/sdb3): / partition, ext3This is the current situation:df -hserver1:~# df -h Filesystem /dev/sda3 tmpfs udev Size 4.4G 126M 10M Used Avail Use% Mounted on 729M 0 56K 3.4G 126M 10M 18% / 0% /lib/init/rw 1% /devtmpfs /dev/sda1 server1:~#126M 137M0 12M126M 118M0% /dev/shm 10% /bootfdisk -lserver1:~# fdisk -lDisk /dev/sda: 5368 MB, 5368709120 bytes 255 heads, 63 sectors/track, 652 cylinders Units = cylinders of 16065 * 512 = 8225280 bytesDevice Boot /dev/sda1 /dev/sda2 /dev/sda3 *Start 1 19 81End 18 80 652Blocks 144553+ 498015 4594590Id 83 82 83System Linux Linux swap / Solaris LinuxDisk /dev/sdb: 5368 MB, 5368709120 bytes 255 heads, 63 sectors/track, 652 cylinders Units = cylinders of 16065 * 512 = 8225280 bytesDisk /dev/sdb doesn't contain a valid partition table server1:~#2 Installing mdadmThe most important tool for setting up RAID is mdadm. Let's install it like this:apt-get install initramfs-tools mdadmYou will be asked the following question:MD arrays needed for the root filesystem: <-- allAfterwards, we load a few kernel modules (to avoid a reboot):modprobe md modprobe linear modprobe multipath modprobe raid0 modprobe raid1 modprobe raid5 modprobe raid6 modprobe raid10Now runcat /proc/mdstatThe output should look as follows:server1:~# cat /proc/mdstat Personalities : [linear] [multipath] [raid0] [raid1] [raid6] [raid5] [raid4] [raid10] unused devices: <none> server1:~#3 Preparing /dev/sdbTo create a RAID1 array on our already running system, we must prepare the /dev/sdb hard drive for RAID1, then copy the contents of our /dev/sda hard drive to it, and finally add /dev/sda to the RAID1 array.First, we copy the partition table from /dev/sda to /dev/sdb so that both disks have exactly the same layout:sfdisk -d /dev/sda | sfdisk /dev/sdbThe output should be as follows:server1:~# sfdisk -d /dev/sda | sfdisk /dev/sdb Checking that no-one is using this disk right now ... OKDisk /dev/sdb: 652 cylinders, 255 heads, 63 sectors/tracksfdisk: ERROR: sector 0 does not have an msdos signature /dev/sdb: unrecognized partition table type Old situation: No partitions found New situation: Units = sectors of 512 bytes, counting from 0Device Boot /dev/sdb1 /dev/sdb2 /dev/sdb3 /dev/sdb4 *Start 63 289170 1285200 0End 289169 1285199 10474379 -#sectors 289107 996030 9189180 0Id 83 82 83 0System Linux Linux swap / Solaris Linux EmptySuccessfully wrote the new partition tableRe-reading the partition table ...If you created or changed a DOS partition, /dev/foo7, say, then use dd(1) to zero the first 512 bytes: (See fdisk(8).) server1:~# dd if=/dev/zero of=/dev/foo7 bs=512 count=1The commandfdisk -lshould now show that both HDDs have the same layout:server1:~# fdisk -lDisk /dev/sda: 5368 MB, 5368709120 bytes 255 heads, 63 sectors/track, 652 cylinders Units = cylinders of 16065 * 512 = 8225280 bytesDevice Boot /dev/sda1 /dev/sda2 /dev/sda3 *Start 1 19 81End 18 80 652Blocks 144553+ 498015 4594590Id 83 82 83System Linux Linux swap / Solaris LinuxDisk /dev/sdb: 5368 MB, 5368709120 bytes 255 heads, 63 sectors/track, 652 cylinders Units = cylinders of 16065 * 512 = 8225280 bytesDevice Boot /dev/sdb1 /dev/sdb2 /dev/sdb3 server1:~# *Start 1 19 81End 18 80 652Blocks 144553+ 498015 4594590Id 83 82 83System Linux Linux swap / Solaris LinuxNext we must change the partition type of our three partitions on /dev/sdb to Linux raid autodetect:fdisk /dev/sdbserver1:~# fdisk /dev/sdbCommand (m for help): <-- m Command action a b c d l m n o p q s t u v w x toggle a bootable flag edit bsd disklabel toggle the dos compatibility flag delete a partition list known partition types print this menu add a new partition create a new empty DOS partition table print the partition table quit without saving changes create a new empty Sun disklabel change a partition's system id change display/entry units verify the partition table write table to disk and exit extra functionality (experts only)Command (m for help): <-- t Partition number (1-4): <-- 1 Hex code (type L to list codes): <-- L0 1 2 3 4Empty FAT12 XENIX root XENIX usr FAT16 <32M1e 24 39 3c 40Hidden W95 FAT1 80 NEC DOS Plan 9 PartitionMagic Venix 80286 81 82 83 84Old MinixbeSolaris boot Solaris DRDOS/sec (FATDRDOS/sec (FATDRDOS/sec (FAT-Minix / old Lin bf Linux swap / So c1 Linux OS/2 hidden C: c4 c65 6 7 8 9 a b c e f 10 11 12 14 16 17 18 1b 1cExtended FAT16 HPFS/NTFS AIX AIX bootable41 42 4d 4e 4fPPC PReP Boot SFS QNX4.x85 86 87Linux extendedc7Syrinx Non-FS data CP/M / CTOS / . Dell Utility BootIt DOS access DOS R/O SpeedStor BeOS fs EFI GPT EFI (FAT-12/16/ Linux/PA-RISC b SpeedStor SpeedStor DOS secondary Linux raid auto LANstep BBTNTFS volume set da NTFS volume set db Linux plaintext de Linux LVM Amoeba Amoeba BBT BSD/OS df e1 e3 e4QNX4.x 2nd part 88 QNX4.x 3rd part 8e OnTrack DM 93OS/2 Boot Manag 50 W95 FAT32 51OnTrack DM6 Aux 94 CP/M 9fW95 FAT32 (LBA) 52 W95 FAT16 (LBA) 53 W95 Ext'd (LBA) 54 OPUS Hidden FAT12 55 56OnTrack DM6 Aux a0 OnTrackDM6 EZ-Drive Golden Bow Priam Edisk SpeedStor a5 a6 a7 a8 a9IBM Thinkpad hi eb FreeBSD OpenBSD NeXTSTEP Darwin UFS NetBSD Darwin boot BSDI fs BSDI swap ee ef f0 f1 f4 f2 fd feCompaq diagnost 5c Hidden FAT16 <3 61 Hidden FAT16 63GNU HURD or Sys ab Novell Netware Novell Netware b7 b8Hidden HPFS/NTF 64 AST SmartSleep 65Hidden W95 FAT3 70 Hidden W95 FAT3 75DiskSecure Mult bb PC/IXBoot Wizard hid ffHex code (type L to list codes): <-- fd Changed system type of partition 1 to fd (Linux raid autodetect)Command (m for help): <-- t Partition number (1-4): <-- 2 Hex code (type L to list codes): <-- fd Changed system type of partition 2 to fd (Linux raid autodetect)Command (m for help): <-- t Partition number (1-4): <-- 3 Hex code (type L to list codes): <-- fdChanged system type of partition 3 to fd (Linux raid autodetect)Command (m for help): <-- w The partition table has been altered!Calling ioctl() to re-read partition table. Syncing disks. server1:~#To make sure that there are no remains from previous RAID installations on /dev/sdb, we run the following commands:mdadm --zero-superblock /dev/sdb1 mdadm --zero-superblock /dev/sdb2 mdadm --zero-superblock /dev/sdb3If there are no remains from previous RAID installations, each of the above commands will throw an error like this one (which is nothing to worry about):server1:~# mdadm --zero-superblock /dev/sdb1 mdadm: Unrecognised md component device - /dev/sdb1 server1:~#Otherwise the commands will not display anything at all.Now let's create our RAID arrays /dev/md0, /dev/md1, and /dev/md2. /dev/sdb1 will be added to /dev/md0, /dev/sdb2 to /dev/md1, and /dev/sdb3 to /dev/md2. /dev/sda1, /dev/sda2, and /dev/sda3 can't be added right now (because the system is currently running on them), therefore we use the placeholder missing in the following three commands:mdadm --create /dev/md0 --level=1 --raid-disks=2 missing /dev/sdb1 mdadm --create /dev/md1 --level=1 --raid-disks=2 missing /dev/sdb2 mdadm --create /dev/md2 --level=1 --raid-disks=2 missing /dev/sdb3The commandcat /proc/mdstatshould now show that you have three degraded RAID arrays ([_U] or [U_] means that an array is degraded while [UU] means that the array is ok):server1:~# cat /proc/mdstat Personalities : [raid1] [linear] [multipath] [raid0] [raid6] [raid5] [raid4] [raid10] md2 : active raid1 sdb3[1] 4594496 blocks [2/1] [_U]md1 : active raid1 sdb2[1] 497920 blocks [2/1] [_U]md0 : active raid1 sdb1[1] 144448 blocks [2/1] [_U]unused devices: <none> server1:~#Next we create filesystems on our RAID arrays (ext3 on /dev/md0 and /dev/md2 and swap on /dev/md1):mkfs.ext3 /dev/md0 mkswap /dev/md1 mkfs.ext3 /dev/md2Next we must adjust /etc/mdadm/mdadm.conf (which doesn't contain any information about our new RAID arrays yet) to the new situation:cp /etc/mdadm/mdadm.conf /etc/mdadm/mdadm.conf_orig mdadm --examine --scan >> /etc/mdadm/mdadm.confDisplay the contents of the file:cat /etc/mdadm/mdadm.confAt the bottom of the file you should now see details about our three (degraded) RAID arrays:# mdadm.conf # # Please refer to mdadm.conf(5) for information about this file. # # by default, scan all partitions (/proc/partitions) for MD superblocks. # alternatively, specify devices to scan, using wildcards if desired. DEVICE partitions # auto-create devices with Debian standard permissions CREATE owner=root group=disk mode=0660 auto=yes # automatically tag new arrays as belonging to the local system HOMEHOST <system> # instruct the monitoring daemon where to send mail alerts MAILADDR root # This file was auto-generated on Mon, 26 Nov 2007 21:22:04 +0100 # by mkconf $Id: mkconf 261 2006-11-09 13:32:35Z madduck $ ARRAY /dev/md0 level=raid1 num-devices=2 UUID=72d23d35:35d103e3:01b5209e:be9ff10a ARRAY /dev/md1 level=raid1 num-devices=2 UUID=a50c4299:9e19f9e4:01b5209e:be9ff10a ARRAY /dev/md2 level=raid1 num-devices=2 UUID=99fee3a5:ae381162:01b5209e:be9ff10a5 Adjusting The System To RAID1Now let's mount /dev/md0 and /dev/md2 (we don't need to mount the swap array /dev/md1):mkdir /mnt/md0 mkdir /mnt/md2mount /dev/md0 /mnt/md0 mount /dev/md2 /mnt/md2You should now find both arrays in the output ofmountserver1:~# mount /dev/sda3 on / type ext3 (rw,errors=remount-ro) tmpfs on /lib/init/rw type tmpfs (rw,nosuid,mode=0755) proc on /proc type proc (rw,noexec,nosuid,nodev) sysfs on /sys type sysfs (rw,noexec,nosuid,nodev) udev on /dev type tmpfs (rw,mode=0755) tmpfs on /dev/shm type tmpfs (rw,nosuid,nodev) devpts on /dev/pts type devpts (rw,noexec,nosuid,gid=5,mode=620) /dev/sda1 on /boot type ext3 (rw) /dev/md0 on /mnt/md0 type ext3 (rw) /dev/md2 on /mnt/md2 type ext3 (rw) server1:~#Next we modify /etc/fstab. Replace /dev/sda1 with /dev/md0, /dev/sda2 with /dev/md1, and /dev/sda3 with /dev/md2 so that the file looks as follows:vi /etc/fstab# /etc/fstab: static file system information. # # <file system> <mount point> <type> <options> <pass> proc /proc proc defaults 0 /dev/md2 / ext3 defaults,errors=remount-ro 0 1 /dev/md0 /boot ext3 defaults<dump> 002 /dev/md1 0 /dev/hdc 0 /dev/fd0 0none /media/cdrom0 /media/floppy0swapsw0 0 0udf,iso9660 user,noauto auto rw,user,noautoNext replace /dev/sda1 with /dev/md0 and /dev/sda3 with /dev/md2 in /etc/mtab:vi /etc/mtab/dev/md2 / ext3 rw,errors=remount-ro 0 0 tmpfs /lib/init/rw tmpfs rw,nosuid,mode=0755 0 0 proc /proc proc rw,noexec,nosuid,nodev 0 0 sysfs /sys sysfs rw,noexec,nosuid,nodev 0 0 udev /dev tmpfs rw,mode=0755 0 0 tmpfs /dev/shm tmpfs rw,nosuid,nodev 0 0 devpts /dev/pts devpts rw,noexec,nosuid,gid=5,mode=620 0 0 /dev/md0 /boot ext3 rw 0 0Now up to the GRUB boot loader. Open /boot/grub/menu.lst and add fallback 1 right after default 0:vi /boot/grub/menu.lst[...] default fallback [...]0 1This makes that if the first kernel (counting starts with 0, so the first kernel is 0) fails to boot, kernel #2 will be booted.In the same file, go to the bottom where you should find some kernel stanzas. Copy the first of them and paste the stanza before the first existing stanza; replace root=/dev/sda3 with root=/dev/md2 and root (hd0,0) with root (hd1,0):[...] ## ## End Default Options ## title Debian GNU/Linux, kernel 2.6.18-4-486 RAID (hd1)root kernel initrd savedefault title root kernel initrd savedefault(hd1,0) /vmlinuz-2.6.18-4-486 root=/dev/md2 ro /initrd.img-2.6.18-4-486Debian GNU/Linux, kernel 2.6.18-4-486 (hd0,0) /vmlinuz-2.6.18-4-486 root=/dev/sda3 ro /initrd.img-2.6.18-4-486title Debian GNU/Linux, kernel 2.6.18-4-486 (single-user mode) root (hd0,0) kernel /vmlinuz-2.6.18-4-486 root=/dev/sda3 ro single initrd /initrd.img-2.6.18-4-486 savedefault ### END DEBIAN AUTOMAGIC KERNELS LISTroot (hd1,0) refers to /dev/sdb which is already part of our RAID arrays. We will reboot the system in a few moments; the system will then try to boot from our (still degraded) RAID arrays; if it fails, it will boot from /dev/sda (-> fallback 1).Next we adjust our ramdisk to the new situation:update-initramfs -uNow we copy the contents of /dev/sda1 and /dev/sda3 to /dev/md0 and /dev/md2 (which are mounted on /mnt/md0 and /mnt/md2):cp -dpRx / /mnt/md2 cd /boot cp -dpRx . /mnt/md06 Preparing GRUB (Part 1)Afterwards we must install the GRUB bootloader on the second hard drive /dev/sdb:grubOn the GRUB shell, type in the following commands:root (hd0,0)grub> root (hd0,0) Filesystem type is ext2fs, partition type 0x83grub>setup (hd0)grub> setup (hd0) Checking if "/boot/grub/stage1" exists... no Checking if "/grub/stage1" exists... yes Checking if "/grub/stage2" exists... yes Checking if "/grub/e2fs_stage1_5" exists... yes Running "embed /grub/e2fs_stage1_5 (hd0)"... succeeded Running "install /grub/stage1 (hd0) (hd0)1+15 p (hd0,0)/grub/stage2 /grub/menu.lst".. . succeeded Done. 15 sectors are embedded.grub>root (hd1,0)grub> root (hd1,0) Filesystem type is ext2fs, partition type 0xfdgrub>setup (hd1)grub> setup (hd1) Checking if "/boot/grub/stage1" exists... no Checking if "/grub/stage1" exists... yes Checking if "/grub/stage2" exists... yes Checking if "/grub/e2fs_stage1_5" exists... yes Running "embed /grub/e2fs_stage1_5 (hd1)"... succeeded Running "install /grub/stage1 (hd1) (hd1)1+15 p (hd1,0)/grub/stage2 /grub/menu.lst".. . succeeded Done. 15 sectors are embedded.grub>quitNow, back on the normal shell, we reboot the system and hope that it boots ok from our RAID arrays:rebootIf all goes well, you should now find /dev/md0 and /dev/md2 in the output ofdf -hserver1:~# df -h Filesystem /dev/md2 tmpfs Size 4.4G 126M Used Avail Use% Mounted on 730M 0 3.4G 126M 18% / 0% /lib/init/rwudev tmpfs /dev/md0 server1:~#10M 126M 137M68K 0 17M10M 126M 114M1% /dev 0% /dev/shm 13% /bootThe output ofcat /proc/mdstatshould be as follows:server1:~# cat /proc/mdstat Personalities : [raid1] md2 : active raid1 sdb3[1] 4594496 blocks [2/1] [_U]md1 : active raid1 sdb2[1] 497920 blocks [2/1] [_U]md0 : active raid1 sdb1[1] 144448 blocks [2/1] [_U]unused devices: <none> server1:~#Now we must change the partition types of our three partitions on /dev/sda to Linux raid autodetect as well:fdisk /dev/sdaserver1:~# fdisk /dev/sdaCommand (m for help): <-- t Partition number (1-4): <-- 1 Hex code (type L to list codes): <-- fd Changed system type of partition 1 to fd (Linux raid autodetect)Command (m for help): <-- t Partition number (1-4): <-- 2 Hex code (type L to list codes): <-- fd Changed system type of partition 2 to fd (Linux raid autodetect)Command (m for help): <-- t Partition number (1-4): <-- 3 Hex code (type L to list codes): <-- fd Changed system type of partition 3 to fd (Linux raid autodetect)Command (m for help): <-- w The partition table has been altered!Calling ioctl() to re-read partition table.WARNING: Re-reading the partition table failed with error 16: Device or resource busy. The kernel still uses the old table. The new table will be used at the next reboot. Syncing disks. server1:~#Now we can add /dev/sda1, /dev/sda2, and /dev/sda3 to the respective RAID arrays:mdadm --add /dev/md0 /dev/sda1 mdadm --add /dev/md1 /dev/sda2 mdadm --add /dev/md2 /dev/sda3Now take a look atcat /proc/mdstat... and you should see that the RAID arrays are being synchronized:server1:~# cat /proc/mdstat Personalities : [raid1] md2 : active raid1 sda3[2] sdb3[1] 4594496 blocks [2/1] [_U] [=====>...............] 85440K/sec recovery = 29.7% (1367040/4594496) finish=0.6min speed=md1 : active raid1 sda2[0] sdb2[1] 497920 blocks [2/2] [UU]md0 : active raid1 sda1[0] sdb1[1] 144448 blocks [2/2] [UU]unused devices: <none> server1:~#(You can runwatch cat /proc/mdstatto get an ongoing output of the process. To leave watch, press CTRL+C.)Wait until the synchronization has finished (the output should then look like this:server1:~# cat /proc/mdstat Personalities : [raid1] md2 : active raid1 sda3[0] sdb3[1]4594496 blocks [2/2] [UU]md1 : active raid1 sda2[0] sdb2[1] 497920 blocks [2/2] [UU]md0 : active raid1 sda1[0] sdb1[1] 144448 blocks [2/2] [UU]unused devices: <none> server1:~#).Then adjust /etc/mdadm/mdadm.conf to the new situation:cp /etc/mdadm/mdadm.conf_orig /etc/mdadm/mdadm.conf mdadm --examine --scan >> /etc/mdadm/mdadm.conf/etc/mdadm/mdadm.conf should now look something like this:cat /etc/mdadm/mdadm.conf# mdadm.conf # # Please refer to mdadm.conf(5) for information about this file. # # by default, scan all partitions (/proc/partitions) for MD superblocks. # alternatively, specify devices to scan, using wildcards if desired. DEVICE partitions # auto-create devices with Debian standard permissions CREATE owner=root group=disk mode=0660 auto=yes # automatically tag new arrays as belonging to the local systemHOMEHOST <system> # instruct the monitoring daemon where to send mail alerts MAILADDR root # This file was auto-generated on Mon, 26 Nov 2007 21:22:04 +0100 # by mkconf $Id: mkconf 261 2006-11-09 13:32:35Z madduck $ ARRAY /dev/md0 level=raid1 num-devices=2 UUID=72d23d35:35d103e3:2b3d68b9:a903a704 ARRAY /dev/md1 level=raid1 num-devices=2 UUID=a50c4299:9e19f9e4:2b3d68b9:a903a704 ARRAY /dev/md2 level=raid1 num-devices=2 UUID=99fee3a5:ae381162:2b3d68b9:a903a7048 Preparing GRUB (Part 2)We are almost done now. Now we must modify /boot/grub/menu.lst again. Right now it is configured to boot from /dev/sdb (hd1,0). Of course, we still want the system to be able to boot in case /dev/sdb fails. Therefore we copy the first kernel stanza (which contains hd1), paste it below and replace hd1 with hd0. Furthermore we comment out all other kernel stanzas so that it looks as follows:vi /boot/grub/menu.lst[...] ## ## End Default Options ## title root kernel initrd savedefault title root kernel initrd savedefault #title #root Debian GNU/Linux, kernel 2.6.18-4-486 RAID (hd1) (hd1,0) /vmlinuz-2.6.18-4-486 root=/dev/md2 ro /initrd.img-2.6.18-4-486Debian GNU/Linux, kernel 2.6.18-4-486 RAID (hd0) (hd0,0) /vmlinuz-2.6.18-4-486 root=/dev/md2 ro /initrd.img-2.6.18-4-486Debian GNU/Linux, kernel 2.6.18-4-486 (hd0,0)#kernel #initrd #savedefault/vmlinuz-2.6.18-4-486 root=/dev/sda3 ro /initrd.img-2.6.18-4-486#title Debian GNU/Linux, kernel 2.6.18-4-486 (single-user mode) #root (hd0,0) #kernel /vmlinuz-2.6.18-4-486 root=/dev/sda3 ro single #initrd /initrd.img-2.6.18-4-486 #savedefault ### END DEBIAN AUTOMAGIC KERNELS LISTIn the same file, there's a kopt line; replace /dev/sda3 with /dev/md2 (don't remove the # at the beginning of the line!):[...] # kopt=root=/dev/md2 ro [...]Afterwards, update your ramdisk:update-initramfs -u... and reboot the system:rebootIt should boot without problems.(JavaScript must be enabled in your browser to view the large image as an image overlay.) That's it - you've successfully set up software RAID1 on your running Debian Etch system! Now let's simulate a hard drive failure. It doesn't matter if you select /dev/sda or /dev/sdb here. In this example I assume that /dev/sdb has failed.To simulate the hard drive failure, you can either shut down the system and remove /dev/sdb from the system, or you (soft-)remove it like this:mdadm --manage /dev/md0 --fail /dev/sdb1 mdadm --manage /dev/md1 --fail /dev/sdb2 mdadm --manage /dev/md2 --fail /dev/sdb3 mdadm --manage /dev/md0 --remove /dev/sdb1 mdadm --manage /dev/md1 --remove /dev/sdb2 mdadm --manage /dev/md2 --remove /dev/sdb3Shut down the system:shutdown -h nowThen put in a new /dev/sdb drive (if you simulate a failure of /dev/sda, you should now put /dev/sdb in /dev/sda's place and connect the new HDD as /dev/sdb!) and boot the system. It should still start without problems.Now runcat /proc/mdstatand you should see that we have a degraded array:server1:~# cat /proc/mdstat Personalities : [raid1] md2 : active raid1 sda3[0] 4594496 blocks [2/1] [U_]md1 : active raid1 sda2[0] 497920 blocks [2/1] [U_]md0 : active raid1 sda1[0] 144448 blocks [2/1] [U_]unused devices: <none> server1:~#The output offdisk -lshould look as follows:server1:~# fdisk -lDisk /dev/sda: 5368 MB, 5368709120 bytes255 heads, 63 sectors/track, 652 cylinders Units = cylinders of 16065 * 512 = 8225280 bytesDevice Boot /dev/sda1 /dev/sda2 /dev/sda3 *Start 1 19 81End 18 80 652Blocks 144553+ 498015 4594590Id fd fd fdSystem Linux raid autodetect Linux raid autodetect Linux raid autodetectDisk /dev/sdb: 5368 MB, 5368709120 bytes 255 heads, 63 sectors/track, 652 cylinders Units = cylinders of 16065 * 512 = 8225280 bytesDisk /dev/sdb doesn't contain a valid partition tableDisk /dev/md0: 147 MB, 147914752 bytes 2 heads, 4 sectors/track, 36112 cylinders Units = cylinders of 8 * 512 = 4096 bytesDisk /dev/md0 doesn't contain a valid partition tableDisk /dev/md1: 509 MB, 509870080 bytes 2 heads, 4 sectors/track, 124480 cylinders Units = cylinders of 8 * 512 = 4096 bytesDisk /dev/md1 doesn't contain a valid partition tableDisk /dev/md2: 4704 MB, 4704763904 bytes 2 heads, 4 sectors/track, 1148624 cylinders Units = cylinders of 8 * 512 = 4096 bytesDisk /dev/md2 doesn't contain a valid partition table server1:~#Now we copy the partition table of /dev/sda to /dev/sdb:sfdisk -d /dev/sda | sfdisk /dev/sdb(If you get an error, you can try the --force option:sfdisk -d /dev/sda | sfdisk --force /dev/sdb)server1:~# sfdisk -d /dev/sda | sfdisk /dev/sdb Checking that no-one is using this disk right now ... OKDisk /dev/sdb: 652 cylinders, 255 heads, 63 sectors/tracksfdisk: ERROR: sector 0 does not have an msdos signature /dev/sdb: unrecognized partition table type Old situation: No partitions found New situation: Units = sectors of 512 bytes, counting from 0Device Boot /dev/sdb1 /dev/sdb2 /dev/sdb3 /dev/sdb4 *Start 63 289170 1285200 0End 289169 1285199 10474379 -#sectors 289107 996030 9189180 0Id fd fd fd 0System Linux raid autodetect Linux raid autodetect Linux raid autodetect EmptySuccessfully wrote the new partition tableRe-reading the partition table ...If you created or changed a DOS partition, /dev/foo7, say, then use dd(1) to zero the first 512 bytes: (See fdisk(8).) server1:~# dd if=/dev/zero of=/dev/foo7 bs=512 count=1Afterwards we remove any remains of a previous RAID array from /dev/sdb...mdadm --zero-superblock /dev/sdb1 mdadm --zero-superblock /dev/sdb2 mdadm --zero-superblock /dev/sdb3... and add /dev/sdb to the RAID array:mdadm -a /dev/md0 /dev/sdb1 mdadm -a /dev/md1 /dev/sdb2 mdadm -a /dev/md2 /dev/sdb3Now take a look atcat /proc/mdstatserver1:~# cat /proc/mdstat Personalities : [raid1] md2 : active raid1 sdb3[2] sda3[0] 4594496 blocks [2/1] [U_] [======>..............] 83309K/sec recovery = 30.8% (1416256/4594496) finish=0.6min speed=md1 : active raid1 sdb2[1] sda2[0] 497920 blocks [2/2] [UU]md0 : active raid1 sdb1[1] sda1[0] 144448 blocks [2/2] [UU]unused devices: <none> server1:~#Wait until the synchronization has finished:server1:~# cat /proc/mdstat Personalities : [raid1] md2 : active raid1 sdb3[1] sda3[0] 4594496 blocks [2/2] [UU]md1 : active raid1 sdb2[1] sda2[0] 497920 blocks [2/2] [UU]md0 : active raid1 sdb1[1] sda1[0] 144448 blocks [2/2] [UU]unused devices: <none> server1:~#Then rungruband install the bootloader on both HDDs:root (hd0,0) setup (hd0) root (hd1,0)setup (hd1) quitThat's it. You've just replaced a failed hard drive in your RAID1 array.。