Citrix+Access+Gateway配置手册
citrix客户端登陆说明手册

Citrix客户端安装及登录手册一、Citrix客户端安装:安装Citrix客户端程序(1)、在地址栏中输入http://ip(2)、IE右下角会有一个下载提示。
点击Download the citrix presentation server client for 32-bit Windows(3)、出现文件下载提示窗口,选择保存(4)、在另存为窗口中,选择桌面,点击保存(5)、出现下载完成提示框,点击运行按扭。
(5)、出现软件安装警告。
点击运行(6)、出现Citrix Presentaion Server客户端安装界面,选择下一步(8)、出现许可协议界面,选择我接受许可协议点击下一步(9)、在客户端名称界面上,保持默认设置,下一步(10)、在安装摘要界面,点击下一步(11)、应用程序开始安装(12)、应用程序安装完成。
点击完成按扭结束。
二、Citrix客户端登录:(1)、启动IE上网浏览器软件,直接在地址栏输入:http://(2)、出现Citrix Web Interface页面(3)、输入用户名及密码,点击Log In,将看到发布的应用程序。
(4)、点击联合石化联桥系统,应用程序开始连接(5)、在连接过程中,可能会出现Client File Security界面,选择Full Access和Never ask me again。
点击OK(6)、连接完成后,出现应用程序登录界面,输入帐号密码,点击Login登录。
(7)、找到任意一张报表,点击导出(4)、出现数据导出对话框,将出现几个盘符,请务必将文件保存到带‘Client’上的标记的盘符上,不要保存到桌面,我的文档等地方。
V:是你的电脑的c:盘。
U:是你的D盘,以后类推(5)、选择盘符后,点击保存。
(6)、保存成功后,会出现保存成功的提示信息。
(7)、在报表上,点击打印按扭(8)、出现打印对话框,默认的打印机即是你的电脑中的默认打印机。
点击确认开始打印。
Citrix Gateway Configuring ServiceNow说明书
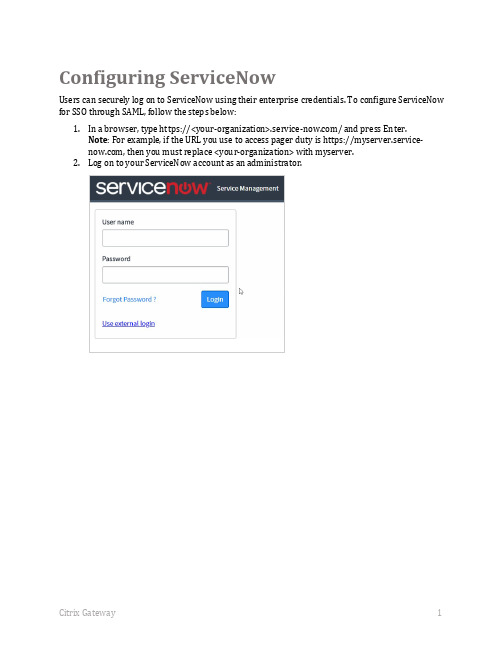
Configuring ServiceNowUsers can securely log on to ServiceNow using their enterprise credentials. To configure ServiceNow for SSO through SAML, follow the steps below:1.In a browser, type https://<your-organization>/ and press Enter.Note: For example, if the URL you use to access pager duty is https://myserver.service- , then you must replace <your-organization> with myserver.2.Log on to your ServiceNow account as an administrator.3.In the upper-left corner, using the Filter Navigator, search for plugins, and click Plugins in the search results.4.In the right pane, in System Plugins section, search for integration.5. In the search results, right-click Integration - Multiple Provider Single Sign-On Installer and click Activate/Upgrade.6. Click Activate.A progress bar indictaes the completion of activation process.7.In the left pane, scroll down to the Multi-Provider SSO section and click Multi-Provider S SO > Identity Providers.8.In the right pane, click New.9.Click SAML.10.If you have the metadata URL, in the Identity Provider New Record section, in the ImportIdentity Provider Metadata pop-up window, click URL and enter the metadata URL and click Import.The values for the Identity Provider record fields are automatically populated.If you have the metadata XML file, click XML. Copy the Identity Provider Metadata XML data and paste in the box. Click Import.The values for the Identity Provider record fields are automatically populated. You can update the values if required.11.If you want to enter the values manually without uploading a metadata file, close the ImportIdentity Provider Metadata pop-up window. In the Identity Provider New record section, specify the following information: – type the name that you want to use for the identity provider.ii.Default – select the check box if you want to set this configuration as default. iii.Identity Provider URL – type the issuer name that can be used while configuring IdPNetScaler for SSO.iv.Identity Provider's AuthnRequest – type the NetScaler URL followed by/saml/login. For example: https://<customerFQDN>/saml/loginv.Identity Provider's SingleLogoutRequest – If you users to log out from NetScalerafter they log out from ServiceNow, enter the logout URL of NetScaler:https://<customerFQDN>/cgi/logout.vi.ServiceNow Homepage – type the URL to access the home page:https:///navpage.dovii.Entity ID / Issuer – Type a unique Issuer ID. For E.g. https://<yourorg.service->viii.Audience URI – type the URL in https://<> format. ID Policy – type urn:oasis:names:tc:SAML:1.1:nameid-format:emailAddress. x.External logout redirect – retain the default values.12.Click Submit.13.In the left pane, click x509 Certificate to upload x509 certificate.14.In the right pane, click New.15.In the X.509 Certificate New record section, specify the following information: – type a certificate name.ii.Format – click the appropriate format: for e.g. PEM.iii.Expiration notification – select the check box.iv.Type – click the appropriate type.v.Notify on expiration – click the Add me icon to get notified. Click the Unlock Notify on expiration to add more users.vi.Active – select the check box.vii.Short Description – type description for the certificate.viii.PEM Certificate – paste the PEM certificate.To obtain your IdP certificate, follow the steps below:i.Remotely access your NetScaler instance using PuTTY.ii.Navigate to /nsconfig/ssl folder (using shell command cd /nsconfig/ssl) andpress Enter.iii.Type cat <certificate-name> and press Enter.iv.Copy the text from -----BEGIN CERTIFICATE----- to -----END CERTIFICATE-----v.Paste the text in a text editor and save the file in an appropriate format suchas <your organization name>.pemix.Click Submit.16.In the left pane, click Identify Providers.17.Click the Identity Provider that you have added.18.On the identity Provider details page, scroll down to the Related Links section. In the X.509 Certificate row, search for the X.509 certificate, and add the appropriate certificate for the identity provider by clicking Edit.Note: To add a new x.509 certificate, click New and to add or remove the certificates, click Edit.19.To save the changes, in the upper right corner on the identity provider details page, c lickUpdate.20.To obtain metadata to be used for IdP configuration, click Generate Metadata.Note: You must click Generate Metadata to complete the updates.The service provider metadata appears in a new window. Save the metadata in xml format to use it while configuring IdP for SSO.You have completed the required configuration on the service provider which is in this case – ServiceNow.。
Citrix Access Gateway_产品概述

随时随地安全便捷的应用访问随着全球化、移动化、离岸化和家庭办公等趋势的发展,用户离数据中心越来越远,因此,企业必须具备为各地交付商业应用和数据的能力。
此外,自然灾害、罢工、恐怖袭击和其它事件都可能降低企业的生产力,继而引发财政危机。
传统的远程访问解决方案无法规避让所有用户随时随地访问公司信息所存在的固有风险,每次数据泄露都有可能让企业损失几百万美元,还不包括因触犯政府法规而遭受的严厉的法律处罚。
Citrix Access Gateway Citrix ® Access Gateway TM 作为一种安全的应用访问解决方案,为IT 人员提供了细粒度的应用层策略和行为控制能力,可保障应用和数据访问的安全,同时让用户可在任何地方开展工作。
该解决方案为IT 提供的单点控制能力和工具可帮助确保企业内外的合规性及最高的信息安全性。
同时,Access Gateway 让用户可单点访问所需的企业应用和数据,单点访问功能还针对用户角色、设备和网络进行了优化。
这一独特的功能组合帮助企业最大程度地提高了移动办公人员的工作效率。
为用户简化 IT 运营Access Gateway 为用户提供了丰富的桌面体验,可与本地网络相媲美。
该解决方案的不间断访问功能让用户在变换地点和设备或断开连接时可自动无缝地进行重连接,减少了挫败感,提高了工作效率。
基于 Web 的登录页面让用户可快速、方便地访问关键资源,而且可使用各种设备进行访问。
此外,Access Gateway 和Citrix Repeater TM 配合使用可为移动和远程用户提供出色的访问体验。
Repeater Plug-in 经SSL VPN 隧道加速了应用响应,不仅保障了数据和应用访问的安全,还加快了访问速度。
适当的应用层控制加快业务发展凭借强大的策略设置能力,Access Gateway 访问解决方案可轻松适应不断变化的业务要求,让IT 人员只需一个访问基础架构就可服务所有用户群体,同时保护敏感数据的安全。
通过电脑连接Citrix使用手册
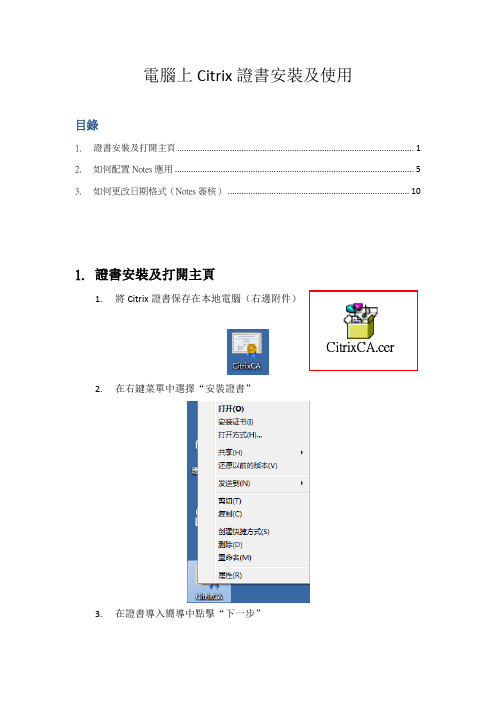
電腦上Citrix證書安裝及使用目錄1.證書安裝及打開主頁 (1)2.如何配置Notes應用 (5)3.如何更改日期格式(Notes簽核) (10)1.證書安裝及打開主頁1.將Citrix證書保存在本地電腦(右邊附件)2.在右鍵菜單中選擇“安裝證書”3.在證書導入嚮導中點擊“下一步”4.在證書存儲提示中,選擇“將所有的證書放入下列存儲”,點擊“瀏覽”5.選擇“受信任的根證書頒發機構”,點擊“確定”注:如是Vista系統,需勾選“顯示物理存儲區”,然後選擇“本地計算機”6.下一步點擊“完成”即可。
7.在電腦IE 瀏覽器中輸入https://,並輸入用戶名及密碼8.進入系統後,下載並安裝Client 文件9.安裝客戶端進入系統後如下圖10.使用完畢後請點擊“注銷”11.Notes配置2.如何配置Notes應用a.在公司園區網中用辦公電腦將Notes ID 上傳到服務器;訪問共享\\xenapp.ecmms.foxconn(\\10.157.152.99), 用戶名為Citrix賬號及密碼。
(用戶名為:ECMMS\xxxxx)。
注:如無法訪問共享,請訪問ftp://10.157.152.99b.複製本機電腦上的Notes ID文件,粘貼到個人目錄中(此目錄在服務器的位置C:/UserData/username,ftp上傳的在C:/UserData/temp)c.啟動Notes 程序d.出現Notes用戶端配置嚮導,點擊下一步e.在Notes配置嚮導中輸入您的信箱名稱及伺服器名稱,並點擊下一步例:你的名稱(Y) CMM-IT-SA/CMM/FOXCONNDomino伺服器名稱 CHNLH05/FOXCONN”f.配置伺服器:輸入伺服器名稱,選擇TCP/IP,並填入Domino伺服器的IP地址,並點擊下一步。
附常用Domino伺服器名稱及IP 地址:CHNLH05/FOXCONN 10.134.102.25CHNLH06/FOXCONN 10.134.101.26CHNLH23/FOXCONN 10.134.102.53CHNLH24/FOXCONN 10.134.101.54CHNVIP01/FOXCONN 10.134.102.101CHNVIP02/FOXCONN 10.134.101.102選擇Notes ID,(Notes ID在C:\UserData\個人目錄下)a.彈出複製文件的提示,選擇“Yes”b.在即時訊息設定提示中,取消“設定即時訊息”,點擊下一步。
Citrix Secure Gateway数字证书使用说明
Citrix Secure Gateway数字证书安装说明
证书安装说明:
一.安装根证书:
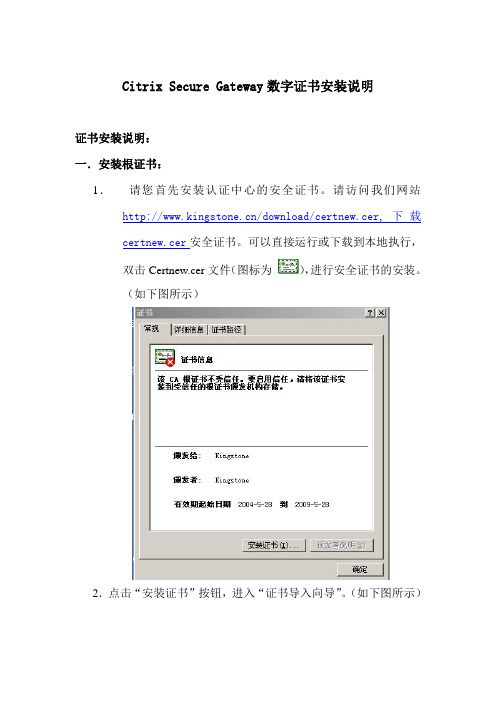
1.请您首先安装认证中心的安全证书。
请访问我们网站/download/certnew.cer,下载
certnew.cer安全证书。
可以直接运行或下载到本地执行,
双击Certnew.cer文件(图标为),进行安全证书的安装。
(如下图所示)
2.点击“安装证书”按钮,进入“证书导入向导”。
(如下图所示)
3.点击“下一步”按钮,出现如下画面。
(如下图所示)
4.直接点击“下一步”按钮,出现如下画面。
(如下图所示)
5.直接点击“完成”按钮,出现下面窗口。
(如下图所示)
6.点击“是”按钮,完成根证书的安装。
(如下图所示)
此时安全证书已经成功的安装到您的电脑上。
思杰(Citrix)软件使用说明书

思杰(Citrix)软件使用说明书
一:软件安装
1、打开浏览器,在地址栏里输入
192.168.0.20
2、按回车键出现安装界面,选择“我同意Citrix许可协议”,
点击安装
3、选择运行
4、继续选择运行
5、单击确定,完成安装
6、若弹出输入URL窗口,选测“输入URL”,服务器地址
填:192.168.0.20 点更新
7、这时桌面右下角就出现思杰软件图标
二:软件使用
1、右键单击思杰图标,选择登录
2、输入域\用户:ddc01\wisdom 密码:wisdom 登录
3、点击开始-程序,这时程序里会有“citrix”这个程
序,下面会有“citrix”发布的应用程序,比如“高达”
4、点击“高达”,登录就可以使用了
(注:如果应用程序一段时间不操作会自动退出,再登录即可)。
Citrix+Access+Gateway配置手册
再新建的资源中输入需要访问的网段
选择认证的方式,如无特殊的选择,请选择 No Authorization
将 Enable Portal Page Authorization 前面的复选框去除,保证一次登陆
填入允许访问的内网 IP 网段,格式:10.0.0.0/8
Dns server 填外网的 DNS 名
选择 staticRouting,填入内网路由,填入内网的 IP 地址段
用于申请证书,也可通过 admin guide 后的指示通过第三方软件或通过微软的传统方式申请 证书
证书必须是 PEM 格式的,做完后在此导入
在 access policy Manager 中在 Default 组上右键,eway Portal 中选择 Redirect to URL: Portal homepage: /citrix/secureaccess Proxy Server: your Citrix Server IP 二、如果直接使用 Access Gateway:
选择 Full Client
Citrix Access Gateway 配置手册
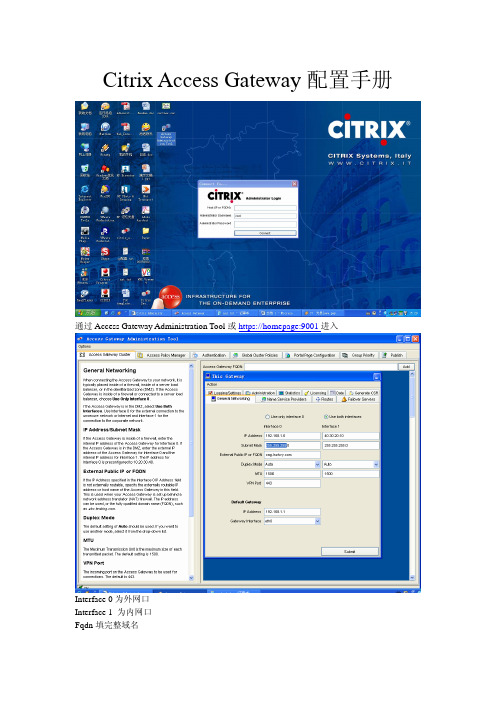
通过 Access Gateway Administration Tool 或 https://homepage:9001 进入
Interface 0 为外网口 Interface 1 为内网口 Fqdn 填完整域名
IP Address 填外网 gateway 地址
9001进入interface0为外网口interface为内网口fqdn填完整域名ipaddress填外网gateway地址dnsserver填外网的dns选择staticrouting填入内网路由填入内网的ip地址段用于申请证书也可通过adminguide后的指示通过第三方软件或通过微软的传统方式申请证书证书必须是pem格式的做完后在此导入在accesspolicyanager中在default组上右键选择propertioes在gatewayportal中选择redirecturl
外设配置手册-citrix-图文
外设配置手册-citrix-图文CITRI某桌面虚拟化外设配置手册2022年8月Citri某桌外设配置手册目录1.概述............................................................. ............................................................... .......22.软件版本............................................................. .. (2)3.收集硬件信息............................................................. (2)1.12.13.1audio.......................................................... ............................................................... ....3video..................................................... ............................................................... ..........4记录格式............................................................. . (5)4.组策略设置............................................................. . (5)3.1.3.2.添加模块............................................................. ..........................................................5修改............................................................. ............................................................... (6)5.修改注册表............................................................. ........................................................106.完成............................................................. ............................................................... .. (11)1.概述默认情况下通过设置DDC的策略可以重定向USB外设,由于USB设备种类繁多也会出现不能成功的情况。
- 1、下载文档前请自行甄别文档内容的完整性,平台不提供额外的编辑、内容补充、找答案等附加服务。
- 2、"仅部分预览"的文档,不可在线预览部分如存在完整性等问题,可反馈申请退款(可完整预览的文档不适用该条件!)。
- 3、如文档侵犯您的权益,请联系客服反馈,我们会尽快为您处理(人工客服工作时间:9:00-18:30)。
再新建的资源中输入需要访问的网段
选择认证的方式,如无特殊的选择,请选择 No Authorization
将 Enable Portal Page Authorization 前面的复选框去除,保证一次登陆
填入允许访问的内网 IP 网段,格式:10.0.0.0/8
在 Gateway Portal 中选择 Redirect to URL: Portal homepage: /citrix/secureaccess Proxy Server: your Citrix Server IP 二、如果直接使用 Access Gateway:
选择 Full Client
Citrix Access Gateway 配置手册
通过 Access Gateway Administration Tool 或 https://homepage:9001 进入
Interface 0 为外网口 Interface 1 为内网口 Fqdn 填完整域名
IP Address 填外网 gateway 地址
Dns server 填外网的 ,填入内网路由,填入内网的 IP 地址段
用于申请证书,也可通过 admin guide 后的指示通过第三方软件或通过微软的传统方式申请 证书
证书必须是 PEM 格式的,做完后在此导入
在 access policy Manager 中在 Default 组上右键,选择 Propertioes