eybuild中文手册.pdf
EDI中文版

5.0关闭和储存本小节包含了如何关闭IP-XL 的程序,在某些环境下,在每个模块和整个系统里 水滞停的地方细菌会迅速的繁殖。
5.1系统的停机1. 关掉IP-XL 模块的进水2. 将IP-XL 模块内滞留的水排放干净3. 关闭隔离阀以免膜和树脂内的水份蒸发5.2停机后的开机将模块的出口连接至排水沟附近 开启IP-XL 模块的进水用直流电源开启系统,将废水排放至排水沟 如果有需要,请清洗IP-XL 模块1. 2. 3. 4.lONP URE目录表部分描述免责申明用户指导手册设备的维护维修记录页码iiiiiiiv1.0 绪论1.1 IP-XL模块的外观1-11.2 手册的应用1-21.3 安装须知1-21.4 操作须知1-31.5 关机须知1-42.0 安装前的必备条件2.1 工具2-12.2 检查模块2-22.3 运行的必须条件2-22.4 流里和压力2-43.0 模块的安装和操作3.1 将模块放入系统3-13.2 检查模块的转矩3-13.3 连接好必备的管件3-23.4 电源3-33.5 启动3-34.0 维护和故障维修4.1 普通的维护指导方针4-14.2 特殊的维护指导方针4-14.3 清洗和化学清洗程序4-5故障维修/维修记录/流程记录表4-204.4lONPURE部分描述页码5.0停机和储存5.1系统的停机 5-1 5.2停机后的重启5-1A B C D附录模块的使用说明 设计原理和流程图 电路图 设备的原料A-1 B-1 C-1D-1lONPURE免责申明操作维护手册应该在出版时现有信息基础上提供适合你的操作和服务要求的完 整且正确的信息。
在本手册里面的信息可能不会包含所有的操作细节和所有变化, 也可能没提供在安装、操作和维修过程中的所有条件,如果一些特殊的问题出现而本册里没有特 定的答案,请和你的当地服务商取得联系。
使IONPURE 工程精细化的正确方法在本册里面可能不会被涉及到。
在本册里面 的材料只是起到一个宣传的作用,如果不留心可能会有选择性的变化。
ABB AbilityTM EDCS Ekip E-Hub 产品介绍说明书
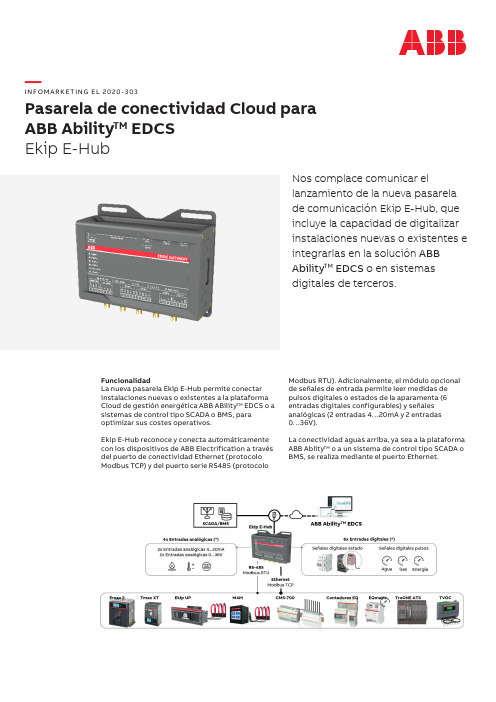
—I N FO M A R K E TI NG EL 2020-303Pasarela de conectividad Cloud para ABB Ability TM EDCS Ekip E-HubNos complace comunicar ellanzamiento de la nueva pasarela de comunicación Ekip E-Hub, que incluye la capacidad de digitalizar instalaciones nuevas o existentes e integrarlas en la solución ABB Ability TM EDCS o en sistemas digitales de terceros.FuncionalidadLa nueva pasarela Ekip E-Hub permite conectar instalaciones nuevas o existentes a la plataforma Cloud de gestión energética ABB ABility TM EDCS o a sistemas de control tipo SCADA o BMS, para optimizar sus costes operativos.Ekip E-Hub reconoce y conecta automáticamente con los dispositivos de ABB Electrification a través del puerto de conectividad Ethernet (protocolo Modbus TCP) y del puerto serie RS485 (protocoloModbus RTU). Adicionalmente, el módulo opcional de señales de entrada permite leer medidas de pulsos digitales o estados de la aparamenta (6 entradas digitales configurables) y señales analógicas (2 entradas 4…20mA y 2 entradas 0…36V).La conectividad aguas arriba, ya sea a la plataforma ABB Ablity TM o a un sistema de control tipo SCADA oBMS, se realiza mediante el puerto Ethernet.Módulos enchufables Ekip Com como alternativa Los módulos enchufables Ekip Com son unaalternativa en aquellos casos donde sea posible el uso de dispositivos como Emax 2, Tmax XT, Ekip UP o TruONE ATS. En este caso, Ekip Com Hub permite la conexión a ABB Ability TM EDCS y Ekip Com Modbus TCP (u otros módulos Ekip Com con protocolos de comunicación estándares) permite la conexión a sistemas de control tipo SCADA o BMS.Configuración y puesta en marchaLa herramienta de configuración de la nuevapasarela Ekip E-Hub es el software Ekip Connect, una herramienta gratuita de configuración, supervisión y diagnóstico para otras gamas de producto como Emax 2, Tmax XT, Ekip UP, M4M, TruONE ATS, etc.Ekip Connect reconoce automáticamente la pasarela Ekip E-Hub, conectando el PC al puerto Ethernet del dispositivo.Ekip Connect Ekip E-HubEn cuanto a dimensiones:Características técnicas Alimentación 9…36 V DCMontaje Carril DIN 35mm (DIN EN 60 715)IPIP40Temperatura de trabajo -20…+70ºCDimensiones 198,0 x 90,3 x 48,4 mm Norma IEC62368-1Antena 3G Opcional (necesarias 2uds)Memoria interna4GB eMMCConectividadPuertos y protocolos2x RJ45 Ethernet – Modbus TCP2x RS-485 - Modbus RTU 2x USB 2.02x MicroSIM – 3G (no suministrada)Módulo opcional E/S6x Entradas digitales 24 V DC 4x Entradas analógicasCaracterísticas principalesLas características técnicas principales de la nueva pasarela Ekip E-Hub son:—01Ejemplo conectividadcon los dispositivos deprotección, medida ygestión de la energía—01—(*) Únicamente se muestran los códigos incluidos en tarifa PDF 2020. Parael resto de códigos y precios consultar la tarifa electrónica o PDC.Códigos de pedido (*)Código pedido Descripción Precio unit. €GTV ABC Sum.mín./Embalaje Ud ConectividadI N F O M A R K E T I N G E L 2020-303Haga click en la imagen para acceder a la documentaciónHaga click en la imagen para acceder a la documentación—Manual técnico Ekip E-HubPresentación PDF de lanzamiento Ekip E-HubHaga click en la imagen para acceder a la webPágina web soluciones digitales de supervisión de la energíaHaga click en la imagen para acceder a la documentaciónManual usuario Ekip E-Hub Haga click en la imagen para acceder a la documentaciónFolleto ABB ABility TM EDCS—Pau MasgrauABB Ability™ Market Development ManagerAsea Brown Boveri, SA Low Voltage Products Tel.: 93 484 22 25Fax: 93 484 21 90www.abb.es/bajatension。
byd battery-box 2.0 系统集成商手册说明书
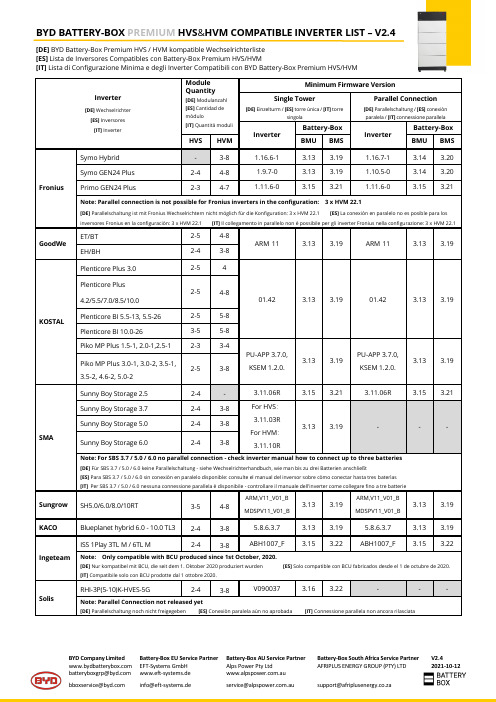
BYD Company Limited Battery-Box EU Service Partner Battery-Box AU Service Partner Battery-Box South Africa Service Partner EFT-Systems GmbH Alps Power Pty Ltd AFRIPLUS ENERGY GROUP (PTY) LTD www.eft-systems.de .au V2.4 2021-10-12Inverter [DE] Wechselrichter [ES] Inversores[IT] Inverter ModuleQuantity[DE] Modulanzahl[ES] Cantidad demódulo[IT] Quantità moduliMinimum Firmware VersionSingle Tower[DE] Einzelturm / [ES] torre única / [IT] torresingolaParallel Connection[DE] Parallelschaltung / [ES] conexiónparalela / [IT] connessione parallelaInverterBattery-BoxInverterBattery-Box HVS HVM BMU BMS BMU BMSFronius Symo Hybrid - 3-8 1.16.6-1 3.13 3.19 1.16.7-1 3.14 3.20 Symo GEN24 Plus 2-4 4-8 1.9.7-0 3.13 3.19 1.10.5-0 3.14 3.20 Primo GEN24 Plus 2-3 4-7 1.11.6-0 3.15 3.21 1.11.6-0 3.15 3.21 Note: Parallel connection is not possible for Fronius inverters in the configuration: 3 x HVM 22.1[DE] Parallelschaltung ist mit Fronius Wechselrichtern nicht möglich für die Konfiguration: 3 x HVM 22.1 [ES] La conexión en paralelo no es posible para los inversores Fronius en la configuración: 3 x HVM 22.1 [IT] Il collegamento in parallelo non è possibile per gli inverter Fronius nella configurazione: 3 x HVM 22.1GoodWe ET/BT 2-5 4-8ARM 11 3.13 3.19 ARM 11 3.13 3.19 EH/BH 2-4 3-8KOSTAL Plenticore Plus 3.0 2-5 401.42 3.13 3.19 01.42 3.13 3.19 Plenticore Plus4.2/5.5/7.0/8.5/10.02-5 4-8Plenticore BI 5.5-13, 5.5-26 2-5 5-8Plenticore BI 10.0-26 3-5 5-8Piko MP Plus 1.5-1, 2.0-1,2.5-1 2-3 3-4PU-APP 3.7.0,KSEM 1.2.0.3.13 3.19PU-APP 3.7.0,KSEM 1.2.0.3.13 3.19 Piko MP Plus 3.0-1, 3.0-2, 3.5-1,3.5-2,4.6-2,5.0-22-5 3-8SMA Sunny Boy Storage 2.5 2-4 - 3.11.06R 3.15 3.21 3.11.06R 3.15 3.21Sunny Boy Storage 3.7 2-4 3-8 For HVS:3.11.03RFor HVM:3.11.10R3.13 3.19 - - - Sunny Boy Storage 5.0 2-4 3-8Sunny Boy Storage 6.0 2-4 3-8Note: For SBS 3.7 / 5.0 / 6.0 no parallel connection - check inverter manual how to connect up to three batteries[DE] Für SBS 3.7 / 5.0 / 6.0 keine Parallelschaltung - siehe Wechselrichterhandbuch, wie man bis zu drei Batterien anschließt[ES] Para SBS 3.7 / 5.0 / 6.0 sin conexión en paralelo disponible: consulte el manual del inversor sobre cómo conectar hasta tres baterías[IT]Per SBS 3.7 / 5.0 / 6.0 nessuna connessione parallela è disponibile - controllare il manuale dell'inverter come collegare fino a tre batterieSungrow SH5.0/6.0/8.0/10RT 3-5 4-8 ARM,V11_V01_BMDSPV11_V01_B3.13 3.19ARM,V11_V01_BMDSPV11_V01_B3.13 3.19KACO Blueplanet hybrid 6.0 - 10.0 TL3 2-4 3-8 5.8.6.3.7 3.13 3.19 5.8.6.3.7 3.13 3.19Ingeteam ISS 1Play 3TL M / 6TL M 2-4 3-8 ABH1007_F 3.15 3.22 ABH1007_F 3.15 3.22 Note: Only compatible with BCU produced since 1st October, 2020.[DE] Nur kompatibel mit BCU, die seit dem 1. Oktober 2020 produziert wurden [ES] Solo compatible con BCU fabricados desde el 1 de octubre de 2020. [IT] Compatibile solo con BCU prodotte dal 1 ottobre 2020.Solis RHI-3P(5-10)K-HVES-5G 2-4 3-8 V090037 3.16 3.22 - - - Note: Parallel Connection not released yet[DE] Parallelschaltung noch nicht freigegeben [ES] Conexión paralela aún no aprobada [IT] Connessione parallela non ancora rilasciataBYD BATTERY-BOX PREMIUM HVS&HVM COMPATIBLE INVERTER LIST – V2.4 [DE] BYD Battery-Box Premium HVS / HVM kompatible Wechselrichterliste[ES] Lista de Inversores Compatibles con Battery-Box Premium HVS/HVM[IT] Lista di Configurazione Minima e degli Inverter Compatibili con BYD Battery-Box Premium HVS/HVMBYD Company Limited Battery-Box EU Service Partner Battery-Box AU Service Partner Battery-Box South Africa Service Partner EFT-Systems GmbH Alps Power Pty Ltd AFRIPLUS ENERGY GROUP (PTY) LTD*********************www.eft-systems.de .au*******************V2.4 2021-10-12Note:∙Always install the latest firmware on the Battery-Box!∙Requirements for Parallel Connection: Maximum three battery systems could be connected in parallel; HVS system CANNOT be connected in parallel with HVM system; Every tower connected in parallel requires the same module quantity;[DE] Bemerkung:∙Installieren Sie immer die neueste Firmware auf der Battery-Box!∙Anforderungen an Parallelschaltung: Es dürfen maximal drei Batteriesysteme parallel geschaltet werden; Ein HVS-System kann NICHT mit einem HVM-System kombiniert werden; Jeder parallel geschaltete Turm benötigt die gleiche Modulanzahl[ES] Nota:•¡Instale siempre el firmware más reciente en la Battery-Box!•Requisitos para la conexión en paralelo: se pueden conectar en paralelo un máximo de tres sistemas de baterías; El sistema HVS NO PUEDE conectarse en paralelo con el sistema HVM; Cada torre conectada en paralelo requiere la misma cantidad de módulos por torre;[IT] Nota:•Installare sempre l'ultimo firmware sul Battery-Box!•Requisiti per il collegamento in parallelo: è possibile collegare in parallelo un massimo di tre sistemi di batterie; Il sistema HVS NON può essere collegato in parallelo al sistema HVM; Ogni torre collegata in parallelo richiede la stessa quantità di moduli per torri; The Information in this document is subject to change without notice. Please take the latest version of this document at our websites into account.[DE] Die Informationen in diesem Dokument können ohne vorherige Ankündigung geändert werden. Bitte berücksichtigen Sie die neueste Version dieses Dokuments auf unseren Websites.[ES] La información de este documento está sujeta a cambios sin previo aviso. Tenga en cuenta la última versión de este documento en nuestros sitios web.[IT]Le informazioni contenute in questo documento sono soggette a modifiche senza preavviso. Si prega di prendere in considerazione l'ultima versione di questo documento sui nostri siti web.。
第吉尔门锁软件使用说明书

---门锁软件使用流程说明书-----------------------------------------------第吉尔企业股份有限公司门锁系统管理软件第一部分软件的安装1、安装本司配置的读写器,一定要确保串口与读写器连接牢固,并接上电源↓2、启动计算机进入Windows↓3、将光碟放入CD-ROM(光驱)↓4、打开“我的电脑”,进入光盘,用鼠标双击“setup.exe”文件进行安装(安装过程中遇到所有的对话框均选择“确定”即可)↓5、安装完毕后,重新启动计算机。
第二部分软件的操作一、门锁的各类设定:(一)、登录1. 点击桌面图标运行系统。
2. 系统出厂时默认的用户代码为0,密码为空。
用户代号:0 ,密码:为空3. 如果在使用当中遗失密码,可以输入以下代码用户代号:为空,密码:197209此时登录的用户可以读取[特别卡],修改增添用户,修改其他用户的登录密码(注意该用户没有发卡的权限)。
如果密码和[特别卡]同时遗失将不能登录系统,所以请妥善保管好[特别卡]。
(二)、使用特别卡1.系统第一次使用时必须用[特别卡]激活,方法如下:a)进入系统,将[特别卡]插入发卡机,点击[查卡]。
系统显示为:输入A,B,C级密码(可以随意输入,请紧记)。
输入酒店名称(可以随意输入)。
起始卡号:为空(如果电脑故障,系统重装时才使用)。
点击[确定]保存退出,此时系统已经激活。
b)此时可以点击[用户管理]增添用户,修改其权限和密码(具体操作为:单击“操作员管理”→输入操作员代码、姓名,输入完第一个操作员资料后可双击该用户进行修改其权限和密码→单击“添加”,接着输入第二个操作员资料→依次类推。
全部操作员资料输入完毕后→单击“关闭”退出操作员管理)。
(三)、门锁设置每一个门锁使用前,必须完成初始化过程,初始化的步骤是:第一步:先插复位卡(绿灯亮)->设置门锁所属酒店ID身份证第二步:再插设置卡(绿灯亮)->设置门锁房号第三步:再插入时间卡(绿灯亮)->设置门锁当前的时间每张卡插入时,门锁必须亮绿灯,方表示插卡有效,亮红灯则无效。
12系统保留寄存器地址

第十二章. 系统保留寄存器地址 (2)12.1 Local Bit(LB) (2)12.2 Local Word(LW) (5)12.3 Recipe Word(RW) (9)第十二章. 系统保留寄存器地址系统保留了一些Local Word(LW),Local Bit(LB),Recipe Word(RW) 的地址作特殊用途,用户必须按照相关说明来使用这一部分寄存器地址。
Local Bit(LB):预留范围LB9000~9999Local Word(LW):预留范围LW9000~9999Recipe Word(RW):预留范围RW60000~6553512.1 Local Bit(LB)地址说明注释版本9000~9009 初始化设置为ON 这些位可以用来在系统开始时初始化某些元件为ON。
(读/写)ver 1.2 9010 配方下载指示用户可以使用这个位地址来指示配方下载的过程。
处于下载状态时置为ON,下载完毕置为OFF(读)ver 1.29011 配方上传指示用户可以使用这个位地址来指示配方上传的过程。
处于上传状态时置为ON,上传完毕置为OFF(读)ver 1.29012 配方下载/上传指示用户可以使用这些位地址来指示配方下载/上传的过程。
(读)ver 1.2 9013 触控指示灯当触控”触控指示灯”时置为ON(读)Ver 1.4 9014 CPU指示灯当触控“CPU指示灯”时置为ON(读)Ver 1.4 9015 报警指示灯当触控“报警指示灯”时置为ON(读)Ver 1.4 9016 打印机出错指示打印出错时置为ON,正常时为OFF(读)Ver 1.4 9017 打印机控制要关闭打印功能置ON,要开启打印功能置OFF,(在系统参数中关于打印机的选项必须首先设为”开启”,否则这个位地址是无效的)。
(读/写)Ver 1.49020 画笔(画笔处于选中状态时置ON) 留言板功能。
可以判断当前是否处于选中画笔的状态(读/写)Ver 1.49021 橡皮擦(橡皮擦处于选中状态时置ON) 留言板功能。
EAREBEL Z ER M US V2 0618说明书
Z ER M US V2 0618Instruction Manualstarting on page 3I MPORTANT INSTRUCTIONS!PLEASE RETAIN!Read through these instructions for use carefully before you use the device for the fi rst time, and keep them for reference later. If you pass the device on to someone else, these instructions should also be provided.The device should only be used as described in these instructions. The manufacturer and importer do not assume any liability if the device is not used according to this instruction manual.If you have a question please contact our customer service by email: ****************************For more information, explanatory videos and more,please see:ContentsExplanation of the Symbols Used (4)Designated Use (4)Safety Instructions (5)Scope of Supply (7)Before First Use (8)Charging the Battery (8)Setting Up the Headphones (9)Headphone Components (10)Connecting the Headphones via Bluetooth ® (10)Operating the Headphones (11)Cleaning and Storage (12)Changing Ear Cushions (12)Technical Speci fi cations (12)FCC statement (13)Disposal ................................................................14Explanation of the Symbols UsedThe symbols designate hazards. They warn users of risksof injury (e.g. electric shock or fi re). Please read and care-fully follow the safety precautions at the end of this list ofhazard warning signs to avoid possible injury or death.Read the instructions before use.Electrical symbol for direct currentThis device meets the specifi cations of Section 15 of FCCregulations.Designated Use■The headphones are suitable for Bluetooth®-(compatible) de-vices such as smartphones. They enable you to listen to music and make phone calls wirelessly.■The device is meant for private household use and is not for commercial use.■The device must only be used as described in the instructions for use. Any other type of use is deemed to be contrary to the intended purpose.■Any modifi cation of the device will be regarded as improper use and can lead to serious risk. The manufacturer accepts no li-ability for any damage or loss resulting from improper use.■All defects which result from improper handling, damage or re-pair attempts are excluded from the warranty. This also applies to normal wear and tear.IMPORTANT INFORMATION FOR CONSUMERSThis device has been manufactured in compliance with the strict specifi cations and voltage requirements which apply in the country of intended use. If you have purchased this device online, by mail order and/or telephone sales, you must make sure that it is suitable for use in your country of residence.NOTE:Using this device in any country other than the country for which it is destined could be dangerous and render the warranty of the manufacturer or the dealer null and void.Please keep the sales receipt as evidence of purchase in the event of warranty claims.Safety InstructionsIf not properly used and / or used for some other purpose, the device may lead to hazards. The following safety precautions as well as the procedure described in these instructions must be followed.Risk of injury!■MORTAL DANGER OF SUFFOCATION! Keep children young-er than 3 and animals well away from the packaging and the device, because it contains parts which could be swallowed.■RISK OF BURNS FROM BATTERY ACID! The device containsa battery which could be fatal if swallowed. If swallowed, medi-cal help should be sought immediately. Keep the device and the USB cable out of the reach of small children and animals.■IMPROPER USE COULD LEAD TO INJURY! This device can be used by persons with reduced physical, sensory or mental capacities or with a lack of experience and/or know-how, pro-vided that they are supervised or have been instructed in the safe use of the device and have understood the risks which are involved.Children should be supervised if they use the device. It is nota toy.■RISK OF BURNS FROM BATTERY ACID! If a battery leaks, avoid touching the skin, eyes or mucous membranes with the battery acid. If your skin comes into contact with the acid, im-mediately rinse with clean water and seek medical advice.■RISK OF INJURY FROM MAGNETIC FIELDS! This device generates magnetic fields that could interfere with implanted medical devices such as pacemakers or implanted defi brillators (ICDs). Affected persons should consult a doctor before usingthe device to fi nd out whether it can infl uence the operation of their implanted medical device.Always keep a distance of at least 10 cm between the article and an implanted medical device!■DANGER OF HEARING DAMAGE! Hearing can be damaged if exposed to high volumes for too long or too suddenly. Hearing damage is irreversible! Before putting on the headphones, set the volume of the playback device to a minimum and then grad-ually increase it until a medium, pleasant volume is reached.■RISK OF ELECTRIC SHOCK! Never touch the article and the connecting cable with wet hands when these components are connected to the power supply.■RISK OF ACCIDENT! Take care of your own safety and the safety of others when the device is used during an activity that requires attention (e.g. on the road). Follow applicable laws re-garding the use of smartphones and headphones. Remove the device or adjust the volume to ensure that ambient noise, such as alarms and warnings, is heard.Fire and explosion hazards■Do not use this product in rooms containing highly fl ammable or explosive substances.■Do not expose the battery and headphones to high tempera-tures (above 158° F / 70° C) (hair dryer, heating, long exposure to sunlight, etc.). The battery could overheat and explode.■Do not crush or puncture the battery! Do not expose the battery to high pressure that could cause an internal short-circuit and overheating.■The headphones and their battery must not be taken apart, thrown into fi re, immersed in liquids or short-circuited. Damage to property and articles■Do not immerse the headphones and the connecting lead in water or other liquids and make sure that they cannot fall into the water. Do not wear the article for water sports (e.g. swim-ming, water skiing, surfi ng).■Protect the headphones and the connection cable against: Moisture, frost, extreme heat, dust, electrostatic interference, shock and high pressure. Do not place heavy objects on the headphones or the connecting cable.■Connect and charge the headphones only to a power source that matches the headphone specifi cations. .■Keep the headphones away from magnetic data carriers to avoid data loss due to the generated magnetic fi eld!■In the event of damage / malfunctions, switch off the device immediately.■Do not use the headphones and USB cable if they are dam-aged, modifi ed or if liquid has entered them.■Never repair or modify the headphones and connecting cable yourself, but always contact customer service or a specialist workshop to ensure your own safety.■Only use original spare parts by the manufacturer. Use of parts not authorized by the manufacturer renders the warranty nulland void.■Use the device only in environments where Bluetooth® wireless technology is permitted.■If the battery is not used for a longer period of time, recharge it regularly (approx. every 3 months).■Long storage or long use can impair the quality of the ear cush-ions.S cope of Supply1 cap or headband1 pair of headphones1 USB cable (A plug to micro-B plug)2 spare ear cushions1 instruction manualBefore First Use1 Check that everything is complete and no damagehas occurred during transport. In case of damage do not use the device (!), but contact customer service at ****************************2 Fully charge the battery (see below).Charging the Battery■Only use a USB cable (A plug to micro-B plug) to charge the battery.■Only charge the battery at an ambient temperature of 50° F to 104° F / 10° C to 40° C. In an environment that is too cold, the charging time could increase, and in an environment that is too hot, the battery could overheat.Connect the micro USB cable to the jack on theheadphones and to a power source (e.g. computer).During the charging process, the LED lights upred and switches off as soon as the battery is fullycharged.The battery is not replaceable by the user. If youhave problems with the battery, contact customer ser-vice at ****************************Setting Up the Headphones1 Place the headphones with the earebel logo on the right sideand with the e logo on the left side.2Push the headphonecap/headband outwards through the roundopening.ing at the edge ofthe opening into theheadphones.6 Repeat steps 1 to 4 on the other sidewith the second headphone.7 Now connect your earebel to a smart-phone or player and enjoy perfectsound!5ing of the head-phones: The thick-ening should not bevisible.Right!Wrong!(Similar to illustrations.)Headphone Components1Micro-USB socket for charging 2LED 3Microphone for telephoning 4 Soft-touch operating panelConnecting the Headphones via Bluetooth ®1To connect the headphones to a smartphone orother Bluetooth ®-enabled device, press the Play/Pause button (on the soft-touch panel) for 5 sec-onds until the LED alternately fl ashes blue andred . Now the headphones can be found by Blue-tooth ®-enabled devices.2 Switch on Bluetooth ® on the Bluetooth ®-enableddevice and start the search for available devices.3 "Select "Earebel" and connect. As soon as bothdevices are connected, the LED lights up blueonly.NOTICE: To conserve battery power, the headphones automati-cally turn off when there is no Bluetooth ®connection for 5 minutes.secondsOperating the HeadphonesINTERFERENCE WITH OTHER ELECTRICAL DEVICES!! Radios and televisions in the vicinity can cause interference with recep-tion. Operate the device at an appropriate distance from radios and televisions.POWER ON Press and hold for approx. 3 sec.POWER OFF Press and hold for approx. 3 sec.CONNECTION MODE Press and hold for approx. 5 sec.PHONEAnswer/Hang up Press onceMUSIC Play/Pause Press oncePREVIOUS TRACK Press onceREDUCE VOLUME Press and holdNEXT TRACK Press onceINCREASE VOLUME Press and holdCleaning and Storage■Never submerge the headphones in water or other liquids! ■Never use abrasive or aggressive cleaning agents for cleaning.• Wipe the headphones with a damp cloth only.• To wash the cap/headband, remove the headphones and follow the care instructions on the label.C hanging Ear CushionsIf the ear cushions are damaged or worn, they must be replaced.1 Remove the old ear cushions from the headphones.2 Remove the new ear cushions from the foil and stick them onthe headphones.Technical Specifi cationsHeadphones model: SF543/BTSSensitivity: 35 dB (microphone); 120 +/- 3 dB (head-phones)Frequency range: 20 Hz – 20 kHzMax. input: 0.5 WImpedance: 16ΩBluetooth® version: Vimicro4.1Bluetooth® range: 10 mPower supply: 5V DC 500 mA (3.7 V lithium polymerbattery)Battery capacity: 180 mAhBattery life: approx. 500 charging cyclesBattery charging time: approx. 2 hours if completely empty Operating time: approx. 8 hours at full volume; approx.30 hours standby (power on, but withoutBluetooth® connection)FCC ID: 2APBH- SF543BTSModel: SF543/BTSFCC statementThis device complies with Part 15 of the FCC Rules.Operation is subject to the following two conditions:(1) This device may not cause harmful interference, and(2) T his device must accept any interference received, includinginterference that may cause undesired operation.The grantee is not responsible for any changes or modifi cations not expressly approved by the party responsible for compliance. Such modifications could void the user’s authority to operate the equipment.The RF Exposure Compliance distance is 5 millimeters.NOTE: This equipment has been tested and found to comply with the limits for a Class B digital device, pursuant to part 15 of the FCCRules. These limits are designed to provide reasonable protection against harmful interference in a residential installation. This equip-ment generates, uses and can radiate radio frequency energy and, if not installed and used in accordance with the instructions, may cause harmful interference to radio communications. However, there is no guarantee that interference will not occur in a particular installation. If this equipment does cause harmful interference to radio or television reception, which can be determined by turning the equipment off and on, the user is encouraged to try to correct the interference by one or more of the following measures:• Reorient or relocate the receiving antenna.• Increase the separation between the equipment and receiver.• Connect the equipment into an outlet on a circuit different from that to which the receiver is connected.• Consult the dealer or an experienced radio/TV technician for help.DisposalThe packaging should be disposed of at a local recycling facility and in compliance with all federal, state and local regulations.The device should not be disposed of with regular household trash. For information about disposing of the device at the end of its useful life, please contact your local administration.Improper disposal of batteries can harm the environment! De-fective or empty batteries must be recycled. Take your batteries and/or the device to a local collecting point. Never throw batter-ies into household trash. They can contain heavy metals and are classed as hazardous waste. The chemical symbols for heavy met-als are: Cd = cadmium, Hg = quicksilver, Pb = lead. You should therefore take your batteries to a local collecting point.Distributed byEarebel Inc.P.O. Box 21422Boulder, CO 80308USAEmail:****************************© 2018 Earebel GmbH, All rights reserved. Earebel is a trademark of Earebel GmbH, registered in Germany and/or other countries. The Bluetooth® word mark and the logo are registered trademarks of Bluetooth SIG, Inc. Any use of the trademark by Earebel is done under license. Other trademarks and trade names belong to the respective owners.Headphones and headgear made in China.。
Easy5 2021.4 参考手册说明书
For Windows® and Linux®Worldwide Web, Support/Contents/Services/Technical-Support/Contact-Technical-Support.aspxDisclaimerThis documentation, as well as the software described in it, is furnished under license and may be used only in accordance with the terms of such license.Hexagon reserves the right to make changes in specifications and other information contained in this document without prior notice.The concepts, methods, and examples presented in this text are for illustrative and educational purposes only, and are not intended to be exhaustive or to apply to any particular engineering problem or design. Hexagon assumes no liability or responsibility to any person or company for direct or indirect damages resulting from the use of any information contained herein.User Documentation: Copyright © 2021 Hexagon AB and/or its subsidiaries. Printed in U.S.A. All Rights Reserved.This notice shall be marked on any reproduction of this documentation, in whole or in part. Any reproduction or distribution of this document, in whole or in part, without the prior written consent of Hexagon is prohibited.This software may contain certain third-party software that is protected by copyright and licensed from Hexagon suppliers. Additional terms and conditions and/or notices may apply for certain third party software. Such additional third party software terms and conditions and/or notices may be set forth in documentation and/or at /thirdpartysoftware (or successor website designated by Hexagon from time to time). Portions of this software are owned by Siemens Product Lifecycle Management, Inc. © Copyright 2021Hexagon, Hexagon logo, MSC, MSC Software logo, MSC Adams, MD Adams, Adams and Easy5 are trademarks or registered trademarks of Hexagon AB and/or its subsidiaries in the United States and/or other countries. NASTRAN is a registered trademark of NASA. FLEXlm and FlexNet Publisher are trademarks or registered trademarks of Flexera Software. Parasolid is a registered trademark of Siemens Product Lifecycle Management, Inc. All other trademarks are the property of their respective owners.Use, duplicate, or disclosure by the U.S. Government is subjected to restrictions as set forth in FAR 12.212 (Commercial Computer Software) and DFARS 227.7202 (Commercial Computer Software and Commercial Computer Software Documentation), as applicable.December 8, 2021Corporate Europe, Middle East, Africa5161 California Ave, Suite 200Am Moosfeld 13University Research Park 81829 Munich, Germany Irvine, CA 92617 Telephone: (49) 89 431 98 70Telephone: (714) 540-8900Email :**********************Email :********************************Japan Asia-Pacific KANDA SQUARE 16F 100 Beach Road 2-2-1 Kanda Nishikicho, Chiyoda-ku #16-05 Shaw Tower Tokyo 101-0054, Japan Singapore 189702Telephone: (81)(3) 6275 0870Telephone: 65-6272-0082Email :***************************Email :****************************Documentation FeedbackAt MSC Software, we strive to produce the highest quality documentation and welcome your feedback. If you have comments or suggestions about our documentation, write to us at: documentation-************************.Please include the following information with your feedback:⏹Document name⏹Release/Version number⏹Chapter/Section name⏹Topic title (for Online Help)⏹Brief description of the content (for example, incomplete/incorrect information, grammaticalerrors, information that requires clarification or more details and so on).⏹Your suggestions for correcting/improving documentationYou may also provide your feedback about MSC Software documentation by taking a short 5-minute survey at:.The above mentioned e-mail address is only for providing documentation specificfeedback. If you have any technical problems, issues, or queries, please contact TechnicalSupport.C o n t e n t sReference ManualPrefaceConventions Used in This Guide . . . . . . . . . . . . . . . . . . . . . . . . . . . . . . . . . . . . . . . . . . . . . . . . . . . . . . . . . xviii1 Reference Manual TopicsOverview. . . . . . . . . . . . . . . . . . . . . . . . . . . . . . . . . . . . . . . . . . . . . . . . . . . . . . . . . . . . . . . . . . . . . . . . . . . . 5 Accelerator Keys . . . . . . . . . . . . . . . . . . . . . . . . . . . . . . . . . . . . . . . . . . . . . . . . . . . . . . . . . . . . . . . . . . . . . 5 Adding Components. . . . . . . . . . . . . . . . . . . . . . . . . . . . . . . . . . . . . . . . . . . . . . . . . . . . . . . . . . . . . . . . . . . 6 Add Components Window. . . . . . . . . . . . . . . . . . . . . . . . . . . . . . . . . . . . . . . . . . . . . . . . . . . . . . . . . . . . . 6Adding Components to the Schematic . . . . . . . . . . . . . . . . . . . . . . . . . . . . . . . . . . . . . . . . . . . . . . . . . . . 9Add Components by Name Reference. . . . . . . . . . . . . . . . . . . . . . . . . . . . . . . . . . . . . . . . . . . . . . . . . . . . 10 Analyses. . . . . . . . . . . . . . . . . . . . . . . . . . . . . . . . . . . . . . . . . . . . . . . . . . . . . . . . . . . . . . . . . . . . . . . . . . . . 11 Nonlinear Analyses. . . . . . . . . . . . . . . . . . . . . . . . . . . . . . . . . . . . . . . . . . . . . . . . . . . . . . . . . . . . . . . . . . 11Linear Analyses . . . . . . . . . . . . . . . . . . . . . . . . . . . . . . . . . . . . . . . . . . . . . . . . . . . . . . . . . . . . . . . . . . . . 12 Analysis Data Form . . . . . . . . . . . . . . . . . . . . . . . . . . . . . . . . . . . . . . . . . . . . . . . . . . . . . . . . . . . . . . . . . . . 12 Analysis Data Form Header. . . . . . . . . . . . . . . . . . . . . . . . . . . . . . . . . . . . . . . . . . . . . . . . . . . . . . . . . . . . 13Analysis Data Form. . . . . . . . . . . . . . . . . . . . . . . . . . . . . . . . . . . . . . . . . . . . . . . . . . . . . . . . . . . . . . . . . . 14 Auxiliary Input File. . . . . . . . . . . . . . . . . . . . . . . . . . . . . . . . . . . . . . . . . . . . . . . . . . . . . . . . . . . . . . . . . . . . 15 Analysis Title . . . . . . . . . . . . . . . . . . . . . . . . . . . . . . . . . . . . . . . . . . . . . . . . . . . . . . . . . . . . . . . . . . . . . . 15Time of the Analysis. . . . . . . . . . . . . . . . . . . . . . . . . . . . . . . . . . . . . . . . . . . . . . . . . . . . . . . . . . . . . . . . . 16Initial Operating Point. . . . . . . . . . . . . . . . . . . . . . . . . . . . . . . . . . . . . . . . . . . . . . . . . . . . . . . . . . . . . . . . 16Model Explorer “Pickable” Fields . . . . . . . . . . . . . . . . . . . . . . . . . . . . . . . . . . . . . . . . . . . . . . . . . . . . . . . 17Auxiliary Input File . . . . . . . . . . . . . . . . . . . . . . . . . . . . . . . . . . . . . . . . . . . . . . . . . . . . . . . . . . . . . . . . . . 18Creating an Auxiliary Input File. . . . . . . . . . . . . . . . . . . . . . . . . . . . . . . . . . . . . . . . . . . . . . . . . . . . . . . . . 18Using an “auxfile” To Enter Blocks of Data. . . . . . . . . . . . . . . . . . . . . . . . . . . . . . . . . . . . . . . . . . . . . . . . 19Specifying a Label in an Auxiliary Input File . . . . . . . . . . . . . . . . . . . . . . . . . . . . . . . . . . . . . . . . . . . . . . . 20 Auxiliary Input File Data Format . . . . . . . . . . . . . . . . . . . . . . . . . . . . . . . . . . . . . . . . . . . . . . . . . . . . . . . . . 21 PARAMETER VALUES Command. . . . . . . . . . . . . . . . . . . . . . . . . . . . . . . . . . . . . . . . . . . . . . . . . . . . . . . . 22Scalar Parameter Data . . . . . . . . . . . . . . . . . . . . . . . . . . . . . . . . . . . . . . . . . . . . . . . . . . . . . . . . . . . . . . . 22Array Parameter Data. . . . . . . . . . . . . . . . . . . . . . . . . . . . . . . . . . . . . . . . . . . . . . . . . . . . . . . . . . . . . . . . 23Expressions . . . . . . . . . . . . . . . . . . . . . . . . . . . . . . . . . . . . . . . . . . . . . . . . . . . . . . . . . . . . . . . . . . . . . . . 26Tabular Data. . . . . . . . . . . . . . . . . . . . . . . . . . . . . . . . . . . . . . . . . . . . . . . . . . . . . . . . . . . . . . . . . . . . . . . 26“Analysis Only” Mode . . . . . . . . . . . . . . . . . . . . . . . . . . . . . . . . . . . . . . . . . . . . . . . . . . . . . . . . . . . . . . . . . 29viReference ManualOperations Allowed . . . . . . . . . . . . . . . . . . . . . . . . . . . . . . . . . . . . . . . . . . . . . . . . . . . . . . . . . . . . . . . . . 30Disabled Functionality . . . . . . . . . . . . . . . . . . . . . . . . . . . . . . . . . . . . . . . . . . . . . . . . . . . . . . . . . . . . . . . 30Creating a “Locked Configuration” Model for Distribution Purposes . . . . . . . . . . . . . . . . . . . . . . . . . . . . . 31Using a Locked Configuration Easy5 Model . . . . . . . . . . . . . . . . . . . . . . . . . . . . . . . . . . . . . . . . . . . . . . . 32 Background Processes . . . . . . . . . . . . . . . . . . . . . . . . . . . . . . . . . . . . . . . . . . . . . . . . . . . . . . . . . . . . . . . . 32C Component . . . . . . . . . . . . . . . . . . . . . . . . . . . . . . . . . . . . . . . . . . . . . . . . . . . . . . . . . . . . . . . . . . . . . . . . 34Adding C Code. . . . . . . . . . . . . . . . . . . . . . . . . . . . . . . . . . . . . . . . . . . . . . . . . . . . . . . . . . . . . . . . . . . . . 35Example C Code Component . . . . . . . . . . . . . . . . . . . . . . . . . . . . . . . . . . . . . . . . . . . . . . . . . . . . . . . . . . 36Adding C Declarations . . . . . . . . . . . . . . . . . . . . . . . . . . . . . . . . . . . . . . . . . . . . . . . . . . . . . . . . . . . . . . . 38C Code Files and Structure. . . . . . . . . . . . . . . . . . . . . . . . . . . . . . . . . . . . . . . . . . . . . . . . . . . . . . . . . . . . 38Code Components . . . . . . . . . . . . . . . . . . . . . . . . . . . . . . . . . . . . . . . . . . . . . . . . . . . . . . . . . . . . . . . . . . . . 39Command Line Options . . . . . . . . . . . . . . . . . . . . . . . . . . . . . . . . . . . . . . . . . . . . . . . . . . . . . . . . . . . . . . . . 40 Option Examples . . . . . . . . . . . . . . . . . . . . . . . . . . . . . . . . . . . . . . . . . . . . . . . . . . . . . . . . . . . . . . . . . . . 43 Compiling External Code. . . . . . . . . . . . . . . . . . . . . . . . . . . . . . . . . . . . . . . . . . . . . . . . . . . . . . . . . . . . . . . 43 Default Compiler Options . . . . . . . . . . . . . . . . . . . . . . . . . . . . . . . . . . . . . . . . . . . . . . . . . . . . . . . . . . . . . 44Obtaining Current Compiler Options. . . . . . . . . . . . . . . . . . . . . . . . . . . . . . . . . . . . . . . . . . . . . . . . . . . . . 44Setting Debug Compiler Options. . . . . . . . . . . . . . . . . . . . . . . . . . . . . . . . . . . . . . . . . . . . . . . . . . . . . . . . 45User Specified Compiler Options . . . . . . . . . . . . . . . . . . . . . . . . . . . . . . . . . . . . . . . . . . . . . . . . . . . . . . . 45Examples of Compiling External Code. . . . . . . . . . . . . . . . . . . . . . . . . . . . . . . . . . . . . . . . . . . . . . . . . . . . 45Compiling and Linking Mixed Code. . . . . . . . . . . . . . . . . . . . . . . . . . . . . . . . . . . . . . . . . . . . . . . . . . . . . . 46 Components. . . . . . . . . . . . . . . . . . . . . . . . . . . . . . . . . . . . . . . . . . . . . . . . . . . . . . . . . . . . . . . . . . . . . . . . . 51 Component Basics. . . . . . . . . . . . . . . . . . . . . . . . . . . . . . . . . . . . . . . . . . . . . . . . . . . . . . . . . . . . . . . . . . 51Blocks . . . . . . . . . . . . . . . . . . . . . . . . . . . . . . . . . . . . . . . . . . . . . . . . . . . . . . . . . . . . . . . . . . . . . . . . . . . 54Standard Components . . . . . . . . . . . . . . . . . . . . . . . . . . . . . . . . . . . . . . . . . . . . . . . . . . . . . . . . . . . . . . . 54Code Components . . . . . . . . . . . . . . . . . . . . . . . . . . . . . . . . . . . . . . . . . . . . . . . . . . . . . . . . . . . . . . . . . . 55User-defined Library Components . . . . . . . . . . . . . . . . . . . . . . . . . . . . . . . . . . . . . . . . . . . . . . . . . . . . . . 56Extension Components. . . . . . . . . . . . . . . . . . . . . . . . . . . . . . . . . . . . . . . . . . . . . . . . . . . . . . . . . . . . . . . 57Dimensioned Components . . . . . . . . . . . . . . . . . . . . . . . . . . . . . . . . . . . . . . . . . . . . . . . . . . . . . . . . . . . . 58 Component Data Table . . . . . . . . . . . . . . . . . . . . . . . . . . . . . . . . . . . . . . . . . . . . . . . . . . . . . . . . . . . . . . . . 60 Documentation/Configuration Tab . . . . . . . . . . . . . . . . . . . . . . . . . . . . . . . . . . . . . . . . . . . . . . . . . . . . . . 60States Tab . . . . . . . . . . . . . . . . . . . . . . . . . . . . . . . . . . . . . . . . . . . . . . . . . . . . . . . . . . . . . . . . . . . . . . . . 65Variables Tab. . . . . . . . . . . . . . . . . . . . . . . . . . . . . . . . . . . . . . . . . . . . . . . . . . . . . . . . . . . . . . . . . . . . . . 66Version Tab . . . . . . . . . . . . . . . . . . . . . . . . . . . . . . . . . . . . . . . . . . . . . . . . . . . . . . . . . . . . . . . . . . . . . . . 67User-Comments Tab . . . . . . . . . . . . . . . . . . . . . . . . . . . . . . . . . . . . . . . . . . . . . . . . . . . . . . . . . . . . . . . . 67 Connecting Components . . . . . . . . . . . . . . . . . . . . . . . . . . . . . . . . . . . . . . . . . . . . . . . . . . . . . . . . . . . . . . . 67 Rules for Connecting Components . . . . . . . . . . . . . . . . . . . . . . . . . . . . . . . . . . . . . . . . . . . . . . . . . . . . . . 68Default Connections. . . . . . . . . . . . . . . . . . . . . . . . . . . . . . . . . . . . . . . . . . . . . . . . . . . . . . . . . . . . . . . . . 68Port Connections . . . . . . . . . . . . . . . . . . . . . . . . . . . . . . . . . . . . . . . . . . . . . . . . . . . . . . . . . . . . . . . . . . . 70Default Port Connection Points. . . . . . . . . . . . . . . . . . . . . . . . . . . . . . . . . . . . . . . . . . . . . . . . . . . . . . . . . 71Custom Connections . . . . . . . . . . . . . . . . . . . . . . . . . . . . . . . . . . . . . . . . . . . . . . . . . . . . . . . . . . . . . . . . 72Making a Branch Connection . . . . . . . . . . . . . . . . . . . . . . . . . . . . . . . . . . . . . . . . . . . . . . . . . . . . . . . . . . 74Connecting Incompatibly Vectorized Components. . . . . . . . . . . . . . . . . . . . . . . . . . . . . . . . . . . . . . . . . . . 75 Connection Lines . . . . . . . . . . . . . . . . . . . . . . . . . . . . . . . . . . . . . . . . . . . . . . . . . . . . . . . . . . . . . . . . . . . . . 76viiContentsMoving Connection Line Endpoints. . . . . . . . . . . . . . . . . . . . . . . . . . . . . . . . . . . . . . . . . . . . . . . . . . . . . . 76 Moving Connection Line Segments. . . . . . . . . . . . . . . . . . . . . . . . . . . . . . . . . . . . . . . . . . . . . . . . . . . . . . 77 Changing an Anchored Connection Back to an Autoroute Connection . . . . . . . . . . . . . . . . . . . . . . . . . . . . 78 Customized Line Routing . . . . . . . . . . . . . . . . . . . . . . . . . . . . . . . . . . . . . . . . . . . . . . . . . . . . . . . . . . . . . 78 Defining Connection Line Labels and Attributes . . . . . . . . . . . . . . . . . . . . . . . . . . . . . . . . . . . . . . . . . . . . 80 Connection Line Navigation. . . . . . . . . . . . . . . . . . . . . . . . . . . . . . . . . . . . . . . . . . . . . . . . . . . . . . . . . . . . 83 Submodel Connection Labels . . . . . . . . . . . . . . . . . . . . . . . . . . . . . . . . . . . . . . . . . . . . . . . . . . . . . . . . . . 84 Connection Label Options. . . . . . . . . . . . . . . . . . . . . . . . . . . . . . . . . . . . . . . . . . . . . . . . . . . . . . . . . . . . . 84 Moving Submodel Connection Nodes . . . . . . . . . . . . . . . . . . . . . . . . . . . . . . . . . . . . . . . . . . . . . . . . . . . . 85 Connection Line Color Dots. . . . . . . . . . . . . . . . . . . . . . . . . . . . . . . . . . . . . . . . . . . . . . . . . . . . . . . . . . . . 86 Copying Components and Models. . . . . . . . . . . . . . . . . . . . . . . . . . . . . . . . . . . . . . . . . . . . . . . . . . . . . . . . 87 Copying Components within a Model . . . . . . . . . . . . . . . . . . . . . . . . . . . . . . . . . . . . . . . . . . . . . . . . . . . . 87 Copying Components From or To Another Model. . . . . . . . . . . . . . . . . . . . . . . . . . . . . . . . . . . . . . . . . . . . 88 Copying Components With User-defined Names. . . . . . . . . . . . . . . . . . . . . . . . . . . . . . . . . . . . . . . . . . ..88 Data Display . . . . . . . . . . . . . . . . . . . . . . . . . . . . . . . . . . . . . . . . . . . . . . . . . . . . . . . . . . . . . . . . . . . . . . . . . 88 Data Types . . . . . . . . . . . . . . . . . . . . . . . . . . . . . . . . . . . . . . . . . . . . . . . . . . . . . . . . . . . . . . . . . . . . . . . . . . 92 States. . . . . . . . . . . . . . . . . . . . . . . . . . . . . . . . . . . . . . . . . . . . . . . . . . . . . . . . . . . . . . . . . . . . . . . . . . . . 93 Variables . . . . . . . . . . . . . . . . . . . . . . . . . . . . . . . . . . . . . . . . . . . . . . . . . . . . . . . . . . . . . . . . . . . . . . . . . 93 Parameters. . . . . . . . . . . . . . . . . . . . . . . . . . . . . . . . . . . . . . . . . . . . . . . . . . . . . . . . . . . . . . . . . . . . . . . . 93 Tables . . . . . . . . . . . . . . . . . . . . . . . . . . . . . . . . . . . . . . . . . . . . . . . . . . . . . . . . . . . . . . . . . . . . . . . . . . . 93 Debugging the Model and Analysis. . . . . . . . . . . . . . . . . . . . . . . . . . . . . . . . . . . . . . . . . . . . . . . . . . . . . . . 94 Example of Using the Symbolic Debugger on Windows. . . . . . . . . . . . . . . . . . . . . . . . . . . . . . . . . . . . . . . 94 Example of Using the Symbolic Debugger on a Linux Platform . . . . . . . . . . . . . . . . . . . . . . . . . . . . . . . . . 97 Deleting Components and Connections. . . . . . . . . . . . . . . . . . . . . . . . . . . . . . . . . . . . . . . . . . . . . . . . . . . . 100 Deleting Components. . . . . . . . . . . . . . . . . . . . . . . . . . . . . . . . . . . . . . . . . . . . . . . . . . . . . . . . . . . . . . . . 100 Deleting Connections . . . . . . . . . . . . . . . . . . . . . . . . . . . . . . . . . . . . . . . . . . . . . . . . . . . . . . . . . . . . . . . . 101 Discrete (Digital) System Analysis . . . . . . . . . . . . . . . . . . . . . . . . . . . . . . . . . . . . . . . . . . . . . . . . . . . . . . . 102 Operating Point Considerations. . . . . . . . . . . . . . . . . . . . . . . . . . . . . . . . . . . . . . . . . . . . . . . . . . . . . . . . . 102 Linear Analysis Considerations. . . . . . . . . . . . . . . . . . . . . . . . . . . . . . . . . . . . . . . . . . . . . . . . . . . . . . . . . 102 Integration Method Considerations . . . . . . . . . . . . . . . . . . . . . . . . . . . . . . . . . . . . . . . . . . . . . . . . . . . . . . 103 Discrete (Digital) System Modeling. . . . . . . . . . . . . . . . . . . . . . . . . . . . . . . . . . . . . . . . . . . . . . . . . . . . . . . 103 Digital Models. . . . . . . . . . . . . . . . . . . . . . . . . . . . . . . . . . . . . . . . . . . . . . . . . . . . . . . . . . . . . . . . . . . . . . 103 Hybrid Models . . . . . . . . . . . . . . . . . . . . . . . . . . . . . . . . . . . . . . . . . . . . . . . . . . . . . . . . . . . . . . . . . . . . . 104 Discrete System Modeling Using Fortran, C and LIbrary Components . . . . . . . . . . . . . . . . . . . . . . . . . . . . 105 Matching TAU Method (obsolete). . . . . . . . . . . . . . . . . . . . . . . . . . . . . . . . . . . . . . . . . . . . . . . . . . . . . . . 106 Documenting and Printing the Model . . . . . . . . . . . . . . . . . . . . . . . . . . . . . . . . . . . . . . . . . . . . . . . . . . . . . 109 Generating a Model Document File. . . . . . . . . . . . . . . . . . . . . . . . . . . . . . . . . . . . . . . . . . . . . . . . . . . . . . 109 Exporting an Easy5 Model as a MAT EMX Function . . . . . . . . . . . . . . . . . . . . . . . . . . . . . . . . . . . . . . . . . . 111 MAT function “ezmodel”. . . . . . . . . . . . . . . . . . . . . . . . . . . . . . . . . . . . . . . . . . . . . . . . . . . . . . . . . . . . . . 111 Easy5 Window . . . . . . . . . . . . . . . . . . . . . . . . . . . . . . . . . . . . . . . . . . . . . . . . . . . . . . . . . . . . . . . . . . . . . . . 111 Description Lines . . . . . . . . . . . . . . . . . . . . . . . . . . . . . . . . . . . . . . . . . . . . . . . . . . . . . . . . . . . . . . . . . . . 112viiiReference ManualModel Info . . . . . . . . . . . . . . . . . . . . . . . . . . . . . . . . . . . . . . . . . . . . . . . . . . . . . . . . . . . . . . . . . . . . . . . . 113Menu Bar. . . . . . . . . . . . . . . . . . . . . . . . . . . . . . . . . . . . . . . . . . . . . . . . . . . . . . . . . . . . . . . . . . . . . . . . . 113Tool Bar. . . . . . . . . . . . . . . . . . . . . . . . . . . . . . . . . . . . . . . . . . . . . . . . . . . . . . . . . . . . . . . . . . . . . . . . . . 113Dockable Add Component WIndow. . . . . . . . . . . . . . . . . . . . . . . . . . . . . . . . . . . . . . . . . . . . . . . . . . . . . . 113Scroll Bars. . . . . . . . . . . . . . . . . . . . . . . . . . . . . . . . . . . . . . . . . . . . . . . . . . . . . . . . . . . . . . . . . . . . . . . . 113Message Line. . . . . . . . . . . . . . . . . . . . . . . . . . . . . . . . . . . . . . . . . . . . . . . . . . . . . . . . . . . . . . . . . . . . . . 114Schematic Window . . . . . . . . . . . . . . . . . . . . . . . . . . . . . . . . . . . . . . . . . . . . . . . . . . . . . . . . . . . . . . . . . 114Working with Easy5 Windows. . . . . . . . . . . . . . . . . . . . . . . . . . . . . . . . . . . . . . . . . . . . . . . . . . . . . . . . . . 114 Eigenvalue Sensitivity Analysis. . . . . . . . . . . . . . . . . . . . . . . . . . . . . . . . . . . . . . . . . . . . . . . . . . . . . . . . . . 116 Setting up an Eigenvalue Sensitivity Analysis . . . . . . . . . . . . . . . . . . . . . . . . . . . . . . . . . . . . . . . . . . . . . . 116 Eigenvalue Sensitivity Analysis Method. . . . . . . . . . . . . . . . . . . . . . . . . . . . . . . . . . . . . . . . . . . . . . . . . . . 117Executable Model. . . . . . . . . . . . . . . . . . . . . . . . . . . . . . . . . . . . . . . . . . . . . . . . . . . . . . . . . . . . . . . . . . . . . 118 Create Executable . . . . . . . . . . . . . . . . . . . . . . . . . . . . . . . . . . . . . . . . . . . . . . . . . . . . . . . . . . . . . . . . . . 119Link External Object. . . . . . . . . . . . . . . . . . . . . . . . . . . . . . . . . . . . . . . . . . . . . . . . . . . . . . . . . . . . . . . . . 120Solve Implicit Loops. . . . . . . . . . . . . . . . . . . . . . . . . . . . . . . . . . . . . . . . . . . . . . . . . . . . . . . . . . . . . . . . . 120Force Explicit Typing . . . . . . . . . . . . . . . . . . . . . . . . . . . . . . . . . . . . . . . . . . . . . . . . . . . . . . . . . . . . . . . . 120Check for Duplicate Names . . . . . . . . . . . . . . . . . . . . . . . . . . . . . . . . . . . . . . . . . . . . . . . . . . . . . . . . . . . 120Debug Mode . . . . . . . . . . . . . . . . . . . . . . . . . . . . . . . . . . . . . . . . . . . . . . . . . . . . . . . . . . . . . . . . . . . . . . 120Stop Create Executable . . . . . . . . . . . . . . . . . . . . . . . . . . . . . . . . . . . . . . . . . . . . . . . . . . . . . . . . . . . . . . 121 Executable Output Files. . . . . . . . . . . . . . . . . . . . . . . . . . . . . . . . . . . . . . . . . . . . . . . . . . . . . . . . . . . . . . . . 121 Create Executable Process. . . . . . . . . . . . . . . . . . . . . . . . . . . . . . . . . . . . . . . . . . . . . . . . . . . . . . . . . . . . 121Model Generation Listing File. . . . . . . . . . . . . . . . . . . . . . . . . . . . . . . . . . . . . . . . . . . . . . . . . . . . . . . . . . 122Executable Source File. . . . . . . . . . . . . . . . . . . . . . . . . . . . . . . . . . . . . . . . . . . . . . . . . . . . . . . . . . . . . . . 122Executable Error File . . . . . . . . . . . . . . . . . . . . . . . . . . . . . . . . . . . . . . . . . . . . . . . . . . . . . . . . . . . . . . . . 124 External (Environment) Variables . . . . . . . . . . . . . . . . . . . . . . . . . . . . . . . . . . . . . . . . . . . . . . . . . . . . . . . . 124Fortran Component . . . . . . . . . . . . . . . . . . . . . . . . . . . . . . . . . . . . . . . . . . . . . . . . . . . . . . . . . . . . . . . . . . . 129 Forced Explicit Typing . . . . . . . . . . . . . . . . . . . . . . . . . . . . . . . . . . . . . . . . . . . . . . . . . . . . . . . . . . . . . . . 129Using Integer or Logical Variables in Fortran Code . . . . . . . . . . . . . . . . . . . . . . . . . . . . . . . . . . . . . . . . . . 130Adding Nonexecutable Fortran Statements. . . . . . . . . . . . . . . . . . . . . . . . . . . . . . . . . . . . . . . . . . . . . . . . 131Reserved Fortran Unit Numbers . . . . . . . . . . . . . . . . . . . . . . . . . . . . . . . . . . . . . . . . . . . . . . . . . . . . . . . . 132Adding Comments to Fortran Code. . . . . . . . . . . . . . . . . . . . . . . . . . . . . . . . . . . . . . . . . . . . . . . . . . . . . . 132Easy5 Reserved Words. . . . . . . . . . . . . . . . . . . . . . . . . . . . . . . . . . . . . . . . . . . . . . . . . . . . . . . . . . . . . . . 132Calculating Initial Condition Values in a User-Code Component. . . . . . . . . . . . . . . . . . . . . . . . . . . . . . . . . 134Easy5 Matrix Operations. . . . . . . . . . . . . . . . . . . . . . . . . . . . . . . . . . . . . . . . . . . . . . . . . . . . . . . . . . . . . . 134Sorting Fortran Component Code . . . . . . . . . . . . . . . . . . . . . . . . . . . . . . . . . . . . . . . . . . . . . . . . . . . . . . . 135 Function Scan Analysis. . . . . . . . . . . . . . . . . . . . . . . . . . . . . . . . . . . . . . . . . . . . . . . . . . . . . . . . . . . . . . . . 135 Setting up a Function Scan Analysis. . . . . . . . . . . . . . . . . . . . . . . . . . . . . . . . . . . . . . . . . . . . . . . . . . . . . 136Function Scan with Two Independent Values . . . . . . . . . . . . . . . . . . . . . . . . . . . . . . . . . . . . . . . . . . . . . . 138 Function Scan Analysis Method . . . . . . . . . . . . . . . . . . . . . . . . . . . . . . . . . . . . . . . . . . . . . . . . . . . . . . . . . 139Graphic Files, EMFs, and PostScript. . . . . . . . . . . . . . . . . . . . . . . . . . . . . . . . . . . . . . . . . . . . . . . . . . . . . . 139 Generating the Schematic Block Diagram EMF Graphics File . . . . . . . . . . . . . . . . . . . . . . . . . . . . . . . . . . 139Generating Plotter EMF Graphics File . . . . . . . . . . . . . . . . . . . . . . . . . . . . . . . . . . . . . . . . . . . . . . . . . . . . 141Using EMF Graphics. . . . . . . . . . . . . . . . . . . . . . . . . . . . . . . . . . . . . . . . . . . . . . . . . . . . . . . . . . . . . . . . . 141ixContentsOverriding Hard copy and EMF Plot Curve and Grid Widths . . . . . . . . . . . . . . . . . . . . . . . . . . . . . . . . . . . . 142 Exporting Plot Files. . . . . . . . . . . . . . . . . . . . . . . . . . . . . . . . . . . . . . . . . . . . . . . . . . . . . . . . . . . . . . . . . . 142 Importing a PostScript File Into a Document . . . . . . . . . . . . . . . . . . . . . . . . . . . . . . . . . . . . . . . . . . . . . . . 144 Icon Editor. . . . . . . . . . . . . . . . . . . . . . . . . . . . . . . . . . . . . . . . . . . . . . . . . . . . . . . . . . . . . . . . . . . . . . . . . . . 144 Implicit Model. . . . . . . . . . . . . . . . . . . . . . . . . . . . . . . . . . . . . . . . . . . . . . . . . . . . . . . . . . . . . . . . . . . . . . . . 145 Definition of an Implicit Model. . . . . . . . . . . . . . . . . . . . . . . . . . . . . . . . . . . . . . . . . . . . . . . . . . . . . . . . . . 146 Example of an Implicit Model . . . . . . . . . . . . . . . . . . . . . . . . . . . . . . . . . . . . . . . . . . . . . . . . . . . . . . . . . . 146 How to Break Implicit Loops. . . . . . . . . . . . . . . . . . . . . . . . . . . . . . . . . . . . . . . . . . . . . . . . . . . . . . . . . . . 149 Initial Condition Calculation. . . . . . . . . . . . . . . . . . . . . . . . . . . . . . . . . . . . . . . . . . . . . . . . . . . . . . . . . . . . . 151 Initialization Statement . . . . . . . . . . . . . . . . . . . . . . . . . . . . . . . . . . . . . . . . . . . . . . . . . . . . . . . . . . . . . . . . 152 Integration Methods. . . . . . . . . . . . . . . . . . . . . . . . . . . . . . . . . . . . . . . . . . . . . . . . . . . . . . . . . . . . . . . . . . . 153 The Integration Method. . . . . . . . . . . . . . . . . . . . . . . . . . . . . . . . . . . . . . . . . . . . . . . . . . . . . . . . . . . . . . . 153 Integration Methods Available. . . . . . . . . . . . . . . . . . . . . . . . . . . . . . . . . . . . . . . . . . . . . . . . . . . . . . . . . . 154 Definition of Terms. . . . . . . . . . . . . . . . . . . . . . . . . . . . . . . . . . . . . . . . . . . . . . . . . . . . . . . . . . . . . . . . . . 155 The BCS Gear Method. . . . . . . . . . . . . . . . . . . . . . . . . . . . . . . . . . . . . . . . . . . . . . . . . . . . . . . . . . . . . . . . 157 The Runge-Kutta Methods . . . . . . . . . . . . . . . . . . . . . . . . . . . . . . . . . . . . . . . . . . . . . . . . . . . . . . . . . . . . 157 The Huen Method. . . . . . . . . . . . . . . . . . . . . . . . . . . . . . . . . . . . . . . . . . . . . . . . . . . . . . . . . . . . . . . . . . . 157 The Euler Method. . . . . . . . . . . . . . . . . . . . . . . . . . . . . . . . . . . . . . . . . . . . . . . . . . . . . . . . . . . . . . . . . . . 157 The Adams Method. . . . . . . . . . . . . . . . . . . . . . . . . . . . . . . . . . . . . . . . . . . . . . . . . . . . . . . . . . . . . . . . . . 158 The User-defined Method. . . . . . . . . . . . . . . . . . . . . . . . . . . . . . . . . . . . . . . . . . . . . . . . . . . . . . . . . . . . . 158 Integration Method Selection Guidelines . . . . . . . . . . . . . . . . . . . . . . . . . . . . . . . . . . . . . . . . . . . . . . . . . . 160 Guidelines for Setting Error Controls. . . . . . . . . . . . . . . . . . . . . . . . . . . . . . . . . . . . . . . . . . . . . . . . . . . . . 161 Interactive Simulation . . . . . . . . . . . . . . . . . . . . . . . . . . . . . . . . . . . . . . . . . . . . . . . . . . . . . . . . . . . . . . . . . 163 Linear Model Generation Analysis. . . . . . . . . . . . . . . . . . . . . . . . . . . . . . . . . . . . . . . . . . . . . . . . . . . . . . . . 163 Types of Linear Model Generation Analysis. . . . . . . . . . . . . . . . . . . . . . . . . . . . . . . . . . . . . . . . . . . . . . . . 163 Setting up a Linear Model Generation Analysis . . . . . . . . . . . . . . . . . . . . . . . . . . . . . . . . . . . . . . . . . . . . . 165 Controlling the Calculation . . . . . . . . . . . . . . . . . . . . . . . . . . . . . . . . . . . . . . . . . . . . . . . . . . . . . . . . . . . . 168 Saving the Linear Model System Matrices. . . . . . . . . . . . . . . . . . . . . . . . . . . . . . . . . . . . . . . . . . . . . . . . . 168 Linear Model Generation Method. . . . . . . . . . . . . . . . . . . . . . . . . . . . . . . . . . . . . . . . . . . . . . . . . . . . . . . . . 168 Continuous Systems. . . . . . . . . . . . . . . . . . . . . . . . . . . . . . . . . . . . . . . . . . . . . . . . . . . . . . . . . . . . . . . . . 168 Stability Analysis for Sampled-Data Systems . . . . . . . . . . . . . . . . . . . . . . . . . . . . . . . . . . . . . . . . . . . . . . 175 Linking External Code . . . . . . . . . . . . . . . . . . . . . . . . . . . . . . . . . . . . . . . . . . . . . . . . . . . . . . . . . . . . . . . . . 175 Linking Routines Using the Build Menu. . . . . . . . . . . . . . . . . . . . . . . . . . . . . . . . . . . . . . . . . . . . . . . . . . . 176 Linking Routines Using the EASY5_OBJECT Variable. . . . . . . . . . . . . . . . . . . . . . . . . . . . . . . . . . . . . . . . . 177 Linking Routines Using an Object Library . . . . . . . . . . . . . . . . . . . . . . . . . . . . . . . . . . . . . . . . . . . . . . . . . 178 Linking Library Component Routines. . . . . . . . . . . . . . . . . . . . . . . . . . . . . . . . . . . . . . . . . . . . . . . . . . . . . 179 Library Component Code . . . . . . . . . . . . . . . . . . . . . . . . . . . . . . . . . . . . . . . . . . . . . . . . . . . . . . . . . . . . . . . 180 Using Variable Dimensions in Library Component Code. . . . . . . . . . . . . . . . . . . . . . . . . . . . . . . . . . . . . . . 180 Using Integer or Logical Variables in Library Component Code . . . . . . . . . . . . . . . . . . . . . . . . . . . . . . . . . 181 Configurations . . . . . . . . . . . . . . . . . . . . . . . . . . . . . . . . . . . . . . . . . . . . . . . . . . . . . . . . . . . . . . . . . . . . . 182 Component Libraries . . . . . . . . . . . . . . . . . . . . . . . . . . . . . . . . . . . . . . . . . . . . . . . . . . . . . . . . . . . . . . . . 182。
EdiPure操作运行手册
恩临水科技保留任何时间修改该产品技术规格的权利,如有修改,恕不另行通知,详情访问en-Link网站ELEDI-ELEDI-353535T T系统操作运行手册版本3.72010年10月说明感谢您成为恩临水科技产品的用户!在使用前请详细阅读本手册,并始终遵守本手册有关规定.请保存此书以备日后参考.恩临水科技保留不断改进产品的权利,如有变动恕不另行通知.ELEDI-35T的纯水处理系统简介ELEDI是恩临公司开发的最新产品,2009年投放市场。
ELEDI集合了15年的商业实践,比以前的产品更可靠且成本更低。
EDI指用离子交换膜,离子交换树脂,在直流电场的作用下,从水中去离子的过程,自从1987年Millipore的水处理部,著名的Ionpure(现归属Usfilter公司)将此技术推向市场后,不断进行改进,以降低成本和提高去离子度。
恩临在消化和吸收国外Ionpure、E-cell和Electropure等先进技术的基础上,开发出抗干扰能力强和性能价格比更优的ElwbPure EDI模块化产品。
市场上大多数的CDI产品由交替放置的阳离子膜和阴离子膜构成,水从其中的膜隙流过。
这些交替放置的阴、阳离子交换膜被固定在两个带有进出水口的装置之间,水从其中的膜间隙流过。
面向正极的阴离子膜与面向负极的阳离子膜之间构成浓水室,面向负极的阴离子膜与面向正极的阳离子膜之间组成淡水室。
为了便于在弱电解质溶液中强化离子交换过程,在淡水室,有时在浓水室添加离子交换树脂。
在CDI装置机架两端的电极提供了横向的直流电场,直流电场驱动水中的离子运动穿过离子交换膜。
其结果是降低了淡水室中的离子浓度和增加了浓水室的离子浓度。
图1显示的是两个淡水室和一个浓水室离子交换过程。
大型的CDI装置,要由许多这样的基本单元组合在一起,并联工作。
设备参数主要设备以及功能设备名称设备功能CEDI模块杂质离子去除。
CEDI控制柜CEDI模块电流电压调整,整机自控和CEDI产水电阻率检测CEDI进水压力表监控CEDI系统进水口压力CEDI产水压力表监控CEDI产水压力CEDI浓水压力表监控CEDI浓水压力CEDI浓水流量计测量CEDI浓水流量CEDI产水流量计测量CEDI产水流量CEDI浓水流量计开关在浓水排放流量低于设定值时,提供浓水排放流量不足的控制信号,供自控系统关闭CEDI模块电源。
EASYBOOK 使用手册 v1.71D说明书
EASYBOOK使用手册v1.71D2022/11/08简便地排版中文学位论文或书籍瞿毅https:///texno3/easybook**************easybook是基于ctexbook书籍文档类创建的纯净学术模板,同时兼具book与article文档类的功能。
结合中国许多高校学位论文的通用框架设计,提供多个命令和接口可以使用户简便地定制论文模板。
它的基础宏包easybase还可以搭配CT E X和标准文档类使用。
目录1准备开始21.1基本用法 (2)1.2编译方式 (2)1.3依赖宏包 (3)2文档类选项32.1基本选项 (3)2.2配置字体 (4)2.3article模式 (4)3接口选项53.1风格 (5)3.2超链接 (7)3.3行距 (8)3.4其它字体 (8)3.5参考文献 (9)3.6定理样式 (10)3.7页面尺寸 (11)3.8页眉页脚 (12)3.9脚注格式 (13)3.10目录样式 (15)4环境和命令184.1文区命令 (18)4.3双语标题 (19)4.4上标和下标 (20)4.5公式 (21)4.6表格 (21)4.7列表 (21)4.8悬挂缩进 (22)4.9代码 (22)4.10盒子 (23)5扩展功能245.1物理量 (24)5.2化学式 (24)5.3计数器 (24)5.4标签引用 (25)5.5图表题注 (25)5.6索引 (26)5.7边注 (26)5.8公式符号对照 (26)5.9插入文档 (27)5.10下划线 (27)A更新日志27 B参考文献281准备开始您在使用easybook文档类编写文档前可能需要具备以下的条件:•使用XƎL A T E X(推荐)或LuaL A T E X两种编译方式。
•由于文档类用到了一些L A T E X和依赖宏包较新的功能,需要版本至少在2020/10/01以后的L A T E X内核支持。
建议您安装最新的T E X发行版。
ABB BendWizard 软件说明书
Industrieslexible production: this key strategic goal of every modern manufacturing company has made robotic tending of press brake machines acommon sight in sheet metal fabrication workshops. And with advantages over manual tending like better quality, higher efficiency, improved safety, less scrap and accurate repeatability, its popularityis certain to grow. One limitation is slowing its advance, however: traditional programming of a new part is complex and takes considerable time – production downtime that until now has made robotic tending commercially less inter-esting for small-batch production.Smaller workshops clearly need a soft-ware tool that does away with the complexity and saves time through a combination of offline programming andwork cell simulation with a user-friendly interface.One, unique programming toolABB developed BendWizard to provide all these features and so offer the benefits of advanced automation to metal fabrication companies producing parts in small- as well as large-batch runs, thereby adding real value to theirShaping the futurePaolo ConcaSetting up a robot to make metal cabinets or cases for desktop computers can be a complex operation. For instance, one expert might be required to carry out a feasibility study, and then another to actually program the robot. Understandably, the need for so much expertise, and the time that’s required, generally limits the usefulness of automation to high-volume production.Workshops producing parts in batches smaller than 50 or so, or which rely heavily on semi-skilled operators, are therefore often discouraged from investing in automation, and so miss out on its many advantages. What is needed is a software tool that operators without special knowledge of robotics, or with no more than rudimentary CAD skills, can use. One which allows easy offline programming and simulation of the work cell on a PC.FBendWizard: A tool for off-line programming of robotic tending systemsoperations. By dramatically reducing robot downtime and making production runs for 50 pieces and fewer econo-mically viable, BendWizard offers smaller workshops a genuine incentive to invest in modern automation systems. BendWizard represents a significant advance in robotic press brake pro-duction. The result of three years of development, it incorporates experience and process know-how accumulated by ABB in a wide variety of press brake tending applications over the last decade.The latest version of BendWizard gives users of press brakes from ABB-preferred partners a single, unique software tool for programming the entire production cell. Apart from making programming easier, BendWizard offers an unparalleled level of integration between the robot and the press brake, making it the ideal tool for offline programming of a ‘new’, fully integrated machine: the robotized press brake cell. BendWizard and FlexBender ABB has standardized its solutions for press brake tending applications with a range of function packages, based on the different robot models, for different sheet metal and press brake sizes.With BendWizard, ABB presents a software product that has been specifi-cally developed for fast and easy offline programming of the entire FlexBender line. BendWizard features 3D graphics, based on 3D solid modeling. Using it, the operator can easily move within the virtual cell and check every detail ofevery phase in the bending cycle, com-pletely validating the process in theoffice before going into the workshop.Thus, there is no interruption of pro-duction and ramp-up time is zero.Programming with BendwizardBendWizard’s graphic interface andextensive functionality enable machineoperators with only limited knowledgeof robotics and PC software to programand simulate the robot. The user doesn’tsee any of the robot’s technical com-plexity. All the programming is done justas before, starting with the drawing ofthe flat metal sheet and then movingthrough the sequence of bends. The usercan see the 3D image of the final shapethe whole time. The program code iscompletely transparent to the user all thetime it is being written.The user starts programming a newpart by importing the DXF/IGES drawingof the part. Then he generates the virtual BendWizard gives the operator an accurate virtual modelof the robotized cell to work with.Industriesset-up of the press brake using thevarious tools.The bending sequence is defined interactively through the simulation of the robot operation and press brake cycle. As the system runs through the bending cycle, it automatically checks at each stage the reachability of the robot targets, the working area and the possibility of collision. If trouble isdetected, the user has several tools with which to implement the necessary modifications.After the system has verified the cycle, the path can be converted into a format compatible with the robotlanguage and the file downloaded to the robot controller. When working with press brakes from ABB-preferredpartners, the press part program is also directly generated. After quick, final verification in the workcell, production can start.Documentation is also made easier.All the data processed by BendWizardcan be converted into reports in HTML format.Four programming environmentsBendWizard software is sequentially structured and comprises four different programming environments:s Working cell configuration and setup – the definition of the layout through selection of the system components and their positioning. Libraries are available for all the robot models, system modules and models of the press brake.s Part definition – the definition of the geometry of the part to be programmed through the import of the DXF/IGES drawing or the creation of the drawing by means of an incorporated CAD system.s Workcell set-up definition – the definition of the set-up of the press brake with the different set of tools required, and of the robot gripper and the other adjustable modules included in the robotic system.sBending sequence definition – the generation of the part program.One platformOne of BendWizard’s strong points is its RobotStudio [1] platform – thestandard ABB platform for the simulation and programming of robots. RobotStudio guarantees high quality and reliability levels and uses the innovative tech-nology of the Virtual Controller to make the same control system used for the robot available on a PC.The Virtual Controller communicates with BendWizard to precisely simulate the behavior of the robot in terms of movement, reachability, collision and diagnostics, etc. Exploiting the strategic advantages that derive from the use of a standard ABB platform, BendWizard guarantees that every functional update is linked to the ABB robot upgrades.Ensuring compatibility with RobotStudio was central to the development of the BendWizard software.The drawing of the part can be imported from .dxf or .iges files, or can be defined from CAD functions integrated in BendWizard.A 3D model is used for the feasibility study of a bending job and to check for reachability and possible collisions.Easy to work withWorking with BendWizard couldn’t beeasier. If the part already exists in a CAD environment, all the operator has to do is import the drawing – usually an .igesor .dxf file – in order to examine its geometry. For parts which have to be designed from scratch, BendWizard has CAD functions for the geometric definition.Before a feasibility check can be carried out, the part has first to be visualized. Two views of the imported drawing are possible: a two-dimensional view which shows the part as a flat sheet,and a three-dimensional view which shows the folded sheet and lets the user modify the fold angles in real time. The next step is to set up the cell components. The operator of the press brake machine imports the profiles of the punches and dies from appropriate libraries and then defines the length and the position of every single set of tools. Depending on the dimensions of the sheet and on its geometry, it may be possible during the bending sequence to set up the gripper and correctly position the vacuum cups, even the magnets. A similar environment is provided for setting up the overturning equipment,which is necessary when the part has a counter-fold.ProgrammingMoving on to the programming environ-ment, the user sees here a 3D model of the cell with all the peripherals equipped exactly as required and in their exact position.Programming of the system takes place interactively, with the software guiding the operator through the different robot cycle phases:s Loading the sheet from the feeding systems Double-thickness control (only one part in the robot’s gripper) s Centerings Bending sequences Overturning and palletization After verification of the complete cycle,the bending sequence can be downloaded to the workcell. Production can start just as soon as the final verification is received from the shop floor.A large variety of press brake machines, robots and peripherals are available in the BendWizard libraries for the definition of every type of work cell.Top: By integrating different BendWizard operating envi-ronments, modifications can be performed quickly and simply to solve problems involving collision or reachability.Bottom: To set up the press brake machine, drawings of standard tools can be taken from the relevant libraries.IndustriesBendWizard includes standard Applica-tion Program Interfaces to controller programming languages that allow oper-ators of press brakes from ABB-preferred partners to use one programming tool throughout the production cell. Besides reducing the necessary programming, BendWizard’s ability to generate a part program provides for an unparalleled level of integration between the robot and press brake.This makes it the ideal offline pro-gramming tool for a ‘new’, fully integrated machine: the robotized press brake cell.The success of these interfaces is high-lighted by press brake builders who have connect to BendWizard’s APIs, and there-by delegate to this powerful software toolthe programming tasks of their ownmachines. Bendwizard also has openinterfaces to CAD/CAM tools (eg, unfold-ing tools) for metal fabrication and canretrieve production data from a commonserver for immediate transfer to the shopfloor, ie to the press and the robot.BendWizard further represents a mile-stone in integrated offline programmingfor the metal fabrication sector and fitsperfectly into ABB’s Industrial IT archi-tecture [2]. Working together with othertools based on the same platform, itprovides a direct, vertically integratedand the CAD office. Modifications toproduct drawings, for example, can beimmediately transferred to the productionenvironment.This and other benefits of BendWizardare ensuring that it will play a key role inshaping the future of this sector.Backbonee a ppli ca ti。
- 1、下载文档前请自行甄别文档内容的完整性,平台不提供额外的编辑、内容补充、找答案等附加服务。
- 2、"仅部分预览"的文档,不可在线预览部分如存在完整性等问题,可反馈申请退款(可完整预览的文档不适用该条件!)。
- 3、如文档侵犯您的权益,请联系客服反馈,我们会尽快为您处理(人工客服工作时间:9:00-18:30)。
eyBuild 中文手册版本状态文件标识:eyBuild Group 当前版本:0.3.0 作 者:newzy 文件状态: [ ] 草稿 [√] 正式发布 [ ] 正在修改 完成日期:2006-3-28修订日志版本日期变更位置 变更内容 变更者 0.1.0 2006-1-22 新建 newzy 0.2.0 2006-2-6 全部 完成初版 newzy 0.2.1 2006-2-9 CSP 注释符 修改CSP 注释符 newzy 0.2.2 2006-2-13 头部 CSP 的解释、联系信息等 newzy 2006-3-25 0.3.0 2006-3-28 全文 为eybuild-0.8更新 newzy更多信息:请访问eyBuild 的网站 或发送email 到: newzy@ , xxt@目录第1章序言 (3)第2章什么是eyBuild (5)2.1 CSP与CGI (5)2.2 为什么要选择eyBuild开发Web站点 (6)第3章 CSP的语法 (8)3.1 CSP的语句 (8)3.2 语句格式 (8)3.3 CSP的语句行宏定义前缀符 (8)3.4 CSP的注释前缀符(//) (10)3.5 CSP的指令前缀符(@) (10)3.6 CSP的require指令 (11)3.7 CSP的内建函数前缀符($) (13)3.8 CSP的字符串输出前缀符(=,=$ 和 =%) (13)3.9 在CSP中输出总结 (14)3.10 在CSP中获取输入 (14)3.11 CGI前缀和ROM前缀 (18)第4章 eyBuild开发环境简介 (20)4.1 安装eyBuild (20)4.2 eyBuild目录结构 (20)4.3 project 的目录结构 (23)4.4 什么是虚目录 (23)4.5 MAP文件 (23)4.6 WEB2BIN (25)4.7 CSP2BIN (26)4.8 DONEMAP (26)4.9 脚本的入口cgimain() (28)4.10 CSP 页面内置对象 (29)第5章建立工程并生成CGI可执行文件 (30)5.1 建立工程的一般步骤 (30)5.2 示例 (30)5.2.1 环境准备: (30)5.2.2 创建源文件 (30)5.2.3 配置翻译器 (31)5.2.4 翻译CSP文件和ROM文件 (32)5.2.5 创建项目编译环境 (33)5.2.6 运行结果 (34)第6章调试 (35)6.1 用ebSetDebug()调试 (35)6.2 异常中断调试 (35)第1章序言VB/JA V A/PHP等脚本直接嵌入在HTML中叫 ASP/JSP/PHP,那么用 C 直接嵌入在HTML中叫 CSP 吗?是的, 现在我们可以直接将 C 语句嵌入在HTML中并叫它 CSP。
C 语言天然好的"移植性/高效性/灵活性",一直以来都是最受程序员青睐的语言。
现在用CSP 技术我们就可以轻松地将 C 语句直接嵌入到 HTML 源文件来快速编写CGI程序。
CSP VS cgilib:传统的cgilib的直接使用标准函数printf等语句输出HTML代码。
不但使得C程序和HTML程序交织的混乱不堪,还使得页面输出的流程控制变得异常复杂。
现在ASP/JPS/PHP 等几乎完全取代用cgilib。
CSP与cgilib的开发模式不同,它充分吸取了ASP/JSP/PHP等以HTML/XML为模板嵌入脚本等诸多优点,并充分融合C语言的语言特性。
使得CSP的开发变得快速、高效,并大大提了最终代码的可读性和维护性。
CSP及其开发环境eyBuild是cgilib 的继承和发展,同时目前也是开发高效率WEB应用的最佳选择。
一般工作步骤:编辑好的 CSP 源程序,用eyBuild开发包提供的 CSP2BIN 工具将 CSP 源文件生成C 程序的源文件,再链接上 eyBuild 提供的高效 CGI 运行库,就可以在各种平台生成移植性非常高的 CGI 程序。
To ASP/JSP/PHP 的程序员:编写 CSP 程序就跟编写 ASP/JSP/PHP 一样,可以以先编写 HTML 文件为模板,再在其中插入CSP 的语句。
甚至有些时候,就可以直接拿 ASP/JSP/PHP 的源文件稍加修改后作为 CSP 的源文件了,因为它们都用类似 <% 和 %> 的标签进行标记的嘛。
如果你是ASP/JSP/PHP的程序员,并熟悉C语言,半天时间你就能把 CSP 全学会。
To 嵌入式WEB开发:CSP 设计的最原始的初衷,就是要为嵌入式开发定制的一套类似 ASP/JSP/PHP的C语言开发工具。
因为嵌入式设备(如路由器/交换机/V oIP网关PBX等)上用的开发语言主要是C,而传统的 CGI 库 cgilib 以及开发模式远远不能跟上现代的开发需求。
现在 CSP 的eybuild开发环境提供的PC和嵌入式设备上高效移植的开发库,让服务器上应用和嵌入开发进行了有效统一,使得两者上的开发变得更为容易。
同时,优秀的跨平台的移植性也是eybuild的重要特性。
实践证明,CSP 及其开发工具 eybuild是嵌入式设备WEB开发的最理想工具,它能大大节缩短发周期(一般提高4-6倍),提高最终代码的可读性、可维护性(HTML 和 C 代码进行了有效的分离,所以代码维护更容易)。
高效的页面/图片/CSS集成技术:通过eyBuild提供的集成技术,你可以把许多CSP/HTML页面集成生成到一个CGI中(包括页面相关的图片,CSS 文件及其它静态文件)。
甚至,你可以将一个小型的网站或WEB 应用生成到一个CGI文件中,这使得最终的可执行脚本文件管理变得异常简单。
这一点在嵌入式设备上特别有用,因为它们中的很多只有有限的外存储器(如Flash ROM)和文件系统。
eyBuild为最后生成的 CGI 程序在其内部建立了虚拟目录,使得页面间的链接和引用跟一般HTML的编写方法一样,非常方便建立和维护。
同时对服务器级应用,这也将是一个非常有利的选择。
可以直接调用任意 C 的函数在 CSP 源程序中还可以非常容易地包含C 程序的头文件,这样在 HTML 代码中你就可以像写编写 C 文件一样调用外部函数或系统函数了,跟直接编辑 C 程序几乎没有差别。
CSP 的宏指令指示符 @用宏指令指示符不仅可以进行包含 C 程序的头文件,还可以包含其它CSP文件。
这样当许多页面需要引用共通的一部分时(如页头/页脚或其它部分),包含其它 CSP 源文件这个功能显示特别有用。
有效的页面输出缓冲控制跟 ASP/JSP/PHP一样,通过宏指令指示符还可以有效控制页面输出时的 MIME 头,页面缓冲区大小等等。
这种使得页面上的流程控制变得更简单更直观。
第2章什么是eyBuildeyBuild,是 Easy Build 的简写,它是CSP(C Language Service Page)开发套件的总称。
eyBuild是嵌入式设备上WEB应用的最理想的开发工具,同是也是服务器WEB应用开发最有益的补充,它主要包括CSP2BIN、WEB2BIN、DONEMAP、eyBuildLib等开发组件。
CSP是C Language Service Page 的缩写,它是一种基于C语言的脚本开发技术。
跟ASP、JSP类似,它们都是CGI(Common Gateway Interface)的一种变种。
我们可以直接将C语句插入到HTML/XML等模板文件中来编写CSP的源文件,用CSP2BIN将该文件转换成C 语言的源程序。
2.1 CSP与CGI自CGI产生以来,C语言以其高效性、灵活性和通用性一直是开发交互式WEB应用的最有吸引力的选择。
但近年来,能直接内嵌于HTML文档中间的各种脚本工具,以其简便性易用性使一部分用户开始放弃了直接用C来开发CGI脚本。
但还有两类用户没有放弃用C来开发它们的应用,一是对性能追求较高的高端开发者,二是嵌入式设备的开者。
前者选择C语言来开发它们的WEB应用,是因为C高效性、灵活性和通用性是各种脚本工具无法取代的。
后者选择C语言,是因嵌入式设备的特点(内存、CPU等资源有限等,不可在设备上运行如ASP,PHP,PERL等的脚本的运行环境)决定的(另外,目前嵌入式设备主要以C语言开发为主)。
自CGI出现以来,就有人开发方便C语言开发的开发库cgilib,从目前的情况看cgilib 并没有得到广泛的应用;反观下各种脚本开发工具,它们则受到WEB开发者的直接异常青睐。
对比后不难发现,基于C语言的cgilib并没有从根本上解决交互式WEB应用的真正需求,这是因为直接用C语言无法像其它脚本一样嵌入在HTML文档中间,使得用输出HTML 文档时非常烦琐,源代码可读性较差,维护困难。
现在用CSP来开发WEB应用程序则与之不同,我们可以像ASP、JSP、PHP等工具一样直接将脚本语言(这里指C语言)的语句嵌入到HTML/XML等模板文件中。
因为在源文件中用<% %>标记分隔,使得C程序和HTML/XML代码程序进行了有效的分离,同时也使得代码的可读性、可维护性大大增强,开发周期大大缩短。
如果你是个C/C++或JA V A程序员,你不必重新学习任何一种新语言,即可以像高效地开发WEB应用,工作模式跟原来几乎一样。
如果曾经用ASP、JSP、JSP开发过并有一定的C语言基础,你会发现CSP简单就是它们的一种变种。
无需太多学习即可用CSP做开发了。
下面是一段简单的CSP代码(头文件包含不是必须的,仅用作示范),它是将一段C程序直接嵌套在HTML模板文件中:1 <html>2 <body>3 <% 语句起始标签4 @ include <stdio.h> C 语言头文件包含5 @ include <my_header.h> C 语言头文件包含6 %> 语句结束标签7 输出:<% = “hello world<BR>” %>输出字符串8 也可以这样输出:9 <%10 $printf (“%s<BR>”, “*** hello world ***”); C 语句11 %>12 </body>13 </html>2.2 为什么要选择eyBuild开发Web站点eyBuild 是基于CSP技术的开发套件的总称,它具有如下特点:1.嵌入式设备WEB应用开发的最佳选择目前嵌入式设备上的WEB应用最主要还是C语言直接开发CGI程序。
除在序言中提到了直接用C开发CGI的诸多缺点外,直接将HTML代码用C语句输出,不能对两都进行有效的分离,将大大降低HTML源程序和C源程序的可读性、维护性;直接用C语言开发还必须手工对页面输出的流程进行控制,还将大大降低了开发的效率。