AM-MAG-001.04A 设备规格说明书
奥美晨曦系列微波传感器说明书

OS100 SERIES Mini-Infrared Transmitter e-mail:**************For latest product manuals: Shop online at User’s G ui d e***********************Servicing North America:U.S.A. Omega Engineering, Inc.Headquarters: Toll-Free: 1-800-826-6342 (USA & Canada only)Customer Service: 1-800-622-2378 (USA & Canada only)Engineering Service: 1-800-872-9436 (USA & Canada only)Tel: (203) 359-1660 Fax: (203) 359-7700e-mail:**************For Other Locations Visit /worldwideThe information contained in this document is believed to be correct, but OMEGA accepts no liability for any errors it contains, and reserves the right to alter specifications without notice.Table of ContentsSection ...................................................................PageSafety Warnings and IEC Symbols (iii)Caution and Safety Information (iii)Section 1 Introduction ....................................................................1-1Section 2Installation ......................................................................1-12.1 Unpacking and Inspection ......................................1-12.2 Electrical Connection ..............................................2-1Section 3Operation ........................................................................3-13.1 Main Board ................................................................3-13.2 Ambient Temperature ..............................................3-23.3 Atmospheric Quality ................................................3-33.4 Measuring Temperature ..........................................3-33.5 Alarm Setting ............................................................3-43.6 Adding Extension Cable...........................................3-4Section 4 Laser Sight Accessory ...................................................4-14.1 Warning and Cautions .............................................4-14.2 Operating the Laser Sight Accessory .....................4-1Section 5 Specifications .................................................................5-15.1 General .......................................................................5-15.2 Laser Sight Accessory (OS100-LS) ..........................5-2Section 6Emissivity Table .............................................................6-1iTable of FiguresFigure Description Page2-1Power Supply & Analog Output Connections ..........2-12-2 Alarm Output Connection ............................................2-13-1 Main PC Board ...............................................................3-23-2 Sensor..............................................................3-2Housing3-3 Optical Field of View .....................................................3-43-4Setting the Temperature Engineering Unit..................3-43-5Mounting Bracket OS100-MB .......................................3-53-6Water Cooling Jacket, OS100-WC ................................3-53-7Typical Water Cool Jacket Assembly ...........................3-53-8Air Purge Collar, OS100-AP..........................................3-63-9DIN Rail Mounting Adapter, OS100-DR ....................3-63-10NEMA-4 Aluminum Enclosure ....................................3-64-1Laser Sighting Accessory, OS100-LS ............................4-24-2Laser Warning Label ......................................................4-2iiSafety Warnings and IEC SymbolsThis device is marked with international safety and hazard symbols in accordance with IEC 1010. It is important to read and follow all precautions and instructions in this manual before operating or commissioning this device as it contains important information relating to safety and EMC. Failure to follow all safety precautions may result in injury and or damage to your calibrator. IEC symbols DescriptionCaution and Safety Information• If the equipment is used in a manner not specified in this manual, the protection provided by the equipment may be impaired.• The installation category is one (1).• There are no user replaceable fuses in this product• The output terminals of this product are for use with equipment (digital meters, chart recorders, etc,) which have no accessible five parts. Such equipment should comply with all the applicable safety requirements.• Do not operate the equipment in flammable or explosive environments.• All connections to the thermometer should be made via a shielded cable, 24 AWG stranded wire with the following ratings: 300V , 105°C (221°F), PVC insulation.• Power must be disconnected before making any electrical connections.• The power supply used to power the thermometer should be VDE or UL approved with the following ratings: 12 to 24vdc @150mA with overload protection of 500mA.iiiCaution, refer to accompanying documentsDirect Current Laser SymbolFrame or ChassisNOTES: ivSection 1 - IntroductionThe low cost OS101 mini-infrared transmitter provides non-contacttemperature measurement for industrial applications. The unit measures atemperature range of -18 to 538°C (0-1000°F) and provides a linear analogoutput of either 4-20 mA, 0-5 VDC, K type TC, 1 mV/°C, or 1 mV/°F.The new OS102 mini-infrared transmitter has all the functions of OS101plus a built-in LED display that shows the measured temperature indegrees F or degrees C which is switchable in the field.The miniature sensor head design 2.5 cm dia. x 6.3 cm Length (1" x 2.5") isideal for measuring temperature in confined, and hard to reach places.The aluminum sensor head as well as the rugged electronic housing (Diecast Aluminum) are NEMA-4 rated.The sensor head is connected to the electronic housing via a 1.82 m (6 feet)shielded cable as standard. The unit provides field adjustable alarmoutput.Section 2 - Installation2.1UnpackingRemove the packing list and verify that you have received all yourequipment. If you have any questions about the shipment, please callCustomer Service at:1-800-622-2378 or 203-359-1660. We can also be reached on the internet:e-mail:**************When you receive the shipment, inspect the container and equipment forany signs of damage. Note any evidence of rough handling in transit.inspection. After examination and removing contents, save packing material and carton in theevent reshipment is necessary.The following items are supplied in the box:• The infrared transmitter including the sensor head and the 1.82 m(6 feet) shielded cable• User's Manual• Mounting Nut1-1The following describes the ordering information:OS102 or OS101 - MA- *,**, where The following optional accessories are available:Here are the Features of OS101 and OS102 infrared transmitters:2.2Electrical Connection Sensor Head Cable - The Sensor head is pre-wired to a 1.8 m (6 feet)shielded cable. Plug & lock-in the male connector to the mating female connector on the aluminum housing.Power & Output Connection - Open the cover of the main aluminum housing. Slide the cable through the strain relief and connect the wires to the terminal block on the board as shown in Fig. 2-1. For Alarm output connection, refer to Fig. 2-2.2-1MA - 4/20 mA output V1 - 0 to 5 VDC output K - Thermocouple output, K type MV - Millivolt output C - 1 mV/°C output F - 1 mV/°F output HT- High temperature sensor head3-1Figure 2-2. Alarm Output Connection Section 3 - Operation3-1Main BoardThe Main Board is shown in Fig. 3-1. Here are the important components on the board:(1) - Terminal Block for Power & Output connections(2) - Single Turn Potentiometer to adjust Emissivity in tenths (0.x_)(3) - Single Turn Potentiometer to adjust Emissivity in hundreds (0._x)(4) -Slide switch to select between real time (Normal Operation) and alarm set point(5) - Alarm set point adjust, P4(6) - Sensor Head connection(7) - Input Zero adjust, P3(8) - Input Span adjust, P2(9) - Output Zero adjust, P5(10) - Output Span adjust, P6Figure 3-1. Main PC Board3.2Ambient TemperatureThe Sensing head can operate in an ambient temperature of 0 to 70°C (32to 158°F). The Sensing head in the high temperature model (-HT) can operate in an ambient temperature of 0 to 85°C (32 to 185°F) without any cooling required. The Sensing head can operate up to 200°C (392°F) using the water cool jacket accessory OS100-WC (See Fig. 3-6).There is a warm up period of 3 minutes after power up. After the warm up period, temperature measurement can be made.When the ambient temperature around the sensor head changes abruptly,the sensor head goes through thermal shock. It takes a certain amount of time for the sensor head to stabilize to the new ambient temperature. For example, it takes about 30 minutes for the sensor head to stabilize going from 25°C to 50°C (77 to 122°F) ambient temperature.The sensor head dimensions are shown in Fig. 3-2.Figure 3-2. Sensor Housing3-23-33.3Atmospheric QualityEnvironments with smoke, dust, and fumes dirty up the optical lens, and cause erroneous temperature readings. To keep the surface of the optical lens clean, the air purge collar accessory is recommended, OS100-AP , See Fig. 3-7.3.4Measuring TemperatureBefore starting to measure temperature, make sure that the following check list is met:ߜ The power and analog output connections are made (Fig. 2-1).ߜThe sensor head is connected to the main unit.ߜThe slide switch (SW1) on the main board is set to real time (Fig. 3-1).ߜThe target is larger than the optical field of view of the sensor head (Fig. 3-3).ߜThe emissivity adjustment on the main board is set properly (Fig. 3-1).ߜThe output load is within the product specification.On OS102 transmitters, follow these additional steps:ߜ The temperature display is set to °F or °C (Fig. 3-4)ߜ For 4-20mA output models, make sure an output load is added, ie. 250ohms.Figure 3-3. Optical Field Of ViewFigure 3-4. Setting the Temperature Engineering Unit3.5Alarm SettingThe unit provides 0-100% alarm set point adjustment. Here is an exampleof an alarm setting.• An OS101-MA(4/20 mA output), the alarm is to be set at 400°Ftemperature.• Connect the alarm output as shown in Fig. 2-2.• Set the slide switch (SW1) on the main board to the Alarm position.• Measure the analog output, and set the Potentiometer P4 until theoutput reads 10.4 mA which is 40% (400°F) of the temperature range.40 x (20-4)[10.4mA=+ 4]100• Set the slide switch (SW1) back to the Real Time position.• If the temperature reading is below the alarm set point, the alarmoutput stays high, otherwise it goes low.On the OS102, you can set the alarm set point directly based on thetemperature display.3.6Adding Extension CableYou can add extension cable between the Sensor Head and the mainelectronic housing up to 15.2 m (50 feet). After adding the extension cable,the Zero input potentiometer, P3 may be re-adjusted. (See Fig. 3-1, forproper analog output reading)The following figures show the mounting bracket (OS100-MB), Watercooling jacket (OS100-WC), Air purge collar (OS100-AP), DIN RailMounting adapter (OS-100-DR), and the main aluminum enclosure. TheDIN Rail Mounting adapter (OS100-DR) is mounted to the bottom of themain aluminum enclosure using two 4-40 screws.A typical water cool jacket assembly is shown in Fig. 3-7, on the following page.1. Mounting Nut2. Mounting Bracket3. Water Cool Jacket4. Sensor Head3-4Figure 3-5. Mounting Bracket OS100-MBFigure 3-6. Water Cooling Jacket, OS100-WCFigure 3-7. Typical Water Cool Jacket Assembly3-5Figure 3-8. Air Purge Collar, OS100-APFigure 3-9. DIN Rail Mounting Adapter, OS-100-DRFigure 3-10. NEMA-4 Aluminum Enclosure3-6Section 4 - Laser Sight Accessory4.1Warning and Cautionsbelow:•Use of controls or adjustments or performance of procedures other than those specified here may result in hazardous radiation exposure.• Do not look at the laser beam coming out of the lens or view directly with optical instruments - eye damage can result.• Use extreme caution when operation the laser sight accessory • Never point the laser accessory at a person • Keep out of the reach of all children4.2Operating the Laser Sight AccessoryThe laser sight accessory screws onto the front of the sensor head. This accessory is only used for alignment of the sensor head to the target area.After the alignment process, the accessory has to be removed from the front of the sensor head before temperature measurement.The laser sight accessory is powered from a small compact battery pack (included with the accessory). Connect the battery pack to the accessory using the cable provided. Aim at the target, and turn on the battery power using the slide switch on the battery pack. Adjust the sensor head position so that the laser beam points to the center of the target area. Turn off the battery pack, and remove the laser sighting accessory from the sensor head. See Fig. 4-1 for reference.4-14-2Figure 4-2. Laser Warning LabelSection 5 - Specifications5.1 - GeneralTemperature Range-18 to 538°C (0 to 1000°F)Accuracy @ 22°C (72°F)±2% of Rdg. or 2.2°C (4°F) whichever is ambient temperature & greateremissivity of 0.95 or greaterOptical Field of View6:1 (Distance/Spot Size)Repeatability±1% of Rdg.Spectral Response 5 to 14 micronsResponse Time150 msec (0 to 63% of final value)Emissivity Range0.1 to 0.99, adjustableOperating Ambient TemperatureMain Transmitter0 to 50°C (32 to 122°F)Sensor Head0 to 70°C (32 to 158°F)Sensor Head (-HT Model)0 to 85°C (32 to 185°F)Sensor Head with OS100-WC(Water Cooling Jacket)0 to 200°C (32 to 392°F)Operating Relative Humidity Less than 95% RH, non-condensingWater Flow Rate for OS100-WC0.25 GPM, room temperatureThermal Shock About 30 minutes for 25°Cabrupt ambient temperature change Warm Up Period 3 minutesAir Flow Rate for OS100-AP 1 CFM (0.5 Liters/sec.)Power12 to 24 VDC @ 100 mAAnalog OutputsMV-F 1 mV/°FMV-C 1 mV/°CK K Type TC - OS101 onlyMA 4 to 20 mAV10 to 5 VDCOutput Load requirementsMin. Load (0 to 5VDC) 1 K-OhmsMax. Load (4 to 20 mA)(Supply Power - 4 )/20 mATransmitter Housing NEMA-4 & IP65, Die Cast AluminumSensor Head Housing NEMA-4 , AluminumAlarm Output Open Drain, 100 mAAlarm Set Point0 to 100% , Adjustable via P4Alarm Deadband14°C (25°F)5-15-25.1 - General Con’t.DimensionsSensor Head25.4 OD. x 63.5 mm L(1" OD. x 2.5" L)Main Housing, OS10165.5 W x 30.5 H x 115.3 mm L(2.58" W x 1.2" H x 4.54" L)Main Housing, OS10265.5 W x 55.9 H x 115.3 mm L(2.58" W x 2.2" H x 4.54" L)Weight 272 g (0.6 lb)5.2Laser Sight Accessory (OS100-LS)Wavelength (Color)630 - 670 nm (Red)Operating Distance (Laser Dot)Up to 9.1 m (30 ft.)Max. Output Optical Power Less than 1 mW at 22°F ambienttemperature.European Classification Class 2, EN60825-1/11.2001Maximum Operating current45 mA at 3 VDCFDA Classification Complies with 21 CFR 1040.10,Class II Laser ProductBeam Diameter 5 mmBeam Divergence< 2 mradOperating Temperature0 to 50°C (32 to 122°F)Operating Relative Humidity Less than 95% RH, non-condensingPower Switch ON / OFF , Slide switch on the BatteryPackPower Indicator Red LEDPower Battery Pack, 3 VDC (Consists of two 1.5VDC AA size Lithium Batteries) Laser Warning Label Located on the head sight circumferenceIdentification Label Located on the head sight circumferenceDimensions38 DIA x 50.8 mm L(1.5" DIA x 2" L)Section 6 - Emissivity Table6-1Material Emissivity (ε)Aluminum – pure highly polished plate . . . . . . . . . . . . . . . . . . . . . . . . 0.04 to 0.06Aluminum – heavily oxidized . . . . . . . . . . . . . . . . . . . . . . . . . . . . . . . 0.20 to 0.31Aluminum – commercial sheet . . . . . . . . . . . . . . . . . . . . . . . . . . . . . . . . . . . . 0.09Brass – dull plate. . . . . . . . . . . . . . . . . . . . . . . . . . . . . . . . . . . . . . . . . . . . . . 0.22Brass – highly polished, 73.2% Cu, 26.7% Zn. . . . . . . . . . . . . . . . . . . . . . . . . 0.03Chromium – polished. . . . . . . . . . . . . . . . . . . . . . . . . . . . . . . . . . . . . 0.08 to 0.36Copper – polished. . . . . . . . . . . . . . . . . . . . . . . . . . . . . . . . . . . . . . . . . . . . . 0.05Copper – heated at 600°C (1112°F). . . . . . . . . . . . . . . . . . . . . . . . . . . . . . . 0.57Gold – pure, highly polished or liquid. . . . . . . . . . . . . . . . . . . . . . . . . 0.02 to 0.04Iron and steel (excluding stainless)– polished iron . . . . . . . . . . . . . . . . 0.14 to 0.38Iron and steel (excluding stainless)– polished cast iron. . . . . . . . . . . . . . . . . . . 0.21Iron and steel (excluding stainless)– polished wrought iron . . . . . . . . . . . . . . . 0.28Iron and steel (excluding stainless)– oxidized dull wrought iron . . . . . . . . . . . . 0.94Iron and steel (excluding stainless)– rusted iron plate . . . . . . . . . . . . . . . . . . . 0.69Iron and steel (excluding stainless)– polished steel. . . . . . . . . . . . . . . . . . . . . . 0.07Iron and steel (excluding stainless)– polished steel oxidized at600°C (1112°F). . . . . . . . . . . . . . . . . . . . 0.79Iron and steel (excluding stainless)– rolled sheet steel . . . . . . . . . . . . . . . . . . . 0.66Iron and steel (excluding stainless)– rough steel plate . . . . . . . . . . . . . 0.94 to 0.97Lead – gray and oxidized . . . . . . . . . . . . . . . . . . . . . . . . . . . . . . . . . . . . . . . 0.28Mercury . . . . . . . . . . . . . . . . . . . . . . . . . . . . . . . . . . . . . . . . . . . . . 0.09 to 0.12Molybdenum filament . . . . . . . . . . . . . . . . . . . . . . . . . . . . . . . . . . . . 0.10 to 0.20Nickel – polished . . . . . . . . . . . . . . . . . . . . . . . . . . . . . . . . . . . . . . . . . . . . . 0.07Nickel – oxidized at 649 to 1254°C (1200°F to 2290°F). . . . . . . . . . . 0.59 to 0.86Platinum – pure polished plate . . . . . . . . . . . . . . . . . . . . . . . . . . . . . . 0.05 to 0.10Platinum – wire . . . . . . . . . . . . . . . . . . . . . . . . . . . . . . . . . . . . . . . . 0.07 to 0.18Silver – pure and polished . . . . . . . . . . . . . . . . . . . . . . . . . . . . . . . . . 0.02 to 0.03Stainless steel – polished . . . . . . . . . . . . . . . . . . . . . . . . . . . . . . . . . . . . . . . . 0.07Stainless steel – Type 301 at 232 to 942°C (450°F to 1725°F). . . . . . . 0.54 to 0.63Tin – bright . . . . . . . . . . . . . . . . . . . . . . . . . . . . . . . . . . . . . . . . . . . . . . . . . 0.06Tungsten – filament . . . . . . . . . . . . . . . . . . . . . . . . . . . . . . . . . . . . . . . . . . . . 0.39Zinc – polished commercial pure . . . . . . . . . . . . . . . . . . . . . . . . . . . . . . . . . . 0.05Zinc – galvanized sheet. . . . . . . . . . . . . . . . . . . . . . . . . . . . . . . . . . . . . . . . . 0.23M E T A L S6-2Material Emissivity (ε) Asbestos Board . . . . . . . . . . . . . . . . . . . . . . . . . . . . . . . . . . . . . . . . . . . . . . .0.96 Asphalt, tar, pitch . . . . . . . . . . . . . . . . . . . . . . . . . . . . . . . . . . . . . . .0.95 to 1.00 Brick– red and rough . . . . . . . . . . . . . . . . . . . . . . . . . . . . . . . . . . . . . . . . . .0.93 Brick– fireclay . . . . . . . . . . . . . . . . . . . . . . . . . . . . . . . . . . . . . . . . . . . . . . .0.75 Carbon– filament . . . . . . . . . . . . . . . . . . . . . . . . . . . . . . . . . . . . . . . . . . . . .0.53 Carbon– lampblack - rough deposit . . . . . . . . . . . . . . . . . . . . . . . . . .0.78 to 0.84 Glass- Pyrex, lead, soda . . . . . . . . . . . . . . . . . . . . . . . . . . . . . . . . . .0.85 to 0.95 Marble– polished light gray . . . . . . . . . . . . . . . . . . . . . . . . . . . . . . . . . . . . .0.93 Paints, lacquers, and varnishes– Black matte shellac . . . . . . . . . . . . . . . . . . . .0.91 Paints, lacquers, and varnishes– aluminum paints . . . . . . . . . . . . . . . .0.27 to 0.67 Paints, lacquers, and varnishes– flat black lacquer . . . . . . . . . . . . . . .0.96 to 0.98 Paints, lacquers, and varnishes– white enamel varnish . . . . . . . . . . . . . . . . . .0.91 Porcelain– glazed . . . . . . . . . . . . . . . . . . . . . . . . . . . . . . . . . . . . . . . . . . . . .0.92 Quartz– opaque . . . . . . . . . . . . . . . . . . . . . . . . . . . . . . . . . . . . . . . .0.68 to 0.92 Roofing Paper . . . . . . . . . . . . . . . . . . . . . . . . . . . . . . . . . . . . . . . . . . . . . . .0.91 Tape– Masking . . . . . . . . . . . . . . . . . . . . . . . . . . . . . . . . . . . . . . . . . . . . . .0.95 Water . . . . . . . . . . . . . . . . . . . . . . . . . . . . . . . . . . . . . . . . . . . . . . . .0.95 to 0.96 Wood– planed oak . . . . . . . . . . . . . . . . . . . . . . . . . . . . . . . . . . . . . . . . . . . .0.90 NONMETALSNOTES:6-3NOTES: 6-4OMEGA’s policy is to make running changes, not model changes, whenever an improvement is possible. T his affords our customers the latest in technology and engineering.OMEGA is a trademark of OMEGA ENGINEERING, INC.© Copyright 2017 OMEGA ENGINEERING, INC. All rights reserved. T his document may not be copied, photocopied, reproduced, translated, or reduced to any electronic medium or machine-readable form, in whole or in part, without the prior written consent of OMEGA ENGINEERING, INC.FOR WARRANTY RETURNS, please have the following information available BEFORE contacting OMEGA:1. P urchase Order number under which the product was PURCHASED,2. M odel and serial number of the product under warranty, and3. Repair instructions and/or specific problems relative to the product.FOR NON-WARRANTY REPAIRS, consult OMEGA for current repair charges. Have the following information available BEFORE contacting OMEGA:1. Purchase Order number to cover the COST of the repair,2. Model and serial number of the product, and 3. Repair instructions and/or specific problems relative to the product.RETURN REQUESTS/INQUIRIESDirect all warranty and repair requests/inquiries to the OMEGA Customer Service Department. BEFORE RET URNING ANY PRODUCT (S) T O OMEGA, PURCHASER MUST OBT AIN AN AUT HORIZED RET URN (AR) NUMBER FROM OMEGA’S CUST OMER SERVICE DEPART MENT (IN ORDER T O AVOID PROCESSING DELAYS). The assigned AR number should then be marked on the outside of the return package and on any correspondence.T he purchaser is responsible for shipping charges, freight, insurance and proper packaging to preventbreakage in transit.WARRANTY/DISCLAIMEROMEGA ENGINEERING, INC. warrants this unit to be free of defects in materials and workmanship for a period of 25 months from date of purchase. OMEGA’s WARRANTY adds an additional one (1) month grace period to the normal two (2) year product warranty to cover handling and shipping time. This ensures that OMEGA’s customers receive maximum coverage on each product.If the unit malfunctions, it must be returned to the factory for evaluation. OMEGA’s Customer Service Department will issue an Authorized Return (AR) number immediately upon phone or written request. Upon examination by OMEGA, if the unit is found to be defective, it will be repaired or replaced at no charge. OMEGA’s WARRANT Y does not apply to defects resulting from any action of the purchaser, including but not limited to mishandling, improper interfacing, operation outside of design limits, improper repair, or unauthorized modification. T his WARRANT Y is VOID if the unit shows evidence of having been tampered with or shows evidence of having been damaged as a result of excessive corrosion; or current, heat, moisture or vibration; improper specification; misapplication; misuse or other operating conditions outside of OMEGA’s control. Components in which wear is not warranted, include but are not limited to contact points, fuses, and triacs.OMEGA is pleased to offer suggestions on the use of its various products. However, OMEGA neither assumes responsibility for any omissions or errors nor assumes liability for any damages that result from the use of its products in accordance with information provided by OMEGA, either verbal or written. OMEGA warrants only that the parts manufactured by the company will be as specified and free of defects. OMEGA MAKES NO OTHER WARRANTIES OR REPRESENTATIONS OF ANY KIND WHATSOEVER, EXPRESSED OR IMPLIED, EXCEPT THAT OF TITLE, AND ALL IMPLIED W ARRANTIES INCLUDING ANY W ARRANTY OF MERCHANTABILITY AND FITNESS FOR A PARTICULAR PURPOSE ARE HEREBY DISCLAIMED. LIMITATION OF LIABILITY: The remedies of purchaser set forth herein are exclusive, and the total liability of OMEGA with respect to this order, whether based on contract, warranty, negligence, indemnification, strict liability or otherwise, shall not exceed the purchase price of the component upon which liability is based. In no event shall OMEGA be liable for consequential, incidental or special damages.CONDITIONS: Equipment sold by OMEGA is not intended to be used, nor shall it be used: (1) as a “Basic Component” under 10 CFR 21 (NRC), used in or with any nuclear installation or activity; or (2) in medical applications or used on humans. Should any Product(s) be used in or with any nuclear installation or activity, medical application, used on humans, or misused in any way, OMEGA assumes no responsibility as set forth in our basic WARRANT Y /DISCLAIMER language, and, additionally, purchaser will indemnify OMEGA and hold OMEGA harmless from any liability or damage whatsoever arising out of the use of theProduct(s) in such a manner.Where Do I Find Everything I Need forProcess Measurement and Control?OMEGA…Of Course!Shop online at TEMPERATUREM U Thermocouple, RTD & Thermistor Probes, Connectors,Panels & AssembliesM U Wire: Thermocouple, RTD & ThermistorM U Calibrators & Ice Point ReferencesM U Recorders, Controllers & Process MonitorsM U Infrared PyrometersPRESSURE, STRAIN AND FORCEM U Transducers & Strain GagesM U Load Cells & Pressure GagesM U Displacement TransducersM U Instrumentation & AccessoriesFLOW/LEVELM U Rotameters, Gas Mass Flowmeters & Flow ComputersM U Air Velocity IndicatorsM U Turbine/Paddlewheel SystemsM U Totalizers & Batch ControllerspH/CONDUCTIVITYM U pH Electrodes, Testers & AccessoriesM U Benchtop/Laboratory MetersM U Controllers, Calibrators, Simulators & PumpsM U Industrial pH & Conductivity EquipmentDATA ACQUISITIONM U Communications-Based Acquisition SystemsM U Data Logging SystemsM U Wireless Sensors, Transmitters, & ReceiversM U Signal ConditionersM U Data Acquisition SoftwareHEATERSM U Heating CableM U Cartridge & Strip HeatersM U Immersion & Band HeatersM U Flexible HeatersM U Laboratory HeatersENVIRONMENTALMONITORING AND CONTROLM U Metering & Control InstrumentationM U RefractometersM U Pumps & TubingM U Air, Soil & Water MonitorsM U Industrial Water & Wastewater TreatmentM U pH, Conductivity & Dissolved Oxygen InstrumentsM3572/1217。
上海奥马定位器说明书

上海奥马定位器说明书
1、首先你需要有一台GPS定位器硬件设备;
2、其次你需要一张物联卡或者手机卡,因为定位器是通过物联卡或者手机卡中的GPRS获取位置信息的,所以这个卡是必不可少的;
3、你需要登录平台或者安装手机APP查车软件,因为定位器获取位置之后,是需要通过软件在后台进行数据换算之后再通过地图的形式再软件中展现出来,能够让你对定位器当前位置一目了然;
4、定位器充电使用说明,定位器作为日常常用的定位装置,它的结构非常简单。
电池提供重力流量卡作为无线传输进行定位。
他的电池非常简单。
由干电池作为电池动力的提供。
充电时只需要将充电器的插头插入定位器的充电器。
经过四个小时左右的充电就可以充电完成。
5、如果按正面大绿色键,灯不亮,表示没有电自动关机了,请插上充电电源,并开机。
一般充电2-4个小时,就会充满。
可正常使用3天以上。
如果孩子语音较多,建议开通亲情号。
Omega 流量监测仪产品文档说明书

e-mail:**************For latest product manuals:Shop online atSeries FTB–1400-MD-LP FTB–1400-SD-LP FTB–1400-RD-LPFlow Monitor - Simplified VersionServicing North America:Servicing Europe:U.S.A.:Omega Engineering, Inc., One Omega Drive, P.O. Box 4047ISO 9001 Certified Stamford, CT 06907-0047Toll-Free: 1-800-826-6342Tel: (203) 359-1660FAX: (203) 359-7700e-mail:**************Canada:976 BergarLaval (Quebec), Canada H7L 5A1Toll-Free: 1-800-826-6342TEL: (514) 856-6928FAX: (514) 856-6886e-mail:*************For immediate technical or application assistance:U.S.A. and Canada:Sales Service: 1-800-826-6342/1-800-TC-OMEGA ®Customer Service: 1-800-622-2378/1-800-622-BEST ®Engineering Service: 1-800-872-9436/1-800-USA-WHEN ®Mexico:En Español: 001 (203) 359-7803FAX: (001) 203-359-7807**************.mxe-mail:*****************Benelux:Managed by the United Kingdom Office Toll-Free: 0800 099 3344TEL: +31 20 347 21 21FAX: +31 20 643 46 43e-mail:**************Czech Republic:Frystatska 184733 01 Karviná, Czech RepublicToll-Free: 0800-1-66342TEL: +420-59-6311899FAX: +420-59-6311114e-mail:*****************France:Managed by the United Kingdom OfficeToll-Free: 0800 466 342TEL: +33 (0) 161 37 29 00FAX: +33 (0) 130 57 54 27e-mail:**************Germany/Austria:Daimlerstrasse 26D-75392 Deckenpfronn, GermanyToll-Free************TEL: +49 (0) 7059 9398-0FAX: +49 (0) 7056 9398-29e-mail:*************United Kingdom:OMEGA Engineering Ltd.ISO 9001 Certified One Omega Drive, River Bend Technology Centre, NorthbankIrlam, Manchester M44 5BD EnglandToll-Free: 0800-488-488TEL: +44 (0)161 777-6611FAX: +44 (0)161 777-6622e-mail:**************.uk OMEGAnet ® Online Service Internet e-mail **************It is the policy of OMEGA Engineering, Inc. to comply with all worldwide safety and EMC/EMI regulations that apply. OMEGA is constantly pursuing certification of its products to the European New Approach Directives. OMEGA will add the CE mark to every appropriate device upon certification.The information contained in this document is believed to be correct, but OMEGA accepts no liability for any errors it contains, and reserves the right to alter specifications without notice.WARNING: These products are not designed for use in, and should not be used for, human applications.CONTENTSINTRODUCTION . . . . . . . . . . . . . . . . . . . . . . . . . . . . . . . . . . . . . . . . . . . . . . . . . . . . . . . . . . .4 SPECIFICATIONS . . . . . . . . . . . . . . . . . . . . . . . . . . . . . . . . . . . . . . . . . . . . . . . . . . . . . . . . . .6 OPERATING THE MONITOR . . . . . . . . . . . . . . . . . . . . . . . . . . . . . . . . . . . . . . . . . . . . . . . .7 BASIC PROGRAMMING MODE . . . . . . . . . . . . . . . . . . . . . . . . . . . . . . . . . . . . . . . . .7 PROGRAMMING . . . . . . . . . . . . . . . . . . . . . . . . . . . . . . . . . . . . . . . . . . . . . . . . . . . . . . .7 FTB–1400 Simplified 4-20 mA Programming . . . . . . . . . . . . . . . . . . . . . . . . .10 ADDITIONAL INPUT OPTIONS . . . . . . . . . . . . . . . . . . . . . . . . . . . . . . . . . . . . . . . . . . .12 TROUBLESHOOTING GUIDE . . . . . . . . . . . . . . . . . . . . . . . . . . . . . . . . . . . . . . . . . . . . .17 DEFAULT K-FACTOR VALUES . . . . . . . . . . . . . . . . . . . . . . . . . . . . . . . . . . . . . . . . . . . . .17 PART NUMBERING . . . . . . . . . . . . . . . . . . . . . . . . . . . . . . . . . . . . . . . . . . . . . . . . . . . . . .18 REPLACEMENT PARTS . . . . . . . . . . . . . . . . . . . . . . . . . . . . . . . . . . . . . . . . . . . . . . . . . . .183INTRODUCTIONThe FTB–1400 Flow Monitor is a state-of-the-art, digital signal processing flow monitor, designed to provide the user with exceptional flexibility at a very affordable price . Though designed for use with Omega FTB–1400 flow meters, this display can be used with almost any flow meter producing a low amplitude AC output or contact closure signal(s) .This flow monitor is capable of accepting a low-level frequency input for calculating flow rate and total . These calculations can then be displayed in the desired units of measurement . All FTB–1400 flow monitors come pre-calibrated, from the factory, if ordered with an Omega FTB–1400 Flow Meter . If required, however, it can easily be re-configured in the field . The monitor’s large 8 digit by .75" numeric liquid crystal display makes extend-ed range viewing practical . The second 8 digit by .38" alphanumeric display provides for selectable units viewing in run mode and prompts for vari-ables in program mode . Finally, the user can choose between displaying rate, total, or alternating between both rate and total .Figure 1: Flow Monitor Face4FEATURES• Displays Rate and/or Total• Large 0 .75 Inch, 8 Digit Display for Easy Viewing• Simple, Front Panel Programming• Various Mounting Styles Available• NEMA 4X Suitable for Outdoor Mounting• Intrinsically Safe• Microprocessor Based, Low Power Components• 4-20 mA Loop Powered• Automatic Decimal Point Locating• Lead Zero Blinking• Surface Mount Technology Use Throughout5SPECIFICATIONSPower Supply:4-20 mA loop powerPower Consumption:25 mA (maximum)Alphanumeric Rate and Total Display:8 digit, .75" high numeric display8 character, .38" high alphanumeric displayFixed or toggle modes of operation for flow rate and totalizer display Pulsed Output Signal:Outputs one pulse for each increment of the least significanttotalizer digitMax . Voltage: 30 VdcPulse Type: Opto-Isolated open collector transistorPulseWidthONState:***************************** Magnetic Pick-up Inputs:Frequency Range: 0 to 3500 HzTrigger Sensitivity: 30 mV p-pOver Voltage Protected: ±30 VDCFrequency Measurement Accuracy: ±0 .1%Temperature Drift: 50 ppm / ºC (max)Transient Overvoltages: Category 3, in accordance with IEC664 Pollution Degree: 2, in accordance with IEC664Mounting Classification:Meter Mount: NEMA 4X EnclosureRemote Mount: NEMA 4X EnclosureSwivel Mount: NEMA 4X EnclosureEnvironmental:Operating Temperature: -22 ºF to +158 ºF (-30 ºC to +70 ºC)Humidity: 0-90% Non-condensingUnits of Measure:Gallons, Oil Barrels, Liters, Cubic Meters, MGal, Cubic FT, MCF, MMCF Megltrs, Acre FT, Liq . Barrels, LBS, KGSTime Intervals: Day, Hour, Minute, Second6OPERATING THE MONITORThe monitor has two modes of operation referred to as the RUN mode and the PROGRAM mode . Both the run mode and the program mode display screen enunciators confirming the state of the monitor . A quick glance at the lower left hand corner of the LCD screen will confirm operating status . Normal operation will be in the RUN mode . To access the program mode, press the MENU button until the first programming screen is displayed . After programming the display with the necessary information, a lock out feature can be turned on to prevent unauthorized access or changing the meter’s setup parameters .BASIC PROGRAMMING MODEKeys:MENU – Switch between RUN and PROGRAM modesUP Arrow – Scrolls through programming sub-menus in forwarddirection and increments numeric variablesRIGHT Arrow – Scrolls through programming sub-menus in reverse direction and moves the active digit to the rightENTER – Used to enter sub-menus, save programming informationand in the reset processIf your monitor was ordered with an Omega flow meter, the two compo-nents ship from the factory calibrated as a set . If the monitor is a replace-ment, the turbine’s K-factor has changed, or the monitor is being used with some other pulse generating device, programming will be necessary . PROGRAMMINGEach turbine flow meter is shipped with either a K-factor value or frequency data . If frequency data is provided, the data must be converted to a K-factor before programming . K-factor information, when supplied, can usually be found on the neck of the flow meter or stamped on the body . The K-factor represents the number of pulses per unit of volume . The K-factor will be needed to program the monitor .ENTER PRO GRAM MO DE – Change to program mode by press-ing the MENU button once . The mode indicator will change from RUN to PROGRAM .78ton once . The current meter size number will begin to flash . Using the arrow keys, scroll through the size choices until you find the bore size ofyour meter . Press ENTER once to save the meter size choice .Rate / Total DisplayAndProgrammingKeys Mode IndicatorAndProgramming ChoicesFigure 2: Flow Monitor ControlsENTER THE METER’S K-FACTOR UNIT – Directly after the METER size is selected, the display’s K-factor unit must be chosen . Use the UP arrow key to select your K-factor unit . For meters calibrated in gallons, use PUL/GAL (pulses per gallon); for meters calibrated in cubic meters, use PUL/M3 (pulses per cubic meter), etc . Press ENTER to save the K-factorunit and advance to the next parameter .SELECT THE RATE/TOTAL UNITS OF MEASURE – The monitor allows the choice of five common rate/total units . The monitor shows the rate/ total unit that the display is currently set for . If the current selection is correct, press the ENTER key once to advance to the next parameter . To change to an alternate unit, use the arrow keys to scroll to the desiredrate unit and press ENTER to save the choice .SELECT THE DISPLAY FUNCTION – The monitor can display RATE or TOTAL or alternate between BOTH rate and total . At the DISPLAY prompt, press the ENTER key once . The monitor now shows the display mode currently in effect . If the current selection is correct, press the ENTER key to advance to the next parameter . To change to an alternate display mode, use the ar-row keys to scroll to the desired display mode and press ENTER to save the choice .A TEST function is also available in the Display Function sub-menu . With the test function selected, the display acts like a frequency counter and displays the raw input frequency being supplied to the frequency input terminals . This is very useful when troubleshooting flow problems .9TOTALIZER PULSE OUTPUT – The pulse output parameter can be either enabled or disabled . When enabled this output generates 20 mS duration pulse for every time the least significant digit of the totalizer increments . The amplitude of the pulse is dependent on the voltage level of the supply connected to the pulse output and is limited to a maximum 30 VDC . FTB–1400 SIMPLIFIED 4-20 MA PROGRAMMINGFLOW 4mA SETTING – When the loop powered option is ordered, the flow rate that corresponds to 4mA must be set . Zero is default flow rate for this setting . If the current selection is correct, press the ENTER key once to advance to the next parameter . If adjustment is required, use the RIGHT arrow key to select the position of the number you wish to change . Then use the UP arrow key to increment the number . Once you have completed this step, press the ENTER key to advance to the next parameter .FLOW 20mA SETTING – The flow rate that corresponds to 20mA must be set next . The turbine meter’s maximum flow rate is the default value .If the current selection is correct, press the ENTER key once to advance to the next parameter . If adjustment is required, use the RIGHT arrow key to select the position of the number you wish to change . Then use the UP arrow key to increment the number . Once you have completed this step, press the ENTER key to advance to the next parameter .4-20mA CALIBRATIO N – When ordered with a 4-20mA option, this menu item allows the fine adjustment of the 4-20mA output . The 4mA setting is typically between 35 and 50 . To set the 4mA value, connect an ammeter in series with the loop power supply . At the 4mA OUT prompt, adjust the 4mA value to obtain a 4mA reading on the amme-ter . The UP arrow key increments the value and the RIGHT arrow key decrements the value . When a steady 4mA reading is obtained on the ammeter, press the ENTER key to lock in this value and move to the 20mA adjustment . The 20mA adjustment is performed using the same procedure as the 4mA adjustment .4-20mA TEST – The monitor contains a diagnostic routine that allows the simulation of mA values between 4 and 20 to check output track-ing . At the 4-20TEST prompt the arrow keys change the simulated mA output in increments of 1mA . The ammeter should track the simulated mA output . If a 4-20mA test in not necessary, pressing the ENTER key once will escape the testing at any time .1011Figure 3: Typical Ammeter ConnectionPASSWO RD – Password protection prevents unauthorized users fromchanging programming information . Initially, the password is set to all ze-ros . To change the password, simply enter any 4 digit code using the arrow keys as previously described to enter the password value . Pressing ENTER once will store the password and take you back to the RST PSWD screen .RST PSWD – The reset password screen allows the operator to enter any 4 digit code for the manual reset totals function .RESET TOTAL – To reset the monitor total display, in RUN mode press the MENU and ENTER simultaneously until TOTAL RST starts to flash . The TOTAL RST will stop flashing and the display will return to the RUN mode at the conclusion of the reset procedure .STORE TOTAL – The current total can be manually stored in the monitor’s flash memory . Press and hold the ENTER key for 2 seconds . The display will respond with a flashing TOTALSVD and then return to the RUN mode .AUTOMATIC STORE TOTAL – The monitor is equipped with a store total feature that works automatically, saving the current total to flash memory . The frequency of saves depends on the power supply option chosen .Loop Powered: Once every ten minutes . ADDITIONAL INPUT OPTIONSThe FTB–1400 Flow Monitor is capable of receiving magnetic pick-up input (small signal sine wave) or a contact closure input (pulse) . Since Omega FTB–1400 Flow Meters utilize a magnetic pick-up, the monitor is shipped configured for magnetic pick-up input . To change to a contact closure in-put, remove JP2 from the top two pins and jumper them to the bottom two pins . See Figure 4 .+10 - 30 VDC+1 - 5 VDCFigure 4: Wiring Diagram12Figure 5: Basic Programming Menu13REMOTE DISPLAY14151SWIVEL MOUNTFigure 6: MOUNTING OPTIONSFigure 7: Installation Drawing 16TROUBLESHOOTING GUIDEDEFAULT K-FACTOR VALUES17PART NUMBERINGFTB–1400–X D–LPMounting StyleM -Meter MountR -Remote MountS -Swivel MountREPLACEMENT PARTS18Where Do I Find Everything I Need for Process Measurement and Control?OMEGA…Of Course!Shop online at SMTEMPERATUREThermocouple, RTD & Thermistor Probes, Connectors, Panels & Assemblies Wire: Thermocouple, RTD & Thermistor Calibrators & Ice Point ReferencesRecorders, Controllers & Process Monitors Infrared PyrometersPRESSURE, STRAIN AND FORCETransducers & Strain Gages Load Cells & Pressure Gages Displacement Transducers Instrumentation & AccessoriesFLOW/LEVELRotameters, Gas Mass Flowmeters & Flow Computers Air Velocity IndicatorsTurbine/Paddlewheel Systems Totalizers & Batch ControllerspH/CONDUCTIVITYpH Electrodes, Testers & Accessories Benchtop/Laboratory MetersControllers, Calibrators, Simulators & Pumps Industrial pH & Conductivity EquipmentDATA ACQUISITIONData Acquisition & Engineering Software Communications-Based Acquisition Systems Plug-in Cards for Apple, IBM & Compatibles Datalogging System sRecorders, Printers & PlottersHEATERSHeating CableCartridge & Strip Heaters Immersion & Band Heaters Flexible Heaters Laboratory HeatersENVIRONMENTALMONITORING AND CONTROLMetering & Control Instrumentation Refractometers Pumps & TubingAir, Soil & Water MonitorsIndustrial Water & Wastewater TreatmentpH, Conductivity & Dissolved Oxygen InstrumentsM-5299/0613☑☑☑☑☑☑☑☑☑☑☑☑☑☑☑☑☑☑☑☑☑☑☑☑☑☑☑☑☑☑☑☑☑。
TOA电子有限公司 AM-1 悬挂微机配件说明书

INSTALLATION MANUALAM-1 MOUNTING BRACKET HY-AM1B-Q with HEIGHT / ANGLE ADJUSTMENT HY-AM1W-Q 1. GENERAL DESCRIPTIONThe AM-1 mounting bracket with height and angle adjustment is an optional kit for mountingthe AM-1 Real-time Steering Array Microphone on the ceiling. The mount is available inBlack (HY-AM1B-Q) or White (HY-AM1W-Q).The HY-AM1x-Q includes:ADJUSTABLE BRACKET M4 SCREWS (X4) ADJUSTABLE POLEInstallation Notes:* Installation of the AM-1 with this product requires the use of MB-AM1B-Q (black) or MB-AM1W-Q (white) Microphone Bracket (sold separately).** The mounting screws and wall anchors are provided with the MB-AM1 Microphone Bracket.Suspended from Hard Ceiling:Step 1: Line up the bottom of adjustable pole to surface, mark hole locations and drill holes(1/4 inch (approx. 6mm) diameter) for plastic wall anchors.Step 2: Insert anchors from AM-1 Mounting Bracket into holes until flush.Step 3: Align pole flange on surface, use #10 flat head screws to secure in place by tightening screws. Step 4: Align AM-1 Microphone Bracket (not shown) to the angle adjusting bracket, use theM4 screws to secure the microphone bracket to the adjustable bracket.Step 5: Turn the knurled fastener on pole to adjust height and rotate bracket to proper orientation.After Microphone is installed use the thumb screw fasteners to adjust the angle.Step 6: With the Microphone Bracket secured, follow instructions from the AM-1 Microphone Bracket to install the Microphone to the mounting bracket (see step 8).*For suspended ceiling with drop-in tiles, it is highly recommended to use a backer panel support above the ceiling tile (1/4 inch MDF or equivalent) to assure structural stability. Also, recommend use of toggle bolts (drilling 5/8” holes) or appropriate fixing screws for >10lb weight load.END RESULT OF INSTALLKnurled FastenerThumb Screw。
海南曼姆全系产品介绍说明书

Heinemann®GJ1P Series Circuit BreakersDESCRIPTIONOptional Low-Voltage Shunt for Current MeteringEaton Corporation’s Cutler-Hammer series of Heinemann GJ1P breakers offer high quality circuit protection for DC applications from 100 to 1200 Amperes.Their precisely tailored time delays and ability to interrupt high currents makes them ideally suited for critical applications. On overloads exceeding 1000 – 1400% of rating, there is no intentional time delay and the breaker interrupts currents of as much as 25,000 A at 65V DC.An optional shunt (25 or 50millivolt full scale) permits metering of current. Since the shunt output is low voltage,light-gauge wiring can be used from shunt to meter.Indication may be displayed inpercent, watts, safe/danger or other dial calibrations. In addition, the busbar is available in two versions:Standard Size and Reduced Size. Contact your Eaton Sales Representative for more information.Precision Current Equalization (PCE) Circuit BreakersGJ1P breakers rated 250 to1200 A are built in parallel construction. Conventional parallel pole breakers can experience uneven current distribution because of variations in internalresistances. This condition can result in nuisance tripping since the higher current in one parallel branch has the same effect as an overload on the sensing element in that branch. Proprietary Precision Current Equalization (PCE)circuit breakers, on the other hand, allow for differences in internal resistances byautomatically distributing the current equally through the parallel current sensing elements, minimizing the danger of nuisance tripping.The UL listed series GJ1P (UL489) models are available in a choice of fast, medium or slow response times to accurately match load conditions. They can be ordered in “series trip ”, “mid-trip ” and “switch only ”constructions and are available front- or back-mounted, front- or back-connected, with optional auxiliary switches for signaling.HYDRAULIC-MAGNETIC BENEFITSThe magnetic/hydraulic load-sensing and time delaymechanisms used in GJ1P breakers are insensitive to changes in ambient or enclosure temperature.Therefore, GJ1P circuitbreakers are suited for service conditions encountered in telecommunications,transportation, air conditioning and other outdoor or “heat-loaded ” equipment.SPECIFICATIONSStandard Current Ratings:100, 125, 150, 175, 200, 225,250, 300, 350, 400, 450, 500,600, 700, 800, 900, 1000,1100, 1200 A.Standard Maximum Voltages:160V DC up to 700A65V DC from 701 to 1200A Breakers will be labeled with standard maximum (UL) voltage unless otherwise specified.Special Current Ratings:Any integral rating between 100and 1200 A DC. Consult factory for ordering information and metering shunt restrictions.Interrupting Capacities:UL Listed:10,000 A @ 160V DC 25,000 A @ 65V DC Non-UL:14,000 A @ 160V DC.Operating Temperature Range:-40°C to +85°C.Approximate Weight:1-pole (100-225A) 1.13kg (2.5lbs)2-pole (250-400A) 2.27kg (5lbs)3-pole (450-700A) 3.40kg (7.5lbs)4-pole (701-800A) 4.54kg (10lbs)5-pole (801-1000A) 5.67kg (12.5lbs)6-pole (1001-1200A) 6.80kg (15lbs)Weight may vary based on shunt and busbar.APPROVALSUL Listing:GJ1P breakers are UL listed per UL489. For CSA certification,consult application engineering.Description . . . . . . . . . . . . . .2Specifications . . . . . . . . . . . .2Approvals . . . . . . . . . . . . . . .2Time Delay Characteristics . . .3Dimensions . . . . . . . . . . . .4-5How to Order . . . . . . . . . . .6-7Additional Products. . . . . . . . .8TABLE OF CONTENTS PageHEINEMANN ®CIRCUIT BREAKERSGJ1P Series Circuit Breakers(100-1200 Amperes DC)2Heinemann is a registered trademark of the Eaton Corporation, Commercial Controls Business Unit.100150.01.001.1110100100010,000200300400500600700800900100011001200125C u rv e 1C u rv e 2C u rv e 3Current – Percent of Ampere RatingT r i p T i m e – S e c o n d sDC CURVES100150.01.001.1110100100010,000200300400500600700800900100011001200125Current – Percent of Ampere RatingT r i p T i m e – S e c o n d sINSTANT DELAY DC CURVE PPERCENT OF RATED CURRENT VS. TRIP DELAY AT 25ºCTIME DELAYCHARACTERISTICSTime delay, in all models,is inversely proportional to the magnitude of the overload, adjusting automatically to limit transient power to the load. On overloads exceeding 1,000 –1,400%, the circuit breaker trips without any deliberately imposed delay.Curve 1.Standard time delayis furnished unlessanother optional delay is specified. It is thepreferred characteristic for use where the load is composed of both resistive and inductive components.Curve 2.Medium time delayis for general usein mixed (inductive and resistive) circuits where the breaker rating is matched to the current carrying capacity of the mains.Curve 3.Short time delaypermits a very brief delay period before tripping.Curve P .Non-time delay breakersare available forapplications which cannot tolerate even brief transient overloads.These breakers have no time delay mechanism other than that imposed by the coil self-inductance and the inertia of the mechanism.Tripping specificationsThe time delay curves depict breaker response time vs. percent of rated load with no preloading.The function is plotted at an ambient temperature of 77°F (25°C) with the breaker in a vertical or wall-mounted position.Series GJ1P circuitbreakers will carry 100%of rated load continuously.Both time delay and non-time delay breakers may trip between 101%and 125% of rated load,and must trip at 125%and above.3% (sec)Delay 100%125%200%400%600%800%1000%Delay Max.1no trip 1100150206 1.7.065Delay Min.1no trip 110224 1.1.01.008Delay Max.2no trip 110153.8.28.055Delay Min.2no trip 12 2.5.5.18.01.008Delay Max.3no trip 10.8.19.08.047.038Delay Min.3no trip.44.13.03.015.01.008STANDARD FRONT-CONNECTED CONSTRUCTIONWire Range #6 to 250 MCM74.59(2.938)76.20(3.000)Aux. Terminals, Male Type Molex 02-09-2101, Model 1190-T(See Illustrations for Combinations)Shunt Terminals, Female TypeMolex 02-09-1101, Model 1189-T37.69(1.484)42.84(1.687)0.99 (0.390)71.42(2.812)#10-32 Inserts (4 Places)38.10(1.500)19.05(0.750)19.05(0.750)6.35 ± 0.38(0.250 ± 0.156)6.35 ± 0.38(0.250 ± 0.156)Panel Mounting Hole Distance for #10-32LINELOAD 75.38(2.968)5.53(0.218)59.91(2.359)32.13(1.266)5.53(0.219)“D ” Type Terminals as Shown180.97(7.125)41.27(1.625)4.74(0.188)58.67(2.313)41.27(1.625)41.27(1.625)263.52(10.375)29.36(1.156)7.14(0.281)78.56(3.094)59.13(2.328)28°±5°32°±5°ONOFFSee Optional Terminal ConfigurationWire Range #6to 250 MCM41.27(1.625)36.49(1.437)38.10(1.500)100 – 22 A250 – 400Width dimensions are as follows:100 – 225 38.1 (1.5)250 – 400 A 76.2 (3.0)450 – 700 A 114.3 (4.5)701 – 800A 142.4 (6.0)801 – 1000A 190.5 (7.5)1001 – 1200A228.6 (9.0)28.95(1.141)46.40(1.828)22.22(0.875)Fastener Mounted ThisSide of Bus Plate,Terminals are Front-Connected and Unit is Rear-Mounted.Fastener Mounted This Side of Bus Plate, Terminalsare Back-Connected and Unit is Panel-Mounted.60.32(2.375)7.92(0.312)3/8-16UNC -2B (4 per Unit)38.10(1.500)225.43 (8.875)Center to CenterOptional Terminal ConfigurationsHEINEMANN ®CIRCUIT BREAKERSGJ1P Series Circuit BreakersDIMENSIONSDimensions are given here only as a preliminary guide to specifying. Final engineeringdrawings should be made from the latest Heinemann drawings. Contact Customer Service Center.Tolerance:±0.79 (0.031) except where noted. For metric threads, contact Customer Service Center.DIMENSIONS APPROXIMATE IN MM (INCHES)431.75(1.250) Min.41.65(1.641) Max.19.05(0.750)7.51(0.297)7.51(0.297)7.51(0.297)16.66(0.656)Typ.29.36(1.156)29.36(1.156)48.41(1.906)48.41(1.906)67.46(2.656)67.46(2.656)38.10(1.500)38.10(1.500)38.10(1.500)38.10(1.500)19.05(0.750)19.05(0.750)19.05(0.750)22.23(0.875) Min.321.31(12.65) Max.78.96(3.109)Min. Typ.5.15(0.203)Dia. Typ.C100 – 225 A Ratings 226 – 400 A Ratings401 – 700 150A RatingsBA106.75(4.203)Typ.C LC L C L FRONT MOUNTING PANEL AND SUPPORT BRACKET115.08(4.531)76.98(3.031)38.1(1.500)38.1(1.500)71.42(2.912)5.94(0.234)Ref.5.15(0.203)Typ. Dia.65.02(2.562)59.13(2.328)(3-Pole)3PoleC L C L C L Holes Required When Breaker Is Front-Mounted2Pole1PoleAB C (2-Pole)(1-Pole)38.88(1.531)19.43(0.765)Mounting kits containing clips, brackets and necessary hardware and instructions are available (consult factory).009-18234 100 – 225 A 1.5 (1-pole wide)009-18235 250 – 400 A 3 (2-pole wide)009-18232 450 – 700 A 4.5 (3-pole wide)For 701-1200A devices, contact your Eaton Sales Representative for mounting kit part numbers.See Step (2)See Step (5)BACK MOUNTING CIRCUIT BREAKERBack mounting circuit breaker mounting instructions 1. Position circuit breaker to support brackets.2. Place mounting bracket in recess on front top portion of circuit breaker.3. Install four (4) #10-32 by 3-1/4" long screws through holes in mounting bracket and support structure.4. Install lock washer and nut on each of the screws and tighten.5. Place mounting bracket on front lower portion of circuit breaker.6. Install two (2) #10-32 by 5/8" screws through holes in mounting bracket and support structure.7. Repeat step 4.5DIMENSIONS APPROXIMATE IN MM (INCHES)NOTE: Standard size busbar is shown above. For the reduced size busbar, contact your Eaton Sales Representative for mounting dimensions.Series PrefixGJ1PSwitch (No Coil)Series Trip w/SPDT Aux. SwitchSeries Trip Series Trip and Mid-Trip Series Trip, Mid-Trip and SPST Alarm SwitchTerminal Location Back FrontInternal Circuit Metering ShuntNo Shunts Metering Shunt Metering ShuntB HCodeLocationInternal CircuitCodeDescriptionShuntCode—25mV 50mVP M N0-2-3-98-99-Series Prefix GJ1PTerminal LocationBInternal Circuit3-Metering ShuntPAdd each appropriate Number or Letter …HEINEMANN ®CIRCUIT BREAKERSGJ1P Series Circuit BreakersHOW TO ORDER — Series GJ1PTo determine your Complete Catalog Number , you must start with appropriate Series Prefix and add the appropriate Code Letters and/or Numbers as in the example below:SELECTION TABLE61Multi-pole construction – Consult factory.An auxiliary switch, if supplied, will be located in the right pole space. If the auxiliary switch is supplied in a breaker which has a metering shunt, it will be single-pole single throw (SPST). The single-pole double throw (SPDT) auxiliary switch can be supplied only in a breaker without a metering shunt.2Cannot be used on breaker containing metering shunt.3Only for breakers rated in excess of 250 A. Breakers up to 250 A without meteringshunt are available as standard GJ1 type breakers. Please consult Series GJ catalog.MarketUL-489TerminalsSolderless Connector Bus Bar ConnectionStandard Current Ratings 1AmpereTrip Curve 1123P0 – 1200(Add 0 before amp rating if less than 1000A.Example: 0700)-01-02-03-0PDescriptionCodeDEDUStandardCodeCurveCodeComplete Catalog Number: GJ1PB3-PEDU0700-02Terminal ConfigurationEUS/European ApprovalDUStandard Current Ratings 10700Trip Curves 1-024Add 0 before amp rating if less than 1000. For example: a 700A rating would bedesignated as 0700.The width of the breaker is determined by the current rating:100 – 225 A 1.5” (1-pole wide)250 – 400 A 3” (2-pole wide)450 – 700 A 4.5” (3-pole wide)701 – 800A 6” (4-pole wide)801 – 1000A 7.5” (5-pole wide)1001 – 1200A 9” (6-pole wide)5See page 3 for time delay characteristics and trip curve information.7© 2001 Eaton Corporation All Rights Reserved Printed in USAForm No. BR5401SE0002A / CSS 65322June 2001Commercial ControlsFor the Widest Selection of Circuit Protection, from 0.01 to 1200 Amperes, Look to Eaton.。
非标设备说明书范本

太阳花丝压入操作规程第 1 章安全1-1内容提供:测电笔,万用表及设备操作手册。
表现:指出安全装置的位置(EMO,总电源开关,气源总开关阀) 。
描述当设备维护或运行时如何安全预防。
1-2安全装置的功能1-3 潜在危险当危险发生时,应立即按下紧急停止按钮(EMO),使机器停止运动。
1-4 安全预防1-4-1 机械方面对设备进行操作时,一定要参考操作手册穿着合适的工作服。
操作或者维修设备的时候不要戴领带,项链或宽松的衣服。
穿着必需的保护装置。
例如:手套、无边帽、护目镜等。
自律和服从管理者的安排。
操作设备之前,要考虑操作的步骤。
不要屏蔽安全互锁,除非你是有资格的人员。
在设备旁演示任何操作的操作之前,总是要先停止所有的活动的部件。
1-4-2 电气方面设备的电源和接线端总存在电气危害。
为了避免任何的触电和死亡的事故发生,在维护设备时,要先切断主电源。
并且只有有资格或经过训练的维护人员来维护和维修设备。
在维修电气线路之前一定要关闭主电源。
在电气箱内做任何修护之前请关掉主电源,严禁带电操作。
只有经过训练的人员才允许带电维护或调整。
检查并且确定设备/ 系统已经正确地接地。
一般的维护将不仅仅保证稳定和可靠的操作,也会延长设备的使用寿命。
对设备/系统进行任何操作或修护时,标准安全程序应该被严格的执行。
这样可以避免任何的不必要的意外事故发生。
了解并记住所有的安全装置的位置例如 EMO , MCB, RCCB 等。
1-4-3 Lockout / Tag-out 程序Lockout:当维护设备的时候,要用 LOCKOUT 装置锁住设备的主电源开关以防止其它人员通断设备的电源。
Tag-out:在设备的周围放置必须的,明显的 Tag-out 标志来通知人附近的每个人设备正在维护当中。
Tag-out 标志必须具有以下信息:一.修护设备人员的姓名。
二.部门名称。
三.必需的危险警告。
第 2 章操作原理2-1 内容提供:纸、笔、设备运行流程图。
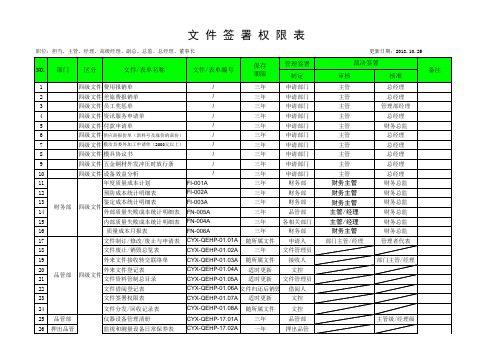
公司文件签署权限表
50
外被押出制程检验记录表
QA-MAG-002.16A
51
冲压IPQC巡检记录表
QA-MAG-002.17A
52 品管部
制程巡检日报表(W/H.R/C)
QA-MAG-002.18A
53
FQC检验日报表
QA-MAG-003.01A
54 押出品管
线材成品检验报告
QA-MAG-003.02A
55
零件/成品尺寸测量报告
备注
NO. 部门 区分
文件/表单名称
文件/表单编号
57
重工需求单
QA-MAG-005.01A
58 品管部
59
停线(开线)通知单 量测/实验申请表
QA-MAG-007.01B QA-MAG-008.01A
60
实验室记录表
QA-MAG-008.02A
61
盐雾试验盐水配比登记表
QA-MAG-008.03A
18
文件废止/销毁总览表
CYX-QEHP-01.02A
三年
文件管理员
19
外来文件接收转交联络单
CYX-QEHP-01.03A 随所属文件 接收人
20
外来文件登记表
21 品管部 四级文件 文件资料管制总目录
CYX-QEHP-01.04A CYX-QEHP-01.05A
适时更新 适时更新
文控 文件管理员
二年
培训部门
108
员工满意度调查表
CYX-QEHP-06.08A
三年
管理部
109
员工满意度调查分析报告
CYX-QEHP-06.09A
三年
管理部
110
员工入职教育卡
AM AE系列智能型角行程电动执行机构 说明书

AM/AE系列智能型角行程电动执行机构 使 用 说 明 书一、产品用途AMR/AER 系列一体化智能型电动执行器是采用先进的智能数字控制技术,无需另外配置反馈单元和伺服放大器,可直接接收工业控制仪表或计算机输出的4-20mA.信号,对各种工业球阀、蝶阀或转动装置实现0-90°范围内准确位置定位和控制。
该产品不仅提高了电动执行机构位置控制的精度,而且实现了小型化、智能化、一体化(控制器与执行机构合为一体)。
与传统的电动执行机构相比,具有体积小、重量轻、扭矩大、精度高、功能强、性能可靠、运转成本低、不需维护保养等特点,可广泛应用于电站、石油、化工、冶金、医药、轻工等行业。
产品分为普通型和防爆型,两者外型安装尺寸相同.适用于含有IIC 类爆炸性气体环境中,温度级别为CT6。
二、规格与型号本产品有开关式和调节式两大系列。
开关式电动执行机构主要用于两位式位置定位和控制,无需配置EVP 系列智能控制器。
调节式电动执行机构主要用于连续角位移转动,在0-90°范围内任意位置的定位和控制,要求配置EVP 系列智能控制器。
产品具体规格和型号分别见表1和表2开关式电动 执行机构型号 AER-10AER-25 AER-60 AER-160 AER-250 AER-400 AER-600 输出轴力矩(N.m) 1002506001600250040006000调节式电动*普通调节型可选配红外遥控型智能控制器(内置式)防爆调节型可选配远红外智能控制器(外置式)。
三、主要技术性能·电 源:交流220V±10%,50Hz60Hz ·控制精度:0.5%-3.1%可设·输入信号:4-20mA DC 或1-5V DC ·输入阴抗:200Ω·位置反馈信号:光电隔离输出4-20mA DC 对应执行机构全闭至全开或全开至全闭 ·位置反馈电阻:500Ω-1KΩ ·定位方式选择:手动自动·作用方式选择:正作用/反作用 ·自动定位标定:全开/全闭 ·开关触点容量:交流250V,4A·安全位置选择:输入信号故障时电动执行机构所处位置可选为全开/停止/全闭执行机构型号 AMR-10 AMR-25 AMR-60 AMR-160 AMR-250 AMR-400 AMR-600 输出轴力矩(N.m)1002506001600250040006000·保护功能:内置过热保护器,同时具有软件、电气和机械三重限位保护。
- 1、下载文档前请自行甄别文档内容的完整性,平台不提供额外的编辑、内容补充、找答案等附加服务。
- 2、"仅部分预览"的文档,不可在线预览部分如存在完整性等问题,可反馈申请退款(可完整预览的文档不适用该条件!)。
- 3、如文档侵犯您的权益,请联系客服反馈,我们会尽快为您处理(人工客服工作时间:9:00-18:30)。
□外购
□其它
完成: 年作 二:机台动 单作 位 回 复 栏
三:具体说 明
委托单位
执行单位
部
经
门
办
主
管
责 任 人
记录流转:自动化→委托部门主管审核→部门主管审核→自动化
保存部门:自动化
保存期限:三年
部 门 主 管
表单编号:AM-MAG-001.04A
产品名称
产品料号
□简易治具
设备形式
□治具 □半自动机
□自动机
BBBB电子有限公司
设备规格说明书
委托日期 需求日期
制作目的
□提升品质 □新开发 □追加复制
□提升产能 □增加料号 □其它
设备名称
设备编号
开发形式 开发日程预 估 设备费用预 估 规格说明: 一:机台功
□自制 开始: RMB
□委外设计/制造 年月日