GCM说明书
白色GCM34VW20M冰箱说明书

Serie | 6, chest freezer, White, White GCM34VW20M Freezer with 419 l gross capacity, provides additional storage capacity for frozen food.XXL size: provides much more space for your food.Technical DataProduct category : Chest freezerBuilt-in / Free-standing : Free-standing Color / Material body : White Frost free system : No Climate class : SN-T Width of the appliance : 1416Depth of the product : 750Dimensions of the packed product (HxWxD) (mm) :885 x 778 x 1449Warning signal / malfunction : No signal Defrost process : manual Number of freezing flaps (Stck) : 0Lockable door : No Light : Yes Length electrical supply cord (cm) : 170Door hinge : Other Net weight (kg) : 56.700Gross weight (kg) : 63.0Multi-Flow Air Tower : No Number of compressors : 1Number of independent cooling systems : 1Economy setting : No Fast freezing switch : No Door bin adjustability - Freezer : No Tilt-out door bins in freezer : No Door bin adjustability - Freezer : No Reversible Door Hinge : No Connection Rating (W) : 131Frequency (Hz) : 50Approval certificates : CE Main colour of product : White Installation typology : N/A Noise level (dB) : 44Energy Star Qualified : No Approval certificates : CE Plug type : GB plug Required cutout/niche size for installation (in) : x x Dimensions of the packed product (in) : 34.84 x 57.04 x 30.62Net weight (lbs) : 125.000Gross weight (lbs) : 139.000'!2E 20A F -b f j d b e !1/3Serie | 6, chest freezer, White, WhiteGCM34VW20MFreezer with 419 l gross capacity, providesadditional storage capacity for frozen food.Performance and consumption-Total capacity: 419 litres-Airborne acoustical noise emissions: 44 dB dB(A) re 1 pWDesign-LED Illumination-Counterbalanced lid-YesComfort and Safety-Mechanical controlFreezer Section-Freezer capacity: 419 litres-Freezing capacity: 19 kg in 24 hours-Storage time in power failure: 50 Hours-Removable dividing wall, which can be used for collectingdefrosted waterDimensions-Dimensions: H 82.5 cm x L 141.6 cm x D 75 cmTechnical Information-Climate Class SN-T-Connection load: 131 W-Rated Voltage 220 - 240 VAccessoriesCountry Specific Options-Gross capacity, total: 419 l-Gross capacity**** freezer: 419 l (-18°C and below)-Based on the results of the standard 25-hour test. Actualconsumption depends on usage/position of the appliance.2/3Serie | 6, chest freezer, White, WhiteGCM34VW20M3/3。
AgilentGCMS操作说明书

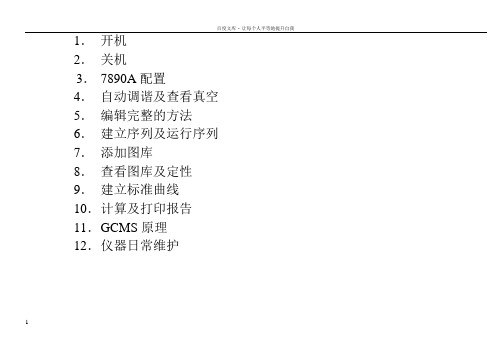
AgilentGCMS操作说明书12020年4月19日1.开机2.关机3.7890A配置4.自动调谐及查看真空5.编辑完整的方法6.建立序列及运行序列7.添加图库8.查看图库及定性9.建立标准曲线10.计算及打印报告11.GCMS原理12.仪器日常维护2 2020年4月19日GCMS开机程序1.打开载气(He)瓶,并把减压阀出口压力调到0.5MPa2.打开电脑电源,并进入windows操作系统.3.打开GC电源.再打开MS电源(第一次开机或已放空的情况下,要在推压侧板况态下打开MS电源)如果是MS部分不漏气的话,分子涡轮泵的速度会很快升上去的.不然就说明是漏气.要关MS再重新再开.4.双击电脑桌面上的图标.打开GCMS工作站.5.调出用户户建立的方法:3 2020年4月19日6. 方法调出后,仪器会进入用户方法所设定的参数状态.待仪器稳定后就能够建立序列,并进行样品检测.GCMS关机程序1.首先回到工作站主介面:4 2020年4月19日2.“视图”--->“调谐和真空控制”--->“真空”--->“放空”此时仪器将会把MS中的分子涡轮泵速度降下来.并把所有的加热源停止加热.令其温度降下来.5 2020年4月19日当分子涡轮泵速度<50% ,所有加热部分温度<100度时.就说明仪器达到关机状态。
6 2020年4月19日3.先关闭电脑中的仪器工作站软件。
4.关闭MS电源,关闭GC电源。
7890A配置我们要对仪器进行正确的配置。
因为仪器是不可能正确识别我们用的气是什么气体,还有就是毛细管柱里的气体流量和气压是经过计算得出来的。
如果不正确的配置会令到仪器得不到正确的参数,以致于仪器会认为仪器自已有问题。
7 2020年4月19日毛细管的配置:我们要正确配置毛细管柱的参数。
毛细管柱里是没有流量计和压力计的,它里面的压力和流量半不是测出来的,而是经过进样口中其它的几个参数计算出毛细管柱中的压力和流量的。
Caterpillar 950GC-M 移动构建机型号说明书

Safe and Comfortable• Improved ingress/egress with a totally redesigned cab withfl ip up armrest• Keep your operators informed about machine conditions and operation with VIMS™ 3G machine monitoring system• Safety and visibility enhanced with optional rearview camera • Preferred temperature settings maintained with automatic climate control• Operator productivity enhanced with new membrane switch panels, keyed ignition and E-H parking brake switch• Improved comfort with low operator sound levels• Improved spectator sound levels and optional low sound packages • New angled stairway provides safe accessibility to the cab and key service pointsEasy to Service• Easier access and in a controlled environment, electronics bayis located inside the cab• Focused on safety with ground level or platform accessto most major components• Ground level emergency shutdown, battery disconnect, stairway light switch• Quick visual inspection and minimize fl uid contamination with sight gauges for coolant, transmission, and hydraulic oil• Electronic air inlet restriction indicator• Designed for ease of service and inspection–Swing out fuel, hydraulic oil coolers and condenser–Centralized grease points Built for Production, for Your Effi ciency• Powerful, responsive, fuel-effi cient Cat® C15 engine withACERT™ Technology• Reliable performance, long life, low emissions• High productivity and excellent fuel effi ciency• Meets U.S. EPA Tier 4 Final/EU Stage IV emission standards or meets U.S. EPA Tier 3/EU Stage IIIA equivalent emission standards.• Tier 4 Cat Clean Emissions Module contains a Diesel Oxidation Catalyst, Diesel Particulate Filter and Cat Regeneration System, utilizing SCR technology• Regeneration is completely automatic and does not interruptthe machine’s work cycle• Increase productivity, effi ciency, and consistency with innovative Cat Compaction Control technology• Experience maximum responsiveness and control withSteering and Transmission Integrated Control System (STIC™)• Conserve more fuel with the automatic engine and electrical system shutdown• Transfer more power to the ground and optimize fuel effi ciency with the lock up torque converter• Achieve greater momentum on grades and fuel savings by carrying that momentum through the shift points with the all new Single Clutch Speed Shifting (SCSS) transmission controls• Operators experience less fatigue with throttle lock to maintainengine speedCat® 825K Soil Compactor AEXQ1159© 2014 Caterpillar • All Rights Reserved • Printed in USACAT, CATERPILLAR, BUILT FOR IT, , their respective logos, “Caterpillar Yellow” and the “Power Edge” trade dress, as well as corporate and product identity used herein, are trademarks of Caterpillar and may not be used without permission.Cat 825K Soil CompactorEngine ModelCat C15 ACERTMeets U.S. EPA Tier 4 Final/EU Stage IV emission standards or meets U.S. EPA Tier 3/EU Stage IIIA equivalentemission standards.Rated Power (Net SAE J1349)302 kW 405 hp Rated Power (Net ISO 9249)302 kW 405 hp Gross Power 324 kW435 hpNet PowerDirect Drive – Gross Power 307 kW 412 hp Converter Drive – Gross Power 324 kW 435 hp Maximum ‘Net’ Torque @ 1,300 rpm 2005 N∙m 1,478.8 lbf-ft Max Altitude w/out Derating (Tier 4 Final/Stage IV Equivalent)2834 m 9,298 ft Max Altitude w/out Derating (Tier 3/Stage III Equivalent)2773 m 9,098 ft Bore 137.2 mm 5.4 in Stroke 171.4 mm 6.7 in Displacement15.2 L927.6 in 3ForwardReverse First 5.5 km/h 3.4 mph 6.2 km/h 3.9 mph Second 9.7 km/h 6.0 mph 11.1 km/h 6.9 mph Third17.2 km/h10.7 mph19.7 km/h12.2 mphMain Relief Pressure 24 100 kPa 3,495 psi Bore 120 mm 4.7 in Stroke1070 mm42.1 inSteering System – Circuit Double Acting – End MountedVehicle ArticulationAngle 86°Front Planetary – Fixed RearPlanetary – OscillatingOscillation Angle±8°Diameter with Tips 1672 mm 5 ft 5.8 in Drum Diameter 1299 mm 4 ft 3.1 in Drum Width1125 mm3 ft 8.3 inCooling System 116 L 30.6 gal Engine Crankcase 34 L 9.0 gal Transmission 66 L 17.4 gal Fuel Tank782 L 206.6 gal Diesel Exhaust Fluid Tank(Tier 4 Final/Stage IV Equivalent)32 L 8.5 gal Differentials and Final Drives – Front 100 L 26.4 gal Differentials and Final Drives – Rear 110 L 29.1 gal Hydraulic Tank Only134 L35.4 galAll non-road U.S. EPA Tier 4 Final, EU Stage IV, and Japan 2014 (Tier 4 Final)diesel engines are required to use:• U ltra Low Sulfur Diesel (ULSD) fuels containing 15 ppm (mg/kg) sulfur or less. Biodiesel blends up to B20 are acceptable when blended with 15 ppm (mg/kg) sulfur or less ULSD and when the biodiesel feedstock meets ASTM D7467 specifi cations.• C at DEO-ULS™ or oils that meet the Cat ECF-3, API CJ-4, and ACEA E9 specifi cations are required.• D iesel Exhaust Fluid (DEF) that meets all requirements defi ned in ISO 22241-1.Operating Weight35 528 kg78,326 lbHeight to Top of Hood 3162 mm 10 ft 4.5 in Height to ROPS/Canopy 4059 mm 13 ft 3.8 in Height to Top of Cab with Strobe 4381 mm 14 ft 4.5 in Ground Clearance to Bumper810 mm 2 ft 7.9 in Center Line of Rear Axle to Edge of Counterweight 2830 mm 9 ft 3.4 in Hitch to Center Line of Front Axle 1850 mm 6 ft 1 in Wheelbase3700 mm 12 ft 2 in Length with Blade on Ground (straight blade) – Blade at Wheel Tip Plane8561 mm 28 ft 1 in Length with Blade on Ground (straight blade) – Blade at Wheel Drum Plane8586 mm 28 ft 2 in Ground Clearance to Trunnion 450 mm 1 ft 5.7 in Ground Clearance to Hitch 492 mm 1 ft 7.4 in Width over Wheels3650 mm 11 ft 11.7 in Turning Radius – Inside of Pusharms 2627 mm 8 ft 7.4 in Turning Radius Blade – Inside3103 mm 10 ft 2 in Turning Radius Blade – Outside 7300 mm 23 ft 11 in Width over End Bits (straight blade)4628 mm 15 ft 2.2 in Maximum Depth of Cut (straight blade)602 mm 1 ft 11.7 in Maximum Lift above Ground (straight blade)958 mm 3 ft 1.7 in Capacity, Rated (straight blade)3.73 m 34.88 yd 3。
AgilentGCMS操作说明书
AgilentGCMS操作
说明书
1
2020年4月19日
1.开机
2.关机
3.7890A配置
4.自动调谐及查看真空
5.编辑完整的方法
6.建立序列及运行序列
7.添加图库
8.查看图库及定性
9.建立标准曲线
10.计算及打印报告
11.GCMS原理
12.仪器日常维护
2 2020年4月19日
GCMS开机程序
1.打开载气(He)瓶,并把减压阀出口压力调到0.5MPa
2.打开电脑电源,并进入windows操作系统.
3.打开GC电源.再打开MS电源(第一次开机或已放空的情况下,要在推压侧板况态下打开MS电源)如果是MS部分不漏气的话,分子涡轮泵的速度会很快升上去的.不然就说明是漏气.要关MS再重新再开.
4.双击电脑桌面上的图标.打开GCMS工作站.
5.调出用户户建立的方法:
3 2020年4月19日
6. 方法调出后,仪器会进入用户方法所设定的参数状态.待仪器稳定后就能够建立序列,并进行样品检测.
GCMS关机程序
1.首先回到工作站主介面:
4 2020年4月19日
2.“视图”--->“调谐和真空控制”--->“真空”--->“放空”
此时仪器将会把MS中的分子涡轮泵速度降下来.并把所有的加热源停止加热.令其温度降下来.
5 2020年4月19日
当分子涡轮泵速度<50% ,所有加热部分温度<100度时.就说明仪器达到关机状态。
6 2020年4月19日。
AgilentGCMS操作说明书
1.开机2.关机3.7890A配置4.自动调谐及查看真空5.编辑完整的方法6.建立序列及运行序列7.添加图库8.查看图库及定性9.建立标准曲线10.计算及打印报告11.G CMS原理12.仪器日常维护1GCMS开机程序1.打开载气(He)瓶,并把减压阀出口压力调到0.5MPa2.打开电脑电源,并进入windows操作系统.3.打开GC电源.再打开MS电源(第一次开机或已放空的情况下,要在推压侧板况态下打开MS电源) 如果是MS部分不漏气的话,分子涡轮泵的速度会很快升上去的.不然就说明是漏气.要关MS再重新再开.4.双击电脑桌面上的图标.打开GCMS工作站.5.调出用户户建立的方法:26. 方法调出后,仪器会进入用户方法所设定的参数状态.待仪器稳定后就可以建立序列,并进行样品检测.GCMS关机程序1.首先回到工作站主介面:32.“视图”--->“调谐和真空控制”--->“真空”--->“放空”此时仪器将会把MS中的分子涡轮泵速度降下来.并把所有的加热源停止加热.令其温度降下来.当分子涡轮泵速度<50% ,所有加热部分温度<100度时.就说明仪器达到关机状态。
43.先关闭电脑中的仪器工作站软件。
4.关闭MS电源,关闭GC电源。
57890A配置我们要对仪器进行正确的配置。
因为仪器是不可能正确识别我们用的气是什么气体,还有就是毛细管柱里的气体流量和气压是通过计算得出来的。
如果不正确的配置会令到仪器得不到正确的参数,以致于仪器会认为仪器自已有问题。
6毛细管的配置:我们要正确配置毛细管柱的参数。
毛细管柱里是没有流量计和压力计的,它里面的压力和流量半不是测出来的,而是通过进样口中其它的几个参数计算出毛细管柱中的压力和流量的。
所以毛细管柱的参数必须要正确设置。
789101112自动调谐1314查看真空1516编辑完整的方法171819202122232425262728建立序列2930运行序列3132添加图库1.设定PBM图库332.选择谱库34353.选择结构库363738查看谱图及定性3940414243快捷定性444546建立标准曲线1.首先调出数据采集的方法。
GCM16和GCM32全球控制管理器产品指南说明书

GCM16 and GCM32 Global Console ManagersProduct GuideThe Global 2X2X16 Console Manager (GCM16) and Global 4X2X32 Console Manager (GCM32) are the next generation digital keyboard-video-mouse (KVM) console managers that provide KVM-over-IP and serial console management technology in a single appliance. Either console lets you access and manage all servers remotely, even to the system BIOS, using your existing IP infrastructure.The GCM16 has 16 target ports and supports up to 2 local users and 2 remote users, and the GCM32 has 32 target ports and supports up to 2 local users and 4 remote users. Figure 1 shows these two models.Figure 1. The Global Console Managers: GCM16 (top) and GCM32 (bottom)Did you know?The GCM16 and GCM32 Global Console Managers provide enhanced remote management, access, and security capabilities with out-of-band access to servers, network equipment, and other devices with serial configuration or console ports all from a single appliance. This unified approach improves staff efficiency by reducing the time required to remotely diagnose, reconfigure, repair, or restore servers as well as network devices and other hardware with serial configuration or management consoles, or both.The serial capabilities of these appliances enable connecting and managing nearly any device with a serial port directly from the console manager, including switches, routers, and PDUs. SSH and Telnet connections are supported.Click here to check for updatesFeature comparisonThe GCM16 and GCM32 replace the GCM2 Global Console Manager. Table 2 compares the console switches.Table 2. Comparison of featuresFeature GCM16GCM32Model1754D1X1754D2XNumber of local concurrent users22Number of remote concurrent users24Local user connections - KVM VGA + 2x USB VGA + 2x USBLocal user connections - total USB 4 (including 2 for K & M) 4 (including 2 for K & M) Maximum number of target systems - Direct (ARI ports)1632Maximum number of target systems - Daisy-chained256512Maximum number of target systems - Tiered configuration1024 (2 levels)1024 (2 levels)Maximum video resolution1600 x 1200 standard1680 x 1050 widescreen 1600 x 1200 standard 1680 x 1050 widescreenUser interface Web GUI (local andremote)Web GUI (local and remote)Manage remotely with Virtual Console Software (VCS)Yes Yes Manage remotely with Avocent DSView Yes*Yes* Keep Alive feature in Conversion Options Yes YesIPV6 support Yes Yes User Authentication via user database in console switch Yes Yes User Authentication via remote LDAP server Yes Yes AES encryption Yes Yes Manage serial devices Yes Yes Manage intelligent power devices Yes Yes Smart Card or Common Access Card support Yes Yes Support for Virtual Media Conversion Option Gen2, VCO2(46M5383)Yes Yes Support for Serial Conversion Option, (SCO) 46M5382Yes Yes Virtual media Yes Yes Tiering Yes Yes Gigabit Ethernet (10/100/1000 Mbps)Yes (2)†Yes (2)†Serial port Yes Yes Modem port for out-of-band access Yes Yes Firmware upgrades to the console switch Yes Yes Firmware upgrades to the COs Yes YesInput power100-240V, 50/60 Hz18 W power 100-240V, 50/60 Hz 24 W powerRedundant power supplies Yes Yes * Avocent DSView management software available directly from Vertiv† Ethernet ports are redundant for increased availabilityConnectionsConnectionsFigure 2 shows the connections on the GCM32 Global Console Manager. The GCM16 Global Console Manager has identical connections except it only has 16 ARI ports, whereas the GCM32 has 32 ARI ports.Figure 2. Connections on the GCM32 Global Console ManagerNote: Figure 2 shows the rear of the unit. There are no connectors on the front of the unit.FeaturesDetails about the features of the GCM16 and GCM32 are as follows:Number of local concurrent users:The GCM16 and GCM32 console switches enable one or two local user to access any attached servers. If the target device is currently in use, the user attempting to gain access will be given an opportunity to force a connection to the device if their preemption level is equal to or higher than the current user’s level. If the user attempting to gain access has a lower preemption level, the active user will be asked if they wish to give up control to the new user (a timeout is also configurable).The GCM16 and GCM32 both support two independent local users as shown in Figure 3. One local user attaches to the VGA and USB ports on the console switch as shown in Figure 2. The second local user attaches to a tiered (slave) console switch (see "Tiered consoles" below for more information). These two ports are independent of one another (that is, not pre-emptive or shared). This configuration allows you to place a console in every rack, for local connectivity to those servers complete with local KVM access, plus tier up to a master console that has local KVM access to all the servers attached to all attached console switches.Figure 3. Two local users in a tiered configurationLocal user connections:Local displays are connected to the console switch using VGA analog connections. Keyboard and mouse must be USB attached and two USB ports are provided for this purpose. Two additional USB ports are provided for the attachment of devices such as optical drives or memory keys. These devices can be made available on remote target systems provided Virtual Media Conversion Options are used to connect to those target systems. Note, however, that the Virtual Media Conversion Option does not support chaining of target systems.Target systems:The GCM16 has 16 target system ports (known as analog rack interface or ARI ports) and the GCM32 has 32 target system ports. These can be directly attached to systems with the appropriate USB or PS/2 conversion option connector on the end. These connections use standard CAT-5 cables. You can increase the number of connected target systems by two methods: chaining or a tiered arrangement of switches (more about these below). Both methods mean that each of the 16 or 32 ports will have multiple systems connected to it. You can mix connection methods.Remote access via Ethernet or Modem:Remote access to console switch and to the target systems is via a Web browser. The switch provides agentless remote control and access. No special software or drivers are required on the attached servers or client. Access is normally via a standard Ethernet network, requiring that the console switch be connected to the network via one or both Ethernet ports. Connecting both ports provides redundancy. Additionally, if a modem is connected to the modem port on the console switch and the modem is connected to a telephone (PSTN) system, then you can dial the console switch via your modem and establish an out-of-band connection to the console switch using the Point-to-Point Protocol (PPP) for remote control. V.34, V.90, or V.92 connections are supported.Conversion Options:These are cable-connector combinations that are connected between the CAT-5 cables from the console switches to the target systems. The figure below shows the conversion option cables that can be used with the console switches. The part numbers are listed in the Part number information section.The Virtual Media Conversion Options (VCO and VCO2) supports the virtual media capability of the console switches; however, they do not support chaining.Note: The KVM and USB conversion options are withdrawn from marketing.Figure 4. Available conversion optionsThe built-in memory of each connection option helps simplify configuration by assigning and retaining unique server identification codes for each attached server. This integrated intelligence enhances security and helps prevent unauthorized access to a server through cable manipulation. The connection option is powered directly from the server, providing Keep Alive functionality even if the server is not powered on. Supported video resolutions are listed in the following table.The GCM16 and GCM32 switches also allow you to use smart cards to ensure access is authorized. Smart cards are pocket-sized cards that store and process information. Smart cards such as the Common Access Card (CAC) can be used to store identification and authentication to enable access to computers, networks, and secure rooms or buildings. Smart card readers are connected directly to the switch via one of the USB ports, or they can be connected to any remote workstation that is running the remote browser interface or DSView management software and is connected to the switch using an Ethernet connection.Note: For smart card use, the target device must be connected to the console switch using the Virtual Media Conversion Option Gen2 (VCO2), part number 46M5383.Use of encryption:The GCM16 and GCM32 support encryption for KVM signals and for remote media. Available encryption levels are 128-bit SSL, DES, 3DES, or AES. These are configurable via the browser interface.True serial capabilities:The GCM16 and GCM32 switches support Serial Conversion Option (SCO) cables that provide serial capabilities through Telnet. The capability provides a proper serial connection, not serial-to-VGA conversion. You can launch an SSH session or a serial client from the on-board Web interface to connect the targets that are connected to the GCM16 and GCM32 switches with an SCO cable. The SCO includes a separate USB-to-barrel power cord adapter - see Figure 2. Connect the USB end of the adapter to an available USB port on the target system to supply power to the SCO.Managing Intelligent Power Distribution Units:The dedicated Power Distribution Unit (PDU) ports on the GCM16 and GCM32 switches support the direct attachment of certain Avocent-branded Intelligent PDUs and can provide the ability to view and manage these units directly through the switch. Lenovo Intelligent PDUs are not supported.Tiered consolesTiered consolesYou can tier multiple rack console switches to enable access to additional servers. In a tiered system, an ARI port on the main rack console switch connects to the ACI port of a tiered rack console switch (see Figure 3 for locations of these ports). Consider a tiered configuration if you want to manage servers connected to multiple switches from one central location. For example, you could have a primary GCM16 console switch with 16 switches tiered underneath it that all have servers chained on their ports.The GCM16 and GCM32 support two levels of tiering. The use of virtual media and smart card authentication are both supported only when primary and secondary switches are GCM16 or GCM32 console switches.Figure 6 shows an example of tiered consoles.Figure 5. Tiered consolesIf there are local users attached to other tiered consoles, each can control target systems connected to that specific console. The local user at the primary console (Local user A in Figure 6) can preempt other local users if necessary.The GCM16 and GCM32 support up to 1024 target systems in a tiered configuration.Physical specificationsTrademarksLenovo and the Lenovo logo are trademarks or registered trademarks of Lenovo in the United States, other countries, or both. A current list of Lenovo trademarks is available on the Web athttps:///us/en/legal/copytrade/.The following terms are trademarks of Lenovo in the United States, other countries, or both:Lenovo®Other company, product, or service names may be trademarks or service marks of others.。
GCM-5KV可调高压绝缘电阻测试仪使用说明书高级型 带打印 中文

GCM-5KV可调高压绝缘电阻测试仪使用说明书高级型带打印中文上海冠测电气科技有限公司尊敬的用户,欢迎使用可调高电压绝缘特性测试仪。
为了您的安全,在操作前请先仔细阅读此说明书。
产品执行标准:DL/T 845.1 - 2004 ;生产许可证号:沪制00000310号;型式批准证号:11E011 - 42 ;产品专利号:ZL201020590645.2 ;1性能特点1)采用微电脑控制,菜单操作,大屏幕液晶LCD点阵显示,性能稳定,属智能化仪表。
2)抗干扰能力强,适合在强电磁干扰环境中测量。
3)有50V、100V、250 V、500V、1.0kV、2.5kV、5.0kV共7个电压输出档。
4)输出高电压同时也可从零开始全范围连续调节。
5)自动测量R15、R60、R600,自动计算吸收比、极化指数,同时显示泄漏电流和吸收电容。
6)带载能力强,短路电流约5mA。
7)测量范围最大为0 ~10TΩ,自动切换量程。
8)模拟条指针与数字显示相结合,形象的表明数据的变化趋势及准确的测量结果。
9)随时显示测试时间,且每隔15秒蜂鸣器自动鸣叫提示。
10)测试前若检测到试品带电,则给出带电电压和相关提示。
11)能设置测试时间,达到预定的测试时长后,自动停止测量。
12)测量完毕自动泄放高压,高压泄放时间不超过30秒。
13)自动测量环境温度、空气湿度及每次测试的日期与时间。
14)能保存60组测量结果,且数据20年可不丢失。
15)自带RS232串行接口,能与计算机数据通信。
16)RS232串口外接打印机,可打印测量结果,免抄表工作。
17)非测试状态下,5分钟无任何操作,仪器提示关机。
18)具有全面完善的保护功能,工作可靠性高。
2技术指标安全操作规程1 测试开始,应先接好测试线,后开启仪表电源。
2 测试完毕,应先关闭仪表电源,后拆解测试线。
3 仪表工作时,人体不得触碰或靠近测试线。
4 测试全过程中,须有专职人员现场监督安全操作。
3仪器外形1. L端插座2. 显示屏3. G端插座4. E端插座5. 高压调节旋钮6. ESC按键7. 温湿度传感器8. 蜂鸣器9. UP按键10.DOWN按键11.OK按键12.对比度旋钮13.RST复位按键14.电源开关15.充电插口16.RS232串行接口4使用方法4.1 测试线连接无误后,打开面板上的电源开关,液晶屏出现如图1的开机欢迎界面,显示当前的温度,湿度,时间。
气相色谱质谱联用仪器操作说明书

气相色谱质谱联用仪器操作说明书一、导言本操作说明书旨在向用户提供关于气相色谱质谱联用仪器(以下简称GC-MS)的详细操作指南。
通过严格按照本手册的要求进行操作,可以确保仪器的正确使用,提高实验结果的准确性和可靠性。
二、仪器概述1. 仪器型号:GC-MS-xxxx2. 仪器组成:GC部分和MS部分3. 仪器特点:高分辨率、高灵敏度、高选择性4. 适用领域:药物分析、环境监测、食品安全等三、安全注意事项1. 仪器操作前,确保工作环境平稳、无振动,并处于良好通风状态。
2. 在操作过程中,注意避免与有机溶剂、毒性气体和易燃物接触。
3. 定期检查GC-MS仪器的电源线、气源管路和连接插头等是否完好无损。
4. 使用高纯度的气源以保证分析结果的准确性。
5. 操作完毕后,及时关闭仪器电源,并进行仪器的日常清洁和维护。
四、仪器操作步骤1. 准备工作(1)检查仪器所需试剂和耗材的储备情况,如色谱柱、进样器、进样针等。
(2)将仪器电源插头正确连接至电源插座并通电,待仪器准备就绪。
(3)根据样品特点选择合适的色谱柱,并确保色谱柱与仪器连接紧密。
(4)开启气源,调节气压、流速和纯度以满足实验要求。
2. 样品进样(1)将待测样品置于进样瓶中,用推进器将样品推入进样针。
(2)通过进样器控制样品的进样量和进样时间,确保稳定的样品进样。
(3)进样前应设置好样品的保护时间和进样模式,使样品分子之间不会发生相互作用。
3. 色谱部分操作(1)调节色谱仪的温度,使色谱柱在理想工作温度下进行分离。
(2)设置电子质谱仪的离子源和检测器温度,确保仪器性能处于最佳状态。
(3)选择合适的色谱柱流速和色谱程序以满足实验需求。
4. 质谱部分操作(1)调整质谱仪的工作模式(正离子、负离子、中性子等)。
(2)设置质谱仪的质荷比范围,选择适宜的质谱扫描速度和积分时间。
(3)在质谱扫描前,进行质谱仪的校准和空白测试,以确保分析结果准确可靠。
5. 数据采集与分析(1)根据实验需求,设置数据采集的时间范围和数据点数。
- 1、下载文档前请自行甄别文档内容的完整性,平台不提供额外的编辑、内容补充、找答案等附加服务。
- 2、"仅部分预览"的文档,不可在线预览部分如存在完整性等问题,可反馈申请退款(可完整预览的文档不适用该条件!)。
- 3、如文档侵犯您的权益,请联系客服反馈,我们会尽快为您处理(人工客服工作时间:9:00-18:30)。
发电机状态监视系统(GCM)说明书一工作原理发电机状态监测器(GCM)包括一个离子室检测器(ICD)、电表/报警盘、记录器、流量计(差压表)、过滤器/电磁阀及流量设定阀。
它是设计用于氢气压力高达100PS1G(磅/平方英寸表压)(7巴)的。
从发电机来的氢气经过过滤器电磁阀组件、ICD及流量设定阀。
该ICD产生一个由电位计放大并施加在记录器或盘式表上的电流。
在正常运行情况下,该输出电流是一个由流量及氢气压力而决定的定值。
当有颗粒、例如由于超温而产生的颗粒存在时,此电流将下降,控制回路将打开一个触点,琥珀色的安全灯将熄灭,而红色的报警灯将点亮。
用于外部报警的SPDT(单极双投)接触也被触发。
一旦该回路报警了,它可以通过按在电表/报警盘上的“ALARM SEQUENCE RESET”按钮而被重新设定。
该报警是有故障保护的,并将在电源发生故障的情况下触动SPDT外部报警触点。
通过ICD的正确的流量是由位于ICD出口侧上的柜内侧的流量设定控制装置设定的,而在电表/报警盘上的报警设定控制则设定报警跳闸点。
在正常运行情况下,在过滤器/电磁阀组合中的过滤器是被旁路掉的。
当前面板上的“FILTE”按钮被按下时,该电磁阀被启动,全部气体通过过滤器而除去颗粒。
其目的是为了确定一个报警状态是真实的或者是设备故障的结果。
假如报警是真实的,并确有颗粒存在于气流中,按下“FILTE”按钮将导致输出电流返回至正常、安全的水平。
当该按钮被按下后,红色的FILTE灯应亮着。
GCM所有的组件均放置在一个单独的小室中。
对所有型号均配备有一个试验颗粒源。
当按下一个按钮而启动该源时,颗粒被引入ICD;通过生成一个模拟的报警信号校核其运行。
GCM配备有一个集成的自动采样器。
当GCM发警报时,氢气通过一个可移动的收集器,它捕捉了由热力分解产生的颗粒。
然后该收集器可以被送到试验室,以分析过热的来源。
GCM可以与通常位于控制室内的GCM自动报警装置相连接。
该自动报警器监测GCM 的输出并将其显示于一个表计或记录器上。
当输出下降时,该过滤器自动地插入;该自动报警器决定了是否有一个GCM故障存在,或验证报警状态存在。
该自动报警器控制自动采样器,仅在为了证实一个报警时才启动它。
假如GCM输出超过了预设定的上限或下限,或者GCM流量降至设定极限以下,该自动报警器就提供警告指示。
二试验颗粒源在电位计/报警盘上的“PARTICLE TEST”按钮开关启动试验颗粒源。
一个红色的导向灯“VERIFIED ALARM”(检验报警)表示该源已启动。
颗粒由在试验源中的加热线上的涂层所产生,它包含着用于50次或更多次试验的足够的材料。
该源应仅在氢气纯度及压力适于发电机正常运行、且GCM在“安全”模式时才被启动。
触动该“PARTICLE TEST”按钮应将使输出电流在约5秒钟之内产生一个明显的下降。
一旦GCM有了报警,该颗粒源的电源将被自动断掉。
假如保持“试验”按钮被按下20秒钟之后仍无反应,则需更换试验颗粒源。
通过按下“FILTE”及“PARTICLE TEST”按钮,核查过滤器及电磁阀。
输出电流不应发生变化且无报警。
切勿将“PARTICLE TEST”按钮保持按下超过20秒,并且应在释放“FILTE”按钮之前先释放它。
三报警步骤1.无自动报警如果有一个报警指示,需检查记录图表。
假如报警是由于过热,记录的电流迹线应显示电流在几分钟或小时内会有一个逐渐的下降。
假如电流下降并立即恢复至正常水平,该报警很可能是瞬间电力中断的结果;在此情况下,应通过按下“重置”按钮重新设定该报警。
假如确实显示电流有一个确定的、持久的下降,并且“流量”读数是正常的,按下“过滤器”按钮。
(在流量显示上有一个大于20%的下降,表示在电磁阀或过滤器中有过量的限制,对此应加以调查)。
输出电流应返回至接近其正常值。
假如确实如此,则该下降是铁芯故障或是其它颗粒源譬如发电机中过热导致的,应采取恰当的措施。
假如在“过滤器”按钮按下的情况下,电流仍维持在报警水平以下,则表示GCM的某一个组件有故障,这可使用“故障寻找”中概述的程序确定其位。
当“自动采样器”系统被启动了,通过GCM入口的流量增加,ICD的流量可能减少。
对于风机差压低的发电机这个效应将达到最大,尤其是当入口管很长时。
在有些情况下,ICD流量可能为零。
由于这个原因,可能有必要等待,直至“自动采样器”流量已在进行上述报警验证程序之前被关闭。
2.有自动报警该“自动报警”自动地确定是“GCM故障”引起了GCM输出的下降,还是由于发电机过热引起了“证实的报警”,从而可以采取适当的纠正动作。
因为“自动采样器”仅在一个报警已由“自动报警”证实之后才被启动的,任何从“自动采样器”来的ICD流量的变化,在“自动报警”被使用时,将不会影响报警的证实。
四自动采样器“自动采样器”的操作是自动的,毋需另外的注意。
假如不需要自动运行并且未安装有“自动报警”,则在TB2上的端子7及8之间的连接应该被去掉。
假如安装了“自动报警”,则扭开在报警屏上的“MANUAL START ONL Y”指示器,即可禁止“自动采样器”的自动操作。
如果到GCM的交流电先被断开然后恢复,虽然“报警”灯可能亮着,但该采样器将不会被启动。
通过按下采样器控制上的“START”按钮,在任何时候都能收集样品。
在预先设定的时间间隔之后,该流量将被自动地停止。
该流量的停止可先于按下采样器上的“停止”按钮。
五定期检查和维修为了确保GCM的连续可靠的性能,建议进行下列的定期检查:每天:1.检查流量,“FLOW”上指示应为1.5;如有必要,用“流量设定”控制设定为正常。
2.检查输出电流轨迹,它应在记录器或表计上的箭头处(显示)。
每周:按下“过滤器”按钮,指示器灯应亮,假如电磁阀在工作,应有一个可听到的滴答声。
流量或输出中应无变化或仅少量变化。
假如流量指示值下降超过20%,过滤器可能受限制了。
假如输出显著地增加,可能有一些颗粒存在于氢气中。
每月:启动“试验颗粒源”。
在发电机停机期间,建议维持给GCM供电,特别是在高湿度时期。
其目的是避免水分冷凝在ICD及电位计/报警中的关键绝缘器上。
假如安装了记录器,可将其电源停下,以停止图表驱动。
六详细说明1.离子室检测器(ICD)ICD包括一个离子化区及一个离子收集室,均包含在一个压力外壳内。
气体首先通过离子化去,它包含一个低能级的α源(钍232)。
然后产生的离子和气体一起传送至离子收集室,在那里有一个电极维持在对地-1 0伏。
由于离子非常小,它们对质量有一个高比例的电荷,将其放在一个电气场中,它们有一个高的活动性。
10伏的电势是足够引起大部分离子被吸引至收集电极上;在该处,它们产生的电流由电位计指示。
当气体中存在有颗粒时,某些离子将吸附着他们。
这些颗粒,即使在显微镜下也看不清,也比离子大了许多倍。
因此,颗粒—离子组合的电荷与质量的比减少了许多(千分之一左右),故其可动性低。
这意味着现在仅少数被吸引至收集电极,导致至放大器的电流减少。
试验显示:当一个面积大约为13平方厘米的芯材,在一个典型的发电机内侧,被足够地加热到使珐琅涂层退色时,电流将减少50%。
在正常的发电机运行下,在氢气中的颗粒浓度基本为零。
图5显示:当“流量”计的设定维持在1.5,纯氢的典型的离子室输出电流及体积流与压力的函数关系,它显示在一个已知的设定值下,电流依赖于氢气压力;压力增加电流就减少。
但是,假如当压力变化时不重新调整流量,此效应将被部分地抵消;压力的增加导致发电机的一个较高的风扇差压,从而增加了流量,这将减少电流的变化(流量减小,输出电流下降)。
所绘的是体积流量(而不是惯常的标准流量),因为它更逼真地确定离子室性能。
该电流曲线在约2巴处有一个峰值;体积流率降低引起压力增加,电流就减少。
当压力降低至2巴以下时,电流再次下降;这是因为较低的气体密度允许一些α颗粒在它们产生离子之前到达离子室的壁上。
2.电位计/报警回路只要GCM输出高于报警水平,它将置继电器K2于安全模式中。
当GCM输出下跌至50%以下时,置K2于报警模式。
从而即使GCM输出上升至50%以上,输出触点将留在报警模式,直至按下“重置”(RESET)按钮。
在流量计中一个磁性操动的簧片开关控制流量报警回路。
在正常流量时,该开关闭合并短路了电路板B3上的固态继电器K1的输入端子。
在低流量时,该开关打开,它使K1通电,并施加交流线电压至“自动报警”中的流量报警回路。
该流量报警开关在工厂中已调整好在流量减少约20%时打开。
由于流量压差与流量的平方成比例,这相当于一个流量指示减少约36%。
3.自动采样器假如未安装“自动报警”,任何时候GCM由“安全”变成“报警”状态,采样器将启动,一股气体流将在一个规定的时间内经过收集器,此时流量将被关闭。
一个盖子联锁装置可避免当校核电位计零位或使用“试验颗粒源”时自动启动采样器。
该流量能在任何时候用手启动或停止。
当安装有“自动报警”时,继电器K3被更换。
但是一个适配器将传送“自动采样器”控制于“自动报警”屏,因此采样器只有在一个报警被证实时,才被启动。
七故障查寻由于没有移动部件、高温组件或危险的调整,GCM应长期无故障地工作。
如果有任何运行困难,要核查电源及所有连接处。
1.回路保护GCM回路由一个位于电位计/报警盘上的5安培断路器保护。
跳闸时其按钮将伸出,并可见一个红光带。
在确定并纠正了跳闸原因后,压下按钮以重新置位。
2.无流量指示并无输出电流●阀门被关闭,或至发电机的管道有堵塞。
●至发电机的不正确的连接导致零或低的差压。
3.负流量指示●至发电机的连线接反了。
●流量计有故障。
4.不稳定的流量●在通往发电机的管道中、或GCM的管道中有液体进入。
●“流量设定阀”中有污物。
5.流量良好,但输出电流低或无。
●到ICD的-10伏连接开路或短路了。
●电位计坏了。
●至电位计的电缆开路、连接被断开,或短路了。
●表计或记录器坏了。
●电源坏了。
●ICD中输出对地短路。
6.输出电流超限,甚至在流量为零或流量低时也超限●可能由于离子室中进入了纤维,造成短路、或ICD内有导电通路。
●供电有故障。
●电位计有缺陷。
●R1开路,或在反馈回路中开路,或R5开路。
7.输出良好,但报警不重置●A2或B2组件有缺陷。
●K1有缺陷。
●K2有缺陷。
●R6或相连的接线有缺陷。
●S2有缺陷,核查“遥控重置”。
8.输出低于50%但回路不报警●R6(报警设定)有缺陷或未恰当地调整●A2或B2组件有缺陷●K1有缺陷●K2有缺陷●S2短路,或在“遥控重置”回路中有短路。
9.过滤器灯持续亮着●S3有缺陷。
由于输入信号可能被过滤器去掉,在此情况下GCM将不会探知一个故障。
为了临时操作,可通过断开电磁线圈回路中的2针连接器(J4),对电磁线圈断电。