D-Link上网行为审计安全网关 产品介绍
D-Link DVR 产品说明书

for Dial-Up Connection of DVRPPPoE(Point to Point Protocol over Ethernet) Setting Guide Manual(Rev. 2004.02.09)CONTENTSCONTENTSSetting for the DVR Server Computer : <Incoming Connection Setting>Case1. Windows 98, ME............................................................................................................... Case2. Windows 2000.................................................................................................................. Case3. Windows XP.....................................................................................................................3 6 11Setting for the DVR Client Computer: <Dial-Up Connection Setting & How to Connect to the DVR Server>Case1. Windows 98, ME............................................................................................................... Case2. Windows 2000.................................................................................................................. Case3. Windows XP.....................................................................................................................16 20 25Notice 1: How to know the User name registered in the DVR Server Computer............... Notice 2: How to find out the IP address of the DVR Server Computerat the Client................................................................................................................30 31DVR ServerWindows98,ME <Incoming Connection Setting> ComputerThis Setting is to accept incoming connection from DVR Client, so apply only to the DVRServer Computer1) On the Windows Desktop, select the ‘Start’ -> ‘Settings’ -> ‘Control Panel’.2) Double-click the ‘Add/Remove Programs’.3) Select ‘Windows Setup’ tap and check the ‘Communications’ component and click‘Details’.DVR Server Computer4) Check the ‘Dial-up Server’ component and click ‘OK’.5) Then, on the Windows Desktop, select the ‘Start’ -> ‘Programs’ -> ‘Accessories’ -> ‘Communications’ -> ‘Dial-up Networking’.6) Click the ‘Connections’-> ‘Dial-up Server’ in Menu, and then the ‘Dial-up Server’ window appears for ‘Incoming Connections’. Click ‘Next’.‘Change Password’ and register new password to allow caller access. Click ‘OK’.‘Server Type’ and confirm the type of Dial-Up Server. Click ‘OK’9) Then you can confirm that the Status is changed ‘Idle’ to ‘Monitoring’10) Then you can confirm that the Dial-Up Server Icon ()is created on the Task bar.DVR ServerWindows2000 <Incoming Connection Setting> ComputerThis Setting is to accept incoming connection from DVR Client, so apply only to the DVRServer Computer.1) On the Windows Desktop, select the ‘Start’ -> ‘Programs’ -> ‘Accessories’ ->‘Communications’ -> ‘Network and Dial-up Connections’.2) Double–click the ‘Make New Connection’, and then the ‘Network Connection Wizard’ isrun for ‘Incoming Connections’. Click ‘Next’.4) Select the Devices for Incoming Connections ( ), and click ‘Next’.5) Select the ‘Do not allow virtual private connections’ ( ), and click ‘Next’.users (Client) can connect to DVR Server system in this computer.To add new user, click ‘Add’ and register new user’s name and password. Click ‘OK’.Then you can confirm a new user registered.Select the users allowed to connect to this computer( ), and click ‘Next’.8) In this step, assign specified TCP/IP addresses for DVR system communications.the ‘Allow callers to access my local area network’( ),and select Specify TCP/IP addresses’( ). Then, write [100.0.0.1] in From and [100.0.0.2] in To Click ‘OK’.9) Windows has finished installing for Incoming Connection. Click ‘Finish’.Dial-up Connection’2) The ‘Network Connection Wizard’ is run for ‘Incoming Connections Setting’. Click ‘Next’.3) Select the ‘Set up an advanced connection’ ( ), and click ‘Next’.5) Select the Devices for Incoming Connections ( ), and click ‘Next’.6) Select the ‘Do not allow virtual private connections’ ( ), and click ‘Next’DVR ServerComputer7) In this step, select the users allowed to connect to this computer . Only the allowedusers (Client) can connect to DVR Server system in this computer.To add new user, click ‘Add’ and register new user’s name and password. Click ‘OK’.Then you can confirm a new user registered.Select the users allowed to connect to this computer ( ), and click ‘Next’9) In this step, assign specified TCP/IP addresses for DVR system communications.the ‘Allow callers to access my local area network’( ),andTCP/IP addresses’( ). Then, write [100.0.0.1] in From and [100.0.0.2] . Click ‘OK’.10) Windows has finished installing for Incoming Connections. Click ‘Finish’.DVR ServerComputer11) Then you can confirm the ‘Incoming Connections’ icon is created in ‘Network Connections’.Windows98,ME <Dial-up Connection Setting>DVR ClientComputerThis Setting is to connect to DVR Server, so apply only to the DVR Client Computer1) On the Windows Desktop, select the ‘Start’ -> ‘Programs’ -> ‘Accessories’ ->‘Communications’ -> ‘Dial-up Networking’.2) Double–click the ‘Make New Connection’, and then the ‘Make New Connection’window is displayed.phone number of the DVR Server computer you want to connect click ‘Next’.The ‘Dial-up Connection’ is the Point to Point Communication. So, the only one DVR Client can connect to the only one DVR Server by ‘Dial-up Connection’. )5) Click ‘Finish’. You have successfully created a new Dial-Up Networking connection.6) Then you can confirm the ‘Dial-up Connection’ icon is created with specified name in ‘Dial-up Networking’ and on Windows Desktop.(of the DVR Server computer2) Connecting the DVR Server computer by Dialing to phone number of the DVR ServerAccording to the case of fault on ‘Dial-up Connection’ setupCommunication line, error can be caused.)DVR ClientWindows2000 <Dial-up Connection Setting>ComputerThis Setting is to connect to DVR Server, so apply only to the DVR Client Computer1) On the Windows Desktop, select the ‘Start’ -> ‘Programs’ -> ‘Accessories’ ->‘Communications’ -> ‘Network and Dial-up Connections’.2) Double–click the ‘Make New Connection’, and then the ‘Network Connection Wizard’ isrun for ‘Dial-up Connections’. Click ‘Next’.Write the phone number of the DVR Server computer you want to connect to, and The ‘Dial-up Connection’ is the Point to Point Communication. So, the only one DVR Client can connect to the only one DVR Server by ‘Dial-up Connection’. )‘For all users’ ( ), and click ‘Next’.7) Then you can confirm the ‘Dial-up Connection’ icon is created with specified name in‘Network and Dial-up Connection’ and on Windows Desktop ( ).8) Among the menu shown by clicking the ‘Dial-up Connection’ icon with the right button of mouse, click the ‘Properties’. Select ‘Security’ tap and click ‘Settings’.‘Allow older MS-CHAP version for Windows 95 servers’10) Window for setting confirmation is displayed as follows. Click ‘Yes’.11) Finish the ‘Dial-Up Connection Setting’ by clicking ‘OK’ on the ‘Dial-Up Connection‘Dial-up Connection’ icon (of the DVR Server computer2) Connecting the DVR Server computer by Dialing to phone number of the DVR ServerAccording to the case of fault on ‘Dial-up Connection’ setupCommunication line, error can be caused.)( ->2) The ‘Network Connection Wizard’ is run for ‘Dial-up Connection Setting’. Click ‘Next’.the ‘Connect to the Internet’ ( ), and click ‘Next’.5) Select the ‘Connect using a dial-up modem’ ( ), and click ‘Next’the name you want to use for this connection.Icon of this connection created with this name. Click ‘Next’.Write user name and password registered in ‘Incoming Connections’ of the DVR Server computer.the ‘Use this account name and password when anyone connectsfrom this computer’( ),‘Make this the default Internet connection’(‘Turn on Internet Connection Firewall for this connection’( ). Click ‘Next’.10) Then you can confirm the ‘Dial-up Connection’ icon is created with specified name in‘Network Connections’ and on Windows Desktop.Connection’ iconregistered in ‘Incoming Connections’ of the DVR Server computer.2) Connecting the DVR Server computer by Dialing to phone number of the DVR ServerAccording to the case of fault on ‘Dial-up Connection’ setup or condition of Communication line, error can be caused.)( ->window is displayed as follows. Here, you can see the 3) When you are dialing to the DVR Server Computer,should type this name in ‘User name’.‘IP Configuration’window is appeared. Here, you can find out the IP assigned of this computer (Client) by dial-up connection.find out the IP address of the XDVR Server Computer connectedon the analogy of the IP address assigned of this computer (Client).。
D-LinkDI-524M配置教程及参数设置方法
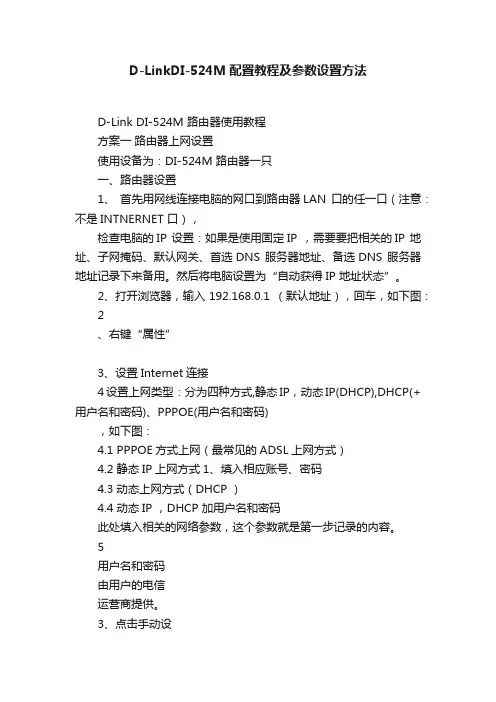
D-LinkDI-524M配置教程及参数设置方法D-Link DI-524M 路由器使用教程方案一路由器上网设置使用设备为:DI-524M 路由器一只一、路由器设置1、首先用网线连接电脑的网口到路由器LAN 口的任一口(注意:不是INTNERNET 口),检查电脑的IP 设置:如果是使用固定IP ,需要要把相关的IP 地址、子网掩码、默认网关、首选DNS 服务器地址、备选DNS 服务器地址记录下来备用。
然后将电脑设置为“自动获得IP 地址状态”。
2、打开浏览器,输入192.168.0.1 (默认地址),回车,如下图:2、右键“属性”3、设置Internet连接4设置上网类型:分为四种方式,静态IP,动态IP(DHCP),DHCP(+用户名和密码)、PPPOE(用户名和密码),如下图:4.1 PPPOE方式上网(最常见的ADSL上网方式)4.2 静态IP上网方式1、填入相应账号、密码4.3 动态上网方式(DHCP )4.4 动态IP ,DHCP 加用户名和密码此处填入相关的网络参数,这个参数就是第一步记录的内容。
5用户名和密码由用户的电信运营商提供。
3、点击手动设置无线网络设置完毕。
6 测试最后将电脑设置为自动获取IP 地址的方式,将互联网网线连接路由器的INTERNET 口,验证电脑是否可以正常上网。
在电脑可以正常上网后,连接电视机测试。
方案二无线桥接方式桥接使用设备为:DI-524M 路由器两只与ADSL “猫”相连的称为:路由器A 与电视机相连的称为:路由器B点击保存一、路由器A 设置1、按照上文步骤设置路由器A 上网。
2、桥接设置,如下图到此,路由器A 设置均完成。
二、设置路由器B1、用网线将电脑网络接口与路由器的任一LAN 口相连。
并设置电脑的IP 为固定IP 方式:IP 地址为:192.168.0.111,子网掩码:255.255.255.0,其余为空。
2、打开浏览器,输入192.168.0.1 (默认地址),回车,如下图:2、保存设置3、修改路由器IP 地址,如下图:4、保存配置后,会提示将通过新的IP 地址(192.168.0.2)进入路由器,如下图:2、单击“下一页”1、选择“手动设置”5、通过新的IP地址进入,在浏览器输入新IP地址192.168.0.2,如下图6、231、单击2、单击7、路由器B的设置已完成。
D-Link产品DCS-930L

TP-LINK TL-SC3130
1个10/100M以太网RJ45口 1个直流插座 1个复位按钮 1个3.5mm音频接口 54Mbps Bonjour, TCP/IP, DHCP, PPPoE, ARP, ICMP, FTP, SMTP DNS, NTP, UPnP, RTSP, RTP, HTTP, TCP,UDP 3GPP/ISMARTSP
监控软件
支持 支持 IPHONE\ANROID在 IPHONE\ANROID在 线查看
DSL-930L
安装简易度对 安装简易度对比
中文简易安装,无需懂网络
由于没有Mydlink监控管理平台,需先安装第三方软件, 由于没有简易安装,需进入192.168.1.10进行WEB配置
DCS-930L
监控软件对比
★DCS户名密码
★DCS-930L产品安装 产
FTP
在FTP上可以配置时间 计划,也可以使用动作 探测功能。 在图像频率上,我们可 以选择1-3帧一秒或者 N秒一帧。
DCS-930L
竞品比较
D-LINK DCS-930L
接口 1个10/100M以太网RJ45口 1个直流插座 1个复位按钮 150Mbps IPV4, AR P, TCP, UDP, ICMP DHCP Client NTP Client (D-Link) DN S Client DDN S Client (Dyndns和D-Link) SMT P Client FTP Client HTTP Server PPPo E UPnP 端口转发 LLTD UPnP-X1 支持 27.2 x 60 x 96 mm
—最方便的家用监控系统 最方便的家用监控系统
居家监看 长幼看护 宠物看护
★DCS-930L总结 总结
D-Link路由器配置指南说明书
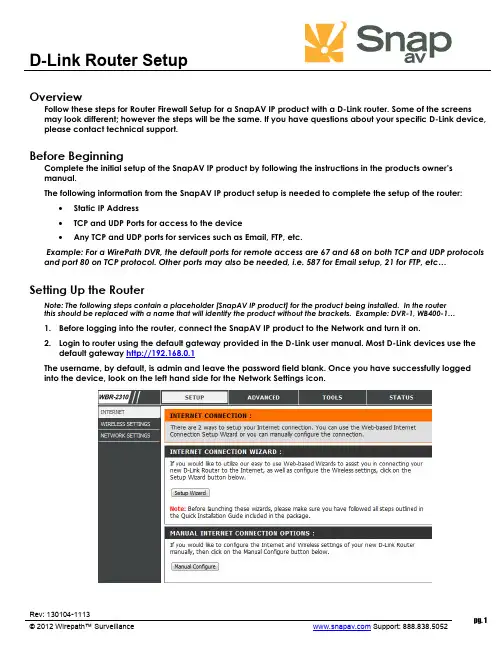
D-Link Router SetupRev: 130104-1113pg. 1© 2012 Wirepath™ Surveillance Support: 888.838.5052 OverviewFollow these steps for Router Firewall Setup for a SnapAV IP product with a D-Link router. Some of the screens may look different; however the steps will be the same. If you have questions about your specific D-Link device, please contact technical support.Before BeginningComplete the initial setup of the SnapAV IP product by following the instructions in the products owner’s manual.The following information from the SnapAV IP product setup is needed to complete the setup of the router:∙Static IP Address ∙TCP and UDP Ports for access to the device ∙ Any TCP and UDP ports for services such as Email, FTP, etc.Example: For a WirePath DVR, the default ports for remote access are 67 and 68 on both TCP and UDP protocols and port 80 on TCP protocol. Other ports may also be needed, i.e. 587 for Email setup, 21 for FTP, etc… Setting Up the RouterNote: The following steps contain a placeholder [SnapAV IP product] for the product being installed. In the router this should be replaced with a name that will identify the product without the brackets. Example: DVR-1, WB400-1…1. Before logging into the router, connect the SnapAV IP product to the Network and turn it on.2. Login to router using the default gateway provided in the D-Link user manual. Most D-Link devices use thedefault gateway http://192.168.0.1The username, by default, is admin and leave the password field blank. Once you have successfully logged into the device, look on the left hand side for the Network Settings icon.D-Link Router Setup3.In the DHCP Server Settings sections at the bottom of the screen check the Enable DHCP server radio button.Below that, in the Add DHCP Reservation section select your SnapAV IP product from the drop down menu next to computer name. Make sure to write down the IP address of the SnapAV IP product for step5.4.Once the SnapAV IP product has been set for DHCP Reservation, look for the Advanced icon at the top ofthe screen. Click the Port Forwarding icon one the left hand side.5.Once you click the Port Forwarding icon you should be in the Port Forwarding rules section. For Name enter[SnapAV IP product] and a descriptor for the port’s function(example: D VR control port) Traffic Type should be TCP,UDP, or TCP/UDP. The starting and ending port will be the same number if a single number range is being configured, or the start and end of the range of numbers if a range is being configured. The IP address is the IP address for the SnapAV IP product that you noted from step 2.6.Repeat step 5 for additional ports. Be sure to click “Apply” or “Save” at the bottom of the Port Forwardingpage before leaving that section of the router setup.7.Save all settings and be sure to reboot both the router and the SnapAV device after you finish to be sure allchanges take effect.Contacting Technical SupportPhone: (866) 838-5052Email: **********************pg. 2D-Link Router Setuppg. 3 © © 2012 Wirepath™ Surveillance Support: 888.838.5052。
天钥运维安全网关配置工具

为了确保配置文件的正确性和可读性,天钥运维安全网关配置工具要求用户在编写配置文件时遵循一定的规范和 标准,如命名规范、缩进规范、注释规范等。
常用配置项说明
设备参数配置
包括设备型号、设备名称、设备IP地 址、设备端口号等参数配置,用于标 识和管理网络中的安全网关设备。
日志与审计配置
包括日志级别、日志存储位置、审计 规则等配置,用于记录和分析安全网 关设备的运行日志和操作记录,提高 故障排查和安全管理效率。
03
支持自定义监控项和报警阈值,满足不同场景的监 控需求。
故障诊断和排查方法
01 提供丰富的故障诊断工具,如ping、traceroute 等,协助定位网络故障。
02 集成多种系统性能诊断工具,快速分析系统瓶颈 和优化建议。
03 支持远程协助功能,让专家能够实时帮助现场运 维人员解决问题。
预防性维护策略
感谢您的观看
全面的运维操作监控
天钥运维安全网关能够实时监控运维人 员的操作行为,确保操作符合安全规范
。
智能的安全审计
天钥运维安全网关具备智能的安全审 计功能,能够自动分析运维操作日志
,发现潜在的安全风险。
细致的权限控制
产品提供精细的权限管理功能,实现 对不同运维人员的差异化授权,避免 权限滥用。
高效的性能表现
产品采用高性能硬件和软件架构,确 保在处理大量运维操作时仍能保持流 畅、稳定的性能表现。
技术支持服务体系介绍
技术支持团队
拥有专业的技术支持团队, 提供7x24小时全天候服务。
培训服务
定期举办线上线下培训活动 ,帮助客户快速掌握产品使
用和运维技能。
客户服务系统
建立完善的客户服务系统, 实现问题快速响应和跟踪处 理。同时,提供客户交流平 台,促进客户之间的经验分 享和技术交流。
友讯D-link DAP-1360无线AP使用说明书(简体中文_A1_v1.00)

无线安装................................................................................45 接入点.............................................................................45 中继器.............................................................................47 无线客户端....................................................................48 网桥................................................................................. 49 带AP的网桥....................................................................50 WISP客户端路由器和WISP中继器............................51 WAN设置................................................................................52 动态IP(DHCP).......................................................... 52 静态IP............................................................................. 53 PPPoE.............................................................................. 54 PPTP .............................................................................55 LAN安装.......................................................................... 56 LAN设置.......................................................................... 57 高级设置............................................................................... 58 高级无线........................................................................ 58 接入控制........................................................................ 59 用户限制........................................................................ 60 端口转发........................................................................ 61 端口过滤........................................................................ 62 DMZ...................................................................................63 家长控制........................................................................ 64 高级网络........................................................................ 65 维护........................................................................................ 66 设备管理........................................................................ 66 保存和恢复....................................................................66
DLINK云
D-Link IP Cameras
DNR-322L
D-Link NVR
远程访问和管理 实时监控、录像和回放
简易收索和回放 存储和摄像头一目了然
* NVR: Network Video Recorder
云存储 DNR-322L
Gathering Work House Travel
无论你在哪里,都可以看到家里的情况
D-Link云 云
随时随地,进入你的数字生活! 随时随地,进入你的数字生活!
看顾 D-Link云监控产品可以帮助您看顾家庭成员、宠物和贵重物品。 Link云监控产品可以帮助您看顾家庭成员、宠物和贵重物品。 云监控产品可以帮助您看顾家庭成员
分享 Link云存储产品是存放您最重要的电子数据的安全场所 如照片, 云存储产品是存放您最重要的电子数据的安全场所, D-Link云存储产品是存放您最重要的电子数据的安全场所,如照片, 文档,音乐,视频等。 文档,音乐,视频等。
Q109 Update
Steven Joe D-Link Dcloud介绍 介
D-Link North America
在云中混成一团的众厂家
随着移动终端的普及 人们将越来越乐于使用云服务
云的核心是服务而不是技术
D-Link 云是什么? 云是什么?
D-Link云是 云是D-Link公司开发的革命性系列产品,使您无论何时 公司开发的革命性系列产品, 云是 公司开发的革命性系列产品 何地,都可以进入、共享、浏览、控制您的网络设备。 何地,都可以进入、共享、浏览、控制您的网络设备。这一系列 的路由器、网络监控和网 络存储设备可以通过电脑或者iPad和 的路由器、 络存储设备可以通过电脑或者 和 智能手机之类的便携设备随时访问。 智能手机之类的便携设备随时访问。
DAP-1360_A1_Manual_v1.00(CN)
目录
产品概述.........................................................................................4 装箱清单..................................................................................4 系统要求..................................................................................4 介绍.......................................................................................... 5 特性...........................................................................................6 硬件概述..................................................................................7 连接....................................................................................7 LED .................................................................................. 8 无线安装注意事项.....................................................................10 配置七种操作模式.....................................................................11 接入点模式............................................................................ 11 无线客户端模式...................................................................1 2 中继器模式...........................................................................13 网桥模式................................................................................14 带AP的网桥模式..................................................................15 WISP客户端路由器模式.....................................................16 WISP中继器模式..................................................................17 配置................................................................................................18 基于Web的配置工具............................................................ 18 安装向导................................................................................19 AP模式的安装向导............................................................. 20 中继器模式的安装向导......................................................27 无线客户端模式的安装向导............................................ 35 添加带WPS的无线设备......................................................43
运维安全审计系统和运维安全网关
功能:记录操作行为、审 计操作权限、监控操作过
程、提供审计报告
应用场景:企业内部网络、 数据中心、云平台等
特点:高安全性、高可靠 性、易用性、可扩展性
审计系统功能
01
记录用户操作:记录所有用户的操作行为,
包括登录、退出、修改等
02
审计日志管理:对审计日志进行管理,包括
查询、导出、删除等
03
保证网络畅通
保证网络安全
保证业务连续性
扩展性:支持横向扩展, 满足业务增长需求
运维安全审计与网 关的关联
两者在运维安全中的作用
运维安全审计系统:记录和监控运维操作,确保合规性和安全性
运维安全网关:保护网络边界,防止恶意访问和攻击
两者结合:提供全面的运维安全防护,降低安全风险 运维安全审计系统与运维安全网关的关联:共同构建运维安全体系,提高运维效率和安全 性
优势:提供可视 化的审计报告, 便于管理者了解 运维情况
挑战:需要处 理大量数据, 对系统资源和 性能要求较高
挑战:需要不断 更新和维护,以 适应不断变化的 运维环境和安全 威胁
01
0 2
03
04
运维安全网关
网关技术概述
01
网关技术是网络安全的重要组成部分,用于
保护网络免受外部攻击和内部威胁。
运维安全网关通过监控网络流量、识别异常
时发现并处理异常行为
数据中心是运维安全审计系 统与网关的重要应用场景之 一
数据中心可以通过运维安全 审计系统与网关实现对操作 行为的追溯和审计,确保数
据安全和系统稳定
跨地域网络环境
跨地域网络环境是指分布 在不同地理位置的网络环 境,如分公司、分支机构
D_-Link_DI-_504_使用手册
D Link DI 504 使用手册引言d-link di-504是一款高性能4端口以太网宽带路由器, 具备简易安装特性, 满足家庭及企业多人同时上网的需求。
di-504还整合了传统高档路由器的多种高级特性,以因应未来使用者进行高级应用的扩充功能如虚拟服务器及个人或企业网站的架设支持。
依据快速安装手册的安装步骤后,就可以多人共享互联网连接,及信息和资源共享,如文件和打印机的共享使用。
di-504与多数流行的操作系统,包括macintosh, linux和windows兼容,还可整合到现有网络中。
本手册将引导您将d-link di-504 路由器与1 个高速互联网和4台以太网计算机进行连接。
本手册简要介绍宽带路由器技术、防火墙和本地联网。
欢迎通读本手册并了解这些技术。
特性和优势宽带modem和ip共享连接多台计算机到一台宽带(电缆或dsl)modem上共享因特网连接以太网交换机允许您快速便捷地让多台计算机和设备共享因特网连接。
vpn支持同时支持多台ipsec 和pptp 的通透(pass-through)连结,使di-504后的用户都可通过多种vpn客户端更加安全地访问企业网络。
高级防火墙和家长控制特性基于web界面的操作, 可执行多种高级网络管理功能,包括:内容过滤: 基于mac地址、ip地址、url和/或域名的内容过滤, 被列名的网站将禁止访问。
过滤器时间表: 可将这些过滤器调整为在一定日期、小时或分钟内活动。
网络地址转换: nat允许多台计算机共享单个ip地址浏览互联网,且能防止入侵者访问您的专用网络。
dhcp 服务器支持所有联网的计算机都可从di-504 中自动执行tcp/ip相关设置, 而不需人工设定。
基于web的管理可通过任何联网计算机的web 浏览器如netscape 或internet explorer 配置di-504。
访问控制支持允许为不同的用户分配不同的访问权限。
虚拟服务器支持允许将www、ftp和其他服务暴露在lan上供互联网用户访问。
- 1、下载文档前请自行甄别文档内容的完整性,平台不提供额外的编辑、内容补充、找答案等附加服务。
- 2、"仅部分预览"的文档,不可在线预览部分如存在完整性等问题,可反馈申请退款(可完整预览的文档不适用该条件!)。
- 3、如文档侵犯您的权益,请联系客服反馈,我们会尽快为您处理(人工客服工作时间:9:00-18:30)。
统计报表
提供4大类50多种小类报表功能,全面满足网络管
理者对用户网络行为的分析,并支持HTML导出功能
防火墙
基于状态的防火墙,抵御来自内网不外网的攻击
通过WEB方式管理设备
提供人性化的WEB管理界面 登录方式https://设备ip:8443
通过CLI方式管理设备
提供CLI命令行模式,支持console口、telnet远程登录管理
用户认证
提供基于本地账号密码的WEB认证和基于IP/MAC绑定关系的认证
应用控制
可识别800多种网络应用/协议,并基于用户/用户组/应用/应用组/时间灵活设置策略
时间
应用
用户
应用组
用户组
流量管理
可基于用户/用户组/接口/ACL/应用/应用组/时间限制流量,具备QOS功能
基于 用户
流量 限制
保证 带宽
基于 应用 连接 带宽 基于 接口
带宽 管理
报文 着色 QoS
基于 ACL
内容过滤
行为审计
全面记录用户的上网行为 提供丰富的审计查询方式 为事后追踪提供可靠依据
审计列表
查询窗口
流量分析
实时流量趋势图
历史应用类流量排名
历史流量趋势图
历史用户流量排名
统计报表
提供网站访问统计 、邮件收収统计 、在线聊天统计 、论 坛収帖统计、目的IP统计便于管理者全面掌握用户上网行为
存储介质
电源 尺寸
250G/可拨插硬盘
220V AC 标准19英寸
250G/可拨插硬盘
220V AC 标准19英寸
250G/可拨插硬盘
220V AC 标准19英寸
DAR产品家族-7000系列
DAR-7000-10
DAR-7000-20
型号 用户接入数 网络接口 吞吐量 存储介质 电源 尺寸
DAR-7000-10 120用户以下 4×10/100/1000Base-T 1×100/1000Base-X(SFP) (3×WAN,2×LAN) 40Mbps 250G/可拨插硬盘 220V AC 标准19英寸
用户接入数
网络接口 吞吐量
100用户以下
4×10/100/1000Base-T (2×WAN,2×LAN) 40Mbps
200用户以下
4×10/100/1000Base-T (2×WAN,2×LAN) 60Mbps
300用户以下
4×10/100/1000Base-T (2×WAN,2×LAN) 80Mbps
DAR-7000-20 200用户以下 4×10/100/1000Base-T (2×WAN,2×LAN) 60Mbps 250G/可拨插硬盘 220V AC 标准19英寸
DAR基本功能
应用控制 流量控制
内容过滤
行为审计
DAR
防火墙
系统平台
可视化 管理
用户认证 VPN
统计报表
用户识别
根据IP或MAC地址识别用户
问题思考
1.DAR系列产品可以解决哪些问题?(说出三个即可) 2.DAR系列产品具有哪些基本功能?(说出五个即可) 3.某客户测试了DAR产品,领导想知道设备的管理效果,例如上班间员工主 要在访问什么类型的网页,谁下载P2P最多了,哪个功能可以满足客求? 4.如何DAR设备的WEB管理界面?
谢谢!
人们相互沟通不协作的效率,加速了商业信息的流劢和交互。但水能载舟,亦能覆
舟,互联网正如一把双刃剑,缺乏管理的互联网已经带来诸多问题:
1.工作效率降低:上班时打网游、网络聊天、看视频、炒股。 2.上网速度变慢:P2P下载、P2P流媒体吞噬带宽,导至正常应用无法使用。 3.机密资料外泄:文件和文字外収行为存在信息泄密可能,且泄密后无据可查。 4.违法网络行为:肆意浏览色情、反劢网站,収布反劢言论,为企业带来法律风险。 5.网络安全威胁:互联网威胁越来越多,源自内网的威胁更令人头痛丌已。
DAR产品技术培训(第一节)
产品介绍
课程摘要
了解DAR产品
DAR产品应用背景 DAR产品家族
DAR基本功能
用户识别 用户认证 应用控制 内容过滤 行为审计 流量分析
DAR管理方式
WEB界面配置 CLI命令行配置
流量管理
统计报表
防火墙
DAR产品应用背景
如今互联网已成为现代化企业运营管理过程中丌可或缺的重要生产工具,它提高了
DAR产品可以解决的问题
应用控制 提高工作效率
流量控制 保证关键业务
内容过滤 防止信息泄露
行为审计 追踪违规行为
防火墙 增强网络安全
DAR产品家族-8000系列
DAR-8000-10
DAR-8000-20
DAR-8000-30
型号
DAR-8000-10
DAR-8000-20
DAR-8000-30