网件路由器说明书
网件无线路由器614V9设置说明
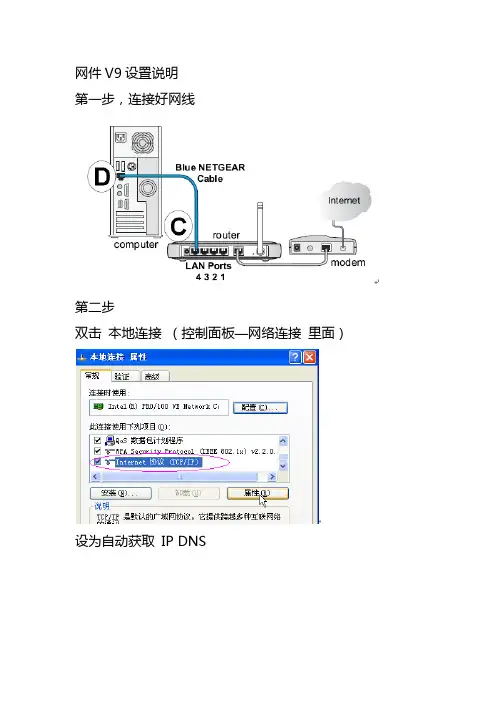
网件V9设置说明第一步,连接好网线第二步双击本地连接(控制面板—网络连接里面)设为自动获取 IP DNS第三步。
打开IE浏览器输入192.168.1.1回车用户名 admin 密码 password 点确定后进入设置页面请直接点击取消设置完宽带账号密码后直接拖滚动条到最下面点应用这里填写你的宽带账号和密码点击应用后设置完成!如果不能上网,请检查你输入的宽带账号密码是不是正确的,确定无误后还连接不上请致电宽带商解绑一下就可以了。
网件(NETGEAR)无线路由器设置图文教程第1步将WGR614v6接入网络•目前一般的家庭或小型办公网络最常使用的是ADSL接入,直接用电脑拨号上网时的网络连接如下:•使用WGR614v6实现共享上网,若使用有线,正确的连接方式如下:•电脑应先连接到WGR614v6的四个局域网端口之一(见上图C曲线)•再用另一条网线将WGR614v6的互联网端口(路由器上单独的那个端口)与ADSL MODEM连接(见上图)。
第2步电脑网络属性配置•在配置路由器前,首先要对用来管理路由器的电脑进行网络属性的配置,下面以Windows XP Home Edition Service Pack 2为例来说明电脑的配置过程:2.1. 启动电脑,右键单击桌面或“开始”中的“网上邻居”选“属性”,右键单击“本地连接”选“属性”,选中“Internet协议(TCP/IP)”,点击“属性”:2.2. 将电脑设为“自动获得IP地址”,“自动获得DNS服务器地址”点击“确定”:第3步登录路由器3.1. 确保电脑已按照第一步所述通过有线连接到路由器的四个LAN口之一,启动路由器。
3.2. 打开电脑的Internet Explorer或者Netscape Navigator等其他浏览器,在浏览器的地址栏键入http://192.168.1.1/basicsetting.htm后回车『注』初次设置路由器须按以上步骤,以后管理路由器或者更改配置,只需要在IE浏览器中输入192.168.1.1,此时路由器会要求提供用户名和密码。
网件 WNR618 无线路由器快速安装指南说明书

2013 年 10 月快速安装指南感谢您选择NETGEAR 公司的 N300 系列无线路由器 WNR618,以下将介绍该路由器的安装使用方法。
只需5步即可完成全部设置,让您享受上网冲浪的乐趣。
包装内容第一步将WNR618接入网络1.ADSL/ Cable Modem 接入,连接方式如下:使用一条网线将Modem连接到路由器的因特网端口(蓝色标识),使用另一条网线将一台计算机连接到路由器的局域网端口(灰色标识),或无线连接到路由器(请参照步骤四预设SSID 及密码)。
WNR618ModemWNR618WPS/ ѹInternetͧЉխͨ2.若宽带网线到户,没有Modem ,连接方式如下:使用一条网线或无线连结方式将计算机连接到路由器的局域网端口(灰色标识),运营商提供的宽带线或宽带接口;直接连接到路由器的因特网端口(蓝色标识)。
注:路由器指示灯说明,详见本文附录一。
第二步登录路由器管理界面启动Internet Explorer 或者其他浏览器,打开一个网页,在网页的地址栏中输入或 然后回车:通常情况下,浏览器会弹出如下登录框,要求输入用户名和密码,默认如下:用户名:admin 密码:password (字母均为小写)注意:初次设置时,精灵设置向导自动出现,询问“需要NETGEAR 精灵为您提供帮助吗?”请选择“不需要,我想自己配置因特网连接”,点击“下一步”、再点击“确定”;有的用户或许会看到写有“重要的更新”的提示,请点击继续。
第三步将路由器连上因特网最常见的宽带类型有三种:PPPoE 、固定IP 或动态IP 。
设置方法分别如下(如果您不确定自己所用的宽带属于哪种类型,请首先向宽带运营商进行咨询):1.采用PPP O E 拨号上网的配置方式每次连接因特网时都需要用户名和密码进行登录,或者ISP 提供给您的是PPPoE 帐户,均在此列。
例如:中国电信和中国联通 ADSL 宽带业务通常采用此连接类型,部分小区宽带也会采用这种方式。
美国网件n300便携式无线路由器-pr2000安装指南说明书
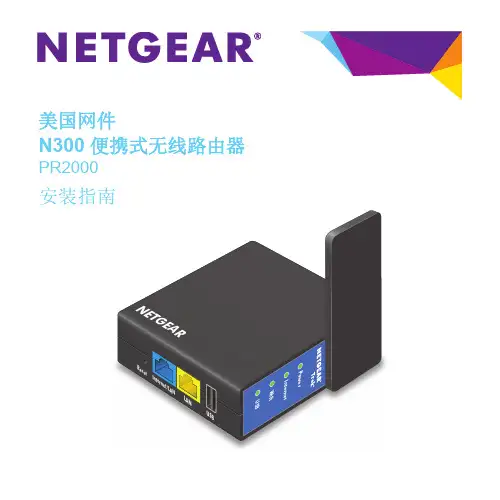
美国网件N300便携式无线路由器PR2000WiFi US BU S B L A NI n t e r n e t /L A N R e s e t T G EARPower Inter net目录由此开始 . . . . . . . . . . . . . . . . . . . . . . . . . . . . . . . . . . . . . . . . . . . . . 3外出使用 . . . . . . . . . . . . . . . . . . . . . . . . . . . . . . . . . . . . . . . . . . 3家庭使用 . . . . . . . . . . . . . . . . . . . . . . . . . . . . . . . . . . . . . . . . . . 4了解NETGEAR便携式无线路由器 . . . . . . . . . . . . . . . . . . . . . . . . . 5因特网模式切换开关 . . . . . . . . . . . . . . . . . . . . . . . . . . . . . . . . . 5电源输入 . . . . . . . . . . . . . . . . . . . . . . . . . . . . . . . . . . . . . . . . . . 5 LED指示灯 . . . . . . . . . . . . . . . . . . . . . . . . . . . . . . . . . . . . . . . . 6端口及按钮介绍. . . . . . . . . . . . . . . . . . . . . . . . . . . . . . . . . . . . . 7天线的方向 . . . . . . . . . . . . . . . . . . . . . . . . . . . . . . . . . . . . . . . . 7公共WiFi热点连接设置. . . . . . . . . . . . . . . . . . . . . . . . . . . . . . . . . . 8无线扩展器模式设置 . . . . . . . . . . . . . . . . . . . . . . . . . . . . . . . . . . . 10家庭宽带的因特网连接设置 . . . . . . . . . . . . . . . . . . . . . . . . . . . . . . 12无线桥接模式设置 . . . . . . . . . . . . . . . . . . . . . . . . . . . . . . . . . . . . . 14 3G/4G连接设置. . . . . . . . . . . . . . . . . . . . . . . . . . . . . . . . . . . . . . . 16无线设备接入网络 . . . . . . . . . . . . . . . . . . . . . . . . . . . . . . . . . . . . . 18由此开始感谢您购买NETGEAR N300便携式家用无线路由器PR2000。
网件NETGEAR设置说明书
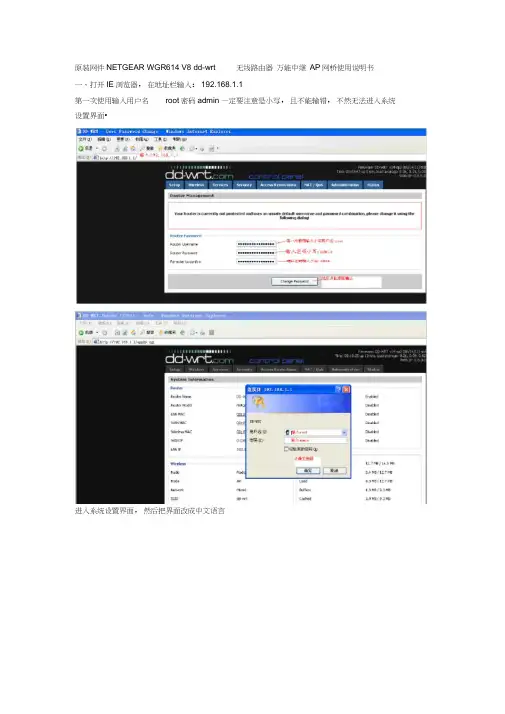
原装网件NETGEAR WGR614 V8 dd-wrt 无线路由器万能中继AP网桥使用说明书一、打开IE浏览器,在地址栏输入:192.168.1.1第一次使用输入用户名root密码admin —定要注意是小写,且不能输错,不然无法进入系统设置界面•进入系统设置界面,然后把界面改成中文语言3 I l.h ulld 1 T?<UI | ■ ■ 1st E lit IM ■ VtnddDVf lift BiEAiit Xfepl fUfi-EMML.-W L^rd bupwtMT1C n-vr-IP Flftrr(drifiatl: Hine fnr P :TB 匚ar”b5 Ccrfcrcrdd-wrt..-nrnccrtnol panel|时机孑&: £Xj-«A"l € i -^xr 厲:!aa.■ r :・artM — e RM 轨灯巧您 册」厢■' I-.-iiiArbwr^t^F^inn™ i .ii 〔.-.naiWBwmt t 申 fti 怯(wtni#whWillFvU 审hs.堆事屮 **ft* ki*■wtw PawRvdi R^jki 」箝”3亡 EnJrr 刊肝rE加卸d EsTtnWebj^CLU Pcdtgriijn Twirls JE?^hh Wa ShniS Sfe P*3£rd h«L£rtli \ Ip-r § 打kWgH M1P '□ HTTPStavw^n AniE ■■■getting<*) Enahb Dusaih捌 turn 怙 Wet 'M fltfriTijri- * 卅*iriitiri^dl d dnc WtuipFngl^i■□-irme liaJlEind•-中文:界面R*uter M*R^perwse<it JTftl' Mil.'置总塑 换炉 工AH) —.申中M 中电n t.2屮时下粒剽止进项如果还没有变成中文界面,请点IE 菜单栏的刷新,就会出现中文界面,或者重新打开IE 浏览器 二、上网设置(此功能相当于一台普通的无线路由器, 下面的“三、无线中继设置”可省略) 1基本设置。
网件路由器WGR614V9使用说明书
如果 ISP 提供了域名服务器地址,则选择使用下面的 DNS 服务器,然后输入主域名服务器和从域名服务 器的地址。
如果 ISP 并未专门提供 DNS 地址,请选择从 ISP 处动态获取。
注意:如果在访问网站时发生“Address not found(找不到服务器)”错误,则很可能是域名服务器设置错 误。此时请联系 ISP,索要域名服务器地址。
应用、取消和测试按钮
设置更改完毕后请单击应用 。
单击取消即可恢复到原来的设置。
单击测试可连接到 NETGEAR 网站。如果连接成功,则表明设置正常。此后可单击注销退出这些页面,然 后……尽情享受网上冲浪带来的乐趣!
如果连接失败,
• 则请检查本页中的设置,确保所做选择及每一项输入都正确无误。 • 联系 ISP 核实配置信息。 • 联系 NETGEAR 技术支持部门:
1.PPPoE:如果每次连接因特网时都需要用户名和密码进行登录,或者 ISP 提供给您的是 PPPoE 帐户, 则选择是。例如:中国电信和中国网通 ADSL 宽带业务通常采用此连接类型,个别小区宽带也会采用此种 方式。
注意:在路由器配置完成后,无需从 PC 机上运行 PPP 拨号软件即可进行因特网连接。 2.静态 IP 地址:商务光纤等专线接入通常会采用此种连接类型。倘若宽带服务商向您提供了 IP 地址,子 网掩码,网关和 DNS 等详细参数,请选择否,将上述参数填入本页点击应用即可。 3.动态 IP 地址:此方式是路由器默认的 Internet 连接类型。倘若您的宽带既无帐号密码、又无固定 IP 地 址,请选择否,点击应用,无需改动其他参数。有线电视(Cable)和部分小区宽带采用此种连接方式,如: 上海有线通、广州珠江宽频、深圳天威视讯等。
NETGEAR无线路由器说明书

注意:完成上述连接并启动Modem 及路由器后,请检查路由器面板的指示灯。若正确连接,电源指示
灯、无线指示灯、WAN 口指示灯及对应的LAN 口指示灯均亮,对照“WGR614v10 的指示灯及端口” 介
绍检查指示灯是否显示正常。
计算机网络属性配置
例:某电信ADSL 用户,电信提供的相关信息如下:
宽带用户名gzDSL1234@163.gd
密码12345678
1.
选择菜单设置→基本设置:第一个问题您的因特网
连接需要登录吗? 选择“ 是” ;因特网服务提供商
选择“PPPoE” ;在登录名和密码后面的空白栏中分
别输入所用宽带的帐号和密码,如右图:
WGR614v10
固件升级
进入管理界面,显示路由器正在检查固件升级。若选中“ 登
录时检测新版本” 复选框,则每次登录WGR614v10 管理界
面时,路由器会自动检查NETGEAR 服务器,查看是否有
新的固件发布。
通常情况下,路由器现有固件都可以稳定工作,不必经常
升级。如果需要刷新固件,建议您登录NETGEAR 中文站
201-12333-01
手动连接:若您希望自己控制路由器与Internet 的连接或断开,请选择手动连接;需要上网时,首先进
入路由器管理界面,在路由器状态→连接状态中点击连接即可,需要注意的是,手动连接后路由器将一
直保持在线,必须在连接状态中点击断开连接方可断开与Internet 的连接。
端口已获取到IP 地址,说明路由器与Internet 连接成功。
关于WGR614v10
连接模式的说明
网件EX6400 快速入门指南说明书
Thank you for purchasing this NETGEAR product. You can visit /support to register your product, get help, access the latest downloads and user manuals, and join our community. We recommend that you use only official NETGEAR support resources.Si ce produit est vendu au Canada, vous pouvez accéder à ce document en français canadien à https:///other/.(If this product is sold in Canada, you can access this document in Canadian French athttps:///other/.)For regulatory compliance information including the EU Declaration of Conformity, visithttps:///about/regulatory/.See the regulatory compliance document before connecting the power supply.SupportNETGEAR INTL LTDBuilding 3, University Technology Centre Curraheen Road, Cork, IrelandNETGEAR, Inc.350 East Plumeria Drive San Jose, CA 95134, USA© NETGEAR, Inc., NETGEAR and theNETGEAR Logo are trademarks of NETGEAR, Inc. Any non‑NETGEAR trademarks are used for reference purposes only.LEDDescriptionRouter LinkThis LED indicates the WiFi connection between the extender and the router.• Solid green . Best connection.• Solid amber . Good connection.• Solid red . Poor connection.•Off . No connection.Client LinkThis LED indicates the WiFi connection between your computer or mobile device and the extender:• Solid green . Best connection.• Solid amber . Good connection.• Solid red . Poor connection.• Off . No connection.Power•Blinking green . The extender is booting.• Solid green . The extender is powered on.• Off . The extender is powered off.WPS•Blinking green . A WPS connection is being established.•Solid green . The extended network is enabled with WiFi security (either WPA or WPA2).•Off . The extended network is enabled without WiFi security.LED descriptionsConfigure a router with advanced MAC settings to work with your extenderIf you enabled a WiFi MAC filter, WiFi access control, or access control list (ACL) on your router, when a WiFi device connects through the extender to your router, the MAC address of the WiFi device shown on the router is translated to another MAC address. If your router’s MAC filter, WiFi access control, or ACL is enabled, the WiFi device connects to the extender but cannot get an IP address from the extender and cannot access the Internet.To allow the WiFi device to receive an IP address from the extender and access the Internet, you must provide the translated MAC address to the router.To add a translated MAC address to your router and reserve an IP address for your extender:1. Log in to your router and disable the MAC filter,WiFi access control, or ACL.For more information about how to disable your router’s MAC filter, WiFi access control, or ACL, see your router’s documentation.2. Power on the extender and connect all of yourWiFi devices to the extender.3. Make sure that the Router Link LED remains lit.4. Log in to your extender:a. Launch a web browser from a computeror mobile device that is connected to your extender network.b. Log in to your extender:• If you did not enable the One WiFi Name feature, enter in the address field of the browser.• If you enabled the One WiFi Name feature, enter one of the following URLs:‑Windows-based computer . http://mywifiext.local/ or http://mywifiext/ ‑Mac computers and iOS devices . http://mywifiext.local/ ‑Android devices .http://<extender’s IP address>/ (for example, http://192.168.1.3/)A login page displays.c. Enter your admin user name and passwordand click the LOG IN button.The Status page displays.5. Select Settings > Connected Devices .The Connected Devices page displays the MAC addresses and virtual MAC addresses for computers and WiFi devices that are connected to the extender network.6. On the router, add all of the extender’s virtualMAC addresses and all of the virtual MAC addresses of the devices connected to the extender to your router’s MAC filter table.Note: To reserve a specific IP address for the extender, you must specify the first virtual MAC address that displays for your extender’s 2.4 GHz or 5 GHz network in your router’s IP reservation table. (The first virtual MAC address that displays for your extender’s 2.4 GHz and 5 GHz networks is the same.)7. Enable the router’s MAC filter, WiFi access control,or ACL.May 2019LEDDescriptionClient Arrow•Blinking . Move the WiFi‑enabled computer or mobile device closer to the extender.• Off . Your computer or moble device is within range of the extender.Router Arrow• Blinking . Move the extender closer to the router.•Off . The extender is within range of your router.After the setup, the One WiFi Name feature is enabled, which allows your extender to use the same WiFi network settings as your router.If you used the Nighthawk app to connect your extender, the following table listsexamples of what your extended WiFi names might look like:If you used WPS to connect your extender, the extended WiFi network name is based on the first WiFi network that it connected to—2.4 or 5 GHz. The following table lists examples of what your extended WiFi name might look like:Connect your device to the extended networkGetting started1. For initial setup, place your extender in the sameYou can move your extender to a new location after the setup.2. Plug the extender into an electrical outlet.3. Wait for Power LED to light solid green.4. If the Power LED does not light, press the On/Offbutton.5. Connect your extender to your existing WiFinetwork using one of these methods:• Connect with the Nighthawk app . TheNighthawk app guides you through the installation. For more information, see Connect with the Nighthawk app.•Connect with WPS . Wi‑Fi Protected Setup (WPS) lets you join a secure WiFi network without typing the network name andpassword. Your router must support WPS to use this method. For more information, see Connect with WPS.WPS does not support WEP network security or a hidden WiFi network. If your router WiFi network uses WEP security or uses a hidden WiFi network, follow the instructions inConnect with the Nighthawk app.Connect with the Nighthawk app1. Download the Nighthawk app on your mobiledevice.For more information about the Nighthawk app,visit Nighthawk‑.2. On your mobile device, open the WiFi connectionmanager, then locate and connect to the extender network called NETGEAR_EXT.3. Launch the Nighthawk app.4. Follow the prompts to connect your extender toyour router WiFi network.5. After the setup is complete, move your extenderto a new location.For more information, see Find a good spot for your extender.6. Connect your WiFi‑enabled devices to theextended network.For more information, see Connect your device to the extended network.1. than five seconds.The WPS LED blinks.Note: If you press the WPS button for more than five seconds, the extender turns off.2. Within two minutes, press the WPS button on yourrouter.When the extender connects to the router, the Router Link LED lights.If the Router Link LED lights green, the connection between your router and extender is good. If the Router Link LED lights amber or red, move the extender closer to the router and try again.Note: If your router supports the 5 GHz band and your extender didn’t connect to that band, repeat the WPS process.3. Move your extender to a new location.For more information, see Find a good spot for your extender.4. Connect your WiFi‑enabled devices to theextended network.For more information, see Connect your device to the extended network.Connect with WPSFind a good spot for your extender1. Unplug your extender and move it to a newlocation.We recommend that the new location be about halfway between your router and the area with a poor WiFi signal.The extender must be within the range of your router WiFi network.2. Power on your extender.3. Use the Router Link LED to find a spotwhere the extender‑to‑router connection is optimal.For more information about the Router Link LED, see LED descriptions on the other side of this quick start guide.。
美国网件 ac2300智能wifi路由器R7000P用户指南说明书
Do MoreWiFi Network Name and PasswordThe preassigned WiFi network name (SSID) and password (network key) are unique to your router, like a serial number. Because the router automatically uses WiFi security, you don’t need to set it up. The WiFi settings are on the router label.We recommend that you use the preassigned WiFi settings because you can check the label if you forget them. You can also log in to the router to change these settings.You can write the WiFi settings from the router label in this space for easy reference. If you change the WiFi settings, write the new settings here for easy reference and store this booklet in a safe place.WiFi network name (SSID):Network key (password):Join the WiFi NetworkYou can either use Wi-Fi Protected Setup (WPS) or select your router’s WiFi network and type its password.Join the WiFi Network Using WPSFor help with the WPS button on your WPS-enabled device, checkthe instructions or online help that came with that device. Some older equipment cannot use WPS.¾To join the network using WPS:1. Press the WPS button on the router for three to five seconds.The WPS LED on the router blinks white.2. Within two minutes, on your WPS-enabled device, press its WPSbutton or click its onscreen WPS button.The WPS LED on the router lights solid white when the WPS-enabled device connects to your router.3. Repeat this process to add other WPS-enabled devices.Join the WiFi Network Using the Router’s WiFi SettingsUse the router’s WiFi network name and password to connect yourWiFi-enabled computer or mobile device to the router’s network through WiFi. If you did not change the router’s WiFi network name and password, use the router’s preassigned WiFi network name and password, which are on the router label.¾To select your network and enter its password:1. On your WiFi-enabled computer or mobile device, open the WiFiconnection manager that manages your WiFi connections.The WiFi connection manager scans for WiFi networks in your area. 2. Find and select your router’s WiFi network name (SSID).The SSID is on the router label.3. Enter the router’s password (or your custom password if you changedit) and click the Connect button.The password is on the router label.4. Repeat Step 1 through Step 3 to add other computers or mobiledevices.View or Change the Router SettingsAfter you use the NETGEAR installation assistant to set up the router, you can log in to the router to view or change its settings.Log In to the Router¾To log in to the router:1. Connect a computer or mobile device to the router.You can connect using an Ethernet connection or a WiFi connection:• Ethernet. To connect using a wired connection, use an Ethernetcable (not included) to connect an Ethernet port on yourcomputer to an Ethernet port on the router.• WiFi. To connect using a WiFi connection, look on the router’s label for the preassigned WiFi network name and password. Openthe WiFi connection manager on your WiFi-enabled computer ormobile device, find the router’s WiFi network name, and use therouter’s password to connect.2. Launch a web browser and visit .A login window opens.3. Enter router admin user name and admin password.The admin user name is admin. If you did not change the adminpassword, the default password is password.The BASIC Home page displays.Change the WiFi Network Name and Password The router’s preset WiFi network name (SSID) and password are on the router label. If you want to change your router’s WiFi network name and password, log in to the router.¾To change the router’s WiFi network name and password: 1. Launch a web browser from a computer or mobile device that isconnected to the network and visit .A login window opens.2. Enter router admin user name and admin password.The admin user name is admin. If you did not change the adminpassword, the default password is password.The BASIC Home page displays.3. Select Wireless.The Wireless Setup page displays.4. To change the WiFi network name (SSID), enter a new name in theName (SSID) field.5. To change the WiFi password, enter a new password in the Password(Network Key) field.6. Click the Apply button.Your settings are saved.Change the admin Password¾To change the admin password:1. Launch a web browser from a computer or mobile device that isconnected to the network and visit .A login window opens.2. Enter router admin user name and admin password.The admin user name is admin. If you did not change the admin password, the default password is password.3. Select ADVANCED > Administration > Set Password.The Set Password page displays.4. Type your old password and type the new password twice.5. To be able to recover the password, select the Enable PasswordRecovery check box.We recommend that you enable password recovery.6. Select two security questions and provide answers to them.7. Click the Apply button.Your settings are saved.Recover a Forgotten admin PasswordThe default password for the admin user name is password. If you changed the password and enabled the password recovery feature, you can retrieve this password.¾To retrieve a forgotten admin password:1. Launch a web browser from a computer or mobile device that isconnected to the network and visit .A login window opens.2. Click the Cancel button.If password recovery is enabled, you are prompted to enter the serial number of the router. The serial number is on the router label.3. Enter the serial number of the router.4. Click the Continue button.A page displays requesting the answers to your security questions.5. Enter the saved answers to your security questions.6. Click the Continue button.A page displays your recovered password.7. Click the Login again button.A login window opens.8. With your recovered password, log in to the router.Enable Dynamic Quality of ServiceDynamic Quality of Service (QoS) resolves Internet traffic congestion when Internet bandwidth is limited by using better application and device identification, bandwidth allocation, and traffic prioritization techniques. If you like gaming and streaming videos, then you can benefit from enabling Dynamic QoS.Note: If you use a gigabit Internet connection, or your Internet download and upload speed is 300 Mbps or faster, then you don’t need to use Dynamic QoS.¾To enable Dynamic QoS:1. Launch a web browser from a computer or mobile device that isconnected to the network and visit .A login window opens.2. Enter router admin user name and admin password.The admin user name is admin. If you did not change the adminpassword, the default password is password.The BASIC Home page displays.3. Select Dynamic QoS.The Dynamic QoS page displays.4. Select the Enable Dynamic QoS check box.5. Specify your Internet bandwidth.You can use Speedtest to detect your Internet bandwidth or you can enter your Internet bandwidth manually. We recommend that you use Speedtest.To use Speedtest to detect your Internet bandwidth, do the following:a. For more accurate Speedtest results, make sure that no otherdevices are accessing the Internet.b. Click the Speedtest button.Speedtest determines your Internet bandwidth.6. Click the Apply button.Your settings are saved.7. To view bandwidth utilization by device and application, click the Clickhere to see bandwidth utilization by device and application link at the bottom of the page.For more information, see the user manual, which is available onlineat or through a link in the router’s user interface.Enable Smart ConnectSmart Connect selects the fastest WiFi band for your device. For Smart Connect to work, the 2.4 GHz and 5 GHz bands must use the same WiFi network name (SSID) and network key (password).¾To enable Smart Connect:1. Launch a web browser from a computer or mobile device that isconnected to the network and visit .A login window opens.2. Enter router admin user name and admin password.The admin user name is admin. If you did not change the adminpassword, the default password is password.The BASIC Home page displays.3. Select Wireless.The Wireless Setup page displays.4. Select the Enable Smart Connect check box.5. Click the Apply button.Your settings are saved.Access a USB Device on the Network ReadySHARE lets you access and share a USB storage device connected to the router’s USB ports. (If your USB device uses special drivers, it is not compatible.)¾To access the USB storage device from a Windows computer:1. Connect your USB storage device to a USB port on the router.To get the best USB device access speed, use the blue USB 3.0 port on the router. It might take up to two minutes before the USB storage device is ready for sharing.2. On a Windows computer that is connected to the network, selectStart > Run, enter \\readyshare in the dialog box, and click the OK button.A window displays the files and folders on the device.¾To access the USB storage device from a Mac:1. Connect your USB storage device to a USB port on the router.To get the best USB device access speed, use the blue USB 3.0 port on the router. It might take up to two minutes before the USB storage device is ready for sharing.2. On a Mac that is connected to the network, launch Finder and selectGo > Connect to Server.The Connect to server window opens.3. Enter the smb://readyshare in the Server Address field and clickthe Connect button.4. When prompted, select the Guest radio button.5. If you set up access control on the router and you allowed your Macto access the network, select the Registered User radio button and enter admin for the name and password for the password.For more information about access control, see the user manual,which is available online at or through a link in the router’s user interface.6. Click the Connect button.A window displays the files and folders on the device.Remotely Access Your Router Using the genie AppYou can use the genie app to remotely access your router and change its key settings. Remote access with the genie app is supported for Windows computers, iOS mobile devices, and Android mobile devices. For more information about this feature, see the genie app user manual, which is available online at .¾To set up remote access using the genie app for Windows computers:1. Visit /genie and download the latest version ofthe genie app for Windows.2. Create a remote access genie account:a. Connect your computer to the router’s network.b. Launch the genie app.c. Select Router Settings.The Router Login page displays.d. From the Login as menu, select Remote Access.e. Click the Sign up link.f. Complete the fields to create an account.3. Log in to your remote access genie account.The genie app determines if the router is registered with yourgenie account. If the router is not registered, follow the onscreeninstructions.After the router registers with your genie account, a cloud icondisplays on the page. You can now remotely access your router from the genie app that is installed on your computer.Remotely Access Your Router With ReadyCLOUDReadyCLOUD allows you to remotely access files on a USB storage device connected to the router. For more information about using ReadyCLOUD, see the ReadyCLOUD user manual for routers, which is available online at .¾To set up your ReadyCLOUD account and register your router:1. Create a ReadyCLOUD account:a. Visit and click the Sign In link.The Sign In page displays.b. Click the Create Account link, complete the fields to set up youraccount, and click the Create button.2. Set up and register your router:a. Connect a USB storage device to a USB port on your router.b. Launch a web browser from a computer or mobile device that isconnected to the network and visit .The BASIC Home page displays.c. Select ReadySHARE.The USB Storage (Basic Settings) page displays.d. Select the ReadyCLOUD radio button.The ReadyCLOUD page displays.e. Enter your ReadyCLOUD user name and password and click theRegister button.The router is now registered with your ReadyCLOUD account. 3. After registration, visit and use yourReadyCLOUD user name and password to sign in to your account.The ReadyCLOUD page displays the router that you registered and the contents of the USB storage device that is connected to the router.Set Up VPN ServiceVPN service allows remote access to your home network with a secure connection. After you set up VPN service, you can use VPN to access the router’s USB drive and media and to access your Internet service at home. VPN service is available for Windows computers, Mac computers, iOS devices, and Android devices.For more information about how to set up VPN service, see the user manual, which is available online at or through a link in the router’s user interface.Print Wirelessly With ReadySHARE Printer ReadySHARE Printer lets you connect a USB printer to the USB port on the router and print wirelessly. Download ReadySHARE Printer from/readyshare and install it on your computer.September 2016NETGEAR INTL LTD Building 3, University Technology CentreCurraheen Road, Cork, IrelandNETGEAR, Inc. 350 East Plumeria DriveSan Jose, CA 95134, USA SupportThank you for purchasing this NETGEAR product. You can visit /support to register your product, get help, access the latest downloads and user manuals, and join our community. We recommend that you use only official NETGEAR support resources.Trademarks© NETGEAR, Inc., NETGEAR and the NETGEAR Logo are trademarks of NETGEAR, Inc. Any non-NETGEAR trademarks are used for reference purposes only.ComplianceFor the current EU Declaration of Conformity, visit /app/answers/detail/a_id/11621/.For regulatory compliance information, visit /about/regulatory/.See the regulatory compliance document before connecting the power supply.。
网件NETGEARWNR2000无线路由器设置指南[教材]
前言:路由器和无线路由器虽然普及得很快,大伙用得也很方便,但还是有很多刚接触路由器的朋友,不懂得如何设置路由器,毕竟它不是跟非网管交换机一样,插上即可用。
而厂商一般都配有说明书,有些却不够简明,过于复杂,有些虽然提供了傻瓜化的安装向导,但在设置的定制化方面显然无法体现。
今天,我们就用最浅显易懂的图文并茂的方式表达出来,希望对菜鸟朋友们有点帮助。
gear 的路由器在市场上也占有很大的份额,我们的路由器设置向导系列文章当然不能少了Netgear的产品。
今天我们为大家带来Netgear WGR614的路由器设置向导,希望能够为大家带来一点帮助。
进入初始的设置向导后,我们发现有5个步骤。
前面两个步骤是提醒用户需要做的准备工作以及连接设备,这里我们不做详细阐述,跳过前两个步骤,直接进入第三步——激活网络。
页面提示我们是否通过设置向导设置网络。
这里本人建议对路由器设置还不大熟悉的大虾们选择“是”,通过向导设置,方便省事。
然后我们点击下一步。
2.接着,系统要求我们设置无线网络名,用于在多个无线网络下,对此网络进行识别。
如果采用默认名字的话,很有可能跟别人的热点重名,会造成很大干扰,所以我们最好改一个个性化的SSID。
输入好自定义名字之后,点击下一步进入下一个步骤。
3.接着我们进入第四步骤——网络安全。
简单的选择是否引导无线安全设置。
选择是,点击下一步继续设置。
4.接着系统询问我们希望使用哪种加密功能,由于我的设备支持WPA-PSK加密方式,所以选择了这个选项。
大家也可以根据自己设备的具体状况选择相应的加密方式,然后点击下一步输入密匙。
5.接下来的这一步非常简单,输入密码即可。
不过这一页面的亮点在打印按钮上,由此看出Netgear为用户考虑周到,方便用户把密码打印下来,以便日后忘记密码后能够有迹可寻。
6.最后,系统询问我们是否更改管理员的帐号密码。
这里我们建议大家把管理员帐号密码改成一个自己不易忘记而别人又不知道的密码,这样便能防止别人胡乱修改你的设置。
网件NETGEAR设置说明书
原装网件NETGEAR WGR614 V8 dd-wrt无线路由器万能中继AP 网桥使用说明书一、打开IE浏览器,在地址栏输入:192.168.1.1第一次使用输入用户名root 密码admin 一定要注意是小写,且不能输错,不然无法进入系统设置界面.进入系统设置界面,然后把界面改成中文语言\如果还没有变成中文界面,请点IE菜单栏的刷新,就会出现中文界面,或者重新打开IE浏览器二、上网设置(此功能相当于一台普通的无线路由器,下面的“三、无线中继设置”可省略)1.基本设置。
一般宽带是ADSL上网方式,请按如下设置,设置完后要点保存并应用。
2.无线安全设置1.修改路由器的IP,使之跟被中继的路由器IP不一样例如:被中继的前一级无线信号的默认网关192.168.1.1(可点击“无线网络连接”—“支持”选项卡下查看)应把192.168.1.1改为192.168.0.1或192.168.2.1等相异的IP注意:改了之后要及时保存,并且点击应用。
应用后再要成功访问路由器则应在地址栏输入修改后的IP地址才可成功访问。
2.查找无线信号3.选择您需要中继的信号,并点“加入”按钮4.设置物理接口和添加及设置虚拟接口5.如果对方的无线加了密码,还要进行加密设置安全模式可访问对方无线路由器的无线安全查看是什么模式或通过刷新无线网络表列查看无线信号是启用安全的无线网络()中的安全模式还可以通过查看对方的无线设置知道加密计算等信息设置好后要点保存并应用,后再访问一下中继路由器“状态”——“W AN”查看路由器是否分配到了IP地址,而不是0.0.0,如果分配到了说明中继成功。
否则再进入下一步。
对方无线基本设置中的信道(频道)是否为自动,如为自动就应改为1或6或11等固定值,修改后还要保存和重启对方的路由器。
(此步骤是无法中继对方信号下才用)注意:如果设置失败或无法访问路由器可恢复路由器的出厂设置再从新上述设置。
恢复路由器的方法如下。
- 1、下载文档前请自行甄别文档内容的完整性,平台不提供额外的编辑、内容补充、找答案等附加服务。
- 2、"仅部分预览"的文档,不可在线预览部分如存在完整性等问题,可反馈申请退款(可完整预览的文档不适用该条件!)。
- 3、如文档侵犯您的权益,请联系客服反馈,我们会尽快为您处理(人工客服工作时间:9:00-18:30)。
在连接到本产品前,我们把电脑上的本地连接(有线网卡)的IP和DNS 都改成自动获得IP.连接好后打开IE.输入192.168.1.1回车(如果路由器复位到出厂设置可以直接输入:http://192.168.1.1/start.htm,直接进入设置页面)
在弹出的对话框中.用户名:admin密码: password
确定后直接进入路由器的全中文设置页面:直接点左边的菜单“基本设置”在“您的因连接需要登录吗?”这边点“是”(默认是“否”)在下面的“因特网服务提供商”下面的“登录”你自己的宽带用户名,在“密码”后面框中填入你的宽带帐号的密码,点下面“应用”完成设置。
路由器重启后,我们点页面左边菜单“路由器状态”看如下页面:在红框中有外网IP 和服务器地址出来表示路由器已经和外网连好,可以上网了。
下面简单介绍一下加密:进入路由器页面点“无线设置”进入设置页面,以最常见的WPA –PSK或者WPA2-PSK加密为例。
注明:有个别无线网卡是不支持WP2-PSK加密的,为了兼用好点一般买家设置WPA-PSK加密就可以了。