ZALObabyheart说明书
埃尔迪斯特儿奶嘴椅说明书

Make adjustments before the child is inthe stander. For easier adjustment,remove the Shadow Tray and raise seatto a slight angle. If you have the SupineOption, make sure the red supine lockinghandles are loose.Loosen the knobs on the seat tube and the following arm (but do not unscrewcompletely).Adjust to a shorter seat depthsetting,first, adjust the following arm(back angle) by depressing the springbutton and moving no more than twoholes at a time. Then adjust the seattube (seat depth) one hole at a time.Continue this sequence until you achievethe desired setting, and the colors on theseat tube and following arm match (C).Adjust to a longer seat depthsetting,first, adjust the seat tube (seatdepth) by depressing the springbutton and moving only one hole at atime. Then adjust the following arm (backangle) no more than two holes at a time.Continue this sequence until you achievethe desired setting, and the colors on theseat tube and following arm match (C).For easier adjustment, use the seatbracket or the lift assist handle to liftslightly as the seat depth adjustment is made (D).™Step Two - Seat Depth/Back Angle Step Three - Knee Pads Position the user’s hips as close as possible to stander’s hip pivot (E). To determinecorrect positioning, fit two fingers between the front of the seat and the back of the knee (F). Adjust and secure the knee pads so the knees are centered in the pads.Bantam -Perfect Fit Guide For more detailed information refer to your owner’s manual.Step One - Foot Plates A B C D Seat Tube Following Arm E FBefore the child is in the stander, loosenthe clamps (do not remove) on thefoot plates to adjust height (A). The kneesshould be slightly lower than the hips (B).Tighten clamps securely.Tips:• Remove Shadow Tray and bring seat up to a slight angle.• Start with the smaller tube to adjust to a shorter setting.• Start with the bigger tube to adjust to a longer setting.Tip:• Position foot plate height so the femur is resting on the seat.Tips:• Position child's hips in seat to match stander's hip pivot.• You should be able to fit only 1-2 fingers behind the knee.For more detailed information refer to your owner’s manual.™Bantam -Supine OptionStep 1:Loosen both red supine locking handles located by the hip pivot on both sides of the unit. Flipthe supine lever located under the right side of the seat down to the“supine” position. This will release theback, seat and foot plates from theframe.Step 2:Adjust to the desired supineposition by tilting the back and thentighten both red supine lockinghandles. This can be done with theuser in the stander and at any position.Step 3:Depress the foot pedal (oroptional hydraulic actuator) toposition the stander at the desired standing angle.Activating Supine PositioningSupine Locking Handle Step 1:Flip the supine lever locatedunder the right side of the seat up tothe “sit to stand” position.Returning to sit-to-stand position/deactivating the Supine Positioning Step 2:Loosen the red supinelocking handles located by the hippivot on both sides of the unit and push the back forward to connect the back, seat and foot plate to the frame. You should hear the supine lever click into place. This can bedone with the user in the standerand at any position.。
爱国者移动伴侣快速使用指南.ENG.V1.0

爱国者移动伴侣快速使⽤指南.ENG.V1.01 Product Introduction1.1Product Introductionaigo Mobil Mate(WiFi Router)and Mobil Mate(WiFi SSD)have 4 function: Mobil Battery, WiFi Router,USB3.0 External HDD and Extended Storage for pad.Package list:Mobil Mate…………………………………….1pcsMultifunction Cable ……………………...1pcsManual …………………………………….1pcsPlease use your own AC to DC adapter(5V,USB Form Factor, such as Ipad Charger)to charge the Product. And also you can use USB port of your PC.The product has 4 kinds of working mode:A. Mobil Battery mode:In Shut down condition, plugthe USB charging cable into the “+5V out” port onthe left side, which is USB Form Factor, then thePhone or Pad can get +5V/1A DC power supply. B. WiFi Router mode:Connect the product to Internetwith Ethernet cable, then your Phone or Pad in the12same room can connect to Internet via the WiFi signal.C. USB3.0 External HDD mode :Connect the productto PC with Multifunction Cable, then you can read or write data or charge the product.D. WiFi Disk mode :In Shut down condition, press thepower button, then your Phone or Pad in the same room can connect to the product via the WiFi signal, and play Video, Audio, Music, Windows OfficeDocuments in certain App or Internet Explorer APP . The product can also backup your files from your Phone or Pad by use of certain APP .1.2 Interface FunctionPower Button :Press and turn on the product, while the +5V out be shut down at the same time . In 50s it will r elease WiFi signal and can be read or write in WiFi Router mode or WiFi Router mode,USB3.0 Micro B Receptacle:Connect the product to PC with Multifunction Cable, then you can read or write data or charge the product. And normal Phone (such as Samsung, HTC and apple)charger can insert the left part with USB2.0 Micro B form factor to charge the product.Reset Button:Press the button and r elease it after 5s, the SSID name, WiFi password, device user name, device user password would restore to Factory Default Settings which is already printed in the back paste.Ethernet Interface (RJ45 port):Used for connect to Internet⽤with Ethernet cable.Phone Charging Port: USB form factor, support phone charging cable of Samsung, HTC, or apple, and offer 5V/1A power out.34Batt Led :1. Green Steady Light: The battery power is >30%.2. Red Steady Light: The battery power is <30% and>10%.3. Red Fast Flash: The battery power is depleting andwill soon shut down.4. Green Slow Flash (every two seconds): The batteryis charging.5. Green Slow Flash (every one second): The device isshutting down.6. LED off: The device is powered off.HDD or SSD Read/Write Led :1. WiFi disk modeA. W hite Steady Light: HDD/SSD connection issuccessful.B. W hite Flashing Light: HDD/SSD is reading or writing.2. Mobile HD modeA. White Steady Light: Connected to USB2.0B. White Flashing Light: Connected to USB2.0 and isreading or writing.C. Blue Steady Light: Connect to USB3.0D. Blue Flashing Light: Connected to USB3.0 and isreading or writing.WLAN Led:1. Blue LED shows the system initiation state. It startsflashing in the process of initiation, and it stopsflashing when the system initiation completes.2. Blue Steady Light: WiFi is ready.3. The LED light is off for the following situations:A. Device is on, but the WiFi signal is unsteady.B. Device is off.C. Device is in Mobile HDD Mode and the WiFi is off. WAN Led:1. WiFi connectionA. Blue Steady Light: WiFi signal is good.B. Red Steady Light: WiFi signal is weak.C. No Light: Not connected to the Internet.2. Wired connectionA. Blue Steady Light: Internet connection issuccessful.B. No light: Internet connection failed.56mode Plug A Plug B1 Plug B2 备注MobilBattery Plug into the Power out portPlug into the USB2.0 Micro B socket of your phone Charge your Phone or Pad WiFiRouterWiFiDisk Plug into the USB3.0 Micro B socket at the bottom ofProductCharge the Product Shutdown Plug into any DC to USB5Vcharger Plug into the USB3.0 MicroB socket at thebottom ofProductUSB3.0 Plug into the Plug into the Read orExternal HDD USB socket ofPCUSB3.0 MicroB socket at thebottom ofProductWrite fromPC;Chargethe Product1.3 ParametersA. Charging parameter: 5V,Electric current≦2.1A,Charging from USB2.0 Micro B part of theReceptacle at the bottom sideB. Power out parameter:5V,1A,in USB2.0 Type Aform factorC. A b uilt in lithium polymer which lasts for more thanfive working hours (seven standby hours) ,WiFiHDD has 3000mAh and WiFi SSD has 2600 mAh.D. WIFI:802.11 b/g/n, up to 150Mbps, AP+cliet modeor Router ModeE. Supports LAN data-sharing and cross-platformsRead/Write which includes Windows, Mac, Linux,iOS (iPad/iPhone/iTouch), and Android.F. Supports samba/webdav.72 Quick Start2.1Mobil Battery modeIn Shut down condition, plug the Multifunction Cable or USB charging cable of your phone or pad into the “+5V out” port on the left side, which is USB Form Factor, then the Phone or Pad can get +5V/1A DC power supply.※As soon as you press the Power button and turn on the product, the +5V Power out would be shut down immediately. 2.2 WiFi Router modeConnect the product to Internet with Ethernet cable or an available WiFi Router, then your Phone or Pad in the same room can connect to Internet via the WiFi signal.press the Power button and turn on the product, in about 50s, you can find the Blue WLAN Led is Steady Light and a WiFi signal with the name of “aigo-****” can be connected with the password”11111111”.(”****” is the8MAC address of the Wireless network adapter of the product).You can change the detail setting of the product at the IP address 10.10.10.254, with the default user name “admin” and the default password is none.2.3 External HDD mode modeConnect the product to PC with Multifunction Cable, then you can read or write data as normal external HDD. After the connection is build, PC will begin to charge the product in 2 minutes.2.4 WiFi Disk modeAfter your phone or pad have connected to the product via WiFi signal, you can list, play, move or delete the files in the Product, and also backup the files from your phone or pad to it:iOS Android Wind owsTypical Hardware iPHONE iPAD SamsungPhoneLaptop9※Expl orer SafariUCWEB、BaiduExplorerIE7‐9、Firefox※Official Client APP To be listed in APPStorePl ease install from theinternalStorageThird‐partyClient APPPower7 Mobil eView Wifi‐DiskThird‐partySAMBAPlayerOplayer、Goodplayer※Third‐party WebDAV APP WebDAV Nav/ /※can view MS OFFICE documentsAll the Internet Explorer and App copyright are are the property of the third-party companies, please download from apple APP Store or Android Market;Please visit /doc/692039be25c52cc58ad6be30.html get the new firmware and Official Client APP.10Please find the userguide for the Client APP and install to your phone or pad or PC from the internal storage of the product.2.5 Play the content stored in the productA. By Internet Explored(such as MS ie7,or Firefox,UCWEB, Baidu Explorer): Input 10.10.10.254 atthe address bar,press “Enter” key and log in withthe username ”admin” and password none You can click the “File management” button to explore all the files stored in the internal disk. You can play allkinds of MS OFFICE documents, PDF files, MP3files, and also MOV, MP4, M4V files. *.AVI and*.RMVB, *.MKV need special Player APP installedin your Phone or PAD.B. By Oplayer or Goodplayer in iOS: Please add theproduct as a Windows Host (Samba) and input10.10.10.254 as the Host Address, Port 139,“admin” as the Username, leave none in thePassword bar, “aigo WiFi Disk” as the Host Title.11Save it, then you can touch the area of “aigo WiFiDisk” listed below “My Documents” in “File Sever”,you will see all the files stored in the internal disk,and the *.AVI and *.RMVB, *.MKV files can beplayed after 1-4 times of loading process.C. By WebDAV NAV in iOS: Press “+” area at theupper right corner and input “aigo WiFi Disk” asthe Name, http://10.10.10.254/data as the ServerURL, “admin” as the Username, leave none in thePassword bar. Save it, then you can touch the area of “aigo WiFi Disk” listed, you will see all the filesstored in the internal disk, the MS OFFICEdocuments and the *.AVI and *.RMVB, *.MKV, *.jpg, *.mp3 files can be played after seconds of loadingprocess.There are many different between the different Player APP in support different kinds of files. aigo do not promise user can connect and play all kinds of files stored in the product stably by above APP software.12。
Etisalat UAE 手机、平板设置指南说明书

How to setup the Mobile/Tablet: • Internet service is by default pre-installed on your device.• If it’s not pre-installed on the device, then you can set it up manually, please go to “Cellular data” or “3G Network” & enter the APN Settings manually by writing “internet.etisalat” in the APN field, and leave both username and password blank.Index:How to setup the Mobile/Tablet 1How to setup the 3G USB Modem (ZTE 190S) for your Laptop 2How to Setup the 4G USB Modem 3How to Setup iModem 4To Check your Balance 5To recharge your balance 6For Extra Add-Ons (Extra MB) 7,8To Renew the bundle 9To Change your Bundle 10Useful Codes 12Postpaid Customers (Mongez Control) 13To contact customer care 14How to setup the 3G USB Modem (ZTE-190S) for your Laptop:• Insert the SIM card into the modem.• Before plugging the USB modem into the PC, uninstall any previous USB software.• Plug the modem into the PC.• Install the Software.• Once installation is finished, open the software.• Click connect.• You can send SMS through the Software.• For Software update, go tohttp://www.etisalat.eg/etisalat/portal/support How to Setup the 4G USB Modem:• Insert the SIM card into the modem.• Plug the modem into the laptop.• Open any internet browser “Google Chrome or Internet Explorer” and enter http://192.168.0.1• You will be prompted to our Web Dashboard.• Click connect.You can see your usage, check your balance and send SMS from the web dashboard.How to Setup iModem:• Charge the iModem until it is fully charged.• Insert the SIM card in the modem & switch it on.• Connect to iModem network “Etisalat 4G iModem-F3BA”. You will find the network name & password on the back of the device.• Open any internet browser “Google Chrome” or “Internet Explorer” and enter http://192.168.0.1• You will be prompted to our Web Dashboard.• You can now change your network name “SSID” & set your new password.• Press connect.You can see your usage, check your balance and send SMS from the web dashboard.To Check your Balance:• Using the dashboard, send an empty SMS to “555” or dial “*130#”. • Or using your mobile/tablet, send an empty SMS to “555” or dial “*130#”.• Or Visit our website www.etisalat.eg and sign in to your account.• Or Visit my.etisalat.eg and enter the dial number.• Or download My Etisalat application.To Recharge your balance:• Using the Dashboard/Mobile, send an SMS to “551” including the(15 digits on the back of the scratch card).• Using your Mobile/Tablet, you can dial *556*15 digits on the back of the scratch card#.• Or visit our website www.etisalat.eg and sign-in to your account.• Or download My Etisalat application.For Extra Add-Ons (Extra MB):Please make sure you have enough balance.Add-On RP Price Quota SMS USSD 1Extra EGP 10All EGP 10500MB1 to 138*130#2Extra EGP 20All EGP 20 1 GB 2 to 138*130# 3Extra UL SocialEGP 5All EGP 5500MBEmpty SMS to780*130# 4Extra UL EGP 10All EGP 10 1 GBEmpty SMSto 781*130#Add-On RP Price Quota SMS USSD5Social Boost(Whatsapp, Snapchat,Instagram, Facebook,and Twitter)Mongez 30Mongez 45Mongez 60EGP 255 GB6 GB7 GBSend “2” to 527*527#6Music & Video Boost(Anghami, Soundcloud, Shahid, andYoutube)Send “1” to 527*527#7Boost on AllProtocolsMongez100, 150,250, 400EGP 5015 GB Send “4” to 527*527#To Renew:Please make sure you have enough balance.To renew your bundle, please send an SMS with “1” to “130” or use thefollowing codes:RP SMS1Mongez 30Send “1” to 1312Mongez 45Send “1” to 7533Mongez 60Send “1” to 1324Mongez 100Send “1” to 1335Mongez 150Send “1” to 1346Mongez 250Send “1” to 1377Mongez 400Send “1” to 7548Mongez 600Send “1” to 863To Change your Bundle:• Please make sure you have enough balance before changing your bundle.• Please note that you will lose any remaining MB on your current bundle before migration.• To migrate to another bundle, send SMS with “1” to any of the numbers exist in the next page.• Or call our customer care service on 333 from Etisalat Line or 0111-1234333 from any line (24 hours).• If you changed your bundle without having enough balance, your request will still be accepted but you will be able to use the internet once youhave enough balance.RP Price Quota WiFiHotspot SMS USSD 1Mongez 3030 1.8GB500MB Send an SMS with “1” to 131 *130# 2Mongez 4545 2.5GB500MB Send an SMS with “1” to 753*130# 3Mongez 6060 3.5GB 1.5GB Send an SMS with “1” to 132 *130# 4Mongez 1001008GB4GB Send an SMS with “1” to 133 *130# 5Mongez 15015014GB4GB Send an SMS with “1” to 134*130# 6Mongez 25025025GB7GB Send an SMS with “1” to 137 *130# 7Mongez 40040045GB7GB Send an SMS with “1” to 754 *130# 8Mongez 60060072GB7GB Send an SMS with “1” to 863 *130#Useful Codes:Service SMS USSDRecharge Send SMS including the 15 digits to “551”*556*15 digits# Balance Enquiry Send an empty SMS to “555”Renew Send “1” to 130 or refer to P9Add-On (Extra MB)Refer to Page 7 (Add-On table)*130# Change your bundle Refer to Page 11 (Migration Table)*130# Show My Dial Number Send an empty SMS to “555”*947#Postpaid Customers (Mongez Control):For Postpaid Extra Add-Ons:Add-Ons RP Price Quota SMS Extra EGP 10All ControlBundlesEGP 10500 MB 1 to 593 Extra EGP 20EGP 20 1 GB 2 to 593 * If you have any other requests, please contact our Customer Serviceor Call Center.To Contact Customer Care:• Dial 333 from Etisalat Line or 0111-1234333 from any line (24 hours).• Or chat with us on our website www.etisalat.eg by signing in to your account.• Or you can contact us through our Facebook page “Etisalat Misr”.。
朗欣特足浴按摩器使用说明

朗欣特足浴按摩器使用说明第一篇:朗欣特足浴按摩器使用说明•操作方法1、先将水倒入足浴器内到最高水位线即可,冬季使用可直接加入38度左右的温水。
•2、插上电源,我们可以看到屏幕上有“OF”出现,这就说明电源已经接通了,再按一下电源开关键屏幕显示ON,时间默认为30分钟。
此时该机功能处于待机状态。
•••3、按一下冲浪加热键,就可以看到两个冲浪口强劲有力的水流冲出,这时候您可以根据需求来设定温度,我们设定的水温是35-48度之间循环调节,一般42度水温对人体比较适当。
当峰鸣器长鸣一声时,该机提醒你已达到设定的温度可以进入浴足。
••••••4、时间设定:我们的时间设定范围60—10分钟,每按键一次,设定时间下调10分钟。
一般每次的足浴在30分钟比较适宜。
•••••••5、振动/远红外:按一次该键,振动按摩开,可以看到水面上有水的波纹,再按一次就是振动按摩和远红外都开了,再按一次,该键功能全部关闭。
••6、气波/臭氧:按一次该键,我们可以看到足底有好多小气泡冒出来给足底按摩,增加水里的氧气;再按一次,气波增氧、臭氧杀菌功能均开,臭氧可以杀去脚底的细菌,防止和家人一起使用产生交叉感染。
臭氧杀菌一般只要5分钟就够了,朗欣特足浴按摩器结束前五分钟,该机会预警三声“嘀嘀嘀”,这时您就可以开启臭氧功能。
••7、排水功能①手动排水功能:饮水机式排水开关,简单方便。
•••②自动排水功能:只要将排水管接在冲浪口上,屏幕显示“OF”的状态下,按一下冲浪键,水就会自动流出,非常方便。
完毕后关机,将剩余的水倾倒。
•8、滚轮:底部配备四个万向轮,其中二个带刹车。
泡脚时放下手柄,轮子固定就不怕足浴盆移动了。
扳开刹车柄,轮子可移动,方便老人或不能提重物者移动足浴盆。
•••••9、养生药盒:本机设计有内置药盒,只要将药盒垂直向上提起,装入药包、即可享受药浴。
10、过滤网:双层过滤网设置,可有效防止药物碎屑等杂物渗入排水孔,有效保证足浴按摩器内部的清洁。
卡塔旅行者使用说明

卡塔旅行者使用说明
卡塔的旅行者背包的主单元设有标准分隔板,并且如果需要进行进一步分隔,可以购买模制多功能(Modi-vers)分隔套板进行分隔。
用来存放水杯、小型三脚架等的两个采用TST(热防护技术)做成的柔软敞口式口袋和一个杂物口袋共同为室外摄影师和电视录像制作人提供终极携带服务和保护服务。
可以利用KATA提供的三脚架固持座将三脚架装设于背包的前面或侧面进行携带。
高级掌控结构的设计使您能对所有特性、肩背带、6点可调式腰带以及护腰垫、进行终极调整,以便确保能符合各个携带者的需要。
当不用时,掌控结构可以被整洁地折叠起来以便于存放和装设额外的KATA 拉杆车。
背包上同时也有一个大型后部便携式电脑单元一个单独设置的顶部单元,可以在该顶部单元内放置一个安装有镜头以便快速拆卸的照相机或各种附件。
适合带有最多8个镜头(最多400mmf2.8)的2-3个D/SLR相机使用,或一个诸如索尼HDRZ1,松下HVX200和类似的便携式DV摄像机使用。
后部单元将最多可以容纳一个17英寸的便携式电脑。
Pololu Baby Orangutan B-328 小型机器人控制器说明书

Baby Orangutan B-328 Robot ControllerOverviewThe Baby Orangutan is a complete control solution for small robots, all packed into a tiny 1.2" x 0.7" 24-pin DIP package. Its compact design eliminates bulkier components such as the LCD and switches while retaining the most essential features of the Orangutan robot controller line: a programmable ATmega48 or ATmega328P AVR microcontroller and a dual H-bridge for direct control of two DC motors. This integrated motor driver sets the Baby Orangutan B apart from similarly-sized microcontroller boards from other manufacturers. Two on-board indicator LEDs, a trimmer potentiometer, a 20 MHz resonator, and reverse battery protection round out the basic hardware features of the Baby Orangutan.The removal of the larger Orangutan components also allows for a significantly improved manufacturing process that allows Pololu to offer the Baby Orangutan B at a very affordable price. Because the Orangutans are based on Atmel’s powerful AVR microcontrollers, the Orangutans deliver significantly higher performance than other similar controller boards. The availability of free development software, such as the Atmel Studio IDE and the WinAVR GCC C/C++ compiler, and low-cost programmers, such as the Pololu USB AVR programmer, make the Baby Orangutan B a truly outstanding value. We offer a combination deal that lets you save when you buy a USB AVR programmer with your Baby Orangutan.For those not necessarily interested in robotics, the Baby Orangutan B is also a great introduction to the AVR microcontrollers because of its size and price. All you need to get started is a low-cost programmer and a power source. You can fit a substantial design even on a small breadboard since you won’t need the space for basic components such as the voltage regulator and resonator. The source code for several sample projects is available under our resources tab; these examples are intended to help you get up and running quickly with your new AVR-based controller. Featuresoverall unit dimensions: 1.2" x 0.7"input voltage: 5-13.5 V (15 V absolute maximum)two bidirectional motor ports can deliver ~1 A continuous (3 A peak) per channelprogrammable 20 MHz Atmel ATmega48 AVR microcontroller (4 KB flash, 512 bytes SRAM, 256 bytes EEPROM) or Atmel ATmega328P AVR microcontroller (32 KB flash,2 KB RAM, 1 KB EEPROM)18 user I/O lines, 16 of which can be used for digital I/O and 8 of which can be usedas analog input channels1 user LEDuser potentiometer tied to ADC720 MHz external resonatorpinout is compatible with the Orangutan SV-328, Orangutan LV-168, and 3pi robot, so the same code will generally work on all of these devicescomprehensive user’s guideATmega48, ATmega168, and ATmega328 comparison The Baby Orangutan B is available with either the ATmega48 or ATmega328P AVR microcontroller (the ATmega168 version has been discontinued). The main differences between the mega48 and mega328P are memory size, boot loader support, and interrupt vector size. The mega328 can also run at lower voltages than the mega48 and mega168 for frequencies below 10 MHz.mega48mega168mega328P Flash4K Bytes 16K Bytes 32K Bytes RAM 512 Bytes 1024 Bytes2048 Bytes EEPROM 256 Bytes 512 Bytes1024 Bytes Interrupt Vector Size 1 instruction word/vector 2 instruction words/vector2 instruction words/vector Boot Loader Section none128, 256, 512, or 1024words(256, 512, 1024, or 2048bytes)256, 512, 1024, or 2048words(512, 1024, 2048, or 4096bytes)Note: As of July 25, 2011, the Baby Orangutan B-48 is only available for high-volume orders. Please contact us if you are interested in placing such an order. The Baby Orangutan B-328 continues to be available as normal.Included components The compact module can be used as a DIP component on breadboards or prototyping boards, or the pin-less versions can be used for space-constrained installations in miniature robots. The 0.1"header pins are included with the Baby Orangutan B but are not soldered in. Power pins, one of the motor outputs, and several I/O lines are all accessible from one side to enable use of the Baby Orangutan as a single in-line pin (SIP) package for applications that do not require all of the I/O lines. The small size and low cost of the Baby Orangutan makes it a perfect option for primary control of small robots or for auxiliary control on larger robots.Baby Orangutan B with included 0.1" header pins.Baby Orangutan B with included header pinssoldered in for breadboard installation.Note: The Baby Orangutan B-168 has been replaced by the Baby Orangutan B-328, which uses the newer ATmega328P microcontroller to provide 32 KB of program memory, 2 KB of RAM, and 1 KB of EEPROM. The ATmega328P is essentially a drop-in replacement for the ATmega168, so the code that works on the Baby Orangutan B-168 should work with minimal modification on the Baby Orangutan B-328 (the Pololu AVR Library now supports the ATmega328P).Documentation on producer website.。
最新娃娃机说明书
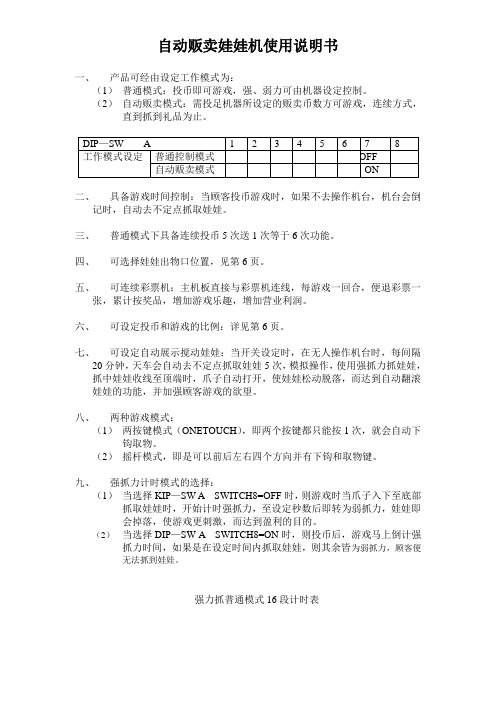
自动贩卖娃娃机使用说明书一、产品可经由设定工作模式为:(1)普通模式:投币即可游戏,强、弱力可由机器设定控制。
(2)自动贩卖模式:需投足机器所设定的贩卖币数方可游戏,连续方式,直到抓到礼品为止。
二、具备游戏时间控制:当顾客投币游戏时,如果不去操作机台,机台会倒记时,自动去不定点抓取娃娃。
三、普通模式下具备连续投币5次送1次等于6次功能。
四、可选择娃娃出物口位置,见第6页。
五、可连续彩票机:主机板直接与彩票机连线,每游戏一回合,便退彩票一张,累计按奖品,增加游戏乐趣,增加营业利润。
六、可设定投币和游戏的比例:详见第6页。
七、可设定自动展示搅动娃娃:当开关设定时,在无人操作机台时,每间隔20分钟,天车会自动去不定点抓取娃娃5次,模拟操作,使用强抓力抓娃娃,抓中娃娃收线至顶端时,爪子自动打开,使娃娃松动脱落,而达到自动翻滚娃娃的功能,并加强顾客游戏的欲望。
八、两种游戏模式:(1)两按键模式(ONETOUCH),即两个按键都只能按1次,就会自动下钩取物。
(2)摇杆模式,即是可以前后左右四个方向并有下钩和取物键。
九、强抓力计时模式的选择:(1)当选择KIP—SW A SWITCH8=OFF时,则游戏时当爪子入下至底部抓取娃娃时,开始计时强抓力,至设定秒数后即转为弱抓力,娃娃即会掉落,使游戏更刺激,而达到盈利的目的。
(2)当选择DIP—SW A SWITCH8=ON时,则投币后,游戏马上倒计强抓力时间,如果是在设定时间内抓取娃娃,则其余皆为弱抓力,顾客便无法抓到娃娃。
强力抓普通模式16段计时表十、中奖模式的控制:可经由设定百分百之百控制顾客中奖率和经营者的实际获利。
四种中奖模式的选择:秒后即转为弱抓力,娃娃松动脱落,动作重复,无几率控制。
(2) 弱抓力控制:受控次数 中奖次数 1 若设定:中奖率= ———— = ———— = —— 控制基数 游戏次数 5 每游戏5次便有1次中奖机会,因设定弱抓力控制,中奖机会便无足够力量来抓取娃娃,使顾客抓不到娃娃,其余4次皆为强抓力抓取娃娃后,经设定秒数后转为弱抓力,因而在半空中娃娃会不知觉中掉落,引起顾客连续投币的欲望。
babystyle-lb-526-leo-fix-狮子座-儿童安全座椅-使用说明书

Handle (adjust the headrest height) Adjuster of the Top tether Harness connector Harness positioning handle ISOFIX release button ISOFIX latching indicator
The product enhance the side impact protect in order to keep child safe when car collision happens.
Adjust the headrest with 7 positions.
The product can be fixed to the car seat conveniently by international general ISOFIX system.
1 Product Overview
1
2 Feature
2
3 Safety Warning
2
4 Usage
3
Install position of the child seat in vehicle Checking the shoulder strap height Usage of buckle Adjust and use the harness Remove the chest pad, cushion, chest pad and hide the harness, buckle Adjust the headrest height Pop up and retract the ISOFIX attachment
6 Maintenance and cleaning
- 1、下载文档前请自行甄别文档内容的完整性,平台不提供额外的编辑、内容补充、找答案等附加服务。
- 2、"仅部分预览"的文档,不可在线预览部分如存在完整性等问题,可反馈申请退款(可完整预览的文档不适用该条件!)。
- 3、如文档侵犯您的权益,请联系客服反馈,我们会尽快为您处理(人工客服工作时间:9:00-18:30)。
连接充电线之后,按摩棒的按键灯未闪烁 电源和充电接口连接不正确。充电方法请参照第3页。 USB端口失效或电压不足。USB端口电压不足也可 能引起充电时间延长。 电池电力耗净。稍等片刻,按摩棒会在接通电源数 分钟后启动按键灯闪烁。 按摩棒无法与ZALO APP 连接 蓝牙连接超时。请将按摩棒和APP 重启。 请确认按摩棒处于开机备用状态,同时确认Z A L O A PP 处于首页并等待若干秒;或点击首页“ENTER”进入 蓝牙扫描页面, “刷新”产品列表,并选择产品,实施
B A B Y H EA R T
Baby heart Vibrator
Welcome to the ZALO world of beauty and love!
Note
The product is strictly applicable to adults of 18 years old or above. Do NOT use the product if in pregnancy or wearing any electronic medical device as a pacemaker or such.
Tip: Do not use silicon-based or oily lubricants because they may damage TM SOFTEK skin imitation layer.
up
applicable part
Luxuriant 18K fine gold surface, safe and allergy-free; Selected Dow Corning medical-level silica gel comply with FDA requirements; Exclusively SOFTEK TM skin imitation silica gel layer;
售后保障服务以购买本品的发票显示购买日期为准,所以请妥善保管原始购
不可将按摩棒放在阳光直射处,紫外线会导致硅胶 褪色。 按摩棒内置锂电池,不可放在高温环境。 小心取用按摩棒,避免敲击、掉落,避免锐物划 伤,触动按键时避免用指甲按压硅胶表面,不可大 力扳动、拉扯按摩棒任何部件。 不可将本品作其它用途。 请妥善保管本品,放在儿童接触不到的地方。 本品作废时,请遵循废旧电池弃置规范,保护我们 的地球不受污染。
IPX
下键
IPx7防水等级,全体可以淋水,清洗超简单。全部浸 入水中也没问题,能在浴缸里使用;
触动Baby heart的按键 (
)一次,按键灯一明一灭的 )就会开
闪烁,这是开机备用状态,再次触动按键( 器紧贴身体敏感部位滑动,享受Baby 好感觉。
始震动,按键灯好像会呼吸一样的明暗变换。将按摩
超大功率,超级静音,温柔时刻绝无噪音打扰。
IPX
mode
down
IPx7 grade waterproof makes it easy to clean by rinsing the whole product. And you may fully immersed the product in water as in the bathtub; Ultra-high power, super quiet and noise free in gentle moments.
TM
仿肤硅胶腐蚀;
紫外线导致的硅胶褪色、接触染料色素导致的硅胶染色;
07
08
Z AL O o ff i c i a l we b s i t e : www.z alo.c om .c n ZA L O E m a i l : s e r v i c e @ z a l o . c o m . c n ZA L O Ho t l i n e : 4 0 0 8 2 8 7 0 6 6
买发票。如果有任何关于售后质保的疑问且处于质保承诺期内,请 联 系 : ZALO邮箱:service@ ZALO微信客服:zalo健康 ZALO热线:400 828 7066
下列情况,我们无法提供售后保障服务:
非Z A L O原装正品、无正规发票证明购买日期; 长期使用造成的外观磨损、腐蚀; 外力导致的链条部件断裂,硅胶部分被硬物损伤; 坠落、冲击等外力导致的损坏; 接触化学品导致的 S OF TEK 高温潮湿导致的损坏; 非正常使用导致的损坏; 人为拆解导致的损坏; Z A L O拥有以上条款的最终解释权。
heart带来的美
01
02
快速使用说明
如何充电
在震动状态下再次触动按键( 动上下键无级调节震动强度。 持续按住中心键(
Hale Waihona Puke ),可以依次循环选择手机充电器
Baby heart预置的8种震动花式,在任何花式中,都能触
)3秒钟就能关机。
Baby heart还 能 与 手 机 蓝 牙 无 线 连 接 , 用 手 机 Z A L O APP遥控震动花式和震动强度。想玩ZALO APP请查 看第5页。
快速使用说明
要先给它充电,方法请参照第3页。 在使用前,最好用ZALO按摩器专用清洁液清洗本品表 面。用温水冲洗也可以。 Baby heart按摩器设计灵感来自于洛丽塔甜美的少女心和公 主梦,是ZALO为可爱的你而创作的轻奢级私密用品。它外表 纤巧,十分呆萌,内心却很摇滚,震起来够激动。不论独享 美妙,或与爱侣共享柔情,Baby heart按摩器都将带你感受 罗曼蒂克的新奇梦幻。
按键 灯
逆时针旋转取下
03
04
快速使用ZALO APP
问题诊断
?
按摩棒无法开机、无震动,或震动偏弱
ZALO
电池耗净。充电方法请参照第3页。 电力不足。此时按键灯会急促的闪烁提示充电。
美貌的ZALO APP可以展现产品的更多功能:比如用手机无线遥 控B a b y h e a r t 的震动花式和强度,有好多“约会场景”可以 玩,又能谱写个人专属的震动花式,Baby heart还能随手机MP3 音乐震动。APP首页的“Z指数”将为你提供私人性健康参考。
Press the “mode” button( ) of Baby Heart for a single time to enter standby mode in which the button LED flickers. Press again to activate the vibration with the indicating LED breathing in light and dark. Enjoy the nice feeling Baby Heart brings to you.
Quick Instructions Charge before use. See Page 3 for the instruction to charge the product. It is recommended to clean the surface of the product with ZALO toy cleaner before use. Rinsing with warm water is also applicable. Inspired by sweet hearts of flowers and beautiful dreams of princesses in Lolita, ZALO whole-heartily presents your lovely— Baby Heart Vibrator of mild luxury. Slim and delicate in an adorable appearance, rock and roll in her excellent moves, Baby Heart brings the novel fantasy of romance to your reverie for your private joviality or shared nights with your lover. It is recommended to use ZALO Water-based Lubricant for Human Body to improve your feel of comfort.
1年质保
自购买之日起1年之内,任何产品制造或材质缺陷导致的质量问 题或机械故障,影响正常使用的,均属于质保范围,ZALO承诺 免费更换同款产品。
10年承诺
自购买之日起10年之内,任何产品制造或材质缺陷导致的质量 问题或机械故障,影响正常使用的,均属于“10年半价购买一 款新产品”承诺范围内,寄回损坏产品,就可以官方零售价的 5折购买任一款ZALO产品。
* 重要提示! 在身体娇嫩区域施用Baby heart时,要将接触面限制在使用端。 也可以取下珐琅吊坠再使用,这不影响Baby heart充电口的防水绝缘性能。
充电插头 插入充电口
电脑USB 端口
如何充电 逆时针旋转按摩器尾端,暂时取下珐琅吊坠,露出充 电口,将充电插头插入充电口,另一端 USB 插头接 入电脑USB端口或手机充电器USB 端口,接通电源; 充电时,按键灯会一明一灭的闪烁; 充电时间通常为90分钟,充满后,按键灯停止闪烁, 保持常亮。 电量不足时,按键灯会快速明灭闪烁,提醒要充电了。
01
02
Quick Instructions
Charge Instructions
ch arger
step 2
自动登录APP首页,这时,触动Baby heart 的 中 心 键( )开机,几秒之后,当按键灯好
如果你有其他关于ZALO Baby heart按摩器的疑问,请联系咨询: ZALO邮箱:service@ ZALO热线: 400 828 7066 扫描二维码关注ZALO微信公众号“zalo健康”,获取更多有趣讯息!
ZALO官网:www.z al o.c om .c n ZALO邮箱:s ervi c e@z al o.c om .c n ZALO热线:4008287066