Spring 监听器
springboot源码分析(四)-监听器实现原理(上)

springboot源码分析(四)-监听器实现原理(上)开篇之前先把祖师爷搬出来 费⽟清:问⼤家⼀个脑筋急转弯,⼥⼈⽣孩⼦,⽤⼀个成语来形容这⼀现象 思考。
思考。
思考。
揭晓谜底: 反正谜底我已经揭晓了,⾄于⼤家能不能看到,我就不管了,哈哈概述 监听器,在很多的源码中都⾮常的常见,之后我会写⼀个nacos源码分析的⽂章,那⾥⾯也⽤了很多的监听器,为什么要使⽤监听器,举个例⼦,⼤家在过红绿灯的时候,每⼀个司机其实就是⼀个观察者,那观察的⽬标是什么呢?观察的⽬标就是红绿灯,那这个过程中会产⽣什么事件呢?就是红灯,黄灯,绿灯的事件,当司机收到这些事件之后会做出不同的举动。
那如果不使⽤这种模式,就是我不⽤红绿灯,我直接找个交警去⼀个司机⼀个司机通知,告诉每个司机,你可以⾛了,你不能⾛,⽐较⼀下⼤家就可以发现第⼀种⽅式效率更⾼。
其实上⾯的红绿灯的场景就是⼀个典型的监听器模式,是23中设计模式中的⼀种,要想搞明⽩springboot中的监听器原理,就要先搞清楚监听器模式原理,所以本篇⽂章就先介绍设计模式之-监听器模式。
监听器模式核⼼组成部分⽬标:这个很难解释,我就把⽐较官⽅的话贴出来吧,⼤家看完例⼦之后回头看看官⽅的定义,⽬标被观察的对象,在⽬标中定义了⼀个观察者集合,提供⼀系列⽅法可以增加或者删除观察者,同时定义了通知观察者的⽅法,⽬标类可以是接⼝或者抽象类或者具体类。
具体⽬标:是⽬标类的字类Observer:观察者,对观察⽬标的改变做出反应,观察者⼀般定义为接⼝ConcreteObserver:具体观察者,和具体的⽬标状态绑定看这些概念很头⼤,下⾯看⼀个具体的例⼦观察者package com.example.demo.event;/*** @author steve* @date 2020/6/3 3:02 下午*/public interface WeekendListener {public void onEvent(WeekendEvent event);}具体观察者public class SleepListener implements WeekendListener{@Overridepublic void onEvent(WeekendEvent event) {if (event instanceof SleepEvent){System.out.println("hello,"+event.getName());}}}具体观察者public class ShoppingListener implements WeekendListener{@Overridepublic void onEvent(WeekendEvent event) {if (event instanceof ShoppingEvent){System.out.println("hello, "+event.getName());}}}事件public class ShoppingEvent implements WeekendEvent{@Overridepublic String getName() {return "shopping";}}事件public class SleepEvent implements WeekendEvent{@Overridepublic String getName() {return "sleep";}}⽬标public abstract class AbstractEventtMulticaster {public List<WeekendListener> listeners ;public AbstractEventtMulticaster(List<WeekendListener> listeners){this.listeners = new ArrayList<>(listeners);}public void multicaster(WeekendEvent event){doStart();listeners.stream().forEach(l -> l.onEvent(event));doEnd();}public void addListener(WeekendListener listener){listeners.add(listener);}public void removeListener(WeekendListener listener){listeners.remove(listener);}abstract public void doStart();abstract public void doEnd();}具体⽬标public class SimpleEventMulticaster extends AbstractEventtMulticaster{ public SimpleEventMulticaster(List<WeekendListener> listeners) {super(listeners);}@Overridepublic void doStart() {System.out.println("start 搞事情");}@Overridepublic void doEnd() {System.out.println("end 搞事情");}}测试public class Test {public static void main(String[] args) {ShoppingListener shoppingListener = new ShoppingListener();SleepListener sleepListener = new SleepListener();SimpleEventMulticaster simpleEventMulticaster = new SimpleEventMulticaster(new ArrayList<WeekendListener>());simpleEventMulticaster.addListener(shoppingListener);simpleEventMulticaster.addListener(sleepListener);simpleEventMulticaster.multicaster(new ShoppingEvent());simpleEventMulticaster.removeListener(shoppingListener);simpleEventMulticaster.multicaster(new ShoppingEvent());}}输出结果:start 搞事情hello, shoppingend 搞事情start 搞事情end 搞事情解释:这⾥定义了观察者WeekendListener,这个观察者的作⽤就是观察周末到底要⼲啥,然后定义了两个具体观察者,就是ShoppingListener和SleepListener,这两个是具体观察者,观察这个⼈是睡觉还是去购物,然后就定义了两种⾏为,也就是两个事件SleepEvent和ShoppingEvent,这两个事件就是具体的状态,然后定义了⽬标就是AbstractEventtMulticaster,这个⾥⾯定义了观察者的集合,定义了新增和删除观察者,同时还定义了⼀个关键的⽅法multicaster,这个⽅法会在出现具体的事件的时候,将事件⼴播给每⼀个观察者,然后执⾏回调onEvent()⽅法,其实在具体观察者中可以定义interest()⽅法,这个⽅法的作⽤就是看这个具体的观察者是不是对这个事件感兴趣,如果感兴趣就可以执⾏具体某个⾏为。
8种监听器分别是:

8种监听器分别是:
1.监听器⽤来监听web程序中的事件,例如创建、修改、删除session、request、context等。
想要实现监听器的功能需要实现监听器的接⼝xxxLinetener,当Tomcat触发监听器的时候,会⾃动调⽤。
监听器可以分为四种类型:
1.监听对象的创建:
ServletContext:主要监听servletContext的创建,需要实现ServeltContextListener接⼝。
ServletRequest:主要监听request的创建,需要实现ServletRequestListener接⼝
HttpSession:主要监听session的创建,需要实现HttpSessionListener接⼝
2.监听属性的改变:
ServletContext:主要监听servletContext属性的更改、添加、删除,需要实现ServeltContextAttrbuteListener接⼝。
ServletRequest:主要监听request属性的更改、添加、删除,需要实现ServletRequestAttrbuteListener接⼝
HttpSession:主要监听session属性的更改、添加、删除,需要实现HttpSessionAttrbuteListener接⼝
3.监听session的活化与钝化:
httpSessionActivationListener主要监听了session的活化与钝化
4.监听session与对象的绑定:
httpSessionBindingListener监听了session与对象的绑定。
applicationlistener原理
applicationlistener原理ApplicationListener是Spring框架中的一个重要接口,用于监听Spring容器中发布的事件。
它提供了一种解耦的机制,使得应用程序的各个模块可以通过监听事件的方式进行通信,而不需要显式地依赖其他模块。
在Spring中,事件的发布和监听是通过ApplicationEventPublisher和ApplicationEventMulticaster来实现的。
ApplicationEventPublisher是Spring容器中的一个接口,用于发布事件;而ApplicationEventMulticaster是一个事件广播器,负责将事件分发给相应的监听器。
ApplicationListener接口继承了EventListener接口,它定义了一个onApplicationEvent方法,用于处理事件。
当一个事件被发布时,ApplicationEventMulticaster会遍历所有注册的监听器,并调用它们的onApplicationEvent方法。
因此,如果一个类实现了ApplicationListener接口,并注册为监听器,那么它就能够接收到相应的事件,并执行相应的逻辑。
在Spring中,事件的发布通常是通过ApplicationContext来完成的。
ApplicationContext是Spring容器的核心接口,它继承了ApplicationEventPublisher接口,因此可以通过调用publishEvent方法来发布事件。
当一个事件被发布时,ApplicationContext会将事件传递给ApplicationEventMulticaster,并由它来负责分发给相应的监听器。
在实际应用中,ApplicationListener常用于处理一些系统级的事件,比如应用启动时的事件、应用关闭时的事件等。
通过监听这些事件,我们可以实现一些初始化操作、资源释放等功能。
spring actuator原理
spring actuator原理Spring Actuator是一个功能强大的管理和监控应用程序端点,可以用来提供对Spring Boot应用程序运行情况的状态视图。
Spring Actuator有助于提供信息,可以成为针对应用程序的管理、监控以及调整的依据。
Spring Actuator使用HTTP和JMX来暴露一组端点,这些端点支持管理程序,如诊断、健康、配置和安全检查,以及在运行时可以被修改的参数。
此外,它还可以提供来自应用程序内部的运行时信息,例如JVM、类路径和内存信息。
Spring Actuator工作原理如下:1. Spring Boot应用程序启动时,Spring Actuator会自动注册一组特定的端点,这些端点用于收集有关Spring Boot应用程序的运行状态信息,以及提供相应的应用程序管理功能。
2. 使用Spring Actuator可以查看应用程序的状态信息,并使用HTTP 或JMX来访问应用程序的端点信息。
3. 当应用程序有变更时,Spring Actuator会收集有关变更的信息,并将其发布到HTTP或JMX,以保持应用程序的最新状态和管理控制情况。
4. Spring Actuator端点实现了可扩展性,可以让开发人员根据自己的需要添加新端点,或修改现有端点的行为。
5. 要使用Spring Actuator,只需在应用程序根目录中添加一个“actuator”依赖,然后就可以使用Spring Actuator的功能了。
Spring Actuator旨在为开发人员提供一个简单的、可扩展的工具,以便更好地了解和管理他们的应用程序。
它的核心功能在于向开发人员提供运行时应用程序的状态视图,以及支持管理程序的端点,如健康检查、诊断等,这有助于在良好的运行状态下快速部署应用程序。
nacos配置中心热更新原理
nacos配置中心热更新原理随着云计算和微服务的发展,配置中心成为了一个重要的基础设施。
在微服务架构中,服务之间的通信和协调往往需要大量的配置信息,这些信息需要在不同的服务之间共享和管理。
Nacos作为一款开源的配置中心,提供了一系列的功能,包括服务发现、配置管理、流量管理等,被广泛应用于云原生应用开发中。
在使用Nacos配置中心时,常常需要更新配置信息。
由于配置信息的变化可能会影响到应用程序的行为,因此需要确保配置信息的变化能够及时生效,而不需要重启应用程序。
这就需要使用到热更新技术。
本文将介绍Nacos配置中心热更新的原理和实现方式。
一、热更新的概念和原理热更新是指在应用程序运行时更新程序的代码或配置信息,而不需要停止或重启应用程序。
热更新可以提高应用程序的可用性和稳定性,同时也可以提高开发和部署的效率。
热更新的实现方式有多种,包括Java的热部署、Spring的热加载、Nginx的热重载等。
热更新的原理是通过动态加载和卸载资源来实现的。
在Java中,可以使用ClassLoader来实现动态加载和卸载类。
ClassLoader是Java虚拟机的一个重要组成部分,它负责加载Java类文件并将其转换成Java类对象。
ClassLoader可以根据需要从不同的来源加载类文件,例如从本地磁盘、网络、数据库等。
在热更新中,ClassLoader 可以动态加载和卸载类文件,从而实现热部署的效果。
二、Nacos配置中心的热更新实现方式在Nacos配置中心中,热更新主要是指动态更新配置信息。
Nacos 配置中心支持多种方式更新配置信息,包括手动更新、定时更新、监听器更新等。
其中,监听器更新是实现热更新的核心方式。
1. 手动更新手动更新是指通过Nacos控制台或API手动修改配置信息。
手动更新的优点是操作简单,可以快速更新配置信息。
但是手动更新的缺点是需要手动操作,容易出错,而且不适合大规模的部署。
2. 定时更新定时更新是指通过定时任务定期更新配置信息。
SpringBoot如何监控Redis中某个Key的变化(自定义监听器)
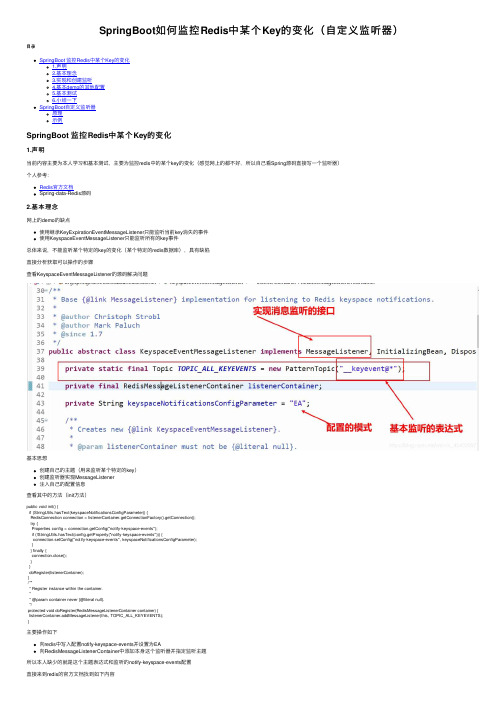
SpringBoot如何监控Redis中某个Key的变化(⾃定义监听器)⽬录SpringBoot 监控Redis中某个Key的变化1.声明2.基本理念3.实现和创建监听4.基本demo的其他配置5.基本测试6.⼩结⼀下SpringBoot⾃定义监听器原理⽰例SpringBoot 监控Redis中某个Key的变化1.声明当前内容主要为本⼈学习和基本测试,主要为监控redis中的某个key的变化(感觉⽹上的都不好,所以⾃⼰看Spring源码直接写⼀个监听器)个⼈参考:Redis官⽅⽂档Spring-data-Redis源码2.基本理念⽹上的demo的缺点使⽤继承KeyExpirationEventMessageListener只能监听当前key消失的事件使⽤KeyspaceEventMessageListener只能监听所有的key事件总体来说,不能监听某个特定的key的变化(某个特定的redis数据库),具有缺陷直接分析获取可以操作的步骤查看KeyspaceEventMessageListener的源码解决问题基本思想创建⾃⼰的主题(⽤来监听某个特定的key)创建监听器实现MessageListener注⼊⾃⼰的配置信息查看其中的⽅法(init⽅法)public void init() {if (StringUtils.hasText(keyspaceNotificationsConfigParameter)) {RedisConnection connection = listenerContainer.getConnectionFactory().getConnection();try {Properties config = connection.getConfig("notify-keyspace-events");if (!StringUtils.hasText(config.getProperty("notify-keyspace-events"))) {connection.setConfig("notify-keyspace-events", keyspaceNotificationsConfigParameter);}} finally {connection.close();}}doRegister(listenerContainer);}/*** Register instance within the container.** @param container never {@literal null}.*/protected void doRegister(RedisMessageListenerContainer container) {listenerContainer.addMessageListener(this, TOPIC_ALL_KEYEVENTS);}主要操作如下向redis中写⼊配置notify-keyspace-events并设置为EA向RedisMessageListenerContainer中添加本⾝这个监听器并指定监听主题所以本⼈缺少的就是这个主题表达式和监听的notify-keyspace-events配置直接来到redis的官⽅⽂档找到如下内容所以直接选择的是:__keyspace@0__:myKey,使⽤的模式为KEA所有的⼯作全部完毕后开始实现监听3.实现和创建监听创建监听类:RedisKeyChangeListener本类中主要监听redis中数据库0的myKey这个keyimport java.nio.charset.Charset;import java.util.Properties;import org.springframework.data.redis.connection.Message;import org.springframework.data.redis.connection.MessageListener;import org.springframework.data.redis.connection.RedisConnection;import org.springframework.data.redis.listener.KeyspaceEventMessageListener;import org.springframework.data.redis.listener.PatternTopic;import org.springframework.data.redis.listener.RedisMessageListenerContainer;import org.springframework.data.redis.listener.Topic;import org.springframework.util.StringUtils;/**** @author hy* @createTime 2021-05-01 08:53:19* @description 期望是可以监听某个key的变化,⽽不是失效**/public class RedisKeyChangeListener implements MessageListener/* extends KeyspaceEventMessageListener */ {private final String listenerKeyName; // 监听的key的名称private static final Topic TOPIC_ALL_KEYEVENTS = new PatternTopic("__keyevent@*"); //表⽰只监听所有的keyprivate static final Topic TOPIC_KEYEVENTS_SET = new PatternTopic("__keyevent@0__:set"); //表⽰只监听所有的keyprivate static final Topic TOPIC_KEYNAMESPACE_NAME = new PatternTopic("__keyspace@0__:myKey"); // 不⽣效// 监控//private static final Topic TOPIC_KEYEVENTS_NAME_SET_USELESS = new PatternTopic("__keyevent@0__:set myKey"); private String keyspaceNotificationsConfigParameter = "KEA";public RedisKeyChangeListener(RedisMessageListenerContainer listenerContainer, String listenerKeyName) {this.listenerKeyName = listenerKeyName;initAndSetRedisConfig(listenerContainer);}public void initAndSetRedisConfig(RedisMessageListenerContainer listenerContainer) {if (StringUtils.hasText(keyspaceNotificationsConfigParameter)) {RedisConnection connection = listenerContainer.getConnectionFactory().getConnection();try {Properties config = connection.getConfig("notify-keyspace-events");if (!StringUtils.hasText(config.getProperty("notify-keyspace-events"))) {connection.setConfig("notify-keyspace-events", keyspaceNotificationsConfigParameter);}} finally {connection.close();}}// 注册消息监听listenerContainer.addMessageListener(this, TOPIC_KEYNAMESPACE_NAME);}@Overridepublic void onMessage(Message message, byte[] pattern) {System.out.println("key发⽣变化===》" + message);byte[] body = message.getBody();String string = new String(body, Charset.forName("utf-8"));System.out.println(string);}}其实就改了⼏个地⽅…4.基本demo的其他配置1.RedisConfig配置类@Configuration@PropertySource(value = "redis.properties")@ConditionalOnClass({ RedisConnectionFactory.class, RedisTemplate.class })public class RedisConfig {@AutowiredRedisProperties redisProperties;/**** @author hy* @createTime 2021-05-01 08:40:59* @description 基本的redisPoolConfig* @return**/private JedisPoolConfig jedisPoolConfig() {JedisPoolConfig config = new JedisPoolConfig();config.setMaxIdle(redisProperties.getMaxIdle());config.setMaxTotal(redisProperties.getMaxTotal());config.setMaxWaitMillis(redisProperties.getMaxWaitMillis());config.setTestOnBorrow(redisProperties.getTestOnBorrow());return config;}/*** @description 创建redis连接⼯⼚*/@SuppressWarnings("deprecation")private JedisConnectionFactory jedisConnectionFactory() {JedisConnectionFactory factory = new JedisConnectionFactory(new JedisShardInfo(redisProperties.getHost(), redisProperties.getPort()));factory.setPassword(redisProperties.getPassword());factory.setTimeout(redisProperties.getTimeout());factory.setPoolConfig(jedisPoolConfig());factory.setUsePool(redisProperties.getUsePool());factory.setDatabase(redisProperties.getDatabase());return factory;}/*** @description 创建RedisTemplate 的操作类*/@Beanpublic StringRedisTemplate getRedisTemplate() {StringRedisTemplate redisTemplate = new StringRedisTemplate();redisTemplate.setConnectionFactory(jedisConnectionFactory());redisTemplate.setEnableTransactionSupport(true);return redisTemplate;}@Beanpublic RedisMessageListenerContainer redisMessageListenerContainer() throws Exception {RedisMessageListenerContainer container = new RedisMessageListenerContainer();container.setConnectionFactory(jedisConnectionFactory());return container;}// 创建基本的key监听器/* */@Beanpublic RedisKeyChangeListener redisKeyChangeListener() throws Exception {RedisKeyChangeListener listener = new RedisKeyChangeListener(redisMessageListenerContainer(),""); return listener;}}其中最重要的就是RedisMessageListenerContainer 和RedisKeyChangeListener2.另外的RedisProperties类,加载redis.properties⽂件成为对象的/**** @author hy* @createTime 2021-05-01 08:38:26* @description 基本的redis的配置类**/@ConfigurationProperties(prefix = "redis")public class RedisProperties {private String host;private Integer port;private Integer database;private Integer timeout;private String password;private Boolean usePool;private Integer maxTotal;private Integer maxIdle;private Long maxWaitMillis;private Boolean testOnBorrow;private Boolean testWhileIdle;private Integer timeBetweenEvictionRunsMillis;private Integer numTestsPerEvictionRun;// 省略get\set⽅法}省略其他代码5.基本测试创建⼀个key,并修改发现变化可以发现返回的是这个key执⾏的⽅法(set),如果使⽤的是keyevent⽅式那么返回的就是这个key的名称6.⼩结⼀下1.监听redis中的key的变化主要利⽤redis的机制来实现(本⾝就是发布/订阅)2.默认情况下是不开启的,原因有点耗cpu3.实现的时候需要查看redis官⽅⽂档和SpringBoot的源码来解决实际的问题SpringBoot⾃定义监听器原理Listener按照监听的对象的不同可以划分为:监听ServletContext的事件监听器,分别为:ServletContextListener、ServletContextAttributeListener。
SpringBoot中配置ApplicationListener监听器的几种方式
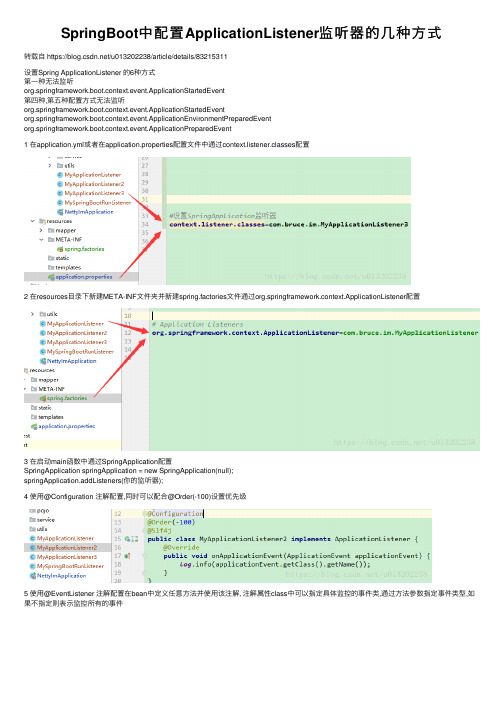
SpringBoot中配置ApplicationListener监听器的⼏种⽅式转载⾃ https:///u013202238/article/details/83215311设置Spring ApplicationListener 的6种⽅式第⼀种⽆法监听org.springframework.boot.context.event.ApplicationStartedEvent第四种,第五种配置⽅式⽆法监听org.springframework.boot.context.event.ApplicationStartedEventorg.springframework.boot.context.event.ApplicationEnvironmentPreparedEventorg.springframework.boot.context.event.ApplicationPreparedEvent1 在application.yml或者在application.properties配置⽂件中通过context.listener.classes配置2 在resources⽬录下新建META-INF⽂件夹并新建spring.factories⽂件通过org.springframework.context.ApplicationListener配置3 在启动main函数中通过SpringApplication配置SpringApplication springApplication = new SpringApplication(null);springApplication.addListeners(你的监听器);4 使⽤@Configuration 注解配置,同时可以配合@Order(-100)设置优先级5 使⽤@EventListener 注解配置在bean中定义任意⽅法并使⽤该注解, 注解属性class中可以指定具体监控的事件类,通过⽅法参数指定事件类型,如果不指定则表⽰监控所有的事件6 通过实现接⼝org.springframework.context.ApplicationContextInitializer,得到context后通过编程式,设置监听器。
Spring中ApplicationContext对事件的支持
Spring中ApplicationContext对事件的支持ApplicationContext具有发布事件的能力。
这是因为该接口继承了ApplicationEventPublisher接口。
Spring 中与事件有关的接口和类主要包括ApplicationEvent、ApplicationListener。
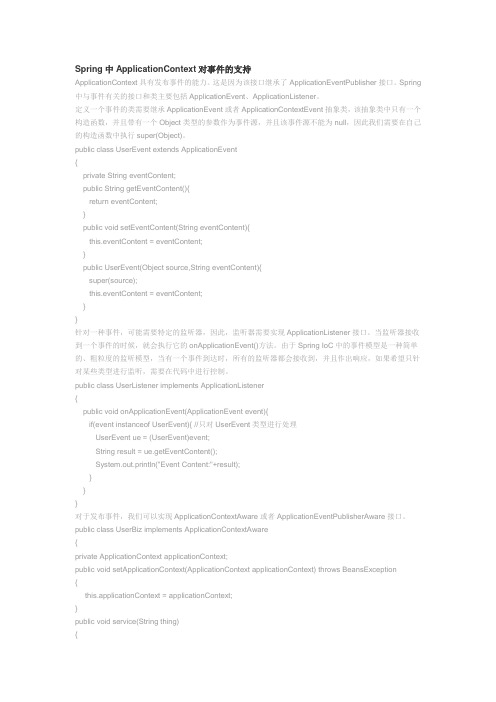
定义一个事件的类需要继承ApplicationEvent或者ApplicationContextEvent抽象类,该抽象类中只有一个构造函数,并且带有一个Object类型的参数作为事件源,并且该事件源不能为null,因此我们需要在自己的构造函数中执行super(Object)。
public class UserEvent extends ApplicationEvent{private String eventContent;public String getEventContent(){return eventContent;}public void setEventContent(String eventContent){this.eventContent = eventContent;}public UserEvent(Object source,String eventContent){super(source);this.eventContent = eventContent;}}针对一种事件,可能需要特定的监听器,因此,监听器需要实现ApplicationListener接口。
当监听器接收到一个事件的时候,就会执行它的onApplicationEvent()方法。
由于Spring IoC中的事件模型是一种简单的、粗粒度的监听模型,当有一个事件到达时,所有的监听器都会接收到,并且作出响应,如果希望只针对某些类型进行监听,需要在代码中进行控制。
public class UserListener implements ApplicationListener{public void onApplicationEvent(ApplicationEvent event){if(event instanceof UserEvent){ //只对UserEvent类型进行处理UserEvent ue = (UserEvent)event;String result = ue.getEventContent();System.out.println("Event Content:"+result);}}}对于发布事件,我们可以实现ApplicationContextAware或者ApplicationEventPublisherAware接口。
- 1、下载文档前请自行甄别文档内容的完整性,平台不提供额外的编辑、内容补充、找答案等附加服务。
- 2、"仅部分预览"的文档,不可在线预览部分如存在完整性等问题,可反馈申请退款(可完整预览的文档不适用该条件!)。
- 3、如文档侵犯您的权益,请联系客服反馈,我们会尽快为您处理(人工客服工作时间:9:00-18:30)。
既然是监听器,他监听什么呢?
主要包括:
看下api,主要针对下面几个的监听,
ServletContent 就是jsp中的application;
HttpSession,jsp中的session;
HttpServletRequest,jsp中的request.
先看一下ServletContent吧,他是通过两个接口实现监听的:
Interface ServletContextAttributeListener,主要是针对
application的属性进行监听,看里面的方法:
public void attributeAdded(ServletContextAttributeEventscab),属性增加public void attributeRemoved(ServletContextAttributeEventscab),属性移除public void attributeReplaced(ServletContextAttributeEvent scab),属性替换和
Interface ServletContextListener,主要是对application的创
建与销毁进行监听,从里面的方法可以看出:
public void contextInitialized(ServletContextEvent sce),
public void contextDestroyed(ServletContextEvent sce)
一个是初始化,一个是销毁。
关于Session等,也是类似查看下api吧。
不在详细说明了。
下面以一个实例说明servlet监听器的具体使用吧。
用与统计在线人员列表:
先看下大体框架:
package com.zzc;
public class ShowPerson implements
ServletContentListener,HttpSessionListener,HttpSessionAttributer{
//对应接口的方法都要写上。
当然实现每个接口都是有用处的,
ServletContentListener不是相当于对application监听吗,这里
用于记录在线用户。
HttpSessionListener,把用户存入session .
HttpSessionAttributer,对在线人员属性的监听。
}
具体的写下,当然方法等都还是在api上复制下来的。
package com.zzc;
import javax.servlet.*;
import javax.servlet.http.*;
import java.util.*;
public class ShowPerson implements
ServletContextListener,HttpSessionListener,HttpSessionAttributeListener{
private ServletContext application = null;
public void contextInitialized(ServletContextEvent sce){
this.application = sce.getServletContext();
this.application.setAttribute("allusers",new ArrayList()); //初始化存放用户的一个容器,采用数组存放
}
public void contextDestroyed(ServletContextEventsce){}
public void sessionCreated(HttpSessionEvent se){}
public void sessionDestroyed(HttpSessionEventse){//删除离开的用户
List l = (List)
this.application.getAttribute("allusers");
String value =(String) se.getSession().getAttribute("uname");
l.remove(value);
this.application.setAttribute("allusers",l);
}
public void attributeAdded(HttpSessionBindingEvent se){
/*当一个用户登陆成功时,存放进application*/
List l = (List)
this.application.getAttribute("allusers");
l.add(se.getValue());
this.application.setAttribute("allusers",l);
}
public void attributeRemoved(HttpSessionBindingEvent se){}
public void attributeReplaced(HttpSessionBindingEvent se){}
}
一个简单的显示在线用户的监听器完成了,不要忘记配置下xml.
<listener>
<listener-class>com.zzc.ShowPerson</listener-class>
</listener>
和过滤器不大一样,要简单点。
怎么在具体jsp文件中使用它呢?。
首先要有个action,用于用户登陆,在着简单方便光记个用户名。
还要用个循环显示登陆用户。
具体jsp 文件差不多就出来了。
<%@ page contentType="text/html;charset=utf-8"%>
<%@ page import="java.util.*"%>
<%
if(request.getParameter("name")!=null)
{
session.setAttribute("uname",request.getParameter("uname")) ;
}
%>
<!-- 传递参数到当前页面-->
<form action="?" method="post">
用户名:
<input type="text" name="uname">
<input type="submit" value="登陆">
<a href="#">注销</a> //可以在另一个页面调用session.invalidate(); </form>
<!-- 向session接收输入的用户名-->
<h2>在线人员</h2>
<hr />
<%
List l = (List)application.getAttribute("allusers") ;
Iterator it = l.iterator() ;
while(it.hasNext())
{
%>
<li><%=it.next()%>
<%
}
%>
到这框架差不多就完成了,然后可以对其自己修改或增加新的功能了。