EMR电子病历安装配置说明
EMR使用说明书

EMR999电子病历操作手册三九集团深圳九明珠信息科技有限公司目录第一章系统的进入与基本维护 (3)1.1系统的进入 (3)1.2系统的退出 (4)1.3修改密码 (4)1.4系统注销 (5)第二章系统维护 (6)2.1.系统参数设置 (6)2.2医疗服务机构维护 (7)2.3.科室资料维护 (8)2.4.医生资料维护 (8)2.5.用户权限配置 (10)2.6.报表管理 (12)第三章病历设计管理 (15)3.1.科室病历配置 (15)3.2.病种模板管理 (21)3.3.病历样式库管理 (22)第四章病人控制台 (24)4.1 病人控制台的进入 (24)4.2 病人控制台的界面分布 (25)4.3 病人资料卡 (25)第五章书写病历 (29)5.1 首页 (29)5.2 病人病历记录的书写 (30)5.3 其他记录 (34)5.4 医疗文书 (35)5.5 病历模板的使用 (36)5.6 打印 (39)第六章病历文件夹 (42)第七章阅改事件 (44)第一章系统的进入与基本维护1.1系统的进入双击桌面快捷图标,即可进入电子病历的登录界面,如(图1-1)所示:(图1-1)(注:本操作说明以外三科工号为1001的王将医生为例)登陆步骤如下:1、录入操作员的工号。
2、按【Enter】键,则系统会自动获取操作员的姓名。
3、输入密码(注:初始密码为医生的工号)。
4、选择自己所对应的科室5、点击【确定】即可进入该主界面(由于进入系统的过程中需要读取数据,所以需要等待几秒钟的时间)。
如(图1-2)所示:注:登陆界面之后,系统默认进入的主界面是电子病历的病人控制台界面。
(图1-2)1.2系统的退出若需退出系统,则点击左下角【开始】—【关闭系统】(如图1-3),即可退出系统。
(图1-3)1.3修改密码若操作员需要修改密码,则需点击【开始】—【用户密码维护】(如图1-3),即可进入修改密码界面,如(图1-4)所示:(图1-4)修改密码步骤如下:1、录入操作员的旧密码(初始密码为操作员工号)2、录入新密码3、录入确认密码:与新密码相同4、点击【确定】按钮即可修改密码成功。
安博维MedInfo电子病历(EMR)模板编辑器使用手册-V3.0

MedInfo电子病历模板编辑器使用手册(V3.0)北京安博维科技发展有限公司2007.09.20版权所有不得复制编写人:日期:1系统简介 (4)1.1模板概述 (4)1.1.1模板制作流程 (4)1.2语法分析 (5)1.3系统主控菜单 (7)1.4模板编辑器 (7)1.5元素分类 (8)2制做基本元素 (9)2.1基本元素概述 (9)2.2增加基本元素分类 (10)2.3增加基本元素 (11)2.3.1制作文本型基本元素 (11)2.3.2制作数值型基本元素 (11)2.3.3制作选择型基本元素 (12)2.3.4制作查询字典型基本元素 (13)2.3.5制作格式化型基本元素 (14)2.4修改基本元素 (16)2.5删除基本元素 (16)2.6查询基本元素 (16)3制作复合元素 (17)3.1增加复合元素 (17)3.2修改复合元素 (19)3.3删除复合元素 (19)3.4从复合元素中删除基本元素 (19)3.5复合元素中的基本元素属性查看、修改 (19)3.6元素列表 (19)3.7查询复合元素 (20)4制作段落模板 (20)4.1制作新段落模板 (20)4.2查找段落模板 (21)4.3修改段落模板 (21)4.4删除段落模版 (21)4.5修改元素属性 (22)5病历模版 (22)5.1病历模板的制作 (22)5.2查找病历模板 (23)5.3修改病历模板 (23)5.4修改病历模版的元素属性 (23)6附录 (23)6.1名词术语 (23)6.2工具使用说明 (24)6.3工具栏 (24)6.4菜单栏 (26)6.4.1概述 (26)6.4.2特殊类型元素编辑 (26)6.4.2.1段落元素 (27)6.4.2.2引用元素 (27)6.4.3模版工具箱设置 (28)6.5其他 (29)6.6模版列表区中的鼠标右键 (32)6.6.1编辑区 (32)6.6.2引用选择 (33)6.6.3添加关联 (33)6.6.4修改关联 (36)6.7快捷键 (37)约定:用‘【】’引起来的相关按钮或者是比较重要的,黑体字部分是术语或是章节中的关键字。
电子病历系统情况说明

电子病历系(EMR)统情况说明
电子病历(EMR)是现代医疗机构临床工作开展所必需的业务支撑系统,也是居民健康档案的主要信息来源和重要组成部分。
电子病历在运行过程中逐渐积累了大量的医疗信息,比如患者的就诊信息、治疗方案、生命体征记录、检验记录、影像诊断记录等构成患者的病案信息,而这些病案信息是为患者以后再进行诊疗的参考信息。
大量病案和典型病例的积累也是医生从事医学研究和对其他患者进行诊断参考的依据。
对临床医生积累经验,提高诊治水平起到了重要的帮助作用。
根据我院医疗业务的发展需要和现代化医院发展对信息化建设的要求,随着2017年4月《电子病历应用管理规范》的实施。
为积极配合国家医改工作,加强医院信息化建设,建立全流程数据跟踪与闭环管理,全面支撑医院临床业务、强化医疗质量管理、保障医疗安全,提高我院医疗水平,更好地为患者服务。
我院准备申请财政资金90万元用于电子病历(EMR)软件的购置安装。
北京市化工职业病防治院信息科
2017.9.20。
Ergotron StyleView SV41电子医疗记录(EMR)电脑车辆与笔记本挂载说明书

| USA: 1-800-888-8458 | Europe: +31 (0)33-45 45 600 | China: 400-120-3051 | Japan:*************************English, Español, Français, Deutsch, Nederlands, Italiano, Svenska, 日本語, 汉语StyleView ® SV41Electronic Medical Records (EMR Cart)with Laptop MountEnglishFor the latest User Installation Guide and StyleLink Software Download please visit: Features & Specifi cations .................................................... 3Set-up ............................................................................ 4 - 11Adjustment ........................................................................ 10Ergonomics .........................................................................11Maintenance & Safety ................................................11 - 12Dimensions . (13)1xThis Class A digital apparatus complies with Canadian ICES-003.Cet appareil numérique de la classe A est conforme à la norme NMB-003 du Canada.FCC Compliance StatementThe cart has been tested and found to comply with the limits for a Class A digital device, pursuant to part 15 ofthe FCC Rules. These limits are designed to provide reasonable protection against harmful interference whenthe equipment is operated in a commercial environment. This equipment generates, uses, and can radiate radiofrequency energy and, if not installed and used in accordance with the instruction manual, may cause harmfulinterference to radio communications. Operation of this equipment in a residential area is likely to cause harmfulinterference in which case the user will be required to correct the interference at his own expense.Changes or modifi cations not expressly approved by Ergotron, Inc. could void the user’s authority to operatethe equipment.Please contact Ergotron for complete EMC compatibility information.Operational StorageComponentsTools NeededIMPORTANT! This product will need tension adjustments once installation is complete. Make sure all equipment is properly installed on the product before attempting range of motion or tension adjustments. Any time equipment is added or changed on this product resulting in a diff erent mounted weight, you should repeat the adjustment steps to ensure safe and optimum operation. This product should move smoothly and easily through the full range of motion and stay where you set it. If movement is diffi cult or the product does not stay where you set it, follow the adjustment instructions to loosen or tighten the tension to create a smooth, easy motion. Depending on your product and the adjustment, it may take many turns to notice a diff erence.711Features & Specifi cationsWorksurfaceSecure storage for open laptop Front HandleHeight Adjustment Brake HandleUSB Hub connects keyboard and mouse USB cablesKeyboard tray slides out, tilts and allows for right or left mousing with attached mouse holder Keyboard Light under Front Handle Keyboard Light SwitchCable Management and Storage for excess cables and power supplies Storage Basket and Rear Handle Front Locking Casters Laptop Screen Holders Quick Reference Card Scanner HolderAntimicrobial coating on worksurface and wrist rest1.2.3.4.5.6.7.8.9.10.11.12.13.14.15.Weight Capacity12 354 98If computer with cables are too wide, then follow these instructions.DO NOT OBSTRUCT AIR VENTS!Obstructing air vents may cause overheating and result in equipment damage.111x10ab1214mm (9/16")1xc 1234M4 x 8mm1xAdjustmentRelease Brake to move riser.Follow theseinstructions to tighten or loosen tension.It is important that you adjust this product according to the weight of the mounted equipment as described in the following steps. Any time equipment is added or removed from this product, resulting in a change in the weight of the mounted load, you should repeat these adjustment steps to ensure safe and optimum operation.Adjustments should move smoothly and easily through the full range of motion and stay where you set it. If adjustments are diffi cult and do not stay in the desired position, follow the instructions to loosen or tighten the tension to create a smooth, easy adjustment motion. Depending on your product and the adjustment, it may take several turns to notice a diff erence.Lift – Up and downNOTE: Adjustment may require 40 - 60 revolutions.1. Please dispose of all batteries in accordance with local law2. All Electronics should be recycled through an electronics recycler.3. Remaining plastics and metals can be recycled through a commercial recycler.Maintenance & SafetyHazard Symbols ReviewThe Meaning of Symbols appearing in this Guide, on the Cart or on the Power SystemThese symbols alert you to a safety condition thatdemands your attention. You should be able to recognize and understand the signifi cance of the following Safety Hazards if you encounter them on the Cart or within Cart documentation such as this Set-up Guide.Maintenance & SafetyCleaning and MaintenanceThe following procedures are not guaranteed to control infection. The hospital infection control administrator or epidemiologist should be consulted regarding cleaning procedures and processes.To avoid risk of electric shock, do not expose electrical components to water, cleaning solutions or other potentially corrosive liquids or substances.Do not immerse Cart or Cart components in liquid or allow liquids to fl ow into the Cart. Wipe all cleaners off surface immediately using a damp cloth. Thoroughly dry surface after cleaning.Do not use fl ammable cleaners on Cart surfaces due to close proximity of electrical power and equipment.All paints and plastic Cart components will withstand cleaning by most commonly used, diluted, non-abrasive solutions such as quaternary ammonia compounds, ammonia enzyme cleaners, bleach or alcohol solutions.• Pen and permanent and dry erase markers can be removed with 91% isopropyl alcohol and a soft cloth.• Iodine stains can be removed with commonly used cleaners and a soft cloth.• Never use steel wool or other abrasive materials that will damage the surface fi nish.• Do not use strong solvents such as trichloroethylene and acetone. These solvents will damage the surface fi nish.It is recommended that any cleaning solution be tested on a small, inconspicuous area to ensure surface is not harmed.Adjustment, Service, Replacement - DO NOT attempt to adjust, service or replace any part of the StyleView Cart unless directed to do so through Ergotron-approved documentation (i.e. installation instructions). Only Ergotron, Inc. or an Ergotron-certifi ed entity may adjust, service or replace StyleView Cart components. If any component on the Cart is missing or damaged, the Cart must not be used, contact Ergotron Customer Care immediately to request a replacement part.Cables - Keep cables neatly organized on the Cart (a variety of solutions are provided with your cart for this purpose). Excess cables should be routed away from moving components with cable clips. Review Cable Routing section of this guide, or contact Ergotron Customer Care for more information.Casters - Check casters periodically to make sure they are clean and free of debris that would prevent smooth travel. Avoid moving Cart across uneven, dirty or damaged surfaces. Customer Equipment- Make sure equipment is balanced and mounted securely to Cart. Do not reposition Cart components on riser or tower unless instructed to do so in theinstallation instructions. Moving Cart components too high or too low on the Riser may create an unstable condition, leading to equipment damage or even personal injury. Contact Ergotron Customer Care for information about moving Cart components.Safety Alerts Associated with this ProductThe following Warnings/Cautions appear in this reference guide or on the cart:NOTE: Failure to adhere to these guidelines may result in equipment damage or personal injury.CAUTION: The lift brake helps stablilize the worksurface and keyboard tray during normal use but it DOES NOT increase load capacity. DO NOT load riser with equipment totaling more than the maximum weight capacity specifi ed by Ergotron. Ensure optimum lift function by testing and if necessary, re-adjusting tension whenever the weight mounted to the riser changes (i.e., equipment is removed or added). See "Set Riser Lift Tension" adjustment instructions.CAUTION: Do not operate StyleView Cart with missing or damaged components! Do not remove, modify or substitute Cart components without consulting Ergotron. If you encounter problems with Cart installation or operation, contact Ergotron Customer Care.CAUTION: DO NOT overtighten fasteners. Overtightening may cause damage to your equipment.WARNING: Stored Energy Hazard: The worksurface lift mechanism is under tension and will move up rapidly, on its own, as soon as attached equipment is removed. For this reason, DO NOT remove equipment unless the worksurface has been moved to the highest position on the tower! Failure to follow this instruction may result in serious personal injury and/or equipment damage! When Shipping the cart, set the worksurface lift mechanism to the lowest tension setting.CAUTION: DO NOT loosen, tighten or remove any other nuts or bolts on the riser or top of tower. Tampering with nuts or bolts may result in an unstable Cart, leading to equipment damage and/or personal injury.CAUTION: Release Lift Brake before moving work surface! Moving work surface while Lift Brake is engaged may cause serious damage to Lift Engine.WARNING: In the event that repair of the StyleView Cart is needed, contact Ergotron Customer Care immediately. Cart repair can only be performed by Ergotron, Inc. or by an Ergotron authorized agent.WARNING: This cart is not intended for use in a fl ammable, anesthetic mixture or oxygen rich environment.Recommended Periodic Inspection and MaintenanceComponent ActionHow often By whom UI, Ethernet, USB cables Inspect for wear, pinching, bad connectorsMonthly Any user Casters Inspect for wear and debris Monthly Any user Maximum LoadInspect to ensure that maximum recommended loads are not exceededDailyAny user1. Please dispose of all batteries in accordance with local law2. Always replace with similar size battery (33 A-h to replace 33 A-h) and always replace in pairsAdditional multiple socket-outlet or extension cord shall not be connected to the medical system.When used in a Medical Electrical system, connect only equipment that complies with IEC, ISO, UL/ANSI, or CSA standards that are relevant to that equipment.Risk of shock or personal injury when connecting non-medical equipment supplied as part of a system directly to the wall outlet when non-medical equipment is intended to be supplied by the multiple socket outlet.Risk of shock or personal injury when connecting any equipment that has not been supplied as part of the medical system to the multiple socket outlet.© 2014 Ergotron, Inc. All rights reserved. | USA: 1-800-888-8458 | Europe: +31 (0)33-45 45 600 | China: 400-120-3051 | Japan:*************************guring dimensions, include DimensionsFor local customer care phone numbers visit: For Service visit: For Warranty visit: /warranty。
易迅电子病历基本操作说明-易迅电子病历首款免费电子病历系统大量
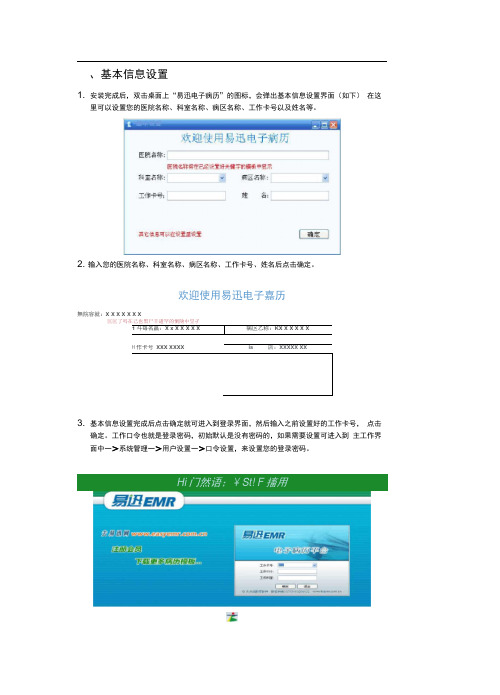
、基本信息设置1. 安装完成后,双击桌面上“易迅电子病历”的图标,会弹出基本信息设置界面(如下)在这里可以设置您的医院名称、科室名称、病区名称、工作卡号以及姓名等。
2. 输入您的医院名称、科室名称、病区名称、工作卡号、姓名后点击确定。
欢迎使用易迅电子嘉历無院容就:X X X X X X X3. 基本信息设置完成后点击确定就可进入到登录界面,然后输入之前设置好的工作卡号,点击确定。
工作口令也就是登录密码,初始默认是没有密码的,如果需要设置可进入到主工作界面中一>系统管理一>用户设置一>口令设置,来设置您的登录密码。
工作界面的模块及功能介绍:1.在主界面中有病人管理、模板管理、知识库维护以及系统管理等几大模块(如图)2.系统管理:为了方便以后的操作,可先进行一些基本设置。
在系统管理里面可以看到有科室病区设置、用户设置、业务活动设置、职位设置、职称设置、医院名称设置等。
2.1用户设置:点击用户设置,可以选择“新增用户”、“修改用户”、“删除用户”、“设置用户口令”等。
2.2医院名称设置:在这里可设置或修改您的医院名称。
3.病人管理:(如图所示)病人管理里包含添加病人、编辑病人、删除病人、病人出院、病人转科等几项功能。
3.1开始使用的时候,首先需要添加病人,点击添加,在病人登记界面中输入病人基本信息以及病历信息等(如图)。
(如果填写完整,这些信息会自动显示在病历模板中, 那么添加病历的时候,就不需要另外填写了,所以最好填写仔细)。
3.2如果需要更改或增加某个已存在病人的相关信息等,可选中该病人然后单击“编辑病人”。
如果该病人出院,可单击“病人出院”,那么病人就变成已出院状态。
3.3如果病人转入其他科室,可单击“病人转科”,选择目标科室、医生名称,然后点确定,病人就转到其他科室了。
当前用户的病人资料夹里就没有该病人的资料了。
如果要查看该病人的资料,需要切换用户。
例如,我将病人A 转到妇产科的李医师工作夹下,那么如果要看到病人A 的资料,就需要通过李医师的工作卡号登录进去才能查看。
电子病历系统设计说明

电子病历系统设计说明电子病历系统是指计算机化的病历,它的容包括纸病历的所有信息。
电子病历不仅指静态病历信息,还包括提供的相关效劳。
电子病历系统是支持电子病历的一套软硬件系统,它能实现病人信息的采集、加工、存储、传输、效劳。
其目的在于改善医院管理,支持医教研,EMR系统方案设计是整个信息建立的重点,虽然在设计EMR系统方案时所选择的具体网络设备、效劳器类型和系统软件等不一一一样,但遵循最根本的原则,既考虑全局、坚持长远开展规划,加强根底设施建立,将EMR系统建成一个起点高,易于扩大、升级、管理和实用的系统。
一、开发医院管理系统的意义改善医院管理,支持医教研。
我国医院的信息处理根本上还停留在手工方式,劳动强度大且工作效率低,医师护士和管理人员的大量时间都消耗在事务性工作上,致使"人不能尽其才";病人排队等候时间长,辗转过程多,影响医院的秩序;病案、临床检验、病理检查等许多珍贵的数据资料的检索十分费事甚至难以实现;对这些资料深入的统计分析手工方式无法进展,不能充分为医学科研利用;在经济管理上也因而存在漏、跑、错费现象;医院物资管理由于信息不准确,家底不明,积压浪费,以致"物不能尽其用"。
开发EMR是解决上述问题的有效途径。
EMR系统的有效运行,将提高医院各项工作的效率和质量,促进医学科研、教学;减轻各类事务性工作的劳动强度,使他们腾出更多的精力和时间来效劳于病人;改善经营管理,堵塞漏洞,保证病人和医院的经济利益;为医院创造经济效益。
完整的EMR系统实现了信息的全过程追踪和动态管理,从而做到简化患者的诊疗过程,优化就诊环境,改变目前排队多、等候时间长、秩序混乱的局面。
如目前多数医院就诊必须经过挂号、等候病历、划价、收费、取药或治疗一系列过程,一个患者少则排3次队,多则5、6次,用于过程性的时间最少在1个小时以上,假设实施EMR以后,每个病人用于诊疗的中间过程性时间会大幅度减少;假定一家医院门诊人次为2000人次/天,年门诊250天,每人少花费半小时,则日节约1000小时,一年节约36万小时,其产生的社会效益和间接经济效益是明显的。
EMR系统部署方案(通用)
EMR系统部署方案(通用)1. 简介本文档提供了一份通用的EMR系统部署方案。
EMR系统是指电子病历系统,旨在方便医疗机构管理和存储患者的电子病历信息。
2. 系统需求- 操作系统:推荐使用最新版本的Linux操作系统(如Ubuntu、CentOS等)- 数据库:需要安装和配置一个可靠的数据库系统(如MySQL或PostgreSQL)- Web服务器:需要安装和配置一个支持动态网页的Web服务器(如Apache、Nginx等)- 安全性:需要采取合适的安全措施来保护患者的个人隐私信息3. 系统架构EMR系统的通用架构如下:- 前端用户界面:提供给医生和医务人员使用的界面,可通过Web浏览器访问- 后端服务器:用于处理前端用户界面的请求,并和数据库进行交互- 数据库:用于存储患者的电子病历信息,需要合理设计和优化数据库结构4. 部署步骤以下是通用EMR系统的部署步骤:1. 安装和配置操作系统:根据系统需求,安装合适的Linux操作系统,并进行必要的配置和更新。
2. 安装和配置数据库:根据系统需求,选择并安装一个可靠的数据库系统,并进行必要的配置和优化。
3. 安装和配置Web服务器:选择并安装一个支持动态网页的Web服务器,并进行必要的配置,以便访问前端用户界面。
4. 部署前端用户界面:将前端用户界面的代码部署到Web服务器上,并配置适当的访问权限。
5. 配置后端服务器:将后端服务器的代码部署到合适的服务器上,并根据需要进行配置和优化。
6. 连接数据库:在后端服务器配置文件中,配置数据库连接信息,确保后端服务器能够正确地与数据库进行交互。
7. 测试和调试:通过访问前端用户界面,测试系统是否正常工作,并进行必要的调试和修改。
8. 安全设置:根据系统需求,采取一系列安全措施,包括数据加密、防火墙设置等,以保护患者的个人隐私信息。
5. 总结本文档提供了一份通用的EMR系统部署方案,包括系统需求、系统架构和部署步骤。
电子病历系统解决方案EMR

密性、高安全性
以电子病历为核心的完整临床信息化解决方案
解决用药安全问题 避免用药事故
解决无纸化 病历的合法性
合理 用药
数字
医生 工作站
电子
数字化医嘱 临床协同和信息共享平台
护士 工作站
临床
医嘱执行 数字化护理记录 费用自动生成
打开消息提醒,出入院登记处完成病员入院登记后对 应的病区即提示此信息;待处理医嘱:医师为病员下达医 嘱后即提示等待处理;医师下达出院医嘱后提示待出院记 录,以醒目滚动字幕方式提醒
产品功能简介
病 案 管 理 系 统
病案管理
完成出院病历的审核、归档,对不合格病历及返回科 室及时完善,并以红色字体醒目提示
XX电子病历系统解决方案
EMR设计理念
一、满足管理者、操作者、系统管理者三个层面的期望需求 • 医院管理者:满足对医院管理宏观效益的把握,整理掌握医院的发展 • 岗位业务人员:代替或简化手工操作、工作量化、细化增强准确性 • 系统管理人员:方便快捷的解决系统故障,集中方便的后台维护
二、满足管理、医疗、病人三位一体的功能需求 • 医院管理者:财务管理、收费管理、成本核算、设备财产 • 面向医疗:电子病历、医学影像、专家系统、远程会诊 • 面向病人:建档建卡、导医咨询、费用查询、医保结算
模板管理
分为:全院/科室/个人模板,个人只有建立模板本人才 能调用,其它用户不能调用,也不能预览模板内容。
病员管理
转科申请与接收/科内转床/出院/住院病员信息一览/查 看在院病员信息/出院未归档病员信息/床位一览(用颜色 标记床位使用情况及护理等级)
- 1、下载文档前请自行甄别文档内容的完整性,平台不提供额外的编辑、内容补充、找答案等附加服务。
- 2、"仅部分预览"的文档,不可在线预览部分如存在完整性等问题,可反馈申请退款(可完整预览的文档不适用该条件!)。
- 3、如文档侵犯您的权益,请联系客服反馈,我们会尽快为您处理(人工客服工作时间:9:00-18:30)。
A g i l e E M R电子病历
安装配置说明
敏捷软件工程实例室
2011年09月06日
目录
第一章 AgileEMR电子病历系统介绍 (3)
第二章AgileEMR的特点与功能 (5)
一、 AgileEMR的特点:.................................. 错误!未定义书签。
二、 AgileEMR的特点:.................................. 错误!未定义书签。
第三章AgileEMR的设计结构. (8)
一、 AgileEMR的项目组织结构: (8)
二、 AgileEMR的类图结构: (9)
第四章AgileEMR的存储结构 (11)
一、 AgileEMR的存储设计: (11)
二、 AgileEMR的操作流程图:............................ 错误!未定义书签。
三、 AgileEMR的存储逻辑设计图:........................ 错误!未定义书签。
四、 AgileEMR的存储拓扑图:............................ 错误!未定义书签。
第五章AgileEMR的权限管理................................... 错误!未定义书签。
一、 AgileEMR的权限设计:.............................. 错误!未定义书签。
二、 AgileEMR的HIS系统权限集成:...................... 错误!未定义书签。
第六章AgileEMR的应用集成................................... 错误!未定义书签。
第一章安装txTextControl控件
AgileEMR电子病历系统使用了TxTextControl控件来完成病历的书写与维护。
下面先说明下如何安装该控件:
一、TxTextControl的安装:
首先、复制setup.inx文件到上级目录中覆盖setup.inx文件。
其次、点击setup.exe:
再次、安装成功后。
重启计算机。
二、TxTextControl的注册:
待重启完毕计算机后,重新点击”setup.ext”等待出现如下界面:
打开如下文件夹
找到如下应用程序:
运行该程序,生成序列号。
复制一个序列号并粘贴到serial number中。
一直下一步,完成安装。
第二章AgileEMR的数据库还原
一、SQL2008的还原:
AgileEMR默认是基于SQLServer2008之上构建的,所以对2008与2005数据库的支持是很好,同时我们也提供了SQL2000的数据恢复脚本。
1、创建EMR数据库:
创建EMR数据库:
2、执行SQL恢复脚本:
选择数据库恢复脚本。
选择打开后,执行脚本。
执行完毕后即完成了数据库的恢复。
二、SQL2000的还原:
SQL2000的还原与SQL2008的还原方式相同,只是操作界面与选项不同。
这里不复述。
三、SQL2005的还原:
SQL2005的还原同SQL2008。
第三章AgileEMR的文件存储服务安装
一、安装分布式文件存储服务:
分布式服务文件的目录结构
1、修改install.bat文件内部的路径信息。
2、运行批处理文件。
(windows7下请鼠标“右键”以管理员身份运行)。
3、安装成功。
则在windows的管理控制台内可以看到服务被正确的安装。
二、配置分布式存储服务的数据库链接字符串:
找到服务配置文件
打开后,修改其中的数据库链接字符串与日志记录路径信息。
打开windows服务管理控制台。
找到EMR服务并启动。
启动成功即可。
第四章AgileEMR的客户端配置
一、AgileEMR的客户端配置:
找到客户端配置文件:
打开并修改配置文件内部的数据库链接字符串。
如果是远程服务器,那么还需修改服务配置部分。
通过上述配置完毕后,即可访问电子病历服务了。
默认的账户信息:
用户名:2
密码:sa
二、AgileEMR的源代码运行配置:找到解决方案:
打开解决方案并找到如下项目工程中的config配置文件:
打开app.config文件,修改的内容与上述客户端配置中的信息相同:
修改完毕后运行即可,用户名与密码同上。
默认的账户信息:
用户名:2
密码:sa。