EtherChannel配置 实例
EtherChannel(PAgP、LACP)基本配置--端口聚合--(转)

EtherChannel(PAgP、LACP)基本配置--端⼝聚合--(转)EtherChannelEtherChannel(以太通道)也叫端⼝聚合或链路聚合,特别提⼀下。
建议我们在使⽤中,物理链路的汇聚,我们可以叫链路(端⼝)汇聚或链路(端⼝)聚合。
⽽VLAN的中继聚合,我们叫vlan聚合或VLAN汇聚,或直接叫trunk! 很容易搞混哦!是由Cisco研发的,应⽤于交换机之间的多链路捆绑技术。
它的基本原理是:将两个设备间多条相同特性的快速以太或千兆位以太物理链路捆绑在⼀起组成⼀条逻辑链路,从⽽达到带宽倍增的⽬的。
除了增加带宽外,EtherChannel还可以在多条链路上均衡分配流量,起到负载分担的作⽤;当⼀条或多条链路故障时,只要还有链路正常,流量将转移到其它的链路上,整个过程在⼏毫秒内完成,从⽽起到冗余的作⽤,增强了⽹络的稳定性和安全性。
在EtherChannel中,负载在各个链路上的分布可以根据源IP地址、⽬的IP地址、源MAC地址、⽬的MAC地址、源IP地址和⽬的IP地址组合,以及源MAC地址和⽬的MAC地址组合等来进⾏分布。
两台交换机之间是否形成EtherChannel也可以⽤协议⾃动协商。
⽬前有两个协商协议:PAgP和LACP,PAgP(端⼝汇聚协议 Port Aggregation Protocol)是Cisco私有的协议,⽽LACP(链路汇聚控制协议 Link Aggregation Control Protocol)是基于IEEE 802.3ad的国际标准。
能形成EtherChannel的模式总结:EtherChannel命令组合:如果想把端⼝配置为on:sw1(config-if-range)#channel-group 1 mode on如果想把端⼝配置为PAgP的desirable:sw1(config-if-range)#channel-protocol pagpsw1(config-if-range)#channel-group 1 mode desirable如果想把端⼝配置为PAgP的auto:sw1(config-if-range)#channel-protocol pagpsw1(config-if-range)#channel-group 1 mode auto如果想把端⼝配置为LACP的active:sw1(config-if-range)#channel-protocol lacpsw1(config-if-range)#channel-group 1 mode active如果想把端⼝配置为LACP的passive:sw1(config-if-range)#channel-protocol lacpsw1(config-if-range)#channel-group 1 mode passiveEtherChannel说明:①Cisco最多允许EtherChannel绑定8个端⼝;1>如果是快速以太⽹,总带宽可达1600Mbit/s;2>如果是Gbit以太⽹,总带宽可达16Gbit/s。
AIXEtherchannel配置

Etherchannel介绍在AIX操作系统中,用户可以配置多个EtherChannel(网卡绑定)。
在AIX 5.2之前,我们要么只能选择active/active EtherChannel模式,要么,只能选择active/standby EtherChannel模式的绑定网卡。
所以,AIX 5.2中引入了新的网卡后备模式,用户可以为整个EtherChannel指定一块备份网卡,当整个EtherChannel失效时,这块网卡会自动顶替EtherChannel的功能。
这与AIX 5.2之前的EtherChannel网卡备份模式有很大区别,因此,在5.2以后可以出现更为复杂的复合网卡绑定模式。
一个EtherChannel中可以有2到8块网卡,一个AIX操作系统中可以配置多个EtherChannel。
但要记住每个EtherChannel都是一个新的以太网接口,用户也许需要通过no命令调整ifsize参数的值来保证以太网卡和EtherChannel的总数不超过ifsize,ifsize的默认值是8。
您可以使用任何AIX系统支持的网卡来组建EtherChannel。
但EtherChannel 的同一个通道成员网卡必须连接到支持EtherChannel的交换机上,备用通道可以接入到另外一个交换机,用于主通道的失败接管。
EtherChannel的所有成员网卡都应该设置成同样的速度和工作模式,如1000兆全双工。
要用作EtherChannel成员的网卡不能配置IP地址,如果已经配置了,必须要在开始配置EtherChannel前删除这些配置。
在Aix5.2以后,我们看看三种典型的配置方式1、双通道或者多通道的共同active模式,这个模式下,所有的网卡都处于active状态,也就是每个网卡都处于工作状态,他们共有一个IP地址与MAC地址,但是,所有网卡的目标必须在同一个交换机上,并且交换机的对应端口也要绑定。
这样做最大的好处就是,当其中一个网卡失效,或者一根网线失效的时候,不影响整个网络的工作,只有当所有的网卡通道失效的时候,网络才失效。
EtherChannel

EtherChannel配置EtherChannel简介:EtherChannel(以太通道)是由Cisco公司开发的,应用于交换机之间的多链路捆绑技术。
它的基本原理是:将两个设备间多条快速以太或千兆以太物理链路捆绑在一起组成一条逻辑链路,从而达到带宽倍增的目的。
除了增加带宽外,EtherChannel还可以在多条链路上均衡分配流量,起到负载分担的作用;在一条或多条链路故障时,只要还有链路正常,流量将转移到其他的链路上,整个过程在几毫秒内完成,从而起到冗余的作用,增强了网络的稳定性和安全性。
EtherChannel中,负载在各个链路上的分布可以根据源IP地址、目的IP地址、源MAC地址、目的MAC地址、源IP地址和目的IP地址组合、源MAC地址和目的MAC地址组合等来进行分布。
1、实验目的通过本实验可以掌握:○1EtherChannel的工作原理。
○2EtherChannel的配置。
2、实验拓扑EtherChannel配置实验拓扑如图所示。
3、实验步骤构成EtherChannel的端口必须具有相同的特性,如双工模式、速度、Trunking的状态等。
配置EtherChannel有手动配置和自动配置(PAGP或者LAGP)两种方法,自动配置就是让EtherChannel协商协议自动协商EtherChannel的建立。
(1) 手动配置EtherChannelS1 (config)#interface port-channel 1//以上是创建以太通道,要指定一个唯一的通道组号,组号的范围是1~6的正整数。
要取消EtherChannel时用“no interface port-channel 1”S1(config)#interface f0/13S1(config-if)#channel-group 1 mode onS1(config)#interface f0/14S1(config-if)#channel-group 1 mode on//以上将物理接口指定到已创建的通道中。
Etherchannel环境下更换网卡
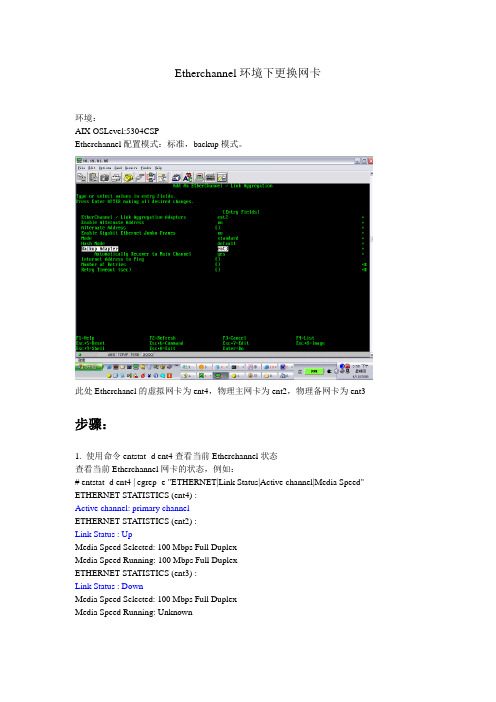
Etherchannel环境下更换网卡环境:AIX OSLevel:5304CSPEtherchannel配置模式:标准,backup模式。
此处Etherchanel的虚拟网卡为ent4,物理主网卡为ent2,物理备网卡为ent3 步骤:1. 使用命令entstat -d ent4查看当前Etherchannel状态查看当前Etherchannel网卡的状态,例如:# entstat -d ent4 | egrep -e "ETHERNET|Link Status|Active channel|Media Speed" ETHERNET STATISTICS (ent4) :Active channel: primary channelETHERNET STATISTICS (ent2) :Link Status : UpMedia Speed Selected: 100 Mbps Full DuplexMedia Speed Running: 100 Mbps Full DuplexETHERNET STATISTICS (ent3) :Link Status : DownMedia Speed Selected: 100 Mbps Full DuplexMedia Speed Running: Unknown注意当前“Active channel”是Primary Channel还是Secondary Channel查看ent2和ent3的link status是Up还是Down2. 如果需要更换的是主网卡ent2,而当前“Active Channel”仍是Primary Channel,则当前ent2上还有网络流量,需要首先进行链路的主备网卡切换,确保需要更换的主网卡ent2上没有网络流量# /usr/lib/methods/ethchan_config -f ent4更换主网卡ent2:1.从etherchannel删除主网卡/usr/lib/methods/ethchan_config -d ent4 ent22.删除并热插拔主网卡3.添加主网卡到etherchannel/usr/lib/methods/ethchan_config -a ent4 ent23. 如果需要更换的是备网卡ent3,而当前“Active Channel”是Secondary Channel,则当前ent3上还有网络流量,需要首先进行链路的主备网卡切换,确保需要更换的备网卡ent3上没有网络流量# /usr/lib/methods/ethchan_config -f ent4更换备网卡ent3:1.从etherchannel删除备网卡/usr/lib/methods/ethchan_config -d ent4 ent32.删除并热插拔备网卡3.添加备网卡到etherchannel/usr/lib/methods/ethchan_config -a -b ent4 ent3完!附录ethchan_config命令说明man ethchan_configCommands Reference, Volume 2, d - h ethchan_config CommandPurposeAdds adapters to an EtherChannel or removes adapters from an EtherChannel.Syntaxethchan_config { -a [ -b ] | -d } EtherChannel Adapterethchan_config -c EtherChannel Attribute NewV alueethchan_config -f EtherChannelDescriptionThis command adds adapters to an EtherChannel or removes adapters from an EtherChannel. This command can also be used tomodify EtherChannel attributes. These additions, deletions or modifications can take place even if the EtherChannel'sinterface is currently configured; that is, it is not necessary to detach the EtherChannel's interface to add or removeadapters or modify most EtherChannel attributes.Flags-aAdds the specified Adapter to the specified EtherChannel. If the adapter must be added as a backup adapter, the -bflag must be specified.-bSpecifies that the Adapter is being added as a backup adapter. This flag is only valid when used with the -a flag.-cChanges the specified Attribute of the specified EtherChannel attribute to the specified NewValue.-dDeletes the specified Adapter from the specified EtherChannel. The -b flag should not be used with the -d flag.-fForces a failover of the specified EtherChannel. Note that the failover will only actually occur if the adapter in theidle channel is up: if the adapter in the idle channel is down, the EtherChannel will keep operating on the active oneand no failover will take place.ParametersAdapterSpecifies the adapter to add or delete.AttributeSpecifies an attribute of the specified EtherChannel.EtherChannelSpecifies the EtherChannel.NewValueSpecifies the new value for the specified attribute of the specified EtherChannel.Exit StatusThe command completed successfully.>0An error occurred.Examples1 To add the adapter ent0 as the backup adapter in the EtherChannel called ent7, type:/usr/lib/methods/ethchan_config -a -b ent7 ent02 To change the address to ping attribute of an EtherChannel called ent7 to type:/usr/lib/methods/ethchan_config -c ent7 netaddr 3 To force a failover of an EtherChannel called ent7 from the currently active channel to the idle channel, type:/usr/lib/methods/ethchan_config -f ent7RestrictionsThe use of the use_jumbo_frame attribute cannot be modified by this command. Attempting to do so will print out an errormessage.Location/usr/lib/methodsAIX33:/>。
EtherChannel技术的研究与实现

0f f P a s s i v e Ac t i v e
× × ×
× × ×
× × √
务I 遘 匐 似
E t h e r C h a n n e l 技 术的研究 与实现
Res ear ch and i m pl em ent a t i on of et her chan nel t echn ol ogy
马 素 刚
MA Su — g a n g
一
所 有 物 理 链 路 的带 宽 总 和 。这 一 技 术 充 分 利 用 了
现 有 的端 口来增加 可 用带 宽 。
1 E t h e r C h a n n e l 配置协议
目前 , 有两 种 用于 协 商 以太 通 道 的协 议 , 即 P Ag P ( P o r t A g g r e g a t i o n P r o t o c o l ,端 口汇聚协 议) 和 L AC P ( L i n k Ag g r e g a t i o n Co n t r o l P r o t o c o l ,链 路 汇 聚控 制 协议 ) 。P Ag P 是C i s c o 的专 有协 议 ,而L AC P
D o i : 1 0 . 3 9 6 9 / J . i s s n . 1 0 0 9 - 0 1 3 4 . 2 0 1 3 . 0 2 ( 下) . 0 4
0 引言
随 着 互 联 网 服 务 领 域 的 不 断 拓 展 ,视 频 点 播 、 网络 电话 等对 网 络带 宽提 出 了更 高 的 要 求 ,
使 用D e s i r a b l e 工 作模 式 。
种 过 渡 性 的解 决 方 法 。 链 路 聚 合 技 术 …是将 多 条
思科Etherchannel链路聚合原理与配置方法详解

思科Etherchannel链路聚合原理与配置⽅法详解本⽂讲述了思科Etherchannel链路聚合原理与配置⽅法。
分享给⼤家供⼤家参考,具体如下:Etherchannel(以太⽹信道)将多个(2-8,2-16)接⼝,逻辑的整合为⼀个接⼝,来转发流量,减少了阻塞端⼝的数量,提⾼了链路带宽,增加了⽹络的稳定性1.1 封装模式1.1.1 PAGP端⼝聚合协议,cisco私有,通过发送慢速hello(30s),协商成为echerchannel,最⼤⽀持在8条链路的协商,链路数量必须为2^x,2 4 8desirable:主动模式auto:auto模式包含了silent模式(安静模式),可以进⾏etherchannel协商1.1.2 LACP链路聚合控制协议(仅⽀持全双⼯接⼝),公有协议。
发送LACPDU进⾏以太信道的协商,最⼤⽀持在16条链路上进⾏以太信道协商,2 4 8 16,默认仅仅使⽤8条。
当使⽤16条链路进⾏协商,选择8条为主链路,其余8条为备份链路。
选择⽅法:1.较⼩优先级(优先级默认32768),2.最⼩的PID模式:active(主动)passive(被动)1.1.3 on模式⼿⼯模式,on模式不能与任何动态PAgP或LAGP建⽴ethechannel。
被动与被动不能形成.1.2 Ethechannel配置1.2.1 配置指南1.通道内所有端⼝必须⽀持ethechannel;同时注意必须连接相同设备(同⼀设备,同本地类型相同)2.这些物理接⼝必须具有相同的速率和双⼯模式(LACP必须为全双⼯)3.通道内不得使⽤span;若为三层通道,IP地址必须配置到逻辑接⼝上(channel-group)4.三层通道内的所有物理接⼝必须为三层接⼝,然后再channel⼝上配置IP地址5.若为⼆层通道,这些物理接⼝应该属于同⼀vlan或者均为trunk⼲道,且封装的类型⼀致,vlan的允许列表必须⼀致6.通道的属性改变将同步到物理接⼝,反之也可;若物理没有全部down,通道依然正常同时配置所有物理接⼝,或者之恶配置channel⼝,均可修改接⼝的属性1.2.2 ⼆层ethechannel配置SW1(config)#int range e0/1-2SW1(config-if-range)#channel-group 1 mode onSW1(config-if-range)#interface port-channel 1 #对逻辑接⼝进⾏管理SW1(config-if)#switchport trunk encapsulation dot1q #修改trunk封装模式SW1(config-if)#switchport mode trunk1.2.3三层ethechannel配置在没有三层ethechannel时,三层链路依然可以使⽤负载均衡来进⾏通信;建⽴三层ethechannel后,可以节省IP地址⽹段,间路路由条⽬的编辑(⼀般配置在核⼼层)SW1(config)#int range e0/1-2SW1(config-if-range)#no switchportSW1(config-if-range)#channel-group 1 mode onSW1(config-if-range)#exitSW1(config)#int port-channel 1 #在通道接⼝上配置IP地址SW1(config-if)#ip add 192.168.1.1 255.255.255.05.3 配置channel时的注意点⼆层通道基于负载分担转发流量,三层通道基于负载均衡转发流量负载均衡:访问同⼀⽬标时,将流量按为单位分割后,沿多条路径同时传输负载分担:访问不同⽬标时基于不同链路,或者不同元在访问⽬标时基于不同链路基于不同源MAC(src-mac)为默认规则。
思科聚合组实验报告
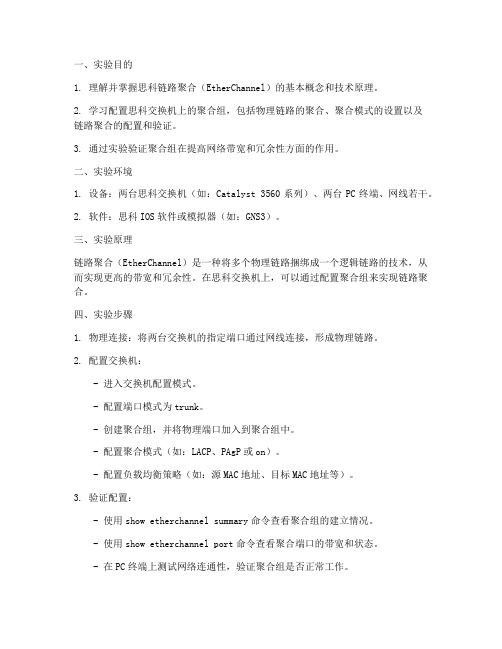
一、实验目的1. 理解并掌握思科链路聚合(EtherChannel)的基本概念和技术原理。
2. 学习配置思科交换机上的聚合组,包括物理链路的聚合、聚合模式的设置以及链路聚合的配置和验证。
3. 通过实验验证聚合组在提高网络带宽和冗余性方面的作用。
二、实验环境1. 设备:两台思科交换机(如:Catalyst 3560系列)、两台PC终端、网线若干。
2. 软件:思科IOS软件或模拟器(如:GNS3)。
三、实验原理链路聚合(EtherChannel)是一种将多个物理链路捆绑成一个逻辑链路的技术,从而实现更高的带宽和冗余性。
在思科交换机上,可以通过配置聚合组来实现链路聚合。
四、实验步骤1. 物理连接:将两台交换机的指定端口通过网线连接,形成物理链路。
2. 配置交换机:- 进入交换机配置模式。
- 配置端口模式为trunk。
- 创建聚合组,并将物理端口加入到聚合组中。
- 配置聚合模式(如:LACP、PAgP或on)。
- 配置负载均衡策略(如:源MAC地址、目标MAC地址等)。
3. 验证配置:- 使用show etherchannel summary命令查看聚合组的建立情况。
- 使用show etherchannel port命令查看聚合端口的带宽和状态。
- 在PC终端上测试网络连通性,验证聚合组是否正常工作。
五、实验结果与分析1. 聚合组建立情况:通过show etherchannel summary命令,可以看到聚合组的建立情况,包括聚合组ID、端口状态、链路状态等。
2. 聚合端口带宽:通过show etherchannel port命令,可以看到聚合端口的带宽和状态,包括端口聚合状态、带宽利用率等。
3. 网络连通性测试:在PC终端上测试网络连通性,可以发现聚合组正常工作,提高了网络带宽和冗余性。
六、实验总结通过本次实验,我们成功配置了思科交换机上的聚合组,并验证了其在提高网络带宽和冗余性方面的作用。
实验结果表明,链路聚合是一种有效的网络技术,可以满足大型网络对带宽和可靠性的需求。
STP和EtherChannel 及部署HSRP三个实验文档
生成树协议,EtherChannel及、部署HSRP实验1、STP将SW2配置为所有奇数VLAN的根交换机将SW1配置为所有偶数VLAN的根交换机2、EtherChannel在SW1和SW2之间部署以太通道,分别使用PAGP、LACP、手动模式3、部署HSRP要求:PC1为active设备PC2为standby设备。
当PC1故障,PC2能够自动接替工作。
当PC1恢复正常,能够自动切换回Active状态。
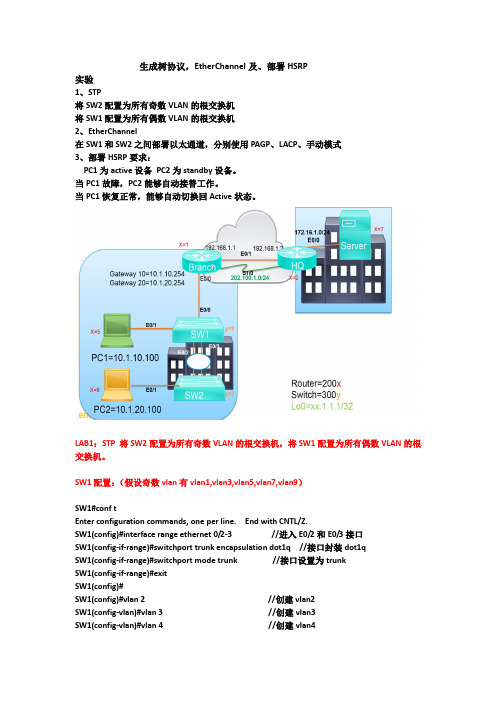
LAB1:STP 将SW2配置为所有奇数VLAN的根交换机,将SW1配置为所有偶数VLAN的根交换机。
SW1配置:(假设奇数vlan有vlan1,vlan3,vlan5,vlan7,vlan9)SW1#conf tEnter configuration commands, one per line. End with CNTL/Z.SW1(config)#interface range ethernet 0/2-3 //进入E0/2和E0/3接口SW1(config-if-range)#switchport trunk encapsulation dot1q //接口封装dot1qSW1(config-if-range)#switchport mode trunk //接口设置为trunkSW1(config-if-range)#exitSW1(config)#SW1(config)#vlan 2 //创建vlan2SW1(config-vlan)#vlan 3 //创建vlan3SW1(config-vlan)#vlan 4 //创建vlan4SW1(config-vlan)#vlan 5 //创建vlan5SW1(config-vlan)#vlan 6 //创建vlan6SW1(config-vlan)#vlan 7 //创建vlan7SW1(config-vlan)#vlan 8 //创建vlan8SW1(config-vlan)#vlan 9 //创建vlan9SW1(config-vlan)#vlan 10 //创建vlan10SW1(config-vlan)#exitSW1(config)#spanning-tree mode mst //设置spanning-tree模式为mst SW1(config)#spanning-tree mst configuration //进入mst配置SW1(config-mst)#instance 1 vlan 1,3,5,7,9 //设置实例instance 1 关联奇数vlan SW1(config-mst)#instance 2 vlan 2,4,6,8,10 //设置实例instance 2关联奇数vlan SW1(config-mst)#name cisco //设置域名SW1(config-mst)#revision 1 //设置修订号SW1(config-mst)#exitSW1(config)#spanning-tree mst 1 root primary //设置mst 1本交换机的为根交换机SW1(config)#SW2配置:(假设偶数vlan有vlan2,vlan4,vlan6,vlan8.vlan10)SW2#conf tEnter configuration commands, one per line. End with CNTL/Z.SW2(config)#interface range ethernet 0/2-3 //进入E0/2和E0/3接口SW2(config-if-range)#switchport trunk encapsulation dot1q //接口封装dot1qSW2(config-if-range)#switchport mode trunk //接口设置为trunkSW2(config-if-range)#exitSW2(config)#SW2(config)#vlan 2 //创建vlan2SW2(config-vlan)#vlan 3 //创建vlan3SW2(config-vlan)#vlan 4 //创建vlan4SW2(config-vlan)#vlan 5 //创建vlan5SW2(config-vlan)#vlan 6 //创建vlan6SW2(config-vlan)#vlan 7 //创建vlan7SW2(config-vlan)#vlan 8 //创建vlan8SW2(config-vlan)#vlan 9 //创建vlan9SW2(config-vlan)#vlan 10 //创建vlan10SW2(config-vlan)#exitSW2(config)#spanning-tree mode mst //设置spanning-tree模式为mst SW2(config)#spanning-tree mst configuration //进入mst配置SW2(config-mst)#instance 1 vlan 1,3,5,7,9 //设置实例instance 1 关联奇数vlan SW2(config-mst)#instance 2 vlan 2,4,6,8,10 //设置实例instance 2关联奇数vlan SW2(config-mst)#name cisco //设置域名SW2(config-mst)#revision 1 //设置修订号SW2(config-mst)#exitSW2(config)#spanning-tree mst 2 root primary //设置mst 2本交换机的为根交换机SW2(config)#结果查看:LAB2: EtherChannel 在SW1和SW2之间部署以太通道,分别使用PAGP、LACP、手动模式.SW1配置:(手动模式)SW1>enable //用户模式进入到特权模式SW1#configure terminal //特权模式进入到全局配置模式Enter configuration commands, one per line. End with CNTL/Z.SW1(config)#interface range ethernet 0/2-3 //进入接口E0/2和E0/3SW1(config-if-range)#switchport trunk encapsulation dot1q //接口封装dot1qSW1(config-if-range)#switchport mode trunk //接口模式设置为trunkSW1(config-if-range)#shutdown //关闭接口SW1(config-if-range)#*Oct 27 17:19:17.164: %LINK-5-CHANGED: Interface Ethernet0/2, changed state toadministratively down*Oct 27 17:19:17.165: %LINK-5-CHANGED: Interface Ethernet0/3, changed state to administratively down*Oct 27 17:19:18.165: %LINEPROTO-5-UPDOWN: Line protocol on Interface Ethernet0/2, changed state to down*Oct 27 17:19:18.165: %LINEPROTO-5-UPDOWN: Line protocol on Interface Ethernet0/3, changed state to downSW1(config-if-range)#channel-group 6 mode on //手动开启channel通道Creating a port-channel interface Port-channel 6SW1(config-if-range)#no shutdown //开启接口SW1(config-if-range)#*Oct 27 17:19:51.060: %LINK-3-UPDOWN: Interface Ethernet0/2, changed state to up*Oct 27 17:19:51.060: %LINK-3-UPDOWN: Interface Ethernet0/3, changed state to upSW1(config-if-range)#*Oct 27 17:19:53.076: %LINEPROTO-5-UPDOWN: Line protocol on Interface Ethernet0/2, changed state to up*Oct 27 17:19:53.076: %LINEPROTO-5-UPDOWN: Line protocol on Interface Ethernet0/3, changed state to upSW1(config-if-range)#*Oct 27 17:19:55.080: %LINEPROTO-5-UPDOWN: Line protocol on Interface Port-channel6, changed state to upSW1(config-if-range)#SW2配置:(手动模式)SW2>enable //用户模式进入到特权模式SW2#configure terminal //特权模式进入到全局配置模式Enter configuration commands, one per line. End with CNTL/Z.SW2(config)#interface range ethernet 0/2-3 //进入接口E0/2和E0/3SW2(config-if-range)#switchport trunk encapsulation dot1q //接口封装dot1qSW2(config-if-range)#switchport mode trunk //接口模式设置为trunkSW2(config-if-range)#shutdown //关闭接口SW2(config-if-range)#*Oct 27 17:17:31.191: %LINK-5-CHANGED: Interface Ethernet0/2, changed state to administratively down*Oct 27 17:17:31.191: %LINK-5-CHANGED: Interface Ethernet0/3, changed state to administratively down*Oct 27 17:17:32.195: %LINEPROTO-5-UPDOWN: Line protocol on Interface Ethernet0/2, changed state to down*Oct 27 17:17:32.195: %LINEPROTO-5-UPDOWN: Line protocol on Interface Ethernet0/3, changed state to downSW2(config-if-range)#channel-group 6 mode on //手动开启channel通道Creating a port-channel interface Port-channel 6SW2(config-if-range)#no shutdown //开启接口*Oct 27 17:19:57.829: %LINK-3-UPDOWN: Interface Ethernet0/2, changed state to up*Oct 27 17:19:57.829: %LINK-3-UPDOWN: Interface Ethernet0/3, changed state to up*Oct 27 17:19:58.835: %LINEPROTO-5-UPDOWN: Line protocol on Interface Ethernet0/2, changed state to up*Oct 27 17:19:58.836: %LINEPROTO-5-UPDOWN: Line protocol on Interface Ethernet0/3, changed state to upSW2(config-if-range)#*Oct 27 17:20:01.829: %LINEPROTO-5-UPDOWN: Line protocol on Interface Port-channel6, changed state to upSW2(config-if-range)#etherchannel通道查看:SW1和SW2配置(PAGP模式)SW1配置:SW1>enable //用户模式进入到特权模式SW1#configure terminal //特权模式进入到全局配置模式Enter configuration commands, one per line. End with CNTL/Z.SW1(config)#interface range ethernet 0/2-3 //进入接口E0/2和E0/3SW1(config-if-range)#switchport trunk encapsulation dot1q //接口封装dot1qSW1(config-if-range)#switchport mode trunk //接口模式设置为trunkSW1(config-if-range)#shutdown //关闭接口SW1(config-if-range)#*Oct 27 17:19:17.164: %LINK-5-CHANGED: Interface Ethernet0/2, changed state to administratively down*Oct 27 17:19:17.165: %LINK-5-CHANGED: Interface Ethernet0/3, changed state to administratively down*Oct 27 17:19:18.165: %LINEPROTO-5-UPDOWN: Line protocol on Interface Ethernet0/2, changed state to down*Oct 27 17:19:18.165: %LINEPROTO-5-UPDOWN: Line protocol on Interface Ethernet0/3, changed state to downSW1(config-if-range)#channel-group 8 mode desirable //开启channel通道协商Creating a port-channel interface Port-channel 8SW1(config-if-range)#no shutdown //开启接口SW1(config-if-range)#*Oct 27 17:19:51.060: %LINK-3-UPDOWN: Interface Ethernet0/2, changed state to up*Oct 27 17:19:51.060: %LINK-3-UPDOWN: Interface Ethernet0/3, changed state to upSW1(config-if-range)#*Oct 27 17:19:53.076: %LINEPROTO-5-UPDOWN: Line protocol on Interface Ethernet0/2, changed state to up*Oct 27 17:19:53.076: %LINEPROTO-5-UPDOWN: Line protocol on Interface Ethernet0/3, changed state to upSW1(config-if-range)#*Oct 27 17:19:55.080: %LINEPROTO-5-UPDOWN: Line protocol on Interface Port-channel8, changed state to upSW1(config-if-range)#SW2配置:SW2>enable //用户模式进入到特权模式SW2#configure terminal //特权模式进入到全局配置模式Enter configuration commands, one per line. End with CNTL/Z.SW2(config)#interface range ethernet 0/2-3 //进入接口E0/2和E0/3SW2(config-if-range)#switchport trunk encapsulation dot1q //接口封装dot1qSW2(config-if-range)#switchport mode trunk //接口模式设置为trunkSW2(config-if-range)#shutdown //关闭接口SW2(config-if-range)#*Oct 27 17:17:31.191: %LINK-5-CHANGED: Interface Ethernet0/2, changed state to administratively down*Oct 27 17:17:31.191: %LINK-5-CHANGED: Interface Ethernet0/3, changed state to administratively down*Oct 27 17:17:32.195: %LINEPROTO-5-UPDOWN: Line protocol on Interface Ethernet0/2, changed state to down*Oct 27 17:17:32.195: %LINEPROTO-5-UPDOWN: Line protocol on Interface Ethernet0/3,changed state to downSW2(config-if-range)#channel-group 8 mode desirable //开启channel通道协商Creating a port-channel interface Port-channel 8SW2(config-if-range)#no shutdown //开启接口*Oct 27 17:19:57.829: %LINK-3-UPDOWN: Interface Ethernet0/2, changed state to up*Oct 27 17:19:57.829: %LINK-3-UPDOWN: Interface Ethernet0/3, changed state to up*Oct 27 17:19:58.835: %LINEPROTO-5-UPDOWN: Line protocol on Interface Ethernet0/2, changed state to up*Oct 27 17:19:58.836: %LINEPROTO-5-UPDOWN: Line protocol on Interface Ethernet0/3, changed state to upSW2(config-if-range)#*Oct 27 17:20:01.829: %LINEPROTO-5-UPDOWN: Line protocol on Interface Port-channel8, changed state to upSW2(config-if-range)#结果查看:SW1和SW2配置(LACP模式)SW1配置:SW1>enable //用户模式进入到特权模式SW1#configure terminal //特权模式进入到全局配置模式Enter configuration commands, one per line. End with CNTL/Z.SW1(config)#interface range ethernet 0/2-3 //进入接口E0/2和E0/3SW1(config-if-range)#switchport trunk encapsulation dot1q //接口封装dot1qSW1(config-if-range)#switchport mode trunk //接口模式设置为trunkSW1(config-if-range)#shutdown //关闭接口SW1(config-if-range)#*Oct 27 17:19:17.164: %LINK-5-CHANGED: Interface Ethernet0/2, changed state to administratively down*Oct 27 17:19:17.165: %LINK-5-CHANGED: Interface Ethernet0/3, changed state to administratively down*Oct 27 17:19:18.165: %LINEPROTO-5-UPDOWN: Line protocol on Interface Ethernet0/2, changed state to down*Oct 27 17:19:18.165: %LINEPROTO-5-UPDOWN: Line protocol on Interface Ethernet0/3, changed state to downSW1(config-if-range)#channel-group 1 mode active //开启channel通道协商Creating a port-channel interface Port-channel 1SW1(config-if-range)#no shutdown //开启接口SW1(config-if-range)#*Oct 27 17:19:51.060: %LINK-3-UPDOWN: Interface Ethernet0/2, changed state to up*Oct 27 17:19:51.060: %LINK-3-UPDOWN: Interface Ethernet0/3, changed state to upSW1(config-if-range)#*Oct 27 17:19:53.076: %LINEPROTO-5-UPDOWN: Line protocol on Interface Ethernet0/2, changed state to up*Oct 27 17:19:53.076: %LINEPROTO-5-UPDOWN: Line protocol on Interface Ethernet0/3, changed state to upSW1(config-if-range)#*Oct 27 17:19:55.080: %LINEPROTO-5-UPDOWN: Line protocol on Interface Port-channel1, changed state to upSW1(config-if-range)#SW2配置:SW2>enable //用户模式进入到特权模式SW2#configure terminal //特权模式进入到全局配置模式Enter configuration commands, one per line. End with CNTL/Z.SW2(config)#interface range ethernet 0/2-3 //进入接口E0/2和E0/3SW2(config-if-range)#switchport trunk encapsulation dot1q //接口封装dot1qSW2(config-if-range)#switchport mode trunk //接口模式设置为trunkSW2(config-if-range)#shutdown //关闭接口SW2(config-if-range)#*Oct 27 17:17:31.191: %LINK-5-CHANGED: Interface Ethernet0/2, changed state to administratively down*Oct 27 17:17:31.191: %LINK-5-CHANGED: Interface Ethernet0/3, changed state to administratively down*Oct 27 17:17:32.195: %LINEPROTO-5-UPDOWN: Line protocol on Interface Ethernet0/2, changed state to down*Oct 27 17:17:32.195: %LINEPROTO-5-UPDOWN: Line protocol on Interface Ethernet0/3, changed state to downSW2(config-if-range)#channel-group 1 mode active //开启channel通道协商Creating a port-channel interface Port-channel 1SW2(config-if-range)#no shutdown //开启接口*Oct 27 17:19:57.829: %LINK-3-UPDOWN: Interface Ethernet0/2, changed state to up*Oct 27 17:19:57.829: %LINK-3-UPDOWN: Interface Ethernet0/3, changed state to up*Oct 27 17:19:58.835: %LINEPROTO-5-UPDOWN: Line protocol on Interface Ethernet0/2, changed state to up*Oct 27 17:19:58.836: %LINEPROTO-5-UPDOWN: Line protocol on Interface Ethernet0/3, changed state to upSW2(config-if-range)#*Oct 27 17:20:01.829: %LINEPROTO-5-UPDOWN: Line protocol on Interface Port-channel1, changed state to upSW2(config-if-range)#结果查看:LAB3、部署HSRP要求:PC1为active设备PC2为standby设备。
- 1、下载文档前请自行甄别文档内容的完整性,平台不提供额外的编辑、内容补充、找答案等附加服务。
- 2、"仅部分预览"的文档,不可在线预览部分如存在完整性等问题,可反馈申请退款(可完整预览的文档不适用该条件!)。
- 3、如文档侵犯您的权益,请联系客服反馈,我们会尽快为您处理(人工客服工作时间:9:00-18:30)。
实验5:EtherChannel配置1.实验目的通过本实验,读者可以掌握如下技能:①EtherChannel的工作原理;②EtherChannel的配置。
2.实验拓扑实验拓扑图如图5-1所示。
图5-1 实验4拓扑图3.实验步骤构成EnterChannel的端口必须具有相同的特性,如双工模式、速度和Trunking 的状态等。
配置EtherChannel有手支配置和自动配置(PAGP或者LAGP)两种方法,自动配置就是让EtherChannel协商协议自动协商EtherChannel的建立。
实验1-1:(1)手动配置EtherChannelS1(config)#interface port-channel 1//以上是创建以太通道,要指定一个唯一的通道组号,组号的范围是1~6的正整数。
要取消EtherChannel时用”no interface port-channel 1”命令S1(config)#interface f0/13S1(config-if)#channel-group 1 mode onS1(config)#interface f0/14S1(config-if)#channel-group 1 mode on//以上将物理接口指定到已创建的通道中S1(config)#int port-channel 1S1(config-if)#switchport mode trunkS1(config-if)#speed 100S1(config-if)#duplex full//以上配置通道中的物理接口的速率及双工等属性S1(config)#port-channel load-balance dst-ip//在EtherChannel中,负载在各个链路上的分布可以根据源IP地址、目的IP地址、源MAC 地址、目的MAC地址、源IP地址和目的IP地址组合,以及源MAC地址和目的MAC地址组合等来进行分布。
两台交换机之间是否形成EtherChannel也可以用协议自动协商。
目前有两个协商协议:PAgP和LACP,PAgP(端口汇聚协议 Port Aggregation Protocol)是Cisco私有的协议,而LACP(链路汇聚控制协议 Link Aggregation Control Protocol)是基于IEEE 802.3ad的国际标准。
//以上是配置EtherChannel的负载平衡方式,命令格式为”port-channel load-balance method”,负载平衡的方式有:dst-ip、dst-mac、src-dst-ip、src-dst-mac等S2(config)#interface port-channel 1S2(config)#interface f0/13S2(config-if)#channel-group 1 mode onS2(config)#interface f0/14S2(config-if)#channel-group 1 mode onS2(config)#int port-channel 1S2(config-if)#switchport 1 mode trunkS2(config-if)#speed 100S2(config-if)#duplex full //注意交换机提示:%Command not available for fiber interfaces.S2(config)#port-channel load-balance dst-mac//以上是配置EtherChannel的负载平衡方式,命令格式为”port-channel load-balance method”,负载平衡的方式有:dst-ip、dst-mac、src-dst-ip、src-dst-mac等(2)查看EtherChannel信息S1#show etherchannel summaryFlags; D - down P - in port-channelI - stand-alone s - suspendedH - Hot-standby (LACP only)R - Layer3 S - Layer2U - in use f - failed to allocate aggregatoru - unsuitable for bundlingw – waiting to be aggregatedd - default portNumber of channel-groups in use; 1Number of aggregators; 1Group Port-channel Protocol Ports------+-------------+-----------+-----------------------------------------------1 Po1(SU) - Fa0/13(P) Fa0/14(P)//可以看到EtherChannel已经形成,”SU”表示EtherChannel正常,如果显示为”SD”,表示把EthernetChannel接口关掉重新开启。
S1# show etherchannel load-balance//显示负载平衡方式。
IPV4和IPv6数据包均基于目的IP进行负载平衡,而对于非ip包则基于目的MAC进行负载平衡。
实验1-2:PAGP配置:(1)配置PAGP或者LAGP Cisco交换机默认PAGP协议!【技术要点】●要想把接口配置为PAGP的desirable模式使用命令:”channel-group 1 mode desirable”;●要想把接口配置为PAGP的auto模式使用命令:”channel-group 1 mode auto”;●要想把接口配置为LACP的active模式使用命令:”channel-group 1 mode active”;●要想把接口配置为LACP的passive模式使用命令:”channel-group 1 mode passive”。
PAGP配置:在这里进行如下配置:S1(config)#interface range f0/13 – 14S1(config-if)#channel-protocal pagp//PAGP 是默认协议,可以不配置S1(config-if)#channel-group 1 mode desirable//配置PAGP的模式为DESIRABLES1(config-if)#switchport mode trunkS2(config)#interface range f0/13 – 14S2(config-if)#channel-group 1 mode autoS2(config-if)#switchport mode trunk(2)Show etherchannel summary 该命令用来查看ether-channel的简要信息S1#show etherchannel summaryFlags; D - down P - in port-channelI - stand-alone s - suspendedH - Hot-standby (LACP only)R - Layer3 S - Layer2U - in use f - failed to allocate aggregatoru - unsuitable for bundlingw – waiting to be aggregatedd - default portNumber of channel-groups in use; 1Number of aggregators; 1Group Port-channel Protocol Ports------+-------------+-----------+-----------------------------------------------1 Po1(SU) - Fa0/13(Pd) Fa0/14(P)//可以看到EtherChannel协商成功。
注意:应在链路的两端都进行检查,确认两端都形成以太通道才行(3)Show etherchannel port-channel该命令用来查看指定的etherchannel包含的接口。
(4) 测试etherchannel 的冗余功能在交换机S1和交换机S2的VLAN 接口上配置IP地址S1(config)#interface vlan 1S1(config)#ip add 173.16.100.1 255.255.255.0S1(config)#interface fa 0/15S1(config-if)#shutdownS2(config)#interface vlan 1S2(config)#ip add 173.16.100.2 255.255.255.0S2(config)#interface fa 0/15S2(config-if)#shutdown从交换机S1连续PING 交换机S2 ,命令为:ping 172.16.100.2 repeat 9000000 ,在交换机S2上关闭f 0/13 ,在交换机S1上查看通讯应该不中断。
在S2上开启f0/13 f0/14 ,在交换机S1上查看通讯应该不中断。
S2#Show etherchannel summary//当f0/14接口关闭后,Etherchannel gropup只有一个接口了,f0/14处于down 状态。
能形成EtherChannel的模式总结:EtherChannel命令组合:如果想把端口配置为on:sw1(config-if-range)#channel-group 1 mode on如果想把端口配置为PAgP的desirable:sw1(config-if-range)#channel-protocol pagpsw1(config-if-range)#channel-group 1 mode desirable如果想把端口配置为PAgP的auto:sw1(config-if-range)#channel-protocol pagpsw1(config-if-range)#channel-group 1 mode auto如果想把端口配置为LACP的active:sw1(config-if-range)#channel-protocol lacpsw1(config-if-range)#channel-group 1 mode active如果想把端口配置为LACP的passive:sw1(config-if-range)#channel-protocol lacpsw1(config-if-range)#channel-group 1 mode passiveEtherChannel说明:①Cisco最多允许EtherChannel绑定8个端口;1>如果是快速以太网,总带宽可达1600Mbit/s;2>如果是Gbit以太网,总带宽可达16Gbit/s。