复蓝海华腾vtv说明手册
VLT 2800 变频器操作说明书
VITSON产品说明书
深圳市慧拓鑫科技有限公司产品资料1、TOP系列电源防雷箱 (2)2、TP系列限压型电源防雷模块 (4)3、TCP系列电源未端精细防护防雷器 (6)4、TDC系列插座式电源电涌保护器 (8)5、TV系列监控系统整体防雷器 (10)6、T系列视频/射频防雷器 (12)7、TC系列控制线路防雷器 (13)8、10/100M网络线路防雷器 (14)9、通讯专线防雷器 (16)10、TT系列天馈线路防雷器 (17)1、TOP系列电源防雷箱产品介绍TOP系列电源防雷箱依据IEC和GB标准设计,8/20波形最大通流容量20KA-100KA,能对电源系统的浪涌电压进行有效的钳制,电源B、C、D级产品均完备。
TOP系列电源防雷箱配备功能测试指示灯,能有效的指示防雷箱工作电源、浪涌防护状态,并可选备雷击计数、远程遥信监测功能。
★电涌保护失效报警功能/相零反接及接地不良报警★雷击计数、电源指示功能(可选)★电涌保护模块失效远程监测功能★残压低、响应时间快★安装设计人性化、结构严谨★工作环境温度适应性强★外壳保护等级高产品适用范围:▲广泛适用于通信、电力、厂矿、金融、民航、铁路等电源系统的保护▲建筑物总配电屏、室外配电柜/配电箱、楼层分配箱▲配电柜电箱无安装位置但须安装第一级防雷设施的环境▲无人值守但须安装第一级带遥信指示的防雷设备的环境▲需要有第一级电涌保护失效指示及报警指示及雷电泄放记录的环境产品尺寸图:安装说明1、取出箱子钥匙,插进锁孔打开防雷箱面板2、根据图1所示,将箱体固定在墙面上。
3、用电缆剪线钳裁剪相应长度的黄、绿、红、蓝色四种电源线及黄绿双色地线。
4、根据现场的接线方式对每条线末端做铜鼻子;选用≥150A开口线鼻子或者与线径相应的国标,圆口线鼻子,开口线鼻子用的电烙铁搪锡;圆口线鼻子用液压钳压接并搪锡。
5、根据图2所示,将防雷箱连接好。
6、把五条连接导线穿管固定;管可选用PVC管\槽、镀锌铁管\槽、黄腊管、波纹管、蛇皮管等;若采用屏蔽接线两端应接地。
VA-M系列机床主轴伺服驱动器V3.0

FUXUIN 微型投影机 说明书
微 型 投 影 机使用说明书公司:东莞市深国科数码科技有限公司地址:广东省东莞市大朗镇黄草朗社区新兴东路11号目录1. 目录 22. 警告 33. 概述 44. 遥控功能 55. 配件 66. 操作 7 a启动和关闭 7b 定位 7c 聚焦/投影距离 8d A / V输入 9e VGA连接 10f USB连接 10g. 机载媒体播放器(OMP)概述 10I 查看照片 11ii. 图像调整 11 iii 听音乐 12 iv 播放视频 12 v. 文件菜单 137. 设置菜单 138. 保养 159. 故障解决 1510. 规格 16不能将投影机放在阳光直射或靠近火源的地方,如加热器、火炉旁边,因为可能会引起火灾。
不能在靠近蒸汽和油的地方操作投影机,比如湿度调节器,因为可能会引起触电。
不能在靠近水的地方,诸如水槽或浴缸旁边操作投影仪,因为可能会引起触电。
不能阻止和限制通风孔排出的气流,因为这样可能导致投影机过热。
不能在投影机的旁边放置易燃材料,因为这样可能引起火灾。
轻拿轻放,不能重力碰撞,否则会造成投影机的损坏。
调焦调整焦距投影镜头按键和接口返回键开机键S-VIDEO电源输入耳机输出Mini USB输入USB输入SD卡插槽 A / V输入遥 控 功 能USB线电源适配器复合A/V电线遥控器(外观以实物为准)启动和关闭启动—连接电源,按住开机键3秒钟,直到屏幕发亮。
关闭—按住遥控器电源键,直至关机。
定位将投影仪放在正确的角度上(参看下图),如果角度不正确会引起投影图像的扭曲。
水平对齐垂直对齐聚焦/投影距离焦距可以通过投影机前面的旋转开关进行调整,聚焦/投影距离参看以下的表格:调焦旋转开关投影机包含一个A / V(音频/视频)端口,可以通过一个3。
5mm的A/V电缆连接到任何配有A/V输出功能的设备。
将A/V电缆插入投影仪的A/V插口,然后选择主菜单中的” “A/V input”键,或者按遥控上的“MENU”键并选择“A/V input”,会出现一个蓝色的屏幕,投影仪开始准备接收A/V信号。
WTV扩展功能说明书V1.0.doc

WTV扩展功能说明书目录1. 芯片扩展特性 (4)2. 扩展使用框图 (4)3. 一线、三线串口控制语音及LED显示连接 (4)4. 一线、三线串口控制语音及LCD显示连接 (6)5. 一线串口模式 (8)5.1语音及命令码对应表 (8)5.2语音地址对应关系 (8)5.3 控制时序 (9)5.3.1单字节命令 (9)5.3.2命令FAH+XX (9)5.3.3命令F5H+XX+XX (10)5.4.4命令F6H+XX+XX+XX+XX (10)6. 三线串口控制模式 (11)6.1语音及命令码对应表 (11)6.2语音地址对应关系 (12)6.3 控制时序 (12)6.3.1单字节命令(时钟上升沿采集数据) (12)6.3.2命令FAH+XX (13)6.3.3命令F5H+XX+XX (13)6.3.4命令F6H+XX+XX+XX+XX (13)7. 产品案例说明 (14)7.1语音电饭煲 (14)7.2语音导航洗衣机 (14)7.3语音电子琴 (15)8. 上位机操作说明 (16)8.1 新建工程 (16)8.2 芯片型号及控制模式设定 (16)8.3 加载语音文件 (18)8.4 地址操作和语音组合 (19)8.5 编译和下载 (21)WTV扩展功能简介WTV系列语音芯片是我司推出的一系列语音芯片。
该系列芯片包括WTV040、WTV080、WTV170、WTV340等语音芯片。
此系列芯片具有众多单元电路,且有极强的可编程能力,除了能够播放语音、MIDI音乐和实现标准的控制方式外,亦可根据需求,订做各种功能。
WTV系列语音芯片扩展功能分一线串口和三线串口两种控制方式,不仅语音方面功能极强,可方便使用MCU实现208段语音的任意调用,同时具有独特的LED、LCD等扩展功能,可直接驱动LCD或LED显示,是一种功能强劲的单芯片实现语音提示和显示的解决方案。
该产品在很多领域都有应用,例如电子琴、高级玩具、防盗设备、智能家电、保健与理疗产品、仪器仪表,以及各类自动控制系统等。
VLT HVAC Drive 操作说明

18
Illustration 3.14: 完全拧紧螺钉。
18
Illustration 4.1: 主电源端子和接地端子。
23
Illustration 4.2: 首先,将两个螺钉安装到固定板上,滑动入位并完全拧紧。
24
Illustration 4.3: 安装电缆时,首先安装并拧紧接地电线。
24
Illustration 4.4: 然后,安装主电源插头并拧紧电线。
对北美市场:ETR 功能提供了符合 NEC 规定的第 20 类电动机过载保护。 • 接地漏电电流大于 3.5 mA。 • [OFF](关闭)键不是安全开关。它不能将变频器与主电源断开。
1.1.3. 一般警告
警告: 即使设备已断开与主电源的连接,触碰电气部件也可能会导致生命危险,请断电后至 少等候 15 分钟。 如果在特定设备的铭牌上规定了更短的等待时间,则以此时间为准。 确保所有其它电源输入都已断开,例如负载共享(直流中间电路的连接)以及电动 机。
Illustration 4.9: 电动机连接端子
28
Illustration 4.10: 首先,断开电动机接地,然后,将电动机 u、v 和 w 电线插入插头并拧紧。 29
Illustration 4.11: 安装电缆夹,以确保机架和屏蔽丝网达到 360 度连接,注意去除电缆夹下面
的电缆绝缘层。
29
25
Illustration 4.5: 最后,拧紧主电源电线的支持架。
25
Illustration 4.6: 如何不用断路器连接主电源和接地。注意,需要使用电缆夹。
26
Illustration 4.7: 如何使用来自路器连接主电源和接地。26
Illustration 4.8: 如何连接主电源和接地。
VULCAN-HART VCV系列烤箱系统操作手册说明书

MODELS VCV13VCV6VCV4VCV5INSTALLATION &OPERATION MANUALCOOK AND HOLD OVEN SYSTEMSF-38052 (4-08)VULCAN-HARTDIVISION OF ITW FOOD EQUIPMENT GROUP, LLC 3600 NORTH POINT BLVD.BALTIMORE, MD 21222For additional information on Vulcan-Hart or to locate an authorized parts and service provider in your area, visit our website at VCV SERIES COOK AND HOLD OVEN SYSTEMSIMPORTANT FOR YOUR SAFETYTHE INSTALLATION SECTION OF THIS MANUAL HAS BEEN PREPARED FOR PERSONNEL QUALIFIED TO INSTALL THIS EQUIPMENT, WHO SHOULD PERFORM THE INITIAL FIELD START-UP AND ADJUSTMENTS OF THE EQUIPMENT COVERED BY THIS MANUAL.damage, injury or death. Read the Installation, Operatingand Maintenance instructions thoroughly beforeinstalling or servicing this equipment.IN THE EVENT OF A POWER FAILURE,DO NOT ATTEMPT TO OPERATE THIS DEVICE.— 2 —© VULCAN-HART, 2008— 3 —VCV SERIES COOK AND HOLD OVEN SYSTEMSSPECIFICATIONSMODEL PAN*MEAT*SHIPPING NO.CAPACITYCAPACITYHEIGHTDEPTHWIDTHWEIGHTVOLTSWATTS AMPSVCV5545 lbs.31.5"33.75"28.25"170 lbs.12012001520.1 kg800 mm857 mm718 mm77 kg27.5" w/o casters699 mmVCV138 each 120 lbs 78 in 30.75 in 22.25 in 438 lbs 208/3800/19/2218"x26" pans 54.5 kg 1981 mm 781 mm 566 mm 199 kg 2405060VCV68 each 120 lbs 43 in 30.75 in 22.25 in 275 lbs 208/1900/10/1118"x26" pans54.5 kg 1093 mm 781 mm 566 mm 125 kg 2402530VCV4340 lbs.32.5"26.875"17.25"130 lbs.12015001518.1 kg826 mm683 mm438 mm59 kg28.5" w/o casters724 mm* Per compartmentINTRODUCTIONThis manual is provided to assist persons responsible for the operation and maintenance of the oven with a simple but comprehensive understanding of its proper use. We recommend that this manual be read and understood prior to placing the oven into operation.Vulcan-Hart’s Cook and Hold Oven System is a basic food preparation unit that has found wide acceptance in both institutional and commercial food service operations. Vulcan-Hart’s products are produced with quality workmanship and materials. Proper installation, usage, and maintenance will result in many years of satisfactory performance.As with any piece of food service equipment,this oven system requires a minimum of care and maintenance. Recommended procedures are contained in this manual and should become a regular part of the operation of the unit.SERIAL NUMBER LOCATIONThe Serial Number and Model Number for the unit are located on the equipment Serial Data Plate located by the electrical connection.Figure 1: Serial Data PlateElectrical RequirementsThe VCV13 and VCV6 ovens are dual voltage,factory wired for 208/240 Volts AC, single phase, 50 or 60 Hz service. The VCV5 and VCV4 ovens are factory wired for 120 Volts AC, 60 Hz service.voltage and phase of the power source are identical to the voltage and phase information on the data plate.The oven must be adequately and safely grounded before operation. A separate disconnect switch or circuit breaker is recommended to be placed at a convenient location between the oven and the electric power source.VCV SERIES COOK AND HOLD OVEN SYSTEMSFigure 2: Model VCV4 DimensionsFigure 3: Model VCV5 Dimensions— 4 —VCV SERIES COOK AND HOLD OVEN SYSTEMSFigure 4: Model VCV6 DimensionsFigure 5: Model VCV13 Dimensions— 5 —VCV SERIES COOK AND HOLD OVEN SYSTEMSINSTALLATIONBefore installing, verify that the electrical service agrees with the specifications on the data plate located on the lower rear of the cabinet. If the electrical service does not agree with the data plate, do not proceed with installation. Contact your dealer or local Authorized Vulcan-Hart Servicer immediately.UNPACKINGThis cabinet was inspected before leaving the factory. The transportation company assumes full responsibility for safe delivery upon acceptance of the shipment. Immediately after unpacking, check for possible shipping damage. If the cabinet is damaged, save packing material and contact the carrier within 15 days of delivery. Check the delivery documentation for damage reporting contacts and time limits. Carefully unpack and place in a work-accessible area as near the installation position as possible.1.Open door(s) and carefully remove anypackaging materials and the retaining straps that hold the tray slides and tray slide upright side supports.2.Remove all scratch-protective film fromcabinet.INSTALLATION CODESAND STANDARDSIn the United States, the Vulcan-Hart ovensystem must be installed in accordance withthe following:1.State and local codes.2.National Electrical Code (ANSI/NFPA No.70, latest edition) available from the NationalFire Protection Association, BatterymarchPark, Quincy, MA 02269.3.Vapor Removal from Cooking Equipment,(NFPA-96, latest edition) available fromNFPA.In Canada, the Vulcan-Hart oven system mustbe installed in accordance with the following:1.Local codes.2.Canadian Electrical Code (CSA C22.2 No.3, latest edition) available from theCanadian Standards Association, 5060Spectrum Way, Mississauga, Ontario,Canada L4W 5N6.LOCATIONFor efficient cabinet operation, choose alocation that will provide easy loading andunloading without interfering with the finalassembly of food orders.The final location must allow adequateclearances for servicing and air circulation forproper operation.— 6 —VCV SERIES COOK AND HOLD OVEN SYSTEMSELECTRICAL CONNECTIONThe VCV13 and VCV6 ovens are dual voltage, factory wired for 208/240 Volts AC, single phase, 50 or 60 Hz service. The VCV4 and VCV5 ovensare factory wired for 120 Volts AC, 60 Hz service. voltage and phase of the power source are identical to the voltage and phaseinformation on the data plate.applicable portions of the National Electrical code and/or other localelectrical codes.vicinity of this or any other applicance.All cabinets are equipped with a durable, suitable,8-ft. (2.4 m) cord and NEMA 5-15 plug asstandard equipment. The cord and plug comewith a proper strain relief to prevent unit frommoving away from electrical connection.Refer to wiring diagram in this manual forproper connection.Do not store flammables near unit.1.At the circuit breaker, turn off power to thecircuit to which the oven system is to beconnected.2.Check that the oven Power ON/OFFSwitch is in the OFF position.3.Connect the power cord from the ovensystem to the electrical power source.4.At the circuit breaker, turn on power tothe circuit.— 7 —VCV SERIES COOK AND HOLD OVEN SYSTEMSOPERATIONOVEN CONTROLSAll operating controls are located on the front Control Panel(s). The oven is supplied with individual operating controls for each oven cavity.Each Control Panel contains:•Power ON/OFF Switch•HOLDING TEMPERATURE knob •ROASTING TEMPERATURE knob •ROASTING TIME knob•Holding Temperature Indicator Light •Roasting Temperature Indicator LightFigure 6: VCV13 and VCV6 Operating ControlsFigure 7: VCV4 and VCV5Operating ControlsBEFORE FIRST USEThoroughly clean the oven before initial use.1.Remove the Interior Side Racks and theAir Tunnel from the cabinet.2.Take the Interior Side Racks and the AirTunnel to a sink or dishwasher for athorough cleaning.damage to electrical components orconnections.Note: Never use harsh chemicals or abrasivepads to clean the cabinet.e a mild soap and water solution toclean these items.4.Wring out the cloth so it is only damp andnot soaking wet.5.Reassemble oven.— 8 —VCV SERIES COOK AND HOLD OVEN SYSTEMSTESTING THE OVENBefore using the oven for the first time, verify that the oven operates normally.1.Check that the oven is connected to thecorrect power source.2.Set the ROASTING TIME knob to -0-.3.Turn the HOLDING TEMPERATURE knobto 140°F.4.Set the oven Power ON/OFF Switch to theON position.5.Check that the Oven Circulating Fan(s)are running.6.Check that the Holding TemperatureIndicator Light is illuminated.Note: The cooling fans may not operate when the oven is first turned on. The cooling fans operate only when the thermostat to which they are connected requires it.7.Set the ROASTING TIME knob to 2 hours.The Holding Temperature Indicator Light will go out and the Roasting Temperature Indicator Light will illuminate.8.Turn the ROASTING TEMPERATUREknob to 250°F. Check the interior rear of the oven cavity to determine that the oven is heating.9.Turn the ROASTING TIME knob to -0- andset the HOLDING TEMPERATURE knob at 250°F.10.Check that the Roasting TemperatureIndicator Light has gone out and the Holding Temperature Indicator Light has turned on.11.Check the interior rear of the oven toensure that the oven is heating.If all the functions perform satisfactorily, the oven is ready for operation.OPERATING THE OVENPreheat the oven cavity to the desiredtemperature when the oven is first used for theday or whenever the compartment is cold.Keep the door closed during preheating cycle.When the cooking compartment is at thedesired temperature, place the pans of foodinto the oven and shut the door.Set the ROASTING TIME knob to the desiredcooking time.SHUTDOWN1.Turn off all thermostats.2.Turn Power ON/OFF Switch to OFF position.EXTENDED SHUTDOWNPerform the following procedure to shut downthe oven for an extended period of time.1.Thoroughly clean the oven according tothe cleaning procedures in this manual.2.Leave the door(s) slightly open to allowventilation and preservation of gasket(s).Whenever repair or adjustment of the oven isnecessary, refer to the PRODUCT SUPPORTAND SERVICE section of this manual.— 9 —VCV SERIES COOK AND HOLD OVEN SYSTEMSGENERAL CLEANINGInteriorWash the inside of the compartment with a solution of mild detergent and warm water. Rinse with warm water. Wipe dry. This should be performed based upon a schedule predetermined for your operation.ExteriorRefer to “STAINLESS STEEL CARE.”Door Gasket(s)At least once a week, thoroughly clean the gasket sealing surfaces of the oven door(s) to remove food acids; this action will ensure maximum gasket life.Note: Do not use any solvents or sharp instruments to clean the gasket(s).Wash the gasket(s) with a cloth moistened with a solution of mild detergent and warm water. Rinse with a fresh cloth moistened in warm water to remove all traces of detergent. Wipe dry with a clean dry cloth.Never apply food oils or petroleum lubricants directly to the gasket(s); petroleum-based solvents and lubricants will reduce gasket life.STAINLESS STEEL CARE CleaningStainless steel contains 70-80% iron, which will rust if not properly maintained. It also contains 12-30% chromium, which forms an invisible passive, protective film that shields against corrosion. If the film remains intact, the stainless steel will remain intact. However, if the film is damaged, the stainless steel can break down and rust. To prevent stainlesssteel breakdown, follow these steps:Never use any metal tools, pads (except for stainless steel scouringpads), which will mar the surface!Never use steel wool, which willNever use acid-based orwhich will break down the protective film!Never rub in a circular motion!Never leave any food products acidic. Salt contains chloride!For routine cleaning, use warm water, mild soap or detergent and a sponge or soft cloth.For heavy-duty cleaning, use warm water, a degreaser and a plastic, stainless steel or Scotch-Brite pad.Always rinse thoroughly. Always rub gently in the direction of the steel grain.MAINTENANCE— 10 —Preserving and RestoringSpecial stainless steel polishing cleaners can preserve and restore the protective film.Preserve the life of stainless steel with a regular application of a high quality stainless steel polishing cleaner as a final step to daily cleaning.If signs of breakdown appear, restore the stainless steel surface. First, thoroughly clean, rinse and dry the surface. Then, on a daily basis, apply a high-quality stainless steel polish according to manufacturer’s instructions. Heat TintDarkened areas, called “heat tint,” may appear on stainless steel exposed to excessive heat, which causes the protective film to thicken. It is unsightly but is not a sign of permanent damage. To remove heat tint, follow the routine cleaning procedure. Stubborn heat tint will require heavy-duty cleaning.To reduce heat tint, limit the exposure of equipment to excessive heat.MAINTAINING DOOR GASKET(S) Leaking and/or damaged door gasket(s) cause inefficient and unsatisfactory operation of the unit. Replace any door gasket(s) that are damaged or deformed.Note:Leave the compartment door(s) slightly open (unlatched) when the unit is not in use. Keeping the gasket under pressure when the unit is not in use can cause permanent deformation of the gasket and reduce its serviceable life.— 11 —SYMPTOM Oven not operatingIndicator Lights are lit but Cooling Fans not operatingOven compartment heating(Blower Motor IS NOT operating with Power ON/OFF Switch ON ) Oven compartment NOT heating(Blower Motor IS operating with Power ON/OFF Switch ON) Oven temperature is incorrectPOSSIBLE CAUSESOven is not plugged intopower sourceFuse is blownPower ON/OFF Switch isnot ONOven is below 150°FDefective connection orwiringDefective fanDefective thermostatDefective connection orwiringDefective motorDefective RoastingTemperature ThermostatDefective HoldingTemperature ThermostatDefective High-LimitThermostatDefective Heating ElementThermostats requirecalibrationREMEDYPlug oven into correct power source asindicated on data plate.Check fuse and replace if necessary.Press Power ON/OFF Switch to ON.This is normal when unit is cold.If Cooling Fans do not operate when ovencavity is above 150°F, contact yourauthorized service provider.Contact your authorized service provider.Set ROASTING TIME knob to -0-. (HoldingTemperature Indicator Light and Power ON/OFF Switch lights will both be lit.)Turn HOLDING TEMPERATURE knob to 250°Fand check for heat at rear of oven cavity.•If heat is present, turn HOLDINGTEMPERATURE knob off, and turnROASTING TEMPERATURE knob to 250°F.Wait until Blower Motor begins to blow coolair into rear of oven cavity and setROASTING TIME knob to 2 hours. (PowerON/OFF Switch light and RoastingTemperature Indicator Light will be lit.)Check rear of the oven cavity for heat.•If heat is not present in one of the cycles,the Thermostat for that cycle is defective.Contact your authorized service provider.•If no heat is present in either cycle, theRoasting T emperature Thermostat, HoldingTemperature Thermostat, High-LimitThermostat, or Heating Element is defective.Contact your authorized service provider.Contact your authorized service provider.TROUBLESHOOTING— 12 —WIRING DIAGRAMSFigure 8: VCV13 and VCV6 Wiring Diagram – Electro-Mechanical Control— 13 —Figure 9: VCV4 Wiring Diagram – Electro-Mechanical Control— 14 —Figure 10: VCV5 Wiring Diagram – Electro-Mechanical Control— 15 —— 16 —F-38052 (4-08)PRINTED IN U.S.A .SERVICE AND PARTS INFORMATIONTo obtain service and parts information concerning this model, contact Vulcan-Hart or refer to our website: for a complete listing of Authorized Service and Parts depots.When calling for service, have the model number and serial number available.。
复蓝海华腾vtv5说明书
功能码号
功能码名称
出厂值
功能码选项
用户设定
用户密码
0
0:无密码;其他:密码保护
功能码保护
0
0:所有参数允许更改;
1:所有参数禁止更改;
2:恢复p区参数为出厂设置;
4:恢复p区a区参数为出厂设置;
5;恢复所有参数为出厂设置(除d组)。
功能码显示
0
0:基本菜单模式;
1:快速菜单模式。
控制运行模式
0
0:过程开环模式;
3:复合控制;
开环主给定方式
0
0: 开环数字频率给定(p0.
05)。
开环数字频率给定
频率上下限(~).
运行命令给定方式
0
0:操作面板;
1:端子;
运行方向命令
0
0:正向‘
1:反向
加速时间0
减速时间0
最大输出频率
50
最大输出电压
380
频率上限
频率下限
基本运行频率
转矩提升
加速时间1
加速时间2
~பைடு நூலகம்
多段频率
1~36
~
X1~x6端子输入功能选择
起。停模式选择
0: 两线式1;
1: 两线式2;
2: 三线式.
密码清除方法:—prg———一次—prg---
- 1、下载文档前请自行甄别文档内容的完整性,平台不提供额外的编辑、内容补充、找答案等附加服务。
- 2、"仅部分预览"的文档,不可在线预览部分如存在完整性等问题,可反馈申请退款(可完整预览的文档不适用该条件!)。
- 3、如文档侵犯您的权益,请联系客服反馈,我们会尽快为您处理(人工客服工作时间:9:00-18:30)。
0:基本菜单模式;
1:快速菜单模式。
P0.03
控制运行模式
0
0:过程开环模式;
3:复合控制;
P0.04
开环主给定方式
0
0:开环数字频率给定(p0.
05)。
P0.05
开环数字频率给定
50.00
频率上下限(p0.13~p0.14).
P0.06
运行命令给定方式
0
0:操作面板;
1:端子;
P0.07
运行方向命令
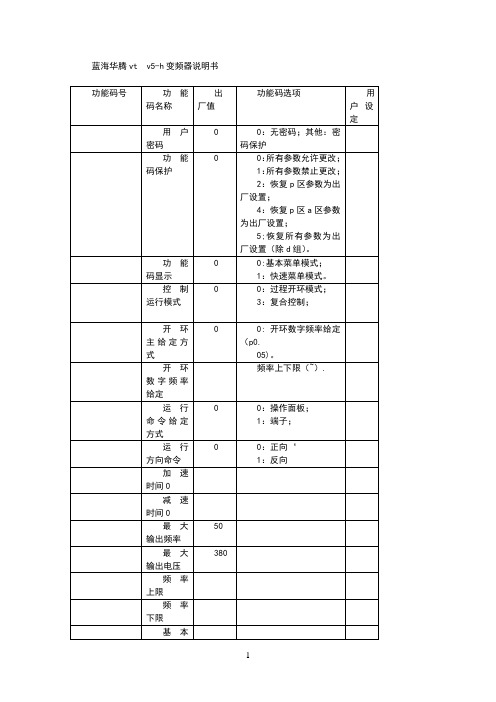
蓝海华腾vtv5-h变频器说明书
功能码号
功能码名称
出厂值
功能码选项
用户设定
P0.00
用户密码
0
0:无密码;其他:密码保护
P0.01
功能码保护
0
0:所有参数允许更改;
1:所有参数禁止更改;
2:恢复p区参数为出厂设置;
4:恢复p区a区参数为出厂设置;
5;恢复所有参数为出厂设置(除d组)。
P0.02
功能码显示
0
0:正向‘
1:反向ห้องสมุดไป่ตู้
P0.08
加速时间0
6.0
P0.09
减速时间0
20.0
P0.11
最大输出频率
50
P0.12
最大输出电压
380
P0.13
频率上限
50.0
P0.14
频率下限
0.00
P0.15
基本运行频率
50.00
P0.16
转矩提升
0.0
P4.09
加速时间1
P4.10
加速时间2
P4.22~p4.36
多段频率
1~36
P5.00~p5.05
X1~x6端子输入功能选择
P5.11
起。停模式选择
0:两线式1;
1:两线式2;
2:三线式.
密码清除方法:25.00—prg—p0.00—prg-0.000—prg-----p0.01---v---一次---p0.00—prg---
0.000----prg---p.clr-----p0.01---esc---25.00