Android移动端自动化测试框架UIAutomator2入门
python uiautomator2 用法

python uiautomator2 用法"python uiautomator2 用法" 是关于使用Python编写自动化测试工具uiautomator2的主题。
本文将逐步回答以下问题:1. 什么是uiautomator2?2. 如何安装uiautomator2?3. 如何创建测试用例?4. 如何定位元素?5. 如何进行操作和断言?6. 如何生成测试报告?7. 如何运行测试用例?8. 如何处理异常情况?9. 如何优化测试用例的执行速度?10. 结语# 什么是uiautomator2?uiautomator2是一个Python库,用于编写Android设备上的UI自动化测试。
它是Google的uiautomator项目的升级版,提供了更多功能和更好的性能。
# 如何安装uiautomator2?首先,您需要确保已经安装了Python,并且具有pip包管理器。
在命令行中运行以下命令来安装uiautomator2:pip install uiautomator2安装完成后,您需要将uiautomator2服务安装到Android设备上。
您可以通过运行以下命令来完成此操作:python -m uiautomator2 init此命令将下载并安装所需的uiautomator2服务。
# 如何创建测试用例?创建一个新的Python文件,导入uiautomator2库:pythonimport uiautomator2 as u2然后,创建一个uiautomator2对象来连接到Android设备:pythond = u2.connect()# 如何定位元素?使用uiautomator2,您可以使用不同的定位方法来定位元素,如下所示:- 通过文本定位元素:pythonelement = d(text="按钮")- 通过描述定位元素:pythonelement = d(description="登录按钮")- 通过类名定位元素:pythonelement = d(className="android.widget.Button")- 通过ID定位元素:pythonelement = d(resourceId="com.example.app:id/login_button") # 如何进行操作和断言?要操作元素,您可以使用以下方法:- 点击元素:pythonelement.click()- 输入文本:pythonelement.set_text("Hello World") - 清除文本:pythonelement.clear_text()要进行断言,您可以使用以下方法:- 检查元素是否可见:pythonelement.wait(timeout=10)- 检查元素是否存在:pythonexists = element.exists# 如何生成测试报告?要生成测试报告,可以使用uiautomator2库提供的内置机制,例如使用HTMLTestRunner或JUnitXMLTestRunner。
uiautomator2 watcher用法

uiautomator2 watcher用法摘要:1.UIAutomator2 简介2.Watcher 的作用3.UIAutomator2 Watcher 的使用方法4.使用示例正文:1.UIAutomator2 简介UIAutomator2 是Android 平台下的一个自动化测试工具,它可以帮助开发者编写自动化测试脚本,以实现对Android 应用的自动化测试。
相较于UIAutomator1,UIAutomator2 在功能和性能上都有很大的提升。
2.Watcher 的作用在UIAutomator2 中,Watcher 是一个非常重要的概念。
它可以用来监视某个元素的状态,当元素的状态发生变化时,可以触发相应的操作。
这对于编写自动化测试脚本来说是非常有用的,因为它可以确保在特定的条件下执行测试操作。
3.UIAutomator2 Watcher 的使用方法要使用UIAutomator2 Watcher,首先需要导入相关的库,然后在测试脚本中创建一个Watcher 实例。
接下来,可以通过调用Watcher 的方法来监视元素的状态。
以下是一个简单的使用示例:```javaimport androidx.test.ui.espresso.Espresso;import androidx.test.ui.espresso.ViewInteraction;public class MyTest extends InstrumentationTestCase {@Overrideprotected void setUp() throws Exception {super.setUp();Espresso.init(this);}public void testWatcherExample() {// 创建一个Watcher 实例Watcher watcher = new Watcher();// 指定要监视的元素,这里我们监视一个TextViewViewInteraction textView =Espresso.onView(withId(R.id.my_text_view));// 监视元素的text 属性watcher.watch(textView, "text");// 当text 属性发生变化时,执行相应的操作watcher.doOnTextChanged(new Watcher.TextChangeListener() {@Overridepublic void onTextChanged(CharSequence oldText, CharSequence newText) {// 在这里执行相应的操作,例如打印新的文本内容Log.d("WatcherExample", "Text changed from " + oldText + " to " + newText);}});// 执行其他测试操作//...// 结束测试Espresso.close();}}```4.使用示例在上述示例中,我们创建了一个Watcher 实例,并指定要监视的元素为一个TextView。
uiautomator2详细使用方法
uiautomator2详细使用方法下载温馨提示:该文档是我店铺精心编制而成,希望大家下载以后,能够帮助大家解决实际的问题。
文档下载后可定制随意修改,请根据实际需要进行相应的调整和使用,谢谢!并且,本店铺为大家提供各种各样类型的实用资料,如教育随笔、日记赏析、句子摘抄、古诗大全、经典美文、话题作文、工作总结、词语解析、文案摘录、其他资料等等,如想了解不同资料格式和写法,敬请关注!Download tips: This document is carefully compiled by the editor. I hope that after you download them, they can help you solve practical problems. The document can be customized and modified after downloading, please adjust and use it according to actual needs, thank you!In addition, our shop provides you with various types of practical materials, such as educational essays, diary appreciation, sentence excerpts, ancient poems, classic articles, topic composition, work summary, word parsing, copy excerpts, other materials and so on, want to know different data formats and writing methods, please pay attention!UIAutomator2是一款功能强大的自动化测试框架,被广泛运用于Android应用程序的UI测试。
uiautomator2 swipe方法

uiautomator2 swipe方法uiautomator2 swipe方法uiautomator2是一个用于Android设备的UI自动化测试框架,其中的swipe方法可以模拟滑动手势操作。
本文将详细介绍uiautomator2的swipe方法的使用,并提供一些实际案例供参考。
一、什么是uiautomator2 swipe方法?uiautomator2 swipe方法是uiautomator2框架提供的一个用于模拟滑动手势操作的方法。
通过指定起始坐标和终点坐标,可以实现屏幕上的滑动操作。
这个方法非常实用,可以用于测试应用程序的滑动功能,也可以用于自动化操作手机屏幕。
二、uiautomator2 swipe方法的语法uiautomator2 swipe方法的语法如下:```javaswipe(startX, startY, endX, endY, duration)```其中,startX和startY表示起始坐标,endX和endY表示终点坐标,duration表示滑动的持续时间(以毫秒为单位)。
三、uiautomator2 swipe方法的实例下面是一些使用uiautomator2 swipe方法的实例:1. 向上滑动屏幕```javadriver.swipe(500, 1500, 500, 500, 1000);```这个实例会将屏幕从坐标(500, 1500)滑动到坐标(500, 500),持续时间为1秒。
2. 向下滑动屏幕```javadriver.swipe(500, 500, 500, 1500, 1000);```这个实例会将屏幕从坐标(500, 500)滑动到坐标(500, 1500),持续时间为1秒。
3. 向左滑动屏幕```javadriver.swipe(1000, 1000, 500, 1000, 1000);```这个实例会将屏幕从坐标(1000, 1000)滑动到坐标(500, 1000),持续时间为1秒。
UI自动化:uiautomator2环境搭建

UI⾃动化:uiautomator2环境搭建概述 uiautomator2 是⽤来做安卓⾃动化测试的python库,主要是对于第三⽅app 进⾏测试,获取屏幕上任意app 的任意⼀控件属性,就可以对其进⾏任意操作,缺点是不⽀持ios ⾃动化测试。
这⾥主要介绍的是怎么搭建uiautomator2 环境的。
⼀、前提准备:准备安卓设备1、⾸先需要⼀部安卓设备(⼿机/pad),打开开发者选项,设备连接到电脑上,执⾏adb devices 的话可以看到连接上的设备。
确认能识别到设备ip的话,第⼀步就成功了。
⼆、安装uiautomator2 库1.通过pip 安装 :pip3 install -U uiautomator2这⾥加了-U 参数,是⽤来升级第三⽅库的。
有这个情况下安装的就会是最新版本的uiautomator2 了。
因为我装的是pip3,所以⽤的是pip3 ,装pip 的记得把命令⾏切换成pip install -u uiautomator2。
2.通过git下载安装git clone https:///openatx/uiautomator2pip install -e uiautomator2三、安装weditor因为uiautomator 是独占的资源,所以运⾏atx 的时候,uiautomatorviewer 不能⽤,因此需要安装weditor UI 查看器pip3 install -U weditor安装之后,可以在命令⾏运⾏ weditor --help 确认是不是成功了,出现以下提⽰说明ok了。
四、运⾏weditor1、运⾏⽅式1.1对于windows 系统,可以通过 weditor --shortcut 在桌⾯创建快捷⽅式,点击快捷⽅式跳转浏览器页⾯。
1.2通过命令⾏,在命令⾏直接输⼊weditor 可以⾃动打开浏览器。
五、安装本库所需要的到的全部设备端程序 uiautomator-server 、atx-agent、openstf/minicap、openstf/minitouchpython -m uiautomator2 init运⾏命令⾏之后会在安卓设备上安装atx 程序,是需要⼿动点击进⾏安装操作的;我这⾥因为已经安装好了,所以运⾏的时候显⽰的是uiautomator2 和atx-agent 的版本。
Android自动化框架uiautomator简介

Android⾃动化框架uiautomator简介UI⾃动化测试框架,安卓移动端APP.要求:Android 4.3以上1.提供⼀系列API:执⾏UI测试在系统或者第三⽅APP上⾯;2.允许在被测设备上执⾏操作,⽐如打开系统设置菜单。
3.适合编写⿊盒⾃动化测试UIautomator框架主要特点:1.元素定位:UIautomator viewer。
扫描、分析待测应⽤的UI组件的图像⼯具;2.元素操作:Accessing devicestate.在⽬标设备和app上的各种操作3.元素识别:UI Automator APIs,在多个应⽤程序中捕获和操作UI组件。
1.uiautomatorvieweruiautomatorviewer位于sdk/tools⽬录下,可以扫描、分析待测试应⽤界⾯,分析结果可以导出为xml与截图。
通过该⼯具可以分析出UI控件的id,text,focusable等等各种属性,甚⾄布局上的层次关系。
windows下运⾏tools下的uiautomatorviewer.batliunx下运⾏./uiautomatorviewer 启动该⼯具。
上图uiautomatorviewer的运⾏截图,左上⾓两个⼿机模样的图标点击后就会开始截图并分析UI组件,分析后的结果如下⽅所⽰,左侧为⼿机当前画⾯截图,右侧上部为view控件的层次关系,下部为当前选中控件的各种信息。
2.uiautomator APIsuiautomator是⼀个包含⼀套UI测试API,和⽀持运⾏测试程序的JAR包。
该JAR包位于sdk/platforms/android-* /uiautomator.jar. 使⽤时需要注意⾃⼰的SDK版本需要⼤于16, SDK Tools版本需要⼤于21.Android版本需要⾼于4.3。
UIautomator有⽐较多的类。
这⾥只介绍我们在APP⾃动化测试中常⽤的三种。
其中UiSelector类是在appium定位元素时会⽤到的类。
uiautomator2基本操作及应用
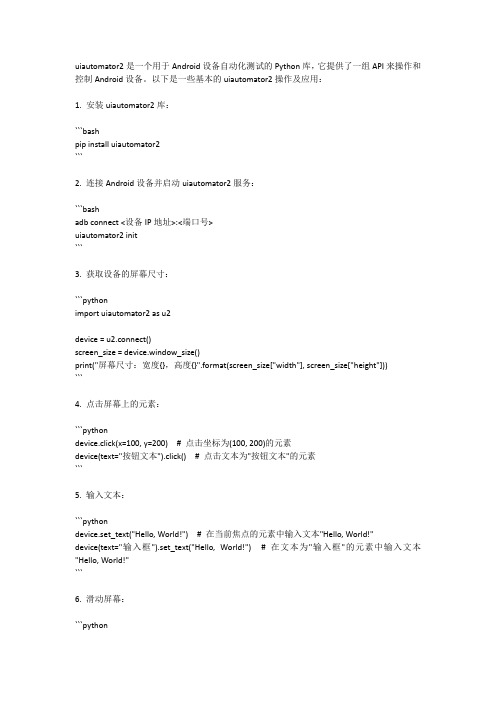
uiautomator2是一个用于Android设备自动化测试的Python库,它提供了一组API来操作和控制Android设备。
以下是一些基本的uiautomator2操作及应用:1. 安装uiautomator2库:```bashpip install uiautomator2```2. 连接Android设备并启动uiautomator2服务:```bashadb connect <设备IP地址>:<端口号>uiautomator2 init```3. 获取设备的屏幕尺寸:```pythonimport uiautomator2 as u2device = u2.connect()screen_size = device.window_size()print("屏幕尺寸:宽度{},高度{}".format(screen_size["width"], screen_size["height"]))```4. 点击屏幕上的元素:```pythondevice.click(x=100, y=200) # 点击坐标为(100, 200)的元素device(text="按钮文本").click() # 点击文本为"按钮文本"的元素```5. 输入文本:```pythondevice.set_text("Hello, World!") # 在当前焦点的元素中输入文本"Hello, World!"device(text="输入框").set_text("Hello, World!") # 在文本为"输入框"的元素中输入文本"Hello, World!"```6. 滑动屏幕:```pythondevice.swipe(x1=100, y1=200, x2=300, y2=400, duration=1) # 从坐标(100, 200)滑动到坐标(300, 400),耗时1秒```7. 获取元素属性:```pythonelement = device(resourceId="com.example.app:id/button") # 根据资源ID获取元素print("元素文本:", element.text) # 获取元素的文本内容print("元素可见性:", element.exists) # 判断元素是否可见print("元素是否可点击:", element.is_enabled) # 判断元素是否可点击```8. 截图:```pythondevice.screenshot("screenshot.png") # 截取当前屏幕并将图片保存为"screenshot.png"```。
uiautumator2用法 -回复

uiautumator2用法-回复uiautomator2用法uiautomator2是一个用于Android系统的自动化测试框架,它允许开发人员编写自动化脚本来模拟用户在Android设备上的操作。
本文将一步一步回答有关uiautomator2用法的问题。
1. 什么是uiautomator2?uiautomator2是由谷歌开发的Android自动化测试框架,用于编写自动化脚本以测试和模拟用户在Android设备上的操作。
它提供了一组API来访问设备的UI元素,包括按钮、文本框、下拉菜单等,并允许开发人员对这些元素进行操作和验证。
2. 如何安装uiautomator2?在开始使用uiautomator2之前,您需要确保已将其安装在您的开发环境中。
您可以通过以下步骤安装uiautomator2:- 首先,确保您的Android设备已连接到开发计算机,并且您有权访问设备的ADB(Android Debug Bridge)。
- 其次,您需要安装Python开发环境,并确保已安装pip(Python 包管理器)。
- 然后,使用pip命令安装uiautomator2库(pip install uiautomator2)。
- 最后,确保您的设备已启用开发者选项,并已启用USB调试模式。
3. 如何编写uiautomator2脚本?uiautomator2脚本可以使用Python编写,您可以使用任何您喜欢的Python编辑器来创建和编辑这些脚本。
以下是编写uiautomator2脚本的一般步骤:- 首先,导入必要的uiautomator2模块和依赖项(如uiautomator2、uiautomator、time等)。
- 其次,创建一个与设备的连接,并实例化uiautomator2对象。
- 接下来,使用uiautomator2对象的API方法来识别和操作设备上的UI元素。
例如,您可以使用"device(text='Hello')"来查找具有文本“Hello”的元素,并使用".click()"来单击该元素。
- 1、下载文档前请自行甄别文档内容的完整性,平台不提供额外的编辑、内容补充、找答案等附加服务。
- 2、"仅部分预览"的文档,不可在线预览部分如存在完整性等问题,可反馈申请退款(可完整预览的文档不适用该条件!)。
- 3、如文档侵犯您的权益,请联系客服反馈,我们会尽快为您处理(人工客服工作时间:9:00-18:30)。
Android移动端自动化测试框架
UIAutomator2入门
随着智能手机的普及,移动应用也越来越受到欢迎。
移动端应用相对于传统的Web应用或桌面应用,有自身独特的测试需求。
在这种情况下,自动化测试框架成为了移动端测试的必备工具。
本文将介绍Android移动端自动化测试框架UIAutomator2的基础知识和使用方法。
一、UIAutomator2介绍
UIAutomator2是Android平台上的一个自动化测试框架,它的作用是为测试人员提供一种自动化测试手段,以验证移动应用的正确性、稳定性和性能。
UIAutomator2可以模拟用户在移动应用上的各种操作,包括点击、滑动、输入等等,以实现对应用的全面自动化测试。
二、UIAutomator2的环境搭建
要使用UIAutomator2,我们首先需要构建相应的测试环境。
具体步骤如下:
1. 安装Android SDK,并配置环境变量。
2. 下载UIAutomator2的源代码。
3. 根据源代码中的README文档,进行所需的编译和安装。
三、UIAutomator2的使用
1. 创建测试脚本
使用UIAutomator2进行自动化测试需要编写相应的测试脚本。
测试脚本是由Java编写的,并可以使用Android Studio进行编辑和调试。
下面是一个简单的测试脚本:
```
import androidx.test.uiautomator.By;
import androidx.test.uiautomator.UiDevice;
public class MyTest {
public static void main(String[] args) throws Exception {
UiDevice device = UiDevice.getInstance();
device.pressHome();
device.findObject(By.text("Chrome")).click();
device.findObject(By.res("com.android.chrome:id/search_box_text")).c lick();
device.findObject(By.res("com.android.chrome:id/search_box_text")).s etText("UIAutomator2");
device.pressEnter();
}
}
```
这个脚本的功能是启动Chrome浏览器,并在浏览器中搜索“UIAutomator2”。
2. 运行测试脚本
完成测试脚本的编写后,我们可以使用adb命令将脚本上传到设备上,并使用Java命令来运行该脚本:
```
adb push mytest.jar /data/local/tmp
adb shell uiautomator runtest mytest.jar -c MyTest
```
这个命令将mytest.jar文件上传到设备上,并在设备上执行MyTest类中的测试脚本。
四、UIAutomator2的优势和不足
1. 优势
UIAutomator2的优势在于它能够完成对大部分Android应用的自动化测试。
UIAutomator2可以跨越应用程序的边界,测试不同应用程序之间的交互。
此外,UIAutomator2还支持跨版本测试,以确保Android应用在不同版本的系统上都能正常运行。
2. 不足
UIAutomator2的不足在于它只能测试Android平台上的应用程序,无法测试其他平台的应用程序;另外,针对UIAutomator2的测试脚本需要用Java编写,需要一定的编程能力。
五、总结
UIAutomator2是Android平台上的一个自动化测试框架,它能够验证移动应用的正确性、稳定性和性能。
使用UIAutomator2需要构建相应的测试环境和编写测试脚本,但它具有跨应用程序和版本的测试能力,是一个功能强大的自动化测试工具。