解决bugzilla与apache的链接界面问题
apache阿帕奇安装命令,bugzilla安装步骤

Web服务器(apache)首先检查能否在主机用IE浏览器浏览到虚拟机的一个web页面。
确保apache服务已经安装并运行。
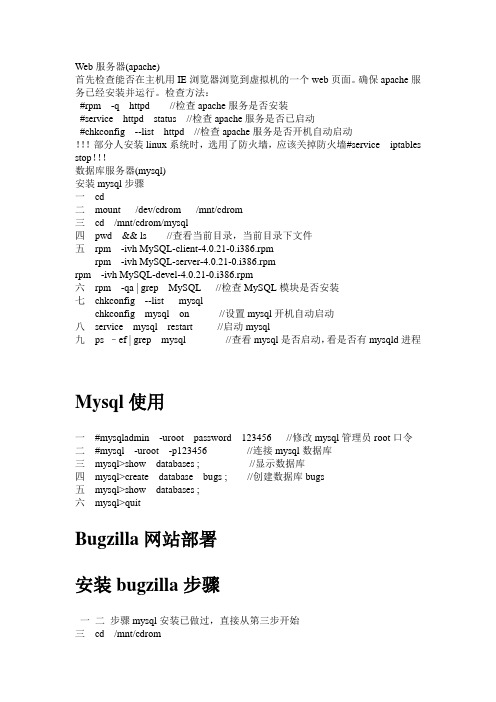
检查方法:#rpm -q httpd //检查apache服务是否安装#service httpd status //检查apache服务是否已启动#chkconfig --list httpd //检查apache服务是否开机自动启动!!!部分人安装linux系统时,选用了防火墙,应该关掉防火墙#service iptables stop!!!数据库服务器(mysql)安装mysql步骤一cd二mount /dev/cdrom /mnt/cdrom三cd /mnt/cdrom/mysql四pwd && ls //查看当前目录,当前目录下文件五rpm -ivh MySQL-client-4.0.21-0.i386.rpmrpm -ivh MySQL-server-4.0.21-0.i386.rpmrpm -ivh MySQL-devel-4.0.21-0.i386.rpm六rpm -qa | grep MySQL //检查MySQL模块是否安装七chkconfig --list mysqlchkconfig mysql on //设置mysql开机自动启动八service mysql restart //启动mysql九ps –ef | grep mysql //查看mysql是否启动,看是否有mysqld进程Mysql使用一#mysqladmin -uroot password 123456 //修改mysql管理员root口令二#mysql -uroot -p123456 //连接mysql数据库三mysql>show databases ; //显示数据库四mysql>create database bugs ; //创建数据库bugs五mysql>show databases ;六mysql>quitBugzilla网站部署安装bugzilla步骤一二步骤mysql安装已做过,直接从第三步开始三cd /mnt/cdrom四cp bugzilla-2.18rc2.tar.gz /var/www/html/五cd /var/www/html/六tar xzvf bugzilla-2.18rc2.tar.gz七mv bugzilla-2.18rc2 bugzilla //文件夹改名八cp /mnt/cdrom/PerlModules/* /tmp/九cd /tmp十ll *.sh十一./bugmod.sh //运行perl模块安装脚本十二安装后查看文件setup.log 看是否都是0!!!若有未安装成功模块,请按照bugmod.sh脚本中的步骤单独安装未成功模块!!!十三cd /var/www/html/bugzilla十四./checksetup.pl如果bugzilla的相关perl模块都安装成功,则会生成文件localconfig十五编辑文件# vi localconfig修改12行(0->1)、75行(数据库用户root)、85行(数据库用户口令123456,口令和mysql部分修改的口令一致)十六./checksetup.plEnter the e-mail address of the administrator:root@主机名.com (//bugzilla管理员帐号)You entered 'root@主机号.com'. Is this correct? [Y/n] 回车Enter the real name of the administrator:姓名Enter a password for the administrator account:工具bugzilla的管理员密码Please tetype the password to verity:再次输入密码十七#vi /etc/httpd/conf/httpd.conf找到AddHandler (AddHandler cgi-script .cgi ) 去掉注释#:/AddHandler 找到该文件通过复制或手工增加下列文本:<Directory "/var/www/html/bugzilla">Options ExecCGI FollowSymLinksAllowOverride LimitOrder allow,denyAllow from all</Directory>十八chown -R apache.apache /var/www/html/bugzilla (//授权bugzilla文件夹给apache用户)十九service httpd restarthttp://192.168.1.1/bugzilla/index.cgi //192.168.1.1是你的bugzilla所在机器ip地址#vi makefileny:你的c源程序名称gcc 你的c源程序名称 -o ny install:cp ny /bin/nyuninstall:rm -f /bin/nyclean:rm -f ny编好了,保存退出#make 表示根据makefile定义的步骤进行创建#./ny #ny#make install 执行makefile中install 部分#ny#make uninstall#ny#make clean#./ny#!/bin/shSUM=0I=1while [ $I -le 99 ]doSUM=`expr $SUM + $I` I=`expr $I + 2`doneecho "1+3+...+99=$SUM" sum.c:int main(){int sum=0,i=1;while(i<=99){sum=sum+i;i=i+2;}printf(“%d\n”,sum);}#include <stdio.h>#include <string.h>void main(int argc, char* argv[]){int i;if(argc!=3){printf("命令语法不正确。
bugzilla的使用帮助

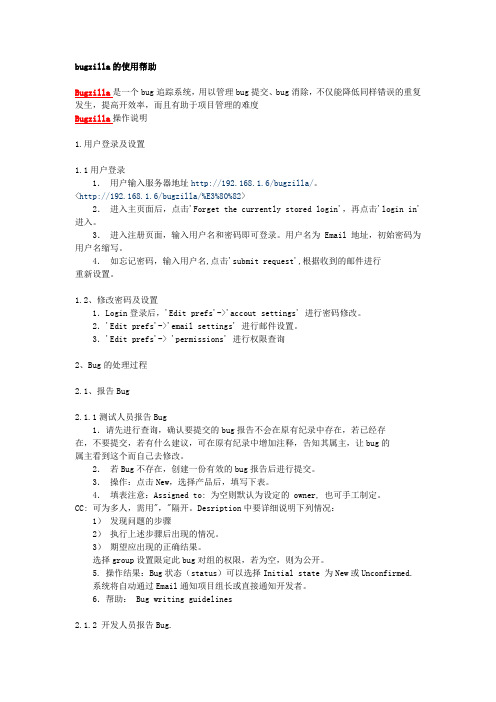
bugzilla的使用帮助Bugzilla是一个bug追踪系统,用以管理bug提交、bug消除,不仅能降低同样错误的重复发生,提高开效率,而且有助于项目管理的难度Bugzilla操作说明1.用户登录及设置1.1用户登录1.用户输入服务器地址http://192.168.1.6/bugzilla/。
<http://192.168.1.6/bugzilla/%E3%80%82>2.进入主页面后,点击'Forget the currently stored login',再点击'login in'进入。
3.进入注册页面,输入用户名和密码即可登录。
用户名为Email 地址,初始密码为用户名缩写。
4.如忘记密码,输入用户名,点击'submit request',根据收到的邮件进行重新设置。
1.2、修改密码及设置1.Login登录后,'Edit prefs'->'accout settings' 进行密码修改。
2.'Edit prefs'->'email settings' 进行邮件设置。
3.'Edit prefs'-> 'permissions' 进行权限查询2、Bug的处理过程2.1、报告Bug2.1.1测试人员报告Bug1.请先进行查询,确认要提交的bug报告不会在原有纪录中存在,若已经存在,不要提交,若有什么建议,可在原有纪录中增加注释,告知其属主,让bug的属主看到这个而自己去修改。
2.若Bug不存在,创建一份有效的bug报告后进行提交。
3.操作:点击New,选择产品后,填写下表。
4.填表注意:Assigned to: 为空则默认为设定的 owner, 也可手工制定。
CC: 可为多人,需用","隔开。
Desription中要详细说明下列情况:1)发现问题的步骤2)执行上述步骤后出现的情况。
解决bugzilla与apache的链接界面问题

这里推荐使用 Apache 作为运行 Bugzilla 的 web 引擎 下载 Apache 2.x
下载 Apache HTTP Server version 2.x 或更高版本:
/download.cgi 安装
默认安装即可,假设安装的路径是 C:\Program Files\Apache Group 它将安装在 C:\Program Files\Apache Group\Apache2。
#
在注册表中创建
DirectoryIndex index.html index.html.var index.cgi
HKEY_CLASSES_ROOT\.cgi\Shell\ExecCGI\Command 编 辑 默 认 值 为 C:\Perl\bin\perl.exe -T # # The location and format of the access logfile (Common Logfile Format). # If you do not define any access logfiles within a <VirtualHost> # container, they will be logged here. Contrariwise, if you *do* # define per-<VirtualHost> access logfiles, transactions will be # logged therein and *not* in this file. # #CustomLog logs/access.log common 重新启动 Apache 最后,在命令行中重新启动 Apache。
在配置文件中添加: AddHandler cgi-script .pl AddHandler cgi-script .cgi
APACHE服务器500错误解决方法

APACHE服务器500错误解决⽅法APACHE服务器500错误解决⽅法与强制跳转遇到500问题可以如下解决1.APACHE没开启rewrite模块。
解决办法:编辑apache的http.conf⽂件,找到#LoadModule rewrite_module modules/mod_rewrite.so,去掉前⾯的#,重启APACHE.2 .htaccess⽂件有错误。
通常是因为写⼊了不合语法的规则。
解决办法:删除该⽬录中的.htaccess即可。
如果还是不⾏,再删除上级⽬录的.htacess,如此反复。
3,权限问题,同时查看/var/log/apache2/error.log⽇志。
于是我找到了这么⼀个东西1在httpd.conf⽂件⾥使下⾯模块⽣效LoadModule rewrite_module modules/mod_rewrite.so2httpd.conf配置⽂件或者是在httpd-vhost.conf⽂件⾥修改<Directory "C:/Apache2.2/docs/">Options Indexes FollowSymLinksAllowOverride All//上⾯是http-https时需要添加的语句Order allow,denyAllow from all</Directory>3在⽹站根⽬录下⾯添加该⽂件“.htaccess” ⽬录访问控制⽂件,并添加如下内容:RewriteEngine on #开启重定向引擎RewriteBase / #可以不设置RewriteCond %{SERVER_PORT} !^443$ #⾮443端⼝的数据全部进⾏重定向RewriteEngine on #开启重定向引擎RewriteBase / #可以不设置RewriteCond %{SERVER_PORT} !^443(或者其他端⼝)$ #⾮443端⼝的数据全部进⾏重定向该 .htaccess 需要放置在⽹站的根⽬录下⾯才可以⽣效5、查看⼀下httpd.conf,如果以下⼏项给注释掉了,就打开这些选项:LoadModule rewrite_module libexec/mod_rewrite.soAddModule mod_rewrite.cg纠结了半天,才发现问题的症结:原来的PHP 关闭了错误的显⽰。
ApacheHTTPServer存在模块跨站脚本漏洞

ApacheHTTPServer存在模块跨站脚本漏洞受影响系统: Apache Group Apache 2.2.x Apache Group Apache 2.0.x Apache Group Apache 1.3.x 不受影响系统:Apache Group Apache 2.2.6 Apache Group Apache 2.0.61 Apache Group Apache 1.3.39 描述: -------------------------------------------------------------------------------- BUGTRAQ ID: 24645 CVE(CAN) ID: CVE-2006-5752 Apache HTTP Server是⼀款流⾏的Web 服务器。
Apache HTTP Server(httpd)的mod_status模块中的mod_status.c⽂件存在跨站脚本漏洞,远程攻击者可能利⽤此漏洞在⽤户的浏览器中执⾏恶意代码。
如果站点的server-status页⾯公开可访问且启⽤了ExtendedStatus的话,远程攻击者就可以在执⾏字符集检查的浏览器中通过没有指定content-type的页⾯注⼊并执⾏脚本或HTML代码。
<*来源:Stefan Esser (*******************)链接:/advisories/26273 /security/vulnerabilities_22.html /security/vulnerabilities_20.html /viewvc?view=rev&revision=549159https:///long_list.cgi?buglist=245112 /security/vulnerabilities_13.htmlhttps:///support/errata/RHSA-2007-0533.html https:///support/errata/RHSA-2007-0557.html https:///support/errata/RHSA-2007-0556.html https:///support/errata/RHSA-2007-0534.html https:///support/errata/RHSA-2007-0532.html *> 建议: -------------------------------------------------------------------------------- ⼚商补丁: Apache Group ------------ ⽬前⼚商已经发布了升级补丁以修复这个安全问题,请到⼚商的主页下载:/download.cgi RedHat ------ RedHat已经为此发布了安全公告(RHSA-2007:0533-01、RHSA-2007:0556-01、RHSA-2007:0532-01、RHSA-2007:0557-01、RHSA-2007:0534-01)以及相应补丁: RHSA-2007:0533-01:Moderate: httpd security update 链接:https:///support/errata/RHSA-2007-0533.html RHSA-2007:0556-01:Moderate: httpd security update 链接:https:///support/errata/RHSA-2007-0556.html RHSA-2007:0532-01:Moderate: apache security update 链接:https:///support/errata/RHSA-2007-0532.html RHSA-2007:0557-01:Moderate: httpd security update 链接:https:///support/errata/RHSA-2007-0557.html RHSA-2007:0534-01:Moderate: httpd security update 链接:https:///support/errata/RHSA-2007-0534.html。
bugzilla心得

前两天安装配置好了bugzilla,因为自己在这个过程中走了些弯路,所以一方面自己提个醒,另一方面可以让有这方面需要的朋友做个参考bugzilla是一个可以发布bug以及跟踪报告bug进展情况的开源软件,有关的官方文档可以查看:http: ///docs/本人是在RH9上安装配置成功bugzilla-2.18rc3的,事先也成功安装配置过2.16.7,后来发现在2.18中加入了图表的功能,觉得蛮有意思的,所以升级了一下。
在安装前先确定自己机器上一些软件版本的情况:perl(5.6 or above)、mysql(3.23.41 or above)、sendmail(8.7 or above),在http://ww /download/下载2.18rc3,并在本地解压#cd /usr/local#tar -zxvf bugzilla-2.18rc3.tar.gz#cd bugzilla#./checksetup.pl-------检查安装需要的perl模块如果缺少相应的perl模块,有两个办法可以解决:1.perl -MCAN -e 'install "Bundle::Bugzilla"'------选择CPAN主机站点下载安装缺少的perl模块,当完成时进入~/.CPAN/build查看INSTALL.html了解安装情况2.直接到http://www//modules/,下载相应的模块下来,解压后一个个安装,比如CGI模块#cd CGI#perl Makefile.PL#make#make test#make install所有模块都可按此法安装,在安装一些模块如Template Toolkit时会有一些信息要求确认,按照默认一路回车即可注:我是比较倾向于第二种方法,一个比较灵活,可以去下载安装不同版本的模块,另一个又不依赖于网络状况,我第一次安装的时候按第一种方法,结果等了老半天还没下载完一个模块,后来才知道CPAN的网站那天关闭,晕~。
软件安装过程中出现的问题解决方案

bugzilla安装中报HTTP403无权查看该网页问题的解决(含HTTP404问题)wangwang技术交流,测试技术0 Comments发表评论在windows server 2003下安装bugzilla过程中,有的朋友遇到如下问题,在此进行解答:问题:安装成功后,在IIS中或IE中进行访问,系统提示“您无权查看该页面”HTTP403。
解决步骤:1. 打开IE,【工具】-【Internet选项】-【高级】—去掉“显示HTTP友好错误通知”前面的勾,然后看看是什么错误。
2.刷新页面,错误页面显示如下:同样,在IIS中选择bugzilla鼠标右键进行刷新如下:3。
在IIS中,【网站】—【默认站点】-【bugzilla】-右键【属性】-【文档】下进行观察,发现缺少了bugzilla的默认打开首页文档类型,故需添加index.cgi。
4.点击【添加】输入index.cgi,并上移至第一行。
5.在默认网站上右键停止-启动站点6。
在默认站点下的bugzilla站点上右键点击【浏览】,页面刷新如下,报HTTP404。
7。
在web服务扩展中,启动如下两项服务8。
在默认网站上右键停止—启动站点9。
在默认站点下的bugzilla站点上右键点击【浏览】,bugzilla首页显示成功测win server 2003下报Service Unavailable提示的解决wangwang技术交流,测试技术0 Comments发表评论在win server 2003下,选择默认站点并进行右键浏览,出现“Service Unavailable"的提示。
如何解决?点击“开始”—“控制面板”—“管理工具”-“组件服务”—“计算机”—“我的电脑"—“DCOM”选项,选择其下的“IIS ADMIN SERVICE”,右健选择“属性”,找到“安全”,在“启动和激活权限”中编辑“自定义”,添加帐号“NETWORK SERVICE ”(可通过输入net查找),给该帐号赋予“本地启动”和“本地激活"的权限,重新启动IIS(点“开始"—“运行”—“CMD”,点确定,然后运行IISRESET)Join the Forum discussion on this po试环境搭建之一:VM tools无法安装的问题解决wangwang其他,技术交流,测试,测试技术vmware,技术0Comments发表评论近期一项目的测试环境搭建需要使用虚拟机,成功安装虚拟机后,发现通过【VM】-【Install VM Tools】菜单进行VM tools的安装无法成功进行.因此采用如下方式解决。
如何解决 Apache 服务器无法启动的问题

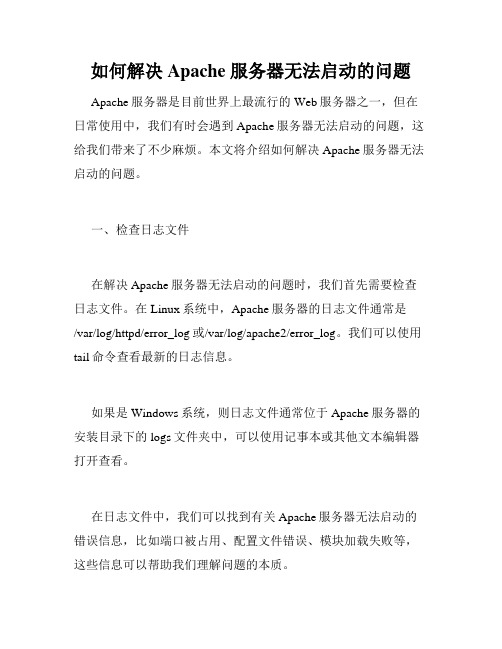
如何解决 Apache 服务器无法启动的问题Apache服务器是目前世界上最流行的Web服务器之一,但在日常使用中,我们有时会遇到Apache服务器无法启动的问题,这给我们带来了不少麻烦。
本文将介绍如何解决Apache服务器无法启动的问题。
一、检查日志文件在解决Apache服务器无法启动的问题时,我们首先需要检查日志文件。
在Linux系统中,Apache服务器的日志文件通常是/var/log/httpd/error_log或/var/log/apache2/error_log。
我们可以使用tail命令查看最新的日志信息。
如果是Windows系统,则日志文件通常位于Apache服务器的安装目录下的logs文件夹中,可以使用记事本或其他文本编辑器打开查看。
在日志文件中,我们可以找到有关Apache服务器无法启动的错误信息,比如端口被占用、配置文件错误、模块加载失败等,这些信息可以帮助我们理解问题的本质。
二、检查配置文件Apache服务器的配置文件位于安装目录的conf文件夹中。
在解决无法启动问题时,我们需要检查配置文件是否正确。
常见的配置文件包括httpd.conf和ssl.conf等。
首先,我们需要检查配置文件是否存在语法错误。
我们可以使用httpd -t命令检查配置文件的语法是否正确。
如果有语法错误,我们需要及时修复。
另外,我们还需要检查配置文件中的端口、虚拟主机、目录等设置是否正确。
这些设置如果不正确,也会导致Apache服务器无法启动。
三、检查服务状态在Windows系统中,我们可以使用服务管理器来检查Apache 服务器的状态。
在运行cmd命令窗口后,可以输入命令“services.msc”来打开服务管理器。
我们可以在服务列表中找到Apache服务,然后查看其状态是否为“正在运行”。
如果状态不是正在运行,我们可以尝试重新启动服务。
在Linux系统中,我们可以使用命令“systemctl status httpd”来查看Apache服务器的状态。
- 1、下载文档前请自行甄别文档内容的完整性,平台不提供额外的编辑、内容补充、找答案等附加服务。
- 2、"仅部分预览"的文档,不可在线预览部分如存在完整性等问题,可反馈申请退款(可完整预览的文档不适用该条件!)。
- 3、如文档侵犯您的权益,请联系客服反馈,我们会尽快为您处理(人工客服工作时间:9:00-18:30)。
# To use CGI scripts outside of ScriptAliased directories: # (You will also need to add "ExecCGI" to the "Options" directive.)
这里推荐使用 Apache 作为运行 Bugzilla 的 web 引擎 下载 Apache 2.x
下载 Apache HTTP Server version 2.x 或更高版本:
/download.cgi 安装
默认安装即可,假设安装的路径是 C:\Program Files\Apache Group 它将安装在 C:\Program Files\Apache Group\Apache2。
如果你已经运行了 IIS,你在安装时配置 apache 运行在不同于 80 端口,否则你将不能访问。 如果你的 windows 系统未安装 IIS 选择默认安装即可。 允许 Apache 可写 创建如下目录: • C:\Bugzilla\data • C:\Program Files\Apache Group\Apache2\logs • C:\Temp 配置 httpd.conf 文件
# for more information.
#
Options Indexes FollowSymLinks ExecCGI
#
# AllowOverride controls what directives may be placed in .htaccess files.
# It can be "All", "None", or any combination of the keywords:
# #Listen 12.34.56.78:80
Listen 80 #
# DocumentRoot: The directory out of which you will serve your # documents. By default, all requests are taken from this directory, but
在记事本中编辑 C:\Program Files\Apache Group\Apache2\conf\httpd.conf 将 httpd.conf 和以下相应的内容比较,对照蓝色字体内容修改原有的内容。
引用:
# # Listen: Allows you to bind Apache to specific IP addresses and/or
# doesn't give it to you.
#
# The Options directive is both complicated and important. Please see
# /docs-2.0/mod/core.html#options
AddType application/x-httpd-php .php AddHandler cgi-script .pl AddHandler cgi-script .cgi Options ExecCGI DirectoryIndex index.html AllowOverride none Order allow,deny Allow from all </Directory>
# Options FileInfo AuthConfig Limit
#
AllowOverride All
#
# Controls who can get stuff from this server.
#
Order allow,deny
Allow from all
#
# Tell Apache to use Perl to execute .cgi
# Note that from this point forward you must specifically allow # particular features to be enabled - so if something's not working as
# you might expect, make sure that you have specifically enabled it # below. # #
# or any combination of: # Indexes Includes FollowSymLinks SymLinksifOwnerMatch ExecCGI MultiViews
#
# Note that "MultiViews" must be named *explicitly* --- "Options All"
#
在注册表中创建
DirectoryIndex index.html index.html.var index.cgi
HKEY_CLASSES_ROOT\.cgi\Shell\ExecCGI\Command 编 辑 默 认 值 为 C:\Perl\bin\perl.exe -T # # The location and format of the access logfile (Common Logfile Format). # If you do not define any access logfiles within a <VirtualHost> # container, they will be logged here. Contrariwise, if you *do* # define per-<VirtualHost> access logfiles, transactions will be # logged therein and *not* in this file. # #CustomLog logs/access.log common 重新启动 Apache 最后,在命令行中重新启动 Apache。
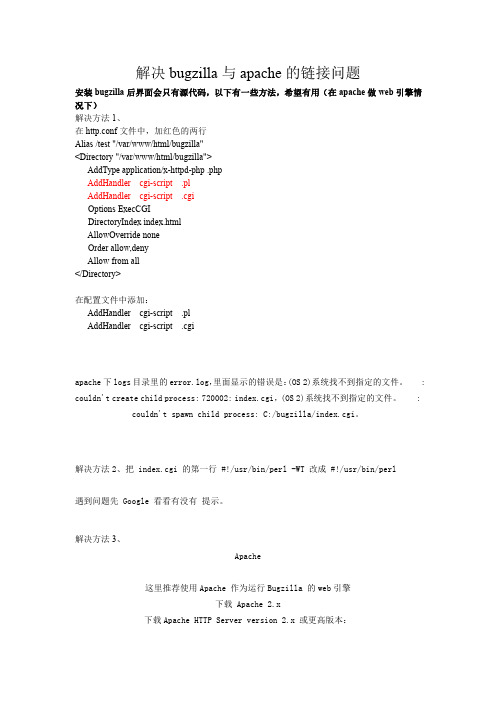
在配置文件中添加: AddHandler cgi-script .pl AddHandler cgi-script .cgi
apache 下 logs 目录里的 error.log,里面显示的错误是:(OS 2)系统找不到指定的文件。 : couldn't create child process: 720002: index.cgi,(OS 2)系统找不到指定的文件。 :
couldn't spawn child process: C:/bugzilla/index.cgi。
解决方法 2、把 index.cgi 的第一行 #!/usr/bin/perl -WT 改成 #!/usr/bin/perl 遇到问题先 Google 看看有This should be changed to whatever you set DocumentRoot to. #
<Directory "C:/Bugzilla"> #
# AddHandler allows you to map certain file extensions to "handlers": # actions unrelated to filetype. These can be either built into the server
# directory (and its subdirectories). #
# First, we configure the "default" to be a very restrictive set of # features. # <Directory />
Options FollowSymLinks AllowOverride None </Directory> #
# symbolic links and aliases may be used to point to other locations. #
DocumentRoot "C:/Bugzilla" #
# Each directory to which Apache has access can be configured with respect # to which services and features are allowed and/or disabled in that
# AddHandler cgi-script .cgi
# # This should be changed to whatever you set DocumentRoot to.
# <Directory "C:/Bugzilla">
# # Possible values for the Options directive are "None", "All",
# ports, instead of the default. See also the <VirtualHost> # directive. #
# Change this to Listen on specific IP addresses as shown below to # prevent Apache from glomming onto all bound IP addresses (0.0.0.0)
解决 bugzilla 与 apache 的链接问题
安装 bugzilla 后界面会只有源代码,以下有一些方法,希望有用(在 apache 做 web 引擎情 况下) 解决方法 1、 在 http.conf 文件中,加红色的两行 Alias /test "/var/www/html/bugzilla" <Directory "/var/www/html/bugzilla">
