Gatan使用简易手册
阿朗传输网管使用手册V2
阿朗传输网管使用手册目录1 网管登陆 (1)2 当前告警查看 (2)3 拓扑查看: (3)4 光功率查询 (7)5 历史告警查询 (9)前言:鹰潭、吉安、景德镇PTN网络使用阿尔卡特传输设备,设备型号主要有1850TSS-320,1850TSS-160,1850TSS-5C和1850TSS-5R,后缀代表设备容量,比如:1850TSS-320代表设备最大支持320G的多速率交叉能力(相当于2048个155M)。
1850TSS-320和1850TSS-160主要用于汇聚层设备,1850TSS—5R主要用于接入层设备,带基站业务或宽带业务。
由于1850TSS-5C问题较多且容量不足,已逐渐升级成5R设备。
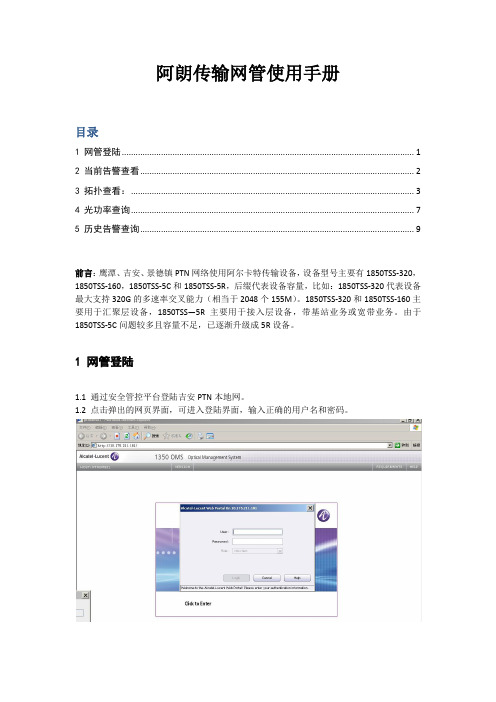
1 网管登陆1.1 通过安全管控平台登陆吉安PTN本地网。
1.2 点击弹出的网页界面,可进入登陆界面,输入正确的用户名和密码。
2.1 登陆成功后,选择左边菜单-》Operation-》Alarms,双击Gobal Alarms图标。
2.2 此时弹出告警浏览界面,监控主要关注MAJOR级别告警:Loss of Signal以及Hardware failure,点击左边树图中MAJOR栏,可选择查看MAJOR级别告警。
勾选掉菜单View-》Paginate sublist选项,可取消告警分页显示,提高告警查看效率。
若告警变成绿色表示告警已清除,若找不到此告警,表明告警已清除且被存入历时库,历史库中的告警需要登陆网元主页中查询,详见第5节。
由于告警查看界面无法关联到拓扑,要查看网络拓扑,需要启动Network Management服务,详见第3节。
3.1在登陆主界面中,选择左边菜单-》Operation-》Management,双击Network Management 图标。
3.2 根据告警信息,查找告警网元:选择菜单Search-》Physical-》Nodes,可以显示所有网元,按Location(区县)排序,可以找到对应网元,注意区分5R和5C设备。
DBMAN使用手册(新)
DBMAN使用手册(新)DBMAN使用手册DBMAN使用手册目录1概述 ........................................................................... ................................................................ 2 1.1 术语 ........................................................................... ................................................ 2 1.2 功能简介 ........................................................................... ........................................ 2 1.3 注意事项 ........................................................................... ........................................ 2 工具使用说明 ........................................................................... ................................................ 3 2.1 主窗口 ........................................................................... ............................................ 3 2.2 数据库服务器管理 ........................................................................... ........................ 4 2.3 数据库管理 ........................................................................... (4)2.3.1 数据库监控 ........................................................................... ............................ 5 2.3.2 创建数据库 ........................................................................... ............................ 6 2.3.3 扩展数据库 ........................................................................... ............................ 7 2.4 备份与恢复 ........................................................................... (9)2.4.1 备份数据库 ........................................................................... .......................... 10 2.4.2 恢复数据库 ........................................................................... .......................... 11 2.4.3 备份单网元时隙 ........................................................................... .................. 12 2.4.4 恢复单网元时隙 ........................................................................... .................. 13 2.4.5 合并网管备份的配置数据 ........................................................................... .. 14 2.4.6 备份单网元数据 ........................................................................... .................. 15 2.4.7 恢复单网元数据 ........................................................................... .................. 17 2.5 时隙校验 ........................................................................... ...................................... 20 2.6 修改网元的软件版本 ........................................................................... .................. 20 文件结构 ........................................................................... ...................................................... 21 3.1 文件结构 ........................................................................... ...................................... 21 3.2 配置文件 ........................................................................... ...................................... 22 3.3 备份配置文件 ........................................................................... .............................. 22 如何更新dbman ........................................................................ (22)234第 1 页共 14 页DBMAN使用手册DBMAN使用手册1 概述1.1 术语dataserver:数据库服务器,是独立运行的一个执行程序,管理多个数据库,ZXONME300的数据是dataserver管理的,ZXONM E300 DBSVR访问dataserver存取数据。
Pro 30 Gas Caddy 操作手册说明书

REV 9/6/17JohnDow Industries, Inc.151 Snyder Ave.Barberton, OH 44203ContentsPageSafety & Warning Instructions 2General Product Description 3Assembly 3Operation 4Storage4Product Specifications4Replacement Parts & Accessories 5Troubleshooting 6Notes7OPERATOR’S MANUAL FC-P30-UL2.INSTRUCTIONS PERTAINING TO THE RISK OR INJURY TO PERSONS.IMPORTANT SAFETY INSTRUCTIONS. SAVE THESE INSTRUCTIONS.READ THIS MANUAL CAREFULLY BEFORE INSTALLING,OPERATING OR SERVICING THIS EQUIPMENTIt is the responsibility of the employer to place this information in thehands of the operator. Keep for future reference.OPERATOR’S MANUALFC-P30-UL3.GENERAL PRODUCT DESCRIPTIONThe Gas Caddy is designed and approved to safely transfer fuel to and from a vehicle. It may be used to safely store fuel during vehicle service. It is approved for use with unleaded gasoline, diesel, kerosene, and E85 (ethanol) fuels.The direction of flow is controlled by a 4-way valve to assure that fuel is filtered in both directions. Caution: Turning the pump in the opposite direction will pump the fuel, but this will cause contaminates inside the filter to be introduced into the fuel stream. Always use the valve to control the direction of flow.The FC-P30 comes standard with a 10 micron filter for use with gasoline. Other filters are available for other fuels. Select the correct filter for the intended application. Proper filter selection is critical to achieving maximum pumping efficiency and to properly remove contaminates from the fuel.Refer to the table shown in REPLACEMENT PARTS AND ACCESSORIES if you intend to pump different fuels.Fuel TypeFilter Type Unleaded Gasoline 10 micron Diesel and Kerosene 30 micron E85 Ethanol1 micronASSEMBLY1.Wrap 2 inch NPT thread on fill tube 4-6 wraps with PTFE tape wrapping clockwise.2.Assemble pump “A” onto tank by threading the “IN” side the pump onto the 3/4 close nipple. Hold the manifold with a 1-1/2 inch adjustable wrench to prevent turning. Turn pump until threads tighten with the final turn positioning the pump.3.Position the handle to the left side of the tank as shown in Figure 1.4.Assemble the pressure hose “B” to the 90° swivel fitting on top of the pump and to the 90° swivel fitting on the filter support. Place a 1-1/16 inch open end wrench on the hose and tighten the swivel using a 1-1/14 inch open end wrench.Tighten securely to prevent leaks. Note: when tight the swiv-el will not rotate.5.Assemble the discharge hose “C” by threading the 3/4 NPT fitting into 90° fitting located on the front of the valve assem-bly. Pace a 1-1/16 inch wrench on the hose and tighten.Tighten with wrench.6.Coil and hang the discharge hose on the hose hanger bracket on the side of the tank.7.Thread the 2 inch fill pipe and cap assembly onto the fitting in the center of the tank. Tighten snugly by hand until secure.Tools and Supplies (not included):•TPFE tape • 1-1/2 inch open end wrench •1-1/16 inch open end wrench •1-1/4 inch open end wrench.10. Remove tape from top of fuel gauge and install plastic indicator cap and plastic nut onto float assembly. Align indicator mark to point diagonally across tank so that float is free to move full range. Tighten nut by hand to secure cap and fuel gage.Fig. 1OPERATOR’S MANUALFC-P30-UL4.OPERATIONSTORAGE1.Always place the valve in the “OFF” position when not in use.2.Wrap and store the hose on the provided hose wrap brack-et.3.Wrap and store the ground wire on the provided wire wrap bracket.4.Locate the park the Gas Caddy on a flat level surface, away from any potential ignition sources, away from any potential hazards that may impact or damage the Gas Caddy.5.Lock the wheel brakes.6.Be certain that the fuel gage vent dome, indicator cap, fill tube and fill tube cap are all present and secure. Replace any missing parts immediately.7.Do not turn the pump handle when not in use as this may accidentally dispense fuel.Fig. 2Fig. 3PRODUCT SPECIFICATIONSWeight (empty):154 lbs (69.5 kg)Capacity:30 gal (114 L)Length:31.25” (88.9 cm)Width:25.00” (63.5 cm)Height:46.00” (117.0 cm)Approx. Flow:5 gpm (19 L pm) @ 110 Rev/minPUMPING FROM GAS CADDY TO VEHICLE1.Position the Gas Caddy near the vehicle and lock the front casters brakes.2.Attach the ground wire clamp to the vehicle to a known ground surface.3.Place the hose inside the fill pipe of the vehicle fuel tank.4.Align valve handle so that the point is position to the “OUT”to vehicle position. (See Fig. 3)5.Turn pump in direction shown on the pump. Turn briskly until pump primes and fluid is visibility flowing in the hose.6.Continue to turn the pump handle to maintain flow to the vehicle.7.Stop turning the handle when the desired amount has been pumped.8. Turn the valve to the “IN” to tank position.9. Uncoil and raise the hose and turn the handle 4-8 turns to return any remaining fuel in the system to the tank.10. Coil and hang the hose on the hanger bracket.11. Turn valve to the “OFF” position.PUMPING FROM VEHICLE TO GAS CADDY1.Position the Gas Caddy near the vehicle and lock the front casters brakes.2.Attach the ground wire clamp to the vehicle to a known ground surface.3.Place the hose inside the fill pipe of the vehicle fuel tank.4.Align valve handle so that the point is to the “IN” to tank position. See figure 2.5.Turn pump in the direction shown on the pump. Turn briskly until pump primes and fluid is visibly flowing in the hose.6.Continue to turn the pump handle to maintain flow to the Gas Caddy.7.Stop turning the handle when the desired amount has been pumped.8.Uncoil and raise the hose and turn the handle 4-8 turns to return any remaining fuel in the system to the tank.9.Coil and hang the hose on the hanger bracket.10. Turn valve to the “OFF” position.OPERATOR’S MANUAL FC-P30-UL5.REPLACEMENT FILTERSFuel TypeFilter Type Part No.Unleaded Gasoline 10 micron 10M-FF Diesel/Kerosene 30 micron 30M-FF E85 Ethanol1 micron1M-FFNote: Coat the O-ring seal with oil or grease before assembly. Hand tighten by turning approximately 1/2 turn after rubber seal contacts the filter support. Do not over-tighten.REPLACEMENT PARTS:1Tank 1_____2Handle 130GC-02C 3Cover 130GC-49-UL 4Wheel (10”)230GC-06-UL 5Caster (5”)230GC-486Fuel Gage (cap/nut)130GC-FGK 7Fuel Gage (complete)1FC-P30-FG 8Vent 130GC-08-VENT 9Fill Tube 130GC-09-0110Fill Cap 130GC-09-0211Hose Assembly 180-593-NI 12Ground Strap 180-57213Valve/Filter Support Asm.130GC-30/3114Manifold130GC-22A 15Hose Kit (3 Hoses)1FC-P30-HK 16Rotary Pump 1JDI-35-UL 17Contents Decal Set 1FC-CON 18Hose Bracket 130GC-4619Ground Wire Bracket130GC-4716141810921912451117Not ShownReplacement Parts & AccessoriesTROUBLESHOOTINGOPERATOR’S MANUALFC-P30-UL6.Pump is hard to turn or poor flowFilter is incorrect size for type of fuelFilter is cloggedReplace filterLoose filterInspect and tightenReplace with correct size filter 1 micron for E85. 10 micron for gasoline, 30 micron for diesel/kerosene Pump is difficult to primeHose not submerged in fuel whentrying to prime Check hose and reposition hose in vehicle fuel tankFuel level gauge does not workFloat positioned diagonally across tankRemove red plastic nut and indicator cap.Remove float mechanism and position so that float is position across tank. Replace cap and nut.Ground wire is damaged or will not clampDamagedReplaceLeak in hose fittingsCheck fittings and tighten Vane sticking Check vanes for contaminationExcessive vane wearCheck vanes for excessive wear and replace Damaged, kinked, or cracked hose Replace with hose assembly Inside of pump is dry or rusted from extended periods of non-useRemove pump out hose by loosening the 90°elbow swivel fitting on top of pump. Spray WD-40 or other light oil into the pump out port. At the same time, turn handle in the opposite direction of the arrow to lubricate the pump. Must turn opposite direction of arrow to prevent pumping fuel from tank.Leak at fittings or pump mount Check fittings and tighten as required. CONDITIONPOSSIBLE CAUSESOLUTIONOPERATOR’S MANUAL FC-P30-ULNOTES7.For Service Assistance Phone Toll Free 1-800-433-0708。
蓝代斯克终端产品功能简要说明管理套件,安全套 件
防病毒管理模块(安全套件的插件,如需要,需先购买安全套件)
准入设备-准入网关(硬件)-准入模块(软件),需要购买安全套件基础上
管理员可以通过控制台制定企业统一的防火墙策略。配置防火墙设置(包括例外)、入网规则以及出网规则(用于服务、端口、程序)。支持Windows XP、2003、Vista的防火墙配置。
应用程序阻止
蓝代斯克应用程序阻止模块是通过互联网到蓝代斯克的服务器进行下载预定义的推荐应用阻止列表。(蓝代斯克提供应用程序阻止列表,包含病毒、木马等恶意程序)。还支持自定义应用程序阻止。基于进程的禁用机制,保证应用程序改名后依然可被禁用。
计算机外部
设备管理
通过网络连接控制功能实现对企业客户端设备接口的控制与管理,企业能够规范企业的安全管理,对企业重要数据与信息的流失进行管理控制,保障企业核心业务数据的安全。
管理人员通过计算机外部设备管理器,能够限定客户端能够使用的物理端口,无线端口等可能会导致泄密的端口,同时针对USB端口LANDesk允许使用USB鼠标键盘、打印机、扫描仪的情况下能够禁止移动存储设备的使用,有效提高物理端口的使用率,有目的地禁止设备使用,保证企业合法设备正常运用的情况下保护数据的机密性。
远程维护管理
电源管理
桌面定制
软件授权监控
跟踪已安装的软件和硬件的使用情况。监视并报告应用程序许可证的使用情况以及拒绝使用的应用程序。限制对特定应用程序的使用权限。
管理人员可以轻松的了解企业内软件安装和使用的状况,为购买软件许可提供购买依据。
管理人员可以对影响企业安全和工作的软件进行使用权限的设定,可以提高企业内网的安全,提高工作效率。
LDSS安全组件
组件名称
功能说明
立体声功率放大器

用户指南
版权与声明
版权所有© 2014 Primare AB公司。 保留所有权利。 Primare AB Limstensgatan 7 21616 Limhamn Sweden 版本:A60/1 本指南所含信息在其出版时是正确的。但由于产品不断开 发和改进的需要,Primare AB 公司有权更改手册内容及 产品规格,恕不另行通知。 Primare(翩美)是 Primare AB 公司的商标。 本手册由 Human-Computer Interface Ltd. 撰写。
2
A60 立体声功率放大器用户指南
目录
欢迎!
4
快速入门
5
1 打开包装箱
5
2 放置
5
3 连接扬声器
5
4 连接输入端
5
5 连接电源
5
背板连接
6
技术规格
7
输出
7
输入
7
性能
7
概述
7
附加信息
8
最佳音效
8
煲机
8
RS232
8
触发输入/输出
8
索引
11
A60 立体声功率放大器用户指南
3
欢迎!
亲爱的音乐发烧友, 欢迎使用,感谢您选购 PRIMARE 60 系列产品。 此用户指南详细介绍如何进行设置以实现最佳音质,以及如何操作使用产品欣赏各种音源设备的音乐。 如果需要获得本指南未涵盖的支持和帮助,请联系当地的 Primare 授权经销商,或访问公司网站:。
触发输入/输出
通过触发输入和输出,可使用每款产品随附的触发/联动控 制线缆将 Primare 产品连接在一起,从而与 PRE60 同步 开机或待机。
DigitalMicrograph使用手册
美国Gatan 公司/科扬国际贸易(上海)有限公司 第二期数字电子显微学训练班DigitalMicreograph软件练习(2005年5月中国杭州)DigitalMicrograph 软件入门在电子显微学界Gatan DigitalMicrograph (DM)是一个为人皆知的软件。
DM 具有采集图像,图像处理和分析,数据管理和报告打印等多种功能。
为了使广大用户能够更好地熟悉和掌握DM的多种功能,我们特别编辑了这本练习册。
由于DM软件的功能五花八门,丰富多彩,我们不可能对它的每一项功能作详细的介绍。
本练习册汇集了一些代表性很强的练习。
每一个练习都有详细的步骤说明。
希望以此能够将读者带进门,以便日后自学提高对DM软件的理解和操作使用能力。
从而更好地满足用户在数字电子显微学方面的需求。
数字暗室同传统的底片技术相比,数字图像最突出的优点在于图像可以很容易地通过计算机软件进行多种操作与变换。
很多同暗室相关的实验步骤都可以通过软件在计算机中很容易地实现。
比如,调节图像的亮度或衬度,选区放大,图像的非均匀亮度调节(遮挡曝光),图像粘贴,贴字和测量等。
上面所举的例子构成了数字暗室的基础。
数字暗室图像技术可以大大地提高工作效率。
通过使用计算机软件,很多繁琐,重复性高和费力的工作步骤可以被大大地简化。
这一点仅从获取一张洗印好的图片所需经过的全过程就可以清楚地说明(底片冲洗,暗室放大,贴字等)。
DigitalMicrograph工作环境全貌(DM Menu)菜单:多种操作指令按照其功能分类。
(DM Tool) 工具; 这些可移动窗口包括标准工具以及多种与被显示图像有关的信息。
(Image) 图像:图像在DM 软件里被显示的位置。
(Results) 结果:这个文字窗口包含DM 软件在运行中的一些输出信息。
比如图像分析和测量的结果。
窗口里面的文字可以被拷贝或以文件格式存储。
练习一1.图像的亮度与衬度图像亮度与衬度的调节是保证图像质量的重要一环。
ATW Dargnet快速配置手册V1.7
ATW Dragnet安防管理系统快速配置流程
报警版
1.运行光盘内的Setup.exe,依照安装向导进行安装。
2.运行“ATW安防管理系统”,默认管理员为“admin”,密码为空
3.在“设备管理”—“设备配置”中,添加设备,选择相应的设备
类型,输入“设备名称”和“设备描述”,点击“确定”,系统将按默认值进行配置
注意:系统默认状态下,将主机配置为主机最大支持的分区数和防区数,例如Vista120,默认为8个分区,128个防区
4.如需修改分区和防区数量,点击“下一页”,点选“分区”或“防
区”,在窗口中的左侧为已添加的分区或防区,右侧为未分配的分区或防区,该窗体支持多选,添加或删除您所需要的分区和防区号即可
注意:该窗体支持多选以方便操作
5.在“设备管理”—“防区列表”中,逐一添加报警用户——即子
系统,选中报警用户,在下方添加隶属于该用户的防区信息
6.在“多媒体管理”—“图像管理”中,添加所有系统中的需要应
用到的地图文件
7.在“多媒体管理”—“地图管理”中,添加地图,并在地图上添
加防区元素、配置子地图。
8.至此,系统即可按照默认状态进入工作!其他个性化配置请您依
照配置细则进行配置。
软件使用中的任何问题,您可以随时通过如下方式获取技术支持: ATW Security中国区总代理
北京马斯康电子有限公司
地址:中国北京市西城区阜外大街2号万通新世界广场A座1906室
邮编:100037
电话:010‐68578656、7、8
网站:。
gaman使用手册
程式開發/撰稿:張基霖GAMAN 測試程式管理軟體使用手冊第1.19版1目錄一、軟體定義---------------------------------------------------------------------------------2二、程式功能---------------------------------------------------------------------------------2三、管理架構說明---------------------------------------------------------------------------2四、單一測試項目模組(*.TI)--------------------------------------------------------------3五、整合模組(*.MTF)-----------------------------------------------------------------------4六、軟體操作說明---------------------------------------------------------------------------46.1 (M)TF File Top-Down Menu(熱鍵ALT+M)---------------------------------------66.1.1 (M)TF File →(O)pen---------------------------------------------------------------66.1.2 (M)TF File →(R)un----------------------------------------------------------------96.1.3 (M)TF File →(N)ew---------------------------------------------------------------106.1.4 (M)TF File →(E)xit----------------------------------------------------------------106.2 (T)I File Top-Down Menu(熱鍵ALT+M)------------------------------------------106.2.1 (T)I File →(O)pen------------------------------------------------------------------106.2.2 (T)I File →(R)un-------------------------------------------------------------------146.2.3 (T)I File →(N)ew------------------------------------------------------------------146.2.4 (T)I File →(E)x it-------------------------------------------------------------------15七、GAPass.exe 與GAFail.exe------------------------------------------------------------15八、熱鍵列表--------------------------------------------------------------------------------16九、Release Note----------------------------------------------------------------------------------1723一、 軟體定義:Gaman (GigaByte Test Program Manager)為配合技嘉科技(GigaByte Technology Co.,LTD)測試環境所開發之管理軟體,主要功能為模組化管理測試程式,使工程師能夠更便利更有效率的整合各測試項目與流程,達到模組化管理的目的。
- 1、下载文档前请自行甄别文档内容的完整性,平台不提供额外的编辑、内容补充、找答案等附加服务。
- 2、"仅部分预览"的文档,不可在线预览部分如存在完整性等问题,可反馈申请退款(可完整预览的文档不适用该条件!)。
- 3、如文档侵犯您的权益,请联系客服反馈,我们会尽快为您处理(人工客服工作时间:9:00-18:30)。
Gatan使用简易手册
目录
1. 文件打开与保存 (1)
2. 图像调整 (1)
3. 图像标记 (2)
4. 晶格条纹测量 (2)
1. 文件打开与保存
(1)常用文件打开方式:
File --- open 选择dm3/dm4/tif格式,其中,dm3/dm4为gatan源文件,保留了最多的信息;只有索引模式的tif文件可以进行FFT变换。
(2)文件保存:
Ctrl+S 保存当前文件
Ctrl+G 将当前显示的内容保存为图片,可将dm3/dm4格式转换为tif 图片格式
Ctrl+W 关闭当前文件
Ctrl+Shift+W 关闭当前所有文件
2. 图像调整
(1)Display Control
一般在左侧,可以看到Display Control方框,可以拉动滑条调节亮度、对比度以及灰度值。
如想取消调节,双击数字即可恢复。
(2)Histogram
用于筛选图片灰度值范围,用法与Photoshop相同。
(3)右键调节
在图像中单击右键,选择Image Display Info,可以在Display中通过数值调整图像。
值得注意的是,在Color选项卡中,可以改变图片颜色,实现伪彩色。
3. 图像标记
在菜单栏中,可以看到一系列按钮,具体功能如下:
插入文字。
单击此按钮,即可在图像中插入文字。
在插入的文字上,单击右键,选择Front,即可改变字体及其颜色;选择Background,确定是否需要字体背景;选择Set background color,改变文字背景颜色
插入直线。
单击此按钮,即可在图像中插入直线。
直线上单击右键,选择Set front color,即可改变直线的颜色;选择Line Options,确定是否需要箭头以及是否需要标出直线长度。
插入带长度标记的直线。
插入矩形。
按住shift,将转变为正方形
插入圆圈。
按住shift,将转变为正圆。
4. 晶格条纹测量
(1)定义标尺
若文件是dm3/dm4格式,跳过此步。
若文件是tif格式,单击,按住shift同时沿着标尺画直线,
确保端点对其,Analysis --- Calibrate,选择合适的单位,并修改数值,点击确认。
(2)直线测量法
点击,垂直晶格条纹画直线,Analysis --- Calibrate,读出线长度即可。
(3)FFT法
点击,按住alt键,拖动鼠标左键即可画出正方形,圈住要分析的晶格。
Process --- FFT,即可获得FFT衍射图案。
量取对应衍射点,读出距离,乘以2,即为所选晶格条纹的长度。
(4)Profile法
点击,垂直晶格条纹画线,可以得到profile 图像。
鼠标左键选取合适的两个峰,读出距离,除以峰的个数,即为晶格条纹长度。
By Xiaoyong Wang。