百灵卡BRAUND设置说明
百灵达音频处理器说明书DEQ2496

GEQ 图形均衡器PEQ 参数均衡器DEQ 动态均衡器WIDTH音像宽广调整FBD 回授抑制DYN 动态处理UTILITY 各项设定选单I / O 输入输出功能BYPASS功能不使用开关MEMORY 储存功能METER 表头RTA 音场实时分析模式在使用此手册之前,请了解说明是依官方操作方式进行,不过在一些功能页面皆包括了一些快速按键的使用,操作者在熟悉基本的运作调整后,自然对于快速使用的功能按键会有一番的认识,而在此不再详述。
2. CONTROL ELEMEENTS ( 控制组件)。
2.1 Front panel ( 正面的面版)。
1. LED METER ( 表头指示)。
指示输入的声音讯号电平大小,在其最上方的灯号是CLIP ( 讯号切割) 的指示,表示输入的讯号已经过大,或是在DYN (动态处理)的调整上,其LIMITER( 限制器) 设定限制电平位置过低的原因,参照章节 3.4。
2. METER key ( 表头按键)。
使用这个按键进入后,可以选择三种不同的表头指示模式,参照章节3.10。
3. RTA key ( 音场实时分析模式按键)。
使用这个按键进入后,可以选择三种不同的分析显示,参照章节 3.8。
4. COMPARE ( 功能调整比较按键)。
使用这个按键进入后,可以将你预设的储存资料来与当下所调整的数据来做两种比较。
5. MEMORY key ( 记忆储存按键)。
在这里,你可以将DEQ - 2496 所调整后的数据储存起来,以方便下次的呼叫使用,参照章节 3.9。
图 2 - 1 各项按键显示图 2 - 2 各项按键显示与飞梭旋转控制定义。
6. PAGE key ( 页面选择按键)。
当你是在某项的功能页面时,藉由这个按键再去选择里面的章节出来做调整。
7. functions performed key ( 功能定义执行按键)。
藉由上方的动作后,欲去执行当下的模式或是型态,或改变设定回复预设等,这个功能按键区分 A 键、B 键,是一个去完成的指令键。
BRAUN D521设置说明
1
备用
P07.03
比较方式0=n>SP1 1= n<SP1
0=n>SP1
0
备用
P07.04
替代比较结果0=未启用1=启用
1=启用
1
备用
P07.05
替代比较结果0=不输出报警1=输出报警
0
备用
P07.06
探头故障输出值0=不输出报警1=输出报警
0
备用
P08.
通讯设置
P08.00
通讯波特率1=1200 2=9600 3=19200
0
P05.
超限设置2
P05.00
设定值2 SP2
rpm
3300
用常闭触点
P05.01
回差
xx%
1
P05.02
回差方向0=高1=低2=双向
1=低
1
P05.03
比较方式0=n>SP1 1= n<SP1
0=n>SP1
0
P05.04
替代比较结果0=未启用1=启用
1=启用
1
机械超速试验用
P05.05
替代比较结果0=不输出报警1=输出报警
替代值释放延时时间
XXXs
0s
P01.
测量信号设置
P01.00
比例:频率输入比例
( 0=整型;1=1位小数)
0~2
1
P01.01
输入脉冲数
Hz
3000Hz (DEH)
4400Hz(ETS)
1500Hz (DEH)
60齿50×齿数
88齿50×齿数
30齿50×齿数
P01.02
比例:对应转速比例
Bergen产品安装和使用手册说明书

Product no: SA-BERG0-000RRF no: 40 10 2244Last updated: 01.01.2013NO Monterings- og bruksanvisning 2GB Installation- and user manual 9SE Installations- och bruksanvisning 15 FIKättöohje219EN1. Prior to assembling the stoveAll our products are tested according to the latest European requirements and also to the Norwegian standard NS 3058 and NS 3059, which include particle tests. However, several European countries have local regulations for installation of fireplaces, which change regularly. It is the responsibility of the client that these regulations are complied with in the country/region where the fireplace is installed. Nordpeis AS is not responsible for incorrect installation.Important to check(please note that this list is not exhaustive):• distance from firebox to combustible/flammablematerials• insulation materials/requirements betweenfireplace surround and back wall• size of floor plates in front of fireplace if required • flue connection between firebox and chimney • insulation requirements if flue passes through aflammable wall Chimney draftCompared with older models, the clean burning stoves of today put significantly higher demands on the chimney. Even the best stove will not work properly if the chimney does not have the right dimensions or is not in good working order. The draught is mainly controlled by gas temperature, outside temperature, air supply as well as the height and inner diameter of the chimney. The diameter of the chimney should never be less than that of the flue/chimney collar. At nominal effect there should be a negative pressure of 12 to 25 Pascal.The draught increases when:• The chimney becomes warmer than the outside air • T he active length of the chimney over the hearth increases • G ood air supply to the combustion It can be difficult to obtain the right draught conditions in case the chimney is too large relative to the stove, as the chimney does not heat up well enough. In such cases you may want to contact professional for evaluation of possible measures. Draught that is too strong can be controlled with a damper. If necessary, contact a chimney sweeper.Air supplyA set for fresh air supply is available as accessory. This will ensure that the air supply to the combustion chamber is less affected by ventilation systems, kitchen fans and other factors which can create a down-draught in the room. In all new construction, we strongly recommend that it is designed and prepared for direct supply of outside air. In older houses, the use of fresh air supply set is also recommended. Insufficient air supply can cause down-draught and thereby low combustion efficiency and the problems that this entails: soot stains on the glass, inefficient use of the wood and a soot deposits in the chimney.1. Prior to assembling the stove 9Chimney draft 9Air supply 9Dimensional drawing 102. Technical information103. Distance to combustible material 104. Assembly10Operating control 10Flue outlet collar10Connection of the flue 10Fresh air supply115. Lighting the fire for the first time116. Maintenance 11Cleaning and inspection 11Ashes 11Thermotte™ 11Door and glass 127. Warranty128. Advice on lighting a fire12Some advice in case of combustion problems14INDEX10ENdown to ember.3. Distance to combustible materialEnsure that the safety distances are respected (FIG 1).When connecting a steel chimney to the top outlet use the security distances required from the manufacturer.4. AssemblyThe following tools are necessary:• ScrewdriverThe stove must be lifted from vertical position. Do not tilt! It can damage the legs.Operating controlWhen the stove is in position, check that all functions are easy to manoeuvre and appear satisfactory.DoorHandle turned downward Handle turned upwardClosed OpenedIgnition vent control FIG A (bottom centre) Air vent control FIG B (bottom left corner)Left position = closed Right position = openPushed in = closedPulled out = openFIG A FIG BFlue outlet collarBergen is delivered as standard with a top flue outlet collar. In order to change to a posterior mounted flue outlet :FIG 2:Remove the perforated decoration lid in the back with a hammer, or saw it out with a hacksaw FIG 3: Unscrew the rear sheet steel lidFIG 4: Unscrew the top collar. The draft diverter will also loosenFIG 5: Fasten the collar on the posterior flue outlet FIG 6: Fasten the sheet steel lid and the draft diverter on the top flue outletConnection of the fluePlease be aware when connecting the 155 mm flue to the smoke dome that the flue is placed inside the flue outlet collar.*Alternative versions exsists due to National requirements . Dimensional drawingThe illustration indicates the approximate center height of the hole for the flue. Distortions in floors and walls may influence the height. Place the stove for accurate position and height of the flue/chimney connection. We accept no liability for typographical errors and changes.For your own safety, comply with the assembly instructions. All safety distances are minimum distances. Installation of the stove must comply with the current rules and regulations of the country where the product is installed. Nordpeis AS is not responsible for wrongly assembled stoves.Subject to errors and changes.For the latest updated version go to .2. Technical InformationThe stoves from Nordpeis have secondary combustion and are clean burning. The combustion takes place in two phases: first the wood burns and then the gases from the fumes are lit by the hot air. This ensures that these new stoves have minimal emissions of soot particles and unburnt gases (such as CO) and are thus better for the environment. Clean burning stoves require a small amount of wood in order to obtain a good heat output. Use exclusively clean and dry wood. We recommend seasoned hardwood with a maximum moisture content of 20%.Material:Sheet steelSurface treatment door/doorframe: Heat resistant varnish Fuel:Wood logs, 30 cm Operating range: 5 kW nominal Efficiency:84,8%CO % @ 13% O 2:0,10Draught system:Air vent control Combustion system:Secondary combustion (clean burning)Heating area:40-110 m²Flue outlet: Top and rear Flue:Inner Ø 155 mm *Alternative versions exsists due to National requirementsWeight:110 kg Flue gas temperature 239 °CAir supplyrequirements (m³/h):11 Fuel Charge 1,1 kg Refueling interval 47min Opening of the air vent control 33%OperationIntermittent** Intermittent combustion refers to normal use of a fireplace, i.e. new wood is inserted when the previous load has burnedIgnition vent controlAir vent controlFor the flue connection to the chimney, follow the recommendations from the chimney manufacturer. Fresh air supplyFIG 8: The possibility to connect a fresh air supply ducting set5. Lighting the fire for the first timeWhen the stove is assembled and all instructionshave been observed, a fire can be lit. Be careful with touching the stove the first few times it is used as it may damage the varnish.Take care when inserting logs into the burn chamber, in order not to damage the Thermotte plates. Please note that during the first few firings, the insulations panels within the firebox will release moisture contained within them from production. This will slow down the burn rate slightly and could cause markings on the glass. These are easily removed with glass cleaner once the glass has gone cold. Possibly leave the door slightly open the first 2-3 times that the stove is used. It is advisable to ventilate the room well when making the fire for the first time as the varnish on the stove will release some smoke or smell. Both the smoke and smell will disappear and are not hazardous.When lighting the fire for the first time we also recommend opening/shutting the door regularly the first two hours to avoid the door gasket sticking to the varnish.Lighting a fireInsert small dry pieces of wood, ignite and ensure that the flames have a good grip of the wood before closing the door. Open the ignition vent control (Fig A) as you close the door. When the flames are stable and the chimney is warm, close the ignition vent control. If it is not closed the stove and chimney may overheat. The air supply is then regulated with the air vent control (Fig B). NB! If the draught is low after the fire has been lit, additional air supply can be added by opening the ignition vent control.When there is a glowing layer of ash, new wood logs can be inserted. Remember to pull the hot ember forward in the burn chamber when inserting new logs so that the wood is ignited from the front. Open the vent or leave the door slightly open each time new logs are inserted so that the flames get established. The fire should burn with bright and lively flames.Using the stove with low combustion effect increases pollution as well as the risk of a fire in the chimney. Never allow the stove or flue to become glowingred. Turn off the air vent control should this happen. Regulation of the air vent control takes some experience, but after a little while a natural rhythm for the fire will be found.IMPORTANT! Always remember to open the air vent control (preferably also the door) before new wood logs are inserted into a hot burn chamber. Let the flames get a good grip on the wood before the air control setting is reduced.When the draught in the chimney is low andthe vent is closed, the gas from the firewoodcan be ignited with a bang. This can cause damages to the product as well as the immediateenvironment.6. MaintenanceCleaning and inspectionThe stove should be inspected thoroughly and cleaned at least once per season (possibly in combinationwith the sweeping of the chimney and chimney pipes). Ensure that all joints are tight and that the gaskets are rightly positioned. Exchange any gaskets that are worn or deformed.Remember that the stove must always be cold when inspected.AshesThe ashes should be removed at regular intervals.Be aware that the ashes can contain hot ember even several days after the fire is finished. Use a container of non-combustible material to remove the ashes. It is recommended to leave a layer of ashes in the bottom as this further insulates the burn chamber. Take care with the Thermotte plates when the ashes are removed, particularly when using an ash shovel, so as not to damage them.Thermotte™The insulating plates in the burn chamber (FIG 9) contribute to a high combustion temperature, which leads to cleaner combustion of the wood and a higher rate of efficiency. Any fissures in the plates will not reduce their insulation efficiency.If new plates are needed, contact your dealer. Please note: Wood logs that are too long can cause strain and crack the plates, due to the tension created between the side plates.In case the Thermotte plates need to be replaced, lift the smoke baffle (A) in order to remove the sideplates.A. Smoke baffleB. Left side plateC. Back plateD. Back plateE. Right side plateF. Bottom platePlease note that the Thermotte plates may release coloured dust when touched. Avoid touching any cast iron parts with dust on your fingers. Any visible dust on cast iron can be brushed off with a dry cloth.11ENDoor and glassShould there be any soot on the glass it may be necessary to clean it. Use dedicated glass cleaner. (NB! Be careful, detergents can damage the varnish and gaskets). If different detergents are used they may damage the glass. A good advice for cleaning the glass is to use a damp cloth or kitchen roll paper and apply some ash from the burn chamber. Rub around the ash on the glass and finish off with a piece of clean and damp kitchen roll paper. NB! Only clean when the glass is cold.Check regularly that the transition between the glass and the door is completely tight. Possibly tighten the screws that hold the glass in place - but not too hard, as this can cause the glass to crack. Periodically, it may be necessary to change the gaskets on the door to ensure that the burn chamber is air tight and working optimally. These gaskets can be bought as a set including ceramic glue.Recycling of the ceramic glassCeramic glass cannot be recycled. Old glass, breakage or otherwise unusable ceramic glass, must be discarded as residual waste. Ceramic glass has a higher melting temperature, and can therefore not be recycled together with glass. In case it would be mixed with ordinary glass, it would damage the raw material and could, in worst case end the recycling of glass. It is an important contribution to the environment to ensure that ceramic glass does not end up with the recycling of ordinary glass.Packaging recycleThe packaging accompanying the product should be recycled according to national regulations.7. WarrantyFor detailed description of the warranty conditions see the enclosed warranty card or visit our website 8. Advice on lighting a fireThe best way to light a fire is with the use of lightening briquettes and dry kindling wood. Newspapers cause a lot of ash and the ink is damaging for the environment. Advertising flyers, magazines, milk cartons and similar are not suitable for lighting a fire. Good air supply is important at ignition. When the flue is hot the draught increases and door can be closed.Warning: NEVER use a lighting fuel such as petrol, karosine, alcohol or similar for lightinga fire. This could cause injury to you as wellas damaging the product.Use clean and dry wood with a maximum moisture content of 20%. The wood should be dried for a minimum of 6 months after it is cut. Humid wood requires a lot of air for the combustion, as extra energy/ heat is required for drying the humid wood and the heat effect is therefore minimal. This in addition creates soot in the chimney with the risk of creosote and chimney fire.Storing of woodIn order to ensure that the wood is dry, the tree should be cut in winter and stored during the summer, covered and in a location with adequate ventilation. The wood pile must never be covered by a tarpaulin lying against the ground as the tarpaulin will then act as a sealed lid that will prevent the wood from drying. Always keep a small amount of wood indoors for a few days before use so that moisture in the surface of the wood can evaporate.UsageNot enough air to the combustion may cause the glass to soot. Hence, supply the fire with air just after the wood is added, so that the flames and gases in the combustion chamber are properly burnt. Open the air vent and have the door slightly ajar in order for the flames to establish properly on the wood.Note that the air supply for the combustion also canbe too large and cause an uncontrollable fire that very quickly heats up the whole combustion chamber to an extremely high temperature (when using with a closed or nearly closed door). For this reason you should never fill the combustion chamber completely with wood.It is recommended to keep an even fire with a small amount of wood. Too many logs put on hot ember, may result in combustion air starvation, and the gases will be released unburnt. For this reason it is important to increase the air supply just after adding logs.Choice of fuelAll types of wood, such as birch, beech, oak, elm, ash and fruit trees, can be used as fuel in the insert. Wood species have different degrees of density - the more dense the wood is, the higher the energy value. Beech,12 ENoak and birch has the highest density.Attention! We do not recommend using fuelbriquettes/ compact wood in our products. Use ofsuch fuel may cause the product to overheat andexceed the temperatures determined safe.Burning briquettes/ compact wood is done so atyour own risk and only small amounts (max 1/3 ofnormal load) should be used for each load.Warning:NEVER use impregnated wood, painted wood,plywood, chipboard, rubbish, milk cartons,printed material or similar. If any of these itemsare used as fuel the warranty is invalid.Common to these materials is that duringcombustion they can form hydrochloricacid and heavy metals that are harmful tothe environment, yourself and the insert.Hydrochloric acid can also corrode the steel inthe chimney or masonry in a masonry chimney.Also, avoid burning with bark, sawdust or otherextremely fine wood, apart from when lightinga fire. This form of fuel can easily cause aflashover that can lead to temperatures that aretoo high.Warning:Make sure the insert is not overheated - it cancause irreparable damage to the product. Suchdamage is not covered by the warranty.Source “Håndbok, effektiv og miljøvennlig vedfyring” by EdvardKarlsvik SINTEF Energy Research AS and Heikki Oravainen, VTT.http//EN13Some advice in case of combustion problems14 ENFIG 1=Brannmur/Brandmur/Palomuuri//Firewall/Mur parefeu/Hitzenschutzwand=Brennbart materiale/Brændbart materiale/ Brännbart material/ Tulenarka materiaali/Combustible material Matières combustibles/Brennbarem Material2930Nordpeis AS, Gjellebekkstubben 11, N-3420 LIERSKOGEN, Norwaywww.nordpeis.no。
布朗司诺L中文版使用说明书-Bron

2016‐08‐15I. 司诺L灯头图示2016‐08‐152016‐08‐15II, 开始1. 打开灯头保护盖 (取走灯管前的保护海绵, 另确定灯管正确固定在插座上)3. 安装电池至灯头上。
2. 按一下电池后方的 “on/check” 按钮测试电池的电量。
4. 启动开关按钮 (在底部)2016‐08‐15III. 操作按钮按钮 /标示功能旋转按钮 (1)启动或关闭灯头(备用模式)。
按下”旋转按钮”维持3秒钟可启动或关闭灯头至备用模式。
轻按”旋转按钮”可进入菜单选项介面。
有关详细说明请参照第五章。
进入菜单模式后” 旋转按钮” 底部的蓝色指示灯会闪烁。
在操作模式下:转动”旋转按钮”:可调整灯头的输出功率。
反时钟方向转动可调减输出功率。
顺时钟方向转动可增加输出功率。
慢速转动可按1/10的功率调节,而快速转动可按1级光功率调节。
数字显示屏 (2) 显示输出功率或菜单的选取。
Mod / Eco 造型灯及省电模式开关 (3) 轻按启动或关闭造型灯。
长按按钮可改选为正常或省电模式。
Test (4)测试键当”旋动按钮”底部的蓝色灯亮着,表示灯头已充电及准备就绪。
可按测试键引发灯头作测试。
长按按钮可把灯头的设定回到默认设定Speed (5) 高速模式提升回电速度及闪速。
详细内容请参照第7章。
WiFi (6)启动或关闭wifi 接连功能。
st/ch (8) 无线引闪频道设定可选取布朗RFS 无线引发的频道。
lamp (9) 灯头地址设定可选取布朗RFS 频道的灯头地址。
2016‐08‐15seq (10)连续频闪设定可设定连续频闪的次数。
beep (11) 声音提示启动或关闭准备就緖的声音提示功能。
sync (12) 同步引闪 可选择启动或关闭哪一项同步引闪模式。
(无线引发及光敏感应同步)同歩线插口/ USB插口 (13/14) 同步线插入口供同步引闪用 / USB 插囗供固体升级用开关按钮 (15)启动或关闭灯头电源。
博朗,说明书
篇一:博朗产品说明书全系列buran博朗系列超细干粉自动灭火装置南京燕苑博朗消防设备有限公司目录第一部分第二部分第三部分第四部分第五部分第六部分悬挂式超细干粉灭火装置1 适用范围2 技术性能3 结构和工作原理4 运输、保管注意事项5 安装注意事项6 维护注意事项7 装箱单8 售后服务悬挂式超细干粉灭火装置1 适用范围2 技术性能3 结构和工作原理4 运输、保管注意事项5 安装注意事项6 维护注意事项7 装箱单8 售后服务悬挂式超细干粉灭火装置1 适用范围2 技术性能3 结构和工作原理4 运输、保管注意事项5 安装注意事项6 维护注意事项7 装箱单8 售后服务自动温感启动器手动启动功能模块1 概述2 探测器性能特点3 主要技术指标4 安装方法5 使用方法6 维护安装注意事项备注 fzxa2.5-buran fzxa5-buran fzxa8-buran第一部分 fzxa2.5-buran悬挂式超细干粉灭火装置1 适用范围1.1 能迅速扑灭a、b、c类火灾和带电电气火灾。
如生产车间、办公室、小型仓库、商店、配电房等层高比较小的相对封闭空间及火车、船舶等交通工具消防使用。
1.2 防爆标志exibiibt32 技术性能2.1 外形尺寸(含固定架;mm)直径 ??????????????200±5高度??????????????375±52.2 灭火装置重量(kg)?????????????????????6.0±0.5 2.3 灭火超细干粉重量(kg)???????????????????2.5±0.125 2.4保护面积、体积(不密闭程度5%)2.5自动温感启动器启动温度(℃)???????????????? ≥70 2.6启动电流(a)????????????????????????≥1 2.7 检查电启动的安全电流(ma)????????????????≤150 2.8 喷射时间(秒)????????????????????????≤5 2.9 灭火时间(秒)???????????????????????≤1 2.10 使用环境温度(℃)?????????????????? -40~+50 2.11 装置启动有效期(年)?????????????????????10 2.12 可人控电启动或与火灾自动报警系统配套使用。
百灵达B205D,B208D等音箱说明书

LEVEL — 调节从 THRU 端口发出的信 号的电平。
快速启动向导
请登录 下载更详细的用户手册
EUROLIVE B205
Active 150-Watt PA/Monitor Speaker System
A50-00000-23712
2 EUROLIVE B205D
重要的安全须知
带有此标志的终端设备具 有强大的电流, 存在触电 危险。 请只使用高品质的 带有 1/4" TS 插头的音箱线。 所有的安 装或调整均须由合格的专业人员 进行。
(6) 下列情况引起的损坏 / 故障不在
保修范围内:
• 操作不当, 未按 BEHRINGER 用户手 册或服务手册操作引起的故障;
• 未按当地国家的技术或安全规 定进行使用而引起的故障;
• 因自然灾害 (意外事故, 火灾, 洪水等) 或其他任何不在 MUSIC Group 控制范围之内的因素引 起的损坏 / 故障。
(10) BEHRINGER 产品的授权销售商不
会在网上以拍卖方式销售新产品。 通过网上拍卖购买产品, 买家自担 风险。 网上拍卖产品的确认或销 售单据均不作为保修服务的依据, MUSIC Group 将不予维修或更换任何 通过网上拍卖购买的产品。
§ 5 保修服务转让
本保修服务只对最初的买家 (即授 权销售商的顾客) 有效, 不可转让给 二手购买此产品的人。 任何人 (包括 销售商等) 均无权以 MUSIC Group 的名 义承诺对此类产品给予保修服务。
处联系。
(2) MUSIC Group* 对按使用说明正常
使用的产品的机械和电子部件提供 1 年的保修期, 从购买之日起计算, 除非当地法律强制规定更长的保修 期。 若产品在保修期内出现故障且 不属于本保修条款第 § 4 条规定的 情形, MUSIC Group 将自行决定为用户 维修或更换产品。 若需要更换整个 产品, 则该更换产品的保修期为原 购买产品剩余的保修期, 即从原产 品购买之日起计算 1 年 (或其它适用 的保修期)。
BICONIC BC-AU-BS-249 蓝牙便携耳机操作手册说明书
Manuals+— User Manuals Simplified.BICONIC BC-AU-BS-249 Portable Bluetooth Speaker User ManualHome » BICONIC » BICONIC BC-AU-BS-249 Portable Bluetooth Speaker User ManualContents1 BICONIC BC-AU-BS-249 Portable BluetoothSpeaker2 Product Information3 Product Usage Instructions4 Package includes5 Precautions6 Operating Panel7 Operating Instructions8 Bluetooth Connection9 Specifications10 Frequently Asked Questions11 FCC Statement12 WARRANTY13 Documents / Resources14 Related PostsBICONIC BC-AU-BS-249 Portable Bluetooth Speakerfrom the phone. TWS pairing is not Po disconnect the os tea, long press one of the + buttons.Note(A) Reboot: When the pairing is successful, Bluetooth speaker will automatically connect to your phone.(B) Low Battery Prompt: When the Bluetooth speaker battery power is low, it will issue a low battery tone.(C) Short click means press once, long press means press and hold the button for 2-3 seconds. Bluetooth Connection1. Once power is ON, blue lights will flash, indicating that the Bluetooth speaker is in search pairing state.2. Turn on your device’s Bluetooth and scan for new devices, look for BC-BS-249. Once found, pair with it.Affer pairing, devices can connect with each other automaticallySpecificationsBT Version: JL 5.1Output Power: 5 WLithium Battery: 400 mAhTransmission Distance: 10 MSensitivity: ≤1%SNR: ≥85dBFM Radio: 87.5-108 MHzDC/5V: Input DC 5V/300mAOperating Voltage: DC 5VCharging Time: 1-1.5 hoursPlay Tim e: 2 hours aroundMaterial: ABS Plastic + FabricDimension: 110 110 93mmFunctions: Bluetooth,TF/SD card,USB,FM,RGB Lights,TWSFrequently Asked Questions: This equipment has been tested and found to comply with the limits for a Class B digital device, pursuantReorient or relocate the receiving antenna.Increase the separation between the equipment and receiver.Connect the equipment into an outlet on a circuit different from that to which the receiver is connected.Consult the dealer or an experienced radio/TV technician for help.Cations to this device not explicitly approved by manufacturer could CautionAny changes or modivoid your authority to operate this equipment. RF Exposure Information The device was evaluated to meet general RF exposure requirements. The device has been evaluated to meet general RF exposure requirement. The device can be used in portable exposure condition without restriction.WARRANTYWARRANTY- 12 MONTHPlease visit our website /warranty 02022 BYTECH NY INC.B Iconic ™ is a registered trademark of Bytech NY INC.Bluetooth® is a registered trademark of SIG.IncAll Trademarks and copyrights are the property of the respective companies.Photos are for illustration purposes onlyBICONICBytech NY Inc.2585 West 13 street Brooklyn NY 11223(718) 449-3700©2022 BYTECH NY INC.Documents / ResourcesBICONIC BC-AU-BS-249 Portable Bluetooth Speaker [pdf] User ManualBC-AU-BS-249, 2AHN6-AUBS-249, 2AHN6AUBS249, BC-AU-BS-249 Portable Bluetooth Speaker, Portable Bluetooth Speaker, Bluetooth Speaker, SpeakerManuals+,。
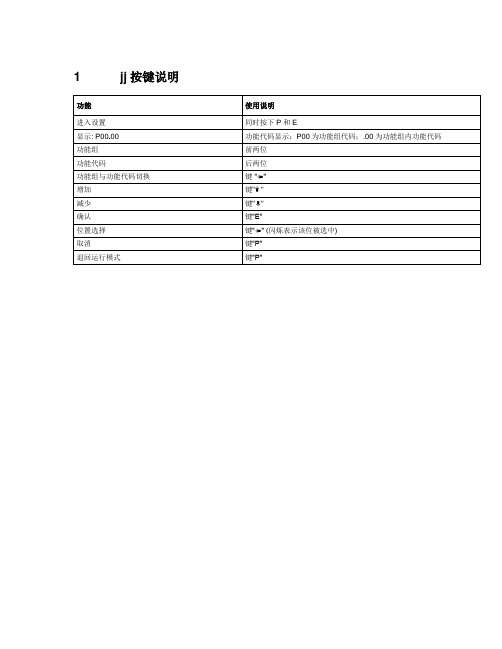
百灵卡BRAUN D521设置说明
按键说明功能使用说明进入设置同时按下P和E显示:P00.00 功能代码显示:P00为功能组代码;.00为功能组内功能代码功能组前两位功能代码后两位功能组与功能代码切换键”✍”增加键"✍"减少键"✍"确认键”E”位置选择键”✍”(闪烁表示该位被选中)取消键”P”退回运行模式键”P”参数设置功能组no.:Pxx.代码no.:.xx参数说明项目参数设置备注P00. 通用设置P00.00 输入密码;E1表示密码输入错误,---------0000默认设置P00.01 设置新密码--------- 1234 P00.02 密码状态(1=密码未启用,0=密码启用) --------- 0P00.03 测量刷新时间5~99999ms 20ms P00.04 替代值释放延时时间XXXs 0sP01. 测量信号设置P01.00 比例:频率输入比例(0=整型;1=1位小数)0~2 1P01.01 输入脉冲数Hz 3000Hz(DEH)4400Hz(ETS)1500Hz(DEH)60齿50×齿数88齿50×齿数30齿50×齿数P01.02 比例:对应转速比例(0=整型;1=1位小数)0~2 1 与P01.00一致P01.03 对应转速rpm 3000转/minP01.04 低速限制(低于该值显示0) rpm 00001P01.05 脉冲计数类型0=标准0P01.06 低通滤波0=off1=50KHz2=10KHz 2=10KHz 2P01.07 未启用P01.08 探头检测0=off1=on2=on且需要确认复位0=off 0P01.09 监视类型0=off1=电流2=电压3=电流&电压0=off 0P01.10 转速输出系数1=1:12=2:1 001P02. LCD显示设置P02.00 Zeroed”lessersignificantdigits”(LCD′s)indisplay none 0P02.01 LCD显示刷新时间(x.xsec) 0.3sec 0.3P02.02 Timedelayofstart-upblocking(xxxs) 0sec 000P03. 模拟量输出设置P03.00 模拟量输出量程上限1000 1000 备用P03.01 模拟量输出量程下限0 0 备用P03.02 类型0=0~20mA/0~10V1=4~20mA/2~10V 1=4~20mA/2~10V 1 备用P03.03 模拟量输出类型0=电压1=电流1=电流 1 备用P03.04 探头故障时输出值0=不变1=输出<0mA2=输出>20mA 0=不变0 备用P03.05 线性类型0=线性增1=线性减0=线性增0 备用P04. 超限设置1P04.00 超限设定值1SP1 rpm 3300 用常闭触点P04.01 回差xx% 1.0P04.02 回差方向0=高1=低2=双向1=低 1P04.03 比较方式0=n>SP11=n<SP1 0=n>SP1 0P04.04 替代比较结果0=未启用1=启用1=启用 1 机械超速试验用P04.05 替代值0=不输出报警1=输出报警0 试验时不输出信号P04.06 探头故障输出值0=不输出报警1=输出报警0P05. 超限设置2P05.00 设定值2SP2 rpm 3300 用常闭触点P05.01 回差xx% 1P05.02 回差方向0=高1=低2=双向1=低 1P05.03 比较方式0=n>SP11=n<SP1 0=n>SP1 0P05.04 替代比较结果0=未启用1=启用1=启用 1 机械超速试验用功能组no.:Pxx.参数说明项目参数设置备注代码no.:.xxP00. 通用设置P05.05 替代比较结果0=不输出报警1=输出报警0 试验时不输出信号P05.06 探头故障输出值0=不输出报警1=输出报警0P06. 超限设置3 只有常开触点P06.00 设定值3SP3 rpm 8000 备用P06.01 回差xx% 1 备用P06.02 回差方向0=高1=低2=双向1=低 1 备用P06.03 比较方式0=n>SP11=n<SP1 0=n>SP1 0 备用P06.04 替代比较结果0=未启用1=启用1=启用 1 备用P06.05 替代比较结果0=不输出报警1=输出报警0 备用P06.06 探头故障输出值0=不输出报警1=输出报警0 备用P07. 超限设置4 只有常开触点P07.00 设定值4SP4 rpm 8000 备用P07.01 回差xx% 1 备用P07.02 回差方向0=高1=低2=双向1=低 1 备用P07.03 比较方式0=n>SP11=n<SP1 0=n>SP1 0 备用P07.04 替代比较结果0=未启用1=启用1=启用 1 备用P07.05 替代比较结果0=不输出报警1=输出报警0 备用P07.06 探头故障输出值0=不输出报警1=输出报警0 备用P08. 通讯设置P08.00 通讯波特率1=12002=96003=19200 3P08.01 通讯地址。
Philips BT6000藍牙揚聲器使用手冊说明书
控制通話
在藍牙連線之後,您就能使用本揚聲器控 制來電。
按鈕 功能 按下即可接聽來電。 按住三秒即可拒絕來電。 通話時,按下即可結束目前通話。 通話時,按住三秒即可將來電轉接 到您的行動裝置。
重新連線裝置
當您開啟揚聲器時,揚聲器會自動重新連 線到上次連線的裝置;如果沒有,請在您 的藍牙裝置上選擇 [Philips BT6000] 以開始 連線。
188 x 70 x 71 公釐 0.5 公斤
10 ZH-TW
7 疑難排解
警告
• 請勿打開裝置外殼。
為維持有效的保固,請勿自行嘗試修理系 統。 如果您在使用本裝置時發生任何問題,請 在送修前先行檢查下列項目。 如果問題仍 未解決,請造訪 Philips 網頁 (www.philips. com/support)。 聯絡 Philips 時,手邊請先準 備好您的裝置、型號與序號。
注意 • 拆卸內建電池將導致保固失效,而且可能損壞本
產品。
若要取出產品的內建電池,請務必交由專 業人員處理。
環境保護資訊 所有非必要之包裝材料均已捨棄。 我們嘗 試讓包裝可以輕易拆解成三種材質:厚紙 板 (外盒)、聚苯乙烯泡棉 (防震) 以及聚乙 烯 (包裝袋、保護性泡棉膠紙)。 產品本身含有可回收並重複使用的材質, 但是需由專業公司拆解。 請根據各地法規 丟棄包裝材料、廢電池和舊機器。
一般
沒有電力 • 確定裝置的 AC 電源插頭已妥善連接。 • 請確認 AC 電源插座有電。 • 為揚聲器進行充電。 沒有聲音 • 調整本產品的音量。 • 調整連線裝置上的音量。 • 請確定您的藍牙裝置位於有效操作範
圍內。 揚聲器沒有反應 • 將電源插頭拔除後再插入,然後再開啟
布朗卢比操作手册
2
上海市闵行区申南路 59 弄泰弘研发园 1 号楼 305 室 201108 Tel:86 21 5109 8399 Fax:86 21 3463 5073
上海仪脉自控科技有限公司
目录
1.1 概述 1.2 触摸屏 1.3 菜单 1.4 操作模式 1.5 仪表校准及测量 1.6 错误信息 1.7 总酚试剂配方与清洗液配制 1.8 反应原理
1.3.1.2 Current out(电流信号输出)菜单
用来设置 4-20mA 信号输出,电线连接方法见下图及说明:
9
上海市闵行区申南路 59 弄泰弘研发园 1 号楼 305 室 201108 Tel:86 21 5109 8399 Fax:86 21 3463 5073
上海仪脉自控科技有限公司
1 图 1.2.2 1 退出按钮(按一下可退出到上级菜单)
1.2.3 查看历史值
POWERMON 会记录所有的测量结果。通过 RESULTS 键进入以下界面:
再按 Table 按键进入以下界面:
再按 List 按键进入以下界面
6
上海市闵行区申南路 59 弄泰弘研发园 1 号楼 305 室 201108 Tel:86 21 5109 8399 Fax:86 21 3463 5073
上海市闵行区申南路 59 弄泰弘研发园 1 号楼 305 室 201108 Tel:86 21 5109 8399 Fax:86 21 3463 5073
上海仪脉自控科技有限公司
图 1.3.3 按 Meas.Point 进入下级菜单,如下:
图 1.3.4 选择 Pause 菜单,可进入暂停时间设置界面,用来设置两次测量程序之间的间隔时间. 选择 Sequence 菜单,可进入测量程序的排序设置,例如设置 1*,即在启动测量后,仪表会 先测量第一通道的水样,然后执行清洗程序;设置 1C,即在启动测量后,仪表会先测量第 一通道的水样,然后执行校准程序。如下图:
- 1、下载文档前请自行甄别文档内容的完整性,平台不提供额外的编辑、内容补充、找答案等附加服务。
- 2、"仅部分预览"的文档,不可在线预览部分如存在完整性等问题,可反馈申请退款(可完整预览的文档不适用该条件!)。
- 3、如文档侵犯您的权益,请联系客服反馈,我们会尽快为您处理(人工客服工作时间:9:00-18:30)。
1=启用
1
备用
P06.05
替代比较结果0=不输出报警1=输出报警
0
备用
P06.06
探头故障输出值0=不输出报警1=输出报警
0
备用
P07.
超限设置4
只有常开触点
P07.00
设定值4SP4
rpm
8000
备用
P07.01
回差
xx%
1
备用
P07.02
回差方向0=高1=低2=双向
按键说明
功能
使用说明
进入设置
同时按下P和E
显示:P00.00
功能代码显示:P00为功能组代码;.00为功能组内功能代码
功能组
前两位
功能代码
后两位
功能组与功能代码切换
键””
增加
键""
减少
键""
确认
键”E”
位置选择
键””(闪烁表示该位被选中)
取消
键”P”
退回运行模式
键”P”
参数设置
功能组
no.:Pxx.
0
试验时不输出信号
P05.06
探头故障输出值0=不输出报警1=输出报警
0
P06.
超限设置3
只有常开触点
P06.00
设定值3SP3
rpm
8000
备用
P06.01
回差
xx%
1
备用
P06.02
回差方向0=高1=低2=双向
1=低
1
备用
P06.03
比较方式0=n>SP11=n<SP1
0=n>SP1
0
备用
P06.04
0=off
0
P01.09
监视类型0=off1=电流2=电压3=电流&电压
0=off
0
P01.10
转速输出系数1=1:12=2:1
001
P02.
LCD显示设置
P02.00
Zeroed”lessersignificantdigits”(LCD′s)indisplay
none
0
P02.01
LCD显示刷新时间(x.xsec)
超限设置2
P05.00
设定值2SP2
rpm
3300
用常闭触点
P05.01
回差
xx%
1
P05.02
回差方向0=高1=低2=双向
1=低
1
P05.03
比较方式0=n>SP11=n<SP1
0=n>SP1
0
P05.04
替代比较结果0=未启用1=启用
1=启用
1
机械超速试验用
P05.05
替代比较结果0=不输出报警1=输出报警
P04.02
回差方向0=高1=低2=双向
1=低
1
P04.03
比较方式0=n>SP11=n<SP1
0=n>SP1
0
P04.04
替代比较结果0=未启用1=启用
1=启用
1
机械超速试验用
P04.05
替代值0=不输出报警1=输出报警
0
试验时不输出信号
P04.06
探头故障输出值0=不输出报警1=输出报警
0
P05.
3
P08.01
通讯地址
1=低
1
备用
P07.03
比较方式0=n>SP11=n<SP1
0=n>SP1
0
备用
P07.04
替代比较结果0=未启用1=启用
1=启用
1
备用
P07.05
替代比较结果0=不输出报警1=输出报警
0
备用
P07.06
探头故障输出值0=不输出报警1=输出报警
0
备用
P08.
通讯设置
P08.00
通讯波特率1=12002=96003=19200
1
备用
P03.03
模拟量输出类型0=电压1=电流
1=电流
1
备用
P03.04
探头故障时输出值0=不变1=输出<0mA2=输出>20mA
0=不变
0
备用
P03.05
线性类型0=线性增1=线性减
0=线性增
0
备用
P04.
超限设置1
P04.00
超限设定值1SP1
rpm
3300
用常闭触点
P04.01
回差
xx%
1.0
P00.04
替代值释放延时时间
XXXs
0s
P01.
测量信号设置
P01.00
比例:频率输入比例
(0=整型;1=1位小数)
0~2
1
P01.01
输入脉冲数
Hz
3000Hz(DEH)
4400Hz(ETS)
1500Hz(DEH)
60齿50×齿数
88齿50×齿数
30齿50×齿数
P01.02
比例:对应转速比例
(0=整型;1=1位小数)
0.3sec
0.3
P02.02
Timedelayofstart-upblocking(xxxs)
0sec
000
P03.
模拟量输出设置
P03.00
模拟量输出量程上限
1000
1000
备用
P03.01
模拟量输出量程下限
0
0
备用
P03.02
类型0=0~20mA/0~10V1=4~20mA/2~10V
1=4~20mA/2~10V
0~2
1
与P01.00一致
P01.03
对应转速
rpm
3000转/min
P01.04
低速限制(低于该值显示0)
rpm
00001
P01.05
脉冲计数类型
0=标准
0
P01.06
低通滤波0=off1=50KHz2=10KHz
2=ቤተ መጻሕፍቲ ባይዱ0KHz
2
P01.07
未启用
P01.08
探头检测0=off1=on2=on且需要确认复位
代码
no.:.xx
参数说明
项目参数设置
备注
P00.
通用设置
P00.00
输入密码;
E1表示密码输入错误,
---------
0000
默认设置
P00.01
设置新密码
---------
1234
P00.02
密码状态(1=密码未启用,0=密码启用)
---------
0
P00.03
测量刷新时间
5~99999ms
20ms