HDMI矩阵参数
高清视频网络矩阵说明书

高清视频传输及高清编解码专业厂商高清视频网络矩阵产品说明书优点:任意输入口、输出口设置支持HDMI、DVI、VGA、音频切换功能支持HDMI、DVI、VGA混合切换支持HDCP (HDMI接口)支持最高分辨率1600*1200 1080P 60HZ支持菊花链连接网络远距离传输(六类网线150米)支持传输串口RS232数据应用软件操作,兼容性更好图型界面,操作容易直观预荐配置方案,一键调用网络布线施工,成本更低无线网络远程操作光纤连接远程管理可以由多用户控制切换整套系统成本低维护、检修方便容易功耗低,节能,稳定应用:视频会议系统、视频教学系统、大屏拼接系统、数字标牌系统、信息发布系统安防监控系统、电视墙显示、视频高清演示、军事演习系统、医院医疗系统电视台信号切换、交互式多媒体教室一、设备介绍1.高清视频网络矩阵高清视频网络矩阵是由一台高清视频网络矩阵交换机与应用软件组成,它需要与VGA、DVI、HDMI 编解码器配合使用组成一款高清视频网络矩阵切换系统。
由VGA、DVI、HDMI编码器对高清视频音频信号进行编码与压缩处理,输出标准的TCP/IP标准网络流,通过视频网络矩阵进行分配切换,输出网络流由VGA、DVI、HDMI解码器还出高清的视频与音频,由显示设备显示。
高清视频网络矩阵可以通过管理PC进行任意方式的切换与组合,它不同于其它视频矩阵,一台设备可灵活组成不同的输入与输出端口,因此,在实际工程中更加灵活方便。
由于采用了网络传输方式,因此具有了远距离传输功能,采用网络布线方式,为大型系统的组成带来更多方便。
由于具有传输功能,因此,更合适远距离信号的传输与切换,省掉了工程中远距离传输高清信号的烦恼。
它比传统的视频矩阵更加灵活方式,采用网络布线的方式,使现场施工更为简单。
由于采用混合视频信号的切换功能,用户就不用考虑采用什么接口的信号源与显示设备。
采用标准1U机箱结构,安装方便,配合前面板接线方式,符合标准的网络交换机安装方式。
高清混合矩阵图片及参数
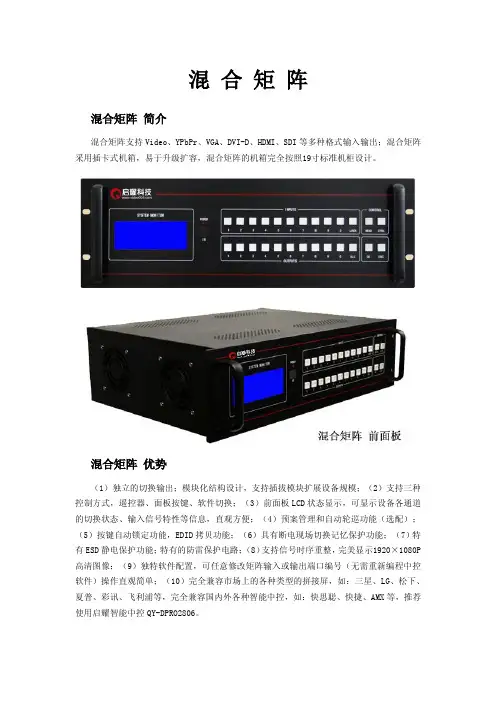
混合矩阵混合矩阵简介混合矩阵支持Video、YPbPr、VGA、DVI-D、HDMI、SDI等多种格式输入输出;混合矩阵采用插卡式机箱,易于升级扩容,混合矩阵的机箱完全按照19寸标准机柜设计。
混合矩阵优势(1)独立的切换输出;模块化结构设计,支持插拔模块扩展设备规模;(2)支持三种控制方式,遥控器、面板按键、软件切换;(3)前面板LCD状态显示,可显示设备各通道的切换状态、输入信号特性等信息,直观方便;(4)预案管理和自动轮巡功能(选配);(5)按键自动锁定功能,EDID拷贝功能;(6)具有断电现场切换记忆保护功能;(7)特有ESD静电保护功能;特有的防雷保护电路;(8)支持信号时序重整,完美显示1920×1080P 高清图像;(9)独特软件配置,可任意修改矩阵输入或输出端口编号(无需重新编程中控软件)操作直观简单;(10)完全兼容市场上的各种类型的拼接屏,如:三星、LG、松下、夏普、彩讯、飞利浦等,完全兼容国内外各种智能中控,如:快思聪、快捷、AMX等,推荐使用启耀智能中控QY-DPRO2806。
混合矩阵插卡板混合矩阵参数∙支持Video/VGA/YPbPr/DVI/HDMI/SDI等混合输入输出∙支持FULL现场EDID拷贝模式,操作简单,通俗易懂∙输入输出端强大的ESD,防雷击等保护电路,及时保护设备的正常运行∙输入内置信号采样放大电路,保证高清信号传输30米∙支持Video/VGA/YPbPr/DVI-D/HDMI/3G-SDI等输出板卡∙支持DVI-D/HDMI输出板卡信号格式转换,行场頻率转换∙支持USB控制,232控制,自带控制软件无需安装,可直接控制操作∙自带控制软件实现简体中文、繁体中文、英文等多种语言控制界面∙支持端口重定位:此功能适用我公司所有带232串口的切换设备∙支持产品过流,过压等保护电路设计;支持冗余电源配置∙切换速度:150ns(具体设备切换时间有所不同)∙串接接口:RS232,9孔D-Sub型连接器,端口2,3,5分别直通∙串口参数:9600bps、8位数据、1位起始位、1位停止位、无校验,无流控∙功耗:30~150W(视具体型号确定功耗)温度:0℃~60℃∙输入电压:AC100~240V;50/60Hz∙3U混切机箱尺寸:450×330×132mm(长×宽×高)约13Kg∙6U混切机箱尺寸:450×330×264mm(长×宽×高)约22Kg∙11U混切机箱尺寸:450×330×484mm(长×宽×高)约25KgVGA板卡VGA板卡:采用高性能专业处理芯片,实现信号分配或交叉切换等功能,输入自带缓冲设计,增强了现场抗干扰、防静电、防雷击等安全措施,使图像输出更加稳定清晰;设备自带信号延长,长距离传输失真补偿技术,保证信号长距离传输高保真输出;支持各种RGB、VGA、信号源,全贴片SMD工艺,特有ESD静电保护功能;安装简单,即插即用。
迈拓维矩矩阵切换器设备参数的解释说明
迈拓维矩矩阵切换器设备参数的解释说明
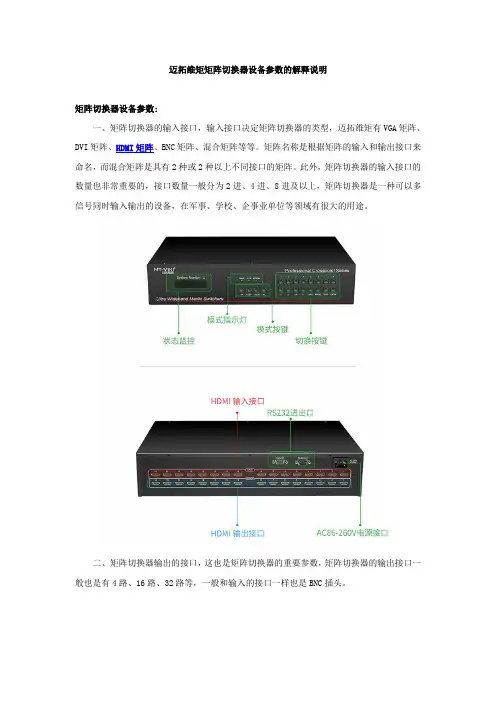
矩阵切换器设备参数:
一、矩阵切换器的输入接口,输入接口决定矩阵切换器的类型,迈拓维矩有VGA矩阵、DVI矩阵、HDMI矩阵、BNC矩阵、混合矩阵等等。
矩阵名称是根据矩阵的输入和输出接口来命名,而混合矩阵是具有2种或2种以上不同接口的矩阵。
此外,矩阵切换器的输入接口的数量也非常重要的,接口数量一般分为2进、4进、8进及以上,矩阵切换器是一种可以多信号同时输入输出的设备,在军事、学校、企事业单位等领域有很大的用途。
二、矩阵切换器输出的接口,这也是矩阵切换器的重要参数,矩阵切换器的输出接口一般也是有4路、16路、32路等,一般和输入的接口一样也是BNC插头。
三、矩阵切换器带宽,带宽通俗的说法是在一定的时间单位内可以传输的资料大小,带宽可以表示出数据在此线缆或设备中的传输能力,传输数据的单位我们表示为:每秒多少K 或M。
四、矩阵切换器的输入抗阻和输出抗阻是电路或设备对交流电流的阻力,高输入阻抗是可以减小电路连接的时候信号变化,输出阻抗是在输出口处检查出的,输入阻抗是在输入口处检查的。
五、矩阵切换器的控制方式,这是设备参数的另个重要方面,通常的情况下控制方式有面板手动控制,有软件控制,有遥控器控制等方式。
HDMI 4x2 矩阵开关器 用户手册说明书
HDMI® 4x2 Matrix Switcher with Dual Audio De-embedder, ARC & 4K UltraHDUser Manual v1.1All rights reserved 20151.IntroductionThis is a high performance HDMI Matrix with four HDMI inputs & two outputs, it allows any source (Blue-Ray player, HD DVD player, satellite receiver, game system, etc.) to be shown on the any of the two displays simultaneously, and supports 4K×2K, 3D, 12-bit Deep Color. With its 3Gbps bandwidth and the additional features of the latest HDMI standards you can be sure of great HDMI distribution. It support dual ARC and wide band IR extend function also.2.FeatureCompliant with HDMI 1.4,HDCP 1.4Supports multiplexed HDMI 4-input and 2-outputSupports video format up to 4k2k@30Hz with 24bit RGB/YCbCr 4:4:4/YCBCR 4:2:2, and up to 4k2k@60Hz with 12bit YCBCR 4:2:0.Deep Color support 48/36/30/24-bitSupports reception of any audio data conforming to the HDMI specification such PCM at up to 192kHz, compressed audio (IEC 61937), DSD, DST, DTS and HBR.Supports Dual ARC controlSuper wideband IR control system, IR transport channel can be forward or backward. Supports button,IR,RS232 etc various controlled ways;3.Package Contents4x2 HDMI Matrix 1pc5V/1A DC power adaptor 1pcRemote Control 1pcOperation Manual 1pcWideband IR Tx 4pcWideband IR Rx 2pcRS232 Cable 1pc4.SpecificationVideo Bandwidth297MHz/2.97 GbpsInput Ports 4 × HDMI (Female type)Output Ports 2 × HDMI (Female type)Output Resolution480i ~1080p50/60, 4Kx2K@24/30, VGA~UXGAHDMI Cable in1080p/12bits (15m)HDMI Cable out1080p/12bits (15m)ESD Protection±8 kV (air-gap discharge)Human Body model: ±4 kV (contact discharge)Power Supply 5 V/1A DC (US/EU standards, CE/FCC/UL certified) Dimensions113 mm (W) × 260 mm (D) × 26 mm (H)Weight750 gChassis Material MetalSilkscreen Color BlackOperating Temperature0 °C~40 °C/ 32 °F~104 °FStorage Temperature−20 °C ~ 60 °C/−4 °F ~140 °FRelative Humidity20~90 % RH (non-condensing)Power Consumption 2.0 W5.Operation and Functions5.1 Front panel1.ON/OFF: Power on/off switch.2.POWER LED: This red LED illuminates when the device is connected with powersupply.3.IR: Remote control receiver window.4.OUT A: These red LED illuminates when the output A channel select to thecorresponding input.5.OUT B: These red LED illuminates when the output B channel select to thecorresponding input.6.ARC: Press this button to select OUT A or OUT B Coaxial audio from source or HDTV. ARC function: If you need use ARC, your HDTV must support this function, when you open the ARC function, the Coaxial of the matrix will output the HDTV current display content audio. Otherwise will output the matrix input source audio.7.RST BUTTON: Press this button the matrix setting will recover to factory state.5.2 Rear panel1.RS232: Connect the RS232 port to the PC or notebook by RS232 Cable to control thematrix.2.Input:This slot is where you connect the HDMI source output from Blu-ray, PS4,Set-top Box or a laptop.3.IR TX: Connect the IR Blaster cable included in the package for IR signal transmission.Pace the IR blaster in direct line-of-sight of the equipment to be controlled.4.IR RX: Connect to the IR Receiver for IR signal reception. Ensure that remote beingused is within the direct line-of-sight of the IR receiver.5.OUT B:The HDMI is where you connect the HDTV or monitor with HDMI cable forinput source display. The Coaxial audio output is where you connect to the amplifier with coaxial cable.6.OUT A:The HDMI is where you connect the HDTV or monitor with HDMI cable forinput source display. The Coaxial audio output is where you connect to the amplifier with coaxial cable.7.DC 5V: Plug the 5V1A DC power supply into the unit and connect the adaptor to ACwall outlet.5.3 Connect and Operate1. Connect the signal sources such as Blu-Ray Players, Play Station 3, audio/video receiver, satellite receivers and computers equipped with HDMI output interfaces with a short high-speed HDMI cable to the HDMI Matrix inputs.2. Connect the HDMI output from the HDMI Matrix to a high-definition display device such as HDTV, 4K Ultra HDTV or projectors with HDMI input interfaces. Use high-speed HDMI cables that are recommended for the distances that are required for each connection.3. The Matrix is powered by an external power supply that is included. Connect power first to the source, then to the Matrix and then to each HD TV or projector.4. The input source can be controlled from the display. This is accomplished by using an optional IR Receiver pigtail pointing away from the display(s), which can be connected with the optional HDMI IR Adapter, and inserted between the HDMI cable connector and the display with the toggle switcher at the “IR” posit ion. The IR Transmitter pigtail is then connected to the Matrix and pointed to the source(s). A remote control is used at the display to select switch inputs and output. The matrix also has the capability of being controlled via Remote control.5.4 Wideband IR (30 KHz---60 KHz) introductionIR BLASTER (TX)To control the source:Plug IR Blaster into IR TX port of transmitter unit; place blaster in front of the IR eye of the source.IR RECEIVER (RX)To control the source:Plug IR Receiver into IR RX port of receiver unit; place receiver at or near display.6.Remote ControlOUTPUT A: Press IN1\IN2\IN3\IN4 button will fast switch to selectinput source to HDMI OUTPUT A, and the LED will indicate thecorresponding input source. Press button OUTPUT A will cyclefrom input IN1\IN2\IN3\IN4.OUTPUT B: Press IN1\IN2\IN3\IN4 button will fast switch to selectinput source to HDMI OUTPUT B, and the LED will indicate thecorresponding input source. Press button OUTPUT B will cyclefrom input IN1\IN2\IN3\IN4.7. RS-232 Control guide using a PCInstallationThe PC controller is green software. Just use a cable to connect the PC via RS232 port and copy “4x2 HDMI matrix Controller.exe” to PC to complete installation.Preparation1. Connect PC and multi-viewer by RS232 cable2. Power-up multi-viewer3. Double click 4x2 HDMI matrix Controller.exe icon to run itGeneral Page1.Select RS232 COM port2.Click to connect or disconnect PC and Matrix3.Click to refresh device status: include device information and Input/Output Settings on“Matrix” page4.Click to clear device information5.Click to reset to the factory settingsEDID PageThe controller has 3 methods to set the EDID mode. Manual mode, Copy mode and open EDID file mode.1.Select the needed EDID to input port and click set button the EDID will write to theselected HDMI input ports.2.Copy the selected HDMI output or HDBT output EDID and click set button to write tothe selected HDMI input ports.3.Open the user define EDID file and click set button to write to the selected HDMI inputports.4.Click the status button to refresh input EDID status.Matrix Page1.LED which display Input number for respective Output2.Click to select Input port for respective Output port3.Click to select previous or next Input port for respective Output port4.Click to open or close output ARC functionFirmware Upgrade Page1.Click to open FW file (file extension is “.fw”)2.Click to upgrade the Matrix software3.Display the message of the software upgrade process.8.Connection DiagramWarrantyB.KanexPro TM warrants that (a) its products (the “Product”) will perform greatly inagreement with the accompanying written materials for a period of 3 years from the date of receipt and (b) that the product will be free from defects in materials and workmanship under normal use and service for a period of 1 year.C.Customer RemediesKanexPro entire liability and Customer’s exclusive remedy shall be, at KanexPro option, either return of the price paid for the product, or repair or replacement of the Product that does not meet this Limited Warranty and which is returned to Kanex Pro with a copy of customers’ receipt. This Limited Warranty is void if failure of the Product has resulted from accident, abuse, or misapplication. Any replacement Product will be warranted for the remainder of the original warranty period or 90 days whichever is longer.D.NO LIABILITY FOR DAMAGESTo the maximum extent permitted by applicable law, kanex Pro disclaims all other warranties, either express or implied, including, but not limited to implied warranties of merchantability and fitness for a particular purpose, with regard to product and any related written materials. This limited warranty gives customers specific legal rights. Customers may have other rights depending on the jurisdiction.E.NO LIABILITY FOR DAMAGESTo the maximum extent permitted by applicable law, in no event shall Kanex Pro be liable for any damages whatsoever (Including without limitation, special, incidental, consequential, or indirect damages for personal injury, loss of business profits, business interruption, loss of business information, or any other pecuniary loss) arising out of the use of or inability to use this product, even if Kanex pro has been advised of the possibility of such damages.SupportKanexPro Technical and Customer support inquiries can be sent electronically via the following avenues:Tech Support Inquiry: /support/Email: ********************KanexPro Customer support can be reached via phone at (888) 975-1368 (International Calls: 1-714-332-1682) during the following times:Monday – Friday: 6:00 am – 5:00 pm PST。
HDMI矩阵说明书
HDMI矩阵操作手册安全操作指南为确保设备可靠使用及人员的安全,在安装,使用和维修时,请遵守以下事项:1.系统接地。
系统必须有完善的接地,否则,不仅造成讯号干扰,不稳定或机械损坏,而且还可能因漏电引起人身事故;请使用标准的三线电源插座,其地线接地电阻应小于1Ω。
2.禁止改变原设计。
禁止对本产品的机械和电器设计更改或增添任何部件。
否则。
本公司对由此所带来的后果不负责任。
3.请勿使用两芯插头,确保设备的输入电源为220V50Hz的交流电。
4.机器内有220V高压部件,请勿打开机壳,以免触电。
5.不要将机器置于过冷或过热的地方。
6.设备电源在工作时会发热,因此要确保工作环境的良好通风。
以免温度过高而损坏机器。
7.阴雨潮湿天气或长时间不用时,应关闭设备电源总闸。
一、产品简介…………………………………………..……………….1.关于HDMI系列矩阵切换器………..…….2.HDMI矩阵连接示意图………………二、矩阵系统的安装………..…………………….1、矩阵与控制电脑的连接……………………………….……….三、前面板功能键…………………………..………………..……….1、切换指令……………………………………..…………….2、UP、Down状态查询指令……………………..………….3、SAVE存储指令…………………………………………….4、RECALL调用指令…………………………………...…….5、CANCEL键…………………………………………..…….四、矩阵控制软件…………………….……….….五、R S232通讯协议…………………………………………………产品简介:1.1关于HDMI系列矩阵切换器HDMI数字视频矩阵切换器是为了将计算机数字视频信号进行重新分配和组合的矩阵交换设备,该设备可将多路HDMI数字视频输入信号切换到多路输出通道的任意通道上去。
可广泛用于所有需要进行HDMI信号分配和组合的场合,应用领域涉及军工、多媒体教学、电视电话会议、金融、科研、气象等领域。
hdmi矩阵切换器使用方法_hdmi矩阵切换器操作方法

hdmi矩阵切换器使用方法_hdmi矩阵切换器操作方法安全知识1.请使用带保护地的单相三线制电源,并确保整个系统使用同一保护地。
不能使用无保护地的电源,电源线的接地脚不能破坏。
无完善的接地,容易造成信号干扰,不稳定,还可能因漏电引起人身事故。
2.需要进行设备移动或其他需要断电的工作时,要关断所有的电源,包括关断外部电源插座,拔掉电源3.非专业人士未经许可,请不要试图拆开设备机箱,不要私自维修,以免损坏内部精密部件,或发生意外事故或加重设备的损坏程度4.从设备上插.拔信号线时,设备需要断电,以免击穿电路。
带电插拔造成的损坏不在保修范围5.注意防潮防尘,环境温度不要过高或过低6.不要将过重物品压在机器上,以免损坏7.遇到问题,请先详细参阅本说明,如不能解决,请联系我们目录一.前言 (3)二.注意事项 (3)三.产品介绍 (3)3.1包装清单 (3)3.2主要功能 (4)3.3参数表 (5)3.4输入与输出接口 (6)3.5安装说明 (7)四.操作指南 (8)4.1 HDMI 1.3 4×4矩阵 (8)4.2 前面板控制方式 (8)4.3 红外遥控器控制方式 (9)4.4 4×4红外矩阵控制HDMI输入设备 (9)五 PC控制用户指南 (10)安装 (10)步骤 (10)如何控制矩阵 (10)1.General页 (10)2.Matrix control页 (12)前言:感谢您购买迈拓维矩HDMI 4进4出带延长功能高清视频矩阵,在使用本产品前,请仔细阅读此用户手册。
按照手册内的内容安装并使用本产品,已保证您的安全和避免产品损坏,谢谢!由于产品升级,此用户手册可能不定期进行更新,此手册用途仅为操作指导,我们对于手册的内容与建议不做担保。
注意事项:不宜在过热、过冷、多尘、潮湿环境下使用本产品。
请避免过硬物体划伤产品表面请避免产品从高处跌落,以免损坏产品硬件本产品不具备防水功能,请避免液体渗入产品内部请不要人为拆散、组装或者更改本产品硬件、软件。
了解迈拓维矩HDMI矩阵切换器的功能与使用
了解迈拓维矩HDMI矩阵切换器的功能与使用
迈拓维矩HDMI矩阵切换器在生活中是一种常见的监控设备的重要部分。
对于迈拓维矩HDMI矩阵切换器的功能,你又了解多少?
迈拓维矩HDMI矩阵切换器是将一路或者多路的视频信号分别传输,传输给一个或者多个的显示器上面,如果有多台电脑主机都需要一个共同的显示器,迈拓维矩HDMI矩阵切换器可以随使用者的意愿将多台主机上的任意一台画面内容切换到一个或者多个显示器上面去。
迈拓维矩HDMI矩阵切换器的兼容性知识采用了不同的封锁装置。
与其他的矩阵相比,迈拓维矩HDMI矩阵切换器可以传输数字信号,增加了技术设备的支持,同时也可以提供更好的DDC的功能选择,HDMI矩阵支持很多数据的传输,最远的传输可到都15米。
此外迈拓
维矩HDMI矩阵切换器还支持设备随插随用的热插拔功能,信号的源头和设备显示之间会自动进行调和协商,自动选择最佳视频或者音频。
HDMI8808矩阵说明书V10
2 SWT 3 END
(2)、AND键:即与操作,在LCD上显示'&'字符,当一个输入 端口同时切换到 多个输出端口时,使用这个命令可以快速实现切换操作。 命令格式:输入端 口号 S WT 输出端口号 A ND 输出端口 号…AND 输出端 口 号 END 举例说明:第二路输入端口切换到第三路、第四路和第八路输出端口,应 执行以下按键操作:
图 3 搜索 2000 操作 如果此 时H D M 88 08主机已 接通电 源并且L A N网线已 连接好,将会搜索到当前局域 网内 所有的C2 0 0 0网络 设备,选 择一个 未被系统 使用的 串口,如 图4所 示:
T568B 接线顺序
引脚序号 1 2 3 4 5 6 7 8
网线颜色 橙白 橙 绿白 蓝 蓝白 绿 棕白 棕
6.2 L A N通信软件安装及使用
-7-
HDMI矩阵(HDM-8808)使用说明书 在使用L AN接口前,先安装C 2 0 0 0软件包(这个软件可 向我可以申请),安装过程采
用默 认方式即可。安 装完成后 ,在开 始菜单可 以找到如下安装 好的程序,如图2所示 。
-4-
HDMI矩阵(HDM-8808使用说明书
STO 3
( 5)、R C L键: 全称R ecal l即调用键,可以将保 存在F 0~F 9存储区中对应关系直接 调 用出来使用,省去重新设置的麻烦。 命令格式:RCL存储区(F0~F 9 ) 举例说明:调用存储 区F3的 路由 关系 ,应执行 以下按 键操作:
3.2 H D M I矩阵背面
序号 1 2 3 4 5 6 7
AC-MX44-UHD AVProConnect 4x4 HDMI 矩阵切换器说明书
A V P r o C o n n e c t3518 N C a s c o A v e n u e ~ S i o u x F a l l s , S D 571041-877-886-5112 ~ 605-274-6055s u p p o r t @a v p r o c o n n e c t.c o mAC-MX44-UHD4x4 HDMI Matrix w/ Audio De-Embedding 4K 60Hz, HDMI 2.0 and HDCP 2.2 CompatibleThe AC-MX44-UHD is a true 4x4HDMI matrix switch. Supporting HDMI 2.0, HDCP 2.2, up to 4K video resolution, and up to 10.2 GBPS bandwidth. This switch allows any source (Blu-ray, UHD Blu-ray, satellite receiver, game consoles, PCs, etc...) to be shown on any of the connected displays.This matrix equalizes and amplifies the output to ensure the HDMI signal can be transmitted through long HDMI cables without loss of quality. You can extend your distance further with the AC-EX70-UHD HDMI Extender. Full EDID management allows maximum flexibility with todays wide mixture of sources and displays.This is an ideal solution for digital entertainment centers, HDTV retail, show sites, data centers, schools, conference and training centers and more!Features:•HDMI 2.0 (10.2 GBPS)•HDCP 2.2 compliant•De-embed 2CH audio on each output •Independent source/display switching •Up to 4K Resolution (4K60 4:2:0)•HDR Supported•IR & RS-232 Control Easy to use:•Install in seconds •Feature rich•Powerful EDID management •Front Panel Control•IR Remote•IR & RS-232 Control•LAN ControlDevice Overview:Figure 1 ~ AC-MX44-UHD Panel ControlsNOTE: There is an application diagram on page 11 of this manual.In The Box:•AC-MX44-UHD Matrix Switch •IR Remote Control •IR Extension Cable•12V/3A Locking Power Supply •Instruction ManualQuick Installation:1.Connect the HDMI input sources (Blu-ray, Set Top Box, etc...) to the AC-MX44-UHD2.Connect the HDMI output devices (AVR, Display, Distribution Amplifier, Extender) to the AC-MX44-UHD3.Power on the sources4.Connect the power supply into the AC-MX44-UHD5.Turn on output devices/displays6.You may now use the front panel controls, supplied IR remote or free PC software to control the switch.* For advanced programming please see the RS-232 commands on page 7Front Panel Control:The AC-MX-44-UHD front panel controls allow for the selection of the inputs to the various outputs. First press a button on the OUTPUT row to choose the output port, then press a button on the INPUT row to select the input signal for the selected output. (Output, then Input)Select Output First --><-- Then Select Your InputIR Remote Control:The HDMI routing of the matrix can also be controlledby using the IR remote supplied with the product.The left arrow button decrements to the next lowerinput port, and the right arrow increments to thenext input port.The IR remote controller for the AC-MXDH-44 alsoallows direct selection of the inputs for each output.Figure 2 ~ AC-MX44-UHD IR RemoteAdditionally, the supplied IR Extension Cable can provide a different receiver position. Just plug into the IR Extension Socket on the back of the matrix and place the receiver in a more convenient location.Figure 3 ~ AC-MX44-UHD IR Controls Figure 4 ~ IR Extension CableBonus Feature!Pressing and holding the any OUTPUT button will automatically read, store and apply the EDID from the display device to the current INPUT assigned. It will be stored in USER EDID 1.EDID Management:This matrix has 12 factory defined EDID settings. It also has 3 user defined EDID memories. The user EDID memories are independent to each input and can be set differently. The user defined EDID can be uploaded using the free PC Control software or RS-232. In addition, you can choose to read the EDID from the desired output and that read EDID will automatically store and overwrite the EDID in "USER EDID 1". We recommend uploading custom EDID settings to memory 2 or 3.By default the matrix is set to a 1080P EDID, this is to maximize plug and play capability. When using 4K sources, you will want to define a 4K EDID on that input (or read from the display).To Change the EDID setting:1.Press and hold the INPUT you want to change for 3 seconds2.Now "click" desired INPUT to toggle through the available EDID options3.Once you are on the EDID you want to select, press and hold for 3 seconds again. This will set the EDID for the desired input. Please see the example below for detailed instructions.These are the pre-defined EDID settings that you can toggle through:1 - 1080P 2CH (PCM)2 - 1080P 6CH (5.1 Channel)3 - 1080P 8CH (7.1 Channel)4 - 1080p 3D 2CH (PCM)5 - 1080P 3D 6CH (5.1 Channel)6 - 1080P 3D 8CH (7.1 Channel)7 - 4K30Hz 3D 2CH (PCM)8 - 4K30Hz 3D 6CH (5.1 Channel)9 - 4K30Hz 3D 8CH (7.1 Channel)10 - 4K60Hz (Y420) 3D 2CH (PCM)11 - 4K60Hz (Y420) 3D 6CH (5.1 Channel)12 - 4K60Hz (Y420) 3D 8CH (7.1 Channel)U SER EDID 1 USER EDID 2 USER EDID 3EDID from output 1 EDID from output 2 EDID from output 3 EDID from output 4EDID Management Cont:The first 12 EDID settings cannot be altered. The three USER EDID settings are programmed using RS-232 or the free PC Software. However, you can read an EDID from any output and it will automatically store in USER EDID 1. Remember, each IN P UT has an independent EDID setting and you may need to program each one.To read and set an EDID to a specified input the steps are the same as on PAGE 5. The only difference is that when you see a screen similar to FIGURE 5, you press and hold the INPUT button again for 3 seconds and this AUTOMATICALLY reads, stores and sets the EDID for that INPUT.Figure 5 ~ Read EDID ScreenDisplay IP Data:Press and hold INPUT 3 and INPUT 4 at the same time for three seconds to display the current IP settings. This screen will change every 3 seconds showing additional settings (host, net mask, router IP). NOTE: This screen always starts with the current IP address of the matrix:In order to prevent potential IP problems, most IP settings have to be managed in the Free PC Software or using RS-232 commands.NOTE: The default IP address is 192.168.001.239 (As pictured above)You can enable/disable DHCP mode directly from the front panel. When DHCP is enabled it will automatically gather an IP address from the network and it will be discoverable on said network. You can now view the assigned IP address by following the steps above. To toggle DHCP, press and hold INPUT 1 and INPUT 3 at the same time for three seconds. You will see this:Cascade Mode:When Cascade Mode is turned on, the signal is passed from the switch without reading EDID or HotPlug. Many issues can be resolved in the field with this mode, including:•Invalid/incorrect EDID coming from display (It happens more than you think)•When you want to manage EDID in a device further down the chain (AVR or Distribution Amp)•When running one or more outputs into additional peripherals before the displayWe recommend you ONLY use cascade mode if you have exhausted all other troubleshootingoptions. To toggle Cascade Mode press and hold INPUT 1 and INPUT 2 at the same time for three seconds. When Cascade Mode is enabled you will see this:AC-MX44-UHD and AC-MX88-UHDThe same commands can be sent to the matrix using Ethernet as IP commandsdiagram at the end of the manual.NOTE: HDR (High Dynamic Range) is supported on these matrix switchers. you mus read EDID from and HDR capable display and store it to to the input where the HDR source resides.Specifications:After Sale Service:AVProConnect.Application Diagram:RS-232 Wiring Diagram:Audio Wiring Diagram:Using the Free PC Software: General Matrix ControlUsing the Free PC Software: EDID ManagementUsing the Free PC Software: IP SettingsAVP roC o nn e ct 3518 N Casco A v e nu e ~ S ioux Fa l l s , S D 57104 1-877-886-5112 ~ 605-274-6055su p por t @a v p r o c o n n ec t.c o mThank you for choosing AVProConnect!Please contact us with any questions, we are happily at your service!。
HDMI矩阵参数
HDMI矩阵参数1.输入/输出端口数量:HDMI矩阵通常具有多个HDMI输入端口和多个HDMI输出端口。
输入端口的数量决定了可以连接到矩阵中的不同视频源的数量。
输出端口的数量决定了可以将信号发送到的不同显示设备的数量。
2.分辨率支持:HDMI矩阵应该支持多种分辨率,包括标准的1080p、4K和8K分辨率。
这样可以确保它能够适应不同显示设备的需求。
3.HDMI版本支持:HDMI矩阵应该支持最新的HDMI版本,以确保最高的性能和兼容性。
当前的HDMI版本是HDMI2.1,它支持更高的带宽和更高的分辨率。
4.信号切换方式:HDMI矩阵可以支持不同的信号切换方式。
一些矩阵具有手动切换功能,用户可以通过按按钮或旋转选择器来切换输入源和输出信号。
而其他一些矩阵具有远程控制功能,用户可以通过遥控器或者计算机软件来进行信号切换。
5.信号延迟:HDMI矩阵应该尽可能地减小信号延迟,以确保图像和声音的同步并提供最佳的观看体验。
信号延迟取决于矩阵的硬件和软件设计,以及信号处理算法的性能。
6.附加功能:一些HDMI矩阵还具有额外的功能,如音频提取、音量控制、亮度调节、远程监控等。
这些附加功能可以增加矩阵的灵活性和易用性。
7.信号传输距离:HDMI矩阵应该支持长距离的信号传输,以便用户可以将显示设备放置在较远的位置。
一般来说,HDMI矩阵应该支持最少50英尺的传输距离。
8.连接类型:HDMI矩阵可以支持不同类型的HDMI连接,如标准HDMI、HDMI2.0和HDMI2.1、这些连接类型决定了矩阵的最高带宽和性能。
9.输出信号调节:一些HDMI矩阵可以调节输出信号的亮度、对比度、饱和度和色调等参数,以满足不同用户的需求。
10.可扩展性:一些HDMI矩阵具有可扩展性的特点,用户可以根据自己的需求扩展输入源和输出设备的数量。
总而言之,HDMI矩阵是一种非常强大和灵活的设备,可以满足多个用户的多媒体信号分发需求。
通过选择合适的HDMI矩阵,用户可以实现高质量的视频和音频传输,提供最佳的观看体验。
- 1、下载文档前请自行甄别文档内容的完整性,平台不提供额外的编辑、内容补充、找答案等附加服务。
- 2、"仅部分预览"的文档,不可在线预览部分如存在完整性等问题,可反馈申请退款(可完整预览的文档不适用该条件!)。
- 3、如文档侵犯您的权益,请联系客服反馈,我们会尽快为您处理(人工客服工作时间:9:00-18:30)。
HDMI矩阵参数
HDMI矩阵是一种可以实现多个HDMI输入和多个HDMI输出之间相互
切换的设备。
它可以用于家庭影院系统、会议室显示系统、数字标牌系统
等多种应用场景。
HDMI矩阵的参数涉及到输入输出接口的数量、分辨率
支持、信号传输距离、控制方式等方面。
首先,一个HDMI矩阵的参数之一是输入输出接口的数量。
一般来说,HDMI矩阵会提供多个HDMI输入接口和多个HDMI输出接口,以满足各种
多媒体设备的连接需求。
通常的矩阵规格有4x4、8x8、16x16等,表示4
个输入接口和4个输出接口、8个输入接口和8个输出接口、16个输入接
口和16个输出接口等。
其次,HDMI矩阵的参数还包括分辨率支持。
HDMI矩阵需要支持各种
标准的视频分辨率,例如480p、720p、1080p等,以及更高的4K、8K分
辨率。
支持的分辨率越多,用户在连接不同设备时的兼容性就会更好。
另外,HDMI矩阵的参数还与信号传输距离有关。
一般来说,HDMI信
号的传输距离有一定的限制,长距离传输可能会导致信号失真或降质。
因此,HDMI矩阵需要具备一定的信号放大和增强功能,以保证信号在较长
距离传输时的稳定性和质量。
此外,HDMI矩阵的参数还包括控制方式。
用户需要能够方便地切换
输入和输出接口,以满足不同设备的连接和使用需求。
一种常见的控制方
式是通过前面板按钮进行手动切换,也可以通过遥控器或软件界面进行远
程控制。
部分HDMI矩阵还提供了自动切换功能,可以根据输入信号的优
先级自动切换到最优的输入源。
除了上述常见的参数,HDMI矩阵还可能具备其他特殊的功能。
例如,一些高端的HDMI矩阵可以支持音频的提取和分离,允许将音频信号单独
输出到外部音响设备。
还有一些HDMI矩阵提供了PIP(画中画)功能,
可以同时显示多个输入源的画面,并支持调整和切换。
在选购HDMI矩阵时,用户需要根据具体的应用需求和预算考虑上述
参数。
不同厂商的产品在性能和价格上可能有差异,用户可以根据自身需
求选择适合的HDMI矩阵。