TOTOLINK AC500用户使用说明
无线路由器安装及使用指导手册

无线路由器安装及使用指导手册一、前言随着互联网的普及,无线路由器已经成为了现代家庭必备的设备之一。
无线路由器可以将宽带信号无线传输,方便我们在家中的各个角落都能享受到高速网络的便利。
本手册将为您提供无线路由器的安装及使用指导,帮助您正确、便捷地使用这一设备。
二、无线路由器安装步骤1.准备工作在安装无线路由器之前,您需要确保已经正确接入了宽带。
同时,您还需要找到一个稳定的电源插座,以供无线路由器使用。
2.连接a)首先,将宽带调制解调器的电源线连接到电源插座,并将宽带信号线连接到调制解调器的WAN口。
b)然后,将无线路由器的电源线连接到电源插座,并将路由器的WAN口与调制解调器的LAN口连接。
请确保连接稳固。
3.开机和设置a)当完成连接后,打开无线路由器的电源开关,等待其启动。
b)使用电脑或移动设备连接到无线路由器的无线网络,打开浏览器,在地址栏输入默认网关地址,按回车键。
c)根据无线路由器背面或说明书中的默认用户名和密码,登录路由器管理界面。
d)按照引导,进行基本设置,包括无线网络名称(SSID)、密码以及其他网络配置。
4.连接其他设备在设置完成后,您可以使用该无线网络连接其他设备,如电脑、手机、平板等。
只需搜索无线网络名称(SSID),输入密码即可成功连接。
三、无线路由器使用技巧1.网络安全为了保护您的无线网络安全,建议您设置一个强密码,并定期更换密码。
另外,您还可以开启WPA2-PSK加密,限制无线网络的接入者。
2.信号覆盖若您希望无线网络信号覆盖更广的范围,可以选择适当的位置放置无线路由器。
通常情况下,将无线路由器放置在距离常用设备较近的地方,避免信号被墙壁等物体阻挡。
3.固件更新定期检查无线路由器是否有新的固件版本发布,并及时进行升级。
固件更新通常能够修复一些已知问题,并提升设备性能。
4.访客网络如有需要,您可以启用访客网络功能,提供给访客一个独立的网络接入,以保护您的主要网络安全。
5.定期重启建议您定期重启无线路由器,以保持网络的稳定性和性能。
无线路由器使用说明书
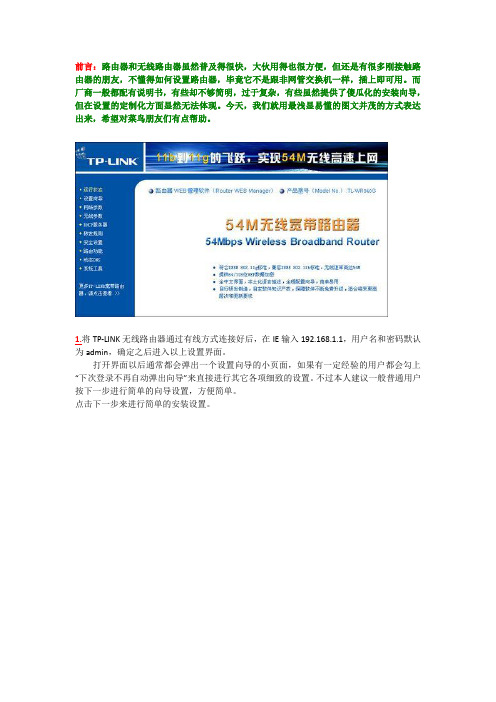
前言:路由器和无线路由器虽然普及得很快,大伙用得也很方便,但还是有很多刚接触路由器的朋友,不懂得如何设置路由器,毕竟它不是跟非网管交换机一样,插上即可用。
而厂商一般都配有说明书,有些却不够简明,过于复杂,有些虽然提供了傻瓜化的安装向导,但在设置的定制化方面显然无法体现。
今天,我们就用最浅显易懂的图文并茂的方式表达出来,希望对菜鸟朋友们有点帮助。
1.将TP-LINK无线路由器通过有线方式连接好后,在IE输入192.168.1.1,用户名和密码默认为admin,确定之后进入以上设置界面。
打开界面以后通常都会弹出一个设置向导的小页面,如果有一定经验的用户都会勾上“下次登录不再自动弹出向导”来直接进行其它各项细致的设置。
不过本人建议一般普通用户按下一步进行简单的向导设置,方便简单。
点击下一步来进行简单的安装设置。
2.通常ASDL拨号上网用户选择第一项PPPoE来进行下一步设置。
但是如果你是局域网内或者通过其它特殊网络连接(如视讯宽带、通过其它电脑上网之类)可以选择以下两项“以太网宽带”来进行下一步设置。
这里先说明一下ADSL拨号上网设置,以下两项在后面都将会进行说明。
到ADSL拨号上网的帐号和口令输入界面,按照字面的提示输入用户在网络服务提供商所提供的上网帐号和密码然后直接按下一步。
3.接下来可以看到有无线状态、SSID、频段、模式这四项参数。
检测不到无线信号的用户留意一下自己的路由器无线状态是否开启。
SSID这一项用户可以根据自己的爱好来修改添加,这一项只是在无线连接的时候搜索连接设备后可以容易分别需要连接设备的识别名称而已。
另外在频段这一项我们拉下来可以看到有13个数字选择,这里的设置只是你路由的无线信号频段,如果你附近有多台无线路由的话你可以在这里设置使用其它频段来避免一些无线连接上的冲突。
接着模式这一选项拉下来我们可以看到TP-LINK无线路由的几个基本无线连接工作模式,11Mbps(802.11b)最大工作速率为11Mbps;54Mbps(802.11g)最大工作速率为54Mbps,也向下兼容11Mbps。
常见问题用户指南
常见问题用户指南在我们的日常生活和工作中,总会遇到各种各样的问题。
为了帮助您更轻松地应对这些常见问题,我们特别为您准备了这份用户指南。
一、网络连接问题1、无法连接 WiFi首先,请确保您输入的 WiFi 密码是正确的。
如果您不确定,可以在路由器背面查找默认密码或者咨询网络服务提供商。
检查您的设备是否在 WiFi 信号覆盖范围内。
有时候距离路由器太远或者有障碍物阻挡会导致信号减弱。
尝试重启您的路由器和设备,这往往能解决一些临时性的连接问题。
2、网络速度慢多个设备同时连接同一网络可能会导致网速变慢。
您可以暂时关闭一些不使用的设备的网络连接。
路由器长时间运行可能会出现性能下降。
定期重启路由器有助于提升网络速度。
检查是否有软件或应用在后台大量占用网络带宽,比如正在进行系统更新或视频自动下载。
二、电脑系统问题1、系统卡顿关闭不必要的程序和进程。
您可以通过任务管理器查看哪些程序占用了较多的系统资源,并将其关闭。
清理磁盘空间,删除临时文件和不再需要的大型文件。
检查是否有病毒或恶意软件感染,运行杀毒软件进行全面扫描。
2、系统崩溃在系统崩溃后,首先尝试重启电脑。
如果能正常启动,可能是某个程序或驱动出现了临时性故障。
如果重启后仍然无法正常启动,您可以尝试进入安全模式进行故障排查和修复。
若问题依旧存在,可能需要重新安装操作系统。
但在这之前,请备份您的重要数据。
三、手机使用问题1、电池续航短降低屏幕亮度和缩短屏幕超时时间可以有效节省电量。
关闭不必要的推送通知和后台运行的应用程序。
检查电池健康状况,如果电池老化严重,可能需要更换新电池。
2、手机存储空间不足删除不常用的应用程序和照片、视频等大文件。
清理应用程序的缓存数据。
将照片、视频等文件备份到云端或外部存储设备。
四、软件应用问题1、软件无法安装检查您的设备是否满足软件的系统要求,包括操作系统版本、内存和存储空间等。
确保您从官方和可靠的渠道下载软件,避免从不明来源安装可能存在风险的应用。
如何利用两台 TOTOLINK 路由器设定 WDS

如何利用兩台TOTOLINK路由器設定WDS注意:WDS有相容性問題,TOTOLINK路由器未必可以相互設定WDS,TOTOLINK路由器N300RG及N300R+可以互相WDS,N300RA/N300RT/N150RA/N150RT四款可以互相WDS。
1.請先進入第一台路由器的WEB設定頁(預設為192.168.1.1)2.點選[進階設定] [無線網路設定] [無線網路基本設定]。
3.無線網路名稱(SSID):依需求設定(兩台的無線網路名稱避免相同)頻道:在此設定為11,可依您的環境做適當調整加密類型:WPA-PSK/WPA2-PSK加密模式:TKIP/AES無線金鑰:請輸入最少8位,最多63位的英文或數字作為您的無線密碼以上設定完成後,點選[確定]4.請點選[進階設定] [無線網路設定] [WDS設定]。
5.點選[掃描AP]。
6.找到您要連線的無線網路名稱,接著點選[選擇AP]。
7.若出現以下視窗,請點選[確定]。
8.畫面中將會自動帶入您選擇的無線網路資訊,請點選[新增]。
台路由器。
9.第1台路由器的設定到此結束台路由器的設定到此結束,,接下來請將您的電腦連接到第2台路由器10. 請先進入第二台路由器的WEB 設定頁(預設為192.168.1.1)11. 請點選[進階設定] [網路設定] [區域網路/DHCP]12. 將LAN IP 改成192.168.1.254,點選[確定並重新啟動]。
注意注意::LAN IP 請避免改成192.168.1.213.待路由器重新啟動之後,再次登入WEB設定頁(192.168.1.254)。
14.點選[進階設定] [無線網路設定] [無線網路基本設定]。
15.無線網路名稱(SSID):依需求設定(兩台的無線網路名稱避免相同)頻道:在此設定為11,請與第一台設定相同頻道加密類型:WPA-PSK/WPA2-PSK加密模式:TKIP/AES無線金鑰:請輸入最少8位,最多63位的英文或數字作為您的無線密碼,密碼可與第一台相同,以上設定完成後,點選[確定]16.請點選[進階設定] [無線網路設定] [WDS設定]。
水星路由器设置说明-完全版(带图)
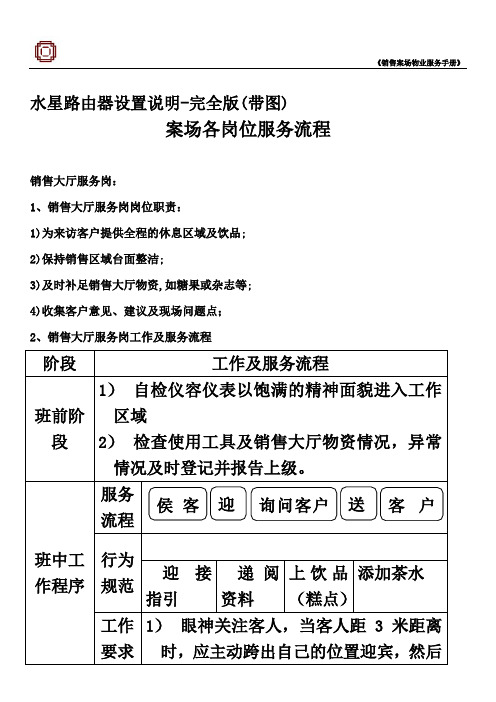
水星路由器设置说明-完全版(带图)案场各岗位服务流程销售大厅服务岗:1、销售大厅服务岗岗位职责:1)为来访客户提供全程的休息区域及饮品;2)保持销售区域台面整洁;3)及时补足销售大厅物资,如糖果或杂志等;4)收集客户意见、建议及现场问题点;2、销售大厅服务岗工作及服务流程阶段工作及服务流程班前阶段1)自检仪容仪表以饱满的精神面貌进入工作区域2)检查使用工具及销售大厅物资情况,异常情况及时登记并报告上级。
班中工作程序服务流程行为规范迎接指引递阅资料上饮品(糕点)添加茶水工作要求1)眼神关注客人,当客人距3米距离时,应主动跨出自己的位置迎宾,然后侯客迎询问客户送客户注意事项15度鞠躬微笑问候:“您好!欢迎光临!”2)在客人前方1-2米距离领位,指引请客人向休息区,在客人入座后问客人对座位是否满意:“您好!请问坐这儿可以吗?”得到同意后为客人拉椅入座“好的,请入座!”3)若客人无置业顾问陪同,可询问:请问您有专属的置业顾问吗?,为客人取阅项目资料,并礼貌的告知请客人稍等,置业顾问会很快过来介绍,同时请置业顾问关注该客人;4)问候的起始语应为“先生-小姐-女士早上好,这里是XX销售中心,这边请”5)问候时间段为8:30-11:30 早上好11:30-14:30 中午好 14:30-18:00下午好6)关注客人物品,如物品较多,则主动询问是否需要帮助(如拾到物品须两名人员在场方能打开,提示客人注意贵重物品);7)在满座位的情况下,须先向客人致歉,在请其到沙盘区进行观摩稍作等待;阶段工作及服务流程班中工作程序工作要求注意事项饮料(糕点服务)1)在所有饮料(糕点)服务中必须使用托盘;2)所有饮料服务均已“对不起,打扰一下,请问您需要什么饮品”为起始;3)服务方向:从客人的右面服务;4)当客人的饮料杯中只剩三分之一时,必须询问客人是否需要再添一杯,在二次服务中特别注意瓶口绝对不可以与客人使用的杯子接触;5)在客人再次需要饮料时必须更换杯子;下班程序1)检查使用的工具及销售案场物资情况,异常情况及时记录并报告上级领导;2)填写物资领用申请表并整理客户意见;3)参加班后总结会;4)积极配合销售人员的接待工作,如果下班时间已经到,必须待客人离开后下班;1.3.3.3吧台服务岗1.3.3.3.1吧台服务岗岗位职责1)为来访的客人提供全程的休息及饮品服务;2)保持吧台区域的整洁;3)饮品使用的器皿必须消毒;4)及时补充吧台物资;5)收集客户意见、建议及问题点;1.3.3.3.2吧台服务岗工作及流程阶段工作及服务流程班前阶段1)自检仪容仪表以饱满的精神面貌进入工作区域2)检查使用工具及销售大厅物资情况,异常情况及时登记并报告上级。
TotoLink X5000R 无线路由器快速安装指南说明书

X5000R使用电脑设置路由器(手机设置和电脑设置二选一即可)3使用网线连接LAN1至LAN4任意接口 ,打开任意浏览器,在地址栏输入 ,跳转到登录界面。
(P12)1在弹出的页面输入默认密码: admin,然后点击“登录”。
(P13)2在跳出的页面中点击“快速设置”,然后时区设置选项中正确选择当地的时区,然后点击“下一步”。
(P14)3选择互联网接入类型。
此处可点击“自动检测”来识别您的网络,如路由器无法正确识别网络类型,请手动选择,填写相关信息后点击“下一步”。
(请在手机设置的第❸步中查看各种方式的详细说明。
)(P15)4IPTV设置,您可以在该页面开启IPTV。
(P16)5设置无线网络的无线名称和密码,然后点击“下一步”。
(P17)6修改路由器的登录密码,然后点击“下一步”。
(P18)7此页面可查看用户设置的网络信息,点击“完成”后等待路由器保存设置即可。
然后路由器会自动重启并断开连接,请在电脑Wi-Fi列表中搜索已设置好的无线名称,输入密码连接Wi-Fi。
(P19)(提示:请牢记该页面显示的信息,建议截屏保存以防忘记。
)8可以修改为用户自定义的无线名称。
) (P2)TOTOLINK_X5000R_5GTOTOLINK_X5000R启用WPS功能:按下1~3秒,直到前面板的系统状态灯常亮恢复出厂设置:按下5-8秒,直到系统状态灯快闪注意:请牢记您的无线网络名称(SSID)和密码,以便连接无线终端。
P8P9 P10P11P2P3P4P6P7登录密码。
(P9)7此页面可查看用户设置的网络信息,点击“完成”后等待路由器保存设置即可。
然后路由器会自动重启并断开连接,请在手机Wi-Fi列表中搜索已设置好的无线名称,输入密码连接Wi-Fi。
(P10-P11)(提示:请牢记配置概要页面显示的信息,建议截屏保存以防忘记。
)常见问题解答4路由器设置好了,但是不能上网,怎么办?1、首先检查网络是否正常:用网线将电脑直接连接猫。
TOTOLINK桥接(同SSID)
N150R+无线桥接设置教程(同SSID)此教程通用型号为:N150R+ N350R N300RT N8004一、首先,我们让A路由器(假如网关为,叫TOTOLINK_00(我的A路由器是PPPOE拨号上网),加密已设置好加密,密码是9。
(建议加密不要设成WEP,防止别人盗取您的网络)设置如下图的顺序进行:1、打开基础设置,将模式改为WDS,2、打开安全设置,选择WPA2的加密方式,输入密码后点击应用3、开WDS设置,先勾选启用WDS,然后点击应用,才能点击站点扫描,选择B 路由后在点击下一步,倒回WDS设置界面后再点一次应用(2):然后,我们对B路由器进行设置。
为了更快捷的设置,直接通过有线连接到B路由器。
(避免有线和无线同时使用,导致网络频繁切换。
)把B路由器和电脑通过有线的方式连接好后:1、先进入B路由器界面,点击高级设置,更改网关IP,局域网IP不能跟A路由器在同一网段,这里我把B路由器网关设成,点应用重启,如下图:2、打开基础设置,将模式改为WDS,信道设为跟A路由一样,点击应用3、打开安全设置,选择跟A路由一样的加密方式,输入同样的密码后点击应用4、打开WDS设置,先勾选启用WDS,然后点击应用,才能点击站的扫描,选择A路由后在点击下一步,倒回WDS设置界面后再点一次应用5、最后,关闭DHCP服务器将本地连接禁用再启用,查看到本地连接的的IP地址是主路由器分配的就说明WDS做成功了。
此时,你的设备可以通过有线连接到TOTOLINK_00或TOTOLINK_n150r+无线连接到TOTOLINK_00。
怎么样,惊喜的时刻到了,您现在可以开心的浏览您的网页了。
若想重新再进入B路由器界面,必须手动设置你设备(笔记本,电脑,手机)的IP(感谢您对TOTOLINK的支持!如有相关或其他问题,您可以在我们的工作时间段与我们联系。
TOTOLINK 技术支持深圳市盛世众唐科技有限公司电话:4006-780-790邮箱:网址:地址:深圳市南山区高新南七道数字技术园邮编:518100。
无线路由器的使用流程
无线路由器的使用流程1. 准备工作在使用无线路由器之前,需要确保具备以下准备工作: - 一台支持无线网络的设备,例如电脑、手机或平板等; - 一个可用的宽带连接,如ADSL、光纤等; -路由器设备; - 网线; - 电源线。
2. 连接路由器在开始使用无线路由器之前,需要将路由器与设备进行连接,具体步骤如下:1. 将路由器的电源线插入路由器的电源接口,并将另一端插入电源插座; 2. 使用网线将宽带连接器与路由器的WAN口相连; 3. 若需有线连接,请使用网线将电脑与路由器的LAN口相连。
3. 设置路由器在完成连接后,需要对路由器进行设置,才能正常使用。
以下是设置路由器的一般步骤: 1. 打开电脑的浏览器,输入路由器的IP地址(一般为192.168.1.1或192.168.0.1); 2. 输入默认的用户名和密码(可在路由器的说明书中找到),进入路由器的管理界面; 3. 在管理界面中,设置无线网络的名称(SSID)和密码,以及其他网络设置,如IP地址、DNS等; 4. 保存设置并重启路由器,等待路由器重启完成。
4. 连接无线网络在完成路由器的设置后,即可连接无线网络了。
以下是连接无线网络的步骤:1. 打开设备上的无线网络连接设置,搜索可用的无线网络; 2. 找到并选择你设置的无线网络名称(SSID); 3. 输入你设置的无线网络密码,点击连接; 4. 等待设备连接到无线网络,连接成功后即可开始使用网络。
5. 常见设置在使用无线路由器的过程中,还可以进行一些常见的设置,以提高网络使用体验。
以下是一些常见设置示例: - 设置无线网络加密方式和密码,以保障网络安全;- 设置无线网络的信道,以改善信号质量; - 设置MAC地址过滤,以控制无线设备的访问权限; - 设置端口转发、虚拟服务器等功能,以实现特定应用的网络访问;- 设置无线网络的名称以及隐藏SSID等,以保护无线网络的隐私。
6. 故障排除在使用无线路由器的过程中,可能会遇到一些问题,例如无法上网、信号不稳定等。
ToToLink设置
设置轻松容易配置界面简洁设置轻松容易配置界面简洁如果你觉得一款无线路由器的设置过程令你感觉繁琐的话,使用ToToLinkN200RS+,你则会感觉到配置的轻松和方便。
将设备LAN口与计算机相连,在浏览器中键入192.168.1.1,通过键入账号admin,密码admin,便可登陆其Web配置界面,对用户所需要的路由器配置进行输入调整。
ToToLink N200RS+ 初始设置界面初登上主配置界面,会看到三个选项按键,分别是“高级设置”、“网络设置向导”和“无线设置向导”。
“网络设置向导”初始界面物理连接(左)和检定互联网服务类型(右)广域网配置完成对于想快速体验无线网络的朋友们,可选择设置向导来进行配置。
首先选择“网络设置向导”,就可方便地点击“下一步”,进而对广域网进行配置。
“无线设置向导”初始界面随后再选择“无线设置向导”,也只需点击“下一步”或简单填写网络SSID和加密密码即可,完成无线网络的搭建,非常方便快捷。
填写网络SSID(左)和选择加密方式(右)填写加密密码(左)和“无线设置向导”完成(右)但如果想进一步的提升无线网络的使用效果,我们还需到“高级设置”中进行设置调整,一起来看看吧。
高级设置精准掌控无线网络高级设置精准掌控无线网络ToToLinkN200RS+在防火墙、QoS和系统管理等方面都具有全面且精准的特色选择。
点入“高级设置”,用户便可对ToToLink N200RS+展开更为丰富的细节调整了。
首先看到的是“状态概要”界面。
左侧为配置选项栏,分“基础设置”和“高级设置”两大类别。
“状态概要”(左)和“无线基本设置”(右)在“基础设置”中有“状态概要”、“广域网设置”、“无线基本设置”和“软件升级”选项。
下面即是“高级设置”选项了,可以看到其中包含“网络”、“无线”、“NA T/路由”、“防火墙”、“应用”、“传输控制”和“系统”等选择,很是全面。
在“网络”选项中,高级用户可对“局域网/DHCP设置”进行更为准确地设置,如进行IP-MAC 地址绑定设置等。
TP-Link AC1200 Wi-Fi Range Extender RE300 用户手册说明书
User GuideAC1200 Wi-Fi Range ExtenderRE300ContentsAbout This Guide 1 Chapter 1 Get to Know About Y our Extender 2 1. 1. Product Overview. . . . . . . . . . . . . . . . . . . . . . . . . . . . . . . . . . . . . . . . . . . . . . . . . . . . . . . . . . . . 3 1. 2. Appearance . . . . . . . . . . . . . . . . . . . . . . . . . . . . . . . . . . . . . . . . . . . . . . . . . . . . . . . . . . . . . . . . . 31. 2. 1. L ED Explanation. . . . . . . . . . . . . . . . . . . . . . . . . . . . . . . . . . . . . . . . . . . . . . . . . . . . . . . 31. 2. 2. B utton Description . . . . . . . . . . . . . . . . . . . . . . . . . . . . . . . . . . . . . . . . . . . . . . . . . . . . 4 Chapter 2 Set Up Internet Connection 5 2. 1. Power On the Extender . . . . . . . . . . . . . . . . . . . . . . . . . . . . . . . . . . . . . . . . . . . . . . . . . . . . . . 6 2. 2. Set Up the Extender . . . . . . . . . . . . . . . . . . . . . . . . . . . . . . . . . . . . . . . . . . . . . . . . . . . . . . . . . 62. 2. 1. M ethod 1: Via the TP-Link T ether App. . . . . . . . . . . . . . . . . . . . . . . . . . . . . . . . . . 62. 2. 2. M ethod 2: Via a Web Browser. . . . . . . . . . . . . . . . . . . . . . . . . . . . . . . . . . . . . . . . . . 82. 2.3. M ethod 3: Via the WPS Button. . . . . . . . . . . . . . . . . . . . . . . . . . . . . . . . . . . . . . . .12 Chapter 3 OneMesh with Seamless Roaming 14 3. 1. What‘s a OneMesh Network. . . . . . . . . . . . . . . . . . . . . . . . . . . . . . . . . . . . . . . . . . . . . . . . .15 3. 2. How to Set Up a OneMesh Network . . . . . . . . . . . . . . . . . . . . . . . . . . . . . . . . . . . . . . . . .163. 2. 1. M ethod 1: Via the TP-Link T ether App. . . . . . . . . . . . . . . . . . . . . . . . . . . . . . . . .163. 2. 2. M ethod 2: Via a Web Browser. . . . . . . . . . . . . . . . . . . . . . . . . . . . . . . . . . . . . . . . .17 3. 3. Remove Extender from OneMesh Network. . . . . . . . . . . . . . . . . . . . . . . . . . . . . . . . . .183. 3. 1. M ethod 1: Via the TP-Link T ether App. . . . . . . . . . . . . . . . . . . . . . . . . . . . . . . . .183. 3. 2. M ethod 2: Via a Web Browser. . . . . . . . . . . . . . . . . . . . . . . . . . . . . . . . . . . . . . . . .18 Chapter 4 TP-Link Cloud Service 204. 1. Register a TP-Link ID. . . . . . . . . . . . . . . . . . . . . . . . . . . . . . . . . . . . . . . . . . . . . . . . . . . . . . . .21 4. 2. Change Y our TP-Link ID Information. . . . . . . . . . . . . . . . . . . . . . . . . . . . . . . . . . . . . . . . .21 4. 3. Manage the User TP-Link IDs . . . . . . . . . . . . . . . . . . . . . . . . . . . . . . . . . . . . . . . . . . . . . . .224. 3. 1. A dd TP-Link ID to Manage the Extender . . . . . . . . . . . . . . . . . . . . . . . . . . . . . .234. 3. 2. R emove TP-Link ID(s) from Managing the Extender . . . . . . . . . . . . . . . . . . .23 4. 4. Manage the Extender via the TP-Link T ether App. . . . . . . . . . . . . . . . . . . . . . . . . . . .24 Chapter 5 Customize Y our Network255. 1. Check Internet Status. . . . . . . . . . . . . . . . . . . . . . . . . . . . . . . . . . . . . . . . . . . . . . . . . . . . . . .26 5. 2. Configure Wireless Network . . . . . . . . . . . . . . . . . . . . . . . . . . . . . . . . . . . . . . . . . . . . . . . .27 5. 3. Change LAN Settings. . . . . . . . . . . . . . . . . . . . . . . . . . . . . . . . . . . . . . . . . . . . . . . . . . . . . . .28 5. 4. Adjust Wi-Fi Coverage . . . . . . . . . . . . . . . . . . . . . . . . . . . . . . . . . . . . . . . . . . . . . . . . . . . . . .29 5. 5. Set Access Control . . . . . . . . . . . . . . . . . . . . . . . . . . . . . . . . . . . . . . . . . . . . . . . . . . . . . . . . .305. 6. Set High Speed Mode. . . . . . . . . . . . . . . . . . . . . . . . . . . . . . . . . . . . . . . . . . . . . . . . . . . . . . .32 Chapter 6 Manage Y our Extender 33 6. 1. Set System Time . . . . . . . . . . . . . . . . . . . . . . . . . . . . . . . . . . . . . . . . . . . . . . . . . . . . . . . . . . .34 6. 2. Control LEDs . . . . . . . . . . . . . . . . . . . . . . . . . . . . . . . . . . . . . . . . . . . . . . . . . . . . . . . . . . . . . . .34 6. 3. Set Power Schedule . . . . . . . . . . . . . . . . . . . . . . . . . . . . . . . . . . . . . . . . . . . . . . . . . . . . . . . .35 6. 4. Upgrade the Firmware . . . . . . . . . . . . . . . . . . . . . . . . . . . . . . . . . . . . . . . . . . . . . . . . . . . . . .36 6. 5. Backup and Restore Configuration Settings. . . . . . . . . . . . . . . . . . . . . . . . . . . . . . . . .37 6. 6. Change Login Password . . . . . . . . . . . . . . . . . . . . . . . . . . . . . . . . . . . . . . . . . . . . . . . . . . . .38 6. 7. Check System Log . . . . . . . . . . . . . . . . . . . . . . . . . . . . . . . . . . . . . . . . . . . . . . . . . . . . . . . . .39 FAQ 40About This GuideThis guide is a complement to Quick Installation Guide. The Quick Installation Guide provides instructions for quick internet setup, while this guide contains details of each function and demonstrates how to configure them.When using this guide, please notice that features of the extender may vary slightly depending on the model and software version you have, and on your location, language, and internet service provider. All screenshots, images, parameters and descriptions documented in this guide are used for demonstration only. ConventionsMore InfoThe latest software, management app and utility are available from Download Center at https:///support/.The Quick Installation Guide can be found where you find this guide or inside the package of the extender.Specifications can be found on the product page at https://.A community is provided for you to discuss our products at https://. Our T echnical Support contact information can be found at the Contact T echnical Support page at https:///support/.Speed/Coverage DisclaimerMaximum wireless signal rates are the physical rates derived from IEEE Standard 802.11 specifications. Actual wireless data throughput and wireless coverage are not guaranteed and will vary as a result of 1) environmental factors, including building materials, physical objects, and obstacles, 2) network conditions, including local interference, volume and density of traffic, product location, network complexity, and network overhead, and 3) client limitations, including rated performance, location, connection quality, and client condition.Chapter 1Get to Know About Y our ExtenderThis chapter introduces what the extender can do and its appearance. It contains the following sections:• Product Overview• Appearance1 1 Product OverviewBring Dead Zones Back to LifeTired of Wi-Fi “dead zones”? The TP-Link extender is connected to your router wirelessly, strengthening its signal and expanding its coverage into areas that could not otherwise be reached.Easy Installation & Quick PositionThe extender works with any standard wireless router. Instantly connect the extender to a router by pressing the router’s WPS button (if available) followed by the extender’s WPS button. Alternatively, follow the Quick Setup instructions on the extender’s web management page.Once the extender is connected to a router, you can relocate it to your preferred location with no further configuration required. The intelligent signal light can help to find the best location.Easy Management with the TP-Link T ether AppT ether provides a simple, intuitive way to access and manage your extender with your smart devices.1 2 Appearance1 2 1 LED ExplanationY ou can check the extender’s working status by following the LED Explanation table.1 2 2Button DescriptionChapter 2Set Up Internet ConnectionThis chapter introduces how to boost your host wireless coverage. Please follow the step-by-step instructions to set up the internet connection.It contains the following sections:• Power On the Extender• Set Up the Extender2 1 Power On the ExtenderPlug the extender into an electrical outlet next to your router, and then wait until the Power LED turns solid on.Note:2 2 Set Up the ExtenderThere are three ways to set up the extender: via the TP-Link T ether app, via a web browser, or via the WPS button.2 2 1 Method 1: Via the TP-Link T ether App1. Launch the Apple App Store or Google Play Store and search TP-Link T ether or simply scan the QR code to download and install the app.OR2. Go to Wi-Fi Settings and connect your device to the extender’s wireless network: TP-Link_Extender.3. Launch T ether and select your extender from the Local Device list.4. Create a password to log in.5. Follow app instructions to set up your extender.6. (Optional) Enable Join OneMesh to copy the router’s wireless settings for seamless roaming. For more information about OneMesh, refer to OneMesh with Seamless Roaming.Tip:It is recommended to enable Smart Connect on your host router to enjoy a seamless connection between dual-band networks. With Smart Connect enabled, your host router’s 2.4GHz and 5GHz share the same SSID (network name) and password. Refer to your host router’s user guide to enable Smart Connect.7. Relocate your extender and follow app instructions to enjoy the extended network.Tip:For more intuitive location assistant, access extender settings via T ether and go to T ools > Location Assistant . Y ou can also manage your extender via T ether, such as controlling LEDs, sharing passwords of your networks and blocking devices.2 2 2Method 2: Via a Web Browser1. Connect your computer to the extender wirelessly as follows:• For Windows Users 1 ) Unplug the Ethernet cable from your computer (if any).2 ) Click the Wi-Fi icon on the taskbar and connect to the extender’s wireless network: TP-Link_Extender .• For Mac OS X Users1 ) Unplug the Ethernet cable from your computer (if any).2 ) Click the Wi-Fi icon in the top right corner of the screen, and connect to the extender’s network: TP-Link_Extender .2. Follow the instructions of the Quick Setup Wizard to connect the extender to your host router.1 ) Launch a web browser, enter or http://192.168.0.254 in the address bar, and then create a password to log in.Note:If the login window does not appear, please refer to FAQ.2 ) Select your host router’s 2.4GHz SSID (network name), enter its password (NOTthe password you just created for management), and click Next.3 ) Select your host router’s 5GHz SSID (network name), enter its password (NOTthe password you just created for management), and click Next.Note:If your host router does not support 5GHz wireless network, please click Skip to continue.4 ) Confirm your host network password.5 ) Either keep the default SSIDs (network names) or customize them for theextended networks, and then click Next.Tip:If you connect the extender to a TP-Link OneMesh router, the extender will automatically join the router’s OneMesh network and copy the router’s wireless settings. For more information, refer to OneMesh with Seamless Roaming.6 ) Follow web instructions to relocate your extender for optimal Wi-Fi coverageand performance, and then click Done.7 ) Enjoy! Connect to the extended network and enjoy the internet.Tip:If you connect the extender to a TP-Link OneMesh router and a success screen as below appears at the end of the setup, the extender has successfully joined the router’s OneMesh network and copied the router’s wireless settings. For more information, refer to OneMesh with Seamless Roaming.Tip:It is recommended to enable Smart Connect on your host router to enjoy a seamless connection between dual-band networks. With Smart Connect enabled, your host router’s 2.4GHz and 5GHz share the same SSID (network name) and password. Refer to your host router’s user guide to enable Smart Connect.2 23 Method 3: Via the WPS ButtonUse this way if your router has a WPS button. The button might look like one of these:Note:For more information about using WPS button on your host router, please refer to the router manufacturer’s user guide.2. Wait until the Signal LED changes from blinking to solid on, which indicates that the WPS connection is successful.Note:If the LED does not turn solid on, try again or refer to Method 1: Via the TP-Link T ether App or Method 2: Via a Web Browser.3. If the extender connects to a dual band router, repeat steps 1 and 2 above to connect to the other band.4. Wait until the Signal LED turns solid on, and the setup is done.Extended Network Names:Router’s network name with _EXT at the endPasswords:Same as your routerNote:1. If you want to customize the extended network name, refer to Configure Wireless Network.2. If you cannot find the network names with _EXT in your Wi-Fi network list, this means that theextender has been connected to a OneMesh router and automatically copied its wireless settings.For more information, refer to OneMesh with Seamless Roaming.1 ) Plug in the extender about halfway between your router and the Wi-Fi dead zone. The location you choose must be within the range of your router.2 ) Wait for about 2 minutes until the Signal LED turns solid white. If it doesn’t, relocate the extender closer to the router to achieve better signal quality.Router DevicesHalfway Tip: T o minimize signal interference, please choose a location which is far away from Bluetooth devices and other household electronic devices, such as cordless phones, microwave ovens and baby monitors.6. Enjoy! Connect to the extended network and enjoy the internet.Chapter 3 OneMesh with Seamless RoamingThis chapter introduces the TP-Link OneMesh TM feature.It contains the following sections:• What‘s a OneMesh Network• How to Set Up a OneMesh Network• Remove Extender from OneMesh Network3 1 What‘s a OneMesh Network TP-Link OneMesh router and TP-Link OneMesh extenders work together to form one unified Wi-Fi network. Walk through your home and stay connected with the fastest possible speeds thanks to OneMesh’s seamless coverage.Unified Wi-Fi Network Router and extenders share the same wireless settings, including network name, password, access control settings and more.Seamless Roaming Devices automatically switch between your router and extenders as you move through your home for the fastest possible speeds.Easy Setup and Management Set up a OneMesh network with a push of WPS buttons. Manage all network devices on the T ether app or at your router’s web management page.T o check full list of TP-Link OneMesh devices, scan the QR code, or visit https:///One-Mesh/compatibility.3 2 How to Set Up a OneMesh NetworkOnce the extender is connected to a TP-Link OneMesh router via web browser or WPS button, the extender will automatically join the router’s OneMesh network and copy the router’s wireless settings. Y ou can manually join a OneMesh network during the configuration via the TP-Link T ether app. For more information about setting up the extender with OneMesh network, refer to Set Up the Extender.If you have already set up the extender before joining the OneMesh network, choose one of the methods below to set up a OneMesh network:Note:Before setting up a OneMesh network, it is recommended to enable Smart Connect on your host router to enjoy a seamless connection between dual-band networks.3 2 1 Method 1: Via the TP-Link T ether App1. Launch T ether and select the extender you want to join the OneMesh network.2. Go to T ools > OneMesh and enable OneMesh.Tip:If your host router does not support OneMesh, you need to reselect a host network first. Go to T ools > Host Network and click Reselect Host Network, and then follow the app instructions to complete the configuration.3. Follow the app instructions to join the OneMesh network.3 2 2 Method 2: Via a Web Browser1. Visit , and log in with the password you set for the extender.2. Go to Settings > OneMesh and enable Join OneMesh.Tip:If your host router does not support OneMesh, you need to reselect a host network first. Go to Settings > Wireless > Connect to Network and follow the instructions to complete the configuration.3. Follow the web instructions to join the OneMesh network. After that, you can view all the devices in OneMesh network in Basic > OneMesh on the web management page of your host router.3 3 Remove Extender from OneMesh NetworkIf you want to remove the extender from the OneMesh network, follow the steps below: 3 3 1 Method 1: Via the TP-Link T ether App1. Launch T ether and select the extender you want to remove from the OneMesh network.2. Go to T ools > OneMesh and disable OneMesh.Or1. Launch T ether and select your host router of the OneMesh network.2. Go to T ools > OneMesh and select the extender you want to remove from the OneMesh network.3. Click Remove Device.3 3 2 Method 2: Via a Web Browser1. Visit , and log in with the password you set for the extender.2. Go to Settings > OneMesh and disable Join OneMesh.Chapter 4TP-Link Cloud ServiceTP-Link Cloud service provides a better way to manage your cloud devices. Log in to your cloud device with a TP-Link ID, and you can easily monitor and manage your home network when you are out and about via the T ether app on your smartphone or tablet. T o ensure that your cloud device stays new and gets better over time, the TP-Link Cloud will notify you when an important firmware upgrade is avaliable. Surely you can also manage multiple TP-Link Cloud devices with a single TP-Link ID.This chapter introduces how to register a new TP-Link ID, bind or unbind TP-Link IDs to manage your cloud device, and the T ether app with which you can manage your home network no matter where you may find yourself.It contains the following sections:• Register a TP-Link ID• Change Y our TP-Link ID Information• Manage the User TP-Link IDs• Manage the Extender via the TP-Link T ether App4 1 Register a TP-Link IDWhen you log in after initial setup, the web page will ask whether you need TP-Link Cloud service. Y ou can also access the TP-Link Cloud settings as follows:1. Visit , and log in with the password you set for the extender.2. Go to Settings > TP-Link Cloud.3. Click Register Now and follow the instructions to register a TP-Link ID.4. After activating your TP-Link ID, come back to the TP-Link Cloud page to log in. The TP-Link ID used to log in to the extender for the first time will be automatically bound as an Admin.Notes:• T o learn more about the Admin and User TP-Link ID, refer to Manage the User TP-Link IDs.• Once you have registered a TP-Link ID on the web management page, you can only register another TP-Link ID via the T ether APP. Please refer to Manage the Extender via the TP-Link T ether App to install the app and register a new one.• If you want to unbind the admin TP-Link ID from your extender, please go to Settings > TP-Link Cloud, an click Unbind in the Device Information section.4 2 Change Y our TP-Link ID InformationFollow the steps below to change your email address and password of your TP-Link ID as needed.1. Visit , and log in with your TP-Link ID.2. Go to Settings > TP-Link Cloud, and focus on the Account Information section.• T o change your email address:1. Click behind the Email.2. Enter the password of your TP-Link ID, then a new email address. And click Save.• T o change your password:1. Click behind the Password.2. Enter the current password, then a new password twice. And click Save.4 3 Manage the User TP-Link IDsThe TP-Link ID used to log in to the extender for the first time will be automatically bound as the Admin account. An admin account can add or remove other TP-Link IDs to or from the same extender as User s. All accounts can monitor and manage the extender locally or remotely, but user accounts cannot:• Reset the extender to its factory default settings either on the web management page or in the T ether app.• Add/remove other TP-Link IDs to/from the extender.4 3 1 Add TP-Link ID to Manage the Extender1. Visit , and log in with your TP-Link ID.2. Go to Settings > TP-Link Cloud, and focus on the Bound Accounts section.3. Click , enter another TP-Link ID as needed and click Save.Note:If you need another TP-Link ID, please register a new one via the T ether app. Please refer to Manage the Extender via the TP-Link T ether App to install the app and register a new TP-Link ID.4. The new TP-Link ID will be displayed in the Bound Accounts table as a User.4 3 2 Remove TP-Link ID(s) from Managing the Extender1. Visit , and log in with your TP-Link ID.2. Go to Settings > TP-Link Cloud, and focus on the Bound Accounts section.3. Tick the checkbox(es) of the TP-Link ID(s) you want to remove and click Unbind.4 4 Manage the Extender via the TP-Link T ether App The T ether app runs on iOS and Android devices, such as smartphones and tablets.1. Launch the Apple App Store or Google Play store and search “TP-Link T ether”or simply scan the QR code to download and install the app.OR2. Connect your device to the extender’s or host router’s wireless network.3. Launch the T ether app, select the model of your extender and log in with your TP-Link ID or the password your set for the extender.4. Manage your extender as needed.Note:If you need to remotely access your extender from your smart devices, you need:• Log in with your TP-Link ID. If you don’t have one, refer to Register a TP-Link ID.• Make sure your smartphone or tablet can access the internet with cellular data or a Wi-Fi network.Chapter5Customize Y our Network This chapter guides you on how to configure network settings that are available for this extender.It contains the following sections:• Check Internet Status• Configure Wireless Network• Change LAN Settings• Adjust Wi-Fi Coverage• Set Access Control• Set High Speed Mode5 1 Check Internet StatusYou can view the internet status of your extender to check whether you have successfully set up the extended network(s).1. Visit , and log in with the password you set for the extender.2. Go to Settings > Status to view the internet status of your extender.• The extender runs normally.• The extender fails to connect to the host networks. Please go to Settings > Wireless > Connect to Network to check whether the host network passwords are correct. If the problem still exists, relocate the extender closer to the router to achieve better signal quality.• The extender is connected to the host networks, but is not transmitting data.Please check the internet connection of your router.• The extender is connected to the router abnormally. Please go to Settings > Network and try setting your extender to obtain an IP address automatically.Click the icon of the Internet/Router/Range Extender/Clients to view corresponding information.5 2 Configure Wireless NetworkIf you want to extend another host network after Quick Setup, you can refer to this section. Moreover, you can change the wireless settings for your extended networks. Tip:If the extender is in your router’s OneMesh network, it will automatically copy wireless settings from your router. No wireless settings is needed for the extender.Visit , and log in with the password you set for the extender. Note:Here we take the configuration of the 2.4GHz network as an example. If the 5GHz network is available on your extender, please refer to the instructions to set your 5GHz network.• T o extend another host network:1. Go to Settings > Wireless > Connect to Network.2. Enable Connect to 2.4GHz Network and click Wireless Scanner to find all available networks.3. Select the 2.4GHz host network you want to extend.Note:If the network you want to extend is on but not listed, please try the following steps.· Move the extender closer to your router, and rescan for networks.· Y ou can manually enter the SSID (network name) and password of the network you want to extend, and click Save. 4. Once a host network is selected, the SSID and security type will be automatically filled in. If the selected network is encrypted, enter the password in the Password field.5. Click Save.• T o enable or disable the extended network:1. Go to Settings > Wireless > Extended Network.2. Extended networks are enabled by default. If you want to disable the wireless function of a certain band, just clear the Enable checkbox. In this case, all the wireless settings of this band will be invalid.3. Click Save.• T o change the wireless network name (SSID):1. Go to Settings > Wireless > Extended Network.2. Create a new SSID in Extended 2.4GHz SSID or click Copy Host SSID. The value is case-sensitive.3. Click Save.Note:If you have changed the wireless settings via a wireless device, you will be disconnected after the settings are applied. Please write down the new SSID for future use.• T o hide the SSID of the extended network:1. Go to Settings > Wireless > Extended Network.2. Select Hide SSID broadcast, and the corresponding SSID will not be displayed when wireless devices scan for local wireless networks. Y ou need to manually enter the SSID to join the network.3. Click Save.5 3 Change LAN SettingsThe extender is preset with a default LAN IP 192.168.0.254, with which you can log in to the web management page. The LAN IP address, together with the Subnet Mask, also defines the subnet that the connected devices are on. If the IP address conflicts with another device on your local network or your network requires a specific IP subnet, you can change it.1. Visit , and log in with the password you set for the extender.2. Go to Settings > Network.3. Select Use the following IP address.4. Enter a new IP Address as needed and leave the Subnet Mask as the default settings .5. Enter the gateway that is in the same subnet as the IP address. The gateway is usually the LAN IP address of your router.6. Enter the DNS IP address provided by your ISP.7. Click Save.5 4 Adjust Wi-Fi CoverageY ou can set the extender’s Wi-Fi coverage depending on how large you want your Wi-Fi area to be.1. Visit and log in with the password you set for the extender.2. Go to Settings > Advanced Settings > Wi-Fi Coverage.3. Select your desired Wi-Fi coverage level for the extender.4. Click Save.5 5 Set Access ControlAccess Control allows you to permit or block specific devices from accessing the internet for a specific period.Tip:If the extender is in your router’s OneMesh network, it will automatically copy access control settings from your router. No access control settings is needed for the extender.1. Visit and log in with the password you set for the extender.2. Go to Settings > Advanced Settings > Access Control.3. Enable Access Control.• T o block specific device(s):1. Select Blacklist and click Save.2. Select the device to be blocked in the Online Devices table by ticking the corresponding checkbox.3. Click Block and the selected device(s) will be added to the Devices in Blacklist table.4. Click in the Devices in Blacklist table to set the Effective Time for a certain entry as needed.。
- 1、下载文档前请自行甄别文档内容的完整性,平台不提供额外的编辑、内容补充、找答案等附加服务。
- 2、"仅部分预览"的文档,不可在线预览部分如存在完整性等问题,可反馈申请退款(可完整预览的文档不适用该条件!)。
- 3、如文档侵犯您的权益,请联系客服反馈,我们会尽快为您处理(人工客服工作时间:9:00-18:30)。
2
图 1.6 二、AP 状态 2.1 查看 AP 状态 功能描述:网络状态是显示已被绑定的 AP 运行状态是否正常,可以查看 AP 的详细的设备 信息。 菜单:AP 状态 步骤:查看当前运行状态,如图 2.1 所示。
TOTOLINK AC500 用户使用说明
一、AP 扫描 1.1 增加绑定 功能描述:绑定设备是将 AC 发现的 AP,赋予指定 AC 管理的权限,绑定后,其他 AC 发 现了也不能对 AP 进行管理。AC 的管理功能需要绑定 AP 后才能实现。 菜单:AP 扫描 步骤: 1. 使用动态 IP 方式绑定(由 AC 自动分配 IP 地址 [推荐]): 输入: AP 名称 选 择:群组 选择:组网模式[动态] 点击:绑定. 如图 方式绑定(设定固定的 IP 地址):输入:AP 名称 选择:群 组 选择:组网模式[静态] 输入:IP 地址 点击:绑定 确定:选 择静态模式? 如图 1.2 所示。
图 1.2 结果 1:点击:已绑定扫描列表,如图 1.3 所示:
1
图 1.3 结果 2:一分钟后,AP 重新获取到 IP 地址。点击:已绑定扫描列表,如图 1.4 所示。
目录
目录..................................................................................................................................................... 1 TOTOLINK AC500 用户使用说明........................................................................................................ 1 一、AP 扫描........................................................................................................................................ 1 1.1 增加绑定.............................................................................................................................. 1 1.2 解除绑定.............................................................................................................................. 2 二、AP 状态........................................................................................................................................ 3 2.1 查看 AP 状态....................................................................................................................... 3 三、AP 群组管理................................................................................................................................ 4 3.1 群组编辑.............................................................................................................................. 4 3.2 AP 分组................................................................................................................................ 6 3.3 群统一设置........................................................................................................................... 8 四、AP 个性设置............................................................................................................................. 10 4.1 AP 基础设置....................................................................................................................... 10 4.2 AP 信道设置....................................................................................................................... 11 五、AP 系统管理............................................................................................................................. 11 5.1 手动重启............................................................................................................................. 11 5.2 定时重启............................................................................................................................. 12 5.3 固件管理............................................................................................................................. 13 5.4 AP 密码设置....................................................................................................................... 15 5.5 AP 恢复出厂设置............................................................................................................... 17 六、AC 系统状态............................................................................................................................. 18 6.1 AP 概览................................................................................................................................18 6.2 AC 系统状态...................................................................................................................... 18 七、AC 组网设置.............................................................................................................................. 19 7.1 本地 IP 设置..................................................................................................................... 19 八、AC 系统管理.............................................................................................................................. 21 8.1 管理员设置....................................................................................................................... 21 8.2 时间设置........................................................................................................................... 22 8.3 固件升级........................................................................................................................... 22 8.4 系统配置........................................................................................................................... 23 8.5 定时重启........................................................................................................................... 24 8.6 退出.................................................................................................................................... 25