Cisco CATALYST交换机端口监听配置
思科交换机安全端口配置

令,或者你可以手动的shut再no shut端口。这个是端口安全违规的默认动作。
默认的端口安全配置:
以下是端口安全在接口下的配置-
特性:port-sercurity 默认设置:关闭的。
特性:最大安全mac地址数目 默认设置:1
特性:违规模式 默认配置:shutdown,这端口在最大安全mac地址数量达到的时候会shutdown,并发
足够数量的mac地址,来降下最大数值之后才会不丢弃。
?restrict:
一个**数据和并引起"安全违规"计数器的增加的端口安全违规动作。
?shutdown:
一个导致接口马上shutdown,并且发送SNMP陷阱的端口安全违规动作。当一个安全端口处在error-
disable状态,你要恢复正常必须得 敲入全局下的errdisable recovery cause psecure-violation 命
switch(config-if)#end
switch#show port-sec add
Secure Mac Address Table
------------------------------------------------------------
Vlan Mac Address Type Ports
switch(config-if)#end
switch#show port-sec int f0/12
Security Enabled:Yes, Port Status:SecureUp
Violation Mode:Shutdown
Max. Addrs:5, Current Addrs:0, Configure Addrs:0
交换机端口监听、端口镜像(PortMirroring)配置
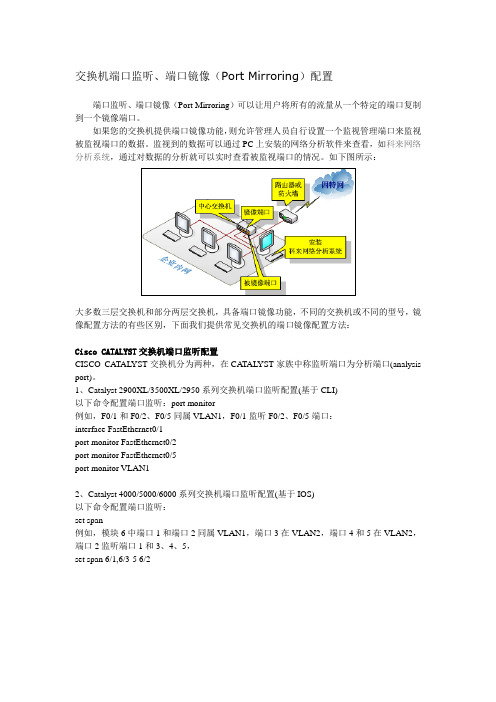
交换机端口监听、端口镜像(Port Mirroring)配置
端口监听、端口镜像(Port Mirroring)可以让用户将所有的流量从一个特定的端口复制到一个镜像端口。
如果您的交换机提供端口镜像功能,则允许管理人员自行设置一个监视管理端口来监视被监视端口的数据。
监视到的数据可以通过PC上安装的网络分析软件来查看,如科来网络分析系统,通过对数据的分析就可以实时查看被监视端口的情况。
如下图所示:
大多数三层交换机和部分两层交换机,具备端口镜像功能,不同的交换机或不同的型号,镜像配置方法的有些区别,下面我们提供常见交换机的端口镜像配置方法:
Cisco CATALYST交换机端口监听配置
CISCO CATAL YST交换机分为两种,在CA TAL YST家族中称监听端口为分析端口(analysis port)。
1、Catalyst 2900XL/3500XL/2950系列交换机端口监听配置(基于CLI)
以下命令配置端口监听:port monitor
例如,F0/1和F0/2、F0/5同属VLAN1,F0/1监听F0/2、F0/5端口:
interface FastEthernet0/1
port monitor FastEthernet0/2
port monitor FastEthernet0/5
port monitor VLAN1
2、Catalyst 4000/5000/6000系列交换机端口监听配置(基于IOS)
以下命令配置端口监听:
set span
例如,模块6中端口1和端口2同属VLAN1,端口3在VLAN2,端口4和5在VLAN2,端口2监听端口1和3、4、5,
set span 6/1,6/3-5 6/2。
Cisco Catalyst 4500 系列交换机配置指南说明书

C H A P T E R54-1Software Configuration Guide—Release IOS XE 3.3.0SG and IOS 15.1(1)SGOL-25340-0154Configuring Storm ControlThis chapter describes how to configure port-based traffic control on the Catalyst 4500 series switch.This chapter consists of these sections:•About Storm Control, page 54-1•Enabling Broadcast Storm Control, page 54-3•Enabling Multicast Storm Control, page 54-4•Disabling Broadcast Storm Control, page 54-5•Disabling Multicast Storm Control, page 54-5•Displaying Storm Control, page 54-6NoteFor complete syntax and usage information for the switch commands used in this chapter, first look at the Cisco Catalyst 4500 Series Switch Command Reference and related publications at this location:/en/US/products//hw/switches/ps4324/index.htmlIf the command is not found in the Catalyst 4500 Series Switch Command Reference, it will be found in the larger Cisco IOS library. Refer to the Cisco IOS Command Reference and related publications at this location:/en/US/products/ps6350/index.htmlAbout Storm ControlThis section contains the following subsections:•Hardware-Based Storm Control Implementation, page 54-2•Software-Based Storm Control Implementation, page 54-2Storm control prevents LAN interfaces from being disrupted by a broadcast storm. A broadcast storm occurs when broadcast packets flood the subnet, creating excessive traffic and degrading network performance. Errors in the protocol-stack implementation or in the network configuration can cause a broadcast storm.54-2Software Configuration Guide—Release IOS XE 3.3.0SG and IOS 15.1(1)SGOL-25340-01Chapter 54 Configuring Storm ControlAbout Storm ControlSoftware Configuration Guide—Release IOS XE 3.3.0SG and IOS 15.1(1)SGOL-25340-01Chapter 54 Configuring Storm ControlEnabling Broadcast Storm ControlEnabling Broadcast Storm ControlTo enable storm control, perform this task:The following example shows how to enable storm control on interface:Switch# configure terminalEnter configuration commands, one per line. End with CNTL/Z.Switch(config)# interface fa3/1Switch(config-if)# storm-control broadcast level 50Switch(config-if)# endSwitch# show storm-controlInterface Filter State Broadcast Multicast Level --------- ------------- --------- --------- -----Fi3/1 Forwarding Enabled Disabled 50.00% Switch# show int fa2/1 capabilities FastEthernet2/1Model: WS-X4148-RJ45V-RJ-45 Type: 10/100BaseTX Speed: 10,100,autoCommandPurposeStep 1Switch# configure terminalEnters global configuration mode.Step 2Switch(config)# interface interface-id Enters interface configuration mode and enter the port to configure.Step 3Switch(config-if)# storm-control broadcast level [high level ]Configures broadcast storm control.Specifies the upper threshold levels for broadcast traffic. The storm control action occurs when traffic utilization reaches this level.(Optional) Specifies the falling threshold level. The normaltransmission restarts (if the action is filtering) when traffic drops below this level for interfaces that support software-based suppression.NoteFor ports that perform hardware-based suppression, the lower threshold is ignored.NoteFor the Catalyst 4500-X Series Switch, on ports operating at 1Gigabit, thresholds less than 0.02% are not supported.Step 4Switch(config-if)# storm-control action {shutdown | trap }Specifies the action to be taken when a storm is detected.The default is to filter out the broadcast traffic and not to send out traps.The shutdown keyword sets the port to error-disable state during a storm. If the recover interval is not set, the port remains in shutdown state.Step 5Switch(config-if)# exit Returns to configuration mode.Step 6Switch(config)# endReturns to privileged EXEC mode.Step 7Switch# show storm-control [interface ] broadcastDisplays the number of packets suppressed.Step 8Switch# copy running-config startup-config(Optional) Saves your entries in the configuration file.Software Configuration Guide—Release IOS XE 3.3.0SG and IOS 15.1(1)SGOL-25340-01Chapter 54 Configuring Storm ControlEnabling Multicast Storm ControlDuplex: half,full,auto Auto-MDIX: noTrunk encap. type: 802.1QTrunk mode: on,off,desirable,nonegotiate Channel: yesBroadcast suppression: percentage(0-100), hw Multicast suppression: percentage(0-100), hw Flowcontrol: rx-(none),tx-(none) VLAN Membership: static, dynamic Fast Start: yes CoS rewrite: yes ToS rewrite: yesInline power: yes (Cisco Voice Protocol) SPAN: source/destination UDLD: yes Link Debounce: no Link Debounce Time: no Port Security: yes Dot1x: yesMaximum MTU: 1552 bytes (Baby Giants) Multiple Media Types: no Diagnostic Monitoring: N/AEnabling Multicast Storm ControlCatalyst 4900M, Catalyst 4948E, Supervisor Engine 6-E, Supervisor Engine 6L-E, Supervisor Engine 7-E, and Supervisor Engine 7L-E support per-interface multicast suppression, which allows you to subject incoming multicast and broadcast traffic to interface-level suppression.NoteMulticast and broadcast suppression share a common threshold per interface. Multicast suppression takes effect only if broadcast suppression is enabled. Disabling broadcast suppression on an interface also disables multicast suppression.To enable multicast suppression, perform this task:The following example shows how to enable multicast suppression on ports that have broadcast suppression already enabled:Switch# configure terminalEnter configuration commands, one per line. End with CNTL/Z.Switch(config)# int fa3/1Switch(config-if)# storm-control broadcast include multicastCommandPurposeStep 1Switch# configure terminalEnters global configuration mode.Step 2Switch(config)# interface interface-id Enters interface configuration mode and enter the port to configure.Step 3Switch(config-if)# storm-control broadcast include multicast Enables multicast suppression.Step 4Switch(config-if)# exit Returns to configuration mode.Step 5Switch(config)# endReturns to privileged EXEC mode.Step 6Switch# show storm-controlVerifies the configuration.Software Configuration Guide—Release IOS XE 3.3.0SG and IOS 15.1(1)SGOL-25340-01Chapter 54 Configuring Storm ControlDisabling Broadcast Storm ControlSwitch(config-if)# end Switch#Switch# show storm-controlInterface Filter State Broadcast Multicast Level --------- ------------- --------- --------- -----Fi3/1 Forwarding Enabled Enabled 50.00%Disabling Broadcast Storm ControlTo disable storm control, perform this task:The following example shows how to disable storm control on interface.Switch# configure terminalEnter configuration commands, one per line. End with CNTL/Z.Switch(config)# int fa3/1Switch(config-if)# no storm-control broadcast level Switch(config-if)# endSwitch# show storm-controlInterface Filter State Broadcast Multicast Level --------- ------------- --------- --------- -----Switch#Disabling Multicast Storm ControlTo disable multicast suppression, perform this task:CommandPurposeStep 1Switch# configure terminalEnters global configuration mode.Step 2Switch(config)# interface interface-id Enters interface configuration mode and enter the port to configure.Step 3Switch(config-if)# no storm-control broadcast levelDisables port storm control.Step 4Switch(config-if)# no storm-control action {shutdown | trap }Disables the specified storm control action and returns to default filter action.Step 5Switch(config-if)# exit Returns to configuration mode.Step 6Switch(config)# endReturns to privileged EXEC mode.Step 7Switch# show storm-control broadcast Verifies your entries.Step 8Switch# copy running-config startup-config(Optional) Saves your entries in the configuration file.CommandPurposeStep 1Switch# configure terminalEnters global configuration mode.Step 2Switch(config)# [no ] storm-control broadcast include multicastEnables and disables multicast suppression.Step 3Switch(config-if)# no storm-control broadcast levelDisables port storm control (broadcast and multicast).Chapter54 Configuring Storm Control Displaying Storm ControlCommand PurposeStep4Switch(config-if)# end Returns to configuration mode.Step5Switch(config)# end Returns to privileged EXEC mode.Displaying Storm ControlNote Use the show interface capabilities command to determine the mode in which storm control is supported on an interface.The following example shows an interface that supports broadcast suppression in software (sw):Switch# show int fa2/1 capabilitiesFastEthernet2/1Model: WS-X4148-RJ45V-RJ-45Type: 10/100BaseTXSpeed: 10,100,autoDuplex: half,full,autoAuto-MDIX: noTrunk encap. type: 802.1QTrunk mode: on,off,desirable,nonegotiateChannel: yesBroadcast suppression: percentage(0-100), hwMulticast suppression: percentage(0-100), hwFlowcontrol: rx-(none),tx-(none)VLAN Membership: static, dynamicFast Start: yesCoS rewrite: yesToS rewrite: yesInline power: yes (Cisco Voice Protocol)SPAN: source/destinationUDLD: yesLink Debounce: noLink Debounce Time: noPort Security: yesDot1x: yesMaximum MTU: 1552 bytes (Baby Giants)Multiple Media Types: noDiagnostic Monitoring: N/ANote Use the show interfaces counters storm-control command to display a count of discarded packets.Switch# show interfaces counters storm-controlPort Broadcast Multicast Level TotalSuppressedPacketsFa2/1 Enabled Disabled 10.00% 46516510Gi3/1 Enabled Enabled 50.00% 0Switch# show storm-controlInterface Filter State Broadcast Multicast Level--------- ------------- --------- --------- -----Fa2/1 Blocking Enabled Disabled 10.00%Gi3/1 Link Down Enabled Enabled 50.00%Software Configuration Guide—Release IOS XE 3.3.0SG and IOS 15.1(1)SGOL-25340-01。
思科Catalyst交换机 IP+MAC绑定

cisco(config-if)# ip access-group 6 in
cisco(config)#access-list 6 permit 10.138.208.81
这样就将交换机的FastEthernet0/17端口与ip:10.138.208.81绑定了。
3550-1(config-if)#switchport mode trunk /配置端口模式为TRUNK。
3550-1(config-if)#switchport port-security maximum 100 /允许此端口通过的最大MAC地址数目为100。
3550-1(config-if)#switchport port-security violation protect /当主机MAC地址数目超过100时,交换机继续工作,但来自新的主机的数据帧将丢失。
10 0006.1bde.3de9 DYNAMIC Fa0/17
bangonglou3#exit
二、ip与mac地址的绑定,这种绑定可以简单有效的防止ip被盗用,别人将ip改成了你绑定了mac地址的ip后,其网络不同,(tcp/udp协议不同,但netbios网络共项可以访问),具体做法:
最常用的对端口安全的理解就是可根据MAC地址来做对网络流量的控制和管理,比如MAC地址与具体的端口绑定,限制具体端口通过的MAC地址的数量,或者在具体的端口不允许某些MAC地址的帧流量通过。
1.MAC地址与端口绑定,当发现主机的MAC地址与交换机上指定的MAC地址不同时,交换机相应的端口将down掉。当给端口指定MAC地址时,端口模式必须为access或者Trunk状态。
CISCO交换机基本配置和使用概述
CISCO交换机基本配置和使用概述CISCO交换机是一种常用的网络设备,用于构建局域网(Local Area Network,LAN)。
它可以通过物理线路的连接,将多台计算机或其他网络设备连接到同一个网络中,实现数据的传输和共享。
CISCO交换机的基本配置包括IP地址的配置、VLAN的配置、端口配置、安全性配置等。
接下来,我们将对这些配置进行详细说明。
首先,IP地址的配置是CISCO交换机的基本操作之一。
通过配置IP地址,我们可以对交换机进行管理和监控。
具体的配置步骤如下:1. 进入交换机的配置模式。
在命令行界面输入"enable"命令,进入特权模式。
2. 进入全局配置模式。
在特权模式下输入"configure terminal"命令,进入全局配置模式。
3. 配置交换机的IP地址。
在全局配置模式下输入"interfacevlan 1"命令,进入虚拟局域网1的接口配置模式。
然后输入"ip address 192.168.1.1 255.255.255.0"命令,配置交换机的IP地址和子网掩码。
4. 保存配置并退出。
在接口配置模式下输入"exit"命令,返回到全局配置模式。
然后输入"exit"命令,返回到特权模式。
最后输入"copy running-config startup-config"命令,保存配置到闪存中。
其次,VLAN的配置是CISCO交换机的关键配置之一。
通过配置VLAN,我们可以将交换机的端口划分为不同的虚拟局域网,实现数据的隔离和安全。
1. 进入交换机的配置模式。
同样,在特权模式下输入"configure terminal"命令,进入全局配置模式。
2. 创建VLAN。
在全局配置模式下输入"vlan 10"命令,创建一个编号为10的VLAN。
设置交换机的侦听口以监视网络会话

设置交换机的侦听口以监视网络会话以前公司里用HUB的时候,可是非常幸福哦,我随便开一个IRIS就能监视整个公司里的网络数据包,能很方便和清楚的看到大家都在做什么,简直就是没有秘密可言了。
后来玩IDS测试SESSIONW ALL的时候我用URL的预先阻断功能,就能做到想黑那里就黑那里的假像,后来很多人纷纷效仿把公司网络简直搞的是一团糟糕。
总结一下就是基于HUB的网络安全性能实在是非常低,而且几乎没有什么可管理性。
如果您正在筹划一个新的网络结构,我强烈建议采用交换机代替HUB来实现(当然费用的差距也必须考虑)。
采用交换机的网络基本上就没有可被监听的危险了,但是前提就是交换机也必须好好配置和管理,否则把买来的设备用默认状态摆在那里也是很危险的。
还是以我们公司为例子好了。
我们用的是3COM的3300的交换机24口的那种,我简单的把我的网络接口配置成了一个侦听接口,还是可以轻松的监听整个网络的数据包,下面简单的介绍下步骤。
说明下就是现在的网络监视软件如IDS和信息审计系统等等都是需要把自己的网络接口在交换机上设置为侦听口的,否则是没有办法正常监视网络流量的。
首先是用串口从后面接上交换机给设备设置一个IP地址,这个可以随便设置当然和我们在一个网段是最方便的了。
然后默认情况下3COM的WEB服务就是打开的我们可以用IE登陆上去。
默认的口令和用户名我们可以用:security 登陆这是3COM设备的一个默认管理帐号,很多人都没有改有意思的是我在互联网上用SNMP扫描找到的3COM交换机99%用这个帐号都可以进去。
简单易用,功能还很强大,听说4400更厉害可惜还没有用过。
我们点击左面的configuration选项,再从右边出来界面中选择Roving AnalysisPort。
这个界面就是配置交换机侦听口的地方了。
当然你如果实现知道自己的网络接口接在交换机那个口上就比较方便可以直接配置了,如果你不知道的话可以点击Advanced Stack Setup这里来查看当前IP地址和交换机端口的对应关系。
思科交换机端口配置
Cisco交换机配置新手篇之端口配置在IOS输入命令时只要缩写的程度不会引起混淆,使用配置命令的时候都可以使用缩写的形式。
比如:Switch>enable,在用户模式下以en开头的命令就只有enable,所以可以缩写成Switch>en。
也可以用TAB键把命令自动补全,如Switch>en,按键盘TAB后自动补全为Switch>enable。
快捷键:1.Ctrl+A:把光标快速移动到整行的最开始2.Ctrl+E:把光标快速移动到整行的最末尾3.Esc+B:后退1个单词4.Ctrl+B:后退1个字符5.Esc+F:前进1个单词6.Ctrl+F:前进1个字符7.Ctrl+D:删除单独1个字符8.Backspace:删除单独1个字符9.Ctrl+R:重新显示1行10.Ctrl+U:擦除1整行11.Ctrl+W:删除1个单词12. Ctrl+Z从全局模式退出到特权模式13.Up arrow或者Ctrl+P:显示之前最后输入过的命令14.Down arrow或者Ctrl+N:显示之前刚刚输入过的命令配置enable口令以及主机名字,交换机中可以配置两种口令(一)使能口令(enable password),口令以明文显示(二)使能密码(enbale secret),口令以密文显示两者一般只需要配置其中一个,如果两者同时配置时,只有使能密码生效.Switch.> /*用户直行模式提示符Switch.>enable /*进入特权模式Switch.# /*特权模式提示符Switch.# config terminal /*进入配置模式Switch.(config)# /*配置模式提示符Switch.(config)# hostname Pconline /*设置主机名Pconline Pconline(config)# enable password pconline /*设置使能口令为pconlinePconline(config)# enable secret network /*设置使能密码为networkPconline(config)# line vty 0 15 /*设置虚拟终端线Pconline(config-line)# login /*设置登陆验证Pconline(config-line)# password skill /*设置虚拟终端登陆密码注意:默认情况下如果没有设置虚拟终端密码是无法从远端进行telnet的,远端进行telnet 时候会提示设置login密码。
Cisco交换机之Catalyst3750G交换机端口限速教程
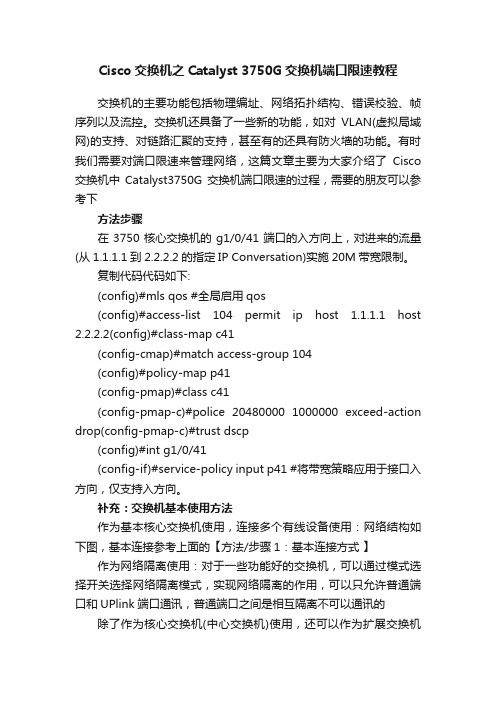
Cisco交换机之Catalyst 3750G交换机端口限速教程交换机的主要功能包括物理编址、网络拓扑结构、错误校验、帧序列以及流控。
交换机还具备了一些新的功能,如对VLAN(虚拟局域网)的支持、对链路汇聚的支持,甚至有的还具有防火墙的功能。
有时我们需要对端口限速来管理网络,这篇文章主要为大家介绍了Cisco 交换机中Catalyst3750G交换机端口限速的过程,需要的朋友可以参考下方法步骤在3750核心交换机的g1/0/41端口的入方向上,对进来的流量(从1.1.1.1到2.2.2.2的指定IP Conversation)实施20M带宽限制。
复制代码代码如下:(config)#mls qos #全局启用qos(config)#access-list 104 permit ip host 1.1.1.1 host 2.2.2.2(config)#class-map c41(config-cmap)#match access-group 104(config)#policy-map p41(config-pmap)#class c41(config-pmap-c)#police 20480000 1000000 exceed-action drop(config-pmap-c)#trust dscp(config)#int g1/0/41(config-if)#service-policy input p41 #将带宽策略应用于接口入方向,仅支持入方向。
补充:交换机基本使用方法作为基本核心交换机使用,连接多个有线设备使用:网络结构如下图,基本连接参考上面的【方法/步骤1:基本连接方式】作为网络隔离使用:对于一些功能好的交换机,可以通过模式选择开关选择网络隔离模式,实现网络隔离的作用,可以只允许普通端口和UPlink端口通讯,普通端口之间是相互隔离不可以通讯的除了作为核心交换机(中心交换机)使用,还可以作为扩展交换机(接入交换机)来扩展网络放在路由器上方,扩展网络供应商的网络线路(用于一条线路多个IP的网络),连接之后不同的路由器用不同的IP连接至公网相关阅读:交换机硬件故障常见问题电源故障:由于外部供电不稳定,或者电源线路老化或者雷击等原因导致电源损坏或者风扇停止,从而不能正常工作。
- 1、下载文档前请自行甄别文档内容的完整性,平台不提供额外的编辑、内容补充、找答案等附加服务。
- 2、"仅部分预览"的文档,不可在线预览部分如存在完整性等问题,可反馈申请退款(可完整预览的文档不适用该条件!)。
- 3、如文档侵犯您的权益,请联系客服反馈,我们会尽快为您处理(人工客服工作时间:9:00-18:30)。
Cisco CATALYST交换机端口监听配置
CISCO CATALYST交换机分为两种,在CATALYST家族中称监听端口为分析端口(analysis port)。
1、Catalyst 2900XL/3500XL/2950系列交换机端口监听配置(基于CLI)
以下命令配置端口监听:
port monitor
例如,F0/1和F0/2、F0/5同属VLAN1,F0/1监听F0/2、F0/5端口:
interface FastEthernet0/1
port monitor FastEthernet0/2
port monitor FastEthernet0/5
port monitor VLAN1
2、Catalyst 4000/5000/6000系列交换机端口监听配置(基于IOS)
以下命令配置端口监听:
set span
例如,模块6中端口1和端口2同属VLAN1,端口3在VLAN2,端口4和5在VLAN2,端口2监听端口1和3、4、5,
set span 6/1,6/3-5 6/2
3COM交换机端口监听配置
在3COM交换机中,端口监听被称为“Roving Analysis”。
网络流量被监听的端口称作“监听口”(Monitor Port),连接监听设备的端口称作“分析口”(Analyzer Port)。
以下命令配置端口监听:
指定分析口
feature rovingAnalysis add,或缩写 f r a
例如:
Select menu option: feature rovingAn alysis add
Select analysis slot: 1
Select analysis port: 2
指定监听口并启动端口监听
feature rovingAnalysis start,或缩写 f r sta
例如:
Select menu option: feature rovingAn alysis start
Select slot to monitor (1-12): 1
Select port to monitor&nb sp; (1-8): 3
停止端口监听
feature rovingAnalysis stop,或缩写 f r sto
DELL交换机端口监听配置
在Dell交换机中,端口监听被称为“端口镜像”(Port Mirroring)。
使用交换机的管理界面,参数如下:
Destination Port(目的地端口):定义端口通信要镜像到的端口号;
Source Port(源端口):定义被镜像端口的端口号。
Add(添加):添加端口镜像操作。
Type(类型):指定要镜像的端口通信类型。
可能的字段值包括:“RX”-表示镜像进入网络的数据;“TX”-表示镜像流出网络的数据;Both()-表示镜像所有数据。
Status(状态):表示端口的状态。
可能的字段值包括:“Active”-表示端口被启用;“Not Active”-表示端口被禁用。
Remove(删除):删除端口镜像会话。
可能的字段值包括:“已选取”-删除端口镜像会话;“未选取”-保留端口镜像会话。
具体设置:
1、在Port Mirroring对话框中的Destination Port中选中目的端口(镜像端口),再单击Add 按钮;
2、在系统将打开“Add Source Port”(添加源端口)页面中,定义“Source Port”(源端口)和“Type”(类型)字段,并单击“Apply Changes”(应用更改),使系统接收更改。
(注:如果需要从端口镜像会话删除副本端口,请打开“Port Mirroring”(端口镜像)页面,选取
“Remove”(删除)复选框,再单击“Apply Changes”(应用更改)。
系统将删除端口镜像会话,并更新设备。
)
以下命令配置端口监听:
指定分析口
CLI 命令实例:
Console(config)# interface ethernet 1/e1
Console(config-if)# port monitor 1/e8
Console# show ports monitor
Source port Destination Port Type Status
----------- ---------------- ----- -------
1/e1 1/e8 RX, TX Active
NetCore交换机端口监听配置
NetCore交换机中,端口监听被称为“端口镜像”(Port Mirroring)。
交换机提供四种监视状态:
Off 关闭Mirror功能
Rx 捕获被监视端口的接收数据
Tx 捕获被监视端口的发送数据
Both 捕获被监视端口的接收和发送的数据
进入NetCore的超级终端,在主菜单中输入“5”进入端口镜像设置界面,输入“1”设置端口镜像状态。
如设置端口1为镜像端口,端口8为被镜像端口,捕获该端口的接收和发送数据。
配置命令如下:
1. 选择配置的选项 (1,off,
2.Rx,
3.Tx,
4.Both) :4
2. 选择捕获端口:1
3. 选择被镜像端口:8
按Esc键退回镜像设置界面,设置成功。
Intel交换机端口监听配置
Intel 称端口监听为“Mirror Ports”。
网络流量被监听的端口称作“源端口”(Source Port),连接监听设备的端口称作“镜像口”(Mirror Port)。
配置端口监听步骤如下:
● 在navigation菜单,点击Statistics下的Mirror Ports,弹出Mirror Ports信息。
● 在Configure Source 列中点击端口来选择源端口,弹出Mirror Ports Configuration。
● 进行源端口设置:
● 源端口是镜像流量的来源口,镜像口是接收来自源端口流量的端口。
● 点击Apply确定
可以选择三种监听的方式:
1.连续(Always):镜像全部流量。
2.周期(Periodic):在一定周期内镜像全部流量。
镜像周期在Sampling Interval configuration 中设置。
3.禁止(Disabled):关闭流量镜像。
Avaya交换机端口监听配置
在Avaya交换机用户手册中,端口监听被称为“端口镜像”(Port Mirror)。
以下命令配置端口监听:
{set|clear } Port Mirror
设置端口侦听:
set port mirror source-port
mirror-portsampling { always } [ max-packets -sec
] [ piggyback-port ]
禁止端口监听:
clear port mirror
命令中,
mod-port-range 指定端口的范围;
mod-port-spec 指定特定的端口;
piggyback-port 指定双向镜像的端口;
sampling 指定镜像周期;
max-packets-sec 仅在sampling设置为periodic时使用,指定监听口每秒最多的数据报数量。
华为交换机端口监听配置
华为交换机用户手册中,端口监听被称为“端口镜像”(Port Mirroring)。
使用Huawei Lanswitch View管理系统添加一个镜像端口:
选择Device Setup或Stack Setup。
点击Port Mirroring。
点击Add按钮。
对于堆叠,点击Switch并从列表选择一个交换机。
点击Reflect from并选择流量将被镜像的端口。
点击Reflect to并选上面所选择的端口上的。