木吉他综合效果器ZOOM A3 Pre-AMP for AC guitar完全中文版说明书
吉他综合效果器使用常识——GT-8初学者调整设置

吉他综合效果器使用常识——GT-8初学者调整设置2006-01-10 tedboy(转)吉他中国论坛点击: 22253吉他综合效果器使用常识——GT-8初学者调整设置GT-8初学者调整设置GT-8终于到手了,怎样才能得到好的音色呢?你可能会花上一两个小时玩遍所有预制音色,却很难找到几个还算满意的,绝大多数音色要么不喜欢,要么根本用不着。
你会觉得困惑,听上去不值得你花的银子,只有那么一点让你满意的,亏大了!因此,你开始自己动手调整音色,可是更糟糕了,简直不忍耳睹,或者只好了那么一点点。
于是你再次开始怀疑银子白花了。
希望这篇文章可以帮你打消疑虑,并且用一种快乐的、内行的方式进行调节,得到你需要的音色。
第一步,基础调节设定电平。
这是最重要的一步。
耐心点,花点时间以免返工。
无须多言,有几点必须牢记。
输入电平的调整。
关掉所有效果,打开电平表 [SYSTEM] [PARAMETER]—METER:INPUT,调整PATCH LEVEL在100(我的建议),然后用力弹琴在METER上得到峰值LEVEL。
接下来,[SYSTEM] [PARAMETER]—METER:OUTPUT,确定二者匹配。
我的值是-3。
这样说可能会有点误导,实际上INPUT LEVEL的调整不会影响INPUT METER。
INPUT METER得到的是吉他的直接输入信号(未经过任何处理),但是可以注意到OUTPUT METER是随着INPUT METER的调整而变化的。
INPUT LEVEL的调整是在效果之前吉他输入之后,而我们的目的是保证INPUT LEVEL和OUTPUT LEVEL之间不产生衰减(保持相同的LEVEL)。
如果你的吉他输入信号的确很弱的话,你可能希望通过提升INPUT LEVEL的电平调整来得到好的、强的信号,这是最重要的设置步骤。
预制INPUT LEVEL设定值为0db。
另外,必须注意的是INPUT LEVEL的调整会影响整体的电平,所以如果你调整了INPUT LEVEL的话,随时应该检查OUTPUT LEVEL,以确保没有衰减信号。
ZOOM电吉他效果器中文说明书.
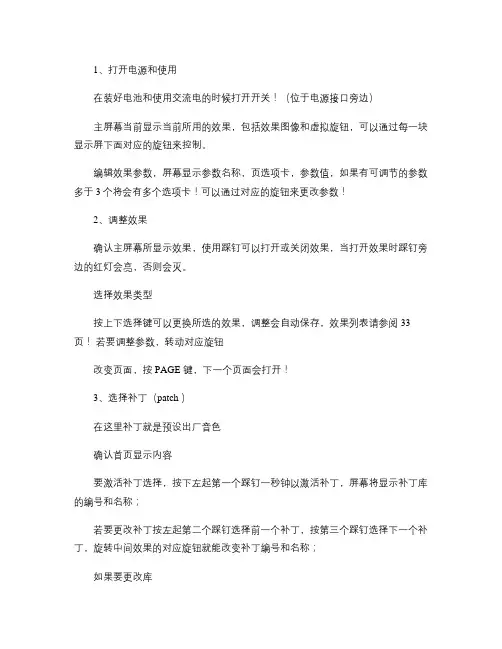
1、打开电源和使用在装好电池和使用交流电的时候打开开关!(位于电源接口旁边)主屏幕当前显示当前所用的效果,包括效果图像和虚拟旋钮,可以通过每一块显示屏下面对应的旋钮来控制。
编辑效果参数,屏幕显示参数名称,页选项卡,参数值,如果有可调节的参数多于3个将会有多个选项卡!可以通过对应的旋钮来更改参数!2、调整效果确认主屏幕所显示效果,使用踩钉可以打开或关闭效果,当打开效果时踩钉旁边的红灯会亮,否则会灭。
选择效果类型按上下选择键可以更换所选的效果,调整会自动保存,效果列表请参阅33页!若要调整参数,转动对应旋钮改变页面,按PAGE 键,下一个页面会打开!3、选择补丁(patch )在这里补丁就是预设出厂音色确认首页显示内容要激活补丁选择,按下左起第一个踩钉一秒钟以激活补丁,屏幕将显示补丁库的编号和名称;若要更改补丁按左起第二个踩钉选择前一个补丁,按第三个踩钉选择下一个补丁,旋转中间效果的对应旋钮就能改变补丁编号和名称;如果要更改库同时按下一号踩钉和二号踩钉选择前一个库,同时按下三号四号踩钉选择下一个库,旋转中间效果的对应旋钮可以改变库的编号和名称。
同时按下两个踩钉时可能会感应较早按下的踩钉,要注意避免这种情况。
返回主页按下一号踩钉一秒!4、存储补丁G3自动保存设置时调整的参数要存储或换用不同的补丁,按STORE /SWAP 键,屏幕显示如下,图见说明书P12第一个图。
通过转动左边效果的最左边旋钮来选择是否存储或交换补丁。
要设置存储或交换新的补丁的位置转动右边效果的二号旋钮给更改的补丁或存储的更换编号。
转动左边效果最左边旋钮更改该库的存储或更换(当前使用的补丁不能作为选择目标)要存储/换用完整补丁按STORE /SWAP 键,屏幕显示”COMPLETE”后,打开STORE /SWAP 交换补丁(如果要退出,按除了STORE /SWAP 以外的任意键。
5、设置特定的补丁参数按TOTAL 键激活总菜单,转动左边效果的第一个旋钮来调整补丁级别,范围0~120。
电吉他效果器篇

Guitar rig5中文版教程-教你使用和调出漂亮的音色1 介绍这本手册会对Guitar Rig 5中的每个效果模块进行更加深入地介绍,会帮助您更好地对声音进行塑形,以及当作是对每个模块每个旋钮参数的工具手册,在以下章节中,将对Guitar Rig 5中的所有放大器、效果器、以及工具模块进行介绍,顺序与在Guitar Rig 5的模块浏览器中的顺序是相同的。
要学习Guitar Rig 5的基础操作,我们推荐您先从Getting Started(快速开始)手册开始,然后可以阅读Application Reference(软件使用手册)来对Guitar Rig 本身的操作功能有更深入地了解。
您可以通过Guitar Rig软件界面的Help(帮助)> Open Manual(打开手册)命令来打开各个英文使用手册。
2 Amplifiers(放大器)除了乐器本身以外,对吉他和贝斯的音色调节通常都是从放大器开始(俗称箱头)。
Guitar Rig 5精挑细选了一些1950年到现在的经典放大器模块。
就像真实的放大器一样,不同的放大器和参数设置会直接影响到其他模块处理后的声音,所以使用放大器来作为探索声音效果的最开始是非常必要的,另外,在每个放大器模块中都有一部分额外的扩展参数,这些参数可以模拟真实世界的各种因素对音色的影响,这些额外的参数在几乎所有的放大器上都是相同的,下一章节会先对这些额外的控制功能进行介绍。
2.1 额外控制功能点击模块界面右上角的三角标志按钮可以展开额外控制面板,这里提供了绝大多数放大器都具有的相同控制功能:·POWER SUPPLY(电源设置)可以将放大器的电源在50Hz和60Hz之间进行切换,用于对放大器电源内部的DC电压进行校正,不正确的电压可以对声音产生一点微妙的调制效果。
·VARIAC(变压器)会尽力模拟一种AC电源中的可调变压器效果,从而实现可变电压的特点(著名的‘brown sound’效果),或者是超过正常电压值(可以让声音显得更加‘凶猛’)。
BOSS ME-33 吉他多效器说明书
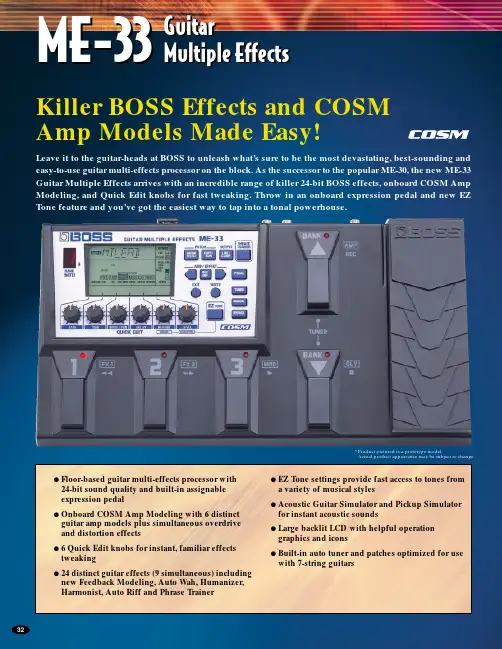
ME-33Killer BOSS Effects and COSM Amp Models Made Easy!32q Floor-based guitar multi-effects processor with24-bit sound quality and built-in assignableexpression pedalq Onboard COSM Amp Modeling with 6 distinctguitar amp models plus simultaneous overdriveand distortion effectsq6 Quick Edit knobs for instant, familiar effectstweakingq24 distinct guitar effects (9 simultaneous) includingnew Feedback Modeling, Auto Wah, Humanizer,Harmonist, Auto Riff and Phrase Trainerq EZ Tone settings provide fast access to tones froma variety of musical stylesq Acoustic Guitar Simulator and Pickup Simulatorfor instant acoustic soundsq Large backlit LCD with helpful operationgraphics and iconsq Built-in auto tuner and patches optimized for usewith 7-string guitarsLeave it to the guitar-heads at BOSS to unleash what’s sure to be the most devastating, best-sounding and easy-to-use guitar multi-effects processor on the block. As the successor to the popular ME-30, the new ME-33 Guitar Multiple Effects arrives with an incredible range of killer 24-bit BOSS effects, onboard COSM Amp Modeling, and Quick Edit knobs for fast tweaking. Throw in an onboard expression pedal and new EZTone feature and you’ve got the easiest way to tap into a tonal powerhouse.GuitarMultiple Effects*Product pictured is a prototype model.Actual product appearance may be subject to change.33q AD Conversion AF Method * q DA Conversion ∆∑Method 24-bit DAC q Sampling Frequency 44.1 kHz qPatches 60 (User) + 30 (Preset) q Effects Guitar Simulator, Compressor, Overdrive/Distortion, Auto Wah, T-WahPhaser, Equalizer, Humanizer, Guitar Amp Simulator, Chorus, Flanger, Tremolo/Pan, Pitch Shifter, Harmonist, Auto Riff, Delay, Reverb, Noise Suppressor < Effects for Expression Pedal > Volume Pedal, Pedal Wah, Pitch Bender,Ring Modulator q Nominal Input Level INPUT: -20 dBu, AUX IN: -10 dBu q Input Impedance INPUT: 1 M ohms AUX IN: 47 k ohms q Nominal Output Level OUTPUT: -20 dBu, Output Impedance, OUTPUT: 2 k ohms q Display 7 segments, 1 character LED, Backlit Custom LCD q Jacks INPUT Jack, AUX IN Jack (Stereo Mini Type), OUTPUT Jacks L (MONO) / R, PHONES Jack (Stereo Mini Type), AC Adaptor Jack q Power Supply DC 9 V: Dry batteries(R6/LR6 (AA) type) x 6, AC Adaptor (PSAseries: Optional) q Current Draw 160 mA * Expected battery life under continuous use: Carbon: 3.5 hours, Alkaline: 12 hours, These figures will vary depending on the actual conditions of use. q Dimensions 397.5 (W) x 212 (D) x 63 (H) mm, 15-11/16 (W) x 8-3/8 (D) x 2-1/2 (H) inches q Weight 1.8 kg / 4 lbs (including batteries) q Accessories Owner's Manual, Dry Batteries (Alkaline: LR6 (AA) type) x 6,Roland Service (information Sheet) q Options AC Adaptor (PSA series)*0 dBu = 0.775 Vrms*In the interest of product improvement, the specifications and/or appearance of this unit are subject to change without prior notice.*AF Method (Adaptive Focus method)*This is a proprietary method from Roland that vastly improves the signal-to-noise (S/N) ratio of the A/D and D/A converters.ME-33 Specifications--------------------------------------------------------------Features that MatterThe ME-33 goes the extra mile by giving you an onboard expression pedal that’s instantly assigned to control a cool-sounding effects parameter. Of course, it can also easily be assigned to control just about anything else you want—from wah to pitch shifting to volume. For 7-string guitarists, it has an auto tuner that can tune a low “B”, as well as patches optimized for bottom-heavy sounds.Optional battery power lets you take it just about anywhere, while a built-in Phrase Trainer and Auxiliary input lets you record and play back riffs from CDs or tapes—the perfect tool for slowing down and learning those difficult riffs.--------------------------------------------------------------Incredible Sounds, Incredibly EasyIt’s no secret that BOSS is known for legendary effects with simple, straightforward designs that let you spend less time tweaking and more time playing. The ME-33 takes this concept to the extreme by putting the full BOSS effects powerhouse at your fingertips using six Quick Edit knobs (Gain, Tone, Modulation,Delay , Reverb and Level) and a large backlit graphic LCD. So getting your sound is now as simple as stomping a pedal and turning a few knobs. Once you’ve got the sound you like, just save it into one of 60 memory locations for instant recall. Don’t want to scroll through effects patches? No problem. A new Easy Tone feature gives you cool settings depending on the style of music you’re playing: Country , Blues, Rock, Hard Rock, Metal or 7-String--------------------------------------------------------------COSM Amp Models and Head-Turning EffectsThanks to the power of COSM Guitar Amp modeling, the ME-33delivers stunning models of six classic and modern amp types—from ultra-clean to bluesy to full-on thrash metal. And unlike some guitar multi-effects processors, you can use these killer amp models and a variety of BOSS overdrive/distortion effects simultaneously .Speaking of effects, there’s 24 in all—nine of which can be used simultaneously—including everything from reverb, chorus and delay to Auto Riff, Harmonist and an Overdrive/Distortion effect with new Feedback Modeling, which can give you realistic ampfeedback at any volume.s ME-33 Rear PanelJC-120, TWIN, MATCH, BG STK, MS STK, METALCOSM Amp Modelsq OverDrive/Distortion (OD, FAT, Blues/DIST, METAL, FUZZ)including Feedback modelingq Guitar Simulator (Pickup Simulator, Acoustic Simulator) q Compressor q Auto W ah q T-W ah q Phaser q Equalizer q Humanizer q Chorus (Mono, Stereo) q Flanger q T remolo/Pan q Pitch Shifter q Harmonist q Auto Riff q Delay (Normal, Pan) q Reverb (Room, Hall) q Noise Suppressor q Pedal W ah q Ring Modulator q Pitch Bend (1-5)Multi Effects。
GuitarPRO使用说明
Guitar-pro(简称GTP,这个软件的一开始格式就是.gtp而得名)是现时网络一个非常火爆的软件,几乎每个吉他网站所提供的吉他谱都有GTP格式。
而且界面很直观地把六线谱为主要输入形式,只要你熟悉纸张的吉他谱上手GTP来说更是得心应手。
对初学者来说,只要在GTP上简单地输入谱例它就会即时为你示范演奏,可以在练习中事半功倍,的确是难得的吉他MIDI制作软件。
Guitra-pro现在已经出了5.2版,向下的还有3.0版,2.16版,2.2版。
老琴友们可能还记得一个很出色的吉他网站——吉他扒手。
可以说,GTP在国内发扬光大在一定程度上和这个网站有很大的关系!相当年,我也是吉他扒手的粉丝,可惜后来关闭了。
现在我们就对GTP5.2版从安装到设置和简单打谱作简单的介绍!GTP5.2和一般软件的安装没什么分别,首先选择安装语言,我们就选U.S.English就行了!安装完后选择Chinese(GB),OK!重启计算机!GTP就可以正常动行了!GTP5.2在下边有提供下载(附注册码)。
GTP5.2第一次运行时会自动弹出MIDI设置窗口。
这里必须要进行简单的设置,否则可能会有不发声的问题!我们在Port Device一定选择你系统的声卡,Instrument Patch选择General MIDI 把后一项打钩,设置好后按一下中间那个喇叭,如果有发出一段琴声就证明设置完成了!如果没有音乐发出把选项交替设置试试,直至成功!在这里要提醒大家,GTP播放的音乐其实就是MIDI,效果的好坏与硬件中的声卡有直接关系,GTP5.2自带出色的软波表,提升播放MIDI音乐的效果!以下是gtp下载地址本站提供下载地址:Guitarpro5.2精简版下载(11.2M)视频教学以下就对GTP的操作进行简单介绍GTP本身也自带了很多示范歌谱的。
现在你就可以用GTP将它们打开,熟悉的六线谱就会出现在你的眼前。
当然了,GTP还可以为你演奏歌谱,如上图,按下从开头演奏键,GTP马上为你演奏一份歌谱就这么简单。
rp50效果器中文说明书
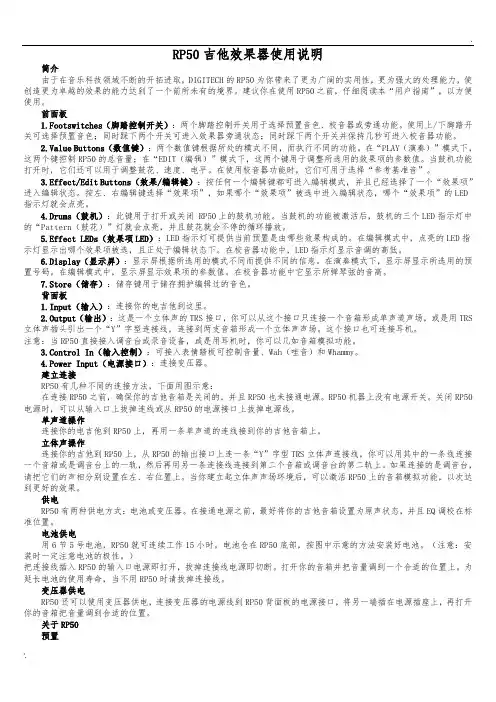
RP50吉他效果器使用说明简介由于在音乐科技领域不断的开拓进取,DIGITECH的RP50为你带来了更为广阔的实用性,更为强大的处理能力,使创造更为卓越的效果的能力达到了一个前所未有的境界。
建议你在使用RP50之前,仔细阅读本“用户指南”,以方便使用。
前面板1.Footswitches(脚踏控制开关):两个脚踏控制开关用于选择预置音色、校音器或旁通功能。
使用上/下脚踏开关可选择预置音色;同时踩下两个开关可进入效果器旁通状态;同时踩下两个开关并保持几秒可进入校音器功能。
2.Value Buttons(数值键):两个数值键根据所处的模式不同,而执行不同的功能。
在“PLAY(演奏)”模式下,这两个键控制RP50的总音量;在“EDIT(编辑)”模式下,这两个键用于调整所选用的效果项的参数值。
当鼓机功能打开时,它们还可以用于调整鼓花、速度、电平。
在使用校音器功能时,它们可用于选择“参考基准音”。
3.Effect/Edit Buttons(效果/编辑键):按任何一个编辑键都可进入编辑模式,并且已经选择了一个“效果项”进入编辑状态。
按左、右编辑键选择“效果项”,如果哪个“效果项”被选中进入编辑状态,哪个“效果项”的LED 指示灯就会点亮。
4.Drums(鼓机):此键用于打开或关闭 RP50上的鼓机功能。
当鼓机的功能被激活后,鼓机的三个LED指示灯中的“Pattern(鼓花)”灯就会点亮,并且鼓花就会不停的循环播放。
5.Effect LEDs(效果项LED):LED指示灯可提供当前预置是由哪些效果构成的。
在编辑模式中,点亮的LED指示灯显示出哪个效果项被选,且正处于编辑状态下。
在校音器功能中,LED指示灯显示音调的高低。
6.Display(显示屏):显示屏根据所选用的模式不同而提供不同的信息。
在演奏模式下,显示屏显示所选用的预置号码。
在编辑模式中,显示屏显示效果项的参数值。
在校音器功能中它显示所弹琴弦的音高。
7.Store(储存):储存键用于储存拥护编辑过的音色。
迪莫克斯迪-可移植吉他效果器说明书
Precautions Preset Selection Tone Setting Tone Saving Quick Recall Buttons Tap Tempo Rhythm Setting TunerAUX INSystem SettingMain Features Panel layoutOperational GuidanceConnections BatteriesEffects Explanation Specifications Troubleshooting Patch List01010204040506070708080909111213151516*Please read carefully before proceeding*Power Supply:Please connect the designated AC adapter to an AC outlet of the correct voltage. Please be sure to use only an AC adapter which supplies 9V DC(±10%), , 300mA,center negative. Unplug the AC power adapter when not in use or during electrical storms.Connections:Always turn off the power and all other equipment before connecting or disconnecting.This will help prevent malfunction and damage to any of the devices. Make sure to unplug all connection cables and power cords before moving this unit. Location:To avoid deformation, discoloration, or other serious damage, do not expose Direct sunlightMagnetic fieldsExcessively dusty or dirty locationStrong vibration or shockInterference with other electrical devices and Cleaning:Radios and televisions placed nearby may experience reception interference. Operate this unit at a suitable distance from radios and televisions.Clean only with a soft, dry cloth.FCC certificationThis device complies with Part 15 of the FCC Rules. Operation is subjectto the following two conditions:This device may not cause harmful interference.This device must accept any interference received, including interferencethat may cause undesired operation.99 Factory presets and 99 user presets2 Auto wah effects10 Overdrive and distortion effects7 Amp models11 Modulation effects5 Different delays4 Reverb types40 Drums patterns and 10 metronomesTap tempo functionality02 0304 05 06 0708 09MODE:Control for scrolling through the various pages in the menu LCD Display: Displays the User Interface and provides all informationfor presets and parametersVALUE:Control for adjusting various parameters and selections within the User Interface.SAVE: Press to enter preset saving pageRHYTHM:Press to access Drum machine and MetronomeTUNER: Press to access guitar tunerEFFECTS CHAIN:Indicates the operational status of the differenteffect blocks and the currently selected page within the User Interface Quick Recall buttons:Quickly recalls 4 of your favorite presetsTAP:Tap tempo control for use with the drum machine, metronome and delay effects0110 11 12 13 1415 16INPUT:1/4” mono audio jack for connecting instrumentOUTPUT:Audio output 1/4” mono audio jackAUX IN:Stereo line in for connection to external devices such as mp3 player for audio playback.HEADPHONES: Stereo line out for connecting to a headset or other external audio equipmentDC IN:Connects to the supplied power adaptor(DC 9V, 300mA, )Master Volume: Adjusts the master output volume of the device Battery hatch: Insert 2 x AAA batteries for battery operationPowerMaster of Guitar Volume02Preset name Preset number 12Drum speed4Battery capacity301(9V, 300mA Preset Selection03Rotate the MODE control until "PL " is highlighted brightly on the "EFFECTS CHAIN' panel. The LCD Display will indicate the information of the current preset(P or U) . P stands for factory preset, U stands for user Preset. Rotating the Value control whilst on the Preset page will scroll through the various presets.Adjust the master output volumeMore details will be listed on page 16.Effect ChainRotate the 'MODE' control to scroll through the Edit pages of the various Effect blocks within the 'Effect Chain’Effect editing Effect On/Off010203Note:The effects chain display panel will illuminate to indicate which effects blocks are currently active within the selected presetThere are 6 effect blocks containing 39 types of effects in PE100's effect Chain. Each effect block provides a different kind of effect.PL = Preset Mode SY = System settingsAfter selecting the effect block you wish to edit using the MODE control, the LCD screen will display the effect model, the on/off status, all of the various settings and parameters of that effect.While on an effect blocks edit page, press the D quick recall button to switch that effect block on or off within the preset.Rotate the VALUE control to select your desired model.Press the VALUE control to scroll through the parameters.After selecting the parameter you wish to edit, rotate the VALUE control to adjust it's value. WAH = Wah Wah effectsREV = Reverb effects AMP = Amplifier Simulation models R.S = Rhythm(Drum machine and Metronomes)MOD = Modulation effects DS = Overdrive and Distortion effects DLY = Delay effectsThe tone can be saved as a User preset01 0203 04 05Press the SAVE buttonRotate the VALUE knob to select which preset number you wish to save your tone in. You can save your tone in any user preset U01 to U99. When you have selected your desired preset slot press the VALUE control to continue.Once you have finished entering the preset name press the SAVE button again to save the preset.Now you can edit the name of the preset. Rotate the VALUE control toscroll through the characters. Press the VALUE control to select acharacter and move onto the next character in the preset name.If you wish to cancel the saving procedure at any time during this process, simply rotate the MODE control to exit the saving page.Notes: P01 to P99 are for factory presets only and can not be used to store customuser presets. You can only save custom tones in U01-U99.TAP TEMPOTap Tempo has 2 operationsNotes: If the screen shows UNSAVED in PL mode, the quick recall button can notsave the tone.0102The QUICK RECALL buttons A,B,C,D provide an easy way to instantly store and recall 4 of your favorite presets.To store a preset in a quick recall slot make sure that PL is highlighted using the MODE control.Navigate to the preset you wish to store in the quick recall slot using the VALUE controlHold the quick recall button (A,B,C,D) where you wish to save the preset, for more than 1 second.The quick recall button will flash 3 times to confirm you have successfully stored the preset within that slot.To quickly recall that preset at any time just press the corresponding "quick recall button" whilst PL is highlighted on the EFFECTS CHAIN display.While you are using the RHYTHM function TAP is highlighted blue. Pressing theTAP button two or more times will synchronize the drum patterns and metronomes speed with your inputted tempoWhile you are not using the RHYTHM function TAP is highlighted red. Pressing theTAP button two or more times will synchronize the Delay time with your inputted tempo.Tuner010*********The PE100 contains 40 drum patterns and 10 metronomes .Pressing the RHYTHM button at any time will start or stop the drum patternsand metronomes.Rotate the MODE control until R.S is highlightedRotate the VALUE control to choose the DRUM or METRONOME.Press the VALUE control to highlight the rhythm parameter and rotate theVALUE knob to choose which rhythm you want.Press the VALUE control again and rotate it to edit the speed, the range isBPM40 to BPM260.Press the VALUE control once more and rotate it to edit the playback volume ofthe rhythm.Press the TUNER button at any time to access the tuning function page. The tuner is set to A=440Hz as stock, rotate the VALUE control to change this calibration.Press the VALUE control to highlight the bypass/mute parameter, rotate the VALUE control to switch between muted tuning and bypassed tuning.Pressing the TUNER button again will return you to the same page you were in whenyou first accessed the tuning function page.Select OUTPUT using the VALUE control, you can choose line out or ampout depending on what equipment you wish to connect your PE100 to.01Connect the output of your favorite external audio device, such as mp3 player, to this input using a mini stereo jack.Rotate the MODE control until SY is selected. The system settings include theOUTPUT type, LCD B (brightness), LCD M (invert colors), RESET (factory RESET).To perform a full factory reset of the PE100 rotate the VALUE control to highlight RESET and press it. Next you will be asked "are you sure to restore factory setting" select “YES” to perform a factory reset. Select “No” to cancel and return to the system settings page.04 Rotate the VALUE control to LCD M, press it. Rotate the VALUE control to invert the LCD display screens colors.03 Rotate the VALUE control to LCD B, press it. Rotate the VALUE control to edit the brightness of the LCD display screen.02Equip two AAA size batteries and close the battery compartment.Turn off PE100 and open the battery compartment.010203input JackThe PE100 will power on using batteries when something is connected to theWAH01NameSpecificationsTOUCH WAH FUNKY MONKEY A dynamically responsive autowah effect Time based Auto Wah effect.*NOTES: All product name called their company, here is only used in this product simulation effect of tone types.DLY05REV06DIGITAL ANALOG DYNAMIC ECHO TAPE ECHO NameSpecificationsRepeats the signal with no special processing, creates the most clean delay sound.Simulates analog delay equipment, produces a warm and vintage delay sound.The delay sound is low while playing, but increases when playing stops.Simulates the sound of a real Echo, authentic and natural delay sound.Simulates a vintage Tape Echo machineROOM HALL CHURCH PLATENameSpecificationsSimulates the acoustics of a room Simulates the acoustics of a concert hall.Simulates the acoustics of a big church.Simulates Plate reverberation.No. of Effect Modules: 6 modulesNo. of Effect Types: 39 Effect typesPreset Patch Memory:99 patchesUser’s Preset Patch Memory:99 patchesInput Jack:1/4” mono audio jackOutput Jack:1/4” mono audio jackHeadphone out:1/8” stereo audio jackAUX IN: 1/8” stereo audio jackPower requirements:AC adapter 9V DC,300mA,Dimensions:137mmX81mmX32mmWeight:230gAccessories:Owner’s Manual,AC adapter 9V DC.Can not power on:Check power connection——Make sure the power is connected correctly. Check the adapter——Make sure the adapter’s type is DC 9V/300mA/No sound or low volume:Check connection of cables——Make sure all the cables are connected firmly. Check the on/off switch and the volume setting of amp——Make sure each equipment’s volume is set to an appropriate level.High noise:Check the adapter——Make sure the adapter’s type is DC 9V/300mA/Check the cables——Make sure the cables are connected firmly and have no quality problemP01 P02 P03 P04 P05 P06 P07 P08 P09 P10 P11 P12 P13 P14 P15 P16 P17 P18 P19 P20 P21 P22 P23 P24 P25DS CLEANGREENBLACKOC FUZZFL FUZZPH FUZZLOST FUZZLOST 1LOST 2SLOW DANCECLASSIC PURPLEGLASSBIG HAIRBLUE SPRINGOLD BRIT METALCHORUS ORGANSENSUOUSSUMMER 6969 LEADTUMBLEWEEDCOWBOY LEADVOCAL INDUSTRWALK IN THE WOCOCK ROCKBREATHEP26P27P28P29P30P31P32P33P34P35P36P37P38P39P40P41P42P43P44P45P46P47P48P49P50DAVE FLAVORSURFING RHYTHMSURFING LEADRANDYAGGRESSIVEAMANI RHYTHMAMANI SOLOGARY TRACKNO HESITATETRUE LOVEGOLDEN AGE RHYTHMGOLDEN AGE SOLOLOVEROCEAN SKYBRITISH METAL of preset of presetJTM45JTM45 SOLOJTM45 ELECTRONJTM45 WAHBRITISHBRITISH ODBRITISH DELAYBRITISH CHBRITISH SOLOBSMP51 P52 P53 P54 P55 P56 P57 P58 P59 P60 P61 P62 P63 P64 P65 P66 P67 P68 P69 P70 P71 P72 P73 P74 P75P76P77P78P79P80P81P82P83P84P85P86P87P88P89P90P91P92P93P94P95P96P97P98P99JC CHORUSTWIN REV1TWIN REV2TWIN REV3TWIN REV4REVERB ONLYCH CLEANFINECONFUSIONPH CLEANBP REVERBHOT WAHELANGER WAHLASER WAHCICADAFLUTTERINGAURORAELECTRICPOP CLEANVOODOO CHILDHAPPY BLUESHAIR METALJUST PUNKROTATING WINDROCK MONKEYJAZZ CLUBROCK SOUNDJST FIGHTERMEMORYCRUNCHERNARROWCOLLAPSEMID-NIGHTDREAM STREAMSWEET TALKINGCLOCK TOWER of preset of preset BSM SOLOBSM SOLO2BSM WAHBSM CRUNCHBSM ODBSM VIBBSM RHYTHMJC SOLOJC ODJC POSTJC CLEANTWIN REV SOLOJC METALMOOER AUDIO CO.,LTD Shenzhen, China。
Ample Guitar PF主面板用户手册说明书
主面板用户手册Ample Guitar PF北京博声音元科技有限公司目录1乐器面板 (4)1.1乐器面板概述(O VERVIEW OF I NSTRUMENT P ANEL) (4)1.2采样库切换(S AMPLE L IBRARY S WIT CH) (4)1.3预制文件读取/保存(S AVE/L OAD P RESET) (4)1.4卷弦器(A LT ERNAT E T UNER) (5)2主面板 (6)2.1主面板概述(O VERVIEW OF M AIN P ANEL) (6)2.2吉他技巧与复音连奏(A RTICULATIONS&P OLY L EGAT O) (7)2.2.1技巧列表(Articulation List) (7)2.2.2标准音(Sustain) (7)2.2.3自然泛音(Natural Harmonic) (7)2.2.4手掌闷音(Palm Mute) (8)2.2.5无头滑音与无尾滑音(Slide In from below&Slide Out downwards) (8)2.2.6连奏滑音(复音连奏)-Legato Slide(Poly Legato) (9)2.2.7击钩弦(复音连奏)-Hammer-On&Pull-Off(Poly Legato) (12)2.2.8滑棒吉他(Slide Guitar) (14)2.2.9双演奏法功能(Doubled Keyswitches) (14)2.3声音模式(S OUND M ODE) (14)2.4双吉他模式(D OUBLED G UIT ARS) (14)2.5丰富的左手演奏噪音(R ICH F RET S OUND) (14)2.6变调夹(C APO) (15)2.7指法逻辑切换(C APO L OGIC M ODE) (15)2.8空弦优先(O PEN S TRING F IRST) (15)2.9演奏模式切换(P LAY M ODE S WIT CH) (15)2.10自动连奏模式切换(A UT O L EGAT O M ODE S WIT CH) (16)2.11自动扫弦噪音(S TROKE N OISE) (16)2.12颤音(V IBRAT O W HEEL) (16)2.13弦指定与把位指定(S TRING F ORCE&C APO F ORCE) (16)2.13.1弦指定(String Force) (16)2.13.2把位指定(Capo Force) (17)2.14效果音组(FX S OUND G ROUP) (17)2.15复音重复键(P OLY R EPEAT ER) (18)2.16延音踏板开关(H OLD P EDAL T OGGLE) (18)1乐器面板1.1乐器面板概述(Overview of Instrument Panel)1.采样库切换(Sample Library Switch)2.预制文件读取/保存(Save/Load Preset)3.卷弦器(Alternate Tuner)4.把位显示(Capo Force Display)5.弦指定显示(String Force Display)1.2采样库切换(Sample Library Switch)AGPF有Neck、Both、Bridge三档采样库。
ZOOM效果器的使用
ZOOM效果器的使用1,音量钮和音箱模拟器钮.通过音量钮可以控制效果器的输出音量,通过音箱模拟器钮可选择7种不同的音箱模拟效果,来使用所有预制完毕的30个用户和30个原厂的音色.2,用户音色和原厂音色的选择.通过上行和下行两个选择踏板,可选择A,B,C,D,E,F六组30个可编辑的用户音色及0,1,2,3,4,5六组不可编辑的原厂音色!通过上下踩动多功能程序踏板,可发出由踏板控制的不同效果.3,自动节奏的使用.按一下节奏开始键,可打开效果器预制的15种不同的鼓节奏,通过多功能钮1,可选择15种不同的节奏型;通过多功能钮2,可以选择所选节奏的速度;通过多功能钮3,可以选择节奏的音量.4,录音功能的使用.按一下录音程序键,可打开效果器的录音功能(ZOOM-707效果器可进行5秒的录音),通过多功能钮1,可选择EF(带效果的录音)和BP(不带效果的录音),当我们演奏时,按下上行选择踏板时,效果器开始录音,这时调音显示灯开始依次闪亮,当5个灯依次闪亮完毕后,效果器将停止录音,进入自动播放状态,我们可以通过下行选择踏板来控制所录音乐的播放或停止.通过多功能钮2,可选择NML(正常速度)和SLW(慢速)两种不同速度的播放形式.一般正常速度用来播放演奏者所录制的伴奏音乐,这样可以配合伴奏来进行练习.慢速播放主要用于录制一些磁带或CD中的独奏音乐,把着些快速演奏的音乐,用慢速播放,以便进行扒带学习.当我们再次按下录音程序键时,效果器自动进入正常的使用状态.(二),效果器的编辑方法1,效果的编辑按下编辑键使效果器进入编辑状态,通过左向和右向两个效果栏选择键,可选择六个不同的效果栏,他们分别是:1,COMP-DIST(压缩与失真);2,ZNR/EQ(噪音门与均衡);3,MOD(常用效果);4,REV(混响);5,TOTAL(效果名称与整体音量);6,PEDAL(踏板程序).通过上行和下行两个效果栏中的效果选择键,可选择每个效果栏中所预制的不同的效果,同时按下左向和右向两个效果栏选择键,可关闭所选的效果栏.(1)COMP-DIST(压缩与失真)这个效果栏包括压缩,失真和压缩与失真的混合效果,压缩有三种形式,它们分别是: CMP FSCMP SKCMP CR多功能钮1:控制压缩色彩;多功能钮2:控制压缩音调;多功能钮3:控制压缩音量.失真有8种,它们分别是:OD1 (轻度失真1)OD2 (轻度失真2)DIST1 (失真1)DIST2 (失真2)FUZZ (法兹)WILDFZ (高增益法兹)LEAD (失真主音)METAL (重金属)PWR DRV (过驱动失真)多功能钮1:控制失真程度;多功能钮2:控制失真音调;多功能钮3:控制失真音量.压缩与失真的混合效果有3种,它们是:CMP+OD (压缩+轻度失真)CMP+DS (压缩+失真)CMP+FZ (压缩+法兹)多功能钮1:控制失真程度;多功能钮2:控制压缩程度;多功能钮3:控制音量.着个效果栏中,还包括一种木吉他效果,它是ACOSIM (木吉他)多功能钮1:控制效果参数;多功能钮2:控制效果参数;多功能钮3:控制音量.(2)ZNR/EQ(噪音门与均衡)当调到着个效果栏时,它的指示灯会有三种颜色:黄,噪音门,通过调整多功能钮1可控制噪音门的量.红,可控制均衡中的高音和中音.多功能钮1:控制现场效果;多功能钮2:控制高音;多功能钮3:控制中音.绿,可控制均衡中的低音.多功能钮1:控制低音;多功能钮2:控制低音增益;多功能钮3:控制均衡音量.(3)MOD(常用效果)常用效果栏中,包括:CHORUS(合唱)V-CHO(超级合唱)FLANGE(飘忽)PHASE(相移)TREMOL(传统颤音)A-PHN(自动琴品弯曲)A-WHA(自动哇音)P-WHA(踏板哇音)STEP(步进)PITCH(附加音程)P-PITCH(踏板控制附加音程)RING-M(电子效果)SOLW-A(慢发音)FILTER()DELAY(延迟)ECHO(回响)T-TRIP()TRMCHO(传统颤音+合唱)RINVIB(电子效果+揉弦效果)VIBE(揉弦效果)这些不同的效果都是通过三个多功能钮来控制它们不同的效果参数.(4)REV(混响)这个效果栏中,包括:HALL(山谷混响)ROOM(房间混响)PP-DLY(踏板延迟)DLY HAL(延迟+山谷混响)DLY ROM(延迟+房间混响)多功能钮1:控制时间;多功能钮2:控制返回次数;多功能钮3:控制音量.(5)TOTAL(效果名称与正题音量)这个效果栏,可编辑所编效果的名称.多功能钮1:可选择字母的位置;多功能钮2:可选择不同的字母;多功能钮3:可控制整体音量.(6)PEDAL(程序踏板)这个效果栏,可选择踏板所控制的不同效果.多功能钮1:可选择踏板所控制的效果.OF是关闭踏板UL可使踏板控制音量DS可使踏板控制COMP-DIST效果栏中任意效果的效果程度ND可使踏板控制MOD效果栏中任意效果的效果程度RU可使踏板控制REV效果栏中任意效果的效果程度多功能钮2:可选择踏板不同的控制类型.UP是使踏板上行控制DN可使踏板下行控制HF使踏板的控制程度最大LO使踏板的控制程度最小多功能钮3:可控制当踏板处在最小状态时,所控制效果的音量.在使用踏板时,应注意所要控制的效果必须打开,如要使踏板控制哇音,踏板效果栏必须处在ND的位置, MOD效果栏中必须调到哇音效果,再把踏板的控制类型和参数调整到合适的位置,就可以发出标准的哇音效果,如果需要带失真的哇音效果,还必须选择一种合适的失真效果.当所有的效果编辑完毕之后,按一下存储键,这时所有的指示灯开始闪烁,在这种状态下,我们可以选择所编效果所要存储的位置,这个位置我们可以通过上行和下行两个选择踏板来选择,当位置选择完毕后,再按一下储存键,所编辑的效果就可以储存在所选择的位置上,以便随时调用这个效果.。
BOSS GT-3中文说明书
第一部分功能介绍 ................................................................... 错误!未定义书签。
主要效果种类介绍.................................................................... 错误!未定义书签。
1. SFX模块:......................................................................... 错误!未定义书签。
2.COMPRESSOR/LIMITER模块........................................ 错误!未定义书签。
3.WAH模块 ......................................................................... 错误!未定义书签。
4.OVERDRIVE/DISTORTION模块.................................... 错误!未定义书签。
5、PREAMP/SPEAKER SIMULATOR模块 ......................... 错误!未定义书签。
6、EQUALIZER模块 ............................................................ 错误!未定义书签。
7、MODULATION模块........................................................ 错误!未定义书签。
8、DELAY模块...................................................................... 错误!未定义书签。