BR0075-54E操作指南
BRG-ES 使用说明书(中英文)

目录Table of Contents备件清单----------------------------------------------------------------------------------------3 Spare Parts List铰刀明细表-------------------------------------------------------------------------------------9 Reamer List安全注意事项----------------------------------------------------------------------------------10 Safety Precautions轮廓及安装尺寸-------------------------------------------------------------------------------11 Construction and Size安装----------------------------------------------------------------------------------------------12 Installation调节作业指导----------------------------------------------------------------------------------13 Operating Instruction Guide清枪站电路图----------------------------------------------------------------------------------15 Circuit Diagram故障排除指南----------------------------------------------------------------------------------17 Trouble Shooting Guide备件清单Spare Parts List101819202211内部细节图InternalDesign23242529262728(选配)30Serial NumberOrder No.ItemQuantityPicture1531PES0014TCP 点指针TCP Pointer12531P102039/2V 型定位块V-type positioning module 13531P102039/1定位块调节顶丝Positioning adjustmentjackscrew14见明细铰刀Reamer15531P102035气动马达Pneumatic motor 16531P102C88气动马达夹紧机构Pneumatic motor clampingpiece 17531P102C82气动马达接头Pneumatic motor adapter 38531P102C81气动马达外接头Pneumatic motor outerconnector 39531P102C31焊渣收集盒Welding spatter box110531PCN0007夹紧气缸顶丝Clamping cylinder jackscrew1SerialNumberOrder No.ItemQuantityPicture11531P102C34夹紧气缸限位开关Limit Switch112531PES0005喷油装置HSG50T Oil injection unit HSG50T113531PES0006手动喷油开关Manual oil injection switch114531PES0002油瓶Oil tank215531P102C43G1/4气源接头G1/4air supply joint116WS20J7TS七针航空插头Seven-pin airline plug117WS20K7Z七针航空母座Seven-pin airline socket118531P102C83气动马达消声器Pneumatic motor muffler119531PES0009进气节流阀Inlet throttle valve 120531PES0024喷油装置硅胶挡油板(根据喷嘴尺寸确定)Protection silicon board foroil injection unit1Serial NumberOrder No.ItemQuantityPicture21531P102C38夹紧气缸Clamping cylinder 122531P102C87夹紧气缸固定架Clamping cylinder mountingbracket 123531P102032二位五通电磁阀5/2way electromagneticvalve124531P102C41滑移机构Sliding unit125531PCN0006二位五通机控阀触杆5/2way tappet 126531P102C962位3通机控阀3/2way mechanical controlvalve127531PES0027真空发生器Vacuum generator128(选配)531PES0012光传感器Optical sensor(optional)129531PES0004二位二通电磁阀2-position 2-way solenoidvalve130531P102C42节流阀Throttle valve2铰刀明细表Reamer list标准铰刀Standard Style单位unit :mm多功能铰刀Multifunctional Reamer单位unit :mm序号Serial number喷嘴内径A Nozzle inner diameter 导电嘴外径B Contact tip outer diameter铰刀外径C Reamer outer diameter 铰刀内径D Reamer inner diameter订货编号Order no1136127531P102010213812.59531P1020063148139531P1020074158149531P102012516101511531P102015617101611531P102017718101711531P102020818101713531P102021919101811531P1020161020101911531P102029序号Serial number喷嘴内径A Nozzle inner diameter 导电嘴外径B Contact tip outer diameter铰刀外径E Reamer outer diameter 铰刀内径F Reamer inner diameter 订货编号Order no11481811531P102019220101911531P102022317101611531P102023安全注意事项Safety Precautions1请严格遵守该使用说明书中所提及的操作规程。
杰弗逊洗净器操作手册说明书

WARNING: OPERATOR MUST READ AND UNDERSTAND THIS MANUALCOMPLETELY BEFORE OPERATING THIS EQUIPMENT. Tacony Corporation, All rights reservedModel Number: ________________________________________________________________________________________ Serial Number: _________________________________________________________________________________________ Date Purchased: _______________________________________________________________________________________WARNING!To reduce the risk of fire, electric shock or injury:Do not leave machine unattended when plugged in. Unplug from outlet when not in use and before changing bags or attempting any maintenance or adjustment.Do not use outdoors or on wet surfaces.Use only as described in this manual. Use only manufacturer’s recommended attachments.Do not use with damaged cord or plug. If machine is not working as it should, has been dropped, damaged, left outdoors, or dropped into water, return it to a service center.Do not pull or carry by cord, use cord as a handle, close a door on cord, or pull cord around sharp edges or corners. Do not run machine over cord. Keep cord away from heated surfaces. Do not unplug by pulling on cord. To unplug, grasp the plug not the cord. Do not handle plug or machine with wet hands.Keep hair, loose clothing, fingers, and all parts of body away from openings and moving parts.Do not put any object into openings. Do not use with any opening blocked; keep free of dust, lint, hair, and anything that may reduce air flow.Turn off all controls before unplugging.Connect to a properly grounded outlet only. See Grounding Instructions.Do not put hands under base. Rotating parts could cause injury. Always keep hands feet and loose fitting clothing away from moving parts to prevent possible injuries. Use care to keep electrical supply cable from contacting moving parts, such as floor brushes.Risk of explosion: Use this machine only in a well ventilated area, free from any flame or match. Do not use machine in areas where flammable and/or explosive vapors or dust are present.Make sure voltage and frequency at the wall power receptacle correspond with that indicated on name plate before plugging in machine. A 15 amp circuit is recommended. Connect only to a dedicated individual branch circuit.Never use a device to lock the switch lever in the ON position.Do not use without dust bag and/or filters in place.Do not allow to be used as a toy. Close attention is necessary when used by or near children.Do not use to pick up flammable or combustible liquids, such as gasoline, or use in areas where they may be present.Do not pick up anything that is burning or smoking, such as cigarettes, matches, or hot ashes.When using an electrical wide area vacuum cleaner, basic precautions should be followed.READ ALL INSTRUCTIONS BEFORE USING VACUUM CLEANER.BEFORE OPERATING MACHINEWARNING: Failure to adhere to these instructions could result in serious bodily injury or property damage.Read this manual completely before attempting to operate machine. This manual has important information for the use and safe operation of the machine. Keep this manual on file and handy.GROUNDING INSTRUCTIONSThis appliance must be grounded. If it should malfunction or breakdown, grounding provides a path of least resistance for electric current to reduce the risk of electric shock. This machine is equipped with a cord having an equipment-grounding conductor and grounding plug. The plug must be inserted into an appropriate outlet that is properly installed and grounded in accordance with all local codes and ordinances.WARNING: Improper connection of the equipment-grounding conductor can result in a riskof electric shock. Check with a qualified electrician or service person if you are in doubt as to whether the outlet is properly grounded. Do not modify the plug provided with the appliance-if it will not fit the outlet, have a proper outlet installed by a qualified electrician.This appliance is for use on a nominal 115 volt circuit and has a grounding plug that looks like the plug illustrated in sketch A. Make sure that the appliance is connected to an outlet having the same configuration as the plug. No adaptor should be used with this appliance.Model PF2030Voltage / Frequency115 V / 60 HzBrush Motor rating1/4 hp / 2 ATotal power consumption`14 AVacuum motor rating1512W / 12.6 ABag capacity – dry45.5 qt. / 43 LAirflow226 cfm / 384 m3/hVacuum – water lift at sealed orifice71 in / 1804 mmFiltration - HEPA99.97% @0.3 micronVibration at controls< 2.5 m/s2Brush width30 in / 762 mmCable length75 ft. / 23 mWeight (including cord)74 lb. / 33.6 kgNoise level69.9 dB(A)Construction class IProtection IP20Machine dimensionsFolded: 33” X 31” X 19”/838 x 787 x 483 mm Operating Position: 33” X 31” X 39”/838 x 787 x 961 mmAOUTLET BOX2BAG INSTALLATIONOPERATION OF MACHINE1. Loosen handle lock lever and adjust handle to comfortable operation height2.Tighten lever to lock handle in place.1. Position the handle in normal operating position.2. Open bag compartment lid and rest it on the handle.3. Unzip cloth bag and install paper bag inside.4. Attach both bag openings together onto vacuum intake housing.5. Make sure bag is properly deployed inside machine housing.6. Completely close zipper on cloth bag and close lid of machine.ATTENTION: Never operate machine without cloth bag. Always use cloth and paper bagstogether.1. This machine has 5 brush adjustment levels.2. To raise brush height level: lift up height adjustment bar until desired brush height is attained.3. To lower brush height level: push down on height adjustment bar until desired brushheight is attained.1. Plug power cord into properly grounded power outlet.2. Click the on/off switch on to the ON position to turn on machine.3. To operate brush squeeze the brush start triggers.4.CIRCUIT BREAKERYour new wide area vacuum comes equipped with two manual circuit breakers, a 15 amp breaker for the vacuum motor and a 2.5 amp breaker for the brush motor. If the machine does not turn on you will need to check the circuit breakers.To reset circuit breakers:1. Unplug the wide area vacuum cleaner2. Check machine for the following:Full bag, obstructions, clogged filters, clogged brush, brush height set too low, etc.3. Press the affected circuit breaker button to reset.4. Resume operationVACUUM MOTOR FILTERSMACHINE MAINTENANCEFOR BEST PERFORMANCE• Keep machine and all accessories clean and in good operating condition.• Change vacuum bags and filters as recommended to maintain optimum cleaning efficiency.• Always use genuine bags, filters andparts, as use of other products may result in poor cleaning or filtration performance. OEM filtration products are designed for maximum performance.• Have machine checked periodically by an authorized service representative.• Store machine carefully in dry area.• For optimum cleaning performance and safety, follow your owner’s manual.• After each use, carefully wrap power cord around handle and check cord for wear or damage. If cord is damaged, have power cord replaced by an authorized service representative immediately 1. Carefully turn machine on its side and remove exhaust cover from bottom of machine.2. Remove the two nuts holding filter onto machine.3. Replace filter in proper position and tighten nuts.4. Reinstall exhaust cover.*Replace exhaust filter every 6 months.1. Remove belt cover on left side of machine.2. Loosen the motor belt adjusting screws on motor bracket.3. Remove belt.4. Install new belt and reposition motor to eliminate excess slack.5. Once proper tension is set, tighten motor adjusting screws.6.Replace belt cover on side of machine.• Position the handle in normal operating position.• Open Wide Area Vacuum lid and rest it on the handle.• Remove clamp with a screwdriver to gain access to filter• Remove plastic cap covering the motor • Remove plastic retainer in cap• Replace filters in their original positions.• Reinstall plastic retainer in cap • Reinstall cap onto motors • Reinstall clamp.*Replace the vacuum motor filter every 6months.。
DCW-BR54+用户手册

linksyswrt54操作手册范本
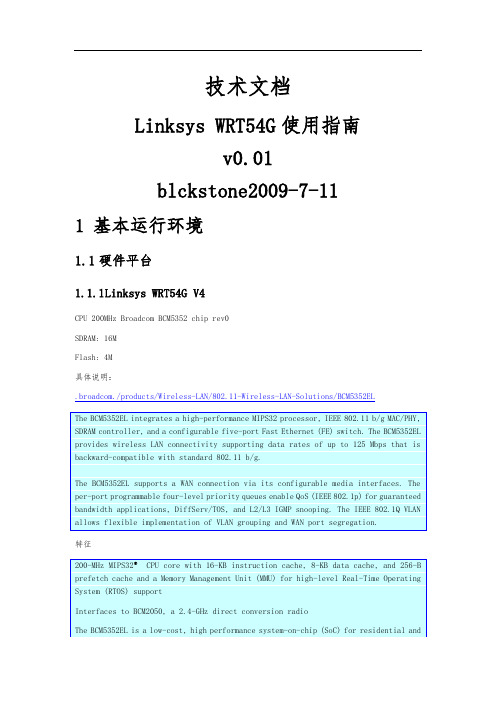
技术文档Linksys WRT54G使用指南v0.01blckstone2009-7-111基本运行环境1.1硬件平台1.1.1L inksys WRT54G V4CPU 200MHz Broadcom BCM5352 chip rev0SDRAM: 16MFlash: 4M具体说明:.broadcom./products/Wireless-LAN/802.11-Wireless-LAN-Solutions/BCM5352EL特征1.2软件平台1.2.1D D-WRT版本号:DD-WRT V24 (05/24/08) std – build 9526 登录时默认的用户名密码:root/admin.dd-wrt./dd-wrtv3/dd-wrt/about.html交叉编译:编译器和所用头文件和库文件对此,我写好了一个makefile专门用来进行交叉编译。
但是目前只能进行静态编译,即将所有的库文件成一个可执行文件,而不能使用动态!原因可能是因为目标机器上的运行的系统中所包含的动态库与交叉编译环境中的动态库版本不同,应该考虑将版本换成同样的动态库后,再次进行编译!此外为了方便调试,可以让目标机器挂载编译环境中的samba服务提供的共享文件,从而方便目标机器与交叉编译机器之间共享文件!在目标机器上,编译的核使用的版本是2.4.35,gcc版本是3.4.6, openwrt-2.0目标机器类型是:mipsel架构(LIL_ENDIAN)假设交叉编译环境安装在/opt/openwrt/目录下CC=/opt/openwrt/bin/mipsel-linux-gccCFLAGS=-I /opt/openwrt/includeLDFLAGS=-L /opt/openwrt/lib--Host=mipsel-linux--prefix=/opt/openwrt1.2.2O penWrtOpenWrt是用于嵌入式设备的Linux发行版。
地磅操作手册(计量员)

蓝鸟锐卫称重系统操作手册计量员部分1、进入系统...............................................................................................................................- 2 -1.1 打开系统....................................................................................................................- 2 -1.2 登录系统....................................................................................................................- 2 -1.3 修改密码....................................................................................................................- 3 -1.4 退出系统....................................................................................................................- 4 -2. 系统操作................................................................................................................................- 5 -2.1 打开称重管理程序......................................................................................................- 5 -2.2 称重操作......................................................................................................................- 5 -2.3 基础数据维护..............................................................................................................- 9 -2.4 红外异常................................................................................................................... - 10 -2.5 修改称重信息........................................................................................................... - 11 -2.6 扣杂重量................................................................................................................... - 12 -2.7 删除车辆和称重信息............................................................................................... - 13 -2.8 修改称重数据........................................................................................................... - 14 -2.9 称重历史数据查询................................................................................................... - 18 -2.10 修改车牌号............................................................................................................. - 18 -2.10 修改车牌号............................................................................................................. - 19 -2.11 计量统计报表............................................................................................................- 20 -1、 进入系统1.1 打开系统双击桌面图片【原材料称重管理系统】, 出现系统登录画面:1.2 登录系统(1) 输入用户名:账号(2) 输入密 码:密码默认:12345678,进入系统后,可修改(3) 点击【登录】,进入系统(画面如下)2、点击【登录】1.3 修改密码1、选择 功能-------修改密码1.4 退出系统1、点击【退出】2、点击【确定】2. 系统操作2.1 打开称重管理程序依次展开左边导航栏,汽车衡称重管理—称重管理—物资称重管理,出现如下称重界面,界面中各分块说明如下:2.2 称重操作(1)创建车辆在【车号】框里输入车号:例如,“陕KG8888”,点击【查询】按钮车辆信息栏里空白,即没有该车辆的信息点击【创建车辆】(即上图第4步),创建车辆信息如下:1、输入车牌号 陕KG88883、没有查询到车辆,空创建的车辆信息司磅员姓名操作按钮区域(2)称重操作根据称重情况,首先确定是称毛重,还是称皮重。
北京标驰泽惠仪器操作流程
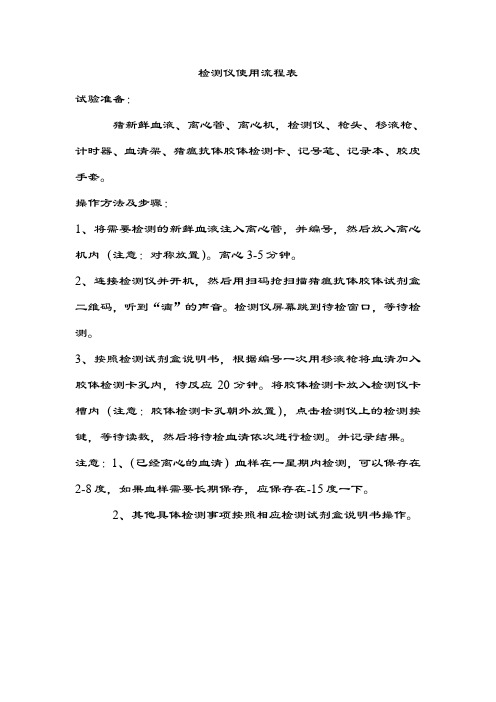
检测仪使用流程表
试验准备:
猪新鲜血液、离心管、离心机,检测仪、枪头、移液枪、计时器、血清架、猪瘟抗体胶体检测卡、记号笔、记录本、胶皮手套。
操作方法及步骤:
1、将需要检测的新鲜血液注入离心管,并编号,然后放入离心机内(注意:对称放置)。
离心3-5分钟。
2、连接检测仪并开机,然后用扫码抢扫描猪瘟抗体胶体试剂盒二维码,听到“滴”的声音。
检测仪屏幕跳到待检窗口,等待检测。
3、按照检测试剂盒说明书,根据编号一次用移液枪将血清加入胶体检测卡孔内,待反应20分钟。
将胶体检测卡放入检测仪卡槽内(注意:胶体检测卡孔朝外放置),点击检测仪上的检测按键,等待读数,然后将待检血清依次进行检测。
并记录结果。
注意:1、(已经离心的血清)血样在一星期内检测,可以保存在2-8度,如果血样需要长期保存,应保存在-15度一下。
2、其他具体检测事项按照相应检测试剂盒说明书操作。
迪芬巴赫压滤机操作手册簿(中文)
广深沙角B电厂脱硫废水压滤机操作手册意大利迪芬巴赫公司2005年12月目录3 1操作准则5 1.0紧急停机–报警–消除警报:5 1.1红外线防护屏5 1.2选择过滤循环方式 < 手动 / 自动 > 6 2自动过滤6 2.0在触控面板 TD 200上输入工作参数6 2.1连续的自动过滤循环7 2.2单次自动过滤循环8 2.3自动循环的启动8 2.4自动过滤循环8 2.5自动过滤的结束9 2.6污泥压力9 2.7自动中孔吹空阶段9 2.8填充半循环的结束10 2.9自动方式下的泥饼排放阶段10 2.10已经进行的过滤步骤的强制重设123在手动模式下执行工作步骤13 3.0手动关闭压滤机和集水盘13 3.1以手动模式进行过滤13 3.2以手动方式进行中孔吹空14 3.3管路冲洗14 3.4手动模式下的泥饼排放15 3.5指示灯测试16 3.6总计数器清零16 3.7气动阀常在位置17 3.8指示灯信号17 3.9报警说明18 4滤布清洗车21 4.0以自动方式进行滤布清洗21 4.1以手动方式进行滤布清洗22 4.2清洗过程的中断22 4.3特别注意事项231 操作准则为了更加合理和安全地使用压滤机,建议用户首先仔细阅读此手册。
1.0 紧急停机–报警–消除警报:一旦按照如下的方法紧急停机,压滤机的所有电机就会立即停止运转,不仅如此,所有正在进行的操作都会中断。
紧急停机时触动的是紧急锁定功能,操作方法如下:1.按下控制柜操作面板上的蘑菇头状按键开关PE01;2.拉动紧急停机绳,或者停机绳安全开关ZS_04没有复位。
紧急停机绳布置在压滤机的操作面上。
3.按下控蘑菇头状按键开关PE02(最后由用户安装在压滤机操作现场)。
为了从紧急停机状态恢复正常操作,必须将紧急停机开关复位(即拉回到弹起状态),然后按下SB_01<紧急状态重设>按钮。
当机器处于紧急停机状态时,控制柜上的紧急状态指示灯HL_01是亮起的。
Aer5400 使用说明书
使用说明书Aer 5400 移动式(壁挂式)在线放射性气溶胶连续监测仪Portable Online Continuous Air Monitor 版本11.2020相关文档dVISION软件使用说明dCONFIG软件使用说明Aer维护手册SARAD GmbHWiesbadener Straße 1001159 DresdenDeutschland内容导读1.通用信息 (4)2.供电方式 (5)3.滤膜更换与泵流量控制 (6)3. 1.滤膜紧固机制 (6)3. 2.滤膜更换流程 (6)3. 2.1.卡片式滤膜手动更换 (6)3. 2.2.卡片式滤膜手动更换 (7)3. 3. 泵恒流控制 (9)3. 4.滤膜用量与保护机制 (9)4. "S"版本导管式进气口的连接方式 (10)5.数据保存 (10)6. 菜单简介 (11)6. 1.显示主页 (11)6. 2.模组设置与版本信息 (11)6. 3.组件设置 (12)6. 4.测量方案选择 (12)6. 5.即时值显示 (12)6. 6.检索历史数据 (13)6. 7.历史数据详细信息 (13)7.仪器设置 (13)7. 1.定时器 (14)7. 2.预约时间同步启动的设置 (14)7. 3.显示屏自动熄屏等待时间 (14)8.报警功能 (14)9.Gamma环境本底影响仪器Beta测量功能的补偿机制 (15)9. 1.静态补偿 (15)9. 2.动态Gamma环境本底补偿,剂量率测量 (16)9. 2. 1.动态Gamma环境本底补偿 (16)9. 2. 2.剂量率的确定 (17)10.天然铀的测量 (17)11.平均活度浓度的计算 (17)12.应用环境注意事项 (18)13.连接PC传输数据 (18)14.用户自定义测量相关设置 (19)14. 1.辐射测量相关量警报设置修改 (19)14. 2.修改总计数率报警阀值 (19)14. 3.本底补偿参数设置 (20)14. 4.显示输出单位确定与剂量因子修改 (20)14. 5.滤膜走纸系统的控制 (20)15. 定期维护与故障判断 (22)附件 (23)1.通用信息移动式在线放射性气溶胶连续监测仪Aer5400,适用于测量工作场所漂浮于空气中的放射性气溶胶的曝光。
Eppendorf Research移液器使用手册说明书
Eppendorf Research® 移液器使用手册目录1. 安全警告与应用限制 (3)1.1. 移液 (3)1.2 . 养护 (3)2 技术参数 (3)2.1 Research系列,固定量程 (3)2.2 Research系列,可调量程 (3)Inaccuracy (Imprecision; CV) (3)2.3 Research系列,多道,可调量程(8-和12-道) (4)Inaccuracy (Imprecision; CV) (4)3 功能原理 (5)4. 操作 (5)4.1. 设定体积(不适用于固定量程移液器) (5)4. 2移液器吸嘴 (5)4.3 吸液 (6)4.4 排液 (6)4.5 特别注意 (6)5 测试/调整 (6)5.1 测试 (6)5.2 调整 (7)5.2.1 何时应进行调整? (7)5.2.2 错误时的后续调整 (7)5.2.3 对密度不同于水的液体进行移液的调整 (8)6、养护/消毒 (8)6.1 养护 (8)6.2 消毒 (8)7. 疑难解答 (9)1. 安全警告与应用限制使用移液器前请参阅本操作手册。
为了保证用移液器安全无误地进行实验,请务必注意以下安全警告:1.1. 移液—只有装上移液器吸嘴后才能使用移液器—只能使用配有滤芯的1-10ml移液器—当移液器吸嘴吸满液体时切勿将移液器水平放置—转移感染性、放射性和/或毒性等危险液体时,请参阅本国相关的安全警告—转移有机溶剂及侵蚀性化学物质时,请注意查对所用移液器吸嘴(PP=聚丙烯)与移液器是否适宜—转移物理性质有别于水的溶液时(如甘油),按5.2部分所述检查排液体积—避免移液器、移液器吸嘴及所转移液体间的温差,因这可能导致排液体积的不准—转移高蒸汽压液体时亦可能发生上述情况1.2 . 养护—勿使液体进入移液器—切勿使用丙酮或其他侵蚀性液体清洗移液器—仅使用原装零配件2 技术参数2.1 Research系列,固定量程2.2 Research系列,可调量程2.3 Research系列,多道,可调量程(8-和12-道)技术参数仅适用于Eppendorf 的移液枪头。
RE_54馈线终端设备操作手册
REF 54_馈线终端设备REM 54_机器终端操作手册ABB的工业IT产品是用于提高生产率的标准件,并具有所有必要的工具,可在产品的寿命周期内以电子形式提供支持。
我们保留更改数据的权力,恕不另行通知。
1.安全信息 (5)2.RE_54_终端设备 (5)3.图形HMI/MIMIC特点 (6)3.1.显示器 (7)3.1.1.显示器背光 (7)3.1.2.显示器对比度 (7)3.1.3.选择语言 (8)3.1.4.主窗口 (8)3.1.5.辅助窗口 (9)3.1.6.上电时的显示器测试 (9)3.2.按钮简介 (10)3.2.1.导航、清除和回车按钮 (10)3.2.2.控制位置按钮 (11)3.2.3.MIMIC视图中的对象控制 (12)3.2.4紧急停止功能 (13)3.3.编程 (14)4.HMI操作等级 (15)4.1.LED指示灯、指示信息、输出和寄存器确认与复位 (16)4.2.密码 (16)4.3.用户等级 (18)4.3.1.MIMIC视图 (18)4.3.2.MEASUREMENT视图 (19)4.3.3.EVENT视图 (20)4.3.4.ALARM视图 (20)4.4.技术等级 (21)4.4.1.菜单系统 (21)4.4.2.整定参数 (22)4.4.3.保存参数 (24)5.辅助窗口信息 (26)5.1.指示和帮助信息的优先级 (26)5.2.帮助信息 (26)5.3.指示信息 (27)5.3.1.保护指示 (27)5.3.2.自检(IRF) (28)5.3.3.状态监视指示 (29)5.4.测试模式 (29)5.4.1.功能测试 (29)5.4.2.控制测试 (29)5.4.3.MIMIC测试 (30)5.4.4.I/O测试 (30)5.4.5.IRF测试 (31)5.5.LED指示灯 (31)5.5.1.绿色LED指示灯 (32)5.5.2.黄色LED指示灯 (33)5.5.3.红色LED指示灯 (33)5.5.4.互锁 (34)关于本手册本文件,即RE_ 54_操作手册说明如何使用REF 54_和REM 54_终端设备的图形HMI。
- 1、下载文档前请自行甄别文档内容的完整性,平台不提供额外的编辑、内容补充、找答案等附加服务。
- 2、"仅部分预览"的文档,不可在线预览部分如存在完整性等问题,可反馈申请退款(可完整预览的文档不适用该条件!)。
- 3、如文档侵犯您的权益,请联系客服反馈,我们会尽快为您处理(人工客服工作时间:9:00-18:30)。
J304操作指南
手表功能和指针介绍
此手表具有时间、日历功能和12/24小时针指示。
各指针的作用:
(1)12点位置:日历窗口
(2)6点位置:12/24小时针指示
(3)9点位置:正常时间的秒针
(4)时分针:正常时间的时分针
手表的调整:(请参照手表进行调整)
(一)时间的调整
待秒针运行到60位置时,将把头拉出到②位置,根据广播或电视,转动表把将时分针指到现在时刻,(注意区分上午/下午时间,避免发生中午跳日历的现象),依照报时将表把推回原位,时间调整完毕。
(二)日期的调整
将把头拉出到①位置,每向前转动一下,手表日历会转动一天。
将手表日历对到今天的日期,之后将表把推回原位。
(注意避免在晚间的21:00~凌晨1:00之间调整,以免发生错误。
在2月末或小月末,需要将日期调整到下个月的1日)
(三)12/24小时针(异地时间)的调整方法
将把头拉出到①位置,每向后转动一下,手表12/24小时针会移动一格。
根据自己的需要将12/24小时针调整到另一个城市的时间。
之后将把头推回到正常位置。
(四)部分型号的手表在外观上有如下特点: 安置一个可转动的刻度圈和一个用于转动刻度圈的旋钮,刻度圈上的数字表示24 小时制的小时数。
用途:依照现在的时刻,查找另一时区城市的当地时间。
使用方法:
先找出本地时区的时间,并将可转动刻度圈上的小时数与本时区的城市名相对应,然后查找另一个时区城市名,此时该城市名外侧对应的数字就是该城市的当地时间。
例如:北京时间是晚间9点,想查找纽约时间是几点?
将外圈的“ 21 ” 对到HONG KONG(香港与北京处同一时区),此时纽约(NEW YORK)外侧对应的是“ 8 ”,表示该地区处于上午八点。
(其他城市依此类推)。