交换机和路由器配置基本命令
交换机路由器配置命令
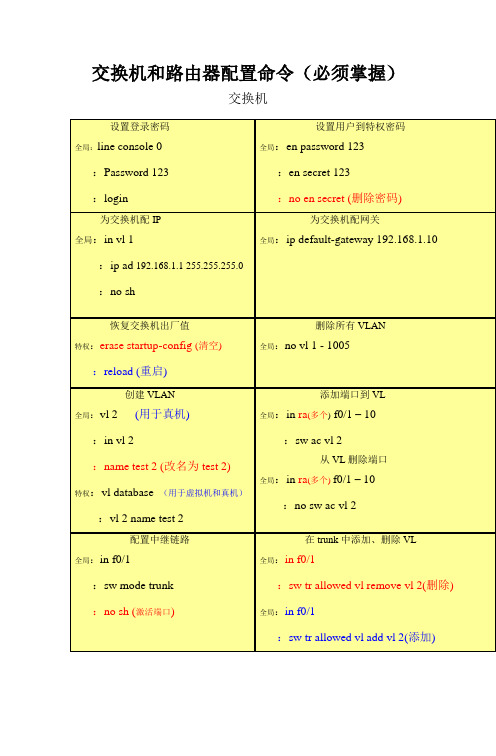
交换机和路由器配置命令(必须掌握)交换机设置登录密码全局:line console 0:Password 123:login设置用户到特权密码全局:en password 123:en secret 123:no en secret (删除密码)为交换机配IP全局:in vl 1:ip ad 192.168.1.1 255.255.255.0:no sh为交换机配网关全局:ip default-gateway 192.168.1.10恢复交换机出厂值特权:erase startup-config (清空):reload (重启)删除所有VLAN 全局:no vl 1 - 1005创建VLAN全局:vl 2 (用于真机):in vl 2:name test 2 (改名为test 2)特权:vl database (用于虚拟机和真机):vl 2 name test 2添加端口到VL 全局:in ra(多个) f0/1 – 10:sw ac vl 2从VL删除端口全局:in ra(多个)f0/1 – 10:no sw ac vl 2配置中继链路全局:in f0/1:sw mode trunk:no sh (激活端口)在trunk中添加、删除VL全局:in f0/1:sw tr allowed vl remove vl 2(删除) 全局:in f0/1:sw tr allowed vl add vl 2(添加)路由器以上命令是我认为学交换机和路由器必须要掌握的。
先就为大家收集这么多了,希望大家能好好学习。
当中可能会存在错误,如果大家发现请及时通知我。
谢谢~!SIT806——无敌精英班 班长留给路由器接口配IP全局:in f0/1:ip ad 192.168.2.2 255.255.255.0 :no sh配置单臂路由全局:in f0/0.1:encapsulation dot1q 1(VL1) :ip ad 192.168.1.1 255.255.255.0查看路由表特权:sh ip route关闭路由全局:no ip routing添加逻辑端口全局:int loopback 0配置默认路由全局:ip route 0.0.0.0 0.0.0.0 address(下一跳IP)配置静态路由 全局:ip route 192.168.1.0 255.255.255.0 192.168.2.1配置动态路由全局:router rip:network 172.25.0.0(所有直连网段)RIP V2的配置全局:router rip:version 2:no auto-summary (关闭汇总)设置远程管理全局:line vty 0 4(允许0到4,五个用户登录):login:pawwword 123全局:enable password 123。
交换机和路由器基本配置

带外管理
带内管理
第7章 交换机和路由器基本配置
1) 带外管理
– 通过带外对交换机进行管理 (PC 与交换机直接相连) 通过Telnet 对交换机进行远程管理 通过Web 对交换机进行远程管理 通过TFTP 对交换机进行远程管理 通过SNMP 工作站对交换机进行远程管理
2) 带内管理
Switch# Show interface f0/24 switchport
Switch# ping {IP address}
第7章 交换机和路由器基本配置
配置主机名
Switch(config)#hostname S2126G S2126G(config)#
第7章 交换机和路由器基本配置
配置交换机管理IP地址
第7章 交换机和路由器基本配置
实验室网卡接线
测试网线 联网网线 联网设备
外网
实验设备
第7章 交换机和路由器基本配置
RACK的特点
统一管理和控制实验台上的多台网络设备 无需拔插控制台线,便可以实现同时管理和控 制多台网络设备 良好的兼容性 提供“统一清”功能,统一清除实验台上网络 设备的配置,方便多次实验(RCMS) 图形界面,简单方便 (RCMS)
!配置端口速率为10M
!配置端口的双工模式为半双工 !开启该端口,使端口转发数据
– 配置端口速率参数有100(100M)、10(10M)、auto(自适应),默认 是auto – 配置双式模式有full (全双工)、half(半双工)、auto(自适应),默认是 auto
第7章 交换机和路由器基本配置
交换机接口开启
将接口启用 Switch(config-if) # no shutdown 将接口关闭 Switch(config-if) # shutdown
路由与交换的配置命令
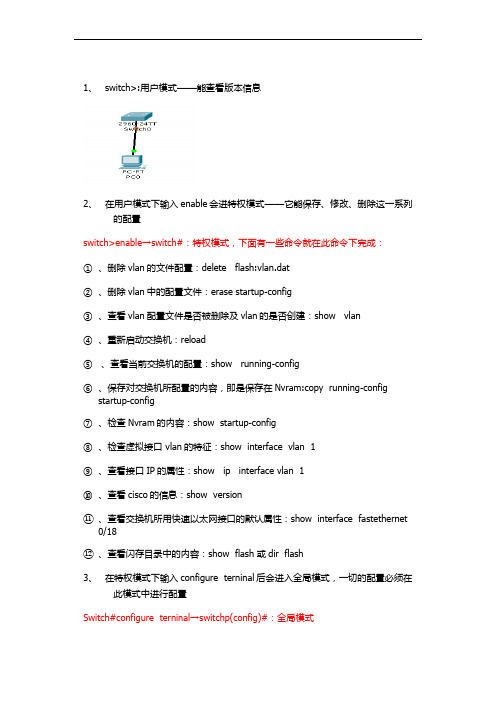
1、switch>:用户模式——能查看版本信息2、在用户模式下输入enable会进特权模式——它能保存、修改、删除这一系列的配置switch>enable→switch#:特权模式,下面有一些命令就在此命令下完成:①、删除vlan的文件配置:delete flash:vlan.dat②、删除vlan中的配置文件:erase startup-config③、查看vlan配置文件是否被删除及vlan的是否创建:show vlan④、重新启动交换机:reload⑤、查看当前交换机的配置:show running-config⑥、保存对交换机所配置的内容,即是保存在Nvram:copy running-configstartup-config⑦、检查Nvram的内容:show startup-config⑧、检查虚拟接口 vlan的特征:show interface vlan 1⑨、查看接口IP的属性:show ip interface vlan 1⑩、查看cisco的信息:show version⑪、查看交换机所用快速以太网接口的默认属性:show interface fastethernet 0/18⑫、查看闪存目录中的内容:show flash 或dir flash3、在特权模式下输入configure terninal后会进入全局模式,一切的配置必须在此模式中进行配置Switch#configure terninal→switchp(config)#:全局模式①、配置路由器设备的名字:switch(config)#hostname + 交换机的名字②、配置进入特权模式的密码,即使能密码:switch(config)#enable password +密码③、配置非明文密码:switch(config)#enable secret + 密码4、为交换机配置console口①、进入现成配置模式,即进入console口:switch(config)# line console 0②、设置密码(重新启动时需要此密码):switch(config-line)#password + 密码③、允许登录:switch(config-line)#login5、配置远程登录的密码:①、首先要配置使能密码②、允许让几个人登录:switch(config)#line vty 0 4(即允许五个登录)③、设置密码:switch(config-line)#password + 密码④、允许远程登录:switchp(config-line)#login6、在全局模式下的有关命令①对所有密码进行加密:switch(config)#service password-encryption②、不解析错误的命令:switch(config)#no ip domain-lookup7、创建vlan(2—1001,注vlan 1既不可以创建,也不可以删除)①、创建vlan :vlan + 要创建vlan的值②、给vlan取名:switch(config-vlan)#name + 名字(此步可以不要)③、把PC与交换机相连的端口添加到相应的vlan中:a、Switch(config)#interface + 端口b、Switch(config-if)#switchport access vlan + 相应vlan的值④、需要传递多个vlan信息就要打中继口,即trunka、switch(config)#interface + 交换机另一端口b、switch(config-if)#switchport mode trunk8、传统vlan 的通信(1)、router的配置①、为接口配置IP地址(该IP是相应vlan的PC网关)②、激活端口:no shutdown(2)、switch的配置①、创建vlan,将PC端口划入相应vlan②、将switch与router相连的端口划入相应的vlan(3) 、PC的配置:就是给PC配置IP,注PC的默认网关与router的IP相同,网关相同9、单臂路由实现vlan的通信(1)router配置①、添加子接口:interface f0/0.1(此处有多少个vlan就添加多少个子接口)②、将子接口封装到相应的vlan:encapsulation dot + 相应vlan的值③、将子接口配置IP:ip add +ip地址 + 子网掩码④、激活物理接口:no shutdown(2)、switch的配置①、创建 vlan,交PC的端口划入到相应vlan②、与router相连的端口打trunk(3)、配置PC的IP9、三层交换(1)、配置三层交换①、启用三层交换:(config)#ip routing②、创建vlan:(config)# vlan + 要创建vlan的值③、把相应的vlan配置IPa、指定一个vlan:(config)#interface vlan + vlan相应的值c、配置IP:(config-if)#ip add + ip + 子网掩码(2)、配置switch①、每个交换机创建vlan②、把端口划分到相应的vlan中③、打中继口(trunk)Show命令1、show version 这个命令可以查看IOS版本号,已启动时间,Flash中的IOS 的文件名,router里面共有什么端口,寄存器的值等等。
华为路由器交换机常用命令
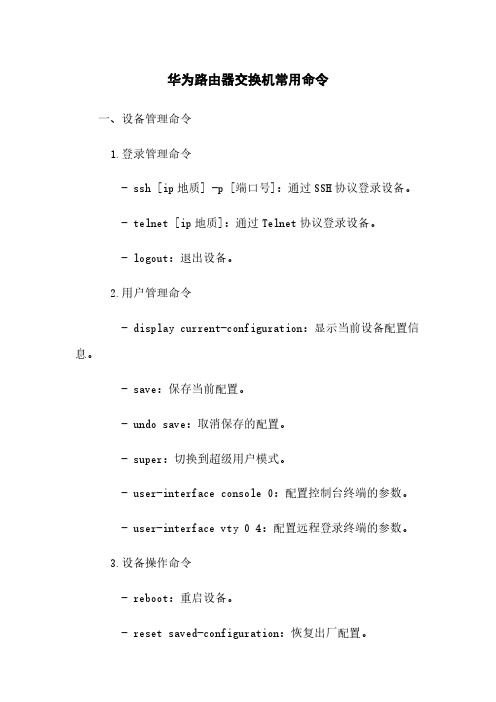
华为路由器交换机常用命令一、设备管理命令1.登录管理命令- ssh [ip地质] -p [端口号]:通过SSH协议登录设备。
- telnet [ip地质]:通过Telnet协议登录设备。
- logout:退出设备。
2.用户管理命令- display current-configuration:显示当前设备配置信息。
- save:保存当前配置。
- undo save:取消保存的配置。
- super:切换到超级用户模式。
- user-interface console 0:配置控制台终端的参数。
- user-interface vty 0 4:配置远程登录终端的参数。
3.设备操作命令- reboot:重启设备。
- reset saved-configuration:恢复出厂配置。
- display version:显示设备的硬件和软件版本信息。
- display device:显示设备的基本信息。
- display interface[接口名称]:显示指定接口信息。
- display ip routing-table:显示IP路由表信息。
二、网络配置命令1.IP配置命令- interface [接口名称]:进入指定接口。
- ip address [IP地质] [子网掩码]:配置接口IP地质。
- undo ip address:取消接口IP地质配置。
- ip route-static [目标网络] [子网掩码] [下一跳地质]:配置静态路由。
- undo ip route-static [目标网络] [子网掩码] [下一跳地质]:取消静态路由配置。
2.VLAN配置命令- vlan [VLAN ID]:创建指定VLAN。
- quit:退出VLAN配置模式。
- interface vlan [VLAN ID]:进入指定VLAN接口。
- ip address [IP地质] [子网掩码]:为VLAN接口配置IP地质。
交换机和路由器命令

Router(config)#int f 端口 进入端口模式
Router(config-if)#:ip address ip+子网掩码 配置IP和子网掩码
Switch(config-if)#:switchport trunk allowed vlan remove vlan-id Trunk中删除VLAN
Switch(vlan)#:exit 退出和保存
全局模式下创建VLAN
Switch(config)#:vlan vlan-id 创建vlanID
Switch(config-vlan)#:name 名字 设置vlan名称
address or name of remote host[] ? 填写FTP服务器IP地址
Destination filename [c2600-i-mz.122-28.bin]? 填写目标文件名
FTP升级或还原路由器镜像
Trunk配置
Switch(config)#:interface {FastEthernet GigabitEthernet} slot/port 进入端口
Switch(config-if)#:switchport trunk encapsulation {isl dot1q negotiate} 选择封装类型
Source filename[]? 填写FTP服务器上路由镜像
Destination filename (IOS文件名) 确认回车
FTP备份路由器镜像
Router(config)#:ip ftp username 用户名 在路由器上配置ftp的用户名
扩展知识:(config)#:username 设备用户名 password 设备密码
主流厂家交换机、路由器基本配置参考

多厂商的基本配置一、思科路由:a\ IP基本配置:Router>enRouter#conf tRouter(config)#hostname SPOTO-DX-R1SPOTO-DX-R1(config)#SPOTO-DX-R1(config)#interface f0/1SPOTO-DX-R1(config-if)#ip address 192.168.166.254 255.255.255.0 SPOTO-DX-R1(config-if)#no shutdownSPOTO-DX-R1(config-if)#exitb\路由配置:SPOTO-DX-R1(config)#router ospf 100SPOTO-DX-R1(config-router)#router-id 21.25.97.5SPOTO-DX-R1(config-router)#network 192.168.166.0 0.0.0.255 area 0 SPOTO-DX-R1(config-router)#network 21.25.97.5 0.0.0.0 area 0 SPOTO-DX-R1(config-router)#exitc\远程管理:SPOTO-DX-R1(config)#enable password espotor1SPOTO-DX-R1(config)#service password-encryptionSPOTO-DX-R1(config)#line vty 0 4SPOTO-DX-R1(config-line)#password tspotor1SPOTO-DX-R1(config-line)#loginSPOTO-DX-R1(config-line)#exitd\查看信息:SPOTO-DX-R1#show versionSPOTO-DX-R1#show ip interface briefSPOTO-DX-R1#show interfaceSPOTO-DX-R1#show ip route ospfSPOTO-DX-R1#show running-config交换:a\Access配置:switch>enableswitch#confi tswitch(config)#hostname SPOTO-S1SPOTO-S1(config)#vlan 10SPOTO-S1(config-vlan)#name vlan10SPOTO-S1(config-vlan)#exit% Applying VLAN changes may take few minutes. Please wait... SPOTO-S1(config)#interface vlan 10SPOTO-S1(config-if)#ip address 192.168.166.252 255.255.255.0 SPOTO-S1(config-if)#interface f0/3SPOTO-S1(config-if)#switchport mode accesSPOTO-S1(config-if)#switchport access vlan 10b\Trunk 配置:SPOTO-S1(config-if)#interface f0/24SPOTO-S1(config-if)#switchport trunk encapsulation dot1q SPOTO-S1(config-if)#switchport mode trunkSPOTO-S1(config-if)#switchporttrunk allowed vlan XSPOTO-S1(config-if)#exit二、华为路由:a\ IP基本配置:<Quidway>system view[Quidway]sysname SPOTO-YD-R2[SPOTO-YD-R2]super password espotor2[SPOTO-YD-R2]interface ethernet 0[SPOTO-YD-R2-Ethernet0]ip address 192.168.2.254 255.255.255.0 [SPOTO-YD-R2-Ethernet0]undo shutdown[SPOTO-YD-R2-Ethernet0]quitb\路由配置:[SPOTO-YD-R2]router id x.x.x.x[SPOTO-YD-R2]interface ethernaet 0[SPOTO-YD-R2-ethernet0]ospf enable area 0.0.0.0[SPOTO-YD-R2-ospf]quit[SPOTO-YD-R2]ospf enable[SPOTO-YD-R2-ospf]import-route direct[SPOTO-YD-R2-ospf]network 192.168.2.0 0.0.0.255c\远程管理:[SPOTO-YD-R2] user-interface vty 0 4[SPOTO-YD-R2-ui-vty0-4]authentication-mode password[SPOTO-YD-R2-ui-vty0-4]set authentication-mode password simpletspotor2 [SPOTO-YD-R2-ui-vty0-4]user privilege level 3[SPOTO-YD-R2-ui-vty0-4]quitd\查看信息:[SPOTO-YD-R2]display version[SPOTO-YD-R2]display interface[SPOTO-YD-R2]display ip route[SPOTO-YD-R2]display current-configuration[SPOTO-YD-R2]display history交换:a\Access配置:[SPOTO-S2]vlan 10[SPOTO-S2-vlan10]quit[SPOTO-S2]interface ethernet 0/1[SPOTO-S2-Ethernet0/1]port link-type access [SPOTO-S2-Ethernet0/1]port access vlan 10 [SPOTO-S2-Ethernet0/1]quitb\Trunk配置:[SPOTO-S2]interface ethernet 0/2[SPOTO-S2-Ethernet0/2]port link-type trunk [SPOTO-S2-Ethernet0/2]port trunk permit vlan 10 [SPOTO-S2-Ethernet0/2]port trunk pvid vlan X [SPOTO-S2-Ethernet0/2]quit三、华三H3C路由:a\ IP基本配置:<H3C>system view[H3C]sysname SPOTO-R[SPOTO-R]interface GigabitEthernet 1/0/1[SPOTO-R-GigabitEthernet1/0/1]ip address192.168.166.254 24[SPOTO-R-GigabitEthernet1/0/1]undo shutdown[SPOTO-R-GigabitEthernet1/0/1]quitb\路由配置:[SPOTO-R]ospf 12[SPOTO-R-ospf-12]area 0[SPOTO-R-ospf-12-area-0.0.0.0]network 192.168.166.0 0.0.0.255[SPOTO-R-ospf-12-area-0.0.0.0]silent-interface gi 0/0[SPOTO-R-ospf-12]import-routestatitc\远程管理:[SPOTO-R]super password simple espotor \\明文密码,密文可用cipher替代simple [SPOTO-R]user-interface vty 0 4[SPOTO-R-ui-vty0-4]authentication-mode password[SPOTO-R-ui-vty0-4]set authentication password tspotor[SPOTO-R-ui-vty0-4]user privilege level 3[SPOTO-R-ui-vty0-4]quit[SPOTO-R]telnet server enabled\查看信息:dirdisplay versiondisplay vlandisplay current-configurationdisplay ip routedisplay usersdisplay interface交换:a\Access配置:[SPOTO-S]vlan 10[SPOTO-S-vlan10]port e 0/1[SPOTO-S-vlan10]quit[SPOTO-S]interface ethernet 0/1[SPOTO-S-Ethernet0/1]port link-type access [SPOTO-S-Ethernet0/1]port access vlan 10b\Trunk配置:[SPOTO-S-Ethernet0/1]port link-type trunk [SPOTO-S-Ethernet0/1]port trunk permit vlan 10 [SPOTO-S-Ethernet0/1]port trunk pvid vlan 1四、锐捷路由:a\ IP基本配置:Router >enableRouter#configure terminalRouter(config)#interface f0/1Router(config-if)#ip address 192.168.166.253 255.255.255.0 Router(config-if)#no shutdownb\路由配置:Router(config)#router ospf 1Router(config-router)#network 192.168.166.0 0.0.0.255 area 0 Router(config-router)#endc\远程管理:Router(config)#enable password espotor1Router(config)#service password-encryptionRouter(config)#line vty 0 4Router(config-line)#password tspotor1Router(config-line)#loginRouter(config-line)#exitd\查看信息:show versionshow ip interface briefshow interface fa0/1show running-configshow ip route交换:a\Access配置:switch>enableswitch#confi tswitch(config)#hostname S1S1(config)#S1(config)#vlan 10S1(config-vlan)#name vlan10S1(config-vlan)#exitS1(config)#interface vlan 10S1(config-if)#ip address 192.168.166.252 255.255.255.0 S1(config-if)#interface f0/3S1(config-if)#switchport mode accessS1(config-if)#switchport access vlan 10b\Trunk配置:S1(config)#interface e0/2S1(config-if)#switchport mode trunk五、Juniper路由:a\ IP基本配置:root@%cliroot>editEntering configuration mode[edit]root#set system host-name SPOTO-Junos[edit]root#commitcommitcomplete[edit]root@SPOTO-Junos#edit interface[edit interface]root@SPOTO-Junos#setem0 unit 0 family inet address 192.168.166.252/24[edit interface]root@SPOTO-Junos#setlo0 unit 0 family inet address 21.99.67.55/32[edit interface]root@SPOTO-Junos#exit[edit]root@SPOTO-Junos#commitb\路由配置:root@SPOTO-Junos#set logical-routers r1 protocols ospf area 0 interface em0 [edit]root@SPOTO-Junos#c\远程管理:[edit]root@SPOTO-Junos#edit system login[edit system login]root@SPOTO-Junos#setuser kiss class super-user authentication plan-text-password Newpassword:Retypenew password:[edit system login]root@SPOTO-Junos#top[edit]root@SPOTO-Junos#edit system services[edit system services]root@SPOTO-Junos#setssh protocol-version v2[edit system services]root@SPOTO-Junos#commitcommitcomplete[edit system services]root@SPOTO-Junos#settelnetd\查看信息:root@SPOTO-Junos>showversionroot@SPOTO-Junos>showroute terseroot@SPOTO-Junos>showconfigurationroot@SPOTO-Junos#showlogical-routersroot@SPOTO-Junos#showinterfaces交换:a\Access配置:[edit]root@SPOTO-Junos#set vlans vlan10 vlan id 10[edit]root@SPOTO-Junos#set interface fe-0/1 unit 0 family Ethernet-switching port-mode access [edit]root@SPOTO-Junos#set interface fe-0/1 unit 0 family Ethernet-switching vlan members 10 b\Trunk配置:[edit]root@SPOTO-Junos#set interface fe-0/1 unit 0 family ethernet-switching port-mode trunk [edit]root@SPOTO-Junos#set interface fe-0/1 unit 0 family ethernet-switching vlan members all六、迈普路由:a\ IP基本配置:Router>enableRouter#configure terminalRouter(config)#hostname MaipuMaipu(config)#interface fastethernet0Maipu(config-if-fastethernet0)#ip add 192.168.2.252 255.255.255.0 b\路由配置:Maipu(config)#router ospf 100Maipu(config-router)#network 192.168.2.0 0.0.0.255 area 0c\远程管理:Maipu(config)#aaa new-modelMaipu(config)#aaa authentication login default local enable none Maipu(config)#user SPOTO password 0 espotoMaipu(config)#line vty 0 4Maipu(config-line)#login locald\查看信息:Maipu#show versionMaipu#show ip routeMaipu#show interfaceMaipu#show cpuMaipu#show memoryMaiou#show running-config交换:a\Access配置:Maipu(config)#vlan 801Maipu(config-vlan801)#exitMaipu(config)#port 0/0/2Maipu(config-port-0/0/2)#port access vlan 801Maipu(config-port-0/0/2)#port-type nnib\Trunk配置:Maipu(config)#interface ethernet1/0/1Maipu(config-if-ethernet1/0/1)#switchport mode trunk Maipu(config-if-ethernet1/0/1)#exit七、Redback路由:a\ IP基本配置:[local]SE800>enable[local]SE800#configuration[local]SE800(config)#context local[local]SE800(config-ctx)#interface toSPOTO-R1[local]SE800(config-if)#ip add 21.98.65.21/30[local]SE800(config-if)#commit[local]SE800(config)#port ethernet 1/1[local]SE800(config-port)#no auto-negotiate[local]SE800(config-port)#no shutdown[local]SE800(config-port)#bind interface toSPOTO-R1 local[local]SE800(config-port)#commitb\路由配置:[local]SE800(config)#context local[local]SE800(config-ctx)#router-id x.x.x.x[local]SE800(config-ctx)#interface lp1 loopback[local]SE800(config-if)#ip address x.x.x.x/32[local]SE800(config-if)#ip source-address snmp syslog[local]SE800(config-ctx)#router ospf 1[local]SE800(config-ospf)#auto-cost reference-bandwidth 80000 [local]SE800(config-ospf)#log-neighbor-up-down[local]SE800(config-ospf)#area 0.0.0.0[local]SE800(config-ospf-area)#interface toSPOTO-R1[local]SE800(config-ospf-interface)#network-type point-to-point [[local]SE800(config-ospf)#redistribute connected metric 20metric-type 1 c\远程管理:[local]SE800(config)#system hostname SPOTO-R[local]SPOTO-R(config)#context local[local]SPOTO-R(config-ctx)#enable password espotor[local]SPOTO-R(config-ctx)#service ssh[local]SPOTO-R(config-ctx)#administrator SPOTO password se800pt [local]SPOTO-R(config-admin)privil start 10[local]SPOTO-R(config-admin)privil max 15ip access-list admin-acldescription This is a sample access control list seq 10 permit ip host 192.168.166.55seq 20 permit ip host 172.16.10.122sep 30 permit ip host 172.16.10.77sep 40 deny ip anyadmin-access-group admin-acl ind\查看信息:show subscribersshow cirsho clocksho vershow releasesho sub summ allshow hardware detailcontext localshow confi八、中兴路由:a\ IP基本配置:interface create ip to-r2 address-netmask 120.190.1.1/16port et.1.2interface create ip to-r3 address-netmask 130.1.1.1/16 portet.1.3b\路由配置:ip add route 202.1.0.0/16 gateway 120.90.1.2ospf startospf create area 140.1.0.0ospf create area backboneospf set ase-default cost 4ospf add interface 140.1.1.1 to-area 140.1.0.0ospf add interface 140.1.2.1 to-area 140.1.0.0ip-router policy create ospf-export-destinationospfExpDstType1 type 1 metric 1 c\远程管理:create user administratorlogin pass administratorline-vty timeout 60d\查看信息:system show active-config?交换:a\Access配置:set vlan 10 add port 1-23 untagset port 1-23 pvid 10b\Trunk配置:set vlan 1-10 add port 24 tag。
交换机路由器命令大全(结合配置实例)
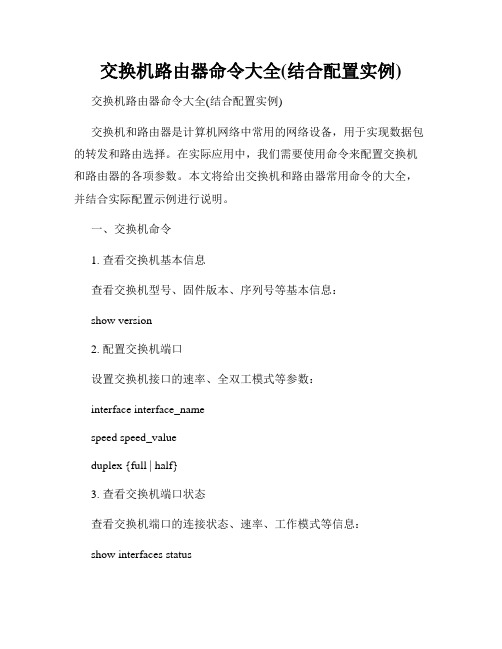
交换机路由器命令大全(结合配置实例)交换机路由器命令大全(结合配置实例)交换机和路由器是计算机网络中常用的网络设备,用于实现数据包的转发和路由选择。
在实际应用中,我们需要使用命令来配置交换机和路由器的各项参数。
本文将给出交换机和路由器常用命令的大全,并结合实际配置示例进行说明。
一、交换机命令1. 查看交换机基本信息查看交换机型号、固件版本、序列号等基本信息:show version2. 配置交换机端口设置交换机接口的速率、全双工模式等参数:interface interface_namespeed speed_valueduplex {full | half}3. 查看交换机端口状态查看交换机端口的连接状态、速率、工作模式等信息:show interfaces status4. 配置交换机VLAN创建VLAN和端口关联,实现VLAN的隔离和管理:vlan vlan_idname vlan_nameinterface interface_name5. 查看交换机MAC表显示交换机学习到的MAC地址和对应的端口:show mac-address-table6. 配置交换机链路聚合将多个物理端口绑定为一个逻辑端口,提高带宽和冗余性:interface port-channel channel_numberdescription description_textswitchport mode trunk/access7. 交换机Spanning Tree配置配置交换机的Spanning Tree协议参数,避免网络环路:spanning-tree vlan vlan_idpriority priority_value二、路由器命令1. 查看路由表显示路由器的路由表,包括直连路由、静态路由和动态路由表项:show ip route2. 配置静态路由手动配置路由器的静态路由表,指定目的网络和下一跳信息:ip route destination_network subnet_mask next_hop_ip3. 配置路由器接口配置路由器的接口参数,包括IP地址、子网掩码、描述等:interface interface_nameip address ip_address subnet_maskdescription description_text4. 配置路由器OSPF协议配置路由器之间的OSPF动态路由协议,实现网络的动态路由选择:router ospf process_idnetwork network_address wildcard_mask area area_number5. 配置路由器ACL配置路由器的访问控制列表,用于控制数据包的流量:access-list access_list_number permit/deny source destination6. 配置路由器NAT配置路由器的网络地址转换功能,实现内网与外网的互通:interface interface_nameip nat inside/outside三、配置实例1. 配置交换机端口接口GigabitEthernet0/1配置为100Mbps全双工模式:interface GigabitEthernet0/1speed 100duplex full2. 配置交换机VLAN创建VLAN10,将接口GigabitEthernet0/1划分到VLAN10:vlan 10name VLAN10interface GigabitEthernet0/13. 配置路由器接口将接口GigabitEthernet0/0配置为192.168.1.1/24的IP地址:interface GigabitEthernet0/0ip address 192.168.1.1 255.255.255.0description LAN interface4. 配置静态路由配置路由器的静态路由表,将目的网络192.168.2.0/24指向下一跳192.168.1.2:ip route 192.168.2.0 255.255.255.0 192.168.1.25. 配置路由器ACL设置访问控制列表,允许源IP地址为192.168.1.0/24的流量通过:access-list 1 permit 192.168.1.0 0.0.0.2556. 配置路由器NAT设置路由器的NAT,将内部接口GigabitEthernet0/1地址转换为公网地址:interface GigabitEthernet0/1ip nat inside以上是交换机和路由器常用命令的大全以及配置实例。
交换机路由器命令大全(结合配置实例)
交换机路由器命令大全(结合配置实例)一交换机命令switch: ;ROM状态,路由器是rommon>hostname> ;用户模式hostname# ;特权模式hostname(config)# ;全局配置模式hostname(config-if)# ;接口状态switch>enable ;进入特权模式交换机口令设置:switch#config terminal ;进入全局配置模式switch(config)#hostname ;设置交换机的主机名switch(config)#enable secret xxx ;设置特权加密口令switch(config)#enable password xxa ;设置特权非密口令switch(config)#line console 0 ;进入控制台口switch(config-line)#line vty 0 4 ;进入虚拟终端switch(config-line)#login ;允许登录switch(config-line)#password xx ;设置登录口令xxswitch#exit ;返回命令交换机VLAN设置:switch#vlan database ;进入VLAN设置switch(vlan)#vlan 2 ;建VLAN 2switch(vlan)#no vlan 2 ;删vlan 2switch(config)#int f0/1 ;进入端口1switch(config-if)#switchport access vlan 2 ;当前端口加入vlan 2 switch(config-if)#switchport mode trunk ;设置为干线switch(config-if)#switchport trunk allowed vlan 1,2 ;设置允许的vlan switch(config-if)#switchport trunk encap dot1q ;设置vlan 中继switch(config)#vtp domain ;设置发vtp域名switch(config)#vtp password ;设置发vtp密码switch(config)#vtp mode server ;设置发vtp模式switch(config)#vtp mode client ;设置发vtp模式switch(config)#interface vlan 1 ;进入vlan 1switch(config-if)#ip address ;设置IP地址switch(config)#ip default-gateway ;设置默认网关switch#dir flash: ;查看闪存交换机显示命令:switch#write ;保存配置信息switch#show vtp ;查看vtp配置信息switch#show run ;查看当前配置信息switch#show vlan ;查看vlan配置信息switch#show interface ;查看端口信息switch#show int f0/0 ;查看指定端口信息二、路由器命令路由器显示命令:router#show run ;显示配置信息router#show interface ;显示接口信息router#show ip route ;显示路由信息router#show cdp nei ;显示邻居信息router#reload ;重新起动路由器口令设置:router>enable ;进入特权模式router#config terminal ;进入全局配置模式router(config)#hostname ;设置交换机的主机名router(config)#enable secret xxx ;设置特权加密口令router(config)#enable password xxb ;设置特权非密口令router(config)#line console 0 ;进入控制台口router(config-line)#line vty 0 4 ;进入虚拟终端router(config-line)#login ;要求口令验证router(config-line)#password xx ;设置登录口令xxrouter(config)#(Ctrl+z) ;返回特权模式router#exit ;返回命令路由器配置:router(config)#int s0/0 ;进入Serail接口router(config-if)#no shutdown ;激活当前接口router(config-if)#clock rate 64000 ;设置同步时钟router(config-if)#ip address ;设置IP地址router(config-if)#ip address second ;设置第二个IProuter(config-if)#int f0/0.1 ;进入子接口router(config-subif.1)#ip address ;设置子接口IProuter(config-subif.1)#encapsulation dot1q ;绑定vlan中继协议router(config)#config-register 0x2142 ;跳过配置文件router(config)#config-register 0x2102 ;正常使用配置文件router#reload ;重新引导静态路由:ip route ;命令格式router(config)#ip route 2.0.0.0 255.0.0.0 1.1.1.2 ;静态路由举例router(config)#ip route 0.0.0.0 0.0.0.0 1.1.1.2 ;默认路由举例动态路由:router(config)#ip routing ;启动路由转发router(config)#router rip;启动RIP路由协议。
- 1、下载文档前请自行甄别文档内容的完整性,平台不提供额外的编辑、内容补充、找答案等附加服务。
- 2、"仅部分预览"的文档,不可在线预览部分如存在完整性等问题,可反馈申请退款(可完整预览的文档不适用该条件!)。
- 3、如文档侵犯您的权益,请联系客服反馈,我们会尽快为您处理(人工客服工作时间:9:00-18:30)。
en 进入特权模式
conf 进入全局配置模式
in s0 进入serial 0 端口配置
ip add xxx.xxx.xxx.xxx xxx.xxx.xxx.xxx 添加ip 地址和掩码,电信分配enca hdlc/ppp 捆绑链路协议hdlc 或者ppp
ip unn e0
exit 回到全局配置模式
in e0 进入以太接口配置
ip add xxx.xxx.xxx.xxx xxx.xxx.xxx.xxx 添加ip 地址和掩码,电信分配exit 回到全局配置模式
ip route 0.0.0.0 0.0.0.0 s 0 添加路由表
ena password 口令
write
exit
以上根据中国电信ddn 专线多数情况应用
普通用户模式
enable 转入特权用户模式
exit 退出配置
help 系统帮助简述
language 语言模式切换
ping 检查网络主机连接及主机是否可达
show 显示系统运行信息
telnet 远程登录功能
tracert 跟踪到目的地经过了哪些路由器
#? 特权用户模式
clear 清除各项统计信息
clock 管理系统时钟
configure 进入全局配置模式
debug 开启调试开关
disable 返回普通用户模式
download 下载新版本软件和配置文件
erase 擦除FLASH中的配置
exec-timeout 打开EXEC超时退出开关
exit 退出配置
first-config 设置或清除初次配置标志
help 系统帮助简述
language 语言模式切换
monitor 打开用户屏幕调试信息输出开关
no 关闭调试开关
ping 检查网络主机连接及主机是否可达
reboot 路由器重启
setup 配置路由器参数
show 显示系统运行信息
telnet 远程登录功能
tracert 跟踪到目的地经过了哪些路由器unmonitor 关闭用户屏幕调试信息输出开关
write 将当前配置参数保存至FLASH MEM中
全局配置模式
aaa-enable 使能配置AAA(认证,授权和计费) access-list 配置标准访问表
arp 设置静态ARP人口
chat-script 生成一个用在modem上的执行脚本custom-list 创建定制队列列表
dialer-list 创建dialer-list
dram-wait 设置DRAM等待状态
enable 修改ENABLE口令
exit 退出全局配置模式
firewall 配置防火墙状态
flow-interval 设置流量控制时间间隔
frame-relay 帧中继全局配置命令集
ftp-server FTP 服务器
help 系统帮助命令简述
host 添加主机名称和其IP地址
hostname 修改主机名
ifquelen 更改接口队列长度
interface 选择配置接口
ip 全局IP配置命令子集
ipx 全局IPX配置命令子集
loghost 设置日志主机IP地址
logic-channel 配置逻辑通道
login 启动EXEC登录验证
modem-timeout 设置
modem 超时时间
multilink 配置multilink 用户使用的接口
multilink-user配置multilink 用户使用的接口bnatserver 设置FTP,TELNET,WWW服务的IP地址no 关闭某些参数开关
priority-list 创建优先级队列列表
router 启动路由处理
settr 设置时间范围
snmp-server 修改SNMP参数
tcp 配置全局TCP参数
timerange 启动或关闭时间区域
user 为PPP验证向系统中加入用户
vpdn设置VPDN
vpdn-group 设置VPDN组
x25 X.25协议分组层。