启网B2B商城使用说明书(正式版)
B2B用户指南说明书
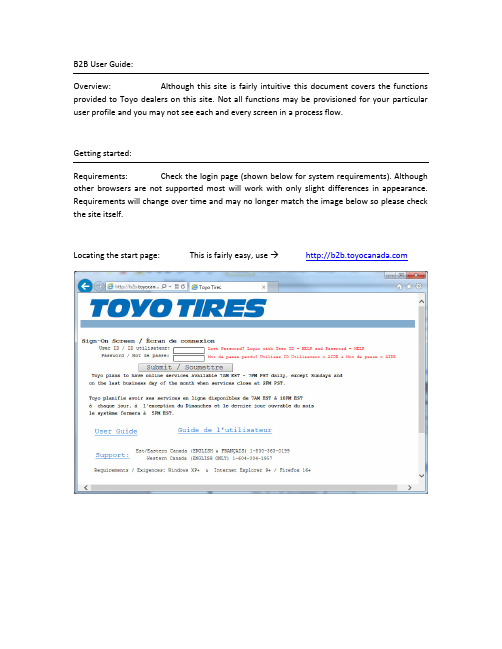
B2B User Guide:Overview: Although this site is fairly intuitive this document covers the functions provided to Toyo dealers on this site. Not all functions may be provisioned for your particular user profile and you may not see each and every screen in a process flow.Getting started:Requirements: Check the login page (shown below for system requirements). Although other browsers are not supported most will work with only slight differences in appearance. Requirements will change over time and may no longer match the image below so please check the site itself.Locating the start page: This is fairly easy, use Log In:In order to use the B2B functions you will need to log in using a valid user ID and password, which you obtain through your head Office or B2B Administrator (or your local B2B Administrator if your head office has appointed one). If your password requires changing you will be prompted as required. Once your user ID and password are accepted you will be shown the main screen, which shows you all of your available options. This screen looks like:Click the green arrow, to the left of each function, in order to start that function.Stock Inquiry:Overview: This function allows you to check the stock of an item, order items and check technical specifications. The “Select Item” button provides an item search tools that assists you in retrieving the item code based on description. The Item Search is explained later in the document.To check stock: Enter the six digit Toyo item number, or click the select item button. The item search is explained in a later section and it does exactly what you would expect (it takes your search criteria and finds matching items).The “Order Now” button serves the purpose of ordering the item code most recently looked up (you need to be authorized for this or you will be blocked by the system).The “Tech Info” button shows the technical information for the item most recently looked up.The “Order Activity” button will show you a list of orders which contain the most recently selected item.Order Activity for item:This function shows a list of orders which contain the selected item. This screen is reached by pressing the “Order Activity” button from the stock inquiry screen. As the order file contains many orders, the program scans up to 1000 orders before pausing. To continue searching press the Page Down key on your keyboard. The screen looks like this:Technical Information for Item:This screen is reached by doing an item stock inquiry for a specific item and then clicking the `Tech Info` button. This screen looks like:Work with Orders:This function allows you to see all your transaction with Toyo. If you are placing orders with your corporate warehouses these cannot be shown here unless your head office has an agreement with Toyo to show these orders on the Toyo system (the Order Type Class for such orders will be “S” for statistics). This screen looks like:There are filter fields at the top of this screen as well as additional buttons at the bottom of this screen. For creation of an order requestOrder Type Class (OTC):The Order Type Class, or OTC, is one of the following values:W = Web order O = Orders D = Direct InvoiceC = Credits R = Direct Credit A = Advertising orderS = Statistics orders replicated on Toyo computer system (sent by your head office)When viewing an order you will see the item level first.View OE Document:To view an OE Document click the Pencil icon on the far left of the row. This will bring you to a screen which looks like this:From this screen there are buttons to view the header as well as Hide/Show prices. Note: Only B2B Administrators at your head office location can see prices.The header screen also has buttons which will show you totals, prices and notes. The header screen looks like this:Creating your order Request:There are two ways to reach this function.1)From “ Stock Inquiry” screen click the “Order Now” button2)From “Work with Orders” function click the click “New” button.The screen you will reach looks like this:On the next screen you will be able to adjust the items as well as the quantity for each item. In the sample shown above item 352440 was passed through from Stock Inquiry so the program will assume a quantity of four (which can be changed on the next screen).To assist you in completing your order request there are buttons provided to allow you to add items to your request, add and edit notes for the order request, add and edit notes for a specific item and also two ways to exit this screen, which are “Confirm” or “Cancel” the order request. Here is what the order request screen looks like when a few items have been added:When your order request is ready to be sent to Toyo click the `Confirm & Order` button. This will take you to the confirmation screen which looks like this:Complete the process by clicking the button labelled “Click here to complete this transaction”.Changing your Password:When you want to change your password, or when it is required, you will use this function.Begin the process by clicking the “Continue” button. You will then be at the actual password change screen. Complete this screen by entering your current password and then your new password twice. It is recommended that you use the tab key to move between fields and only press then ENTER key or submit button when all fields are completed. Fields are ten characters long and the cursor will automatically move to the next field as you type the 10th character in any field.Change your Language:This option allows you to switch between English and French when using this site. The program will offer the other language so all you need to do is to click the Submit button. Here is what this screen looks like:Work with Invoices and Credits:This function is limited to head office staff and only those who have been approved to see this information. This function provides you access to your invoices and credits. Most common uses are to retrieve missing documents and/or to check current and past statements. There are buttons for accessing your most recent statement as well as generating a statement on demand. The statement on demand is useful when looking for your current balance or when attempting to close your fiscal year/period and want your balance without waiting for the month end statement to be sent.Administer B2B Users (Sold-To or Head Office):This function allows B2B administrators to add new users, remove unwanted users and change user access as necessary at your head office as well as all your registered locations.You can also use this function to reset profiles and passwords. The first step is to your locations where the B2B Users to be administered at located at. This screen looks like this:Once you have chosen your location then continue with the same procedure for managing B2B users at a ship-to location (see below).Administer B2B Users (Ship-To or NON-Head Office):This function allows you to add new users, remove unwanted users and change user access as necessary for the location shown. You can also use this function to reset profiles and passwords. This screen looks like this:Create New B2B User:This function allows for adding a new user. This user will be associated with the location selected above. During creation specify the B2B services desired and click submit.Complete the missing fields and set the preferences and then click Submit or press Enter key. This will take you to the next screen which is the Edit B2B User where you can make further changes as well as see the new user’s password. The new B2B profile is now ready for use.Edit B2B User:This function allows you to make changes to an existing B2B user, which includes name, email, password, re-enabling (after too many failed login attempts, etc.), and also what B2B functions the user is entitled to perform.This screen looks like this:To enable or disable the user use the button located by the user ID and password.Reset User Account:This function allows you to change the user’s password as well as change the user’s ability to gain access to the B2B system.This screen looks like this:Note: If you want to block an employee from using the B2B system without permanently removing their profile it is recommended that you change the status of their account to be “*DISABLED”Delete B2B User:This function provides the ability to permanently remove a B2B user profile. This function is suitable for use when an employee is leaving you company.This screen looks like this:Work with National Accounts:This function allows you to enter new national accounts as well as search previously submitted national account transactions. There are different types of National Accounts (such as: Car Dealer Networks, Fleet Lease companies, Government agencies, etc.). This is what the screen looks like:The blue arrows serve to scroll Up and Down the list when there is more than one screen full of data available. You can also use the Page Up and Page Down keys for this same purpose.The pencil icon, when clicked on, will allow you to continue editing the National Account document (if it is still OPEN) or display the document if it is in any other status.The page icon, when clicked on, will allow you to obtain additional copies o the National Account Delivery Form (NADF) Confirmation. This is only permitted for NA documents that have been completed (status = “INV”).National Account – Process Flow:I am showing the national account process for Fleet Lease as this demonstrates almost every feature of the national account process. Other National Account types will differ in both the screens shown for the process flow as well as the features and function allowed during entry.From the “Review National Accounts Processed” screen click the “New” button. You will then see this screen:Select your NA Chain type and the date on which the sales occurred and then click the submit button. The next screen you see will look like this:The next screen you see will look like this:After completing the Authorization/PO# field and click the submit button. This will take you to step 2 which looks like this:record the driver and vehicle information, which looks like this:which looks like this:Did you know?1)If the item code starts with is “NA MISC” or “LABOUR” then you will be prompted fornotes, which the FLEET requires or they will withhold payment.2)When using the item search do not forget to switch to the Parts and Services catalogueby clicking the button with that title at the bottom of the item search screen.3)When adding items, removing items or adjusting quantity and/or price make sure toclick the Submit button to apply your changes.The above screen shot shows a typical FLEET NA document. When finished entering your NAclick the “Continue (Step 5)” button to move to the final step. The next screen looks like this:Select Item:This function is accessed from Stock Inquiry, Order request entry and National Accounts. There are button to switch between “Tires” and “Products and services”. Also, there are filters to help you quickly find the item(s) of interest. When using the filters you will need to vary the amount of detail you supply in order to get a few entries that are the matches you are looking for. The item search screen looks like this:Click the green arrow, to the left of the item code, to select the item. This will return you to the screen from which you arrived here and the item code selected will then appear on that screen. This functions means you can lookup item code(s) as necessary and never need to remember them or be forced to look them up from another source, such as a price list.If using the filters at the top of the screen make sure you click submit after you have type your choices into each field otherwise the screen will not update.The blue arrows serve to scroll Up and Down the list when there is more than one full screen of data available. You can also use the Page Up and Page Down keys for this same purpose.Updates & Technical Support:Updates for this document will be available, via hyperlink, on the login page. For Technical support you have the following choices:-Contact your Toyo sales rep for training-Contact your head office administrator-To report technical problems please contact Toyo IT department。
旗舰自助网站用户手册
旗舰自助网站用户手册目录1. 建站须知 (3)1.1. 最先提示信息 (3)2. 如何进入操作平台 (3)2.1. 如何登陆 (3)3. 如何创建自助网站 (4)3.1. 操作功能介绍 (4)3.1.1. 友好欢迎屏幕 (4)3.2. 站点设置 (4)3.2.1. 基本信息 (4)3.2.2. 预览网站 (4)3.3. 版面设置 (5)3.3.1. 模板选择 (5)3.3.2. 风格设定 (6)3.3.3. 高级设置 (7)3.4. 栏目设置 (9)3.4.1. 如何管理栏目 (9)3.5. 内容编辑 (10)3.5.1. 如何编辑栏目内容? (10)3.5.2. 导航类 (11)3.5.3. 图文类 (11)3.5.4. 单页图文 (11)3.5.5. 图文展示 (12)3.5.6. 列表类 (13)3.5.7. 新闻资讯列表 (13)3.5.8. 招聘求职 (14)3.5.9. 产品/商品 (14)3.5.10. 表单类 (14)3.5.11. 访客留言 (14)3.5.12. 调查投票 (15)3.5.13. 广告类 (15)3.5.14. 广告 (15)3.6. 首页设置 (16)3.6.1. 导航条设置 (16)3.6.2. 页头设置 (17)3.6.3. 主内容区设置 (18)3.6.4. 页尾设置 (19)3.7. 退出系统 (19)3.7.1. 如何退出系统? (19)3.8. 在线帮助 (20)3.8.1. 怎样查看在线帮助? (20)1.建站须知1.1. 最先提示信息最先的提示信息:----- 建站须知:牢记这些提示会使建站事半功倍这里的建站方式与众不同,您可以象编辑报纸一样编辑网站,网站的基本层次为:首页-栏目-内容,记录分文章、导航、单页图文、图文展示、新闻资讯列表、招聘求职、产品/商品、访客留言、调查投票等类别,文章可以设成头版头条或标题出现在首页。
网站的内容和形式是完全分开的,您可以先按照逻辑结构一个栏目一个栏目、一个记录一个记录地建设网站的内容,内容建好后,您便有了一个完整的网站;如果有时间,您就可以按照自己的爱好修改网站的形式了。
网上商城使用说明书范文
二、实验日期:2015年6月13日--2015年6月21日
三、实验目的:
1、目的
1综合应用企业级JAVA I所学知识,使用Servlet和JSP技术等综合应用于实践。
2能够掌握在WEB应用中访问数据库的方式、方法。
2、要求
本次课程设计是对前面学过的Java web编程知识的一个整合实践,因此,开始设计前学生一定要先回顾以前所学的内容,明确本次课程设计所要用到的技术点从书本和网络上搜索、以及查阅相关的书籍资料。通过编写一个使用Servelet和JSP技术的应用系统综合实例,来掌握JavaWeb程序开发技巧。
用例图:
游客用例图
会员用例图
管理员用例图
活动图:
商城前台活动图
后台管理系统活动图
六、实验结果或结论:
一、系统运行界面截图
网上商城前台:
网上商城的主界面。用到JQuery。鼠标移动大屏幕广告,可以自动进行切换。右边是商城公告,是从数据库导进来的。如图1-1所示:
图1-1
会员可以先注册一个账号,如图1-2所示,如果账号被注册过会提示,如图1-3所示:
b所示:
图b
使用说明:
先运行导入mysql数据库
然后将放在商品图片文件夹里面的upload文件夹放在项目工作区间(workspace文件夹)的.metadata\.me_tcat\webapps\client文件里面,不然之前上传上去的商品图片不可以显示
如图所示:
运行server项目和client项目,然后在MyEclipse的默认浏览器里就可以进行项目演示。
3、设计思路
定义阶段:可行性研究初步项目计划、需求分析
网上商城的目的是为广大的网络用户提供一个网上购物平台,利用网络的便捷方便人们的日常生活。为了使它适合更多的用户使用,系统的界面设计应该尽量做到友好、简洁,功能的实现更注重人性化,方便用户的购买,使得用户很快便可以熟练掌握使用方法。
B2B系统使用说明书(门市版)
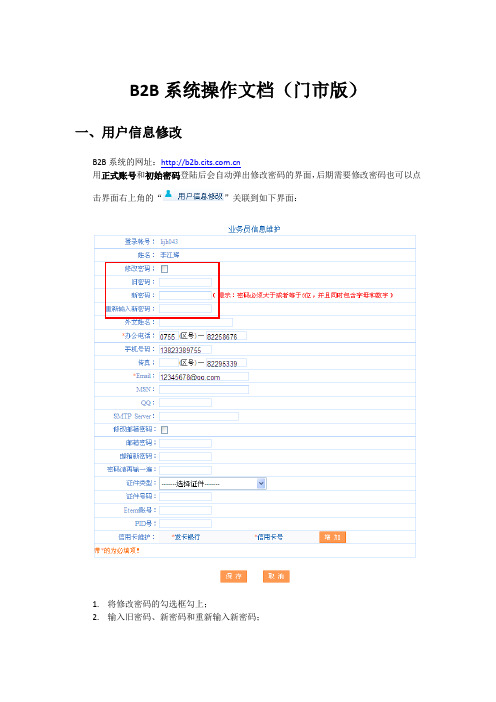
B2B系统操作文档(门市版)一、用户信息修改B2B系统的网址:用正式账号和初始密码登陆后会自动弹出修改密码的界面,后期需要修改密码也可以点击界面右上角的“”关联到如下界面:1.将修改密码的勾选框勾上;2.输入旧密码、新密码和重新输入新密码;3.点击按钮即可修改密码成功;注:密码必须大于或者等于6位,并且同时包含字母和数字。
二、查看可用额度首先报名之前,需要查看门市可用的额度余额,点击界面右上角“”关联到如下界面:1.界面中显示每一次额度变更的轨迹;2.按照时间的倒叙排列,第一条中的更改后的额度即为门市当前可用的额度;3.点击每条记录序号前面的“”可以查看当前额度的详细信息:“预收款余额”为门市实际预存到公司的钱,即为现在可以使用的额度;“尚欠团款”为门市下所有还没有录入收款,或者是录入了收款财务还没有取数;4.在此界面中可以查看某一个订单详细的扣除和恢复额度的记录;通过查询条件中的订单号可以查询出一个订单详细的额度变更的记录;更改额度中负数表示公司扣减的额度,正数表示公司恢复的额度;5.在此界面中可以看到公司给门市充值的记录:查询条件中操作类型选择“充值”,查询结果中显示的操作明细为“预收款充值”的表示公司给门市的充值记录。
三、报名1.国内游和省内游的产品在频道中报名,出境游的产品在频道中报名,以下以国内游为例;2.团队报名1)团队查询a)散客预订的产品都在“团队报名”中进行报名;b)查询条件:出发地、出团日期、目的地、所属市场、首站进入省、线路类型、团名称、团代号、团状态、可报名团队、行程天数、价格、排序方式、展示方式、可即时占位、线路主题、供应商;c)所属市场:可以点击系统左下角“系统帮助”、在弹出页面下载第一个文件“国内游常规目的地信息参考”查看,不明确的所属市场可以参考,专线建立产品也是按照此文档进行维护;d)省内游:可以通过选择线路类型中的“短途游”查询省内游的产品;e)供应商:通过点击“”可以查询某专线提供的所有产品;f)输入查询条件,点击“”可以查询出相匹配的产品:●查询结果中可以看到团名称、出发日期、返回日期、供应商、出发地、成人价格、儿童价格、计划报名人数、可报名人数、报名人数(正式+候补)、团详细;●计划报名人数:该团总的报名人数;●可报名人数:该团当前可以报名的人数;●报名人数(正式+候补):该团当前正式报名的人数和候补的人数,点击“”可以看到该团中所有的游客信息:注:如果游客是本门市报名的可以看到详细的信息,如果该游客是其他门市报名的,在界面中只能看到游客姓名、性别和报名状态,其他详细信息是无法看到的。
B2B报价系统 说明书

B2B 報價系統操作手冊
1. 以下為廠商登入後,,點擊詢價管理菜單所呈現的畫面
:
2. 隨後點擊詢價公告,即可看到所能報價的物料,如圖所示
:
圖片將顯示於此處4. 點擊廠商報價後畫面如下所示:
點擊進行報價
5. 點擊右邊的報價即可對該料號的物料進行報價,畫面如下所示:
6.點擊送樣時間,即出現如下圖所示畫面,
其中帶*號為必填內容,未稅單價等欄位必須為數字(提交時系統也會提示). 在報價有效期起迄值內廠商可對同一料號進行多次報價,系統將取最後一次報價. 當對同一料號進行再次報價時,在報價畫面將顯示前一次報價信息
若提交成功,,系統將提示<報價成功,請留意通知等!>
都填數字
多次報價時,此區域顯示上次報價信息。
网上商城系统功能说明书

烟台智联网络网上商城系统《功能需求说明书》目录1. 系统特点 (3)1.1. 技术架构 (3)1.2. 开放的插件机制 (3)1.3. 功能Ajax化 (4)1.4. 安全高效 (4)1.5. 搜索引擎友好性 (5)2. 商品展示 (5)2.1. 商品分类与品牌 (6)2.2. 商品类型与属性 (6)2.3. 推荐商品 (8)2.4. 商品详情页 (8)2.4.1. 相关商品 (9)2.4.2. 配件 (9)2.4.3. 关联文章 (9)2.4.4. 购买过该商品的人还买过的商品 (9)2.5. RSS Feeds和Tag (9)3. 购物流程 (9)3.1. 智能化的购物流程 (9)3.2. 聪明的配送方式 (10)4. 推广促销 (10)4.1. 拍卖 (11)4.2. 夺宝奇兵 (11)4.3. 团购 (11)4.4. 灵活多样的优惠活动 (11)4.5. 推荐提成 (12)4.6. 会员信用额度 (12)4.7. 销售专题 (12)5. 会员系统 (12)5.1. 会员数据整合 (12)5.2. 积分兑换 (13)6. 网店管理 (13)6.1. 报表统计 (13)6.2. 办事处 (15)6.3. 短信 (15)6.4. 计划任务 (15)7. 结束语 (15)1.系统特点1.1. 技术架构本系统采用PHP、Ajax技术开发,系统可运行于Linux、Windows等多种操作系统平台。
系统采用MVC(Module, View Controller)三层架构设计,从根本上保证了系统的健壮性与可扩展性。
图表 11.2. 开放的插件机制对于电子商务网站来说支付与配送是业务流程中至关重要的一个环节,也正是网上支付与各物流公司的兴起促使了电子商务快速的发展。
本系统抛弃了传统的固定公式,由用户来设置各种参数的方式,而是采用了一个开放式的插件机制来管理各种支付和配送方式。
对于网上商店网站的站长来说,建立一个社区是一种提高网店的用户黏度的有效手段,这样也就带来了一个问题,如何将社区的用户与网店的用户进行整合。
电子商务服务平台用户操作手册

电子商务服务平台用户操作手册1. 简介欢迎使用我们的电子商务服务平台!本用户操作手册旨在帮助您了解平台的各种功能,并提供详细的操作指南。
请按照以下步骤进行操作。
2. 注册和登录2.1 注册新账户要使用我们的电子商务服务平台,您需要先注册一个新账户。
请按照以下步骤进行注册:1.打开平台网站首页。
2.点击页面右上角的“注册”按钮。
3.输入您的个人信息,包括姓名、邮箱地址和密码。
4.点击“注册”按钮完成注册。
2.2 登录账户如果您已经注册了账户,请按照以下步骤进行登录:1.打开平台网站首页。
2.点击页面右上角的“登录”按钮。
3.输入您的邮箱地址和密码。
4.点击“登录”按钮完成登录。
3. 平台功能3.1 商品浏览和搜索在平台上,您可以浏览和搜索各种商品。
请按照以下步骤进行操作:1.登录您的账户。
2.点击导航栏上的“商品”按钮,进入商品页面。
3.使用页面上的搜索框输入关键词进行搜索。
4.点击搜索结果中的商品名称,查看商品详情。
3.2 购物车管理在平台上,您可以将喜欢的商品加入购物车并进行管理。
请按照以下步骤进行操作:1.在商品详情页面上,点击“加入购物车”按钮。
2.进入购物车页面,查看已加入购物车的商品列表。
3.您可以修改商品数量或删除不需要的商品。
4.点击“结算”按钮,进入结算页面。
3.3 下单和支付在结算页面,您可以提交订单并进行支付。
请按照以下步骤进行操作:1.确认订单信息,并填写收货地址。
2.选择支付方式,例如支付宝、微信支付等。
3.点击“提交订单”按钮。
4.根据选择的支付方式进行支付操作。
3.4 订单管理在平台上,您可以查看和管理您的订单信息。
请按照以下步骤进行操作:1.登录您的账户。
2.点击导航栏上的“订单”按钮,进入订单页面。
3.在订单页面上,您可以查看所有订单的状态和详细信息。
4.如果需要进行取消、退款或退货操作,请点击相应的按钮进行操作。
4. 常见问题4.1 如何联系客服?如果您在使用平台过程中遇到任何问题,可以通过以下方式联系我们的客服团队:•拨打客服热线:10086•发送电子邮件至:**********************•在平台上点击“联系客服”按钮,填写联系表单。
网上商城系统操作手册整理版

网上商城系统操作手册目录1 系统描述 (1)1.1总体介绍 (1)1.2软件需求 (1)2系统后台管理介绍和操作说明 (1)2.1后台登陆 (1)2.2管理员信息管理 (1)2.2.1添加管理员 (1)2.2.2管理员列表 (1)2.2.3修改密码 (2)2.3 用户信息管理 (3)2.4 销售量查询 (3)2.5 商品信息管理 (3)2.5.1显示、修改、删除商品信息 (3)2.5.2添加商品信息 (4)2.5.3添加、删除商品类别 (4)3系统前台管理介绍和操作说明 (5)3.1商品浏览 (5)3.2用户管理 (5)3.2.1用户登录 (5)3.2.2修改密码 (5)3.2.3修改个人资料 (6)3.3购物记录查询 (6)3.4购物车管理 ............................................................................................ 6構氽頑黉碩饨荠龈话骛。
1 系统描述1.1总体介绍整个项目分前台和后台两个项目开发。
前台用户可以在网上商城按类别浏览商品的信息,也可以搜索自己所需要的商品的内容,放入购物车以便购买,下订单,也可以修改自己的注册信息,察看自己的订单。
同时可以注册和编辑个人信息。
后台包括用户管理和商品管理和用户权限管理。
前台功能描述:商品浏览:热门商品浏览(首页显示点击率最高的商品列表)、新到商品浏览(首页显示最新添加的商品列表)、商品分类浏览,按商品名称搜索、商品详细信息;注册账户才可以购买商品,用户登录对用户身份进行验证,未注册用户只能浏览商品,不能完成结账;➢用户管理:注册新用户、登录、用户修改密码、用户个人资料管理;➢购物车管理:用户可以将感兴趣的商品加入购物车,便于商品购买,如果用户未登录则提示先登录后购买;订单管理:用户下订单后,可以对订单删除和更改商品,以及修改联系方式,系统判断客户账户里有没有足够的资金,如果没有足够的资金则给出提示,如有则可完成订单。
- 1、下载文档前请自行甄别文档内容的完整性,平台不提供额外的编辑、内容补充、找答案等附加服务。
- 2、"仅部分预览"的文档,不可在线预览部分如存在完整性等问题,可反馈申请退款(可完整预览的文档不适用该条件!)。
- 3、如文档侵犯您的权益,请联系客服反馈,我们会尽快为您处理(人工客服工作时间:9:00-18:30)。
启网B2B商城使用说明书(一)后台使用说明 (3)后台主页 (3)添加快捷菜单 (3)1.商品管理 (5)1.1.商品管理 (5)1.1.1.商品列表 (5)1.2.商品分类 (11)1.2.1.分类设置 (11)1.3.商品属性 (12)1.3.1.类型设置 (12)1.3.2.颜色尺码 (14)1.3.3.品牌资料 (17)1.3.4.商品标签 (19)1.3.5.可视角度 (20)2.页面管理 (22)2.1.网站管理 (22)2.1.1.站点栏目 (22)2.1.2.网页底部栏目 (24)2.1.3.网页底部信息 (25)2.2.帮助管理 (25)2.2.1.帮助明细 (25)3.商务管理 (26)3.1.订单管理 (26)3.1.1.订单浏览 (26)3.1.2.订单发货 (28)3.1.3.发货单查询 (30)3.2.报表中心 (31)3.2.1.订单统计 (32)3.2.2.销售统计 (32)3.2.3.收款统计 (33)3.3.客户管理 (35)3.3.1.客户列表 (35)3.3.2.站内消息 (38)3.3.3.发件列表 (39)4.站点配置 (40)4.1.全站配置 (40)4.1.1.基本设置 (40)4.1.2.购物显示设置 (40)4.1.3.商品图片设置 (42)4.1.4.在线客服设置 (43)4.2.支付管理 (44)4.2.1.支付方式 (44)4.3.管理员 (48)4.3.1.角色管理 (48)4.3.2.管理员列表 (50)4.4.任务管理 (51)4.4.1.任务列表 (51)4.5.系统管理 (52)4.5.1.图片管理 (52)4.5.2.浏览错误日志 (52)(二)前台使用说明 (53)1.1.网站首页 (54)1.1.1.服装行业商品列表显示 (54)1.1.2.非服装行业商品列表显示 (58)1.1.3.在线客服 (59)1.1.4.已选购功能 (60)1.2.购物车页面 (62)1.3.填写订单信息页 (62)1.4.个人后台页面 (64)1.4.1.个人后台页面主页 (64)1.4.2.我的订单 (64)1.4.3.支付欠款额 (66)1.4.4.往来订单记录 (67)1.4.5.个人信息 (69)1.4.6.修改密码 (70)1.4.7.收货地址 (71)1.4.8.我的消息 (71)(一)后台使用说明后台主页A一级菜单选项卡;B用户自定义快捷菜单栏;C二级菜单;D快速访问网站前台;添加快捷菜单点击“添加”按钮,弹出菜单层,网站管理员可以选择任意菜单加入到快捷菜单栏中。
1.商品管理1.1. 商品管理1.1.1.商品列表A全选功能:可以同时对多条数据的操作。
B商品编辑功能:点击商品编辑操作将进入商品编辑页面。
C商品查看功能:点击商品查看功能将打开此商品的详情页面。
便于用户编辑商品后立即能看到商品在前台的显示。
D筛选功能:下拉框提供“商品编号”、“商品名称”、“零售价”等条件进行对商品的删选。
E辅助筛选功能:提供更多的筛选条件。
点击后出现更多筛选条件如下图↓F新增产品功能:点击后进入商品新增页面,可以进行新增商品操作。
G删除商品:可以删除你勾选的商品。
H导出功能:可以根据你选择的导出格式,导出你勾选中的商品数据。
I分页功能:可以自定义每页显示多少条数据。
可以跳到你指定的页数。
商品编辑页(1) 添加新商品时,系统会给出一个商品编号值,管理员可修改,商品编号不能重复。
(2) 列表图片的设置,从上传的图片中选择一张作为此商品列表图片。
前台商品列表页显示效果(3) 颜色尺码的使用,选择不同的使用方式,就会生成不同的颜色尺码表选择“无颜色尺码”方式不会生成颜色尺码表(适于非服装行业使用)。
选择“只有颜色”方式生成的颜色表如下选择“只有尺码”方式生成的尺码表如下选择“有颜色尺码”方式生成的颜色尺码表如下(4) 商品简介,可以写一些商品的备注信息方便客户了解商品网站前台显示效果如下当商品备注过长的时候,将用省略号代替,同时在备注后面出现“查看全文”,鼠标移到“查看全文”上面可以看到完整的商品备注信息。
如果没备注信息,将不会显示(5) 是否上架,勾选后,商品才可在商品列表中出现。
(6) 新品标识,如果勾选中,此商品将在前台商品列表页中标识为“新品”前台效果图如下(7)商品标签设置商品标签后前台可以根据设置的标签搜索到相应标签的商品1.2. 商品分类1.2.1.分类设置A.“所有分类”为顶级分类。
B.添加子类功能:当此分类有商品时添加按钮会变成灰色,不能再添加子类。
C.删除功能:当此分类有子类或者已经存在商品时,删除按钮将变成灰色。
D.查看功能:点击后将以此分类作为筛选条件进入网站前台商品列表页面。
E.添加一级分类按钮:此处添加一级分类其父类是所有分类。
分类编辑页面前台筛选条件:当网站前台商品列表页根据此分类筛选的时候,这些被勾选的品牌和类型属性将显示在商品列表页的条件列表中。
如下图1.3. 商品属性1.3.1.类型设置编辑页当网站前台商品列表页根据此类型进入的时候,开启的属性就会按照你设置的排序在条件列表中依次显示。
如下图,B处暂时停用1.3.2.颜色尺码这里设置的颜色尺码组供添加商品时选用的,网站前台商品列表页面中鼠标移动到商品图片时,将显示出颜色尺码。
添加商品时选择颜色尺码组如下选择完成以后,点击“生成所有”颜色尺码组变把它们的值都生成出来前台商品列表中,当鼠标移动到此商品时,会显示出该商品的颜色图片和尺码如下图1.3.3.品牌资料排序表示当品牌被列出来的显示顺序品牌编辑页面设置此品牌关联的分类设置此品牌关联的属性从此品牌进入的网站前台商品列表的时候,它关联的分类和属性都会显示出来。
1.3.4.商品标签在后台添加商品页中添加商品的时候勾选设置的标签如下商品设置了商品标签以后,网站前台搜索标签的关键字就能找到对应的商品。
1.3.5.可视角度在后台添加商品页中上传图片后,在给它们设置图片设置完保存后,在网站前台商品列表也可以看到效果如下2.页面管理2.1. 网站管理2.1.1.站点栏目导航通栏和竖型导航栏在网站前台的显示位置如下栏目类型为下拉菜单的如下效果图栏目类型为单独页面的的时候点击它是打开一个页面。
站点栏目编辑页面添加顶级栏目后点击添加明细,弹出明细后选择前台对应显示位置如下图所示网站显示效果如下图所示2.2. 帮助管理2.2.1.帮助明细明细页编辑3.商务管理3.1. 订单管理3.1.1.订单浏览表示审核此订单操作,点击后可查看到订单后再审核,如下图发货单号如下图。
可以根据输入的【日期段】、【客户名称】、【仓库】、【制单人】、【审核人】、【审核状态】、【发货状态】等查询条件进行订单查询,如下图。
审核后的订单还可以进行反审核。
本页合计是合计本页的金额总数3.1.2.订单发货只能对已审核的订单进行发货发货操作,点击后进入订单详情页面,可以修改订单发货的数量(不全部发完数量叫部分发货)。
查看发货单号,如果发了两次货就会生成两个发货单号,如下图可以根据输入的【日期段】、【客户名称】、【仓库】、【制单人】、【审核人】、【审核状态】、【发货状态】等查询条件进行订单查询。
如下图3.1.3.发货单查询查询所有已经发货的订单查看发货订单详情页面,点击进入发货订单详情页面可以根据输入的【日期段】、【发货单号】、【关联订单号】、【客户名称】、【机构】、【仓库】、【制单人】、【审核人】、【审核状态】等查询条件进行订单查询。
如下图3.2. 报表中心以下报表的日期段默认都是从本月1日到今天,如下图,管理员可以自定义日期段来进行查询的3.2.1.订单统计统计某日期段的订单数据,只能查询不可以编辑和删除数据可以输入【日期段】,【货品编号】,【货品名称】,【客户名称】,【所属机构】等条件进行查询订单统计,可以导出选中的订单统计数据。
3.2.2.销售统计统计某日期段的商品的销售情况,只能查询不可以编辑和删除数据销售统计,可以导出选中的销售统计数据统计某日期段的收款情况,只能查询不可以编辑和删除数据可以导出选中的收款统计数据3.3. 客户管理3.3.1.客户列表可以对客户进行发送【消息】,【邮件】,【短信息】,支持群发。
发送短消息界面如下发送邮件界面如下发短信界面如下点击【编辑】可查看、编辑客户资料网站管理根据自己的掌管的机构分配客户所属机构,可修改客户密码。
3.3.2.站内消息点击查看功能,查看站内信详情点击【回复】按钮可以回复站内消息。
点击删除站内消息。
3.3.3.发件列表发件列表中显示着已发送成功和待发送的“电子邮件”和“手机短信”,可以点击进行查看,点击进行删除4.站点配置4.1. 全站配置4.1.1.基本设置4.1.2.购物显示设置设置后显示的效果图如下设置后效果图列表每页显示的数量设置的就是商品列表页面中每一页显示的商品个数。
橱窗显示每行数量设置效果如下4.1.3.商品图片设置4.1.4.在线客服设置前台首页显示效果如下鼠标移入后显示效果4.2. 支付管理4.2.1.支付方式表示启用此支付方式。
设置启用的支付方式会在前台订单页面中的付款时使用,如下图显示点击【编辑】支付宝支付方式其他支付方式根据相应设置填写下面以支付宝为例如何获取ParterID和Key进入地址注册一个支付宝(已有支付宝帐号不需要再注册)。
注册成功后,登录,进入主页后点击商家服务如下图然后点击【查询PID、Key】按钮如下图输入支付密码,如下图这样就可以取得PID和Key4.3. 管理员4.3.1.角色管理点击【添加】按钮可以添加新角色点击角色列表中的进行查看权限如下图点击角色列表中的进行修改普通角色权限管理员组编辑页。