电话分机使用说明
北京海天佳和通信技术 HT96 会议电话分机 说明书

HT96 会议电话分机用户手册北京海天佳和通信技术有限公司目录目录 (1)1.概述 (2)1.1 应用范围 (2)1.2 技术特点 (2)2.主要技术指标 (2)3.使用说明 (4)3.1 设备俯视图 (4)3.2 设备后视图 (5)3.3 设备底视图 (6)4.安装开通 (9)4.1 接通电源 (9)4.2 二线开通 (9)4.3 四线开通 (10)1.概述1.1 应用范围HT96 会议电话分机是与会议电话总机配套使用的会议终端设备,可供铁路有关部门、工矿企业召开电话会议使用。
会议电话网终端的会议参加者可以通过本设备以扬声对讲的方式收听或发言。
1.2 技术特点可靠性高:设备采用高性能单片机和大规模集成电路技术,集成度高,可靠性好。
稳定性好:为防止振鸣,发信通路设有自动音量控制,收信通路设有讲话扳键,可根据具体使用情况工作在单工、双工、半双工状态。
电源工作范围宽:本机使用电源为交流220V或直流12V,交流电压在85V~265V,直流电压在9V~12V范围内可正常工作。
2.主要技术指标端口阻抗二线口阻抗:600Ω四线口阻抗:600Ω发信通路发信电平:发信入-45dB(600Ω)、800Hz正弦波信号,二线端输出+5dB,四线端输出-4dB。
幅频特性:300HZ~3400HZ与800HZ相比较,其电平差不超过±2dB。
非线性失真:发信入-35dB(600Ω)、400Hz正弦波信号,外线端信号失真应小于3%。
杂音电平:外线端杂音电平小于-52dB。
收信通路输出功率:外线入-18dB、800HZ正弦波信号,扬声器输出功率不小于500mW(4Ω,电压电平+5dB)。
幅频特性:300HZ~3400HZ与800HZ相比较,其电平差不超过±2dB。
非线性失真:外线入-18dB、400HZ正弦波信号,扬声器额定输出时,失真应小于3%。
杂音电平:扬声器两端杂音电平应小于-52dB。
串音电平扬声器输出额定功率时,发信入-45dB、800Hz正弦波信号,扬声器输出端串音电平应小于-52dB。
内线电话使用方法
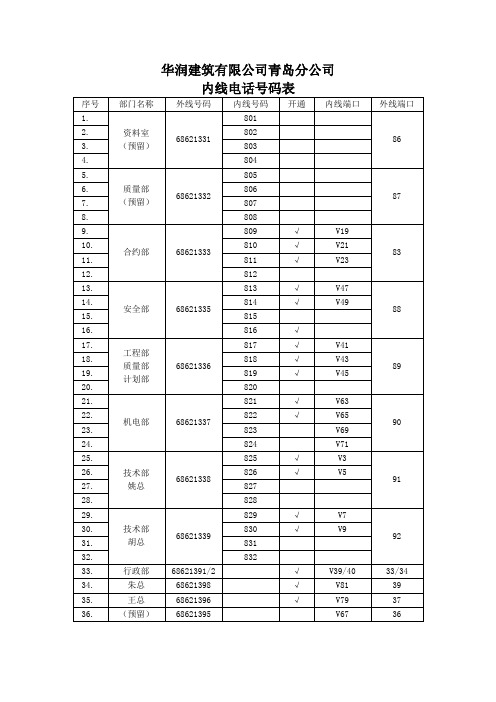
华润建筑有限公司青岛分公司
华润建筑有限公司青岛分公司
内线电话使用方法
1、除行政部(2部)、经理室(2部)外,其他各部门电话均为分
机电话,共用8个外线号码,需通过交换机拨打电话;
2、分机拨打外线方法:先拨9+0+本地或长途电话号码;
例如:9+0+0531+88888888或9+0+013788888888
3、分机拨打分机方法:直拨分机号码,例如:找姚总拨825;
4、分机转分机方法:拍叉簧+分机号+挂机;
5、各分机拨打行政部或经理室:先拨9+1391(外线的后四位);
6、行政部或经理拨打各分机:例如,找姚总拨1338(部门外线的
后四位),对应的分机同时响铃;
7、外线拨打分机:拨打部门的外线号码,对应的部门分机同时响
铃。
如果,打错拨入其他部门,请帮忙转接(方法:见4);
8、行政部与经理办公室互相拨打后四位,即可实现内线通话;
9、说明:分机拨打外线会按照8部外线使用状态,依次自动拨出,
显示的号码可能不是本部门的外线号码。
如需回拨,请告知对
方本部门号码后四位即可;
10、各部门同事共同使用8个外线号码,请长话短说,方便别人,
节约话费;
11、如遇故障或有调整建议,请及时与机电部联系。
机电部
2011年6月4日。
百通1030电话分机系统使用手册说明书

1030 A t t endant’s GuideIntroduction . . . . . . . . . . . . . . . . . . . . . . . . . . . 1 Buttons and Indicators . . . . . . . . . . . . . . . . . . . 2 1030 Console . . . . . . . . . . . . . . . . . . . . . 2Line Buttons . . . . . . . . . . . . . . . . . . . . . 3DSS (Direct Station Select) Buttons . . . . . . . . . 3Indicator Light Flash Rates . . . . . . . . . . . . . . 4Call Processing Buttons . . . . . . . . . . . . . . . 5Console Ringing . . . . . . . . . . . . . . . . . . . 6Incoming Call Indications . . . . . . . . . . . . . . . 6 Operation . . . . . . . . . . . . . . . . . . . . . . . . . . . . 8 Call Answering . . . . . . . . . . . . . . . . . . . . . . . 8Transferring Calls . . . . . . . . . . . . . . . . . . . . . 9Call Hold . . . . . . . . . . . . . . . . . . . . . . . . . . 12Announcing Calls . . . . . . . . . . . . . . . . . . . . . 13Message Waiting . . . . . . . . . . . . . . . . . . . . . 13Call Release . . . . . . . . . . . . . . . . . . . . . . . . 14Call Originating . . . . . . . . . . . . . . . . . . . . . . 14Night Service . . . . . . . . . . . . . . . . . . . . . . . 15Quick Mode . . . . . . . . . . . . . . . . . . . . . . . . 16Adjusting the Handset Volume . . . . . . . . . . . . . . 17Adjusting the Ringer Volume . . . . . . . . . . . . . . . 17Setting The Clock . . . . . . . . . . . . . . . . . . . . . 18Ring Delays . . . . . . . . . . . . . . . . . . . . . . . . 19DSS/Autodial Setup . . . . . . . . . . . . . . . . . . . . 21Name Display Setup . . . . . . . . . . . . . . . . . . . . 23Using a Headset . . . . . . . . . . . . . . . . . . . . . . 25 Console Care . . . . . . . . . . . . . . . . . . . . . . . . . . 25Tone Commander 1030 Attendant’s Guide iFCC W arningThis equipment has been tested and found to comply withthe limits for a Class A digital device, pursuant to Part 15 ofthe FCC Rules. These limits are designed to providereasonable protection against harmful interference when theequipment is operated in a commercial environment. Thisequipment generates, uses, and can radiate radio frequency energy and, if not installed and used in accordance with theinstruction manual, may cause harmful interference to radiocommunications. Operation of this equipment in a residential area is likely to cause harmful interference in which case the user will be required to correct the interference at his ownexpense.ii Tone Commander 1030 Attendant’s GuideThe Tone Commander 1030 console provides an easy to use answering position for Centrex or PABX lines. Calls may be put on hold or transferred from the console. Autodialing, message waiting light control, and station status display is provided for up to 30 stations. Your system may have one or two attendant positions.The features of the Tone Commander 1030 include:PERSONALIZED STATION IDENTIFICATION –each station may be optionally displayed with the user’s or department name.DSS (Direct Station Select)–autodials a station’s number with a single button.INDICATOR LIGHTS –show the status of each line or station by various flash rates.RECALL–an unanswered call extended via a DSSbutton will recall the console after anumber of rings set by the installer. HOLD RECALL–calls left on hold longer than the timeselected by the installer will recall theattendant.AUTOMATIC HOLD –the previous call is automatically placed on hold when the ANSWER button or another line button is pressed.RING DELAY–the attendant can program the console tobegin ringing after the line or station hasrung from 1 to 9 times.Buttons and indicators on the 1030 console are described on the following pages.Tone Commander 1030 Attendant’s Guide 1But t ons and Indicat ors1030 Consoleused for dialing and accessing system features.DISPLAY a 20 character display gives the attendant PROCESSING BUTTONS (see page 5)select individual telephone lines for calling or answering, and access special features of your system such as paging.(see page 3)DSS BUTTONS(see page 3)2 Tone Commander 1030 Attendant’s GuideLine ButtonsLine buttons connect telephone lines to the handset, for incoming or outgoing calls. Some special features of your telephone system such as paging are accessed via line buttons.DSS (Direct Station Select) ButtonsDSS buttons originate and transfer calls to stations.Spare DSS buttons may be used for autodialing (speed dialing)frequently-dialed numbers.HOLD LIGHTSwinking – line is on holdflashing – line that has been on hold for too longLINE STATUS LIGHTS off – line is idle, or special feature is inactive slow blinking – line is ringing,but not yet at the console (delayed ringing)flashing – line is ringing at the console, or special feature is activeflickering – line is currently in use at the console (I-Use line).on steady – line is in use at another console, or specialfeature is activeSTATION STATUS LIGHTSoff – station is idleslow blinking station, but not at the console (delayed ringing)flashing station and the consoleon steady – station is busy; also indicates a waiting message after the MESSAGE button has been pressedflickering – station has been selected for DSS dialingTone Commander 1030 Attendant’s Guide 3Indicator Light Flash Rates50% on, 50% off; slow rate50% on, 50% off; fast rate50% on, 50% off; very fast ratemostly off, with brief on flashesmostly on, with brief off flashes; fast ratemostly on, with brief off flashes; slow ratesteady on, followed by two quick flashesflashingfast flashingflickeringslow blinkingwinkingslow winkingnight= light on lightoff4 Tone Commander 1030 Attendant’s GuideCall Processing ButtonsRELEASE disconnects the attendant from a callRING DELAY programs or reads ring delay values for lines and stations ANSWER answers the ringing call (line or station) that is shown in the display TRANSFER used to manually transfer calls or cancel a DSS selection HOLD puts the selected line on hold PICK UP answers ringing station calls not shown in the display (used with DSS)CONNECT connects calls to stationsMESSAGE turns station message waiting lights on or off (optional)Tone Commander 1030 Attendant’s Guide 5Console RingingLines1 or2 warble tones every 4 seconds indicates a ringing incoming call on any line.Incoming call ringing rate is determined by the source of the call, and depends upon the type of telephone system the 1030 console is connected to. Consult with the installer for your system’s ringing rates.Stations1 (or 3) steady tones every 4 seconds indicates unanswered station ringing or recall.The number of tones heard during ringing station calls is selectable by the installer.Incoming Call IndicationsRinging calls are queued for answering in the order received.The display will show the source of the oldest ringing call. The number of additional calls waiting to be answered is shown on the right side of the display. When a line is accessed and another line rings, the ringing tone is shortened. This feature allows attendants to process calls with less background ringing at the console.RNG LIZ BARRETT 3an unanswered call ringing at a station,with three additional ringing calls6 Tone Commander 1030 Attendant’s GuideThe abbreviation for the type of call will be followed by a name ifthe line or station has been programmed with a name display. Otherwise, the line or station number will be displayed.INC line # or nameincoming attendant callRNG station # or nameunanswered station callRCL station # or nameunanswered station call previouslytransferred by the attendantNXF station # or namecall that failed to properly transfer to a stationHLD line # or namecall that has been left on hold too longCMP line # or namecall that has been camped onto a station too longTone Commander 1030 Attendant’s Guide 7Call A nsw eringThe source of the oldest call waiting to be answered is shown in the display – see page 6.To answer (pick up) a ringing station call not shown in the display:a Press PICK UP.a Press the DSS button for the ringing station.After answering, you may:•transfer the call to a station•transfer the call to a voice mail system•put on the call hold•announce the call over a paging system•turn on a message waiting light at the station•release (disconnect/hang up) the callTransf erring CallsCalls may be transferred by several methods.When a call is screened, the caller is put on hold while you speak privately with the called party and ask them if they will accept the call. You can then return to the caller, transfer the call, or terminate the call.Unscreened calls are transferred without any screening of the called party.If the called party is busy, the call can be camped on to the busy station. The call will be on hold until the busy station hangs up, then it will ring at the station. Calls that have been camped on too long will ring at the console. Some systems may not have the camp-on feature.Stations may be dialed by pressing the appropriate DSS button, or manually with the dial pad if the you have no DSS button programmed for the desired station.The various call transfer procedures differ slightly, and are described below.shown:a Press the CONNECT button to transfer the call.If the wrong DSS button was selected, press the TRANSFER button to cancel dialing.a Press the CONNECT button to camp on the call. The call will be transferred when the station hangs up. The station message lamp,if provided, will flash while the call is camped on.Press the TRANSFER button to cancel dialing. Dialing is automatically canceled. You will remain connected to the caller.DIL JIM HUTCHINS– ready to dial an idle stationorCMP JIM HUTCHINS– station busy, ready to camp onorBUSY– station is busy, dialing not allowedshown:a Press the DSS button again. “DIL” in the display will change to “SCN”.a Wait for the called party to answer, then ask them if they will accept the transferred call.a If yes, press the RELEASE button. The calling party will be connected to the called party.If no, press the TRANSFER button, wait to be reconnected to the calling party, then press the TRANSFER button again to disconnect the called station.The call may now be released, put on hold, or transferred to another station.a Press the TRANSFER button to cancel dialing and return to the calling party.Dialing is automatically canceled. You willremain connected to the caller.DIL MARY OAKLAND – ready to dial an idle stationCMP MARY OAKLAND 2– ready to camp on to a busy stationBUSY– station is busy, dialing not allowedora Wait for the called party to answer, then ask them if they will accept the transferred call.a If yes, press the RELEASE button.If no, press the TRANSFER button, wait to be reconnected to the calling party, then press the TRANSFER button again to disconnect the called station.Call HoldAnswer or place another call. The first call is automatically placed on hold.Calls that are on hold longer than a preset time will ring at theconsole.orA nnouncing CallsTo announce a call over an in-house paging system:a Press the PAGE button. The outside line isput on hold.a Announce the call.a Press the RELEASE button to disconnect from the page. The outside line will remain on hold.Message Wait ing (optional)To set or reset message waiting lights:a Press the MESSAGE button.“MESSAGE” and the current time will be displayed. The station status lights will show the current message waiting status for all stations.a To change the on/off state of any console message waiting light, press the associated DSS button. If the station is equipped with a message light, it will be in the same state as the console message light.a Press the MESSAGE button to return to normal console operation (the console will automatically exit five seconds after the last keypress).PAGE 3:18MESSAGE 10:47Call ReleaseCall Originat ingTo place an outside call:a Press an idle line button.a Dial the number with the dial pad.Press an autodial button (a spare DSS button that has been programmed with the desired number).Press an idle line button, then dial the station number with the dial pad.Placing the handset on its cradle will not release a line.orNight Serv iceThe line status light above the NIGHT button will be on if Night Service is in effect.To activate optional night transfer or night bells:a Press the NIGHT button. The light above thebutton will turn on.Incoming calls will ring over the night bell system after the console begins to ring; or calls will ring at a night answer station (determined by the installer).NIGHT SERVICE 7:026:30Night Service can be turned off with the QUICK button.Daytime operation will resume with Quick Mode activated.Quick ModeThis feature is used in single console installations to reduce the amount of time it takes to answer calls ringing at unattended telephones. This feature must be deactivated whenever the console is left unattended.To deactivate Quick Mode:a Press the QUICK MODE button. The lightsabove the button will turn off.The NIGHT button will deactivate Quick Modewhen activating night bells or night transfer.A dj ust ing t he Handset V olumeust ing t he Ringer V olumeA djpad. The display will show the time entered.The console has no AM/PM indication.(Hour values less than 10 must be precededby a “0” digit.)The time set mode will be exited automatically.18 Tone Commander 1030 Attendant’s GuideRing Delay sThe console can be set to ring after a station or line has rung from 1 to 9 times. The delay affects only console ringing. The station will always ring without a delay, and continue to ring when the console is ringing.Station ring delays are used for stations that can receive outside calls directly (Direct Inward Dialing). Unanswered calls will ring at the console after ringing at the station several times.Line ring delays are intended for systems with multiple answering positions. A backup console can have some or all lines set to begin ringing a selected time after the main console begins ringing.The display will show the ring delay setting for each DSS or line button pressed.a To exit ring delay check mode, press the RING DELAY button again (the console will automatically exit one minute after the last keypress).Each line must be set to ring at one or more consoles with no delay.Otherwise, the caller may hear several rings before any console beginsringing.STATION 23-5Tone Commander 1030 Attendant’s Guide 19a Using the dial pad, enter the number of rings to delay before ringing at the console begins (1-9 rings, 0 for no delay, or w for no ringing at the console).a Press all DSS or line buttons to be set to the chosen ring delay value.The display will show each DSS or line button number and the ring delay value.To set all stations (not lines) to the same value, press # on the dial pad instead of a DSS button.a To exit ring delay set mode, press the RING DELAY button again (the console will automatically exit one minute after the lastkeypress).RING DELAY - 4STATION 15 - 4orALL DELAY - 420 Tone Commander 1030 Attendant’s GuideDSS/A ut odial Set upEach DSS button may be programmed to autodial up to 24 digitsor functions, including 0-9, *, #, dial tone detect, a hookflash (transfer signal), and a pause. Digits are entered with the dialpad. Other console buttons are used to enter the functions –these functions are printed below the buttons on the console front panel.DIAL TONE delays dialing until steady dial tone is present.FLASH is used to transfer calls or access special features ofthe telephone system.PAUSE is used if a delay is required during dialing.IMPORTANT –The first entry of a dialing routine for any buttonused for DSS operation must be a FLASH (F).This entry will determine whether featuresassociated with DSS operation will apply (StationRecall, Line Release with Supervision, StationCamp-on, etc.Example: FD4710Dialing routines, where the first entry is not a FLASH,will operate as Autodialing buttons.Example:D9D5551982A switch inside the Central Processing Unit may be setto prevent autodial programming changes. Consult withyour installer if you cannot program autodial numbers.Tone Commander 1030 Attendant’s Guide 21To program DSS buttons:a Press HOLD, then TRANSFER, then RELEASE, then P (7) on the dial pad to enter autodial programming mode.The display will show:a Press the DSS button to be programmed.The station status light will turn on. The display will show the number currently programmed, or “NOT PROGRAMMED”.a Using the dial pad and the labeled DSS buttons, enter the sequence to be dialed, or press RELEASE to exit autodial programming mode without changing the programmed number.The display will show the number being entered.a Press HOLD to store the number, then select another DSS button to be programmed.orPress RELEASE to exit autodial programming mode without storing the number (or wait for automatic exit).NOTE –Systems with multiple attendant positions have a single set of DSS/Autodial numbers shared by all consoles.Numbers may be programmed from any attendant position.PROGRAM AUTODIAL22 Tone Commander 1030 Attendant’s GuideName Display Set upAny DSS or line button may have an associated name entry which is shown in the display in place of the station or line number. Console buttons are used to enter the names –characters are printed below the buttons on the console front panel.DSS buttons must first be programmed with DSS or autodial numbers before name entries are assigned.To program name displays:a Press HOLD, then TRANSFER, then RELEASE, then N (6) on the dial pad to enter name programming mode.The display will show:- this will be followed by a help display.a Press the DSS or line button to be programmed.The station or line status light will turn on.a If the selected button is currently programmed, the name will be displayed.If you do not want to change the currently programmed name, press HOLD, then select another DSS or line button.a Enter the name using the labeled console buttons; letters are printed on the console front panel beneath the buttons. Any existing name entry will be overwritten. Do not exceed 14 characters, including spaces.A switch inside the Central Processing Unit may be set to prevent name display programming changes. Consult with your installer if you cannot enter or change names.NAME ASSIGN Tone Commander 1030 Attendant’s Guide 23BKSPACE deletes the last character entered.CLEAR deletes the entire entry.a Press HOLD to store the new name.a Select another DSS or line button to beprogrammed.orPress RELEASE to exit autodial programmingmode (or wait for automatic exit).NOTE –Systems with multiple attendant positions have a single set of names shared by all consoles. Name displaysmay be programmed from any attendant position.24 Tone Commander 1030 Attendant’s GuideUsing a HeadsetA headset may be used in place of the handset. Unplug the handset cord from the jack on the left side of the console, andplug the headset into the jack. Some headsets have a jack for the handset, allowing you to switch between the two devices without unplugging.The 1030 console is compatible with amplified electronicheadsets only. Contact your system vendor, headset manufacturer, or Tone Commander if you have any questions regarding headset compatibility.Console CareYour Tone Commander console is easy to care for. There are no specific maintenance requirements.Never attempt to clean the console by spraying it with cleaners.Do not use solvents or abrasive substances – harm to theconsole finish may result.A mild glass cleaner sprayed on a soft cloth is sufficient to cleanthe console. Wipe the console face gently to remove fingerprintsand surface dirt.Although your console is not fragile, it is a precision instrumentand should be treated as such. Spilling liquids on it may adversely affect internal electronics and void your warranty.Tone Commander 1030 Attendant’s Guide 2526 Tone Commander 1030 Attendant’s Guide11609 49th Place West Mukilteo, WA 98275-4255(800) 524-0024 (425) 349-1000Fax: (425) 14-280157 Rev. D©2000。
电话分机使用说明
电话分机使用说明电话分机功能说明一、拨打外线操作:1、摘机2、按“0 + 拨叫号码+ #”说明:最后拨#,可快速完成拨出,如不拨亦可完成拨叫二、查询分机号操作:1、摘机2、拨182三、呼叫前台/总机操作:1、摘机2、拨8000 或9四、来话转移已和内线或外线建立通话时,需将此通话转移给第三方时。
操作:1、用户应答内线或外线后2、拍话机叉簧3、听到连续拨号音后,拨指定分机号4、挺回铃音5、挂机退出五、代接分机当遇到办公区内其他分机响铃,但无人接听时,可由其他分机代接。
代接任意分机操作:1、摘机2、拨“#*#”代接制定分机操作:1、摘机2、拨“#* + 振铃分机号码”六、遇忙回叫当拨打对方分机时,遇到对方占线,当对方结束通话时,本地话机自动响铃提示,摘机即可建立通话。
操作:1、用户A呼叫占线状态的用户B,听到占线提示音后拨“*59# ”2、用户A听到业务接收音,然后挺忙音并挂机3、用户B挂机空闲后,系统自动对用户A话机振铃,A提机即可对用户B振铃,如B摘机,即可建立通话。
七、离位转移如员工外出或暂不在工位办公,可将本机号码转移到指定的分机号,如有拨打本机的来电,由被指定的分机号振铃响应。
登记操作:1、摘机2、拨“*53* + 指定的分机号+ # ”3、听到业务提示音后挂机撤销操作:1、摘机2、拨“#53# ”八、保留与保留取回外线呼入时,分机可以保留此通话,进行其他通话,结束后可取回被保留的通话,被保留期间,对方听到等待提示音。
保留操作:1、建立与外线通话2、拍话机叉簧后拨“* ”3、听到被保留的端口号提示音4、保留成功,可挂机进行其他操作取回保留操作:1、摘机2、拨“*# + 被保留的端口号”3、恢复被保留通话。
1608-I话机使用说明
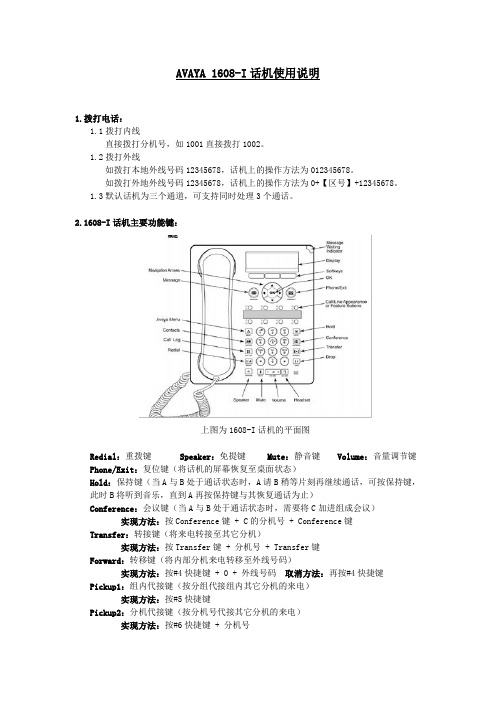
AVAYA 1608-I话机使用说明
1.拨打电话:
1.1拨打内线
直接拨打分机号,如1001直接拨打1002。
1.2拨打外线
如拨打本地外线号码12345678,话机上的操作方法为012345678。
如拨打外地外线号码12345678,话机上的操作方法为0+【区号】+12345678。
1.3默认话机为三个通道,可支持同时处理3个通话。
2.1608-I话机主要功能键:
上图为1608-I话机的平面图
Redial:重拨键Speaker:免提键Mute:静音键Volume:音量调节键Phone/Exit:复位键(将话机的屏幕恢复至桌面状态)
Hold:保持键(当A与B处于通话状态时,A请B稍等片刻再继续通话,可按保持键,此时B将听到音乐,直到A再按保持键与其恢复通话为止)
Conference:会议键(当A与B处于通话状态时,需要将C加进组成会议)
实现方法:按Conference键 + C的分机号 + Conference键Transfer:转接键(将来电转接至其它分机)
实现方法:按Transfer键 + 分机号 + Transfer键
Forward:转移键(将内部分机来电转移至外线号码)
实现方法:按#4快捷键 + 0 + 外线号码取消方法:再按#4快捷键Pickup1:组内代接键(按分组代接组内其它分机的来电)
实现方法:按#5快捷键
Pickup2:分机代接键(按分机号代接其它分机的来电)
实现方法:按#6快捷键 + 分机号。
分机号码设置方法

HB电话交换机公司电话常用功能使用说明一、如何给分机修改号码?1、先对照结构说明查找要改号码的分机所对应的端口号。
2、在总机上按“检查”键3次――1967590――29――输入对应的端口号――按“转接”键1次――输入目前没有使用的分机号码――按“保留”3、拨分机号验证。
二、如何将两个分机号码(或更多)互相交换?1、先对照结构说明查找要改号码的分机所对应的端口号。
2、在总机上按“检查”键3次――1967590――29――输入对应的端口号――按“转接”键1次――按“清除”1次――按“保留”――按“29”继续配置其余的要交换号码的分机号,同上操作。
直至全部清除完。
3、按“29”――输入对应的端口号――按“转接”1次――输入交换后的分机号码――按“保留”1次。
4、拨分机号验证。
三、如何查阅那部分机可以拨打长途?如何设置长途功能1、在总机上按“检查”键3次――1967590――14――会显示例如“001-44”,前边是端口号,后面是控制代码,“11”代表可以拨打国际长途,“22”代表可以拨打国内长途,“44”代表不能打长途――按“转接”查下一号码,直至全部查完。
2、设置长途:在总机上按“检查”键3次――1967590――14――会显示例如“001-44”――输入分机对应的端口号――按“转接”1次――输入相应的控制代码。
3、到分机上拨长途测试。
四、多部外线如何检查分机使用那个电话号码?(比如:公司有三条外线)1、在总机上按长形透明键1,拨手机看是代表的哪个外线。
依此类推至3.2、当分机拨外线时,1-3哪个亮代表用哪个外线拨出的。
(外线使用顺序是1-3,当1战线时会用2往外拨。
)3、公司现在键1代表65816182;2代表65816183;3代表65818601五、如何控制所有分机用某条外线拨出?1、在总机上按“检查”键3次――1967590――09(09代表白天,10代表晚上设置时都要设置)――输入3个*号,代表所有分机,也可以单独输入某部分机的端口号――按“转接”键1次――会出现8为全1数字(0代表关,1代表开),从左到右每一位代表与上一个问题中相应的外线号码――想要控制哪条线就在相应位置输入0(如果是第二位要改就先输入1,再输入0)2、到分机去测试。
HY5716B 消防电话分机 说明书V1.3

(1) 调试时与 HY5711B 总线式消防电话总机配合试验。预置好本机编码、确定安装和接线正确无误后,接通
电源。在总机上通过“设在线分机”功能操作,而将本分机登录到系统中。
1
安装使用说明书(Ver.1.3, 2011.12)
[安装、使用产品前,请阅读安装使用说明书]
HY5716B 消防电话分机
(2) 当拿起本机手柄呼叫总机时,本机将听到回铃声,等待总机应答。总机应答后,本机与总机接通,双方 实现通话。 (3) 在本机摘机时,如果听到忙音,应把手柄放回原处,挂机。 (4) 如果总机呼叫本机,本机发出振铃,同时呼叫指示灯闪烁,拿起本机手柄即可与总机通话。话毕,挂好 手柄,通话结束。
ห้องสมุดไป่ตู้
四、 安装方法
(1) 设备从包装箱取出后,检查本机外观是否良好。本机为壁挂式安装,可直接挂在墙壁上或挂在其他现场 控制设备的侧面,挂孔在设备上方,水平距离 113mm。 (2) 本机同 HY5711B 电话总机之间通过两总线相连,两总线分正负极性。安装本机的导线应选用截面积大于 1 平方毫米的双色双绞线。注意:红色为正,黑色为负。 (3) 改变分机后部拨码开关,可改变分机地址编码。分机地址编码设置可参见附录 1。 (4) 本机应安装在干燥、通风、无腐蚀性气体的地方。 五、 调试
六、
运行和维护
本机安装调试后便可投入使用,发现故障后首先判断是线路问题,还是编码开关接触不良, 还是分机内部故障。如果是分机内部故障,请及时与生产厂家联系。其它故障用户应能自行排 除。
2
安装使用说明书(Ver.1.3, 2011.12)
安装、使用产品前,请阅读安装使用说明书。 请妥善保管好本手册,以便日后能随时查阅。
HY5 716B 消 防 电 话 分 机
国威电话机使用说明书

3.摘机,按#733#,录制第三段语音,录音内容:对方无人接听,请改拨其他分机号。
如果要听刚才录的音,可以分别按#741#、#742#、#743#来播放。
电脑话务员录完后,应将主板录音芯片附近的跳针Jumper1断开,以保证录音不丢失,若需修改电脑话务员,则再将跳针短接。
还有什么不明白,可以继续提问~
提问人的追问 2011-01-12 21:00
你好!说明书早已丢失,听说好像是按7851#哦!~~~~回答人的补充 2011-01-13 08:48 第一段:摘机+#7851#+录音内容:您好,欢迎致电**公司52#+录音内容:对方占线,请改拨其他分机号;
第一段:摘机+#7853#+录音内容:对方无人接听,请改拨其他分机号。
如果要听刚才录的音,可以分别按#7861#、#7862#、#7863#来播放。
进入系统编程:摘机+#787+系统密码(1967590)
您好,国产的一般都自带3段电脑语音的,具体的设置和录音,可以看说明书。
首先,电脑话务员必须在第一个分机上录制,具体的步骤如下:(普通话机)
1.摘机,按#731#,录制第一段语音,录音内容:您好,欢迎致电**公司,请拨分机号,查号请拨零;
2.摘机,按#732#,录制第二段语音,录音内容:对方占线,请改拨其他分机号;
- 1、下载文档前请自行甄别文档内容的完整性,平台不提供额外的编辑、内容补充、找答案等附加服务。
- 2、"仅部分预览"的文档,不可在线预览部分如存在完整性等问题,可反馈申请退款(可完整预览的文档不适用该条件!)。
- 3、如文档侵犯您的权益,请联系客服反馈,我们会尽快为您处理(人工客服工作时间:9:00-18:30)。
电话分机功能说明
一、拨打外线
操作:1、摘机
2、按“0 + 拨叫号码+ #”
说明:最后拨#,可快速完成拨出,如不拨亦可完成拨叫
二、查询分机号
操作:1、摘机
2、拨182
三、呼叫前台/总机
操作:1、摘机
2、拨8000 或9
四、来话转移
已和内线或外线建立通话时,需将此通话转移给第三方时。
操作:1、用户应答内线或外线后
2、拍话机叉簧
3、听到连续拨号音后,拨指定分机号
4、挺回铃音
5、挂机退出
五、代接分机
当遇到办公区内其他分机响铃,但无人接听时,可由其他分机代接。
代接任意分机
操作:1、摘机
2、拨“#*#”
代接制定分机
操作:1、摘机
2、拨“#* + 振铃分机号码”
六、遇忙回叫
当拨打对方分机时,遇到对方占线,当对方结束通话时,本地话机自动响铃提示,摘机即可建立通话。
操作:1、用户A呼叫占线状态的用户B,听到占线提示音后拨“*59# ”
2、用户A听到业务接收音,然后挺忙音并挂机
3、用户B挂机空闲后,系统自动对用户A话机振铃,A
提机即可对用户B振铃,如B摘机,即可建立通话。
七、离位转移
如员工外出或暂不在工位办公,可将本机号码转移到指定的分机号,如有拨打本机的来电,由被指定的分机号振铃响应。
登记操作:1、摘机
2、拨“*53* + 指定的分机号+ # ”
3、听到业务提示音后挂机
撤销操作:1、摘机
2、拨“#53# ”
八、保留与保留取回
外线呼入时,分机可以保留此通话,进行其他通话,结束后可取回被保留的通话,被保留期间,对方听到等待提示音。
保留操作:1、建立与外线通话
2、拍话机叉簧后拨“* ”
3、听到被保留的端口号提示音
4、保留成功,可挂机进行其他操作
取回保留操作:1、摘机
2、拨“*# + 被保留的端口号”
3、恢复被保留通话。