Solaris系统双机群集安装说明
文档4,安装配置Cluster双机软件

青州码头小型机项目实施方案(Solaris 10 U7 + Oracle 10g + ZFS + Sun Cluster 3.2 U2)文档四、安装配置SUN Cluster 3.2双机软件一、软件安装前的配置工作配置IPMP修改fqoradb1的/etc/hosts信息如下:## Internet host table#::1 localhost127.0.0.1 localhost192.168.11.120 fqoradb1 loghost 192.168.11.130 fqoradb2#IPMP test address192.168.11.121 fqoradb1-e1000g0-test192.168.11.122 fqoradb1-e1000g2-test#logic address192.168.11.140 fqoradb配置e1000g0和e1000g2两张网卡创建/etc/hostname.e1000g0文件填入以下内容fqoradb1 netmask + broadcast + group ipmp0 upaddif fqoradb1-e1000g0-test netmask + broadcast + deprecated -failover up创建/etc/hostname.e1000g2文件填入以下内容fqoradb1-e1000g2-test netmask + broadcast + group ipmp0 deprecated -failover up修改fqoradb2的/etc/hosts信息如下:## Internet host table#::1 localhost127.0.0.1 localhost192.168.11.130 fqoradb2 loghost 192.168.11.120 fqoradb1#IPMP test address192.168.11.131 fqoradb2-e1000g0-test192.168.11.132 fqoradb2-e1000g2-test#logic address192.168.11.140fqoradb配置e1000g0和e1000g2两张网卡创建/etc/hostname.e1000g0文件填入以下内容fqoradb2 netmask + broadcast + group ipmp0 upaddif fqoradb2-e1000g0-test netmask + broadcast + deprecated -failover up创建/etc/hostname.e1000g2文件填入以下内容fqoradb2-e1000g2-test netmask + broadcast + group ipmp0 deprecated -failover up建立两机Cluster通讯环境在根目录下创建.rhosts文件,内容如下:+创建/etc/hosts.equiv文件,内容如下:fqoradb1fqoradb2fqoradb两台服务器都需要进行以上配置。
SOLARIS10 双机系统配置

#ping 10.71.100.210
#ping 10.71.100.211
如果网络不通请检查网卡及网络是否物理隔断。
11.2
本节主要介绍双机系统的配置过程,INFOX GW系统采用双机主备组网方式。
----结束
启动资源组成功后,双机系统已经运行起来,执行如下命令,可查看双机资源组状态。
root@infox01#scstat -g
执行结果:
-- Resource Groups and Resources --
Group Name Resources
Resources:infox_rgserver_ipinfox_appinfoxdg_rs datadg_rsoracle_svr oracle_lsnr
数据库和应用合设情况下,/clustershell/appora/sun_sc3.1目录下文件:
sun_sc3.1
sun_sc3.1/etc
sun_sc3.1/etc/HW.smc
sun_sc3.1/bin
sun_sc3.1/bin/gethostnames
sun_sc3.1/bin/smgw_mon_start.ksh
scrgadm -a -jinfoxdg_rs-ginfox-rg -t SUNW.HAStoragePlus:2 -x GlobalDevicePaths="infox" -x FileSystemMountPoints='/export/home/infoxshare,' -y Resource_dependencies=server_ip
微软双机服务器群集安装总结
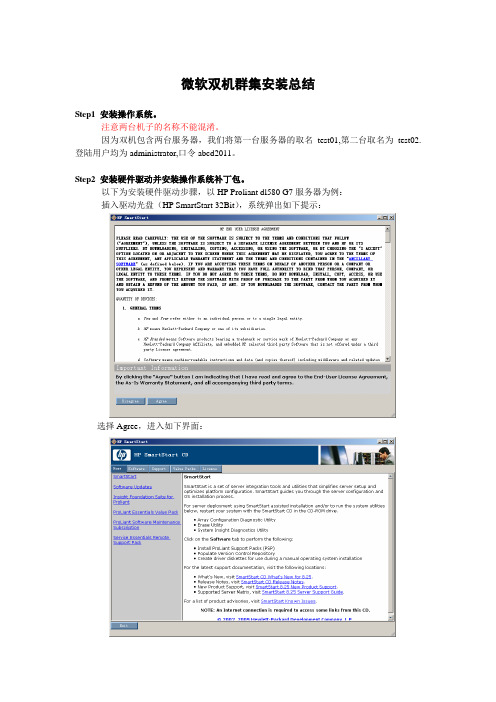
微软双机群集安装总结Step1 安装操作系统。
注意两台机子的名称不能混淆。
因为双机包含两台服务器,我们将第一台服务器的取名test01,第二台取名为test02.登陆用户均为administrator,口令abcd2011。
Step2 安装硬件驱动并安装操作系统补丁包。
以下为安装硬件驱动步骤,以HP Proliant dl580 G7服务器为例:插入驱动光盘(HP SmartStart 32Bit),系统弹出如下提示:选择Agree,进入如下界面:选择software,进入如下界面:选择Install ProLiant Support Pack,进入如下界面:选择Express installation of the PSP for Windows,进入如下界面:选择Start Inventory,进入如下界面:安装即可,进入如下界面:在安装过程中可能会弹出如下错误,单击取消即可:系统驱动安装结束以后,检查一下是否有未安装上的硬件驱动。
这里DL580有一个硬件驱动光线卡,需要手动安装。
但前提是先安装系统补丁KB932755,找到后安装即可,然后安装光线卡驱动。
至此,所举例子的硬件驱动全部安装完毕。
继续安装系统补丁。
Step3 配置IP。
因为每台服务器有两块网卡,一块公有,一块私有。
下面以收费双机群集为例,第一台服务器(即test01)共有网卡,配置如下:私有网卡配置有如下几步,首先进入属性配置界面后,去掉microsoft网络客户端、microsoft网络的文件和打印机共享前面的勾,配置后如下:接下来,点击“配置”进入网卡配置界面,选择“高级”选项卡,将网卡配置成100Mb 半双工。
如下图所示:接下来,配IP,如下:然后,点击“高级”进入下一个配置页面,进入DNS配置选项卡,将“在DNS中注册此连接的地址”前的勾去掉。
如下:最后,点击“WINS”TAB页,禁用TCP/IP上的NetBIOS,如图:点击确定即可。
Oracle Solaris 10操作系统安装指南说明书
An Oracle White PaperApril 2010How to Install the Oracle® Solaris 10Operating System on x86 SystemsIntroduction.........................................................................................1 Installation Assumptions.....................................................................2 Check the Hardware Compatibility List...............................................2 Basic System Requirements...............................................................2 Obtaining Media for the x86 Platform.................................................3 Power Up and Media Boot..................................................................3 Installing the Oracle Solaris 10 5/09 Operating System.....................4 Identifying the Console...................................................................4 Selecting the Type of Installation....................................................5 System Configuration......................................................................6 For More Information........................................................................26 IntroductionThis white paper instructs users unfamiliar with the Oracle® Solaris 10 operating system installation on how to install Oracle Solaris 10 on an Oracle supported x86 system (including the family of 32-bit x86 systems as well as 64-bit AMD64™ and Intel® 64 systems). It is assumed that you are installing Oracle Solaris 10 5/09; all features described in this guide may not be available in earlier updates. This step-by-step guide, complete with screen shots, takes users through the installation process in 22 simple steps. Novice users should be able to complete an Oracle Solaris 5/09 operating system installation on a standalone x86 system using the instructions in this guide.Installation AssumptionsThis guide makes several assumptions, including•The system is an x86 system.•The system is compatible with the Oracle Solaris 10 5/09 OS and is listed on the Oracle Solaris Hardware Compatibility List (HCL).•The system has a graphical interface.While this guide is most appropriate for a standalone system that does not connect to a network or connects to a network with automatic configuration, it can be used to install a system with a fixed IP address if the network configuration information is available.If problems arise during the installation process that are not discussed in this guide, refer to the Oracle Solaris 10 OS Installation Guide: Basic Installations for more information. This guide is part of the Oracle Solaris 10 Release and Installation Collection located on the Sun Web site at/app/docs/prod/solaris.10.Check the Hardware Compatibility ListThe first step before the installation process is to verify that the system to be installed is on the hardware compatibility list located at: /bigadmin/hcl/.Note: The term x86 refers to the family of 32-bit x86-compatible architecture and 64-bit AMD64 and Intel 64.Basic System RequirementsVerify the computer system meets the following requirements. Note that the requirements below are recommended minimums. While it is possible to install Oracle Solaris 10 on a system with less disk capacity and CPU speed, it is not recommended.•Minimum 1,024 MB of physical RAM•Minimum 10 GB of available hard drive space•Minimum 400 MHz CPU speed•DVD or CD-ROM drive•Attached monitor or integrated displayFor more information on Oracle Solaris system requirements, visit /solaris. For a catalog of the more than 5000 Oracle Solaris-ready applications and solutions, visit/bigadmin/apps.Obtaining Media for the x86 PlatformThe Oracle Solaris 10 5/09 OS release is available via download from the Oracle Web site.1.Go to /solaris/ and click on the Oracle Solaris logo if you want to obtain informationabout the Oracle Solaris 10 5/09 OS; if not, proceed to step 2.2.Go to /solaris/get to begin the download process.3.Choose Oracle Solaris 10 on the list of available downloads.4.Click on the appropriate media format (Oracle Solaris for x86 systems).5.Register at the Sun Download Center, if you have not already done so.6.Answer the short questionnaire.7.Read and accept the license agreement.8.Download and burn the CDs or DVDs.See the Oracle Solaris 10 FAQs located at /solaris/get for guidance, instruction, and tips on downloading Oracle Solaris 10 or burning installation CD and DVD media.Power Up and Media BootIf you do not want to substitute your current operating system and instead you want to run Oracle Solaris as a guest OS or virtual machine, please download and install Oracle VM VirtualBox for free from /.The following procedure can be used to install Oracle Solaris 10 5/09 on a new or used system.1.Power up the system and insert the first installation CD or DVD into the drive tray.2.Restart the system.3.If the system appears to be booting from the hard disk and the Oracle Solaris OS installer doesnot start, power cycle the system (power cycle is shutting down the power on the system and then restarting the system). As the system begins to boot, enter setup mode. Typically, the systemdisplays a message indicating which key to press (such as "Enter F2 to enter setup", although the key to press varies by manufacturer; the ESC and F12 keys are other common options.) If you miss the message, simply restart the system a couple of times until you are able to view it.Once in setup mode, specify the boot device for the system. This example specifies the CD or DVD drive as the boot device. To do so, find the list that describes boot order and re-order as needed to ensure the CD or DVD drive appears first on the list. The system should boot from the CD or DVD drive to start the install process.Installing the Oracle Solaris 10 5/09 Operating SystemIdentifying the ConsoleThe next step in the installation process is to select the type of console for the hardware on which Oracle Solaris is being installed. Use the arrow keys to select the version of Oracle Solaris OS that matches the hardware configuration. For most x86 systems, use the default selection.Press the ENTER key and boot the version of operating system selected. The highlighted entry boots in 60 seconds even if a key is not pressed.Note: Prompts do not appear during the boot process. If a selection is not made, the screen times out and the systemautomatically boots the Oracle Solaris OS.Selecting the Type of InstallationAfter the ENTER key is pressed or the counter times out, a series of dots will run on the screen and you will see the basic device configuration message along with a menu with six installation options.Before this new counter times out, select option 3 to install Oracle Solaris 10 5/09 from the beginning using the Oracle Solaris ZFS as the root file system. You can get more information on Oracle Solaris ZFS from /us/products/servers-storage/storage/storage-software/031857.htm.Note: If you don’t want to use Oracle Solaris ZFS as your root file system, you can use option 1. Please refer to the previousversion of this white paper.Once option 3 is selected, you'll see the following screen with some information regarding your hardware. Keep in mind that the hardware information displayed (such as "nge0") may differ from the exact data displayed below and that each step can take up to a couple of minutes to complete.After a few seconds, you are presented with the keyboard layout configuration in case you don't have a standard keyboard or if you have a localized keyboard. If you have a US keyboard, press the [F2] key; if not, select the right language using the arrow keys to move up or down, make your selection with the [space bar] and then press [F2] to continue.Immediately, you'll see the following message. Press ENTER to continue.System ConfigurationA series of screens guides you through the Oracle Solaris configuration process. Note that the graphical screens require a mouse to be rolled over the window in order to answer questions posed throughout the configuration process.1.After you press ENTER, the system configuration process will start through a series of windows.Please roll the mouse over the window, click the mouse, and press ENTER to continue.2.Select a language for the system.3. A new window, the Oracle Solaris Install Console, appears in the bottom-right corner. Thiswindow is used to display pertinent installation messages. Another window appears in which the Oracle Solaris OS installation questions should be answered. Press [F2] to continue.4.The system identification process begins. Press [F2] to continue.5.The Network Connectivity window appears. Use the default answer, (unless you don't have anetwork) and press [F2] to continue.6.The DHCP selection appears. For most cases, just select DHCP for your network configurationusing the arrow keys and the space bar to make the selection and then press [F2] to continue.7.The IPv6 window appears. Just use the default and press [F2] to continue.8.The Confirmation window appears. If you agree with your selections, press [F2] to continue; ifnot, press [F4] and the process will go back to step 5.9.The Security Policy window appears. Use the default for No Kerberos configuration. Press [F2] tocontinue.10.For confirmation of your policy selection, press [F2] and continue to the next screen.11.The Name Service window appears. Select NONE using the arrow keys and pressing the space barto select, then press [F2] to continue.12.For confirmation of your selection, press [F2] and continue to the next screen.13.The NFSv4 domain name window appears. Let the system use the default option and press [F2] tocontinue.14.For confirmation of your selection, press [F2] to continue to the next screen.15.The Time Zone window appears. Next, set the time zone for the system. This example sets theAmericas time zone. Use the arrow keys and the space bar to make the selection. Press [F2] to continue.16.Time Zone cont'd. Set the United States Country & Region, then press [F2] to continue.17.Time Zone cont'd. Set the Pacific Time. Press [F2] to continue.18.Set current date and time. Use arrow keys and keyboard to change the proposed date and time,then press [F2] to continue.19.To confirm your selection, press [F2] to continue.20.The Root Password window appears. Set the root password. Note the password typed remainsinvisible. Re-enter the password in the second box and press [F2] to continue.21.The Network Services window appears. Click [F2] to continue.22.The Remote Services window appears. In this window, you can choose a “Secure by default”Oracle Solaris installation, but afterwards individual services should be enabled. If you are unsure of your type of installation, follow the default “Yes” to enable all remote services and press [F2] to continue.23.The Install Progress window appears. Wait for a few minutes while Oracle Solaris installs on yoursystem. After the installation is completed, the system will reboot automatically and will start the Oracle Solaris OS. Remember that in some cases, you will have to eject the media manually.24.The Eject CD/DVD window appears. Use the default. Press [F2] to continue; the system willautomatically eject the media after installation.25.The Reboot After Installation window appears. Use the default. Press [F2] to continue.26.The Confirmation window appears; press [F2] to continue. In some cases, the system will not beable to eject the media after installation. Be sure to eject it manually to avoid starting theinstallation process again; if after the installation your system didn't eject the media and the install process started again, you can simply reboot your system. During the boot process, eject the media and the system will boot from the hard disk using the freshly installed Oracle Solaris 10 image.27.The License window appears. Please read the Oracle Solaris License Agreement, and if you agree,press [F2] to continue.28.The Geographic Regions window appears. To add support for other regions, select the desiredregion; if not, press [F2] to continue.29.The System Locale window appears. Press [F2] to continue.30.The Selection of Additional Products window appears. Press [F2] to continue.31.The Root File System selection window appears. Select ZFS and press [F2] to continue.32.The Software Selection window appears. Use the default and press [F2] to continue.33.The Disk Selection window appears. Use the default and press [F2] to continue.34.The ZFS Configuration window appears. Use the default and press [F2] to continue.35.The Remote Mounts window appears. Use the default and press [F2] to continue.36.The Profile window appears. On this window, you can see a technical description of how OracleSolaris will be installed on your system. Press [F2] to continue.37.The Install Progress window appears. Wait for a few minutes while Oracle Solaris installs on yoursystem. After the installation is completed, the system will reboot automatically and will start the Oracle Solaris OS. Remember that in some cases, you will have to eject the media manually.38.Now you have successfully installed Oracle Solaris 10 5/09 on your system. Login using the rootuser and the password you assigned on step 19.For More InformationFor more information regarding the Oracle Solaris 10 OS, visit/us/products/servers-storage/solaris/index.html.TABLE 1. REFERENCESDOCUMENTATION AND COMMUNITYSun Documentation /Big Admin System Administration Portal /bigadmin/SUN BLUEPRINTS ARTICLESConfiguring JumpStart Servers to Provision Sun x86 Systems /blueprints/0205/819Performing Network Installations Without a Local Boot Server /blueprints/0504/817/blueprints/0905/819Configuring Multiboot Environments on Sun x86 Systems with AMDOpteron ProcessorsRELATED WEB SITESSolaris Hardware Compatibility List /bigadmin/hclSolaris 10 System Requirements /solaris/docs/solaris-sys.pdf NEXT STEPS TO SOLARIS 10 ADOPTIONGet hands on experience with Solaris 10 using "Solaris 10 White Papers" /solaris/whitepapers/index.jsp Get trained on Solaris 10 /pls/web_prod-plq-dad/db_pages.getpage?page_id=402&p_nl=JSOLGet a support contract /us/support/systems/operating-systems/index.htmlParticipate in the OpenSolaris community How to Install the Oracle Solaris 10 Operating System on x86 Systems April 2010Author: Angel Camacho, Larry WakeOracle Corporation World Headquarters 500 Oracle Parkway Redwood Shores, CA 94065 U.S.A.Worldwide Inquiries: Phone: +1.650.506.7000 Fax: +1.650.506.7200 Copyright © 2010, Oracle and/or its affiliates. All rights reserved.This document is provided for information purposes only and the contents hereof are subject to change without notice. This document is not warranted to be error-free, nor subject to any other warranties or conditions, whether expressed orally or implied in law, including implied warranties and conditions of merchantability or fitness for a particular purpose. We specifically disclaim any liability with respect to this document and no contractual obligations are formed either directly or indirectly by this document. This document may not be reproduced or transmitted in any form or by any means, electronic or mechanical, for any purpose, without our prior written permission.Oracle and Java are registered trademarks of Oracle and/or its affiliates. Other names may be trademarks of their respective owners.AMD, Opteron, the AMD logo, and the AMD Opteron logo are trademarks or registered trademarks of Advanced Micro Devices. Intel and Intel Xeon are trademarks or registered trademarks of Intel Corporation. All SPARC trademarks are used under license and are trademarks or registered trademarks of SPARC International, Inc. UNIX is a registered trademark licensed through X/Open Company, Ltd. 0310。
Solaris系统安装步骤
一.SOLARIS系统安装步骤:1.在开机画面出现后按下stop+a键,把安装光盘方进光驱。
2.OK>boot cdrom回车,等图形界面出现后,选择语言Simplified Chinese(间体中文)最好安装English在登陆界面是可以选中文选件。
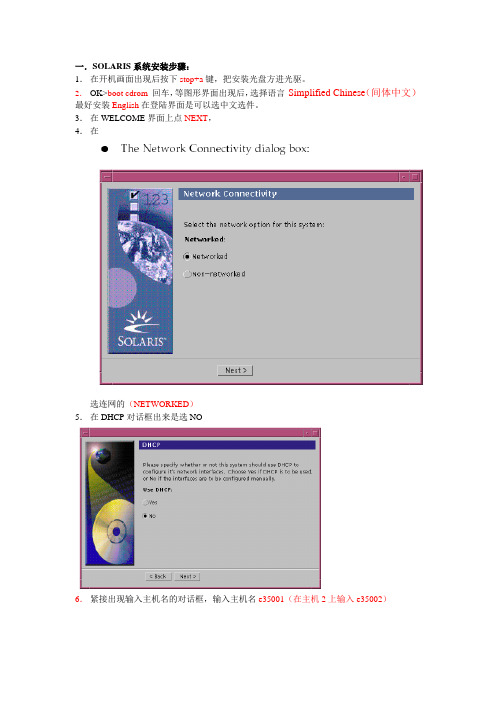
3.在WELCOME界面上点NEXT,4.在选连网的(NETWORKED)5.在DHCP对话框出来是选NO6.紧接出现输入主机名的对话框,输入主机名e35001(在主机2上输入e35002)7.在IP地址的地方输入IP地址,10.35.55.17(在2号机器上输入10.35.55.18)8.在子网掩码对话框里输入255255.255.1289.在IPV6的IP协议框里选默认的版本即可,回车。
10.在如下的名称对话框里选NO。
11.接着选择时区,选东亚,中华人民共和国12.设置日期(默认即可)13.设置密码14.在电源管理对话框里,按NEXT ,(默认选择)15.在代理服务对话框里,根据实际的情况填写。
如果是直接连接到INTERNET 16.接着上一个确认的对话框如下,仔细检查一下,如果没有问题,点确认:17.接着会提示你放如第一张安装光盘18.选择安装方式。
自定义安装19.选择64位安装方式20.选择安装方式:完全安装(ENTIRE SOLARIS SOFTWARE GROUP PLUS OEM)21.选择DISKS,添加:22.在下面的分区框里,选择硬盘分区(MODIFY)23.输入分区打小:0 / 3000m1swap 2000m3/var 2000m4 /usr 2000m5 /opt 3000m6/oracle 4500m7150m24.然后点确认,开始安装。
24.中途会提示更换安装光盘,更换光盘,确认即可。
二.VERITAS voluemanager卷管理软件的安装。
1.把安装光盘放入光驱到安装目录用pkgadd –d . 回车即可。
Solaris 8+oracle 9+VRTSvcs 双机安装手册

Solaris 8.0 +Oracle 9.2.0 +VRTSvcs 双机安装文档文档类型:技术文档完成日期:09/11/2007作者:马铭鸿目的:Oracle 9i 数据库双机备份1、硬件平台SUN 280 2台(SPARC Ⅲ /1G ROM /36G DISK/QLOGIC HBA)NSTOR Fible 磁阵2、软件平台Solaris 8.0 for 64 bitPatch for Solaris 8.0Oracle 9.2.0 for SPARC SUN EnterpriseVRTS Volume ManagerVRTSvcsVRTSvcs Agent for OraclePatch for Nstor3、安装流程A 安装Solaris 8.0B 安装Solaris 8.0 补丁包C 安装Nstor 补定丁包D 安装Volume ManagerE 安装 Oracle 9.2.0F 安装 VRTSvcsG 安装 VRTSvcs Agent for OracleH 配置 VRTSvcsA安装Solaris 8.0此部分的工作想必不用再说了,在SUN的服务器上安装操作系统。
注意的是,在安装Solaris 8.0时,我选择的是全部安装。
安装的是OEM版本的。
B安装Solaris 8.0 补丁包此步骤是必须的。
可以在SUN网站上下载最新的补定丁包,名字为8_recommended.zip。
使用命令unzip 8_recommended.zip 将此包解压。
如果些包在光盘上,要先将其复制到硬盘上。
可如下操作:#cd cdrom/cdrom0 (进入光盘路径)#cp 8_recommended.zip /tmp (将补丁包复制到/tmp目录下)#unzip 8_recommended.zip (解压包)解压完成后,会在当前目录中形成一个8_recommended目录,进入此目录,进行补丁包的安装。
使用如下命令:./install_cluster。
Oracle Solaris Sun Server X4-2 安装指南说明书
Sun Server X4-2安装指南(适用于 Oracle Solaris 操作系统)文件号码: E49361-012013 年 9 月版权所有 © 2013,Oracle 和/或其附属公司。
保留所有权利。
本软件和相关文档是根据许可证协议提供的,该许可证协议中规定了关于使用和公开本软件和相关文档的各种限制,并受知识产权法的保护。
除非在许可证协议中明确许可或适用法律明确授权,否则不得以任何形式、任何方式使用、拷贝、复制、翻译、广播、修改、授权、传播、分发、展示、执行、发布或显示本软件和相关文档的任何部分。
除非法律要求实现互操作,否则严禁对本软件进行逆向工程设计、反汇编或反编译。
此文档所含信息可能随时被修改,恕不另行通知,我们不保证该信息没有错误。
如果贵方发现任何问题,请书面通知我们。
如果将本软件或相关文档交付给美国政府,或者交付给以美国政府名义获得许可证的任何机构,必须符合以下规定:U.S. GOVERNMENT END USERS:Oracle programs, including any operating system, integrated software, any programs installed on the hardware, and/or documentation, delivered to U.S. Government end users are "commercial computer software" pursuant to the applicable Federal Acquisition Regulation and agency-specific supplemental regulations. As such, use, duplication, disclosure, modification, and adaptation of the programs, including any operating system, integrated software, any programs installed on the hardware, and/or documentation, shall be subject to license terms and license restrictions applicable to the programs. No other rights are granted to the U.S. Government.本软件或硬件是为了在各种信息管理应用领域内的一般使用而开发的。
SUN CLUSTER双机服务器安装配置总结

SC双机安装实施文档一、系统规划 (2)1、SCLT_NMSdb配置: (2)2、SCLT_NMSdp配置: (3)3、逻辑主机: (3)4、阵列安装: (3)二、阵列安装 (4)三、双机安装 (8)1、修改SCLT-NMSdp机器的scsi-initiator-id为6 (9)2、修改系统相关配置文件 (9)3、安装双机软件 (10)4、安装双机软件补丁 (17)5、配置CLUSTER (19)6、确定did设备号是否一致 (25)7、安装和配置SDS卷 (27)8、建立和注册双机资源 (29)9、检查资源和双机状态是否正常 (29)四、数据库安装 (32)五、注册SUN CLUSTER FOR SYBASE 资源 (32)一、系统规划两台SUN FIRE 280R,一台3320 SCSI阵列;操作系统为solaris 9,sun cluster 3.1 U4,数据库为Sybase 12.5。
要求两台机器做双机,数据库系统文件和数据文件都安装在阵列中。
卷管理采用SUN 自带的SunDiskSuite,要求数据库采用裸设备。
1、SCLT_NMSdb配置:主机名:SCLT-NMSdbIP 地址:211.95.129.121子网的系统部分:是网络掩码:255.255.255.224主要的网络界面:bge3启用IPv6:否缺省路由∶是路由器IP 地址∶211.95.129.126名称服务:无启用Kerberos:否时区:PRCSolaris 操作环境:Solaris 9 Software 9/05Solaris 软件组:整个群组以及OEM根设备:c1t0d0文件系统:c1t1d0s0 /emv 20480 MBc1t1d0s1 /usr 49500 MBc1t0d0s0 / 20480 MBc1t0d0s1 swap 8192 MBc1t0d0s3 /var 30500 MBc1t0d0s4 /export/home 10240 MBc1t0d0s6 /globaldevices 512 MBc1t0d0s7 /metadb 32 MB2、SCLT_NMSdp配置:主机名:SCLT-NMSdpIP 地址:211.95.129.122子网的系统部分:是网络掩码:255.255.255.224主要的网络界面:bge3启用IPv6:否缺省路由∶是路由器IP 地址∶211.95.129.126名称服务:无启用Kerberos:否时区:PRCSolaris 操作环境:Solaris 9 Software 9/05Solaris 软件组:整个群组以及OEM根设备:c1t0d0文件系统:c1t1d0s0 /emv 20480 MBc1t1d0s1 /usr 49500 MBc1t0d0s0 / 20480 MBc1t0d0s1 swap 8192 MBc1t0d0s3 /var 30500 MBc1t0d0s4 /export/home 10240 MBc1t0d0s6 /globaldevices 512 MBc1t0d0s7 /metadb 32 MB3、逻辑主机:SCLT-NMSapp 211.95.129.1204、阵列配置:SCLT-NMSdisk采用SUN 3320 SCSI 阵列;由14块盘组成,其中1块盘备份,做RAID 5,划分三个slice,一个30G、两个300G,其中30G作为SYBASE 系统安装目录,挂在/U01目录,其他两分区做成裸设备存放数据库数据文件。
- 1、下载文档前请自行甄别文档内容的完整性,平台不提供额外的编辑、内容补充、找答案等附加服务。
- 2、"仅部分预览"的文档,不可在线预览部分如存在完整性等问题,可反馈申请退款(可完整预览的文档不适用该条件!)。
- 3、如文档侵犯您的权益,请联系客服反馈,我们会尽快为您处理(人工客服工作时间:9:00-18:30)。
uiSolaris系统双机+阵列群集安装说明
一、准备工作:
1.安装光盘:Solaris_10_u11_x86
2.编译环境及sun stdio等,此类都包含在serversetup文件夹中
3.Sun cluster软件
4.Sunix系统安装包
5.磁盘阵列管理软件
6.网线5根,3根直连线,2根交叉线
二、磁盘阵列设置及安装
1.安装磁盘阵列管理软件
A.解压host_sw_windows_6.5.0.10.zip文件在电脑上
B.运行runme.bat文件,win7系统需要进入dos,进入HostSoftwareCD_6.9.0.16文件夹,手动输入Runme.bat –c进行安装
C.按照提示进行操作安装
直接回车,选择典型安装
回车,完全安装后等待
完成之后,会有提示
按任意键退出
2.配置磁盘阵列
A.阵列的默认IP是192.168.128.101(控制器1),用将其连接到交换机上,在本地计算机上打开浏览器,输入本机的IP地址,端口号6789,进行管理。
(本地
计算机必须设置密码,不能用空密码,不然无法登陆阵列管理软件)
B.用本机用户名和密码登陆
列管理
D.填写公司名称和站点名称后,点击保存并继续进行设置
E.自动请求服务点击拒绝,进入下一步
G.系统开始自动扫描网络上的存储阵列
H.系统搜索到阵列后,点击完成
I.注册完成后,点击关闭,此时在存储系统中出现了unlabeled的存储系统。
J.在
三、操作系统安装:
1.将电源接通服务器以后,等待几分钟,当机器带电自检完成后,机器会发出声响,
然后按电源按钮,将光盘放入光驱内,等待系统启动。
2.按Ctrl+S键,进入raid配置
3.直接回车,进入配置界面
4.选择RAID Properties选项后回车
5.选择Creat RAID1 Volume,回车
6.将2块硬盘的RAID Disk选项修改为yes
7.按C键建立RAID1
8.选择Save changes then exit this menu,回车
9.按Esc退出后,选择重启计算机选项
10.将Solaris_10_u11_x86光盘放入光驱
11.光盘启动后出现如下界面
12.选择Oracle Solaris,回车
13.按1,选择默认选项
14.检测系统网卡
15.选择US-English,按F2继续
16.按回车继续
17.将鼠标移动到框体内,回车
18.输入7后回车
19.点击下一步
20.选择联网的,点击下一步
21.选择一个要配置的网卡,点击下一步
22.DHCP选择否,点击下一步
23.输入主机名,点击下一步
24.输入主机的IP地址,点击下一步
25.子网掩码是自动填写的,直接点下一步
26.IPV6不启用,选否进入下一步
27.检测一个路由器,选择无,点击下一步
28.选择否,点击下一步
29.名称服务选择无,点击下一步
30.域名选择使用系统派生的NFSv4域,点击下一步
31.选择地域性的洲/国家/地区,点击下一步
32.选择亚洲,中国,点击下一步
33.输入本机时间(默认时间为美国时间),点击下一步
34.输入root用户的密码,点击下一步
35.远程服务选择是,点击下一步
36.注册信息不选(默认是选中的,把勾去掉),点击下一步
37.代理服务器不用配置,直接点击下一步
38.点击确定。
39.Oracle Solaris安装,点击下一步进入系统配置
40.自动引导和自动弹出其他DVD都选择是,点击下一步
41.弹出通知,直接点确定
42.选择操作系统安装介质,CD/DVD,点击下一步
43.将接受协议的勾选中,点击下一步
44.选择自定义安装,点击下一步
45.默认选择为亚洲/中国,直接点击下一步
46.设置语言环境,中文,点击下一步
47.选择则无,点击下一步
48.选择整个群组的缺省包,点击下一步
49.选择硬盘(安装之前做的raid1),点击下一步
50.选择默认安装,点击下一步
51.定值磁盘大小,直接默认,点击下一步
52.修改硬盘分区布局,点击修改
53.将原有的分区删除,重新输入配置分区,分区表如下:
/ 30000M
Swap 内存大小的2倍
/globaldevices 512M
/skystone 20000M
/sunix 40000M
/sunix/etc 剩余分区
略微留一些空闲空间
配置完成后,点击应用,再点击确定
54.磁盘配置完毕后,点击下一步
55.查看分配大小是否与配置相同,确认后点击立即安装
56.操作系统安装完毕,重启后,取出光盘,进入硬盘引导
57.系统启动完毕后,输入用户名root,密码skystone进入操作系统
58.右键点击桌面->打开终端,输入bash,回车
59.在终端中vi /etc/default/login,编辑允许远程控制台登陆
60.在CONSOLE=/dev/console前面加上#号,允许控制台用户登陆
61.在终端输入vi /etc/ftpd/ftpusers,开启FTP允许root用户登陆
62.在root前加上#号,允许root用户FTP登陆
63.在终端输入vi /etc/ssh/sshd_config,允许ssh服务root用户登陆
64.将PermitRootLogin no改成PermitRootLogin yes
65.在终端中输入reboot重启服务器。
四、群集安装
1.将2根交叉网线分别插入到2台服务器的2个网卡上,服务器与服务器之间对连
2.将4根光纤线分别一端插入服务器的光纤卡中,另一端与磁盘阵列的光纤卡相连(注
意交叉,发-收,收-发)。
3.确认光纤与服务器和阵列联通,用luxadm -e port查询,看状态是否CONNECTED
4.编辑2台服务器的/etc/hosts文件,分别将另一台机器配置到文件中
5.
6.重启服务器,用reboot -- -r命令重启
7.重启完毕以后,在服务器上输入scinstall
8.输入1回车
9.
10.输入1回车
11.
12.回车
13.
14.选择2回车
15.
16.输入群集名称后回车
17.
18.输入2台服务器的名称,然后回车,然后Control-D
19.
20.回车继续
21.
22.输入与e1000g0和e1000g1口相连的另外一台服务器的网卡名称后,回车
23.
24.回车
25.
26.回车继续
27.
28.回车继续
29.
30.回车继续
31.
32.回车继续
34.回车继续
35.
36.回车继续
37.
38.回车继续
39.
40.配置完成后,系统自动启动2台服务器
41.重启完毕以后,用scdidadm –L查看公共磁盘,确定仲裁盘
42.
43.上面可以看出,d2和d3都可以作为仲裁盘,
44.输入scsetup
45.
46.选择1,法定
47.
48.选择1,添加法定设备
49.
50.回车继续
51.
52.选择1,直接连接共享磁盘
53.
54.回车继续
55.
56.输入刚刚看到的d2或者d3都可以
57.
58.回车继续
59.修改2台服务器的/etc/vfstab文件,添加挂载的历史库磁盘
61.重启机器,完成群集及挂载的安装。