ASA设置
AS基本设置

AS基本设置
1,点开as之前应该做的事
很多⼈⼀定会在这个界⾯卡顿很久,其实这是as在检测更新。
所以我们在点开as之前先修改它的配置⽂件,让它不再更新。
找到你安装as的⽬录,进⼊bin⽂件夹找到idea.properties⽂件,如图:
右键编辑,在最后⼀⾏添加:
disable.android.first.run=true
如图:
以上设置好了我们再点开as。
2,jdk和sdk的路径
这是使⽤as的根本所在,但是⼤多时候是可以⾃动检测到你电脑上jdk和sdk的路径的。
这⾥还是贴出来。
⾸先设置as的布局字体:
再设置代码的字体和布局样式:
(Darcula 为⿊⾊主题,⽐较保护眼睛)
(其他两个都是⽩⾊主题,⼤同⼩异,其中window主题根据你设置的电脑背景⾊⽽决定)
4,默认编码格式
5,⾃动导⼊类库
6,将快捷键设置成你熟悉的⽅式
7,代码提⽰不区分⼤⼩写
8,不打开上次的项⽬,打开项⽬列表
9,添加本地插件
这⾥需要注意的是:本地的插件建议放在统⼀的⽂件夹中管理,不要轻易去移动这个⽂件夹
10,显⽰⾏号
11,设置git路径
12,关闭/打开,⾃动检测as版本更新
13,当你有Genymotion虚拟机的时候需要设置路径
转载⾃:https:///yehui928186846/article/details/52476300。
Asa配置大全

1、ASA基本配置静态路由:route outside 192.168.100.0 255.255.255.0 192.168.1.99配置允许telnet:telnet 192.168.10.0 255.255.255.0 inside配置telnet超时时间:telnet timeout 5配置本地认证telnet与console:aaa authentication telnet console LOCAL配置SSH生成密钥对:aaa authentication ssh console LOCALciscoasa(config)# crypto key generate rsaINFO: The name for the keys will be: <Default-RSA-Key>Keypair generation process begin. Please wait...ciscoasa(config)#配置允许SSH:ssh 192.168.10.0 255.255.255.0 inside配置允许ASDM管理:http server enablehttp 192.168.10.0 255.255.255.0 insideasdm image disk0:/asdm-602.binusername cisco password cisco privilege 15配置PAT:nat (inside) 1 192.168.10.0 255.255.255.0global (outside) 1 interface配置端口映射:access-list to_server extended permit tcp any host 192.168.1.99 eq wwwaccess-group to_server in interface outsidestatic (inside,outside) tcp interface www 192.168.10.98 www netmask 255.255.255.255配置ACL:access-list to_server extended permit tcp any host 192.168.1.99 eq wwwaccess-group to_server in interface outside配置允许ICMP穿越:policy-map global_policyclass inspection_defaultinspect icmp配置URL过滤:url-server (outside) vendor websense host 192.168.1.100 timeout 30 protocol TCP version 1 connections 5filter url http 192.168.10.0 255.255.255.0 0.0.0.0 0.0.0.0 allow日志管理:开启logging:logging enable开启console日志:logging console 7将日志发送到日志服务器:logging trap 7logging host inside 192.168.10.98配置IPS:ip audit name zxd info action alarmip audit name cisco attack action alarmip audit interface outside zxdip audit interface outside cisco2、VPN配置ASA IPSec L2L配置:access-list nonat extended permit ip 192.168.10.0 255.255.255.0 192.168.100.0 255.255.255.0 nat (inside) 0 access-list nonatcrypto ipsec transform-set cisco esp-des esp-nonecrypto map cisco 10 match address nonatcrypto map cisco 10 set peer 192.168.1.96crypto map cisco 10 set transform-set ciscocrypto map cisco interface outsidecrypto isakmp enable outsidecrypto isakmp policy 1authentication pre-shareencryption deshash shagroup 1tunnel-group 192.168.1.96 type ipsec-l2ltunnel-group 192.168.1.96 ipsec-attributespre-shared-key ciscoASA Remote VPN Server配置:ip local pool vpnpool 192.168.2.250-192.168.2.254group-policy vpntest internalgroup-policy vpntest attributesvpn-tunnel-protocol IPSecusername zhong password xiaodongtunnel-group vpntest type remote-accesstunnel-group vpntest general-attributesaddress-pool vpnpooldefault-group-policy vpntesttunnel-group vpntest ipsec-attributespre-shared-key ciscocrypto ipsec transform-set cisco esp-des esp-md5-hmac crypto dynamic-map vpntest 1 set transform-set cisco crypto dynamic-map vpntest 1 set reverse-route crypto map cisco 1 ipsec-isakmp dynamic vpntest crypto map cisco interface outsidecrypto isakmp enable outsidecrypto isakmp policy 10authentication pre-shareencryption aeshash shagroup 2RADIUS认证用户:aaa-server vpntest protocol radiusaaa-server vpntest (outside) host 192.168.1.100key ciscotunnel-group vpntest general-attributes authentication-server-group (outside) vpntestASA SSL VPN配置ip local pool vpnpool 192.168.2.200-192.168.2.210 username zhong password xiaodongwebvpnenable outsidesvc image disk0:/sslclient-win-1.1.3.173.pkgsvc enabletunnel-group-list enablegroup-policy webvpn internalgroup-policy webvpn attributesvpn-tunnel-protocol svc webvpnwebvpnsvc ask enabletunnel-group webvpn type remote-accesstunnel-group webvpn general-attributesaddress-pool vpnpooldefault-group-policy webvpntunnel-group webvpn webvpn-attributesgroup-alias hnebony enableIOS SSL VPN配置aaa new-modelaaa authentication login vpnauthen localusername zhong password xiaodongip local pool vpnpool 192.168.20.200 192.168.20.254interface loopback 0ip address 192.168.20.1 255.255.255.0exitwebvpn install svc disk0:/webvpn/svc.pkgwebvpn gateway outip address 192.168.1.99inservicewebvpn context vpntestpolicy group vpntestfunctions svc-enabledsvc address-pool vpnpoolsvc split include 192.168.0.0 255.255.0.0exitdefault-group-policy vpntestaaa authentication list vpnauthengateway outinserviceIOS Easy VPN Server配置:aaa new-modelaaa authentication login vpnauthen localaaa authorization network vpnauthor localusername zhong password xiaodongip local pool vpnpool 192.168.20.200 192.168.20.254ip access-list extended splitpermit ip 192.168.0.0 0.0.255.255 192.168.20.0 0.0.0.255 crypto isakmp policy 1authentication pre-sharehash md5group 2crypto isakmp client configuration group vpntestkey ciscopool vpnpoolacl splitcrypto ipsec transform-set cisco esp-aes esp-sha-hmac crypto dynamic-map vpndymap 1set transform-set ciscoreverse-routecrypto map vpntest client authentication list vpnauthen crypto map vpntest client configuration address respond crypto map vpntest isakmp authorization list vpnauthor crypto map vpntest 10 ipsec-isakmp dynamic vpndymap inter f0/0crypto map vpntest使用ACS认证与授权:aaa authentication login vpnauthen group radiusaaa authorization network vpnauthor group radiusradius-server host 192.168.1.100 auth-port 1645 acct-port 1646 key ciscoRADIUS (IETF)选中6、64、65、69、81.建立用户:vpntest(vpn组路由器配置crypto isakmp client configuration group vpntest可以取消)然后建立用户IOS Easy VPN Client配置:crypto ipsec client ezvpn vpntestmode clientconnect autopeer 192.168.10.1group vpntest key ciscousername zhong password xiaodonginterface f0/0crypto ipsec client ezvpn vpntestinterface f1/0crypto ipsec client ezvpn vpntest inside R1#crypto ipsec client ezvpn xauthUsername: zhongPassword:3、802.1X认证aaa new-modelaaa authentication dot1x default group radius aaa authorization network default group radius radius-server host 192.168.1.100 key cisco dot1x system-auth-controlinterface f0/1dot1x port-control auto指定VLAN:4、RSTPAlternate port—Offers an alternate path toward the root switch to that provided by the current root port.Backup port—Acts as a backup for the path provided by a designated port toward the leaves of the spanning tree. A backup port can exist only when two ports are connected in a loopback by a point-to-point link or when a switch has two or more connections to a shared LAN segment.Edge ports—If you configure a port as an edge port on an RSTP switch by using the spanning-tree portfast interface configuration command, the edge port immediately transitions to the forwarding state. An edge port is the same as a Port Fast-enabled port, and you should enable it only on ports that connect to a single end station.Root ports—If the RSTP selects a new root port, it blocks the old root port and immediately transitions the new root port to the forwarding state.Point-to-point links—If you connect a port to another port through a point-to-point link and the local port becomes a designated port, it negotiates a rapid transition with the other port by using the proposal-agreement handshake to ensure a loop-free topology. As shown in Figure 18-4, Switch A is connected to Switch B through a point-to-point link, and all of the ports are in the blocking state. Assume that the priority of Switch A is a smaller numerical value than the priority of Switch B. Switch A sends a proposal message (a configuration BPDU with the proposal flag set) to Switch B, proposing itself as the designated switch. After receiving theproposal message, Switch B selects as its new root port the port from which the proposalmessage was received, forces all nonedge ports to the blocking state, and sends an agreement message (a BPDU with the agreement flag set) through its new root port. After receiving Switch B’s agreement message, Switch A also immediately transitions its designated port to the forwarding state. No loops in the network are formed because Switch B blocked all of its nonedge ports and because there is a point-to-point link between Switches A and B. When Switch C is connected to Switch B, a similar set of handshaking messages are exchanged.Switch C selects the port connected to Switch B as its root port, and both ends immediately transition to the forwarding state. With each iteration of this handshaking process, one more switch joins the active topology. As the network converges, this proposal-agreement handshaking progresses from the root toward the leaves of the spanning tree. The switch learns the link type from the port duplex mode: a full-duplex port is considered to have a point-to-point connection; a half-duplex port is considered to have a shared connection. You can override the default setting that is controlled by the duplex setting by using the spanning-tree link-type interface configuration command.5、时间访问列表time-range zxdabsolute start 08:30 24 August 2009 end 18:00 01 September 2009time-range ciscoperiodic daily 8:00 to 18:00access-list 110 permit ip any any time-range cisco6、QOSCAR:rate-limit input access-group 101 1000000 3000 4000 conform-action transmit exceed-action dropGTS:class-map match-all ciscomatch access-group 101!!policy-map ciscoclass ciscopolice cir 500000 bc 10000 pir 1000000 be 10000conform-action transmitexceed-action set-prec-transmit 2violate-action dropinterface f1/0service-policy output ciscoCBWFQ:class-map match-all cbwfqmatch access-group 101policy-map cbwfqclass cbwfqpriority percent 60interface f1/0service-policy output cbwfq7、NA T-T8、标准化产品特色:1定位准确,以就业为导向。
asa access-group的设定

一、asa access-group的概念ASA(Adaptive Security Appliance)是思科公司推出的一款网络安全设备,用于保护企业网络不受外部攻击和威胁。
其中,asa access-group是ASA防火墙中非常重要的一个设置,它用于定义允许或拒绝流量从一个特定的接口到另一个特定的接口。
二、asa access-group的作用1. 控制流量:asa access-group可以根据管理员的配置规则,控制不同接口之间的流量,实现对网络流量的精确管理和控制。
2. 提高安全性:通过设置asa access-group,管理员可以限制特定接口的访问权限,提高网络的安全性,防止未经授权的访问。
3. 灵活配置:asa access-group允许管理员根据实际的网络环境和需求,灵活地配置不同接口之间的流量控制策略,实现个性化的安全防护。
三、asa access-group的配置步骤1. 确定访问控制列表(ACL): 在配置asa access-group之前,管理员需要先确定需要应用的ACL,即哪些流量需要允许或拒绝。
2. 创建访问控制列表(ACL): 在ASA防火墙上创建ACL,定义需要控制的流量规则,如允许或拒绝特定IP位置区域、端口、协议等的流量。
3. 将ACL与接口关联:管理员需要将创建好的ACL与特定的接口进行关联,以实现对该接口流量的控制。
4. 应用asa access-group:管理员需要将创建好的ACL应用到相应的接口上,实现对流量的精确控制。
四、asa access-group的配置实例以ASA防火墙的GigabitEthernet0/0接口为例,假设管理员需要设置访问控制规则,允许来自192.168.1.0/24网段的HTTP和HTTPS 流量访问该接口。
具体配置步骤如下:1. 创建ACL:access-list web_acl permit tcp 192.168.1.0 255.255.255.0 any eq 80access-list web_acl permit tcp 192.168.1.0 255.255.255.0 any eq 4432. 关联ACL与接口:interface GigabitEthernet0/0ip access-group web_acl in通过以上配置,管理员成功地将访问控制列表web_acl应用到了GigabitEthernet0/0接口上,实现了对来自192.168.1.0/24网段的HTTP和HTTPS流量的允许访问。
ASA配置

vpdn group dx ppp authentication pap //启用验证方式
vpdn username 051211077922 password 983980 //就是ISP给你的帐号和密码
interface GigabitEthernet0/2
route inside 192.168.0.0 255.255.0.0 192.168.4.1 1 *指向三层交换机路由接口的vlan静态路由
: end
lybenet#
vpdn group dx request dialout pppoe //为ADSL拨号创建虚拟专用拨号网络组(VPDN Group),ChengDu为组名,随便填你自己喜欢的
!
nat-control * 定义T的第一步,启动NAT
global (outside) 1 interface *定义PAT的第三步,复用外部端口做PAT
nat (inside) 1 0.0.0.0 0.0.0.0 * 定义PAT的第二步,局域网用户都可以使用PAT
!
route outside 0.0.0.0 0.0.0.0 123.100.1.1 1 * 指向互联网的默认路由
ip address 192.168.100.1 255.255.255.0
!
interface Ethernet0/2 *定义ASA的DMZ接口 (用来连接服务器)
nameif dmz
security-level 50
ip address 192.168.1.3 255.255.255.0
ssh 0.0.0.0 0.0.0.0 dxoutside
教程:ASA配置(三个区域)
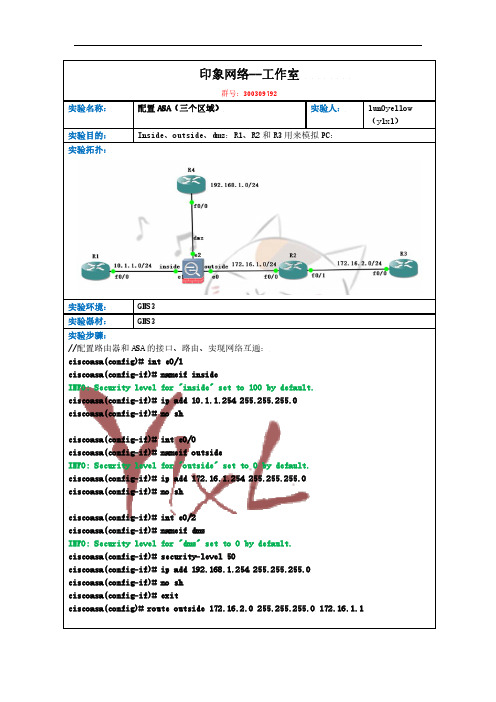
印象网络--工作室群号:300309792实验名称: 配置ASA(三个区域) 实验人:lun0yellow(ylxl) 实验目的: Inside、outside、dmz:R1、R2和R3用来模拟PC:实验拓扑:实验环境: GNS3实验器材: GNS3实验步骤://配置路由器和ASA的接口、路由、实现网络互通:ciscoasa(config)# int e0/1ciscoasa(config-if)# nameif insideINFO: Security level for "inside" set to 100 by default.ciscoasa(config-if)# ip add 10.1.1.254 255.255.255.0ciscoasa(config-if)# no shciscoasa(config-if)# int e0/0ciscoasa(config-if)# nameif outsideINFO: Security level for "outside" set to 0 by default.ciscoasa(config-if)# ip add 172.16.1.254 255.255.255.0ciscoasa(config-if)# no shciscoasa(config-if)# int e0/2ciscoasa(config-if)# nameif dmzINFO: Security level for "dmz" set to 0 by default.ciscoasa(config-if)# security-level 50ciscoasa(config-if)# ip add 192.168.1.254 255.255.255.0ciscoasa(config-if)# no shciscoasa(config-if)# exitciscoasa(config)# route outside 172.16.2.0 255.255.255.0 172.16.1.1//在R1、R2、R3、R4上配置:R1(config)#int f0/0R1(config-if)#ip add 10.1.1.1 255.255.255.0R1(config-if)#no shR1(config-if)#exitR1(config)#ip route 0.0.0.0 0.0.0.0 10.1.1.254R1(config)#do wrR2(config)#int f0/0R2(config-if)#ip add 172.16.1.1 255.255.255.0R2(config-if)#no shR2(config-if)#int f0/1R2(config-if)#int f0/1R2(config-if)#ip add 172.16.2.2 255.255.255.0R2(config-if)#no shR2(config-if)#exitR2(config)#ip route 10.1.1.0 255.255.255.0 172.16.1.254R2(config)#ip route 192.168.1.0 255.255.255.0 172.16.1.254 R2(config)#do wrR3(config)#int f0/0R3(config-if)#ip add 172.16.2.1 255.255.255.0R3(config-if)#no shR3(config-if)#exitR3(config)#ip route 0.0.0.0 0.0.0.0 172.16.2.2R3(config)#do wrR4(config)#int f0/0R4(config-if)#ip add 192.168.1.1 255.255.255.0R4(config-if)#no shR4(config-if)#exitR4(config)#ip route 0.0.0.0 0.0.0.0 192.168.1.254R4(config)#do wr//配置R1/R2/R3/R4的vty密码。
asa配置手册

asa配置手册一些基础配置,个人工作学习中的一点整理,如有错误请指正,谢谢。
#设置主机名:(config)#hostname dust#设置时区:dust(config)#clock timezone EST 7#设置时钟:dust#clock set 15:45:30 28 FEB 2008#配置内接口 IPdust(config)#int Ethernet 0/0dust(config-if)#nameif insidedust(config-if)#security-level 100dust(config-if)#ip address 192.168.88.254 255.255.255.0#配置外部接口IPdust(config)#int Ethernet 0/1dust(config-if)#nameif outsidedust(config-if)#security-level 0dust(config-if)#ip address 210.X.X.X 255.255.255.248#配置用户名和密码dust(config)#username admin password ********* privilege 15 注:15 表示有最高权限#配置HTTP 和TELNETdust(config)#aaa authentication telnet console LOCALdust(config)#http server enabledust(config)#http 192.168.88.0 255.255.255.0 insidedust(config)#telnet 192.168.88.0 255.255.255.0 inside#配置SSH接入:dust(config)#crypto key generate rsa modulus 1024dust(config)#aaa authentication ssh console LOCALdust(config)#ssh 192.168.88.0 255.255.255.0 insidedust(config)#ssh 0 0 outsidedust(config)#ssh timeout 30dust(config)#ssh version 2#配置ASDM(自适应安全设备管理器)接入:dust(config)#http server enable 8080dust(config)#http 192.168.88.0 255.255.255.0 insidedust(config)#http 0 0 outsidedust(config)#asdm image disk0:/asdm-621.bindust(config)#username dust password ccie privilege 15#动态NAT:dust(config)#nat-controldust(config)#nat (inside) 1 192.168.10.0 255.255.255.0dust(config)#nat (inside) 1 0 0dust(config)#global (outside) 1 interfacedust(config)#global (dmz) 1 192.168.202.100-192.168.202.110#静态NATdust(config)#static (dmz.outside) 210.10.10.253 192.168.202.1dust(config)#access-list ccie extended permit tcp any host 210.10.10.253 eq wwww dust(config)#access-group ccie in interface outside#配置ACLdust(config)#access-list ccie extended deny ip 192.168.201.0 255.255.255.240 any dust(config)#access-list ccie extended permit ip any anydust(config)#access-group ccie in interface inside#ICMP协议dust(config)#icmp deny any echo outsidedust(config)#icmp permit any outsidedust(config)#access-list 111 permit icmp any any echo-reply dust(config)#access-list 111 permit icmp any any unrechable dust(config)#access-list 111 permit icmp any any time-exceededdust(config)#access-group 111 in interface outside#配置默认路由dust(config)#route ouside 0.0.0.0 0.0.0.0 220.1.1.1 1#配置DHCP服务器dust(config)#dhcpd address 192.168.10.50-192.168.10.100 insidedust(config)#dhcpd enable insidedust(config)#dhcpd dns 202.102.192.68 insidedust(config)#dhcpd lease 86400 interface insidedust(config)#dhcpd option xx ip 192.168.10.10#保存配置dust#write memory 或copy running-config startup-config #清除配置dust(config)#clear configure alldust(config)#clear configure xxx xxxasa remote vpn#在outside接口上启用isakampdust#configure terminaldust(config)#crypto isakmp enable outside#创建一个isakmp策略dust(config)#crypto isakmp policy 1dust(config-isakmp-policy)#authentication pre-sharedust(config-isakmp-policy)#encryption desdust(config-isakmp-policy)#hash md5dust(config-isakmp-policy)#group 2dust(config-isakmp-policy)#lifetime 86400#配置组策略dust(config)#group-policy mypolicy internaldust(config)#group-policy mypolicy attributesdust(config-group-policy)#vpn-tunnel-protocol ipsecdust(config-group-policy)#split-tunnel-policy tunnelspecifieddust(config-group-policy)#nem enable#定义地址池dust(config)#ip local pool vpn-pool 192.168.88.110-192.168.88.120#定义隧道组dust(config)#tunnel-group cisco type remote-accessdust(config)#tunnel-group cisco general-attributesdust(config-tunnel-general)#address-pool vpn-pooldust(config-tunnel-general)#authentication-server-group (outside) LOCAL dust(config-tunnel-general)#default-group-policy mypolicydust(config-tunnel-general)#tunnel-group cisco ipsec-attributesdust(config-tunnel-ipsec)#pre-shared-key cisco#配置转换集dust(config)#crypto ipsec transform-set ccsp esp-des esp-md5-hmacdust(config)#crypto ipsec transform-set cisco esp-des esp-md5-hmac#添加本地帐户dust(config)#username user01 password adminabcdust(config)#username user02 password admindec#定义映射集,并应用到外部接口dust(config)#crypto dynamic-map dyn-map 10 set transform-set ccsp ciscodust(config)#crypto dynamic-map dyn-map 10 set reverse-routedust(config)#crypto map cisco 60001 ipsec-isakmp dynamic dyn-mapdust(config)#crypto map cisco interface outside#配置分离隧道dust(config)#access-list split_list standard permit 192.168.88.0 255.255.255.0 dust(config)#group-policy mypolicy attributesdust(config-group-policy)#split-tunnel-policy tunnelspecifieddust(config-group-policy)#split-tunnel-network-list value split_listdust(config-group-policy)#dns-server value 202.102.192.68 8.8.8.8#放行访问列表dust(config)#access-list 100 extended permit ip 192.168.88.0 255.255.255.0 192.168.88.0 255.255.255.0dust(config)#access-list 111 extended permit icmp any any echo-replydust(config)#access-list 111 extended permit icmp any any unreachabledust(config)#access-list 111 extended permit icmp any any time-exceededdust(config)#nat (inside) 0 access-list split_listdust(config)#access-group 111 in interface outsidedust(config)#access-group 100 in interface outsidedust(config)#access-group 100 in interface inside#查看被asp和acl drop的包dust(config)# show asp drop frame acl-drop客户端连接时,地址为outside的IP,组名为cisco 密码为cisco。
asa配置步骤

思科防火墙已经从PIX发展到ASA了,IOS也已经从早期的6.0发展到7.2。
但总体的配置思路并没有多少变化。
只是更加人性化,更加容易配置和管理了。
下面是我工作以来的配置总结,有些东西是6.3版本的,但不影响在7.*版本的配置。
一:6个基本命令: nameif、 interface、 ip address 、nat、 global、 route。
二:基本配置步骤:step1: 命名接口名字nameif ethernet0 outside security0nameif ethernet1 inside security100nameif ethernet2 dmz security50**7版本的配置是先进入接口再命名。
step2:配置接口速率interface ethernet0 10full autointerface ethernet1 10full autointerface ethernet2 10fullstep3:配置接口地址ip address outside 218.106.185.82ip address inside 192.168.100.1 255.255.255.0ip address dmz 192.168.200.1 255.255.255.0step4:地址转换(必须)* 安全高的区域访问安全低的区域(即内部到外部)需NAT和global;nat(inside) 1 192.168.1.1 255.255.255.0global(outside) 1 222.240.254.193 255.255.255.248*** nat (inside) 0 192.168.1.1 255.255.255.255 表示192.168.1.1这个地址不需要转换。
直接转发出去。
* 如果内部有服务器需要映射到公网地址(外网访问内网)则需要static和conduit或者acl.static (inside, outside) 222.240.254.194 192.168.1.240static (inside, outside) 222.240.254.194 192.168.1.240 10000 10后面的10000为限制连接数,10为限制的半开连接数。
ASA防火墙基本配置
一、基本配置#hostname name //名字的设置#interface gigabitethernet0/0 //进入接口0/0#nameif outside //配置接口名为outside#security-level 0 //设置安全级别。
级别从0--100,级别越高安全级别越高#ip address 218.xxx.xxx.xxx 255.255.255.248 //设置外部ip地址#no shutdown#interface ethernet0/1 //进入接口0/1#nameif inside //配置接口名为inside#security-level 100 //设置安全级别。
级别从0--100,级别越高安全级别越高#ip address 192.168.10.1 255.255.255.0 //设置ip地址#duplex full //全双工#speed 100 //速率#no shutdown#interface ethernet0/2 //进入接口0/2#nameif dmz //配置接口名为dmz#security-level 50 //设置安全级别。
级别从0--100,级别越高安全级别越高#ip address 192.168.9.1 255.255.255.0 //设置dmz接口ip地址#no shutdown#interface Management0/0 //进入管理接口# nameif guanli //接口名# security-level 100 //安全级别#ip address 192.168.1.1 255.255.255.0 //IP地址注意:security-level 配置安全级别。
默认外网接口为0/0 安全级别默认为0内网接口为0/1 安全级别默认为100dmz 接口为0/2 安全级别默认为50默认情况下,相同安全级别接口之间不允许通信,可以使用以下命令:#same-security-traffic permit interface //允许相同安全级别接口之间互相通信。