dell服务器安装指南
Dell服务器安装操作系统四种方法
Dell服务器安装操作系统四种方法PowerEdge服务器手动安装操作系统.....................(适合有软驱软盘,硬盘有数据要保留的用户) Dell PowerEdge 1950 服务器Windows 2003安装手册本文档介绍了在不使用Dell Open Manage Server Assistant (DOSA) 光盘引导的情况下,如何安装Windows 2003 Server 到您的Dell PowerEdge 1950 上。
这个过程需要大约45 到60 分钟。
*通常不使用Dell Open Manage Installition 光盘引导安装主要是基于以下一些原因:1. 原有的硬盘分区里有重要的数据, 倘若使用OMSA光盘安装, 将会删去硬盘上的原有分区;2. 原有硬盘上有动态磁盘分区,DOSA光盘引导将导致系统自动重启, 而进入不了安装界面。
索引步骤1. 识别您的Power Edge 服务器的系统配置步骤2. 安装前的准备步骤3. win2003安装步骤步骤4. 驱动程序的安装步骤1. 识别您的PowerEdge 服务器的系统配置Note:具体信息随配置不同,请根据自己的配置正确安装。
常见1950 服务器集成的设备:·集成两块网络适配器BroadCom 5708以太网卡;·ATI Radeon(TM) ES1000显示卡;·DRAC 5 远程控制卡(可选)·常见使用的硬盘控制卡:- SAS5i控制器(安装内置磁盘)/SAS-Non-RAID/R122665.exe (32bit)/SAS-Non-RAID/R122666.exe (EMT64/x64)- SAS5E控制器(安装外置磁盘柜)- PERC 5I控制器(安装内置磁盘阵列)/SAS-RAID/R120960.EXE (32bit)/SAS-RAID/R120962.EXE (EMT64/x64)- PERC 5E控制器(安装外置磁盘阵列柜)步骤2. 安装前的准备2.1 安装操作系统前请您先准备好以下物品·硬盘控制卡驱动软盘Note:硬盘控制卡识别以及驱动制作请参考《9G服务器磁盘控制卡识别及Windows 2003驱动制作》· Windows 2003安装光盘2.2设置BIOS1.开机自检时按F2键进入系统BIOS2.光标移到BOOT SEQUENCE ,敲回车进入引导设备列表3.光标移到CD_ROM DEVICE,按"-"键直到CD_ROM跳到第一项,并保证此项最左边有"v"标志,并确定Virtul Floppy/CDROM排列于末端未被选去(该标志用空格键选取)(图1 )4.用同样方法把Hard drive C:列为第二引导设备,并也有"v"标志5.按ESC键退出引导设备选择界面6.按ESC键,敲Enter键保存退出步骤3. Windows 2003 Text Mode Setup 文本模式安装Text Mode Setup 文本模式安装1. 把Windows 2003 安装光盘放入光驱,并从光盘引导。
DELL-服务器RAID卡安装配置步骤PPT课件
第二部份 配置RAID 1 在主界面选择 RAID Properties 进行阵列卡配置
11
在RAID 配置界面中有三个选择项 查看已经存在的阵列配置 ( 此选项只有在已经存在阵列配置的情况下才出会现) 通常在第一次配置阵列时,只会出现 下面两项 创建 IM (镜像) 卷 (做RAID 1 ) (最多只允许两块硬盘做RAID1) 创建IS ( 条带)卷 (做RAID 0 )(最少2块,最多4块硬盘做RAID0)
25
(注意,不论是哪块硬盘掉线了,另一块存在的硬盘自动成为primary ,只是Slot 不变) 下图是slot0 的硬盘被拨掉后,Slot 1 的硬盘自动成为Primary
26
直接插一块新硬盘到slot 1 ,系统自动识别到此硬盘并开始rebuild ( 同步)
27
等到同步( rebuild )完成后,VD 就恢复正常了
如果将虚拟磁盘从一个 SAS 5/iR 控制器或计算机中删除,并移动到另一个控制器或计算机中,则该虚拟磁盘会变为 非活动状态。“Activate Mirror”(激活镜像)选项允许重新激活添加到系统中的非活动虚拟磁盘。该选项仅适用于选 定虚拟磁盘当前处于非活动状态的情况。 • 选择“Activate Mirror”(激活镜像)。 • 按 Y 键继续激活,或按 N 键放弃激活。 暂停一会后,虚拟磁盘将变为活动状态。 • 注:仅当迁移的虚拟磁盘处于最佳状态并且包含所有物理磁盘时,才支持激活迁移的虚拟磁盘。 • 删除虚拟磁盘 注意:删除虚拟磁盘之前,请确保备份虚拟磁盘上需要保留的所有数据。 • 请执行以下步骤删除选定的虚拟磁盘: • 选择“Delete Virtual Disk”(删除虚拟磁盘)。 • 按 Y 键删除虚拟磁盘,或按 N 键放弃删除。 • 按 <F3> 键以确认虚拟磁盘的删除。暂停一会后,固件将删除虚拟磁盘
戴尔PowerEdge服务器快速安装指南.pdf_1701143394.591269说明书

Software Quick Installation Guide w w w.d e l l.c o m|s u p p o r t.d e l l.c o mNotes and NoticesNOTE: A NOTE indicates important information that helps you makebetter use of your computer.NOTICE: A NOTICE indicates either potential damage to hardware or loss of data and tells you how to avoid the problem._________________Information in this document is subject to change without notice.©2006Dell Inc.All rights reserved.Reproduction in any manner whatsoever without the written permission of Dell Inc. is strictly forbidden.Trademarks used in this text: Dell, the DELL logo, and PowerEdge are trademarks of Dell Inc.; Microsoft and Windows are registered trademarks of Microsoft Corporation. Other trademarks and trade names may be used in this document to refer to either the entities claiming the marks and names or their products. Dell Inc. disclaims any proprietary interest in trademarks and trade names other than its own.January 2006P/N CC114Rev. A00This document is available on the Dell PowerEdge SC Server Installation CD and the Dell PowerEdge SC Server Documentation CD in English, French, German, Spanish, Japanese, andSimplified Chinese.Verifying the Software Kit ContentsThe system support software kit includes, but is not limited to, the following components:•The Dell PowerEdge SC Server Installation CD contains the tools you need to configure your system and install youroperating system. This CD also delivers the latest diagnostics and Dell-optimized drivers for your system.•The Dell PowerEdge SC Server Documentation CD includes documentation for your Dell™ PowerEdge™ SC system,peripherals, and RAID controllers.Compare the contents of your system accessories box with the packing slip or invoice enclosed with your system. If any components are missing or damaged, call Dell within 30 days of the invoice date for a free replacement. For more information, see"Obtaining Technical Assistance."34Installing and Configuring the Server and Operating System Perform the following steps to determine if an operating system is already installed on your system:1Ensure that the keyboard, mouse, and monitor are connected to your system, and turn on your system.2Read and accept the software license agreement to continue. If a message appears and states that bootable drives do not exist or that an operating system was not found, then an operating system is not installed on your system. Have youroperating system CD available and continue with step 3. NOTE: If an operating system is already installed on yoursystem, it is not necessary to continue with this process.To complete the installation process, locate theInstallation Instructions document that was provided withyour system and follow these instructions.3Insert the Dell PowerEdge SC Server Installation CD and restart your system.The following options are available during system boot:•Server Assistant — Boots through the CD.•Server Assistant with CD media check — Checks if the CD is created correctly and for validity of content.•Skip CD boot - Boot to hard drive — Boots from the hard drive and verifies if an operating system is installed onyour system. If an operating system is not installed onyour system, boots through the CD.NOTE: If you do not select an option within 10 seconds, thesystem automatically boots through the CD.4Select the language that you want to use.5Read and accept the software license agreement to continue. 6Select Server Setup on the System Support main page.7Follow the step-by-step instructions to configure your hardware and to install your operating system.5Updating Drivers and UtilitiesThe Dell PowerEdge SC Server Installation CD contains device drivers and system utilities that you can use to update your system. Use this CD to locate and extract the drivers designed for your system.NOTE: To update drivers and utilities, you can run the DellPowerEdge SC Server Installation CD only on systems running theMicrosoft® Windows® operating system. To extract drivers for systems that are not running Windows, you must first use this CD on a system running Windows and then copy or share the selected files to thefinal destination system.1Insert the Dell PowerEdge SC Server Installation CD into the CD drive on the system running Windows.The setup program should start automatically. If it does not,click the Start button, click Run, and then type x:setup.exe (where x is the drive letter of your CD drive).2Select the system and the file set that you want to update and click Continue.63Click the file name of the file you want to update.Y ou are prompted for a location to save the file.Files are delivered in compressed format. Running thecompressed file either creates a diskette(s) duringthe extraction or prompts you for the location to save theextracted files.Obtaining Technical AssistanceBefore contacting Dell for technical assistance, see theDell Support website at . If you need additional technical support, see "Getting Help" in your system's Hardware Owner’s Manual for country/region-specific information about contacting Dell by using telephone, fax, and Internet services. Antes de entrar em contato com a Dell para obter assistênciatécnica, consulte o site de suporte na Web: . Você precisará do número da sua etiqueta de serviço para identificação de seu equipamento. Caso necessite de suporte técnico adicional, é fornecida assistência técnica para hardware ao proprietário original do equipamento. Esse serviço está disponível de segunda asexta-feira, das 7 às 19:00h, em português. Telefone: 0800-90-3355.7For the latest product updates, such as drivers and patches, go to the Dell Support website at .Dell Enterprise Training and Certification is available now; see /training for more information. This service may not be offered in all locations.8。
DELL官方服务器内存安装手册及注意事项

系统内存系统支持DDR3 注册的DIMM (RDIMM) 或ECC 非缓冲的DIMM (UDIMM)。
单列和双列DIMM 可以是1067 MHz 或1333 MHz,四列DIMM 可以是1067 MHz。
系统包含18 个内存插槽,分为两组,每组九个插槽,分别用于一个处理器。
每组插槽(9 个)分为三个通道,每个通道有三个内存插槽。
每个通道的第一个插槽上都标有白色释放拉杆。
系统支持的最大内存取决于所用的内存模块类型和大小:•对于大小为2-GB、4-GB 和8-GB(如果有)的单列和双列RDIMM,支持的总量最大为144 GB。
•对于四列RDIMM(每个通道两个),支持的总量最大为96 GB。
•对于1 GB 和2 GB 的UDIMM,支持的最大总容量为24 GB。
内存模块一般安装原则为确保获得最佳系统性能,请在配置系统内存时遵守以下通用原则。
注:未遵循这些原则的内存配置会导致系统在启动时停机,并且无任何系统消息的视频输出。
•不能混合安装RDIMM 和UDIMM。
•每个通道不得安装两个以上UDIMM。
•除了未使用的内存通道之外,所有被占用的内存通道的配置必须相同。
•在双处理器配置中,每个处理器的内存必须配置相同。
•大小不同的内存模块可以在一个内存通道中混用(如2-GB、8-GB 和4-GB),但所有被占用的通道的配置必须相同。
•对于优化器式,内存模块按照插槽的数字顺序安装,以A1 或B1 开始。
•对于内存镜像模式或高级ECC 模式,离处理器最远的三个插槽不使用,内存模块首先从插槽A2 或B2 开始安装,然后按剩下插槽的数字顺序安装(如A2、A3、A5、A6、A8 和A9)。
•高级ECC 模式需要x4 或x8 DRAM 设备宽度。
•每个通道的内存速度因内存配置而异:o对于单列或双列内存模块:o每个通道一个内存模块时最多支持1333 MHz。
o每个通道两个内存模块时最多支持1067 MHz。
o每个通道三个内存模块时最多支持800 MHz(不管内存模块速率如何)。
Dell r730服务器操作系统安装教程
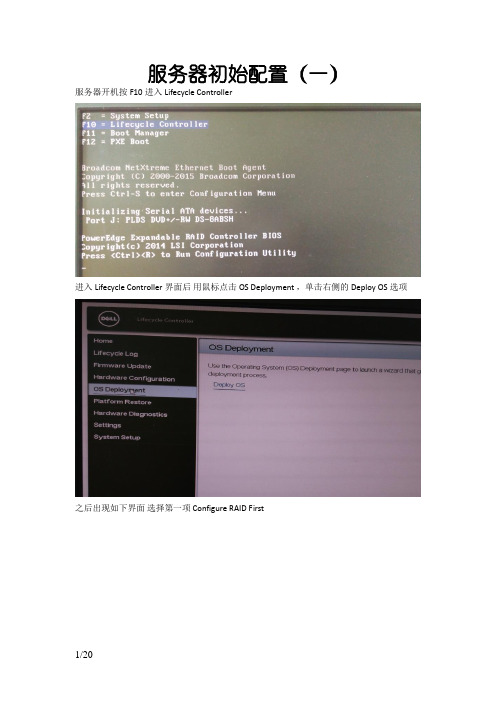
服务器初始配置(一)服务器开机按F10进入Lifecycle Controller进入Lifecycle Controller界面后用鼠标点击OS Deployment ,单击右侧的Deploy OS选项之后出现如下界面选择第一项 Configure RAID First单击NEXT出现如下界面单击NEXT选择RAID5单击NEXT选中上图中的所有磁盘单击NEXT在上图中输入磁盘阵列名称单击NEXT出现如下界面单击Finish单击Yes开始磁盘阵列磁盘阵列完毕单击OK选择操作系统驱动上图单击OK后,出现如下界面按下图勾选选项单击NEXT等待配置完成安装操作系统配置完成后,出现如下界面选择Manual Install单击NEXT将操作系统安装光盘放入光驱单击NEXT单击Finish 服务器自动重启(需要几分钟,重启过程不要按键盘)出现如下界面后,选择如图选项单击下一步单击现在安装选择需要安装的操作系统(要与选择驱动时的操作系统一致)单击下一步勾选接受条款单击下一步安装类型选择“自定义(高级)”磁盘分区单击“驱动器选项(高级)”先选中“未分配空间”然后单击新建选择磁盘分区大小(如无特殊规定,可将磁盘分成C、D、E三个分区,C盘<系统盘>100G,剩下的容量D盘与E盘均分)单击应用单击确定再选中未分配空间,单击新建创建D盘和E盘创建好的磁盘分区如下图单击下一步开始安装操作系统若干时间后出现如下界面设置服务器开机密码确定 --进入系统激活操作系统(系统激活需要连接Inter网)过一会会弹出一个窗口点击激活windows输入操作系统安装秘钥单击下一步系统激活成功R730服务器操作系统安装完成。
Dellr730服务器操作系统安装教程
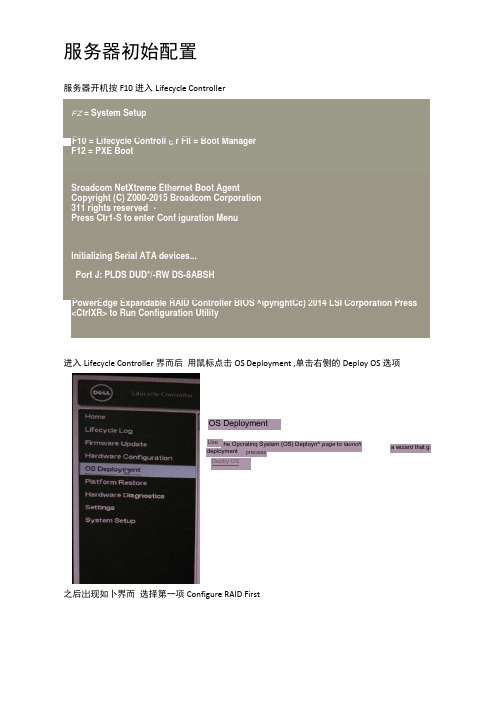
服务器初始配置服务器开机按F10进入Lifecycle ControllerFZ = System SetupF10 = Lifecycle Controll 匕r Fll = Boot Manager F12 = PXE BootSroadcom NetXtreme Ethernet Boot AgentCopyright (C) Z000-2015 Broadcom Corporation 311 rights reserved ・Press Ctr1-S to enter Conf iguration MenuInitializing Serial ATA devices... Port J: PLDS DUD*/-RW DS-8ABSHPowerEdge Expandable RAID Controller BIOS ^ipyrightCc) 2014 LSI Corporation Press <CtrlXR> to Run Configuration Utility进入Lifecycle Controller 界而后 用鼠标点击OS Deployment ,单击右侧的Deploy OS 选项之后岀现如卜界而 选择第一项Configure RAID Firstthe Opcratinq System (OS) Deptoyn^ page to launch precess a wizard that gUse deployment DeptoyOSOS DeploymentDepby OSStep 1 of 5: Select Deployment pathS€tect OS Depkxymecit Path⑥ Ccnfigure RAO FrstO Go Directly to OS DopioynYMURAJD can g confixed prxx to OS Deployrnent. the current wizard w« be restart v/izard tscarpeted.Software suzago ccnrrolers support ody M^xoscft Windows operarng $yst«=cn nStep 1 of 5: View Current RAID Configuration and Select Conti■. ■ *Selected ControUer Disk Ath ibutes WtT DisksRADLev^l DLFRRAD 5Eng 小step 凶斓5"吩RAO.曲旳忌reruns 帕注ct OS Z单击NEXT 选择RAID5PowerEdg© R730Service Tag: D1SY2S2 单击NEXT 出现如下界面See(GB) W2W0State OninGConfiguration Wizards: RAID Configuration4卜B30 Mir7 縞i 0 Qcnty罚呵 ttTw RAID controHor ro view its current confyuratfon. To deters me existnQ wtu^ < vir tuedisk.(*ck NfexLStep 2 of 5: Select RZMD LevelSelect the RAn fee the w 3 ci£j<O RADO O RAD 1* RAID 5 ORAO6 O RAD l i O RAT-50 Of^ADGOMM 口AC 1®曲怕 tho ctr 庐3 <lsks ar d uses grrty 诃ormafion to matxat) f«>Juri^int dotfl.!tm 仁七 tno ante 形 CO O J T ⑷ngparityRA£>・5 pro'/«>e«s epod re^dpetreegneo ord 法wr vwie pericrT^^e.单击NEXTConnguration Wizards: RAID ConTtguratkxi Step 3 of 5: Select Physical Disks选中上图中的所有磁盘 单击NEXTx^cEdgti R730 )orv»» Tdj: DIS 丫 232HQSS3B NextOTS :DIS 丫 252M&ZS3B HES^HB z*1Steel CT^ 的咖&yoj want to ccEQX 今.Mnmjm RAID 5 pfr/^tzal <±3>cs Msxmum RAT) 5 phy^^vsl - -S«*ect me <isk poetPtoiocd --------------------------------------------------------------TywOsk Block S<2OTKJ Prot^rtrn nf<xrreis (Tt> Hi C^paWty Era.rvPtnn CsMty --------------------- 痘5"「<]单击均上选中选中所有Efi兮fcw Phylum Po<4O6k N8TTWSuo <G43} -Ftv^UOfik eno 931000 J PTTTK” X mi931000M3Enaypc^n hto hto 卜舫'•r... Ai : wrfCZntrdor 7 Soloct ^tAO Levial3ei Phytfcal Dtaksi单击NEXT 出现如下界面✓Spwfy Vw wtud drk attftouies. 却2X0 在爺决处畅入喘盘阵列s称v>iud Osk r^(TG SC0<U4・磁2J00GB ) Stripe Etement SizeConfiguration Wizards: RAD Configuration Step 4 of 5 X/rtual Disk Attributes[64KB在上图中输入磁盘阵列需称单击Finishs J Step 5 of 5: Summary■、Warning1 RAID CcnnguratlonIf arry mcxTfcdtws are 卯世the wtuai 曲c<xifi9irat«2n to tot cu ci the vrtumiacks m the 如如・8Y<XJ well to contnip?L ________ ___________________ wAssOT Fbt DKk [ 经士JNcm Sce((3e)单击Yes开始磁盘阵列Step 5 of 5: SummaryTo oxty ux>uu Af»SlXSirrrrrry Gt Dric Allrii^csA“grx 应 *3pare Df4<磁盘阵列完毕 单击OK选择操作系统驱动上图单击OK 后,出现如下界面按下图勾选选项二― WturtORA O L ^Sire (G€jTypo Success)r^riRAID ConfiguraUonSuccxKJsttiy c<xir*»tod RA<3 OTK ;fHtMtSU po Ek FWrfHCb Wrjt^R.4 OjK BOCk QZ$r Q Frmecuon Infgvon SlotiiswadOK ^Q - DKawedW !LH I OSX ATTTtXJt^S “SummaryStep 2 of 5: Select an Operating Systemone of the sippcrtod boot edos fa 8xe<ng Syctom nst<*Btrn.Boot Mode ® KOS O LEFISecure 6ootO Enatfcd 參 0^4:1*NQ8x>tP*o»cy • AwilaMe uper«u>g Systems M^roeon Wniows Sw 2X« R2、仙 SR< t <; “oiocd .cf ioc tc. g i w 口 hoot Hits fhetue check fc< cSqiuJy 旳3 OSOrrvMS •>! owy bat. I 與OFF c<KA nxxlA SHX>XV3 C&US Oparatrig Syritcms单击NEXT 等待配置完成安装操作系统配置完成后,岀现如下界而选择Manual Install✓OS Deployment Deploy OSCancelNext单击NEXT将操作系统安装光盘放入光驱单击NEXT单击Finish服务器自动重启(需要几分钟,重启过程不要按键盘)出现如下界而后,选择如图选项单击下一步单击现在安装选择需要安装的操作系统(要与选择驱动时的操作系统一致)单击下一步勾选接受条款单击下一步安装类型选择“自泄义(高级严磁盘分区单击“驱动器选项(髙级)“先选中“未分配空间〃然后单击新建选择磁盘分区大小(如无特殊规左,可将磁盘分成C、D、E三个分区,C盘V系统盘>1006, 剩下的容量D盘与E盘均分)单击应用单击确左再选中未分配空间,单击新建创建D盘和E盘创建好的磁盘分区如下图单击下一步开始安装操作系统若干时间后出现如下界而设宜服务器开码确定-T进入系统激活操作系统(系统激活需要连接Inter网)过一会会弹岀一个窗口点击激活windows输入操作系统安装秘钥单击下一步系统激活成功R730服务器操作系统安装完成• • •。
Dell EMC PowerEdge R350安装和服务手册说明书

Dell EMC PowerEdge R350安装和服务手册10 2021注意、小心和警告:“注意”表示帮助您更好地使用该产品的重要信息。
:“小心”表示可能会损坏硬件或导致数据丢失,并告诉您如何避免此类问题。
:“警告”表示可能会导致财产损失、人身伤害甚至死亡。
© 2021 Dell Inc. 或其子公司。
保留所有权利。
Dell、EMC 和其他商标是 Dell Inc. 或其附属机构的商标。
其他商标可能是其各自所有者的商标。
章 1: 关于本说明文件 (7)章 2: PowerEdge R350 系统概览 (8)系统的前视图 (8)系统的后视图 (9)系统内部 (10)找到快速服务代码和服务编号 (11)系统信息标签 (11)导轨调整和机架兼容性矩阵 (13)章 3: 初始系统设置程序和配置 (14)设置系统 (14)iDRAC 配置 (14)设置 iDRAC IP 地址的选项 (14)用于登录 iDRAC 的选项 (15)用于安装操作系统的资源 (15)下载固件的选项 (16)下载并安装操作系统驱动程序的选项 (16)下载驱动程序和固件 (17)章 4: POST 和系统管理配置验证的最低要求 (18)开机自检的最低配置 (18)配置验证 (18)错误消息 (19)章 5: 安装和卸下系统组件 (20)安全说明 (20)拆装系统内部组件之前 (21)拆装系统内部组件之后 (21)建议工具 (21)可选的前挡板 (21)卸下前挡板 (22)安装前挡板 (22)系统护盖 (23)卸下系统护盖 (23)安装系统护盖 (24)导流罩 (26)卸下导流罩 (26)安装导流罩 (26)冷却风扇 (27)卸下冷却风扇 (27)安装冷却风扇 (28)防盗开关 (29)卸下防盗开关模块 (29)目录3驱动器背板 (31)卸下背板 (32)安装驱动器背板 (33)线缆布线 (34)驱动器 (38)卸下驱动器托架 (38)安装驱动器托架 (39)从驱动器托架中卸下驱动器 (40)将驱动器安装到驱动器托架中 (41)卸下驱动器挡片 (42)安装驱动器挡片 (43)可选的光驱 (43)卸下光驱 (43)安装光驱 (44)系统内存 (45)系统内存指南 (45)一般内存模块安装原则 (46)卸下内存模块 (47)安装内存模块 (48)处理器和散热器 (49)卸下散热器 (49)安装散热器 (50)卸下处理器 (51)安装处理器 (52)扩展卡和扩展卡转接卡 (53)扩展卡安装原则 (53)卸下扩展卡转接卡 (54)安装扩展卡转接卡 (55)从扩展卡转接卡中卸下扩展卡 (56)将扩展卡安装到扩展卡转接卡中 (58)可选的 BOSS S2 卡 (59)卸下 BOSS S2 模块 (59)安装 BOSS S2 模块 (61)系统电池 (63)更换系统电池 (63)正面安装的前置 PERC 模块 (64)卸下正面安装的前置 PERC 模块 (64)安装正面安装的前置 PERC 模块 (65)卸下 PERC 卡 (66)安装 PERC 卡 (67)可选的内部 USB 卡 (68)卸下可选的内部 USB 卡 (68)安装内置 USB 卡 (69)电源装置 (70)热备盘功能 (70)卸下电源装置 (70)安装电源装置 (71)卸下电源装置挡片 (72)4目录卸下电源插入器板 (73)安装电源插入器板 (74)可选的 IDSDM 模块 (75)卸下 IDSDM 模块 (75)安装 IDSDM 模块 (76)MicroSD 卡 (77)卸下 MicroSD 卡 (77)安装 MicroSD 卡 (78)系统板 (79)卸下系统板 (79)安装系统板 (80)可信平台模块 (82)升级可信平台模块 (82)为用户初始化 TPM (83)为用户初始化 TPM 1.2 (83)为用户初始化 TPM 2.0 (84)控制面板 (84)卸下左控制面板 (84)安装左控制面板 (85)卸下右控制面板 (86)安装右控制面板 (87)章 6: 跳线和连接器 (89)系统板连接器 (89)系统板跳线设置 (90)禁用已忘记的密码 (90)章 7: 系统诊断程序和指示灯代码 (92)系统运行状况和系统 ID 指示灯代码 (92)iDRAC Direct LED 指示灯代码 (92)LCD 面板 (93)查看主屏幕 (93)设置菜单 (94)视图菜单 (94)NIC 指示灯代码 (94)电源装置指示灯代码 (95)驱动器指示灯代码 (96)使用系统诊断程序 (97)戴尔嵌入式系统诊断程序 (97)章 8: 获得帮助 (99)回收或停售服务信息 (99)联系 Dell Technologies (99)通过使用 QRL 访问系统信息 (99)PowerEdge R350 系统的快速资源定位符 (100)通过 SupportAssist 接收自动支持 (100)目录5章 9: 说明文件资源 (101)6目录关于本说明文件本说明文件提供关于系统的概览、有关安装和装回组件的信息、诊断工具,以及安装特定组件时要遵循的原则。
Dell服务器远程安装操作系统
Dell 服务器远程安装操作系统
登录Dell服务器管理页面
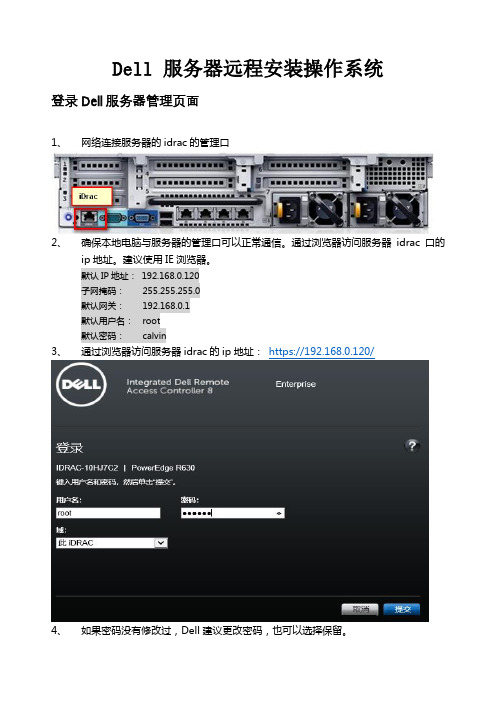
1、网络连接服务器的idrac的管理口
2、确保本地电脑与服务器的管理口可以正常通信。
通过浏览器访问服务器idrac口的ip
地址。
建议使用IE浏览器。
默认IP地址:192.168.0.120
子网掩码:255.255.255.0
默认网关:192.168.0.1
默认用户名:root
默认密码:calvin
3、通过浏览器访问服务器idrac的ip地址:https://192.168.0.120/
4、如果密码没有修改过,Dell建议更改密码,也可以选择保留。
5、已经等了服务器管理页面。
此处可以看到服务器的详细信息。
6、选择“启动”打开服务器窗口控制台。
选择“允许”访问。
7、信任此证书。
8、打开后可以看到服务器当前页面状态。
9、选择“虚拟介质”—“连接虚拟介质”
10、再次选择“虚拟介质”——“映射CD/DVD”选择要连接的ISO镜像。
选择“映
射设备”
11、点击“下次引导”——“选择虚拟CD/DVD/ISO”重启服务器。
12、服务器重启后,即可在“虚拟CD/DVD”启动,进入系统安装界面。
安装系统即可。
直接进入下一步安装系统即可。