华硕N53sv笔记本说明书
华硕(ASUS)笔记本电脑产品说明书.pdf_1719189475.492568

++)
/DUJH/&'5HDGV $LU9HORFLW\DQG 7HPSHUDWXUH 6LPXOWDQHRXVO\
5HFRUGV0LQDQG0D[ 5HDGLQJZLWK5HFDOO
'DWD+ROG)XQFWLRQ
7KH++)LVDQHFRQRPLFDO VROXWLRQIRUDQ\DLUIORZDSSOLFDWLRQ VXFKDVDLUFRQGLWLRQLQJDQGKHDWLQJ V\VWHPVZLQGVSHHGVEDODQFLQJ DQGHQYLURQPHQWDOWHVWLQJ7KH SRUWDEOH++)SURYLGHVIDVW
0RGHO1R ++)
3ULFH
'HVFULSWLRQ 0HWDOYDQHDQ6RIWZDUHDQGFDEOH
++)53
5HSODFHPHQWSUREHIRU++)
&RPHVFRPSOHWHZLWKRSHUDWRUҋVPDQXDOKDUGFDUU\LQJFDVHDQG9EDWWHU\ 2UGHULQJ([DPSOH++)PHWDOYDQHDQHPRPHWHU
UDSLGDQGSUHFLVHPHDVXUHPHQWV 7KHPLFURSURFHVVRUFLUFXLWDVVXUHV WKHPD[LPXPSRVVLEOHDFFXUDF\ DQGSURYLGHVVSHFLDOIXQFWLRQV DQGIHDWXUHV
0HDVXUHPHQW PV NPK IWPLQ
$FFXUDF\ GLJLW GLJLW IWPLQ GLJLW GLJLW
华硕N53笔记本详细参数

华硕N53XI241SN-SL(4G/640G)参数规格查看:更多信息或更多图片基本参数上市时间2011年03月产品类型家用产品定位日常办公本处理器处理器系列英特尔酷睿i5 2代系列(Sandy Bridge)处理器型号Intel 酷睿i5 2410M处理器主频 2.3GHz最高睿频2900MHz总线1333MHz三级缓存3MB核心类型Sandy Bridge核心数/线程双核心/四线程制程工艺32nm指令集AVX,64bit功耗35W存储设备内存容量4GB内存类型DDR3 1333MHz最大支持内8GB存硬盘容量640GB硬盘描述SATA光驱类型DVD刻录机设计类型光驱内置光驱描述支持DVD SuperMulti双层刻录显示屏屏幕尺寸15英寸屏幕比例16:9屏幕分辨率1366×768背光技术LED背光显卡显卡类型中高端独立显卡显卡芯片NVIDIA GeForce GT 550M显存容量2GB显存类型GDDR3显存位宽128bit流处理器个96数音频音频系统内置立体声音效芯片扬声器立体声扬声器麦克风内置麦克风摄像头/网络通信摄像头集成摄像头无线网卡支持802.11b/g/n无线协议网卡描述1000Mbps以太网卡接口数据接口2×USB2.0+1×USB3.0,e-SATA接口视频接口VGA,HDMI音频接口耳机输出接口,麦克风输入接口其它接口RJ45(网络接口),电源接口读卡器5合1读卡器(SD,MMC,MS,MS-Pro,MS-Duo)输入设备指取设备触摸板电源描述电池类型6芯锂电池续航时间具体时间视使用环境而定电源适配器100V-240V 90W 自适应交流电源适配器外观笔记本重量 2.71Kg外形尺寸391×266×30.5-40.5mm外壳材质复合材质外壳描述银灰色其他附带软件随机软件笔记本附件包装清单笔记本主机 x1 电池 x1电源适配器 x1 说明书 x1保修卡 x1保修信息保修政策全球联保质保时间2年质保备注2年全球联保,1年电池保修(需产品注册)客服电话400-600-6655电话备注24小时电话服务详细内容华硕笔记本电脑自用户购买之日起2年内,于正常操作使用状况下主机发生硬件故障可享受免费售后维修服务。
华硕电脑手册说明书

Important NoticesImproper handling of a vehicle , especially while raised and supported by jack stands, ramps or other mechanical means, can cause serious bodily injury or even death. It is strongly rec-ommended that a trained, experienced mechanic, with proper equipment, do the installation.The seller nor the manufacturer assumes no liability, expressed or implied, for the improper installation or use of this product or its components. Before using, the user shall determine the suitability of the products for it’s intended use. The user assume all responsibility and risk in connection there within.It is the buyer’s responsibility to have all suspension, drivetrain, steering, and other compo-nents checked for proper tightness and torque after the fi rst 100 miles and every 3,000 miles by a qualifi ed professional mechanic.Extreme care should be taken while operating your vehicle to prevent vehicle rollover or loss of control. Both can result in serious injury or death. Do not add or modify parts to this kit or use outside it’s intended purpose. Follow all safety regulations and warnings per state and federal laws.Note: Final fi tment of the wheel to caliper is the responsibility of the customer.Note: It is important to read and understand this ENTIRE installation manual, before starting the installation.Kit Contents1 Pair of calipers w/pads2 Rotors2 Retaining plate2 Preload spacers (C-clip applications)4 Caliper bolts8 T-bolts8 Nuts2 Disc brake mounting plate assembly (1 Left and 1 Right)1 stainless steel brake line kitTools and Equipment That May Be RequiredDifferent models and years of vehicle use different-sized fasteners, and every effort has been taken to correctly identify the proper sized tool for each step of the installation. Occasionally, however, manufacturers use alternate fasteners, so it’s advisable to check that each tool cor-rectly fi ts the fastener before loosening or tightening it. The following tools and equipment may be needed:9/16” socket wrench12mm socket14mm wrenchTorque wrenches capable of 10-148 lb-ft settingsSeveral ragsSmall funnel or suitable means of fi lling master cylinder reservoirBrake bleed bottle1 pair of jack stands or other means of supporting vehicleHydraulic pressPair of PliersStep 1-Remove WheelsWARNING - Brake fl uid will damage most painted surfaces. Immediately clean spilled brake fl uid from any painted surfaces. Be sure the cap is securely installed on the master cylinder. If the cap is loose or removed, it is likely more fl uid willdrip.Note: All Photographs Show Left Side Installation, unless noted otherwise.Break loose the lug nuts on both rear wheels before jacking up the car.Refer to the Owners Manual for the correct location when jacking up the vehicle. Jack up the vehicle and secure on a pair of jack stands. Never leave any vehicle supported with only a jack - always use jack-stands.After securing the vehicle at a convenient height, remove the rear wheels.Note: If you remove the bottom lug nut last while holding the bottom of the tire, it will lessen the chances of the wheel tilting on it’s own and make removal easier.Step 2 -Removal of Drum Brakes and AxleRemove brake drums from thebrake assembly.Remove the hard line from thewheel cylinder attached to thebacking plate.For c-clip applications- Removethe differential cover, unbolt thecross shaft and remove it from thevehicle. See factory service manualfor additional information.Using a 9/16” socket, remove thefour nuts that hold each axle shaftinto the axle and remove the axleshafts from the axle. Some leakagemay occur.Remove the backing plate from theaxle housing.Wipe clean grease and contami-nants from all surfaces.For semi-fl oat applications- Pressthe old bearings and seals fromthe axle shafts. C-clip applicationsdo not need the removal of the oldbearings and seals unless parts areneeded to be replaced.Install the disc brake mounting plate onto the axle flange with new supplied retaining bolts. The mounting plate is directional, insurethat the plate is installed on the correct side.Step 3 -Install Disc Mounting PlateIn order to install this kit, remove the factory bolts from the axle fl ange. If installing on a C-clip application do not remove the fac-tory bolts.Install the supplied bolts (longer than factory bolts) in the axle fl ange.Adjust the internal parking brake shoes with the adjuster until there is just enough room to slide the ro-tor over the shoes. Refer to the fac-tory service manual for additional information.STEP 4 -Install Axle ShaftsApply grease to the outside of the bearing seal assembly and slide the preload spacer onto the seal. The grease will help hold the spacer in place.Slide the axle shaft into the axle housing by hand, lining it up with the differential. The axle shaft should not be forced, damage mayoccur.On C-clip retained axles, slide the axles all the way into the axle hous-ing using care to avoid damage to the splines or the bearing surface. Reinstall the C-clip and the cross shaft. Ensure that all old silicone is cleaned from the differential hous-ing and the differential cover, and reinstall the differential cover using a new gasket or silicone. Fill thehousing with new oil.Using a hydraulic press, press the new bearing and retaining collar onto the axle shaft. Refer to the factory service manual for more details.Grease the shaft where the axle shaft seal will be installed, theninstall the seal.Install the retaining plate and new preload spacer on axle shaft. Notice the direction the preload spacer is facing in the photo to the right. The chamfer side faces inboard.STEP 5 -Install the Rotor and CaliperInstall the rotor on the axle.Install the brake pads in the caliper.Using a 12mm socket wrench in-stall the caliper onto the mounting plate. Torque the bolts to 15-18 ft-lbs.Line up the access holes located on the axle shafts with the retainer bolts. Using a 9/16” socket wrench tighten the four nuts to 25 - 30 ft-lbs.STEP 4 -(Continued)Install Axle ShaftsSTEP 6 -Install Stainless Steel Brake LinesInstall the caliper end of the stainless steel brake line by fi rst placing a copper crush washer on either side of the banjo fi tting.Insert the banjo bolt into the caliper using a 14mm wrench or socket to tighten it. Insert the stainless steel brake line fi tting through the chassis bracket, and screw it onto the hard line fi tting by hand a few turns, to ensure that it is properly engaged. Tighten the hard line fi tting.Check to ensure that the brake line is not binding in any way, nor interfering with any suspension component.Note that you will need to purchase shorter metal brake lines from an automotive pats supplier.If the brake line is not properly routed, a catastrophic failure could occur. If you are unsure that the line is routed properly and safely, do not drive the car. Please call our Tech Support Dept. for assistance if you have any doubt as to the brake line routing.Install the emergency brake cable at the mounting plate and adjust, refer to the factory service manual.If realignment is necessary, loosen the banjo bolt, and realign the brake line, or loosen the inboard end of the line, and slightly re-clock the fitting.Weld the brake line mounting tab onto the axle tube. Install the brake line through the tab and install the c-clip to secure the line.STEP 7-Bleed BrakesComplete installation on both sides of the vehicle before bleeding the system. Note: The calipers and lines will need to fi ll with fl uid, quickly draining the master cylinder reservoir. Keep a close watch on the fl uid level when initially bleeding the system. Do not allow the master cylinder reservoir to run dry and draw in air. Doing so may require the brake system to be serviced by a certifi ed brake technician.Refer to owners manual for torque used on bleed screws.After initially bleeding the system, gently tap the caliper body with a non-marring mallet or hammer to dislodge any small air bubbles and re-bleed.After bleeding, apply a constant pressure to the brake pedal and check all connections, including bleed screws, and both ends of the line for leaks.Brake fl uid will damage most painted surfaces. Immediately clean spilled brake fl uid from any painted surface, including the caliper. Though caliper paint is designed to resist harsh chemicals, prolonged exposure will damage the fi nish.STEP 8-Reinstall wheelsCheck wheel to caliper clearance before installing wheels!Reinstall the wheels and torque the lug nuts to your wheel manufacturer’s specifi cations. It may be necessary to snug the bolts before lowering the vehicle and then torque the wheels when the car is on the ground. Alternatively, an assistant may depress the brake pedal while you tighten the wheel nuts to the proper torque setting.Carefully test-drive the vehicle in a safe area at low speed to insure all components are working correctly.。
华硕 笔记本电脑 说明书

請勿放置重物在筆記本電 腦上,筆記本電腦上面也 不可以堆放書本紙張等物 品,��������� 合�������� 上液晶顯示屏上蓋 時���������� 請勿過於用力���� ,避免液 晶顯示屏損壞。
請勿將筆記本電腦放在重 心不穩的物品上。
避免在灰塵飛揚或是環境 髒亂的場所使用筆記本電 腦,因灰塵容易引起系統 故障。
第一章:認識您的電腦
1-1 電腦各部分導覽(僅供參考)................................................................................... 12
前視圖.......................................................................................................................................................... 12 後視圖.......................................................................................................................................................... 13 上視圖.......................................................................................................................................................... 14 左視圖.......................................................................................................................................................... 17 右視圖.......................................................................................................................................................... 18 底視圖.......................................................................................................................................................... 19
华硕笔记本电脑产品说明书
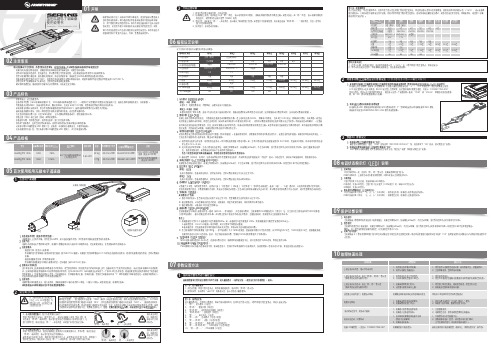
1、启动阶段1)红灯每2秒闪一次,且伴为“哔-,哔-”警示音:电调未检测到油门信号。
2)绿灯闪烁N次:上电时自动进行锂电节数检测,闪烁N次表示当前锂电为N节。
2、行驶阶段1)油门摇杆处于中点区域,红色和绿色LED均熄灭。
2)前进时,红色LED恒亮;当油门处于正向最大(100%油门)时,绿色LED也会点亮。
3)倒退时,红色LED恒亮。
3、相关保护功能触发时,LED状态含义:1)红灯持续闪烁(单闪,“☆,☆,☆”方式闪烁):电池电压太低,电调进入电池低压保护状态。
2)绿灯持续闪烁(单闪,“☆,☆,☆”方式闪烁):电调温度过高,电调进入过热保护状态。
故障现象解决方法可能原因1、电池电压没有输入到电调;1、检查电池与电调是否连接可靠,如有焊接不良,请重新焊好;上电后电机无鸣音,指示灯也未闪亮06编程设定说明08电调状态指示灯(LED)说明09保护功能说明10故障快速处理01声明Seaking Pro 120A • Seaking Pro 160A船用无刷电子调速器使用说明书· 调试请将船模架起,确保船桨不会碰到人或其他物体,以免发生安全事故。
03产品特色· 轻量化设计,适合竞赛要求。
· 出色的防水性能(160A电调采用塑封工艺,120A电调采用纳米镀膜工艺),一般情况下无需做防水处理即可直接使用(注:使用后请将电调插头吹干,以免锈蚀)。
· 内置超强开关模式BEC,持续电流达到4A,瞬间达到8A,且支持 6V和7.4V 切换,轻松驱动各种强力舵机及高压舵机。
· 采用好盈专利铜片导热技术,配合水冷模块和极低热阻的内部MOSFET,使得电调的耐流能力及可靠性大大增强。
· 使用顶级竞赛核心程序,具有一流的操控手感及丰富的调节选项,适应各种比赛环境。
· 行业首创的超速功能(即:开启Turbo进角),让马达瞬间释放更强动力,轻松超越竞争对手。
n53拆机

华硕N53SV拆机,改造,升级全攻略前后一个月,LZ对手上的华硕N53SV-XE进行了全方位的改造升级,基本上除了没有动主板,改模具,能升级改造的,都自己DIY了,现在就把这一个月以来的经验与大家分享下。
一.前言手上的机器型号为N53SV-XE1,今年三月购于美国亚马逊。
LZ身在美国,因此改装配件入手的手段与国内的朋友们或许不同,但大部分东西都是可以在淘宝上找到的。
不同型号的N53可能在硬件配置甚至是模具上有所不同,因此对于不同型号的机器的拆机改造,此教程仅作参考,如果对不同型号的机器强行依葫芦画瓢,以致产生杯具,LZ恕不负责。
此教程中大部分照片拍摄于更换液晶面板的过程中,由于之前电脑内部分配件已经完成了更换,因此在会产生误解的地方,LZ会作出说明在进行任何操作之前,请:1. 拔掉电源线,取出笔记本电池;2. 触摸接地的金属物,释放人体内的静电,以免烧坏电脑内部的电子器件。
3. 谨记在心:东西能装起来,就能拆开,有时候拆不开,可能是因为方法不对,千万不要使蛮力!二.硬盘,内存篇基本大部分朋友都会考虑升级这两样东西,所以LZ把它们放在了最前面。
方法其实很简单。
1. 将笔记本翻过来,建议在桌上垫些报纸或者书之类的,避免A面出现划痕。
2. 取下离散热口最近的两个橡胶脚垫,即可看见螺丝3. 卸下螺丝后横向将挡板抽出,即可见硬盘区与内存区。
4. 卸下固定硬盘架的三根螺丝,拉动黑条将硬盘单元抽出。
5. 卸下固定硬盘的四颗螺丝,成功取下硬盘。
(LZ的原装硬盘是希捷的500GB,7200转,是不是混合硬盘不清楚,此刻躺在光驱位的硬盘架里)三.更换巧克力键盘篇(非背光)LZ最先萌生“换意”的就是键盘,因为这个键盘实在是太让人蛋疼了!用惯了巧克力键盘,在N53上经常打错,已经到了影响工作效率的地步!怎么办?换掉!LZ的键盘也是在ebay上搜到的。
其实换键盘不难,但关键在于要买对!如果发现模具不一样,再好的键盘也没法用。
asus使用手册
華碩筆記本電腦硬件使用手冊
第四章:應用升級指南
4-1 4-2 4-3 4-4 4-4 4-5 外接顯示器. ........................................................................... 54 外接鍵盤及鼠標.................................................................. 54 外接音頻設備. ...................................................................... 55 外接家庭劇院喇叭. ............................................................. 55 擴展內存................................................................................ 56 安裝硬盤................................................................................ 56
免責聲明
本使用手冊沒有任何形式的擔保、立場表達或其它暗示。若有任何因本使 用手冊或其所提到的產品的所有������������������� 信息����������������� ,所引起直接或間接的������� 數據����� 流失、利益 損失或事業終止,華碩及其所屬員工恕不為其擔負任何責任。除此之外,本 使用手冊所提到的產品規格及信息僅供參考,內容亦會隨時更新,恕不另行 通知。華碩不負責本使用手冊的任何錯誤或疏失。 本使用手冊中所談論到的產品名稱僅做識別之用,而這些名稱可能是屬於 其他公司的註冊商標或是版權。 當下列兩種情況發生時,本產品將不再受到華碩公司之保修及服務: (1)該產品曾經非華碩授權之維修、規格更改、零件替換。 (2)產品序號模糊不清或喪失。 產品規格或驅動程序改變,使用手冊都會隨之更新。更新的詳細說明請您 訪問華碩的客戶服務網 ,或是直接與華碩電腦客 戶關懷中心 400-600-6655 聯絡。
华硕产品说明书.pdf_1718591090.6745565
R
3,20 1
R
3,20 9
R
3,20 1
R
3,20 1
R
3,20 1
R
3,20 1
R
3,20 3
R
3,20 9
R
3,20 3
R
3,20 3
R
3,20 1
R
3,20 1
R
3,20 1
R
3,20 1
R
PGC 62A3 62A3 62A3 62A3 62A3 62A3 62A3 62A3 62A3 62A3 62A3 62A3 62A3 62A3 62A3 62A3 62A3 62A3 62A3 62A3 62A3 62A3 62A3 62A3 62A3 62A3 62A3 62A3 62A3 62A3 62A3 62A3
PIN PIN PIN PIN PIN PIN PIN PIN PIN PIN PIN PIN PIN PIN HEX. HEAD SCREW M4 X 12 SCREW SCREW SCREW SCREW SLOTTED SCREW M3X5X4.8 SCREW SCREW SCREW SCREW SCREW SCREW SCREW SCREW SCREW SCREW PARAF. S/ CABEÇA M5X8 SCREW
SCREW SCREW SCREW SET SCREW SCREW SCREW SET SCREW SCREW SCREW SCREW HEX. SOCK M3X8X8.8 SCREW CHC M4X6 SCREW SCREW SCREW SCREW SCREW SCREW SCREW SCREW SCREW SCREW SCREW HEX.CAP SCREW M5X10-12.9 CAP SCREW CAP SCREW SCREW SCREW SCREW SCREW SCREW SCREW
华硕新一代N53S笔记本等
华硕新一代N53S笔记本等作者:来源:《电脑爱好者》2012年第05期携GT630M来袭华硕新一代N53S笔记本NVIDIA新一代GT630M移动显卡已经面世,它的性能有没有提升?当GT630M与顶级四核处理器结合后又能碰撞出怎样的火花?华硕N53S顶盖掌托都采用了镁铝合金材质,摄像头部分设有独立开关,在关闭状态也无需担心在不知情的状态被恶意软件开启和监视,以保护你的隐私。
华硕N53S在功能上的亮点在于配备了B&O ICEPower音效级别认证的音响,内置的蓝牙V3.0模块也方便无线连接时下流行的智能手机。
顶级CPU与新一代显卡华硕N53S武装了英特尔在2011年底最新发布的秋季款i7-2670QM处理器,通过睿频加速后可达3.1GHz,较早期上市的i7-2630QM提升了200MHz。
显卡方面,华硕N53S则升级到了NVIDIA最新的GT630M,该显卡拥有96个流处理器,从参数来看与上一代GT540M完全一致,这也从侧面证明了GT630M就是GT540M的“循环再利用”的产物。
得益于更高主频的处理器,使N53S在3DMark06中可轻松突破万分大关,整体性能要比N53早期型号提升不少。
在高强度测试过程中,N53S处理器和显卡的最高温度分别为83度和67度,除了散热通风孔,在掌托和键盘区域并没有明显的热量,散热效果值得肯定。
待机时间令人满意华硕N53S使用MoblieMark 2007软件测试的持续使用时间达300分钟左右,待机时间不逊于很多尺寸类似的集显产品。
如果你购买了华硕N53S,在没有电源的环境下想获得更长的使用时间,建议先进入“NVID IA控制面板”,强制“管理3D设置”中的“全局设置”工作在“集成图形”状态,并进入Power4 Gear Hybrid屏蔽平时不常用的摄像头与光驱,再选择省电的工作模式,N53S的续航能力会令你大吃一惊。
无系统成遗憾可能是出于成本的考虑,这款N53S随机并没有预装操作系统,购买后需要用户自行安装。
华硕笔记本键盘使用说明
华硕笔记本键盘使用说明退出键换行键大小写切换键上档键(按住后打字母为大写字母)控制键(一般和其它按键共同使用,详见word快捷键使用方法)改写数据键(一般和其它按键共同使用,详见word快捷键使用方法)可以复制当前屏幕内容可以删除光标后面的字符可以删除光标前面字符回车键,换行键翻页键,可以用于部分软件尤其图片查看软件翻页FN+F1:降低屏幕亮度FN+F2:升高屏幕亮度FN+F3:等待状态FN+F4:休眠状态FN+F5:降低音量FN+F6:增加音量FN+F7:静音FN+F10:切换显示器FN+F11:等于按下NUM LOCK键FN+F12:等于按下Scroll lock键FN+Insert:等于按下打印键(PRINT SCREEN)FN+del:等于按下SysRQ键FN+向上方向键:等于按下Page Up 键FN+向下方向键:等于按下Page Down 键FN+向左方向键:等于按下Page Home键FN+向右方向键:等于按下Page End键FN+T:拉伸屏幕下面为以前的机型S8200快捷键比较简单,大家可以对比一下FN+F5:增加亮度FN+F6:减低亮度FN+F7:关闭/打开屏幕FN+F8:前换显示器FN+F9:静音FN+F10:增加音量FN+F11:减少音量FN+F12:等于按下PAUSE间FN+insert:等于按下num lock键FN+del:等于按下Scr Lock键华硕X80系列及华硕F8系列组合键Fn + F1 进入待机或休眠模式Fn + F2 开启内置无线网络功能(视选购机型而不同)Fn + F3 E-mail快捷键,开启互联网邮件程序Fn + F4 因特网快捷键,立即开启互联网浏览器Fn + F5 调暗液晶显示屏亮度Fn + F6 调亮液晶显示屏亮度Fn + F7 液晶屏背光光源开关Fn + F8 切换液晶显示屏显示,外接显示器或电视Fn + F9 触摸板锁定快捷键,可以锁定触摸板功能Fn + F10 静音开关(仅适用于WINDOWS系统下)Fn + F11 降低音量(仅适用于WINDOWS系统下)Fn + F12 提高音量(仅适用于WINDOWS系统下)Fn + Ins 开启或关闭数字键盘功能Fn + <空格键> 等同于性能设置快捷键,按下后可设置系统性能与省电之间的关系Fn + C 此组合键可切换屏幕至不同的颜色设置选项,在屏幕画面左上方将出现一些画面Fn + V 此组合键可以开启摄像头程序Fn + T 此组合键可开启Power for phone程序(附)word快捷键使用方法。
- 1、下载文档前请自行甄别文档内容的完整性,平台不提供额外的编辑、内容补充、找答案等附加服务。
- 2、"仅部分预览"的文档,不可在线预览部分如存在完整性等问题,可反馈申请退款(可完整预览的文档不适用该条件!)。
- 3、如文档侵犯您的权益,请联系客服反馈,我们会尽快为您处理(人工客服工作时间:9:00-18:30)。
第六章:附錄
6-1 藍牙鼠標設置步驟(選配)........................................... 66 6-2 簡易故障排除. ...................................................................... 68
第五章:電源系統
5-1 5-2 5-3 5-4 電源適配器. ........................................................................... 58 電池系統................................................................................ 59 性能設置................................................................................ 62 保持良好的省電習慣. ........................................................ 63
華碩筆記本電腦硬件使用手冊
安全說明
在您使用本產品之前,請先詳細閱讀以下指引的使用原則,並遵守這些規 則,可以增加產品的使用壽命,並可以避免發生危險或觸犯法律。 請勿用手觸摸或按壓電腦顯 示屏,這樣將可能造成顯示 屏損壞。 避免在灰塵飛揚或是環境髒 亂的場所使用電腦(灰塵容 易引起系統故障)。 請勿將電腦放在重心不穩的 物品上。 請勿在電腦上放置重物或 堆放書本紙張等物品,合 上液晶顯示屏上蓋時請勿 過於用力,避免液晶顯示 屏損壞。 避免將電腦放置在磁性物 質附近(譬如音箱及電視 等);並請勿將軟盤放置 在電腦前面及上方,以避 免電磁效應造成軟盤數據 丟失。 請勿將電腦放置在陽光直 接照射的地方,尤其是不 要將電腦留在陽光直射的 車子裡。 請勿將電腦放置在過冷的環 境中(10℃ 或是 50℉ 以 下),也不要將電腦放在 過熱的環境中(35℃ 或是 95℉ 以上),如此可能導 致無法正常開機運作。 避免電腦及其配件淋到水或 是暴露在溼氣當中。 請勿將本產品當作一般垃圾 丟棄。本產品零組件設計為 可回收利用。這個打叉的垃 圾桶標誌表示本產品(電器 與電子設備)不應視為一般 垃圾丟棄,請依照您所在地 區有關廢棄電子產品的處理 方式處理。 請勿將電池存放靠近火源或 是丟入燃燒的火堆中,有可 能造成爆炸的意外,請支持 回收廢棄電池。 使用合格的電池與配件。 只能使用原廠認可或推薦 的電池與配件,請勿使用 其他類別或不知是否兼容 產品或配件,否則可能會 損壞電腦。 電池如有更換不正確會有爆 炸的危險,並請依製造商說 明書處理使用過的電池。 請勿自行修理本產品,只有 合格的專業人員才可以安裝 或維修。搭乘飛機時請關 機。在飛機上使用電腦會造 成儀器的干擾,影響飛行安 全,而且也是違法的。 清潔電腦前請先關機,並 移開電源適配器及內部電 池。 液晶顯示屏表面會因靜電而 吸附灰塵,如發現有灰塵請 使用柔軟乾布擦拭,並請勿 過度用力擦拭,也請勿用手 直接拍除,以免在液晶顯示 屏表面留下指紋。 攜帶電腦所使用的包袋必須 具備防碰撞的緩衝襯墊,並 請勿放置過多物件,以避免 壓壞液晶顯示屏。 請依照電腦底部的電源功率 貼紙說明使用正確的電源適 配器,如果使用錯誤功率的 電源適配器有可能造成內部 零件的損壞。 請勿將內含汞的電池當作一 般垃圾丟棄。這個打叉的垃 圾桶標誌表示電池不應視為 一般垃圾丟棄。
第二章:開始使用
2-1 2-2 2-3 2-4 安裝電池................................................................................ 28 連接電源適配器.................................................................. 30 開啟電源................................................................................ 31 系統恢复光盤(僅限預裝操作系統為微軟系列的機 型)........................................................................................ 33 2-5 LED 指示燈. .......................................................................... 36
華碩筆記本電腦硬件使用手冊来自第四章:應用升級指南
4-1 4-2 4-3 4-4 4-4 4-5 外接顯示器. ........................................................................... 54 外接鍵盤及鼠標.................................................................. 54 外接音頻設備. ...................................................................... 55 外接家庭劇院喇叭. ............................................................. 55 擴展內存................................................................................ 56 安裝硬盤................................................................................ 56
華碩筆記本電腦硬件使用手冊
目錄
安全說明. ...........................................................................................5 使用注意事項. ..................................................................................6
華碩筆記本電腦硬件使用手冊
使用注意事項
• 本產品支持的軟件功能視搭配的操作系統而定,未預先安裝於本機上的 操作系統可能不提供全部的功能支持。 • 假如您的操作系統死機完全不運作,欲將電腦系統關閉,請按住電源開 關超過四秒以上,就可以強制關機。 ‧ 假如您的電源線為具備接地線之三孔電源插頭,請務必將電源線連接到 三孔電源插座。 ‧ 請保留產品外包裝盒,以備將來運送電腦時用以保護產品不致損壞。 ‧ 本產品整機保修期為兩年,電池等損耗性零件,在進行產品註冊後,提 供一年期間之保修。 ‧ 當電腦正常運作或充電時,會將系統正常的發熱散逸到機器表面,電源適 配器在正常使用時也可能發出高熱,請勿將筆記本電腦及電源適配器長時 間放置在膝上或是身體任一部位,以避免高溫可能造成的身體不適。 ‧ 使用筆記本電腦時,務必保持散熱孔暢通,以利散熱。請避免在過於柔 軟不平的表面(如床上)或墊有軟質桌墊的桌面上使用,以防止散熱孔 堵塞。 ‧ 請注意攜帶筆記本電腦所使用的背包必須具備防碰撞的緩衝襯墊,放置 筆記本電腦時請勿同時放置過多物件,避免擠壓損壞筆記本電腦的液晶 顯示屏。 ‧ 連接電源適配器使用時,請遵照各机型的輸入電壓電流標示,使用相符 的電源適配器。並請勿使用非本產品配備的任何電源適配器,由於電路 設計不同,將有可能造成內部零件損壞。 ‧ 請勿邊吃東西邊使用電腦,以免污染機件造成故障。 ‧ 請勿將任何物品放入筆記本電腦內部,以避免引起電路短路,或是零件 損毀。 ‧ 在安裝或是移除不支持熱插拔功能的外圍設備時請先關閉電源。 ‧ 清潔筆記本電腦前請先關機,並移開電源適配器及內部電池。 ‧ 保持機器在乾燥的環境下使用,雨水、溼氣、液體等含有礦物質將會腐 蝕電子線路。 ‧ 不可丟擲筆記本電腦及其相關組件,應將筆記本電腦放在穩定的桌面, 並且放在小孩拿不到的地方。 ‧ 請勿試圖拆開機器內部,非本公司授權之維修工程師自行拆開機器可能 會造成機器故障,並將喪失保修權益。 ‧ 暫時不用電腦時,請同時按下 <Fn> + <F7> 快速鍵將液晶顯示屏背光電 源關閉,或是蓋合上液晶屏,以節省電源,同時能延長液晶屏壽命,並 可避免沾染灰塵。 ‧ 建議使用環境溫度����� 介於��� 攝氏 5~35 ����� 攝氏度� ���� 。 • 為降低火災風險,請使用 AWG 26 號或更粗的電話線。 ‧ 請 避 免 在 雷 電 天 氣 下 及 在 洩 漏 的 可 燃 氣 體 附 近 使 用 有 線 網 絡 連 接 (LAN),否則可能會遭到閃電的遠距電擊。
免責聲明
本使用手冊沒有任何形式的擔保、立場表達或其它暗示。若有任何因本使 用手冊或其所提到的產品的所有������������������� 信息����������������� ,所引起直接或間接的������� 數據����� 流失、利益 損失或事業終止,華碩及其所屬員工恕不為其擔負任何責任。除此之外,本 使用手冊所提到的產品規格及信息僅供參考,內容亦會隨時更新,恕不另行 通知。華碩不負責本使用手冊的任何錯誤或疏失。 本使用手冊中所談論到的產品名稱僅做識別之用,而這些名稱可能是屬於 其他公司的註冊商標或是版權。 當下列兩種情況發生時,本產品將不再受到華碩公司之保修及服務: (1)該產品曾經非華碩授權之維修、規格更改、零件替換。 (2)產品序號模糊不清或喪失。 產品規格或驅動程序改變,使用手冊都會隨之更新。更新的詳細說明請您 訪問華碩的客戶服務網 ,或是直接與華碩電腦客 戶關懷中心 400-600-6655 聯絡。
第三章:操作方法
3-1 3-2 3-3 3-4 3-5 3-6 3-7 3-8 電腦基礎操作. ...................................................................... 40 液晶顯示屏及亮度調整.................................................... 40 觸摸板的使用(視出貨機型而定)............................. 41 鍵盤的使用(視出貨機型而定). ................................. 43 讀卡器的使用. ...................................................................... 48 局域網. .................................................................................... 49 無線網絡(選配). ............................................................. 50 藍牙功能(選配). ............................................................. 52