海尔吸尘器ZW1200-222说明书
海尔卧式吸尘器HZW1212plus HZW1212F PLUS HZW1212A PLUS 说明书
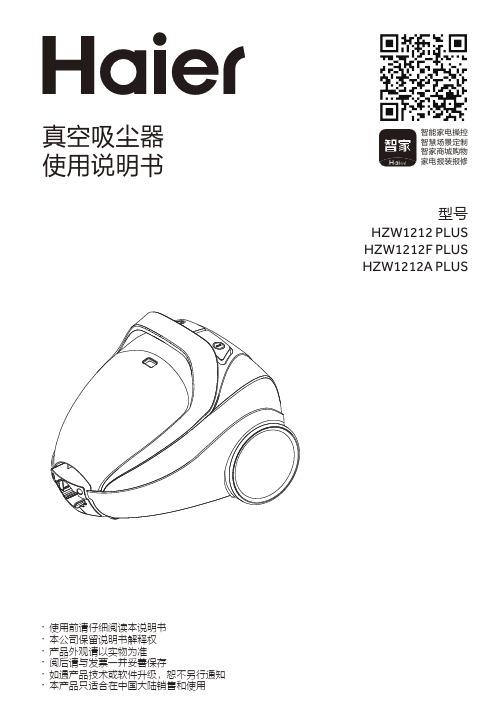
真空吸尘器使用说明书·使用前请仔细阅读本说明书·本公司保留说明书解释权·产品外观请以实物为准·阅后请与发票一并妥善保存·如遇产品技术或软件升级,恕不另行通知·本产品只适合在中国大陆销售和使用智能家电操控智慧场景定制智家商城购物家电报装报修HZW1212 PLUS HZW1212F PLUS HZW1212A PLUS型号目录123679101112产品特点产品部件使用方法清洁保养注意事项常见问题限用物质申明技术规格保修说明产品特点变压分离集尘系统及多重过滤网,尘气分离更彻底!高效电机,吸力强劲,日常清扫更快更随心!高效两用地刷及多附件配置,360°清扫更轻松!产品部件清洁保养220V~注:本项目所有内容均与安全有关,请用户务必遵守本项目中的注意事项只是为了正确地使用本产品。
注意事项中解释了危险、危害的程度大小及可能发生的事故。
1.请勿使用未经厂商许可的其他配件,若因此造成机器故障,保修将自动中止。
2.请在拆除包装后检查产品是否有损伤,核对配件是否齐全。
3.如果电源线发生损坏,请交由制造商或其指定的专业人员进行维修。
4.儿童及无行为能力的人请在监护人监督下使用本产品。
5.倘若发生故障,应立即拔掉电源插头,切勿将有缺陷的产品置于工作状态。
6.本产品只能够在海尔授权的维修中心维修,在非授权维修中心维修时,易引 发其它不安全因素。
凡是带有该标志的内容,是必须禁止的行为,否则可能会造成产品的损坏或危及使用者的人身安全。
凡是带有该标志的内容,必须严格按照要求操作,否则可能会造成产品的损坏或危及使用者的人身安全。
凡是带有该标志的内容,是使用者必须引起重视的部分,否则会因操作不当引起产品损伤或造成其他损失。
禁止标志警示标志注意标志请不要让吸尘器太靠近热源及其它高温物体,以免塑料件变形,影响使用。
注意检查插头、电源线必须完好无损,以免产生触电危险。
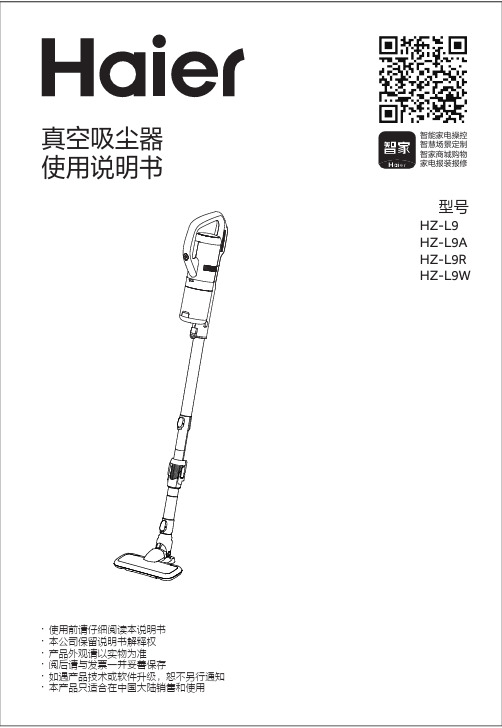
海尔 HZ-L9W 有线手持吸尘器 使用说明书
220V~ 50Hz
尘杯容量
0.5L
电气原理图
装箱清单
主机
1台
插接管
1个
弯接管
1个
说明书
1本
地刷
1个
二合一扁刷
1个
7
故障排除
在委托维修部门之前,请先检查以下各点:
序号
问题现象
1 无法开机
可能原因
插头没有插到位 插座没有电
处理方法
重新插一次插头,并 确保插座是有电的
机器开关没有打开 打开机器启动开关
服务; (5)现场清理服务:服务完成后将服务现场清理干净。 为体现真诚、贴心,我们友情提醒: 产品的安装服务,因用户的安装环境、个性需求不同,安装过程中如需辅加 材料或有特殊服务项目需要支付材料等费用,您可通过“海尔智家”APP “家电服务”-“收费标准”进行查看,并给予监督。如未按标准收费或服务规 范执行不到位,可拨打服务监督电话400 699 9999,或通过“海尔智家 ”APP -“家电服务”、“在线客服”进行监督、评价。 如果您的产品有服务需求,欢迎体验海尔智家自助服务专区( 预约服务、 一键安装、一键维修):手机搜索安装“海尔智家”APP,您可通过“家电服 务”版块选择安装、维修等服务。 如您需要选购更多产品,可在“海尔智家”APP -“商城”进行选购(更 便捷、更快速、更省钱)。 期待您的参与!
①.本产品是经过严格的质量管理及检验过程的产品。 ②.请将说明书妥善保管,作为您享受保修服务的凭证。 ③.如果您需要详细信息或有任何问题,请浏览我们的网站,也可以
与海尔服务中心,或与当地的海尔经销商联系。 ④.如果使用过程中机器出现故障无法排除时,请按以下方式联系维修
包修期内:请与我公司售后服务中心或特约维修点联系维修,我公司 服务人员将上门提供服务。 超过包修期:请与我公司售后服务中心或特约维修点联系维修, 照规定收费。 请勿自行拆机维修,应由专业人士或维修中心维修,否则易发生 危险。
新型洗尘吸尘机说明书
Model Language English Page Material Size(W*H)Designer Designer ConfirmColor(cover/body)Part No.Description Date No.Date Chage RecordChange contentECO No.123456789Weight 100g 2010.01.11VC49*SAF 23MFL625588112/2190×260(mm)QIAOLIANG Owner’s ManualImportant safety instructions ................................................................................. 4 ~ 5How to use ................................................................................................................6 ~ 20Assembling vacuum cleaner ................................................................................................................. 6 ~ 810 ~ 11..................................................................................................................... Operating vacuum cleaner Using carpet and floor nozzle ................................................................................................................ 12 ~ 13Using accessory nozzles....................................................................................................................... 16 ~ 17Emptying dust tank (18)Cleaning dust tank (19)Cleaning air filter and motor safety filter (20)Cleaning exhaust filter (21)............................................. 22 (22)What to do if your vacuum cleaner does not work?What to do when suction performance decreases?Using All Floor nozzle and mini turbine nozzle ...................................................................................... 14User’s guide for sani punch ................................................................................................................... 15Specifications .. (3)Dimension: 402(mm) x 259(mm) x 275(mm)=L x W x HSpecificationsTable of contents2136Carpet and Floor nozzle (depending on model)Push telescopic pipe or dual pipe into the nozzle outlet.• Push the spring latch to release.• Pull out the pipe to the desired length.• Release spring latch to lock the pipe in position.Dual pipe(depending on model)Fit together the two pipes by twisting slightly when choose dual pipe.Hose HandleDual pipeSpring latchTelescopic pipe(depending on model)1Telescopic pipe(depending on model)23ON/OFF type with dual pipe or common telescopic pipe (depending on the model)(depending on model)(depending on model)Carpet and floor nozzle (depending on model)Push the nozzle into the telescopic pipe.1Telescopic pipe(depending on model)(depending on model)(depending on model)2Hose slide Type (depending on the model)Hose HandleTelescopic pipe• Push telescopic pipe firmly into hose handle.• Grasp the spring latch to expand.• Pull out the pipe to desired length.8(depending on model)21Spring latch3Attachment Point9Connecting the hose to the vacuum cleaner3Push the fitting pipe on the flexible hose into the attachment point on the vacuum cleaner.To remove the flexible hose from the vacuum cleaner, press the button situated on the fitting pipe, then pull the fitting pipe out of the vacuum cleaner.ButtonHow to use Operating vacuum cleaner112How to use Using carpet and floor nozzleCarpet and floor nozzle (depending on model)• The 2 position nozzleThis is equipped with a pedal which allows you to alter its position according to the type of floor to be cleaned.• Carpet or rug positionPress the pedal to lift the brush up.• Hard floor position (tiles, parquets floor) Press the pedal to lower brush.• Efficient cleaning of hard floors (wood, linoleum, etc)1Hard Floor Nozzle(depending on model)2214• The 2 position nozzleThis is equipped with a pedal which allows you to alter its position according to the type of floor to be cleaned.• Carpet or rug positionPress the pedal (), then brush will rotate.• Hard floor positionPress the pedal (), then brush will stop rotating.• Mini turbine is used for stairs and other hard to reach places.• To clean the mini turbine nozzle, remove the nozzle cover : Remove 2 screws on the bottom and take mini turbine nozzle cover off as shown.• Frequently clean and remove hair, string, and lint build-up in the brush area.Failure to do so could damage to mini turbine nozzle.Cleaning All Floor nozzle• Open the cover by pulling the hook.• Clean the hole and brush of the nozzle.CarpetPedalFloorHow to use Using All Floor nozzle and mini turbine nozzlePress65All Floor nozzle(depending on model)Mini turbine nozzle (depending on model)256• Bed, bedding, heavy blanket• Light blanket & sheetTo increase cleaning efficiencyfor light blankets, lay on top ofa bulky blanket and then clean.Effective cleaningHow to use User’s guide for sani punchHow to use Using accessory nozzlesCrevice tool Upholstery nozzle Dusting brushHow to use Using accessory nozzlesCaution: Do not push the button whenyou carry the vacuum cleaner.If push the button, it is easy todetach the dust tank from thevacuum cleaner.How to use Emptying dust tankHow to useCleaning dust tankIf suction power decreases after cleaning dust tank, clean air filter and motor safety filter. Next pageHow to use Cleaning air filter and motor safety filterHow to use Cleaning exhaust filterWhat to do if your vacuum cleaner does not work?Check that the vacuum cleaner is plugged in correctly and that the electrical socket is working.What to do when suction performance decreases?• Turn off the vacuum cleaner and unplug it.• Check the dual pipe or telescopic pipe, flexible hose and cleaning tool for blockages or obstructions.• Check that the dust tank is not full. Empty if necessar y.• Check that the exhaust filter is not clogged. Clean the exhaust filter if necessary.• Check that the air filter is not clogged. Clean the air filter if necessary.NoteP/No.:MFL57903808Made in China P/No.: MFL 62558811。
海尔i3智能吸尘器使用说明书

智能吸尘器i3使用说明书目 录1. 安全说明…………………………2-42. 产品组成…………………………5-63. 产品安装 (7)4. 产品使用…………………………7-115. 产品保养………………………… 11-141.1 使用须知1.2 关于产品安全注意事项1.3 关于儿童安全1.4 关于电池1.5 产品的使用范围1.6 免责条款2.1 产品主机及配件2.2 零部件名称4.1 主机的使用4.2 充电方法4.2 遥控器的使用5.1 日常存储5.2 清洁充电极片5.3 清理灰尘盒5.4 清理中扫5.5 清理边刷5.6 清洁轮子5.7 清洁感应器6. 常见故障………………………… 15-167. 技术参数 (16)8. APP操作指南………………………17-231. 安全说明1.1 使用须知使用产品之前,请遵循以下基本的安全预防措施:*仔细阅读说明书中所有内容,按照说明书的指示步骤使用产品。
*妥善保管说明书,以便日后能随时查阅。
*如果您需要将产品转给第三方使用,请将说明书连同产品一起随附。
*任何与说明书指引内容不符的操作,都有可能导致严重的人身伤害或对产品本身造成损坏。
1.2 关于产品安全注意事项不要在潮湿或易燃、易爆、易腐蚀的环境中使不要用于吸取尖锐物体,如玻璃片、铁钉等,以8岁以下的孩童不允许使用本产品,身体、感官、智力有缺陷或者缺乏相关经验、知识的人员不能在无人照看或无操作说明,不了解危险性的情况下使用机器。
机器不能供孩子玩耍,孩童不能在无人照看的情况下 清洗和维修机器。
*禁止儿童玩耍产品的包装袋,否则可能导致窒息。
1.3 关于儿童安全本产品只能在室内使用。
防止吸入水、油或其它液体而损坏吸尘器。
不使用吸尘器时,请关闭电源开关。
以免导致电池损坏。
必须使用厂家的原装电池,否则可能导致损使用前先整理地面上散乱的电线,以免阻碍吸使用前请移开易损物。
将电源插头拔离插座。
产品工作时,移去充电座,会造成机器无法正1.4 关于电池1、本产品仅限使用厂家配备电池。
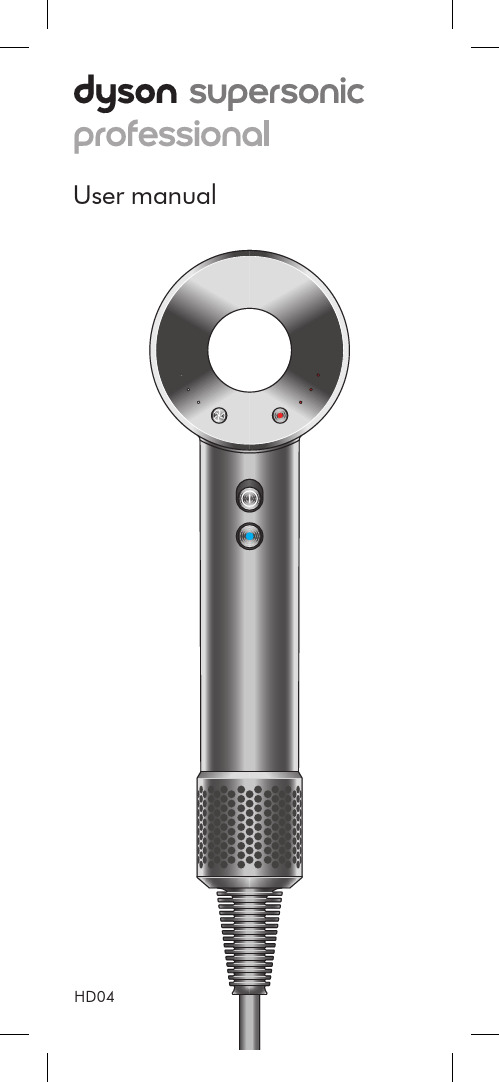
海尔吸尘器HD04说明书
If your appliance cuts out, unplugit from the mains supply socketand leave to cool.7. CAUTION: In order to avoida hazard due to inadvertentresetting of the thermal cut-out,this appliance must not besupplied through an externalswitching device, such as a timer,or connected to a circuit that isregularly switched on and off bythe utility company, or pluggedinto any socket where theelectrical supply is unstable orlikely to be turned off.8. When the appliance is usedin a bathroom, unplug it afteruse since the proximity of waterpresents a hazard even whenthe appliance is switched off.For additional protection whenthe appliance is used in abathroom, it is recommendedthat a Residual Current Device(RCD), with a residual operatingcurrent not exceeding 30mA isinstalled in the electrical circuitsupplying the bathroom. Contacta qualified electrical installerfor advice.9. Do not use the appliance for anyother purpose than drying hair.10. Do not handle any part ofthe plug or appliance withwet hands.46Thank you for buying the Dyson Supersonic ™ hair dryer Professional Even after your guarantee has ended, we’ll still be on hand to help.Exclusive owner benefits Free Dyson parts and labour Hassle-free replacement Expert advice. Seven days a week We don’t stop caring about our machines once they’re yours.Activate your guarantee now7g c ™ alThis illustration is for example purposes only.Your serial number can be found on the rating plate located on the cable label, towards the plug. Note your serial number for future reference on the back page of your User manual.Using your Dyson machinePlease read the ‘Important safety instructions’ in your Dyson User manual before proceeding.Looking after your Dyson machine• Do not carry out any maintenance or repair work other than that shown in your Dyson User manual, or advised by theDyson Helpline.• Always disconnect the plug from the mains before inspecting for problems. If the machine will not operate, first check that the mains socket has an electricity supply and that the plug is properly inserted into the socket.Australian Consumer LawIn Australia, your Dyson machine comes with guarantees that cannot be excluded under the Australian Consumer Law. You are entitled to a replacement or refund for a major failure and for compensation for any other reasonably foreseeable loss or damage. You are also entitled to have your Dyson machine repaired or replaced if it fails to be of acceptable quality and the failure does not amount to a major failure. All rights under the Dyson guarantee are in addition to your rights under the Australian Consumer Law.New Zealand Consumer LawUnder the New Zealand Consumer Guarantees Act 1993, if the product is not of acceptable quality but that defect is not substantial, Dyson may choose whether to repair or replace the product. If a repair will be difficult, Dyson may insteadprovide you with a refund. If a product’s defect is substantial or cannot be fixed, you can ask for either a refund,replacement product, or compensation for any reduction in that product’s value. You are also entitled to compensation for any other reasonably foreseeable loss caused by thatsubstantial defect.Dyson 2-year guaranteeTerms and conditions of the Dyson 2-year guarantee What is covered• The repair or replacement of your Dyson machine (at Dyson’s discretion) if it is found to be defective dueto faulty materials, workmanship or function within two years of purchase or delivery (if any part is no longer availableor out of manufacture, Dyson will replace it with a functional replacement part).• This Dyson guarantee will only be valid if the machine is used in the country in which it was sold.What is not coveredUnder your Dyson guarantee, Dyson shall not be liable forcosts of repair or replacement of a product incurred as aresult of:• Damage caused by not carrying out the recommended machine maintenance.• Accidental damage, faults caused by negligent use or care, misuse, neglect, careless operation or handling of theDyson machine which is not in accordance with your Dyson User manual.• Use of the machine for anything other than the use it is designed for.12• Use of parts not assembled or installed in accordance with the instructions of Dyson.• Use of parts and accessories other than those produced or recommended by Dyson.• Faulty installation (except where installed by Dyson).• Repairs or alterations carried out by parties other than Dyson or its authorised agents.• Normal wear and tear (e.g. fuse etc.).Other terms relating to theDyson guarantee• The Dyson guarantee becomes effective from the date of purchase.• All work will be carried out by Dyson Appliances (Aust.) Pty Limited, Dyson New Zealand Limited (NZ) or theirauthorised agents.• Any parts replaced by Dyson or its service agents will become the property of Dyson Appliances (Aust.) Pty Limited or Dyson New Zealand Limited (NZ).• You must provide proof of purchase for your Dyson machine in order to make a claim under the Dyson guarantee.• Under the Dyson guarantee, the repair, replacement and any associated delivery charges (both to and from Dyson) willbe at no cost to you.• Whether or not the Dyson guarantee applies, you may have rights and remedies available to you under Australian or New Zealand Consumer Law.How to claim under theDyson guaranteeAustraliaTo make a claim under the Dyson guarantee, please contact the Dyson Helpline on 1800 239 766.The Dyson Helpline is available Monday-Friday (8:00am-8:00pm EST), Saturday-Sunday (8:30am-4:00pm EST).You can also contact Dyson:• Byemail:************************• By mail or in person:Dyson Appliances (Aust.) Pty Limited8 -10 Mangrove LaneTaren Point NSW 2229Please visit the Dyson support page at .au/ support for more information on troubleshooting any issues you may have with your machine and maintaining yourDyson machine.New ZealandTo make a claim under the Dyson guarantee, please contact the Dyson Helpline on 0800 397 667.The Dyson Helpline is available Monday-Friday (8:30am-5:00pm NZT).You can also contact Dyson:• Byemail:*************.nz• By mail or in person:Dyson New Zealand LimitedUnit 6, 99 Carbine RoadMount WellingtonAuckland, 1060, New ZealandPlease visit the Dyson support page at /support for more information on troubleshooting any issues you may have with your machine and maintaining yourDyson machine.13Important data protection information When registering your Dyson machine:• You will need to provide us with basic contact information to register your machine and enable us to support yourDyson guarantee.• When you register, you will have the opportunity to choose whether you would like to receive communications from us.If you opt-in to communications from Dyson, we will send you details of special offers and news of our latest innovations. • We never sell your information to third parties and only use information that you share with us as definedby our privacy policies which are available on our website.Disposal information• Dyson products are made from high grade recyclable materials. Recycle where possible.• The battery should be removed from the machine before disposal.• Recycle or dispose of the battery in accordance with local ordinances or regulations.• When your Dyson machine reaches the end of its life, we are responsible for its safe disposal. You can send your old Dyson machine back to us (at our cost) and we will organise for it to be recycled. Please note that not all parts are recyclable.Recycling of parts is subject to the capabilities of third party suppliers. Available in Australia only.Simply:1. Box up your old Dyson machine.2. Take the package to your local post office and send to theaddress below:Dyson We RecycleReply Paid 83215Dyson Service Centre8–10 Mangrove LaneTaren Point, NSW 22291415J N .108253 P N .349260-06-03 15.06.20。
干湿两用手提吸尘器-2helpU
把开关向前推至“I”的位置以启动吸尘器。 把开关滑至“0”的位置以关掉吸尘器。
吸取液体 (图C及H)
把开关向前推至“I”的位置以启动吸尘器。 在硬的表面上吸液体,把橡胶擦干器 (10) 插入吸尘口 (4) (图C)。 以45 角拿着吸尘器,并把它慢慢拉向自己。 在能吸入液体的表面(如地毯),吸液体时不使用橡胶擦干器 (10) 的效果会较好。 切勿让尘埃满溢吸入槽 (12) (图H),如集尘碗内有液体,切勿把吸尘器倒置、侧放、把吸嘴指向上或 把它猛力摇动。 在吸取液体后,应立即清理吸尘器及其滤尘网,以免滋生霉菌。 请使用后把吸尘器放回充电底座充电,以便随时再使用;请确保充电器接头完全插入吸尘器内。
使用前
首次使用吸尘器前须先充电至少十六小时。
充电所费无几
使用本吸尘器是非常经济的,它充电时所需的 耗电量只是一个正常灯泡用电量的一半。 当充满电后,它平均可用的时效大约是8-10分钟; 但可能在多次充电后才可达到上述时效。
组装
装上配件(图B及C)
本吸尘器备有下列配件(图B): 橡胶擦干器 (10) 以清理液体。 罅隙吸尘接头 (11) 以清理罅隙。
小心:本吸尘器使用任何未经推荐的配件,均可能导致危险。
吸尘器的清洁(图I, K, L及M)
注意:滤尘网可多次使用,切勿把它与用完即弃的集尘袋混淆,清理滤尘网后不要把它们丢弃。 重要说明:要有最佳的吸尘效果,吸尘器的滤尘网必须清洁,集尘碗必须无尘屑。如果关机后有尘埃 由吸尘器内倒流,即是说集尘碗已满溢而需要清理。
安全守则
警告:当使用充电电器用品,应遵守下列的基本安全措施以减低火灾、电源泄漏、人身伤害及物件 损坏的危险。 使用前应通读下列所有指示。 本吸尘器的设计用途已在本说明书中列明,使用任何非本说明书推荐的配件或以本吸尘器作为设计用途 以外的用途,将会构成人身伤害的危险。 请保留本说明书以作日后参考。
海尔电器无人加洗机说明书
of the impeller.
7. Insert the pump cover and press
down .
2
a The pump cover clicks into position.
1
8. Install the filter system.
Troubleshooting
Fault
E:32-00 will light up alternately or indicator for water supply lights up.
7. To cancel the programme, press
for
approx. 4 seconds.
The programme is cancelled and ends after ap-
prox. 1 minute.
Cleaning filters
1. After each wash check the filters for
the tableware. Check that the spray arms can ro-
4. Select the programme. 5. Start the programme . 6. Remove the tableware at the end of the pro-
gramme.
... everything your dishwasher needs.
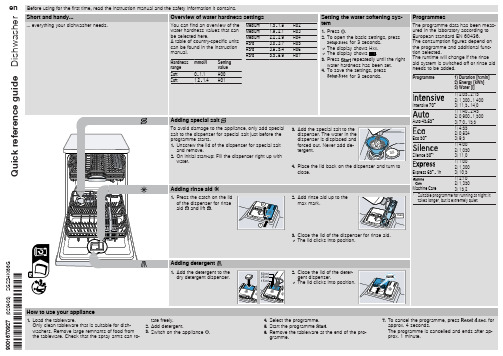
Overview of water hardness settings
You can find an overview of the water hardness values that can be selected here. A table of country-specific units can be found in the instruction manual.
海尔 HC-LB5125G 劲旋风系列 立式双电机吸尘器 使用说明书
ZL1205C ZL1205G ZL1205Z HC-LB5125G
无线设计,走哪吸哪,乐享除尘自由! 立式、手持、车载,一机三用,日常清扫更便捷! 220 0 mAh大容量电池兼具过充放电保护功能,长效续航更安全! 双独立电机搭配两档吸力调节,吸力强劲,日常清扫更随心! 旋风集尘系统,尘气分离更彻底! 电动地刷前置L E D灯 ,阴暗角落尘污一清二楚! 电动地刷+多功能附件配置,全方位清扫更轻松! 电动地刷自行走功能,有效减轻双手束缚!
工厂生产时,只对电池做试 充电检测。电池电量较低, 收到货后需要先充电后再使 用。
请保证前3次充电充满即对电 池激活保护完成。
故障 机器不工作
可能的原因
电池电量耗尽 处于关机状态 开关按钮没按到底
电量指示灯不亮 (充电时)
未插电源 连接导电片接触不良
吸力效果差
电量不足 尘杯已满 吸入口或过滤系统堵塞
附件挂架与手柄的连接
将附件挂架安装在手柄下端,然后将长扁吸与 方毛刷相连后安装在附件挂架上。
吸尘器存放
将手持机重新装回主机,将吸尘器稳定直立放 置在充电座,避免倾倒。
清理尘杯
清理过滤系统 清理电动地刷
推动
当尘杯内的灰尘达到最大指示线时: 1 .按 压手持机释放按钮,握住手持机提手将手
持 机取出。 2.按 压尘杯释放按钮,将尘杯取下。 3.将 尘杯置于垃圾桶上方,将过滤系统向外慢
量 指示灯呈绿色。 5.再 次按压手持机电源开关关闭吸尘器。 使用场合:角落、沙发、缝隙、家具、汽车等。
附件使用方法
1 .将 长扁吸,插入尘杯下端吸入口, 适 用于角落、 缝 隙等场合。
2.将 方毛刷与长扁吸相连后插入尘杯下端吸入口, 适 用于沙发、窗帘等不规则物体表面或软体物 质 等场合。