相机购买指南2
数码相机参数介绍及选购指南
数码相机参数介绍及选购指南对于数码照相机这种产品,许多人并不太熟悉,很容易就受到商家的误导,为此笔者凭着自己一点微薄的知识写下这篇文章,希望能给初购机的消费者带来一点帮助。
篇幅所限,未能结合数码单反DSLR、全幅CCD、4/3系统等多方面的知识,仅针对了目前市场上主流的数码相机,文中错漏之处难免,还忘大家多多包涵。
对于大部分普通消费者而言,数码照相机(Digital Camera)是一种全新的电子产品,其本身充满了高科技味道,加之部分商家不负责任的宣传,给大家带来不少的误导和疑惑。
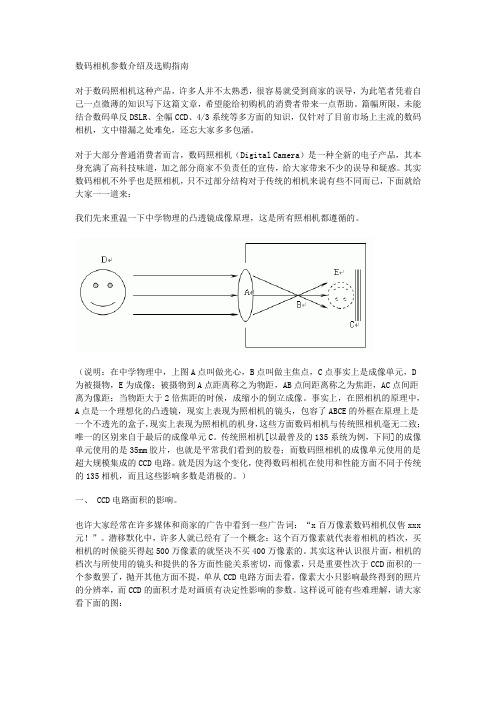
其实数码相机不外乎也是照相机,只不过部分结构对于传统的相机来说有些不同而已,下面就给大家一一道来:我们先来重温一下中学物理的凸透镜成像原理,这是所有照相机都遵循的。
(说明:在中学物理中,上图A点叫做光心,B点叫做主焦点,C点事实上是成像单元,D 为被摄物,E为成像;被摄物到A点距离称之为物距,AB点间距离称之为焦距,AC点间距离为像距;当物距大于2倍焦距的时候,成缩小的倒立成像。
事实上,在照相机的原理中,A点是一个理想化的凸透镜,现实上表现为照相机的镜头,包容了ABCE的外框在原理上是一个不透光的盒子,现实上表现为照相机的机身,这些方面数码相机与传统照相机毫无二致;唯一的区别来自于最后的成像单元C。
传统照相机[以最普及的135系统为例,下同]的成像单元使用的是35mm胶片,也就是平常我们看到的胶卷;而数码照相机的成像单元使用的是超大规模集成的CCD电路。
就是因为这个变化,使得数码相机在使用和性能方面不同于传统的135相机,而且这些影响多数是消极的。
)一、 CCD电路面积的影响。
也许大家经常在许多媒体和商家的广告中看到一些广告词:“x百万像素数码相机仅售xxx 元!”。
潜移默化中,许多人就已经有了一个概念:这个百万像素就代表着相机的档次,买相机的时候能买得起500万像素的就坚决不买400万像素的。
其实这种认识很片面,相机的档次与所使用的镜头和提供的各方面性能关系密切,而像素,只是重要性次于CCD面积的一个参数罢了,抛开其他方面不提,单从CCD电路方面去看,像素大小只影响最终得到的照片的分辨率,而CCD的面积才是对画质有决定性影响的参数。
摄像机手册camera Manual(2)说明书

目录前言 (3)关于本手册 (3)安全与使用注意事项 (3)使用本菜单 (4)简介 (5)系统要求 (5)主要特征 (5)包装明细 (6)相机视图 (7)相机按钮 (8)触摸屏按钮 (9)相机存储 (9)开始使用 (10)连接相机吊带 (10)安装电池 (10)插入 SD/ SDHC 存储卡 (11)为电池充电 (11)打开/关闭电源 (11)初始设置 (12)模式 (12)使用触摸屏 (13)触摸屏布局 (13)更改液晶屏幕显示 (18)拍摄照片、录制视频和声音 (18)拍摄照片 (18)使用防抖功能 (19)设置变焦控制 (19)使用闪光灯 (20)设置对焦模式 (20)设置拍摄模式 (21)设置自动对焦区域/脸部对焦/触碰拍摄 (22)使用录制菜单 (23)设置场景模式 (23)使用录音功能 (30)设置照片大小 (30)设置质量 (31)设置曝光补偿 (31)设置白平衡 (31)设置 ISO (32)设置测光 (32)设置包围曝光 (32)设置自动对焦区域 (33)1设置自动对焦灯 (33)设置锐利度 (33)设置饱和度 (34)设置对比度 (34)设置闪光灯 (35)设置拍摄模式 (35)设置对焦模式 (35)设置色彩模式 (35)设置数码变焦 (36)设置日期印记 (36)设置自动查看 (37)录像 (37)播放 (39)文件导航 (39)单个导航模式查看 (39)以照片流模式查看 (39)以缩略图模式查看 (40)以日历模式查看 (40)缩放图像 (41)播放视频 (42)播放录音 (42)播放语音备忘录 (42)音量控制 (43)播放菜单 (43)使用设置菜单 (53)设置声音 (53)设置节能方式 (53)设置 LCD 节能 (54)设置日期时间 (54)设置语言 (54)设置文件编号 (54)设置电视输出 (54)设置 LCD 亮度 (55)设置内存工具 (55)全部重置 (55)建立连接 (56)连接相机与电视 (56)连接相机与计算机 (56)连接相机与打印机 (57)设置打印模式菜单 (58)附录 (59)关于文件夹和文件名 (59)故障排除 (59)规格 (60)2前言关于本手册本手册旨在帮助您使用新的数码相机。
数码照相机 规格指南 标准

数码照相机规格指南标准一、传感器。
1. 传感器类型。
- CCD(电荷耦合器件):早期广泛应用于数码相机,具有低噪点、色彩还原准确等优点,但功耗较大,制造成本相对较高。
- CMOS(互补金属氧化物半导体):目前主流的传感器类型。
它的功耗低,集成度高,制造成本相对较低,并且在高感光度下表现较好,不过早期CMOS传感器在色彩还原和噪点控制方面略逊于CCD。
2. 传感器尺寸。
- 全画幅(36mm×24mm):这是最接近传统35mm胶片尺寸的传感器规格。
全画幅传感器能够提供更宽广的视角、更好的虚化效果和高画质表现,适合专业摄影,如商业摄影、风光摄影等。
- APS - C(约23.6mm×15.6mm等不同规格):比全画幅小,常见于中高端消费级数码相机和入门级单反相机。
由于传感器尺寸较小,镜头的等效焦距需要乘以一个转换系数(一般在1.5 - 1.6左右)。
它在画质和便携性之间取得了较好的平衡。
- M4/3(17.3mm×13mm):传感器尺寸更小,主要应用于微单相机。
这类相机系统通常具有小巧轻便的特点,镜头群也相对轻便,适合日常携带拍摄,如街拍、旅行摄影等。
- 1英寸传感器(13.2mm×8.8mm):常见于一些高端紧凑型数码相机,虽然传感器尺寸不大,但相比普通的小型数码相机,它能提供更好的画质和低噪点表现。
3. 像素数量。
- 像素数量并不是越高越好。
低像素的相机在高感光度下可能会有更好的噪点控制。
例如,一些专业的中画幅数码相机像素可能在5000万左右,适合需要大尺寸输出的商业摄影。
而对于普通的日常拍摄和网络分享,2000万 - 2400万像素的相机已经足够。
二、镜头。
1. 镜头卡口类型。
- 佳能EF卡口(用于单反相机):佳能单反相机广泛使用的卡口类型,具有丰富的镜头群,涵盖从超广角到超长焦等各种焦段的镜头,包括定焦镜头和变焦镜头。
- 尼康F卡口(用于单反相机):尼康单反相机的卡口,同样有众多优秀的镜头可供选择,尼康镜头以其光学素质和耐用性著称。
单反相机的选购指南及使用技巧
单反相机的选购指南及使用技巧1. 引言1.1 概述在当今的数字时代,摄影已经成为了人们生活中必不可少的一部分。
单反相机作为专业摄影领域中最常见和最受欢迎的工具之一,以其出色的画质、灵活性和创意性而备受青睐。
本文将为读者提供一份全面的选购指南及使用技巧,旨在帮助那些对单反相机感兴趣或者已经拥有单反相机但需要更多指导的人们更好地选择合适的相机并掌握其使用技巧。
1.2 文章结构本文主要分为五个主要部分:引言、单反相机的基本概念、选购单反相机的指南、使用单反相机的技巧以及结论。
首先,我们将介绍什么是单反相机以及它具有哪些优势和劣势。
接下来,我们将提供一些选购单反相机时应考虑的因素,并在品牌和型号选择方面给出建议。
然后,我们会详细讲解如何熟悉相机功能与操作界面,并分享一些调整光圈、快门速度和ISO值的搭配技巧以及拍摄技巧与构图要点。
最后,我们将总结本文的要点,并给出一些建议和对未来发展趋势的展望。
1.3 目的撰写本文的目的是帮助读者更好地了解单反相机及其使用技巧。
无论你是一个摄影新手还是已经有一定经验的摄影爱好者,本文都将为你提供有用且实用的信息。
通过学习本指南,你将能够明确自己所需并正确选择适合自己的单反相机,并掌握使用它所需的关键技巧,从而提升自己在摄影领域中的表现和创造力。
请根据以上指引,详细清晰撰写“1. 引言”部分内容。
2. 单反相机的基本概念2.1 单反相机是什么单反相机(单镜头反光相机)是一种使用镜头和反光镜进行成像的照相机。
它与其他类型的相机最大的区别在于,单反相机通过一个特殊的装置使得在观景窗中所见的画面与最终拍摄到的画面完全一致。
这是因为单反相机采用了一个称为“反光镜”的组件,通过这个组件将进入镜头的光线引导到观景窗并投射出来,同时,在按下快门时,该反光镜会翻动起来,使得光线可以直接照射到感光元件上,从而实现图像的记录。
2.2 单反相机的优势单反相机具有许多优势,使其成为专业摄影师和摄影爱好者们首选的工具之一:- 能够更好地控制曝光:由于单反相机可调节快门速度、光圈大小以及ISO值等参数,因此它能提供更高程度的曝光控制,从而实现更准确以及创造性的摄影效果。
Axiocam 506彩色 单色显微镜相机2用户指南说明书

User GuideAxiocam 506 color/monoMicroscope CameraCarl Zeiss Microscopy GmbHCarl-Zeiss-Promenade 1007745 Jena, Germany********************/microscopyCarl Zeiss Microscopy GmbHKönigsallee 9-2137081 GöttingenGermanyEffective from: October 2014© Jena 2014 by Carl Zeiss Microscopy GmbH - all rights reservedThis document or any part of it must not be translated, reproduced, or transmitted in any form or by any means, electronic or mechanical, including photocopying, recording, or by any information or retrieval system. Violations will be prosecuted.The use of general descriptive names, registered names, trademarks, etc. in this document does not imply, even in the absence of a specific statement, that such names are exempt from the relevant protective laws and regulations and therefore free for general use. Software programs will fully remain the property of ZEISS. No program, documentation, or subsequent upgrade thereof may be disclosed to any third party, unless prior written consent of ZEISS has been procured to do so, nor may be copied or otherwise duplicated, even for the customer's internal needs apart from a single back-up copy for safety purposes.ZEISS reserves the right to make modifications to this document without notice.1About this guide 51.1Introduction 5 1.2Safety notes conventions 6 1.3Text formats and conventions 62Safety 82.1Safety Notes 8 2.2Limitation of liability 9 2.3Warranty 93Technical Data 10 3.1Axiocam 506 color/mono 103.1.1Binning Mode and Frame Rate 123.1.2Live Frame Rates 133.1.3Spectral Sensitivity 14 4Shipment 15 5Connecting the camera 175.1Camera Overview 17 5.2Building in the interface card 18 5.3Mounting the camera on the microsope 18 5.4Connecting the camera to the PC 19 5.5Connecting the trigger cable 20 5.6Function indicator 226Installing Software and drivers 23 6.1Installing ZEN software and drivers 23 7Acquiring images 247.1Introduction 24 7.2Acquiring the first image in ZEN 24 7.3Fluorescence images 258Trouble-shooting 26 8.1Software 268.1.1The camera does not appear in the menu of selectable cameras 268.1.2You don't see a camera image on your screen 268.1.3The color of my image does not correspond to the impressionthrough the ocular 26 8.2Hardware 268.2.1Vibrations 26 9Maintenance 279.1Optical System 27 9.2Cleaning the infrared filter or protective glass 2710Disposal and Recycling 281 About this guide | 1.1 Introduction1About this guide1.1IntroductionWelcome Welcome to the Axiocam 506 user documentation.The camera is a professional digital camera for universal light microscopy with ahigh resolution sensor and a USB 3.0 interface. The camera can be ordered as colorcamera (Axiocam 506 color) or monochrome camera (Axiocam 506 mono).As setting up the two camera models is the same, this guide stands for bothcamera models. The differences in the specs can be found in the chapter TechnicalData [} 10]. To set up the camera correctly, follow the instructions in this guidestep by step.Content1 About this guide | 1.2 Safety notes conventions1.2Safety notes conventionsThe safety notes in this document follow a system of risk levels, that are defined asfollows:Risk of personal injuryCAUTION indicates a potentially hazardous situation which, if not avoided, mayresult in minor or moderate personal injury.NOTICE1.3Text formats and conventionsBold textsBold is used for texts within the software like names of GUI elements (e.g. buttons,sections, tools, menus), key commands (e.g. Crtl + C), buttons on a device, productnames, etc.Font type "Courier"Font type "Couriere" is used for programming code. E.g.macro code as well as for anything that you would typeliterally when programming, including keywords, datatypes, constants, method names, variables, class names,and interface names.1 About this guide | 1.3 Text formats and conventionsShortcuts and key commandsShortcuts do appear like Crtl+C , that means you must press Crtl-Key and C-Keytogether.ProceduresFollowing formats are used for procedures (instructive sequences):Prerequisites¢Stands for a condition which must be fulfilled before starting with the action.Procedure1Stands for a single step the user is asked to perform.Web-LinksWeb links do appear in blue text color. To open the linked website, simply rightclick on the link. Just in case you are not connected to the internet, make sure youhave a internet connection established before opening the web link.2 Safety | 2.1 Safety Notes2Safety2.1Safety NotesThe Axiocam 506 has been manufactured and tested by ZEISS according to theregulations specified in CE and has left the manufacturer’s premises in perfectworking order. In order to ensure that this condition is maintained and to avoid anyrisks when operating the system, the user must comply with any notes andwarnings contained in this manual. The manufacturer shall be exempt fromstatutory liability for accidents should the operator fail to observe the safetyregulations.Personal InjuryTo avoid personal injury, read and adhere the safety notes below.u To avoid the risk of fire or explosion, do not use the camera nearinflammable liquids or gases.u Setup, expansions, re-adjustments, alterations, and repairs must be carried2 Safety | 2.2 Limitation of liability2.2Limitation of liabilityNo warranty shall be assumed by ZEISS during the warranty period if the equipmentis operated without observing the safety regulations. In any such case, ZEISS shallbe exempt from statutory liability for accidents resulting from such operation.2.3WarrantyZEISS shall be exempt from any warranty obligations should the user fail to observethe safety regulations. ZEISS only guarantees the safety, reliability, and performanceof the system if the safety notes are closely observed.3 Technical Data | 3.1 Axiocam 506 color/mono3Technical Data3.1Axiocam 506 color/mono3.1.1Binning Mode and Frame Rate3.1.2Live Frame RatesAxiocam 506 color Max. Ratings at optimum settings; Hardware and color enhancement off:Axiocam 506 mono Max. Ratings at optimum settings3.1.3Spectral SensitivityAxiocam 506 colorIllustration 1: Spectral Sensitivity Axiocam 506 colorAxiocam 506 monoIllustration 2: Spectral Sensitivity Axiocam 506 mono4ShipmentIllustration 3: Camera, data cableAccessory (optional)Illustration 4: Axiocam trigger cable5 Connecting the camera | 5.1 Camera Overview5Connecting the camera5.1Camera OverviewCamera connectionsIllustration 5: Camera back5 Connecting the camera | 5.2 Building in the interface card5.2Building in the interface cardThis chapter describes how to build in the PCI express interface card (4 x USB 3.0)into your PC.Prerequisites¢You have read the documentation of the interface card and of your computerbefore you build in the interface card.Procedure1Switch off your PC and all connected peripherals.2Disconnect the PC and the peripherals from the mains and open the computercase.3Examine your PC’s power supply to see if it has Molex type connectors or SATAtype connectors. Choose the appropriate power connector cable for thefollowing steps. If your PC’s power supply has both connector types, chooseonly one cable.4Connect the appropriate power connector cable to one of the openconnectors from your computer’s power supply.5Connect the other end of the power cable to the PCIe interface card.6Insert the PCIe interface card into the appropriate slot on your computer.7Close the computer case and reconnect the peripherals.You can now mount the camera on the microscope and connect it to the PC viathe USB 3.0 interface, see Connecting the camera with PC.5.3Mounting the camera on the microsopeTo mount the camera onto your microscope’s TV port, use a C-mount adapter. Theadapter is not included in the shipment. You will find some suitbale examples foradapters in the list below:5 Connecting the camera | 5.4 Connecting the camera to the PCProcedure1Remove the dust cap from the camera’s C-mount port.2Screw the adapter in as far as it will go.3Mount the camera onto the microscope’s TV port. Ensure that no dust entersthe opening of the camera or the microscope’s TV port.5.4Connecting the camera to the PCProcedure1Lay the USB cable (2 in 1) carefully between the camera and the PC.2Connect the USB cables to the USB 3.0 interface card of the PC.3Connect the USB cables with the camera.4If you switch on the PC, the camera will be also switched on.Power is supplied via the USB 3.0 cable. The USB 2.0 cable supplies the peletiercooling. By switching off the PC, the camera will be switched of as well. If thecamera is assembled correctly, the status LED will light red. If you start the softwarethe LED will turn blue. You`ll find a detailed description of the LED status light in thechapter Function indicator [} 22]5 Connecting the camera | 5.5 Connecting the trigger cable5.5Connecting the trigger cableIn this chapter you will learn how to connect the trigger cable (optional) to thecamera and the SVB (signal distribution box).Illustration 6: Trigger cableProcedure1Plug the connector Commercial Micro D (7) in the trigger connector on theback of the camera, see Camera Overview [} 17].2Plug the connector Trigger (1) in the socket Trigger Out of the SVB (Signaldistribution box).5 Connecting the camera | 5.5 Connecting the trigger cableIllustration 7: Signal distribution box (SVB) backside3Plug the connector GPO 0 (2) in the socket Trigger In of the SVB (Signaldistribution box).4Connect the connectors GPOPWR (5) and AUXPWR (6) of the trigger cabletogether.5 Connecting the camera | 5.6 Function indicator5.6Function indicator6 Installing Software and drivers | 6.1 Installing ZEN software and drivers6Installing Software and drivers6.1Installing ZEN software and driversPrerequisites¢To acquire images with the Axiocam 506 on a PC, you must install ZENsoftware. You will find the software installation on the DVD delivered. Thecamera drivers will be installed automatically during the installation of thesoftware.¢Before starting the installation of the software and drivers the camera must beconnected to the PC, see chapter Connecting the camera to a PC.Procedure1Install the software according to the installation guide delivered with thesoftware.2During the installation you will be asked to install the camera drivers. Followthe procedure by confirming the upcoming messages.3Restart your PC after the installation.4You can check in the device manager if the driver installation was successfully.You have installed the software and the camera drivers. You can now start withacquiring images with your camera.7 Acquiring images | 7.1 Introduction7Acquiring images7.1IntroductionThe Axiocam 506 color is a professional digital camera with a high-resolution 5megapixels CCD color sensor for universal application in the field of lightmicroscopy. The color camera is suitable for all situations where stained or naturallycolored samples need to be acquired quickly and with very high camera resolution.As it has a number of selectable acquisition modes, the camera can be adaptedflexibly in terms of acquisition speed and quality to suit a variety of acquisitionconditions. The 12-bit digitization of the sensor signals ensures an optimumcombination of spatial definition and outstanding resolution of intensity levels. Thecamera’s very low level of background noise (supported by active Peltier cooling ofthe sensor), and possible exposure times ranging from 1 ms up to 60 sec, make itsuitable for an extremely wide range of applications in the field of microscopy.7.2Acquiring the first image in ZENThis topic guides you through acquiring your first image with ZEN 2012 (blueedition) software.Prerequisites¢You have connected and configured a microscope camera to your system.¢You have started the software.¢You have configured the microscope components (e.g. objective, cameraadapter) und you are using the automatic or manual scaling.¢You are on the Camera (ZEN lite only) or Locate tab.¢You see your microscope camera available in the Active Camera section. Ifnot, select the camera from the list.Procedure1Position your sample on the microscope and adjust the microscope to see afocused image through the eyepieces.2Make sure your microscope is set to divert the image to the camera(e.g. Adjust the tube slider of the microscope to 50% camera and 50%eyepieces).3Click on the Live button.The Live Mode will be activated. You will recognize the Live Mode by thegreen signal and by the hatched tab in the Document Bar. In the CenterScreen Area, you will see the camera`s live image. By default the live imageshows a cross hair, to help in navigating around the sample. In the chapterOptimize Live Image settings, you will learn how to optimize the live imagedisplay.4Click on the Set Exposure button.7 Acquiring images | 7.3 Fluorescence imagesThe exposure time will be automatically determined and set.5Click on the Snap button.You have successfully acquired your first image with ZEN blue. Save the image inthe file system via the menu File | Save as.7.3Fluorescence imagesAxiocam 503 mono The Axiocam 506 mono differs from the Axiocam 506 color in an enhancedspectral sensitivity of the CCD sensor. Because of the sensor having no color filtermask applied and no IR filter is needed unfiltered light will reach the sensors pixels.That's why the camera is best suited for fluorescence imaging.Axiocam 503 color Due to its high sensitivity and the long exposure times that are possible, theAxiocam 506 color can also be used for fluorescence images in the field ofmicroscopy. However, please bear in mind the following points: The color sensoruses a so-called Bayer color filter mask on the pixels in order to produce color.Consequently, pixels with a red filter are sensitive only to red spectra, pixels with ablue filter only to blue spectra, and pixels with a green filter only to green spectra.These filters are distributed in such a way that half of all the pixels are covered withgreen filters. Red and blue filters each cover a quarter of the pixels. In the case offluorescence, however, only very narrow-band light is emitted. This is received onlyby the color pixels that are sensitive to it. Consequently, the resolution of images ofthis type is reduced in comparison with white light.8 Trouble-shooting | 8.1 Software8Trouble-shooting8.1Software8.1.1The camera does not appear in the menu of selectablecameras¢Make sure that you have connected the camera and installed the software anddrivers in accordance to the instructions in this manual.¢Make sure that you installed the software and drivers with administrativerights. Install the driver with administrative rights again if necessary.8.1.2You don't see a camera image on your screen¢Check the light path setting of the microscope.¢Is the status LED on the camera on? If not, check the cable connectionsbetween camera and computer.¢Execute a reset of the camera.¢Execute an automatic exposure measurement.¢Check the display adjustments for the live image.¢Check the aperture diaphragm of the microscope.¢Check the position of the beam splitter between the ocular and the TV port.8.1.3The color of my image does not correspond to theimpression through the ocular¢Check white balance and, if necessary, repeat white balance.¢Check the monitor’s color temperature setting. If necessary, reduce this to thelowest value that can be set (usually 5200 K).8.2Hardware8.2.1VibrationsSudden jolt, vibration or moving objects during the acquisition can detract theimage quality. The intensity of light during exposure time can change as well.¢To avoid jolt use damping systems on your microscope.¢Repeat the shot and take care to ensure the conditions remain calm.9 Maintenance | 9.1 Optical System9Maintenance9.1Optical SystemThe internal optical components of the camera should always be protected. If nolens, or TV adapter with optics, is screwed into the camera's C-Mount thread, thecamera's sensor and IR-filter must be protected by screwing the protective caponto the camera's C-Mount thread.9.2Cleaning the infrared filter or protective glassContamination of the IR filter or the protective glass has an adverse effect on thequality of the resulting image (dark points, cloudy structures in the image). If thereis dry dust on the front side of the infrared filter or protective glass, you can removeit with a soft brush or with cotton (wool). Use cleaning fluid for optics/lenses onlyto clean the IR filter. Do not use tap water to clean the IR filter.10 Disposal and Recycling10Disposal and RecyclingThis product has been developed, tested and manufactured in accordance with theapplicable environmental provisions and directives of the European Union:¢The product and its accessories comply with EU directives 2002/95/EC (RoHS)and 2002/96/EC (WEEE), insofar as these apply to this product.¢ZEISS has implemented a take-back and recycling process that ensures thatproper recycling is carried out in accordance with the aforementioned EUdirectives.¢Please contact your ZEISS sales/service organization for details relating todisposal and recycling.¢This product must not be disposed of with domestic waste or using municipalwaste disposal services. In the event of resale, the seller must inform the buyerof the need to dispose of the product appropriately.Carl Zeiss Microscopy GmbHCarl-Zeiss-Promenade 1007745 Jena, Germany********************/microscopyCarl Zeiss Microscopy GmbHKönigsallee 9-2137081 GöttingenGermanyZEISS reserves the right to make modifications to this document without notice.© Jena 2014 by Carl Zeiss Microscopy GmbH - all rights reserved。
佳能使用说明书电子书版
佳能使用说明书电子书版第一章:引言1.1本电子书的目的本电子书的目的是为了向使用佳能产品的用户提供详细的使用说明,以帮助用户充分了解和熟练使用佳能产品。
本电子书将涵盖佳能公司的多个产品系列,包括相机、打印机、复印机等。
1.2本电子书的使用对象本电子书适用于不同级别的用户,包括初学者和高级用户。
无论您是第一次使用佳能产品还是已经长期使用,本电子书都将为您提供有用的信息和指导。
第二章:了解佳能产品2.1佳能产品系列介绍佳能公司提供多种产品系列,包括 EOS 相机系列、PIXMA 打印机系列、imageRUNNER 复印机系列等。
本章将为读者介绍不同系列的产品,并对其特点进行简要说明。
2.2购买佳能产品的指南在购买佳能产品之前,有一些重要的因素需要考虑,包括产品功能、性能和价格等。
本章将为读者提供一些购买佳能产品的指导,以帮助他们做出明智的决策。
第三章:开始使用佳能产品3.1产品拆包与组装在本章中,将详细介绍佳能产品的拆包和组装过程。
它将包括不同产品的不同步骤和注意事项。
此外,还将为初学者提供一些使用技巧。
3.2基本设置在开始使用佳能产品之前,需要进行一些基本设置,例如语言选择、日期和时间设置等。
本章将为读者介绍如何进行这些设置,并提供一些常见问题的解决方案。
第四章:产品功能和操作指南4.1相机功能和操作指南本章将为读者介绍佳能相机的不同功能,包括拍摄模式、曝光常识、对焦技巧等。
此外,还将介绍如何更好地使用佳能相机的不同功能,并提供一些拍摄技巧。
4.2打印机功能和操作指南在本章中,将详细介绍佳能打印机的不同功能,包括打印质量调整、纸张选择和替换、墨盒更换等。
此外,还将介绍如何进行打印机的基本维护和故障排除。
4.3复印机功能和操作指南本章将为读者介绍佳能复印机的不同功能,包括复印速度选择、文件类型设置、双面打印等。
此外,还将介绍如何进行复印机的基本维护和故障排除。
第五章:高级功能和扩展5.1摄影技巧进阶对于熟练使用佳能相机的用户,本章将提供一些摄影技巧进阶。
数码相机选购方案

以我给的标题写文档,最低1503字,要求以Markdown文本格式输出,不要带图片,标题为:数码相机选购方案# 数码相机选购方案## 1. 简介数码相机已经成为现代生活中必不可少的装备之一。
无论是旅行、聚会还是记录生活点滴,数码相机都能帮助人们轻松捕捉珍贵的瞬间。
然而,市面上数码相机种类繁多,功能各异,对于普通消费者来说,很容易迷失在选择的海洋中。
本文将为您介绍几个数码相机的选购方案,帮助您找到一款适合自己的数码相机。
## 2. 选择相机类型目前市面上常见的数码相机类型主要包括:普通数码相机、高级紧凑型相机、单反相机和无反相机。
在选购前,了解并确定所需的相机类型将有助于缩小选择范围。
- **普通数码相机**:这是最常见的相机类型,适合日常拍摄需求。
它具有较小的尺寸和较轻的重量,操作简单,价格也相对较为便宜。
如果您只是需要一款用于记录生活的相机,普通数码相机是一个不错的选择。
- **高级紧凑型相机**:这类相机具有更大的感光元件和更高的像素,能够提供更高质量的照片。
它的操作界面和功能设置更加丰富,有些甚至具备一些单反相机的功能,但却比单反相机更小巧轻便。
如果您追求更高质量的照片,并且需要更多的拍摄选项,高级紧凑型相机可以满足您的需求。
- **单反相机**:单反相机是一种专业级数码相机,由于其具有更大的感光元件和更高的像素,能够提供更高质量的照片。
此外,单反相机还具备可更换镜头的特点,能够适应不同的拍摄需求。
单反相机的操作和功能较为复杂,适合有一定摄影基础的用户。
- **无反相机**:无反相机继承了单反相机的优点,同时放弃了单反相机的一些特点。
它具有更小巧轻便的体积,适合旅行拍摄。
无反相机能够提供高质量的照片,并支持更换镜头,但其操作和功能相对简单,适合摄影初学者或对便携性要求较高的用户。
## 3. 主要参数和功能在选择相机时,主要需要考虑以下几个参数和功能:- **像素**:像素是衡量相机画质的重要指标,像素越高,照片细节越丰富。
摄影器材选购指南之一——入门篇

摄影器材选购指南之一——入门篇作为一个资深摄影爱好者,虽然从来不是一个器材党,但最近由于自己使用的照相机出了很多状况,因此使用、测试了大量的摄影器材。
其中既包括高端的尼康d5、佳能1d某2和索尼a9,也包括中端的佳能5d4、尼康D810、索尼a7R2,还有尼康半画幅旗舰d500,以及中低端的尼康d7200、d5500,佳能80D、800D和索尼a6000等等。
现在我把这些使用的经验分享给大家,为大家选择摄影器材提供参考。
首先要申明对于这些器材,笔者并没有经过严格的专业对比测试,而仅仅是个人的使用体会,所以评价未必正确。
另外也由于相机、镜头的个体也存在很大差异,有可能笔者的体会和你的使用感受存在很大差异,如果你参考了笔者的建议而购买了摄影器材,并由此所可能引发的不愉快体验,笔者并不承担任何相应责任,敬请谅解。
下面言归正传。
对于初级摄影爱好者来说,你的选择可以是单反,也可以是微单。
但我的建议还是首选单反,单反首先考虑佳能或者尼康。
这里首先要说一下尼康单反系列。
尼康作为一家有百年传统的专业照相机生产厂商,在摄影器材领域已建立了一个非常庞大而完整的体系。
其单反照相机系列齐全,品种众多,从入门的d3400、d5500到中端的d7200、d500到全画幅的尼康d610、d810、df以及定位专业的d5,一应俱全。
对于入门者来说,d5500和7200将是你的首选。
尤其是d7200,这是一台各方面性能都非常平衡的照相机。
在d500推出之前,一直作为尼康半画幅照相机的旗舰用来对抗佳能的半画幅旗舰7D,虽然一直处于下风,但仍足见d7200的实力。
事实上,2022年,尼康已经推出了d7200的升级版d7500,在性能上又有了一个大的提升,但d7500接近万元的售价让人觉得这不像是一台中端半画幅的价格。
衡量一台数码照相机的主要参数有:像素、感光度、连拍速度等,而尼康7200在这三个主要参数上表现都非常不错,约2400万的像素,每秒钟6张的连拍速度,原生感光度 100-25600(可扩展到50-),高感尤其表现优异,iso3200毫无压力。
- 1、下载文档前请自行甄别文档内容的完整性,平台不提供额外的编辑、内容补充、找答案等附加服务。
- 2、"仅部分预览"的文档,不可在线预览部分如存在完整性等问题,可反馈申请退款(可完整预览的文档不适用该条件!)。
- 3、如文档侵犯您的权益,请联系客服反馈,我们会尽快为您处理(人工客服工作时间:9:00-18:30)。
相机购买指南2——配件篇
在了解到基本的相机选购方式之后,我们要带领大家去选配件。
配件虽为附属品,但不可谓不重要,经常,它甚至比本体还更重要。
人要衣装,佛要金装。
卸下Zegna西装,Lange手表,BVD 内衣和阿瘦皮鞋,然后照照镜子,你不过是个瘪三。
续集故事大纲就是这样。
一般盒装相机内附的配件不多,考虑专业形象,势必得再花钱添些行头。
然而如何把钱花在刀口上是一门大学问,学校没有教,电视也不会演,所以人人都需要购买指南。
相机背带,Canon就用Canon,Nikon就用Nikon,各走各的路;Leica附送的特别烂,大伙儿都改用Luigi’s、A&A或者à la carte。
这些不成文的制约,照做即可,没有必要多伤脑筋,尤其你本来就不顶聪明,省着点用。
这些背带上的logo都很大,高阶机型的背带会再写上型号,低阶的就不会。
如果低阶的写了,就把它弄掉,不然你还没出发场面就已经没了。
闪光灯在上一篇已经稍微提过,这一定要买。
大头的。
出力大小、有无TTL或HHS都无所谓,我们的目的是装上去,闪不闪先不必去管它。
它的使用的时机异常复杂,本来想留到相机购买指南第十五集的拍照篇再来写,可现在不写,还真找不出其它东西能写,只得不情愿地提前透露一二,不然本续集片长可能只有两分钟而已。
使用闪灯有个要诀,闪个不停不但耗电,而且一看就是个刚入门的菜B。
请切记基本原则——不能每张都闪。
至于到底
哪张应该闪,那你不一定需要研究,总之就是这张闪,那张不闪,随便闪闪又随机不闪,务必使人摸不透,时而机上闪,时而离机闪,如此在形象方面就能从菜B摇身一变为才华横溢又有自我主张的摄影鬼才。
另外就是帮家人拍照时,在任何情况下闪灯都不要直打。
应将灯头转向上,打个时下最流行的跳灯,顺便演说一下:“反射光较直接照射来得柔和均匀,光源来自上方时在视觉上尤其自然……”,靠着这个简单的唬弄来取得全家人对你摄影功力的信赖。
坏处只是以后照片里就没有你。
摄影家是很孤独的。
闪灯并不需要事先装着,通常我们是抵达现场之后再来弄,因为这个动作可以吸引到一些女孩儿的目光。
技巧纯熟者可以尝试加入几个多余的动作,让自己看起来更像正在组装狙击枪的杰森包恩。
也许你还能更上一层楼用毛巾蒙眼拆装闪灯来赚取一些赏金,只是缺乏勇气这样做。
我建议你把它看做是一门职业,一种表演艺术。
一旦突破这一层心理障碍,接下来就可以表演用老二吊相机了。
在一个绝对不需要闪灯的场合,记得把程序反过来。
我们要在出门前把灯预先装好,等拍摄时再当众把它拆下来,表示我也有买这支神灯喔,只是我现在不需要它。
这让我回忆起十数年前曾经买过的Sony PlayStation上的跳舞机。
美其名为跳舞机,说穿了只是一片PVC跳舞塑料皮。
由于玩起来的动作十足像个曼谷妓男,使用一次即束之高阁。
当时我有点后悔花钱买了这无用的防水布,可我老弟语重心长地训诫我:”这一切无闗好不好玩,而是当三十年后有人聊起时,你可以抬头挺胸地说:“那个,我也有”,光线枪也是。
这种东西就是这样,谁要没买过,日后碰上此话题插不上嘴,人生可能从此逊掉。
所以有点像在买保险。
”我现在想起来的确非常有道理。
第二个配件是垂直电池手把,买副厂的就好。
我们只是装个样子,一整天下来其实也拍不了几张,蓄电量别那么计较,倒是你膀胱的蓄尿量需要锻炼一下。
手把大陆制的也没关系,不会爆炸就行,别去相信什么贵一级的港制品,这年头没有笨蛋会在香港搞工厂的。
手把可以说是所有配件里面性价比最高的一个。
一安装上去,外型就顶天了,看起来十分威猛,专业性也达到了满格的状态。
还有什么比方形相机更酷的?没有了。
不管是“N家”还是“C家”,“机皇”都是方形的。
“机皇”知道吧?知道我就不多做解释了。
但为了续集的片长,还是解释一下好了。
“机皇”比起“镜皇”又不知厉害多少倍,因为一个厂牌同时期只会有一到二款“机皇”,“镜皇”则可能有三到三百种。
“机皇”很好辨认,无论是“全幅机皇”还是“连拍机皇”,特征就是从正面看过去是方形的。
按照这个逻辑,许效舜档次要比布莱德彼特来得高,只可惜他并不是一台相机。
“某机型装上手把后,与机皇一体成型式手把相比,密合度有没有差?”,过去我们经常看到这样的问题,提问者无非是希望大家回答:“其实用起来差不多”这种答案来辅助自慰,这样他就不用多花一倍的钱的去买“机皇”,也可以得到机皇般的荣耀。
这样想其实并没有错。
如果不用力去扯它,我们没有人会去注意到邱毅的头发是不是一体成型的。
垂直手把一举增加了相机近三分之一的体积,携带起来很不方便,算是唯一的缺点,不过这就像乳房大小一样,并不是说携带方便就好。
从某种角度来看,镜头也可归类为配件,但不幸第一集已经写过了。
这时候就只好塞进一些前情提要来拖时间。
口径愈大愈好,这是永远不变的法则。
大只佬不但看起来够份量,也代表着大光圈。
光圈是很重要的,跟车子的极速和潜水表的防水深度一样,用不到也不要输在规格上。
f4.0比起f2.8只不过少了一档,“大三元”就缩水成“小三元”,足足差了有四台之多。
买不买保护镜见仁见智,它就是一个保险作用而已。
套上了,多一层膜,难免失真。
不套则可能不小心烂掉,完全视个人卫生习惯而定。
这种事外人也不好给什么意见。
倒是镜头笔和吹球这等零钱就别省了。
自己动手清那么二三下,还蛮有相机师傅的感觉,当然这也是在人多的时候做,感觉会特别好。
数字时代你可能得多买一瓶“日蚀水”以清理“入尘”的感光组件。
检查“入尘”务必将光圈缩到f22拍五百张并放大1,000%检视,不可放过任何蛛丝马迹,哪怕我们每张生活照都是拍f1.4。
伟大的作品极有可能毁在这些李昌钰看不到的尘点上,因此我认为添购一间防尘室来清理CCD/COMS是有必要的。
如果你只有一支镜头,并且最小光圈大于22,那最好再加购一组显微镜来配合检查。
预算足够的话,给相机添个脚架吧,碳纤维的。
钛合金或是圣斗士超合金的也好,装上去,威风。
空心铝制品则尽量避免,那跟购物台送的破烂基本上没什么不同,万一被误以为是信用卡赠品,不得了,形象可就砸锅了。
尤其脚架是所有配件里面最大的一个,不被注意都难,多投资一点在这上头儿也是应该的。
脚架可以用上一辈子,并不会退流行,三只脚也不可能进化成二只脚,从投资理财的角度来看,其实应该先买脚架,剩下的钱再拿去挑相机。
RF相机因为在电子性能上搞不过单眼,爱好者只得以轻薄短小低震动为傲,也因此并不会去弄一些大体积配件在机身上自打嘴巴。
Leica M机是不装闪灯的,因为少了反光镜箱,安全快门时间容许度高,而且镜头群素质优秀,最大光圈即工作光圈。
这个说法其实很牵强,但因为很多人接受,你也就不要去违抗它。
毕竟省了一颗闪灯的钱,也是件令人开心的事。
现代RF顶多装个皮套、遮光罩和很容易误触的Soft Release。
老机则会多出眼镜、快速卷片器和一定会刮花军舰部的测光表等装饰。
这其中比较有学问的是遮光罩。
单眼相机很简单,接一朵花在镜头前端就好了。
当然,要最大朵的。
莲花就比百合花要好,不但大,还会发出祥瑞之光,趋吉避凶。
Leica则要视不同时期,配合不用形状和材质。
虽然镜头口径一样,外观也差不多,但有的要配金属喇叭形,有的又得用方形塑料款,这样才显得你有点知识。
在使用塑
料款的同时,嘴里要不忘哭腰一下:”其实还是以前金属制的典雅”,这样就显得你不但有点知识还很有品味。
RF最棒配件是配合不同焦段框线所使用的外接式光学观景器。
好的OVF非常昂贵,但是很值得,因为烂的也不便宜。
多装一枚OVF负责构图,原本那个专司对焦,这特殊体位所带来的欢愉,哪里是LCD取景比得上的。
既然用上RF,就别管速度了,踌在那儿慢慢搞,世界都浪漫了起来,好似身边飞舞着蝴蝶,绿地一望无际,天边还有一道彩虹。
当我们进入了这个时空,臣服于自己的帅劲而不自觉微笑了起来,被路人当成同性恋也无所谓了。
相机包是最后一个配件,无关成像素质,却也不能没有。
从小野人到白金汉乃至于LV Reporter Bag,各具特色,请自选。
换句话说,就是我突然发现影片长度似乎是够剪了,还
没写到的部份就请您去掷筊杯吧。
这瞎扯蛋系列日后还会不会再推出续集,目前仍不得而知。
也许我明天就上山去种田了也不一定。