informix安装
Informix7.0安装及初始配置
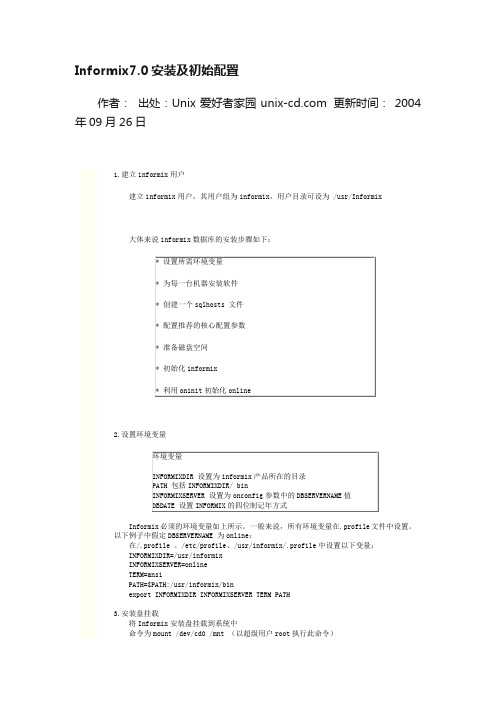
Informix7.0安装及初始配置作者:出处:Unix爱好者家园 更新时间:2004年09月26日1.建立informix用户建立informix用户,其用户组为informix,用户目录可设为 /usr/Informix大体来说informix数据库的安装步骤如下:2.设置环境变量Informix必须的环境变量如上所示。
一般来说,所有环境变量在.profile文件中设置。
以下例子中假定DBSERVERNAME 为online:在/.profile 、/etc/profile、/usr/informix/.profile中设置以下变量:INFORMIXDIR=/usr/informixINFORMIXSERVER=onlineTERM=ansiPATH=$PATH:/usr/informix/binexport INFORMIXDIR INFORMIXSERVER TERM PATH3.安装盘挂载将Informix安装盘挂载到系统中命令为mount /dev/cd0 /mnt (以超级用户root执行此命令)4.安装产品4.1安装INFORMXI--SQL将informix安装盘挂载到/mnt目录下以后,依次执行以下命令进行安装:cd /usr/informix当出现下面的提示时, 按回车键继续进行安装:之后系统要求输入INFORMIX-SQL产品的序列号和活动码:安装程序设置完系统文件的权限并对相关文件进行初始化完毕后, 结束INFORMIX-SQL系统的安装工作。
4.2 安装INFORMIX-ONLINE文件拷贝完毕后, 在#号提示符后面输入下面的命令, 执行INFORMIX-ONLINE系统的安装程序:当出现下面的提示时, 按回车键继续进行安装:之后系统要求输入INFORMIX-ONLINE产品的序列号和活动码:安装程序设置完系统文件的权限并对相关文件进行初始化完毕后, 结束INFORMIX-ONLINE系统的安装工作。
informix数据库安装过程
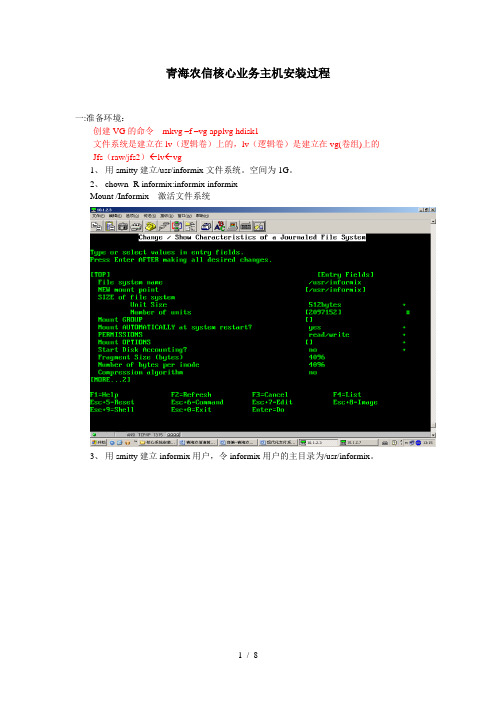
青海农信核心业务主机安装过程一:准备环境:创建VG的命令mkvg –f –vg applvg hdisk1文件系统是建立在lv(逻辑卷)上的,lv(逻辑卷)是建立在vg(卷组)上的Jfs(raw/jfs2)←lv←vg1、用smitty建立/usr/informix文件系统。
空间为1G。
2、chown -R informix:informix informixMount /Informix 激活文件系统3、用smitty建立informix用户,令informix用户的主目录为/usr/informix。
4、编辑/usr/informix目录下的.profile文件写入脚本。
ONCONFIG=onconfig.qhnxINFORMIXSERVER=qhnxonlineINFORMIXDIR=/usr/informixINFORMIXBINDIR=$INFORMIXDIR/binTERMCAP=$INFORMIXDIR/etc/gtmp/termcapDBEDIT=viDBLANG=english_us.8859LIBPATH=$INFORMIXDIR/lib:$INFORMIXDIR/lib/esql:$INFORMIXDIR/lib/tools:/usr/lib:. DBDATE=Y4MDINFORMIXSTACKSIZE=128KAIOOFF=1TERM=vt100PATH=/usr/bin:/etc:/usr/sbin:/usr/ucb:$HOME/bin:/usr/bin/X11:/sbin:.PATH=$PATH:$INFORMIXBINDIRexport ONCONFIG INFORMIXSERVER DBDATE DBEDIT DBLANG LIBPATH INFORMIXSTACKSIZE KAIOOFF INFORMIXBINDIR TERM PATH INFORMIXDIR PATH TERMCAPif [ -s "$MAIL" ] # This is at Shell startup. In normalthen echo "$MAILMSG" # operation, the Shell checksfi # periodically.PS1='[229:$LOGNAME]:$PWD>'export PS1alias 'l=ls -l'set -o vi或者可以将2.1 2.3 2.6 2.7的/usr/Informix 下的.profile 文件拷贝过来。
实验5Informix软件安装及配置
实验5Informix软件安装及配置informix安装配置实验指导书深圳市讯⽅通信技术有限公司2009年8⽉⽬录1. 实验⽬的 (4)2. 实验器材 (4)3. 实验内容说明 (4)4. 实验步骤 (4)4.1安装INFORMIX前准备 (4)4.1.1 增加informix⽤户组 (4)4.1.2 增加informix⽤户 (5)4.1.3 激活informix⽤户 (5)4.2安装I NFORMIX数据库 (5)4.2.1 上传⽂件到服务器 (5)4.2.2 执⾏安装 (5)4.3配置INFORMIX数据库 (13)4.3.1 创建错误信息⽬录 (13)4.3.2 设置环境变量 (14)4.3.3 增加数据库服务信息 (14)4.3.4 配置数据库服务端⼝ (15)4.3.5 检查⽂件配置 (15)4.3.6 创建rootdbs数据库空间 (16)4.3.7 配置onconfig⽂件 (16)4.3.8 初始化数据库 (18)4.3.9 查看数据库运⾏状态 (18)4.3.10 启动后创建⽤户空间 (18)4.3.11 创建命令 (19)4.4启动关闭数据库 (20)5. 附录A:INFROMIX常⽤命令 (20)5.1 ONINIT (20)5.1.1 功能说明 (20)5.1.2 使⽤说明 (21)5.1.3 举例说明 (21)5.2 ONMODE (21)5.2.1 功能简述 (21)5.2.2 使⽤说明 (21)5.2.3 举例说明 (23)5.3 ONSPACES (23)5.3.1 功能简述 (23)5.3.2 使⽤说明 (23)5.3.3 举例说明 (24)5.4 ONSTAT (24)5.4.1 功能简述 (24)5.4.2 使⽤说明 (24)1. 实验⽬的1、通过本实验,让学⽣了解informix软件安装及配置。
2、了解informix软件特点,熟悉基本数据库操作。
2. 实验器材1、安装Linux AS4以上版本操作系统的PC机⼀台(或者LinuxAS4操作系统安装在虚拟机上);2、informix数据库软件⼀套;3. 实验内容说明informix是IBM公司出品的关系数据库管理系统(RDBMS)家族。
informix安装及配置
Informix生产系统安装及配置一、ApplicationDB数据库安装与配置1、创建用户和用户组创建informix用户和informix组Informix用户挂载点/Informix2、修改环境变量修改informix用户的.profile文件,Vi .profile 添加以下内容:INFORMIXDIR=/Informix;PATH=$INFORMIXDIR/bin:$PATH;ONCONFIG=onconfig.loan;INFORMIXSERVER=loandb;export INFORMIXDIR PATH ONCONFIG INFORMIXSERVERexport TERM=vt100TERMINFO=$INFORMIXDIR/etc/typetab;TERMCAP=$INFORMIXDIR/etc/termcap;DBDATE=Y4MD-;Export TERMINFOR TERMCAP DBDATE3、安装数据库及组件Csdk安装:1)Cd /opt/Informix_setup/csdk2)Chmod 777 installclientsdk3)./installclientsdk4)根据安装向导填写安装路径/informix,其他选项按默认值选择,之后开始安装IDS安装:1)Cd /opt/Informix_setup/server2)Chmod 777 installserver3)./installserver4)根据安装向导填写安装路径/informix,其他选项按默认值选择,之后开始安装4、更改磁盘设备信息属组及权限并链接设备文件将所有为AppliactionDB数据库创建的裸设备的字符型设备文件(c类型)的属组更改为informix:InformixCd /devChownInformix:Informixrloan* rflow* rtemp* rphy* rlog*将所有为AppliactionDB数据库创建的裸设备的字符型设备文件(c类型)的权限更改为660Chmod 660 rloan* rflow* rtemp* rphy* rlog*Su –InformixMkdir data将所有为AppliactionDB数据库创建的裸设备的字符型设备文件(c类型)软链接到该目录下,例如:Ln –s /dev/rloan_rootdbsloan_rootdbs链接所在目录:Loan_data_01:/Informix/data/loan_data/Loan_data_02:/Informix/data/loan_data/Loan_index_data:/Informix/data/loan_index/Flow_data_01:/Informix/data/flow_data/Flow_data_02:/Informix/data/flow_data/Flow_index_data:/Informix/data/flow_index/Tempdbs:/Informix/data/temp_data/Rootdbs:/Informix/data/Phy_loan_log:/Informix/data/Log_loan_log:/Informix/data/5、创建onconfig脚本Su –InformixCd etcCponconfig.stdonconfig.loanOnconfig参数修改:################################################################### # Licensed Material - Property Of IBM## "Restricted Materials of IBM"## IBM Informix Dynamic Server# Copyright IBM Corporation 1996, 2009. All rights reserved.## Title: onconfig.std# Description: IBM Informix Dynamic Server Configuration Parameters ## Important: $INFORMIXDIR now resolves to the environment# variable INFORMIXDIR. Replace the value of the INFORMIXDIR# environment variable only if the path you want is not under# $INFORMIXDIR.## For additional information on the parameters:# /infocenter/idshelp/v115/index.jsp####################################################################################################################################### Root Dbspace Configuration Parameters#################################################################### ROOTNAME - The root dbspace name to contain reserved pages and # internal tracking tables.# ROOTPATH - The path for the device containing the root dbspace # ROOTOFFSET - The offset, in KB, of the root dbspace into the# device. The offset is required for some raw devices. # ROOTSIZE - The size of the root dbspace, in KB. The value of # 200000 allows for a default user space of about# 100 MB and the default system space requirements.# MIRROR - Enable (1) or disable (0) mirroring# MIRRORPATH - The path for the device containing the mirrored# rootdbspace# MIRROROFFSET - The offset, in KB, into the mirrored device## Warning: Always verify ROOTPATH before performing# disk initialization (oninit -i or -iy) to# avoid disk corruption of another instance###################################################################ROOTNAME rootdbsROOTPATH $INFORMIXDIR/data/loan_rootdbs(修改到rootdbs所在目录)ROOTOFFSET 256 (偏移量256K)ROOTSIZE 4000000(大小4G)MIRROR 0MIRRORPATH $INFORMIXDIR/tmp/demo_on.root_mirrorMIRROROFFSET 0#################################################################### Physical Log Configuration Parameters#################################################################### PHYSFILE - The size, in KB, of the physical log on disk. # If RTO_SERVER_RESTART is enabled, the# suggested formula for the size of PHSYFILE# (up to about 1 GB) is:# PHYSFILE = Size of BUFFERS * 1.1# PLOG_OVERFLOW_PATH - The directory for extra physical log files# if the physical log overflows during recovery # or long transaction rollback# PHYSBUFF - The size of the physical log buffer, in KB###################################################################PHYSFILE 39000000PLOG_OVERFLOW_PATH $INFORMIXDIR/tmpPHYSBUFF 128################################################################### # Logical Log Configuration Parameters################################################################### # LOGFILES - The number of logical log files# LOGSIZE - The size of each logical log, in KB# DYNAMIC_LOGS - The type of dynamic log allocation.# Acceptable values are:# 2 Automatic. IDS adds a new logical log to the# root dbspace when necessary.# 1 Manual. IDS notifies the DBA to add new logical # logs when necessary.# 0 Disabled# LOGBUFF - The size of the logical log buffer, in KB###################################################################LOGFILES 250LOGSIZE 10000DYNAMIC_LOGS 2LOGBUFF 64################################################################### # Long Transaction Configuration Parameters################################################################### # If IDS cannot roll back a long transaction, the server hangs# until more disk space is available.## LTXHWM - The percentage of the logical logs that can be# filled before a transaction is determined to be a # long transaction and is rolled back# LTXEHWM - The percentage of the logical logs that have been # filled before the server suspends all other# transactions so that the long transaction being# rolled back has exclusive use of the logs## When dynamic logging is on, you can set higher values for# LTXHWM and LTXEHWM because the server can add new logical logs# during long transaction rollback. Set lower values to limit the # number of new logical logs added.## If dynamic logging is off, set LTXHWM and LTXEHWM to# lower values, such as 50 and 60 or lower, to prevent long# transaction rollback from hanging the server due to lack of# logical log space.## When using Enterprise Replication, set LTXEHWM to at least 30%# higher than LTXHWM to minimize log overruns.###################################################################LTXHWM 70LTXEHWM 80################################################################### # Server Message File Configuration Parameters################################################################### # MSGPATH - The path of the IDS message log file# CONSOLE - The path of the IDS console message file###################################################################MSGPATH $INFORMIXDIR/online_loan.logCONSOLE $INFORMIXDIR/tmp/online.con################################################################### # Tblspace Configuration Parameters################################################################### # TBLTBLFIRST - The first extent size, in KB, for the tblspace # tblspace. Must be in multiples of the page size. # TBLTBLNEXT - The next extent size, in KB, for the tblspace# tblspace. Must be in multiples of the page size. # The default setting for both is 0, which allows IDS to manage# extent sizes automatically.## TBLSPACE_STATS - Enables (1) or disables (0) IDS to maintain# tblspace statistics###################################################################TBLTBLFIRST 0TBLTBLNEXT 0TBLSPACE_STATS 1################################################################### # Temporary dbspace and sbspace Configuration Parameters################################################################### # DBSPACETEMP - The list of dbspaces used to store temporary# tables and other objects. Specify a colon# separated list of dbspaces that exist when the# server is started. If no dbspaces are specified,# or if all specified dbspaces are not valid,# temporary files are created in the /tmp directory# instead.# SBSPACETEMP - The list of sbspaces used to store temporary# tables for smart large objects. If no sbspace# is specified, temporary files are created in# a standard sbspace.###################################################################DBSPACETEMP tempdbsSBSPACETEMP################################################################### # Dbspace and sbspace Configuration Parameters################################################################### # SBSPACENAME - The default sbspace name where smart large objects # are stored if no sbspace is specified during# smart large object creation. Some DataBlade# modules store smart large objects in this# location.# SYSSBSPACENAME - The default sbspace for system statistics# collection. Otherwise, IDS stores statistics# in the sysdistrib system catalog table.# ONDBSPACEDOWN - Specifies how IDS behaves when it encounters a# dbspace that is offline. Acceptable values# are:# 0 Continue# 1 Stop# 2 Wait for DBA action###################################################################SBSPACENAMESYSSBSPACENAMEONDBSPACEDOWN 2################################################################### # System Configuration Parameters################################################################### # SERVERNUM - The unique ID for the IDS instance. Acceptable # values are 0 through 255, inclusive.# DBSERVERNAME - The name of the default database server# DBSERVERALIASES - The list of up to 32 alternative dbservernames, # separated by commas###################################################################SERVERNUM 0DBSERVERNAME loandbDBSERVERALIASES loandbshm################################################################### # Network Configuration Parameters################################################################### # NETTYPE - The configuration of poll threads# for a specific protocol. The# format is:# NETTYPE <protocol>,<# poll threads> # ,<number of connections/thread># ,(NET|CPU)# You can include multiple NETTYPE# entries for multiple protocols.# LISTEN_TIMEOUT - The number of seconds that IDS# waits for a connection# MAX_INCOMPLETE_CONNECTIONS - The maximum number of incomplete# connections before IDS logs a Denial # of Service (DoS) error# FASTPOLL - Enables (1) or disables (0) fast# polling of your network, if your# operating system supports it.###################################################################NETTYPE s octcp,8,500,NET (网络协议用户4000)NETTYPE ipcshm,2,50,CPU (内存通道用户100)LISTEN_TIMEOUT 60MAX_INCOMPLETE_CONNECTIONS 1024FASTPOLL 1################################################################### # CPU-Related Configuration Parameters################################################################### # MULTIPROCESSOR - Specifies whether the computer has multiple # CPUs. Acceptable values are: 0 (single# processor), 1 (multiple processors or# multi-core chips)# VPCLASS cpu - Configures the CPU VPs. The format is:# VPCLASS cpu,num=<#>[,max=<#>][,aff=<#>]# [,noage]# VP_MEMORY_CACHE_KB - Specifies the amount of private memory# blocks of your CPU VP, in KB, that the# database server can access.# Acceptable values are:# 0 (disable)# 800 through 40% of the value of SHMTOTAL# SINGLE_CPU_VP - Optimizes performance if IDS runs with# only one CPU VP. Acceptable values are:# 0 multiple CPU VPs# Any nonzero value (optimize for one CPU VP) ###################################################################MULTIPROCESSOR 1VPCLASS cpu,num=8,noageVP_MEMORY_CACHE_KB 0SINGLE_CPU_VP 0################################################################### # AIO and Cleaner-Related Configuration Parameters################################################################### # VPCLASS aio - Configures the AIO VPs. The format is:# VPCLASS aio,num=<#>[,max=<#>][,aff=<#>][,noage] # CLEANERS - The number of page cleaner threads# AUTO_AIOVPS - Enables (1) or disables (0) automatic management # of AIO VPs# DIRECT_IO - Specifies whether direct I/O is used for cooked# files used for dbspace chunks.# Acceptable values are:# 0 Disable# 1 Enable direct I/O# 2 Enable concurrent I/O####################################################################VPCLASS aio,num=1CLEANERS 8AUTO_AIOVPS 1DIRECT_IO 0################################################################### # Lock-Related Configuration Parameters################################################################### # LOCKS - The initial number of locks when IDS starts. # Dynamic locking can add extra locks if needed. # DEF_TABLE_LOCKMODE - The default table lock mode for new tables.# Acceptable values are ROW and PAGE (default). ###################################################################LOCKS 1000000DEF_TABLE_LOCKMODE row################################################################### # Shared Memory Configuration Parameters################################################################### # RESIDENT - Controls whether shared memory is resident.# Acceptable values are:# 0 off (default)# 1 lock the resident segment only# n lock the resident segment and the next n-1# virtual segments, where n < 100# -1 lock all resident and virtual segments# SHMBASE - The shared memory base address; do not change# SHMVIRTSIZE - The initial size, in KB, of the virtual# segment of shared memory# SHMADD - The size, in KB, of additional virtual shared# memory segments# EXTSHMADD - The size, in KB, of each extension shared# memory segment# SHMTOTAL - The maximum amount of shared memory for IDS,# in KB. A 0 indicates no specific limit.# SHMVIRT_ALLOCSEG - Controls when IDS adds a memory segment and# the alarm level if the memory segment cannot# be added.# For the first field, acceptable values are:# - 0 Disabled# - A decimal number indicating the percentage# of memory used before a segment is added# - The number of KB remaining when a segment# is added# For the second field, specify an alarm level# from 1 (non-event) to 5 (fatal error).# SHMNOACCESS - A list of up to 10 memory address ranges# that IDS cannot use to attach shared memory.# Each address range is the start and end memory # address in hex format, separated by a hyphen. # Use a comma to separate each range in the list. ###################################################################RESIDENT 0SHMBASE 0x700000010000000SHMVIRTSIZE 32656SHMADD 8192EXTSHMADD 8192SHMTOTAL 0SHMVIRT_ALLOCSEG 0,3SHMNOACCESS################################################################### # Checkpoint and System Block Configuration Parameters################################################################### # CKPINTVL - Specifies how often, in seconds, IDS checks# if a checkpoint is needed. 0 indicates that# IDS does not check for checkpoints. Ignored # if RTO_SERVER_RESTART is set.# AUTO_CKPTS - Enables (1) or disables (0) monitoring of# critical resource to trigger checkpoints# more frequently if there is a chance that# transaction blocking might occur.# RTO_SERVER_RESTART - Specifies, in seconds, the Recovery Time# Objective for IDS restart after a server# failure. Acceptable values are 0 (off) and# any number from 60-1800, inclusive.# BLOCKTIMEOUT - Specifies the amount of time, in seconds,# for a system block.###################################################################CKPTINTVL 1800AUTO_CKPTS 1RTO_SERVER_RESTART 0BLOCKTIMEOUT 3600################################################################### # Transaction-Related Configuration Parameters################################################################### # TXTIMEOUT - The distributed transaction timeout, in seconds# DEADLOCK_TIMEOUT - The maximum time, in seconds, to wait for a# lock in a distributed transaction.# HETERO_COMMIT - Enables (1) or disables (0) heterogeneous# commits for a distributed transaction# involving an EGM gateway.###################################################################TXTIMEOUT 300DEADLOCK_TIMEOUT 60HETERO_COMMIT 0################################################################### # ontape Tape Device Configuration Parameters################################################################### # TAPEDEV - The tape device path for backups. To use standard# I/O instead of a device, set to stdio.# TAPEBLK - The tape block size, in KB, for backups# TAPESIZE - The maximum amount of data to put on one backup# tape. Acceptable values are 0 (unlimited) or any# positive integral multiple of TAPEBLK.###################################################################TAPEDEV /dev/nullTAPEBLK 32TAPESIZE 0################################################################### # ontapeLogial Log Tape Device Configuration Parameters################################################################### # LTAPEDEV - The tape device path for logical logs# LTAPEBLK - The tape block size, in KB, for backing up logical # logs# LTAPESIZE - The maximum amount of data to put on one logical# log tape. Acceptable values are 0 (unlimited) or any # positive integral multiple of LTAPEBLK.###################################################################LTAPEDEV /dev/nullLTAPEBLK 32LTAPESIZE 0################################################################### # Backup and Restore Configuration Parameters#################################################################### BAR_ACT_LOG - The ON-Bar activity log file location.# Do not use the /tmp directory. Use a# directory with restricted permissions.# BAR_DEBUG_LOG - The ON-Bar debug log file location.# Do not use the /tmp directory. Use a# directory with restricted permissions.# BAR_DEBUG - The debug level for ON-Bar. Acceptable# values are 0 (off) through 9 (high).# BAR_MAX_BACKUP - The number of backup threads used in a# backup. Acceptable values are 0 (unlimited)# or any positive integer.# BAR_RETRY - Specifies the number of time to retry a# backup or restore operation before reporting # a failure# BAR_NB_XPORT_COUNT - Specifies the number of data buffers that# eachonbar_d process uses to communicate# with the database server# BAR_XFER_BUF_SIZE - The size, in pages, of each data buffer.# Acceptable values are 1 through 15 for# 4 KB pages and 1 through 31 for 2 KB pages.# RESTARTABLE_RESTORE - Enables ON-Bar to continue a backup after a# failure. Acceptable values are OFF or ON.# BAR_PROGRESS_FREQ - Specifies, in minutes, how often progress# messages are placed in the ON-Bar activity# log. Acceptable values are: 0 (record only# completion messages) or 5 and above.# BAR_BSALIB_PATH - The shared library for ON-Bar and the# storage manager. The default value is# $INFORMIXDIR/lib/ibsad001 (with a# platform-specific file extension).# BACKUP_FILTER - Specifies the pathname of a filter program# to transform data during a backup, plus any# program options# RESTORE_FILTER - Specifies the pathname of a filter program# to transform data during a restore, plus any # program options# BAR_PERFORMANCE - Specifies the type of performance statistics# to report to the ON-Bar activity log for backup # and restore operations.# Acceptable values are:# 0 = Turn off performance monitoring (Default) # 1 = Display the time spent transferring data # between the IDS instance and the storage # manager# 2 = Display timestamps in microseconds# 3 = Display both timestamps and transfer # statistics###################################################################BAR_ACT_LOG $INFORMIXDIR/tmp/bar_act.logBAR_DEBUG_LOG $INFORMIXDIR/tmp/bar_dbug.logBAR_DEBUG 0BAR_MAX_BACKUP 0BAR_RETRY 1BAR_NB_XPORT_COUNT 20BAR_XFER_BUF_SIZE 31RESTARTABLE_RESTORE ONBAR_PROGRESS_FREQ 0BAR_BSALIB_PATHBACKUP_FILTERRESTORE_FILTERBAR_PERFORMANCE 0################################################################### # Informix Storage Manager (ISM) Configuration Parameters################################################################### # ISM_DATA_POOL - Specifies the name for the ISM data pool# ISM_LOG_POOL - Specifies the name for the ISM log pool###################################################################ISM_DATA_POOL ISMDataISM_LOG_POOL ISMLogs################################################################### # Data Dictionary Cache Configuration Parameters################################################################### # DD_HASHSIZE - The number of data dictionary pools. Set to any# positive integer; a prime number is recommended. # DD_HASHMAX - The number of entries per pool.# Set to any positive integer.###################################################################DD_HASHSIZE 31DD_HASHMAX 10################################################################### # Data Distribution Configuration Parameters#################################################################### DS_HASHSIZE - The number of data Ddstribution pools.# Set to any positive integer; a prime number is# recommended.# DS_POOLSIZE - The maximum number of entries in the data# distribution cache. Set to any positive integer.###################################################################DS_HASHSIZE 31DS_POOLSIZE 127################################################################### User Defined Routine (UDR) Cache Configuration Parameters################################################################### PC_HASHSIZE - The number of UDR pools. Set to any# positive integer; a prime number is recommended.# PC_POOLSIZE - The maximum number of entries in the# UDR cache. Set to any positive integer.###################################################################PC_HASHSIZE 31PC_POOLSIZE 127#################################################################### SQL Statement Cache Configuration Parameters#################################################################### STMT_CACHE - Controls SQL statement caching. Acceptable# values are:# 0 Disabled# 1 Enabled at the session level# 2 All statements are cached# STMT_CACHE_HITS - The number of times an SQL statement must be# executed before becoming fully cached.# 0 indicates that all statements are# fully cached the first time.# STMT_CACHE_SIZE - The size, in KB, of the SQL statement cache# STMT_CACHE_NOLIMIT - Controls additional memory consumption.# Acceptable values are:# 0 Limit memory to STMT_CACHE_SIZE# 1 Obtain as much memory, temporarily, as needed # STMT_CACHE_NUMPOOL - The number of pools for the SQL statement# cache. Acceptable value is a positive# integer between 1 and 256, inclusive.###################################################################STMT_CACHE 0STMT_CACHE_HITS 0STMT_CACHE_SIZE 512STMT_CACHE_NOLIMIT 0STMT_CACHE_NUMPOOL 1################################################################### # Operating System Session-Related Configuration Parameters################################################################### # USEOSTIME - The precision of SQL statement timing.# Accepted values are 0 (precision to seconds)# and 1 (precision to subseconds). Subsecond# precision can degrade performance.# STACKSIZE - The size, in KB, for a session stack# ALLOW_NEWLINE - Controls whether embedded new line characters # in string literals are allowed in SQL# statements. Acceptable values are 1 (allowed) # and any number other than 1 (not allowed).# USELASTCOMMITTED - Controls the committed read isolation level.# Acceptable values are:# - NONE Waits on a lock# - DIRTY READ Uses the last committed value in # place of a dirty read# - COMMITTED READ Uses the last committed value # in place of a committed read# - ALL Uses the last committed value in place # of all isolation levels that support the last # committed option###################################################################USEOSTIME 0STACKSIZE 64ALLOW_NEWLINE 0USELASTCOMMITTED NONE################################################################### # Index Related Configuration Parameters################################################################### # FILLFACTOR - The percentage of index page fullness# MAX_FILL_DATA_PAGES - Enables (1) or disables (0) filling data# pages that have variable length rows as# full as possible# BTSCANNER - Specifies the configuration settings for all # btscanner threads. The format is:# BTSCANNER num=<#>,threshold=<#>,rangesize=<#>, # alice=(0-12),compression=[low|med|high|default] # ONLIDX_MAXMEM - The amount of memory, in KB, allocated for# the pre-image pool and updator log pool for# each partition.###################################################################FILLFACTOR 90MAX_FILL_DATA_PAGES 0BTSCANNER num=1,threshold=5000,rangesize=-1,alice=6,compression=default ONLIDX_MAXMEM 5120#################################################################### Parallel Database Query (PDQ) Configuration Parameters#################################################################### MAX_PDQPRIORITY - The maximum amount of resources, as a# percentage, that PDQ can allocate to any# one decision support query# DS_MAX_QUERIES - The maximum number of concurrent decision# support queries# DS_TOTAL_MEMORY - The maximum amount, in KB, of decision# support query memory# DS_MAX_SCANS - The maximum number of concurrent decision# support scans# DS_NONPDQ_QUERY_MEM - The amount of non-PDQ query memory, in KB.# Acceptable values are 128 to 25% of# DS_TOTAL_MEMORY.# DATASKIP - Specifies whether to skip dbspaces when# processing a query. Acceptable values are:# - ALL Skip all unavailable fragments# - ON <dbspace1><dbspace2>... Skip listed# dbspaces# - OFF Do not skip dbspaces (default)###################################################################MAX_PDQPRIORITY 100DS_MAX_QUERIESDS_TOTAL_MEMORYDS_MAX_SCANS 1048576DS_NONPDQ_QUERY_MEM 128DATASKIP#################################################################### Optimizer Configuration Parameters# OPTCOMPIND - Controls how the optimizer determines the best# query path. Acceptable values are:# 0 Nested loop joins are preferred# 1 If isolation level is repeatable read,# works the same as 0, otherwise works same as 2# 2 Optimizer decisions are based on cost only# DIRECTIVES - Specifies whether optimizer directives are# enabled (1) or disabled (0). Default is 1.# EXT_DIRECTIVES - Controls the use of external SQL directives.# Acceptable values are:# 0 Disabled# 1 Enabled if the IFX_EXTDIRECTIVES environment# variable is enabled# 2 Enabled even if the IFX_EXTDIRECTIVES# environment is not set# OPT_GOAL - Controls how the optimizer should optimize for# fastest retrieval. Acceptable values are:# -1 All rows in a query# 0 The first rows in a query# IFX_FOLDVIEW - Enables (1) or disables (0) folding views that# have multiple tables or a UNION ALL clause.# Disabled by default.# AUTO_REPREPARE - Enables (1) or disables (0) automatically# re-optimizing stored procedures and re-preparing# prepared statements when tables that are referenced # by them change. Minimizes the occurrence of the# -710 error.####################################################################OPTCOMPIND 2DIRECTIVES 1EXT_DIRECTIVES 0OPT_GOAL -1IFX_FOLDVIEW 0AUTO_REPREPARE 1#################################################################### Read-ahead Configuration Parameters####################################################################RA_PAGES - The number of pages, as a positive integer, to# attempt to read ahead#RA_THRESHOLD - The number of pages, as a postive integer, left# before the next read-ahead group。
Informix安装全攻略
Dump Shared Memory改为N
(7)新建一个Dbቤተ መጻሕፍቲ ባይዱpace
onmonitor->Dbspaces->Create
名称、大小自定,Mirror、Temp都为N,路径/u1/cookfile/infx01
输入/opt/Informix 安装路径
若在安装过程中出现:
etc/brand: error while loading shared libraries: libstdc++-libc6.2-2.so.3: cannot open shared object file: No such file or directory
o options
为指定连接提供额外的灵活性。
(5)编辑.profile文件
su - informix
vi .profile
添加内容如下:
INFORMIXDIR=/u1/informix;export INFORMIXDIR
INFORMIXSERVER=test_on;export INFORMIXSERVER
解决:
修改配置文件onconfig中的服务器标识号(默认为0),只要是唯一就可以了,不能过太。在多实例安装中常出现此问题。例如
SERVERNUM 49 # Unique id corresponding to a Dynamic Server instance
nettype最后三个字母按如下方式表示特定的IPC机制或通讯协议。
shm 共享内存通讯
str 数据流管道通讯
Informix安装步骤
Informix安装步骤./ids_install -javahome /usr/bin/java1.前言本文主要描述的是在linux环境下的informix的安装配置步骤,且本实例采用的Cook File作为Chunk文件。
2.安装前准备(release文件首先得解压IDS安装包之后在解压的目录中find . –name “ids_mach*”)2.1.确认Informix所需的系统补丁●通过查看$INFORMIXDIR/rel ease/en_us/0333目录下的●采用如下指令,查看本机是否安装了上面系统补丁rpm –qa | grep <rpm name>2.2.确认Informix所需的内核参数●查看文件$INFORMIXDIR/release/en_us/0333/ids_machine_notes_11.50.txt,确认该平台下Informix所需的内核参数配置。
请参考如下步骤进行内核参数修改:以root的身份登录修改文件/etc/sysctl.conf执行“sysctl –p”,使更改生效2.3.确认DISK剩余空间充足请确保磁盘剩余空间>1G,由于本实例采用cook file作为chunk文件,所以建议至少大于2G的磁盘空间2.4.创建Informix用户及组以root用户执行如下指令,创建所需的user和group3.安装informix软件3.1.创建安装环境在/home/informix目录下创建install目录,并将informix的安装包放在其目录下3.2.解压安装包3.3.执行安装指令下面出现的是安装过程中需要选择的一些信息:●是否选用图形界面安装●确认安装选项●确认继续执行安装●确认安装版本●确认接受使用许可协议并继续●确认安装目录继续●确认安装的产品并继续●确认是否进行角色分离Do you want to enabl e rol e separation for auditing procedures? [ ] 1 - Yes[X] 2 - NoTo select an item enter its number, or 0 when you are finished: [0]If you enabl e rol e separation, you can assign existing groups of users to specific rol es.If you d o not enabl e rol e separation, the database server administrator performs all administration tasks.Press 1 for Next, 2 for Previous, 3 to Cancel or 4 to Redisplay [1] 1●确认是否建立IDS示范数据库服务器实例并继续●确认安装信息并继续●开始安装●确认是否读安装文本并继续●确认成功安装rmix实例配置4.1.环境变量的设置su – Informix 切换至informix用户vi setenv1150 建立一个脚本写环境变量将脚本写到.bash_profil e中执行. ./.bash_profile4.2.配置SQLHOSaobTS文件4.3.配置ONCONFIG文件4.4.建立chunk目录并建立文件4.5.初始化实例oninit –i5.日志的移动5.1.分别建立一个物理的和逻辑的chunk文件并更改权限5.2.分别建立物理和逻辑的dbspace5.3.移动物理日志将物理日志从rootdbs下移动到pl ogdbs5.4.逻辑日志的增加注意:此操作执行10次,但是在最后一次的时候会报错,是因为空间已经不够了。
Informix安装配置精讲
Informix-online Dynamic server完全安装手册一、安装步骤:(1)创建informix目录:/informix如果已创建,这一步可以不执行。
(2)创建informix用户及informix组。
(3)设置环境变量。
设置环境变量在profile文件增加以下内容:INFORMIXDIR=/usr/InformixINFORMIXSERVER=pthkONCONFIG=onconfig.pthkPATH=$PATH:$INFORMIXDIR/binexport INFORMIXDIR INFORMIXSERVERexport ONCONFIG PA TH说明:INFORMIXSERVER 该环境变量被设置为服务器的名称,它是客户机与服务器进行连接的入口,它的值将放入sqlhosts文件中,只有该值有效时客户才能完成与服务器的连接(如果客户与服务器的机型不同,则需要将sqlhosts文件同时装入所有的机器中,以便进行初始化操作)。
(4)SQL 和 online的安装以 root 用户注册, 进入 informix 用户目录:# cd /usr/informix执行命令:# . ./.profile使informix 环境变量生效;SQLRT.TAR、CONNECT.CPI 、IDS.CPI将SQL的安装文件拷贝到当前目录下:用 tar 或 cpio 命令(根据安装文件类型而定);#tar xvf (文件名.TAR)#cpio –icudvmB –I (文件名.cpi)执行SQL的安装程序:# ./installsql根据屏幕提示输入正确的序列号 (serial number) 和活动码 (active number);完成SQL的安装;#./installconn第一个选yes第二个选no将 online 的安装文件拷贝到当前目录下:用 tar 或cpio 命令(根据安装文件类型而定); 将安装文件展开;执行 online 的安装程序:# ./installserver根据屏幕提示输入正确的序列号 (serial number) 和活动码 (active number);完成 online 的文件安装(5) 修改sqlhosts文件中的通信参数。
Informix安装步骤

Informix安装步骤。
/ids_install —javahome /usr/bin/java1.前言本文主要描述的是在linux环境下的informix的安装配置步骤,且本实例采用的Cook File作为Chunk文件。
2.安装前准备(release文件首先得解压IDS安装包之后在解压的目录中find . –name “ids_mach*”)2.1.确认Informix所需的系统补丁●通过查看$INFORMIXDIR/rel ease/en_us/0333目录下的●采用如下指令,查看本机是否安装了上面系统补丁rpm –qa |grep <rpm name〉2.2.确认Informix所需的内核参数●查看文件$INFORMIXDIR/rel ease/en_us/0333/ids_machine_notes_11。
50.txt,确认该平台下Informix所需的内核参数配置。
请参考如下步骤进行内核参数修改:➢以root的身份登录➢修改文件/etc/sysctl.conf➢执行“sysctl –p",使更改生效2.3.确认DISK剩余空间充足请确保磁盘剩余空间〉1G,由于本实例采用cook file作为chunk文件,所以建议至少大于2G的磁盘空间2.4.创建Informix用户及组➢以root用户执行如下指令,创建所需的user和group3.安装informix软件3.1.创建安装环境在/home/informix目录下创建install目录,并将informix的安装包放在其目录下3.2.解压安装包3.3.执行安装指令下面出现的是安装过程中需要选择的一些信息:●是否选用图形界面安装●确认安装选项●确认继续执行安装●确认安装版本●确认接受使用许可协议并继续●确认安装目录继续●确认安装的产品并继续●确认是否进行角色分离Do you want to enabl e rol e separation for auditing procedures?[ ]1 - Yes[X] 2 — NoTo select an item enter its number, or 0 when you are finished:[0]If you enabl e rol e separation,you can assign existing groups of users to specific rol es.If you d o not enabl e rol e separation,the database server administrator performs all administration tasks.Press 1 for Next, 2 for Previous, 3 to Cancel or 4 to Redisplay [1]1 ●确认是否建立IDS示范数据库服务器实例并继续●确认安装信息并继续●开始安装●确认是否读安装文本并继续●确认成功安装rmix实例配置4.1.环境变量的设置➢su – Informix 切换至informix用户➢vi setenv1150 建立一个脚本写环境变量➢将脚本写到.bash_profil e中➢执行。
- 1、下载文档前请自行甄别文档内容的完整性,平台不提供额外的编辑、内容补充、找答案等附加服务。
- 2、"仅部分预览"的文档,不可在线预览部分如存在完整性等问题,可反馈申请退款(可完整预览的文档不适用该条件!)。
- 3、如文档侵犯您的权益,请联系客服反馈,我们会尽快为您处理(人工客服工作时间:9:00-18:30)。
一、安装前的准备:
以root用户身份登录系统后,
1、配置IP地址和Hostname。
2、建立空间大于150MB的Informix文件系统:
# smit crjfs
Mount Point:/informix
3、建立Informix组。
4、建立Informix用户:
primary group:informix
group set:informix,system
HOME directory:/informix
5、将异步IO激活:
# mkdev –l aio
# smit aio使异步IO在系统启动时自动available。
6、插入Informix按照媒体,键入:
# mount /Informix
# cd /informix
# tar –xvf /dev/rmt0 或 # cpio –icvBmud < /dev/cd0
7、更改环境变量:
# export INformIXDIR=/informix
8、创建LV(放置rootdbs):
# smit lv
Lvname:worklv
Devicename:rworklv
Size:80MB(最大2GB)
Type:raw
Mirror Write Consistency:no
Enable BAD BLOCK relocation:no
通常不建议将数据库的日志放在rootdbs上,而应单独建立一个raw类型的LV,存放logdbs。
用户的数据(如索引、表等)需存放在其他的raw类型的LV上。
9、更改LV的权限和属主:
# chown informix:informix rworklv
# chown informix:informix worklv
#chmod 660 rworklv
#chmod 660 worlv
10、更改Informix的环境变量:
# vi $HOME/.profile
export INformIXDIR=/informix
export TERMCAP=/informix/etc/termcap
export INformIXSERVER=ssc
export ONCONFIG=onconfig.ssc# informix启动时的配置文件
export TERM=vt100
11、分配Informix的端口号:
# vi /etc/services
info_service6666/tcp(Informix的端口名称端口号/tcp)
二、Informix的安装:
# cd /informix
# ./installsqlrt安装SQL SERVER
# ./installserver安装IDS SERVER
注意安装顺序:先装SQL Server,再装IDS Server,之后装4GL或Language Supp zh_CN。
不要一次将所有的安装文件一次拷贝至informix目录下,应拷贝一个安装一个。
# vi $INformIXDIR/etc/sqlhosts
ssconsoctcpdemo140info_service
(Informix服务器名称Informix的连接方式主机名Informix的端口名称)
三、Informix的配置:
1、以informix用户身份登录。
2、执行# onmonitor
选择Parameter菜单下的Initialiaze:
第一屏需修改的参数为:
Tape dev:/dev/null
Log Tape dev:/dev/null
Primary Path:/dev/rworklv
Phy. Log Size:4000
按ESC键提交。
第二屏需修改的参数为:
Server name:ssc
第三屏需修改的参数为:
Net type:soctcp210CPU
其余的参数均可使用缺省值。
完成后的正确信息应为Quiescent,错误信息为OFF-LINE。
选择EXIT,MODE,ONLINE,STARTUP,若显示ON-LINE信息,则安装成功。
若显示“Unable to attach to shared memoy”信息,则需重新校验上述步骤。
四、相关的命令:
# oninit启动Online系统
# onmode –ky关闭Online系统
# oncheck –pe查看Online系统中数据库的详细信息
# onstat –a查看所有的Online系统信息。