IP摄像机实用操作使用手册
ipc 网络摄像机快速操作手册
网络摄像机快速操作手册网络摄像机(IPC)是真正的即插即用纯网络视频监控前端设备,IPC可以部署在局域网,何地方对摄像机视频进行显示及控制,大规模视频监控系统中,也可以独立分散应用在如商店、学校、家庭的分布式、需要远程视频监控应用。
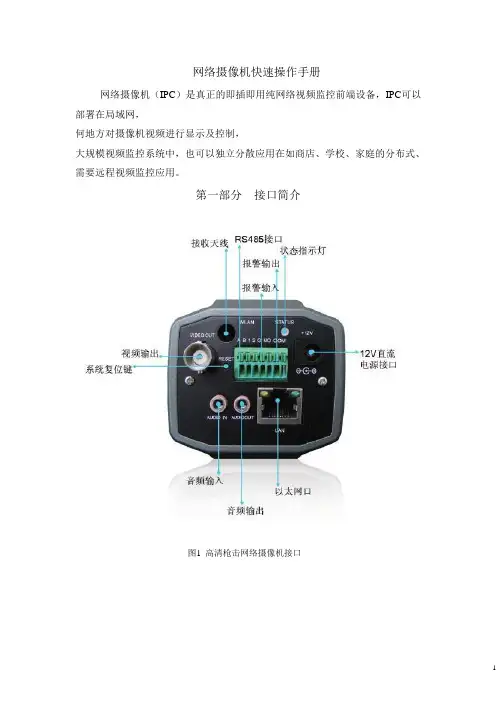
第一部分接口简介图1 高清枪击网络摄像机接口图2图3 红外防水网络摄像机H.264机器人摄像机接口电源接口: 12V 直流电源输入,电源用错会造成摄像机的永久损坏状态指示灯:本地录像为绿色闪烁,触发报警为红色闪烁报警输入: 开关量输入。
常开常闭可以在客户端中配置,默认为常开输入报警输出:开关量输出,用于报警时联动输出RS485输出:用于连接云台或其它485设备RESET按钮:用于恢复出厂默认,持续按键5秒恢复出厂默认设置,包括网络IP地址设置音频输入:音频线性输入,一般与拾音器线性输出相连,用于监听现场声音音频输出:音频线性输出,可外接带功放喇叭进行对讲视频输出:用于图像预览输出,方便调试调焦接收天线:用于WIFI天线或3G模块天线等第二部分WEB浏览步骤一:网线将电脑和摄像机直连(若成功,网卡灯黄色常亮,绿色闪动);步骤二:【光盘资料】>【中文】>【配套工具】找到UpgradeTool并安装;步骤三:打开UpgradeTool,点击IP搜索,若搜索到,在列表中显示设备IP;步骤四:选中列表中的IP点击【设置设备】,在设置界面修改设备的IP,把IP设置为需要使用的路由器网段内骤)如图3:设置IP界面图4出厂默认设置为:IP地址:192.168.1.10 掩码:255.255.255.0 网关:192.168.1.1用户名:admin 密码为空图5 本地模拟输出界面注:设备本地模拟视频输出功能方便镜头调试,网络相关配置信息通用模拟视频输出也可以方便获得,如图5所示(显示30秒后自动关闭)步骤五:打开IE,输入IP地址,在登陆界面输入用户名密码登入,如图6。
图6 WEB操控界面登录成功后,显示如图7所示的界面。
网络摄像头操作手册说明书

网络摄像机快速指南前言本节内容的目的是确保用户通过本手册能够正确使用产品,以避免操作中的危险或财产损失。
在使用此产品之前,请认真阅读产品手册并妥善保存以备日后参考。
使用前说明●访问本公司官网()获取说明书、应用工具和开发资料。
●使用前请先对设备进行校时,校时的具体配置方法请参见《网络摄像机操作手册》。
符号约定对于文档中出现的符号,说明如下所示。
安全使用注意事项●产品安装使用过程中,必须严格遵守国家和使用地区的各项电气安全规定。
●请使用正规厂家提供的电源适配器,电源适配器具体要求参见产品参数表,建议为每台设备配备独立的适配器。
●根据国家相关标准,对弱电设备供电时,要求供电电流不超过8A并且功率不超过100W,防止发生安全事故。
●为减少火灾或电击危险,请勿让产品受到雨淋或受潮。
●应该在建筑物安装配线中组入易于使用的断电设备。
●在设备安装时,请确保产品固定牢固。
●如果产品工作不正常,请联系购买产品的商店或最近的服务中心,不要以任何方式拆卸或修改产品。
(对未经认可的修改或维修导致的问题,本公司不承担任何责任)。
●避免将产品安装到振动或冲击环境,并使产品远离电磁干扰的地点。
(忽视此项可能会损坏产品)。
●请勿直接触碰产品散热部件,以免烫伤。
●室内产品请勿安装在可能淋到水或其他液体的环境。
●请勿在极热、极冷、多尘、有腐蚀性、高盐碱或者高湿度的环境下使用产品,具体温、湿度要求参见产品的参数表。
●设备需存放于干燥无腐蚀性气体环境,避免阳光直射。
●避免将镜头对准强光(如灯光照明、太阳光或激光束等),否则会损坏图像传感器。
●避免热量积蓄,保持产品周边通风流畅。
●请勿直接触碰到图像传感器,若有必要清洁,请将柔软的干净布用酒精稍微湿润,轻轻拭去尘污;当产品不使用时,请将防尘盖加上,以保护图像传感器。
●设备接入互联网可能面临网络安全问题,请您加强个人信息及数据安全的保护。
当您发现设备可能存在网络安全隐患时,请及时与我们联系。
2 1 3 HD IP 摄像头快速上手指南说明书

2134Quick Start GuideNote:123Note:This manual may contain some incorrect places, even though it was published with our carefully proofreading. The news updates will be added to the next release without notice. Your valuable advice is really appreciated.V 4.01. The camera should be connected to an OPTIONAL 12 volt power supply if you do not use PoE (Power over Ethernet).2. A Windows computer is more convenient to setup and troubleshooting.Figure 1: Working With POE SwitchFigure 2: Working With POE NVRNote :you can also find out the LAN configuration via Windows GUINow you can get all the local network information.IPv4 Address: 192.168.1.?Subnet Mask: 255.255.255.0Default gateway: 192.168.1.1DNS Servers: 192.168.1.1Default: IP address: 192.168.0.123 , Username: admin, Password: 123456( We strongly recommend modifying the default password for your security).Each IP camera has the same default IP address after leaving the factory. In order to guarantee network connectivity and access the live video, it is essential to change the camera’s IP address to unique via computer before using. You can install t he device search tool or UC client from the CD to quickly configure the IP camera.Before modifying the IP address you’d better confirm the IP network planning and avoid IP address conflict.Steps on Local Area Windows 10 PC : Search Windows -> cmd -> ipconfig /allRight-click on the Network icon and select open Network and Sharing Center.If the camera is installed to work with the local switch or router directly, the camera IP range should be 192.168.1.x (x=2-254). To void IP conflict, you should test and select an unoccupied IP like this:Command Prompt ping testOnly when reply unreachable that means the IP address is no conflict and available, otherwise when you see time reply do not use this IP address.There are three methods tomodify the camera IP configuration, Search tool,UC Client software and Internet Explorer.2a. Click Start Search and all your cameras in the LAN will be listed. Modify IP address to suit the LAN’s IP scheme. There are two modifying methods available: 1) Right click on the desired camera and choose “Modify IP address”. 2) Click the ALL check-box then click “IP Batch Setting”.Reset Password ->Restore default settings;Video full-screen -> double-click video;Firmware upgrade -> Select the check-box, click Browse then click File Upgrade.b. You can also enable the camera DHCP function if there is a DHCP server available in the LAN.Most router has DHCP server built-in. (IP address in DHCP setting may change after device restart. We do not recommend leaving the IP camera on DHCP).Tips:564To access the camera’s web interface, type in the IP camera’s IP address in Internet Explorer’s URL bar to gain access to the login page. Please modify IP address to the same subnet if login page can not load.(Default user name: admin , Password: 123456) Firefox ESR and IE are supported.From the login page, select your familiar language, then log in with the username and password.4(Default user name: admin, Password: 123456)1. Go to the Devices Config and click Start search, all the camera in the LAN will be listed. Highlighting one of the camera will populate the filed above. Change the parameter listed in the field and click on “Modify IP” to modify the camera’s IP address. Please modify the default IP address to match your LAN’s IP scheme. Note: Be careful when setting up IP addresses to not have duplicated IP as other devices in LAN.2. After changing all the IP cameras’ IP address, you can search again and add them all to the UC client. Once the cameras are added, go to the tab Video View and drag the camera into the split windows to start previewing the cameras.QR code for Danale APP78954Install Web Plug-in when red line characters prompted. You may have to download WEBConfig.exe and run it as administrator. You can also install theWEBConfig.zip from the included CD if some uncertain problems happen during Web Plug-in loading. After installation, restart or refresh your web browser andaccess the IP again. The live video will start automatically after login successfully.Note: Only the Motorized Auto Focus cameras can Zoom In and Zoom Out.Keeping pressing on live video and dragging for Digital Zoom.If there is a delay in video response when accessing remotely, please switch to Sub Stream instead. To learn the function of each button, just put the mouse on, it will show screen tips.1) Power System frequency configuration (50Hz/60Hz )556To avoid the video flicker, the camera should be set to right working frequency to suit the country electric system. The countries that use 60Hz have USA, Canada,Japan, Korea, Taiwan, Brazil, Philippines, Mexico. Other countries apply 50Hz.Configuration > Camera > Image > Power FrequencyConfiguration > Camera > Image > OSD > Title Message2) To modify the camera Title name and Time & DateThere are two time update modes available, Manual and NTP .Configuration > System > Time setupa. Select your Time Zone, and click PC Sync. Set up your DST (Daylight Savings Time) if needed , click Save. (Time and date will reset to 2000-01-01 if camera restarts)b. If the camera is connected to the Internet, you can set up a NTP server for the camera to sync the time and date automatically.3) To enable Motion Detection AlarmConfiguration > Event > Video DetectionWhen Motion is detected ,there is a small alarm light pup up beside the Alarm menu. You can also setup an email address or FTP storage server to receive the motion snapshot. (Trigger recording will work only if memory card or NFS NAS connected. )4) To find the device Cloud ID and QR code for p2p remote accessConfiguration > Network > P2PUsing the P2P ID and QR code, you can access the camera remotely anywhere via smart phone with Internet access. Please register an account via mobile phone after installing the Danale APP from APP Store or Google Play Market,then log in and add your camera to start previewing.Or you can go to the website / to register if you need PC remote access. You can download APP from the website to find out more.Tips: if the Login Status shows Offline, please check your Internet connection and IP camera TCP/IP Network configurations. Please make sure to use a valid DNS server IP in the TCP/IP Network setting.9101181. Why can’t I open the default IP address 192.168.0.123 via web browser?Check your computer’s IP address before accessing the camera. If the IP address does not match the 192.168.0.x scheme, please install the IP search tool from the CD to modify the camera’s IP address. Make sure the IP address of the camera matches the LAN IP scheme. For example, if the LAN is192.168.1.xxx, then set the IP camera to 192.168.1.123 and so on. Only IE and Firefox ESR windows computer are supported by the camera.2. How to reset the password?The default Username: admin, Password: 123456. If you lost the password or would to reset the camera’s setting, please install the search tool to search the camera IP and click Reset factory button.3. How to upgrade the IP camera?1) Ask the supplier for the suitable firmware2) you can use the web browser, search tool, or PC client to upgrade the camera3) go to the Configuration > System > update, click browse and select the firmware, then click Upgrade button and wait for the operation to complete.4. How to fetch the RTSP video stream and http snapshot?1) Main Stream: rtsp://IP:554/h264?username=admin&password=123456 2) Sub Stream: rtsp://IP:554/h264cif?username=admin&password=123456 3) low resolution snapshot: http://IP/cgi-bin/snapshot.cgi?stream=1 4) HD snapshot : http://IP/cgi-bin/snapshot.cgi?stream=05. Why does the NVR not show image after adding your IP camera?1) Make sure you selected the right protocol and enter the correct username and password when adding the cameras,2) Make sure the NVR and IP camera are the same IP scheme.(eg. NVR:192.168.1.x, and IP camera:192.168.1.y),3) try changing the camera encode mode to H.264 if the NVR can’t support H.265. (Configuration -> Camera -> Video > Encode mode: H.264)6. How to make the NVR record in motion detection mode?1) Enable the IP camera motion detection function via web browser or Search configure tool, 2) add the IP camera via ONVIF protocol,3) change the NVR record mode to Motion Detection mode,4) check the NVR screen MD icon and try playback. Please refer to your NVR manual for NVR motion record option.7. Where can i control the motorized auto focus lens zoom? 1) Using the camera’s web interface; 2) Control by PC client software UC;3) Roll the mouse wheel at the search tool preview window; 4) Find the PTZ menu in your NVR to control lens zoom.13127Visit the Apple App Store or the Google Play Store to download the Danale app for iOS or Android devices. (The app file is also included in the CD. For transferring the file manually to your smart device, please refer to your smart device’s manual). After installation, tap the icon to launch the Danale app. For first time use, please create a new account by following the steps below:Note: if you cannot connect the camera, please check your Internet connection and verify the IP address, gateway, and DNS setting in the camera. The Cloud loginstatus should be online, which means the camera has registered to the cloud server.You may also want to connect your phone to WiFi for better performance.1. For new users, please tap CREATE NEW ACCOUNT to register an account.2.Type in your mobile phone number or email address, then tap NEXT .3. Check your SMS or Email for the verification code, then tap NEXT .4. Tap to Add devices5. Tap QR Code to add to get into the scan camera QR code page, or click NEXT to discover the connected local LAN IP camera.6. Put the IP camera QR code in the app effective scan area, and then give a nickname for the recognized camera.7. Tap the camera list to start live video.The IP camera supports standard ONVIF protocol and it can be added to third-party video recorder. Some of the models support both H.264 and H.265 encode mode.The H.265 encode cameras can compress the video data to a very low bit rates which allows more video data storage than normal H.264 camera. Only configure the camera to H.265 mode when your NVR supports H.265 modeNote: Some of the PoE NVR supports Plug & play, which allows you to get video without manually search and add. if Plug & play feature is not available or notcompatible, please follow the NVR manual steps and select ONVIF protocol as the paring protocol. (camera default password: 123456)If the POE NVR can not discover the connected camera or can not display the camera video , please check it’s internal POE interface IP configuration and make sure all connected cameras and NVR POE interface are in the same subnet schema.For more help please contact the both NVR and IP camera suppliers for technical assistance.Before pairing cameras to the NVR, make sure the NVR and cameras have valid and matching IP scheme.a. Tap to check your account profile and configure settingsb. To share your camera with your friends or another user, click “ ” icon and type in or scan his/her Danale account.Tips:。
网络摄像机 IP-Cam 说明书

网络摄像机 网络摄像机用户使用指南用户使用指南目录第一章第一章 产品介绍.....................................................................................................................................。
1 第二章 产品产品安装安装.........................................................................................................................................2 第三章第三章 搜索设备搜索设备搜索设备并登陆并登陆.............................................................................................................................3 第四章 视频属性设置和云台控制操作..................................................................................................4 第五章第五章 系统设置选项................................................................................................................................4 第六章第六章 报警设置报警设置.........................................................................................................................................6 第七章第七章 控制面板.........................................................................................................................................7 第八章第八章 注销.................................................................................................................................................8 第九章第九章 通过通过通过广域广域广域网访问网络摄像机网访问网络摄像机 (9)第一章 产品介绍IPCAM 是一种通过网络传输动态视频的设备,它可以将本地的动态视频通过网络传输到世界各地有网络连接的地方,通过互联网,用户可以随时看到想监控的地方,拓展了人类的视野范围。
IP公共观看监控器用户手册说明书
PVM24ZJ-OC3-4USER’S MANUALIP PUBLIC VIEW MONITORGVISION USA, INC 30398Esperanza,RanchoSantaMargaritaCA92688/949.586.3338/********************Important InformationCare and CleaningTO PREVENT FIRE OR SHOCK HAZARDS, DO NOT EXPOSE THIS UNIT TO RAIN OR MOISTURE. ALSO, DO NOT USE THIS UNIT’S POLARIZED PLUG WITH AN EXTENSION CORD RECEPTACLE OR OTHER OUTLETS UNLESS THE PRONGS CAN BE FULLY INSERTED.TO REDUCE THE RISK OF ELECTRIC SHOCK, MAKE SURE POWER CORD IS UNPLUGGED FROM WALL SOCKET. TO FULLY DISENGAGE THE POWER TO THE UNIT, PLEASE DISCONNECT THE POWER CORD FROM THE AC OUTLET. DO NOT REMOVE COVER (OR BACK). NO USER SERVICEABLE PARTS INSIDE. REFER SERVICING TO QUALIFIED SERVICE PERSONNEL.This symbol warns user that uninsulated voltage within the unit may have sufficient magnitude to cause electric shock. Therefore, it is dangerous to make any kind of contact with any part inside this unit.This symbol alerts the user that important literature concerning the operation and maintenance of this unit has been included. Therefore, it should be read carefully in order to avoid any problems.CAUTION: Please use the power cord provided with this display in accordance with the table below. If a power cord is not supplied with this equipment, please contact GVISION. For all other cases, please use the power cord with the plug style that matches the power socket where the monitor is located. The compatible power cord corresponds to the AC voltage of the power outlet and has been approved by, and complies with, the safety standards in the country of purchase.*When operating this monitor with its AC 125-240V power supply, use a power supply cord that matches the power supply voltage of the AC power outlet being used.∙ Always unplug your monitor from the wall outlet before cleaning. Clean the LCD monitor surface with a lint-free, non-abrasive cloth. Avoid using any liquid, aerosol or glass cleaners.∙Slots and openings on the back or top of the cabinet are for ventilation. They must not be blocked or covered. Your monitor should never be placed near or over a radiator or heat source, or in a built-in installation unless proper ventilation is provided.∙Never push objects or spill liquid of any kind into this product.Safety Precautions / Maintenance▪Do not use this apparatus near water.▪Clean only with dry cloth.▪Do not block any ventilation openings. Install in accordance with the manufacturer’s instructions.▪Do not install near any heat sources such as radiators, heat registers, stoves, or other apparatus (including amplifiers) that produce heat.▪Do not defeat the safety purpose of the polarized or grounding-type plug. A polarized plug has two blades with one wider than the other. A grounding type plug has two blades and a third grounding prong. The wideblade or the third prong are provided for your safety. Ifthe provided plug does not fit into your outlet, consult anelectrician for replacement of the obsolete outlet.▪Protect the power cord from being walked on or pinched particularly at plugs, convenience receptacles, and thepoint where they exit from the apparatus.▪Only use attachments/accessories specified by the manufacturer.▪Use only with the cart, stand, tripod, bracket, or table specified by the manufacturer, or sold with the apparatus. When a cart is used, use caution when moving the monitor combination to avoid injury from tip-over.▪Unplug monitor during lightning storms or when unused for long periods of time.▪Refer all servicing to qualified service personnel.Servicing is required when the apparatus has been damaged in any way, such as power-supply cord or plug is damaged, liquid has been spilled or objects havefallen into the apparatus, the monitor has been exposedto rain or moisture, does not operate normally, or has been dropped.▪Do not press strongly upon the panel with a hand or a sharp object such as a nail, pencil, or pen, or make a scratch on it.▪Do not stick metal objects or any other conductive material into the power cord. Do not touch the end of the power cord while it is plugged in.▪Keep the packing anti-moisture material or vinyl packing out of the reach of children. Anti-moisture material is harmful if swallowed. If swallowed, induce vomiting and go to the nearest hospital. Additionally, vinyl packing can cause suffocation. Keep it out of thereach of children.▪Concerning the Power Cord (Can differ by country): Check the specification page of this owner’s manual tobe certain concerning current requirements. Do not connect too many devices to the same AC power outletas this could result in fire or electric shock. Do not overload wall outlets. Overloaded wall outlets, loose ordamaged wall outlets, extension cords, frayed powercords, or damaged or cracked wire insulation are dangerous. Any of these conditions could result in electric shock or fire. Periodically examine the cord of your device, and if its appearance indicates damage ordeterioration, unplug it, discontinue use of the device, and have the cord replaced with an exact replacementpart by an authorized servicer. Protect the power cordfrom physical or mechanical abuse, such as being twisted, kinked, pinched, closed in a door, or walked upon. Pay particular attention to plugs, wall outlets, andthe point where the cord exits the device. Do not movethe monitor with the power cord plugged in. Do not usea damaged or loose power cord. Be sure do grasp theplug when unplugging the power cord. Do not pull on the power cord to unplug the monitor.▪To reduce the risk of fire or electrical shock, do not expose this product to rain, moisture or other liquids. Donot touch the screen with wet hands. Do not install thisproduct near flammable objects such as gasoline or candles, or expose the TV to direct air conditioning.▪Do not use high voltage electrical equipment near the TV (e.g., a bug zapper). This may result in product malfunction.▪Do not expose to dripping or splashing and do not place objects filled with liquids, such as vases, cups, etc. onor over the apparatus (e.g., on shelves above the unit).▪Do not attempt to modify this product in any way without written authorization from GVISION. Unauthorized modification could void the user’s authority to operate this product.▪Moving: Make sure the product is turned off, unplugged, and all cables have been removed.▪If you smell smoke or other odors coming from the screen, unplug the power cord and contact an authorized service center.▪If water or another substance enters the product (like an AC adapter, power cord, or unit), disconnect the powercord and contact the service center immediately.Otherwise, this may result in fire or electric shock.Table of Contents1. Accessories (5)2. Installation (5)3. Control & Functions (6)4. Remote Control (7)5. Input Source (8)6. OSD Setup Under AV/ HDMI Input Mode (9)7. OSD Setup Under VGA Input Mode (14)8. Setup Under SD/ USB Input Mode (19)9. Care & Cleaning (19)10. Mounting Monitor on Wall (19)11. Camera Management (19)12. Specifications (20)13. Dimensions (21)PACKAGE OF CONTENTSLCD Monitor x1 RemoteControl x1 User’s Manual x1 PowerAdapter x1 Power Cord x1HDMI High Definition Multimedia InterfaceUSB / SDBuilt-in MPEG-2/MPEG-4/H.264/Real Media/AVS Video Decoder.**************************************************memory card capacity: Up to 32GB.Supported file types:AVI/MPG/MPEG/XVID/VOB/DAT/MP4/TS/M2TS/MKV/H.264/RM/RMVBIPC IP camera loop out, For some models may also support POECVBS OutIP camera video loop out via CVBS to make you can connect the PVM tosome old CVBS recording system. The CVBS output May not be available forsome models.VGA Connect device with a VGA output 15 pin D-sub cableDC Power input DC24V,Please check the following listed accessories before installation1AccessoriesRear InterfaceThis section describes the I/O on the back panel of the MONITOR. 2InstallationSOURCE MENU +-Turn on / off the monitorSOURCE Accesses the available video input signals (HDMI/ Camera/ Media)MENU Brings up the MONITOR Main menu. When in the OSD, press MENU button to return to the previous menu or exit+ Turn on the volume. In the MONITOR menu system, function like the right arrow button on the remote control and adjusts menu controls.-Turn down the volume. In the MONITOR menu system, function like the left arrow button on the remote control and adjust menu controls1 POWER ON/OFF the LCD monitor2 Press ‘SOURCE’ button to accesses the available video input signal menu, press +button select, press ‘SOURCE’ to enter the video mode3 Press MENU button then press +/- button move highlight icon left / right.4 Press SOURCE button to enter the sub-menu ,then press +/-button correspondingly to change the setting5When the setting is done, press MENU button to return to the previous menu or exit3 Control & FunctionsIf you cannot locate your remote, you can use the side panel buttons of your monitor to operate the monitor’s features. (* Depends on the types or models, the OSD button may not available)How to Use ButtonsUse the buttons on the right side control panel to adjust the OSDMotion ControlTurn on or off the monitor Mute Turn on or off sound Lock OSD menu lock and unlock Menu Display the main menu ▲ Select Up ▼ Select Down◄ Volume Down/ Select Left ► Volume Up/ Select Right InfoDisplay information Motion Motion detection switch Exit Exit the Monitor OSD Source Source selection menu UnavailableDVRSpecial ControlsMedia Controls▲ Select Up ◄◄ Rewind ▼Select Down►► Forward ◄ Select Left ▲ Fast Rewind Speed / Up ► Select Right ▼ Fast Forward Speed / Down MENU OSD◄ Volume Down / Select Left OK Confirm Selection ► Volume Up / Select Right Exit Exit►IIPlay / PauseOK Confirm Selection ■Exit / Stop4 Remote ControlEnsure the remote control is pointed toward the IR receiver on the display. No obstacles should be placed between the remote control and the IR receiver. The effective receiving distance for the controller is 3 meters.Camera & DVR buttons of the remote controller is for backup use, not functional with this model.1. To ensure a normal operation, the remote control should not be droppedor damaged in any way. It should also be kept dry and away from all heat sources.2. Battery replacement is necessary when the remote controller acts inconsistently or stopsoperating the LCD display.5Input SourceChoose the input sourceIf you hope to show the video from the external input source, Before chose the right source in OSD, you need to connect the devices, otherwise, when you select the source ,the none or no signal will appears on the screen, Press source button on the monitor or remote control, the menu appears on the screen ,then press source to select the monitor item, and press“ +/- (>)”to enter it.HDMI : the input source from HDMI deviceVGA : the input source from VGACamera : the source from Built-in IP camera videoUSB/SD:Monitor built-in multimedia to display advertisement Video or PhotoThe PVM Can automatically switch between the Advertisement and Camera based on motion detection pls refer to the setting of the PVM Image mode>Motion. The PVM can also auto switch between different channel based on time, pls refer to the Image Mode setting>SwitchPICTUREPicture Mode Press “OK “button to select picture modes, then press the < or > button to select “Standard, Dynamic, Mild, or User”. Finally, press “Menu” button to exit.Color Temperature Press ”OK” button to Change the color intensity of the temperature Selected (Medium, Warm, Cool or User),you could change “RGB”. Finally, press “Menu” button to exit.Aspect Ratio Press “OK “button to select picture scales, then press the “< or >“, button to select “4:3 or Full”. Finally, press “Menu” button to exit.Noise Reduction Press the “< or >“, button to select five kinds of settings (Low, Middle, High, Off and Default), then press “Menu” button to exit.OSD Setup under HDMI/AV Input Mode 6OSD SetupSOUNDSound ModePress “< or >” button to select sound modes, “Music, Movie, Sports,standard, or User”. Then, press “Menu” button to exit.BalanceAdjusts how much audio is sent to the left and right (-50 to +50). Theintermediate value is 0, when indication value of balance increasestoward +50, sound of the right and left speaker becomes stronger andweaker, respectively, when indication value of balance decreasetoward -50 sound of the right and left speaker becomes weaker andstronger. Press “OK “button,then press the “< or >” button to adjustsound of the right and left. Finally, press “Menu” button to exit.Mute Press “< or >” button to select ”On or Off”,Then, press “Menu” buttonto exit.OPTIONOSD LanguageThree are nine kinds of languages. Press “< or >” button to select thelanguages which you need. Finally, press “Menu” button to exit. OSD H/V Pos Press “< or >” button to set OSD position on the screen.OSD TimeoutPress “< or >” button to set the time that OSD disappear from thescreen.OSDTransparencyPress “< or >” button to set the OSD transparency. (Low, Middle, orHigh)Restore Factory Press “ >” button to Restore factory menu.Mirror H/VPress “< or >” button to select “On or Off”. Then the picture could flip(horizontally or Vertically).Backlight Press “< or >” button to set backlight. You have three sections: “High,Middle and Low”. Finally, press “Menu” button to exit.ADVANCEH/V-Start Press “< or >” button to set the over scan In this part. Finally, press “Menu” button to exit.H/V-SizePress “< or >” button to set the size of horizontal/ Vertical over-scan. Finally, press “Menu” button to exit.PVMImage ModePress “< or >” button to set image mode, there are three modes. (Off,Switch and Motion) Finally, press “Menu” button to exit. Switch meansthe monitor will auto switch the setting channel. Motion means themonitor will return to camera channel after motion is detected by thecamera.Motion TimeWhen you select the motion, you could set the motion time. Then pressmenu to exit.Motion time is the staying camera time with camera channel aftermotion disappear.Switch TimerWhen you select the switch mode, you could set the switch timer.There are three input sources, you could set the time for each sourcefrom 0 to 30 second. Finally, press “Menu” button to exit.Special ControlPress “>” button to set message select, message flicker and led flicker.And there are four modes in message select. And you could set on/offin the message flicker and led flicker. Finally, press “Menu” button toexit.PICTUREPicture ModeSelect your preferred color module Press “OK “button to select picture modes, then press the “< or >” button to select “ Standard, Dynamic, Mild or User”. Finally, press “Menu” button to exit.ColorTemperatureSelect your preferred color Temperature, Press ”OK” button to Change the color intensity of the temperature Selected (Medium, Warm, Cool or User), you could change “RGB”. Finally, press “Menu” button to exit. Aspect RatioChange the screen between 4:3 and 16:9, Press “OK “button to select picture scales, then press the “<or>“button to select “ 4:3 or Full” . Finally, press “Menu” button to exitNoise Reduction N/A.OSD Setup under VGA Input Mode7 OSD Setup (VGA)SOUNDSound Mode Press “< or >” button to select sound modes, “Music, Movie, Sports, standard or User” .Then, press “Menu” button to exit.Balance Adjusts how much audio is sent to the left and right ( -50 to +50). The intermediate value is 0, when indication value of balance increases toward +50, sound of the right and left speaker becomes stronger and weaker, respectively, when indication value of balance decrease toward -50 sound of the right and left speaker becomes weaker and stronger. Press “OK “button, then press the “< or >” button to adjust sound of the right and left. Finally, press “Menu” button to exitMute Press “< or >” button to select ”On or Off”,Then, press “Menu” buttonto exit.OPTIONOSD Language Three are nine kinds of languages. Press “< or >” button to select the languages which you need. Finally, press “Menu” button to exit.OSD H/V Pos Press “< or >” button to set OSD position on the screen.OSD Timeout Press “< or >” button to set the time that OSD disappear from the screen.OSD Transparency Press “< or >” button to set the OSD transparency. (Low, Middle, or High)Restore Factory Press “ >” button to Restore factory menu.Mirror H/V Press “< or >” button to select “On or Off”. Then the picture could flip (horizontally or Vertically).Backlight Press “< or >” button to set backlight. You have three sections: “High,Middle and Low”. Finally, press “Menu” button to exit.OPTIONAuto Adjust Press “>” button to adjust picture.Horizontal Pos.Press “< or >” button to change the figure (from 0 to 100), Then press menu to exit.Vertical Pos. Press “< or >” button to change the figure (from 0 to 100), Then press menu to exit.Clock Press “< or >” button to change the figure (from 0 to 100), Then press menu to exit.Phase Press “< or >” button to change the figure (from 0 to 100), Then press menu to exit.PVMImage Mode Press “< or >” button to set image mode, three are three modes. (Off, Switch and Motion) Finally, press “Menu” button to exit.Motion Time When you select the motion mode, you could set the motion time. When there is no motion detected for a defined second, the monitor will return to the previous channel.Switch Timer When you select the switch mode, you could set the switch timer. There are three input sources, you could set the time for each source from 0 to 30 second. Finally, press “Menu” button to exit.Special Ctrl Press “>” button to set message select, message flicker and led flicker. And there are four modes in message “RECORDING IN PROGRESS” or “WELCOME”. And you could set on/off in the message flicker and led flicker. And press “Menu” button to exit.FunctionPress the “< or >” button to select some functions. Forexample; ”PHOTO, MUSIC, MOVIE, TEXT”.The default priority auto play video.8 Setup Under SD Card / USB9 Care and CleaningCAUTION: Turn off your MONITOR before cleaning.You can clean the MONITOR as required, using a soft lint-free cloth. Be sure to occasionally dust the ventilation slots in the cabinet to help assure adequate ventilation.The Monitor’s screen may be cleaned with a soft, lint-free cloth as well. Take care not toscratch or mar the screen. If necessary, you may use a cloth dampened with warm water. While cleaning do not spray liquid directly on the screen, or allow liquid to run down the screen and inside the Monitor. Also, never place drinks or vases with water on top of the monitor. This could increase the risk of fire or shock hazard or damage to the monitor.10 Mounting Monitor to WallCAUTION : The wall mount must bear a minimum of five times. The monitor’s net weight without causing damage. To mount your MONITOR to the wall you need to purchase a VESA wall mount 100x100mm or 75x75mm, KM4x 8mm (100 x 100, for example, means the mounting measurements are 100mm horizontally and 100mm vertically; M4 x 8 mm is the types of screw that needs to be used).11 Camera SettingIf you want to access the IP camera OSD to change the setting including IP address, coloradjust, recording activity, etc. Pls log into the IP camera via web or the VMS software in the CD, the default IP address is Dynamic, and User name: admin / Password: admin12SpecificationsMODEL PVM24ZJ-OC3-4Screen Size 23.6Resolution 1920 x 1080Refresh 60Hz Brightness (MAX) 300cd/m²Response Time (Typical) 5msAspect Ratio 16:Contrast Ratio 1000:1Display Color 16.7M (8-bit)INTERFACEBNC CVBS In/Out 1 / 1HDMI In 1VGA In 1SD Slot 1RJ45 (PoE) 1USB 1 IP CAMREASensor 1/2.8" Sony ExmorResolution 1920x1080@25fpsLens 3.3-12mm Vari-focal IR CorrectedCABINETColor/Material Black/Metal POWERConsumption 40W / PoE Standard IEEE802.3bt/af/at 60W MaxElectrical Rating DC24V (AC 100V ~ 240V, 50/60Hz)TEMPERATUREOperating 0~50°C VESA™Mount Size 100 x 100mmSpecifications subject to change without any notice30398Esperanza,RanchoSantaMargaritaCA92688/Tel.949-586-3338/Fax.949-272-4594/**************************2113Dimensions。
Yoosee IP摄像头应用程序用户手册说明书
Cámaras IP con Aplicación YooseeManual de Usuarioaplicación1)Con su celular conectado al Wifi dondeesta conectada la cámara entramos a la app,la cual nos pide registrarnos,dando clic en Registro rápido2)Se selecciona el método que se desea, ya sea mediante un número telefónico o un correo y se selecciona confirmar3)Una vez confirmado el registro,se procede a iniciar sesión para hacer uso de la aplicaciónConexión cableadaInstalación:1)Se conecta el cable de RED a la cámara y al router2)Luego se conecta el cable de corrienteCámara IP3) Para añadir la cámara a la aplicación,se presiona el botón+4) Se presionaAñadir nuevo dispositivo5)Se selecciona el modo de conexión ypresiona siguiente para continuar con elproceso 6)Se realiza la búsqueda del dispositivo y se selecciona el dispositivo encontradoen la etiqueta de la cámaraañadidavisualización desde la aplicaciónConexión Remota1) Para añadir la cámara a la aplicación,se presiona el botón +2) Se presionaAñadir nuevo dispositivo3) Se introduce el ID (que se encuentra en una etiqueta debajo de la cámara)4) Se asigna un nombre al dispositivo a añadir5) Se introduce la contraseña del dispositivo (se encuentra en la etiqueta debajo de la cámara)6) Se presiona Guardar para finalizar la operaciónInalámbrica1) Para añadir la cámara a la aplicación,se presiona el botón +2) Se presionaAñadir nuevo dispositivo3)Se selecciona el modo de conexión ypresiona siguiente para continuar con elproceso 6)Se introduce la contraseña del WIFI donde estáconectado el teléfono y al cual se desea conectar lacámara5)Se verifica que el equipo se encuentreencendido y se presiona el botón Heoído el timbre de aviso para conectar 6)Se coloca el teléfono cercano a la cámara para que esta pueda serescuchada5)Se espera a que el dispositivo escuche el timbre emitido por el teléfono y se espera que se añadaen la etiqueta de la cámaraañadidavisualización desde la aplicaciónMovimientoPara que la cámara gire, se deberá deslizar el dedo sobre la pantalla donde se está visualizando su cámara.Deslizando para arriba o para abajo se conseguirá el movimiento vertical de hasta 120°.Deslizando para la derecha o izquierda se conseguirá el movimiento horizontal de hasta 355°.Grabación2) Para la grabación, se deberá ir a la configuración y seleccionar la Configuración de grabación3) Se podrá seleccionar la grabación manual la cual iniciará la grabaciónde forma inmediata4) La grabación de alarma se activará cuando un movimiento sea detectado5) Con el temporizador de grabación se configurará a qué hora del día se desea iniciar y terminar la grabación1) Apague la cámara e inserte una tarjeta micro SD (La capacidadmáxima varía según el modelo)GrabacionesPara la visualización de grabaciones manuales o programadas se debe presionar el botón Reproducción en la pantalla principal de la aplicaciónAquí podrá seleccionar el video que desea visualizar. Este video se encuentra grabado en la memoria SD instalada en su cámara.Cambio a red WIFIEn el menú de configuraciones se selecciona la Configuración de RedSe cambia el tipo de Red a WIFI y seleccione la red a la que se va a conectar e introduzca la contraseña de la redUna vez introducida la contraseña, el equipo podrá ser desconectado del cable de red y se mantendrá en líneaAlarmasEn la configuración se selecciona el Ajuste de alarmaSe selecciona si se desea recibir lanotificación de la alarmaSe escoge el sonido que se desea escuchar al activarse en ZumbadorSe puede activar la Detección de movimiento y escoger la sensibilidad.Para las notificaciones al correo, se presiona la opción Email de alarmaSe selecciona el correo el cual se utilizará para la notificación Se inicia sesión en el correo y se espera la confirmación de inicio de sesión。
ANRAN无线IP摄像头使用手册说明书
Wireless IP CameraQuick Operation GuideContent1. Thanks2. Safety tips3. Know the hardware4. Things to check before installation5. Setting up WiFi for camera on mobile phone6. View Camera on PC7. Record video with micro SD card8. Playback video9. Backup videos to PC Hard Disk10. Email notification11. FAQs1. ThanksThank you for purchasing Anran Products!This is a quick user guide telling you how to set the camera up and run. IfanyquestionspleasecontactuswithE-mail(**********************)forhelp.2. Safety Tips1 .Please do not put any fluid container on the product.2. Please use the product in ventilated environment and prevent blocking the vents.3. Please use included power supply with the product to prevent damage to the product.4. Please use the product under its standard working temperature and humidity.5. Please obey the regulation and policy in your country and area during the installation of this.3. Know the camera hardwareThe above camera picture is for reference only, the actual product appearance please refer to the product which you purchased.○8Reset: For restore the factory setting.○9SD Card Port: Install micro SD card for record video (Max support 32GB).4. Things to check before installation○1Package IncludesAfter item received, please check all products and accessories according to vendor's Package Includes description. If anything is missed or damaged, please contact us.○2Please install a micro SD card inside the Camera before you connect the power adapter.(If the item which you purchased are pre-installed the micro SD card, please ignore it). The micro SD card is to record video, so you can playback the video. Otherwise, you can view the picture on the phone but can’t record the video without micro SD card.○3Following the steps in section 5 to setup WiFi for the camera. If all work well, you canthen qo ahead to plan and mount the camera to where you want.If there is any exception, pleasecontactAnransupportwithE-mail(**********************).5. Setting up WiFi for camera on mobile phone○1Download and install “CamHi” APP.-from Google play-from Apple Store-or Scan the following QR codeAndroid iOS○2Setting up WiFi for camera on mobile phoneThere are two ways for setting up WIFI for camera. Method A is Wired connection, which need a network cable to connect to the router and setup WiFi for camera in the same LAN. Method B is wireless connection, which do not need network cable and setup WiFi for camera with AP mode.Method A. Setting up WIFI for Camera with LANWhen your mobile phone connect with the router as same as the camera connected to.Step1. Start the IP CameraPlease connect the camera with the power adapters which came with the box refer to PIC.1, and connect the camera to the router via network cable. About 60 seconds later, the camerahas completed the start and you can start to setting WiFi for it (for first time using).Tips:1.Please make sure the smart phone and camera connect to the same WiFi router.2. Please place the camera as much as possible near the router, and the distance that is in the range of 3 meters.PIC.1Step2.Open the “Camhi” APP, click "add camera"(refer to PIC.2).Step3.Click “Search Camera from LAN"(refer to PIC. 3), and click the camera ID to select camera to add (refer to PIC. 4).Step4. Enter the camera Name and password (the camera default User Name is admin, and default password is admin), click on the top right corner ”done” to complete the adding (refer to PIC.5).PIC.2 PIC.3PIC.4 PIC.5Step5.Click the icon to enter into the Camera Setting menu (refer to PIC.6), and click "Wi-Fi Setting" (refer to PIC.7).Step6. Click " Wi-Fi manager "(refer to PIC.8), and select the WiFi which the camera will connect to, input the WiFi password and click “Connect” (refer to PIC.9). If you see the “WiFi setting successfully” show on the APP, which means the camera connect to WiFi successfully. Then you can pull out the network cable and view the camera on your mobile phone.PIC.6 PIC.7PIC.8 PIC.9Method B. Setting up WiFi for Camera with AP modeStep1. Start the IP CameraPlease connect the camera with the power adapters which came with the box refer to PIC.10. About 60 seconds later, the camera has completed the start and you can start to setting up WiFi for it (for first time using).Tips: Please place the camera as much as possible near the router, and the distance that is in the range of 3 meters.PIC.10Step2.P lease go to mobile phone WLAN setting menu, then choose the name which beginning with IPCAM, and the camera AP(Access Point) password is 01234567 (refer to PIC.11).PIC.11Step3.Open the “Camhi” APP, and click "add camera"(refer to PIC. 2).Step4.Click “Search Camera from LAN", and selected the searched UID (refer to PIC. 4).Step5.Please refer to the Step4 to Step6 of “Method A” to finish WiFi setting for the camera.6. View Camera on PCWhen the camera connected with WiFi successfully, you can view camera on IE (Internet Explorer) or PC client software on PC or Laptop locally and remotely.○1View on IE (Internet Explorer)When your PC is in the same LAN with the camera (normally means they are connected to the same router)Step1. Install and run the software “SearchTool .exe” from CD which came with the box.Step2.Open the software “SearchTool.exe”, click “Next”, and it will automatically search the camera IP, then select the camera IP and click “Next”(refer to PIC.12). The tools will auto modify the camera IP and Gateway. You can find the IP address and port # of your camera, and click “Next” to finish the modification (refer to PIC.13).PIC.12PIC.13Step3.Enter the camera’s IP address in your IE browser, for example: http://192.168.1.109 (If the default port has been changed e.g. to 100,you will need to add new port number when input IP address in the browser, for example : http://192.168.1.109:100), input the camera username and password (the camera username is admin and default password is admin).Tips: If for the first time use and software cannot load automatically, you'll need to change some ActiveX settings in Internet Explorer. (This will need to be done on EVERY computer you use to access the system.)Step1. Click "Tools”一“Internet Options”一“Security”一“Internet"一“Custom Level".Step2.Scroll down until you see ACTIVEX CONTROLS AND PLUG-INS.(If you have Internet Explorer 9 or 11,change ALLOW ACTIVEXFILTERING to DISABLE. Other versions of IE will not have this option.)Step3. Change the follow ACTIVEX controls to PROMPT:Download signed ACTIVEX controlsDownload unsigned ACTIVEX controlsInitialize and script ACTIVEX controls not marked as safe for scriptingStep4. When done click OK, and exit the Security Settings Menu.○2View with PC client software1) Install and run the software “HiP2P” from CD which came with the box.Tips: The software default User Name is “amdin”, and default password is nothing (means leaving the password empty, just click OK).2) Add camera to the “HiP2P”There are two ways of adding camera to the PC Client“HiP2P”.Method A. Automatically add cameraWhen your PC connect with the router as same as the camera connected to.Step1.Click the icon to automatically add camera, then you can see the camera was addedto the left List menu about 10-20 seconds later (refer to PIC.14).PIC.14Method B. Add the camera by the camera ID.When your PC is out of local area network with the camera (For example: view yourhome cameras from your office PC).Step1. Click the icon to enter into the settings interface (refer to PIC.15).Step2.Click “Input UID”, then input the camera ID and define the camera name,default UserName is “admin”, and default Password is “admin”, click “ok” (refer to PIC.16).Step3. Click the icon to view the camera.PIC.15Tips: Below is simple introduction of each icon of HiP2P.1: Cloud control camera rotation (need that the camera supports rotation)2: Intercom, speak, speak to video camera (need that camera supports intercom)3: Monitoring, listening to the sound of the camera (need that camera supports the audio camerafunction)4: Picture recording, after click to open the video function5: Picturing, after click to capture the current screen6: Centralized monitoring, switching monitoring screen to achieve a multi screen monitoring7: Local playback, play the history video stored in the local computer8: Remote playback, play the history video stored in the TF memory card of camera9: Cancel the current user10: Exit the software7. Record video with micro SD cardStep1.Please install a micro SD card (max support 32GB) inside the Camera before you connect the power adapter. (If the item which you purchased are pre-installed the micro SD card, please skip it).Then open “CamHi” APP to format the SD card. You can check it in Camera Setting→SD Card Setting→Format SD Card.Step2. Go to Camera Setting→Timing Record (refer to PIC.17), you can modify the camera record parameters, then click “Apply” to save the modification (refer to PIC.18).Record files duration, you can set the length of record video each files. The minimum record video time are 15 seconds, and the maximal record video time are 900seconds.Whether to open Record, you can select “ON” or “OFF” . “ON” which means the camera will record video on SD card, “OFF” which means the camera will not record video.Record Timer, you can select “All Day” or “None”. “All day” which means the camera will24x7 continuous recording. “None” which means the camera will record nothing.PIC.17 PIC.18Tips: If you want to setup a record plan, for example, if you want the camera to record 00:00-11:00AM and 14:00PM-23:59PM. you must view the camera on IE(please refer to the instruction of “View on IE(Internet Explorer)”), click Setting→Advanced→Timer record, below is the setting you should do(refer to PIC.19).PIC.198. Playback videoYou can playback the recorded video on your mobile phone APP or PC client software.○1Playback video on mobile phoneOpen the APP “CamHi”on your mobile phone, then click the icon “video”→choose online→select the camera which you want to playback(refer to PIC.20)→select the file and click it to play(refer to PIC.21).PIC.20 PIC.21○2Playback video on PC client softwareOpen the software HiP2P on your PC, click Remote playback “”→ you can choose the camera, date and time, then click Search→select the file and double click it to play(refer to PIC.22).PIC.229. Backup videos to PC Hard DiskOpen the software HiP2P on your PC, click Remote playback “”→ you can choose the camera, date and time, then click Search→select the file and right click the mouse tochoose Download file→click Begin to start download files to PC Hard Disk(refer to PIC.23).PIC.2310. Email notificationSetup the Email notification on mobile phone APPStep1. Enable motion detectionLogin the “CamHi” APP, and enter into the Camera Setting menu (refer to PIC.29).Click Alarm Setting→ then set the “Motion Detection” is ON→click Apply (refer to PIC.30).PIC.29 PIC.30Step2.Enable Email notificationGo to Camera Setting menu, and click “Action with Alarm” (refer to PIC.31) → set the “E-mail Alarm with Picture” is ON→click Apply (refer to PIC.32).PIC.31 PIC.32Step3. Setup email accountClick Email Setting (refer to PIC.32) → fill email setting →click Apply (refer to PIC.33).PIC.32 PIC.33After email successfully set, you will receive emails with snapshot when motion detected. Tips .1.Due to different policies and work mechanism, some email service providers’ SMTP may not well support this. Due to limited resources we cannot test all emails, we testedGmail, email and Yahoo email work fine as sender. Send to (receiver) could be any email. We will be improving the system.2. If you Setup the Email notification on mobile phone APP, you can’t setup motion detection areas and schedule.11. FAQsQ1. What can I do if the device setting WiFi failed?A:1.Check the antenna connection is OK and the camera was powered on.2. Make sure the camera and mobile phone near by the WiFi router which the distance are not more than 3 meters when you setting WiFi for the camera.3. Make sure your router’s WiFi SSID was not be hidden,and the WiFi frequency is 2.4G.The camera don’t support 5G WiFi.4. Restore the camera to factory settings and restart to setting WIFI for camera.If the camera setting WiFi still failed, please contact us.Q2. How to restore the factory setting?A: Press the reset key more than 3 seconds, and make sure the camera is keeping on power on. The camera will restore the factory settings successfully about 60 seconds later.Q3. What to do if I forgot the camera password?A: There are two ways of resetting camera password.Method AWhen your PC is in the same LAN with the camera (normally means they are connected to the same router), you can reset camera password on “SearchTool”.Step1. Open the “SearchTool” on PC.Step2. Click “Refresh” to search the camera IP, then select the IP address and click “Next” (refer to PIC.34).PIC.34Step3. Click “Pwd Reset” to reset the camera password to default password (refer to PIC.35).Tips: The camera default password is admin.PIC.35Method BPlease restore the camera to factory settings (please refer to Q2), then restart setting up WiFi onyour mobile phone for the camera.Q4. How to add the camera which has connected to the wireless network to the phone?A: There are two ways of adding the devices which have connected WiFi successfully.Method A. ADD the camera with UIDStep1.Open the “Camhi” APP, click "Add camera" to start add camera.Step2. Enter or Scan the camera UID, and camera password, then click “done”.Method B . Add the camera in the same LANWhen your mobile phone connected to the WiFi is in the same LAN with the camera, you can add the camera to your phone from LAN.Step1. Open the “Camhi ” APP , click "Add camera" to start add camera.Step2. Click “Search camera from LAN", and selected the searched UID and enter the camera password, then click “done ”.Service InfoContact Person: AlsiaE-mailID:**********************Skype ID: anran-cctvTel: +86-755-89580866V 1.1-2017.04。
海康威视IP网络摄像机使用手册(V1.0)
网络摄像机(Network Camera)用户使用手册版本1.0非常感谢您购买我公司的产品,如果您有什么疑问或需要请随时联系我们。
本手册可能包含技术上不准确的地方、或与产品功能及操作不相符的地方、或印刷错误。
本手册的内容将根据产品功能的增强而更新,并将定期改进或更新本手册中描述的产品,更新的内容将会在本手册的新版本中加入,恕不另行通知。
目录第一章:产品简介 ---------------------------------------------------------------------------------------------------- 21.1主要功能及特点 -------------------------------------------------------------------------------------------------- 21.2主要应用----------------------------------------------------------------------------------------------------------- 2第二章安装------------------------------------------------------------------------------------------------------------ 32.1注意事项----------------------------------------------------------------------------------------------------------- 32.2面板及说明-------------------------------------------------------------------------------------------------------- 32.2.1侧面图----------------------------------------------------------------------------------------------------- 32.2.2后面板图及说明 ----------------------------------------------------------------------------------------- 32.3硬件安装----------------------------------------------------------------------------------------------------------- 42.3.1 网络拓扑图 ---------------------------------------------------------------------------------------------- 42.3.2 报警输出连接说明 ------------------------------------------------------------------------------------- 52.3.3 网线的制作 ---------------------------------------------------------------------------------------------- 52.4客户端软件4.0的安装----------------------------------------------------------------------------------------- 6第三章参数配置---------------------------------------------------------------------------------------------------- 103.1通过IE浏览器进行参数配置-------------------------------------------------------------------------------- 103.2通过客户端软件进行参数配置 ------------------------------------------------------------------------------ 12第四章广域网接入------------------------------------------------------------------------------------------------- 174.1使用PPP O E接入------------------------------------------------------------------------------------------------- 174.2广域网访问------------------------------------------------------------------------------------------------------- 17常见问题解答 -------------------------------------------------------------------------------------------------------- 19附录技术规格表 -------------------------------------------------------------------------------------------------- 20第一章:产品简介网络摄像机是集传统的模拟摄像机和网络视频服务器于一体的嵌入式数字监控产品。
海康威视全高清IP摄像头手册说明书
1920 × 1200 @ 30fps 2 mm fixed lens1/2.8" Progressive Scan CMOS IP66, IK08Full HD Video (up to 4K)24/7 Operation Built-in WiFi Longer service lifePortrait and landscape modes Built-in 32 GB SD cardPeople Counting CameraDS-2CD6825G0/C-I(V)(S)DS-D60C-BDigital Signage BoxMultiple alarm rules can be configured, helping to save on manpowerProvides alarm notification for operators in order to improve efficiencySaves time wasted on handling false alarms Pop-up video on control client, video wall, and mobile app, email and siren alerts, etc.Displays alarm list, alarm linkage video and alarm location together in a windowHikCentral Professional PlatformLive View: Max. 256 channels’ live view per Control Client. Auto-adaptive window-split overlay for easy operation.Playback: Thumbnail and smooth drag for easy video history skimming.Video Search: VCA search enables the efficient retrieval of desired video footage.E-Map: Locates the cameras on the E-Map for intuitive position demonstration.System Access: Desktop client, web client and mobile client for convenient system access.Video Management SoftwareAccess controller100,000 cards and 300,000 events storageCommunication via TCP/TP, ehome5.0 and RS-485ISAPI, OSDP supportedModular door station main unit, requires mounting bracket 2MP HD camera, fish-eye, IR supplement1 call physical button,2 lock relays, 4-ch alarm inputPro Series Access ControllerDS-K2600TDS-KD8003-IME1/SKD8 Series Pro Stainless SteelModular Door StationHigh quality imaging at 4 MP resolutionExcellent low-light performance via DarkFighter technology180° splicing image: the image presented includes the full panoramic view covered by the cameraPanoramic camera linked to a PTZ: capturing 180° images with the panoramic camera, as well as close-up images with the PTZ cameraDarkfighter PTZPanoramic & PTZ CameraDS-2DF8425IX-AELWDS-2DP0818ZIXS-DE/440/T2High quality imaging with 2 MP resolutionExcellent low-light performance via DarkFighter technologyUp to 4-ch, including people gathering detection, people running detection, violent motion and false alarm redaction detection and trip & fall detection.2 MP ANPR CameraDeepinMind NVRDS-2CD7A26G0/P-IZ(H)SDS-MDH005-BiDS-9632NXI-I8/BA10.1-inch screen showing temperature, mask reminder, etc.Built-in 1/2.7" CMOS cameraBuilt-in thermographic camera with a fixed focal-lens of 3 mm Temperature measuring distance: from 0.3 m to 2 m Temperature measurement range: 30 °C to 45 °COnboard Temperature ScreeningTerminalTemperature Screening & Auto Wi-Fi Record BackupControl RoomCentral ManagementCentral Video MonitoringHikCentral is completely centralised to achieve vast integration capabilities and deliver more powerful solutions.Business IntelligenceThe BI dashboard provides a flexible, customised tabular view interface to provide decision makers with actionable analysis reports.Business IntelligenceWhen someone has an elevated temperature or is not wearing a mask, event & alarm management can guide you to the related video, picture and its location via map, allowing appropriate responses to be initiated.Temperature AnalysisVehicle AnalysisTeaching BuildingBehaviour AnalysisThermographic Handheld Camera Touchless skin-surface temperature and mask detection with LibraryPeople CountingHaving staff management issues?People counting can help optimise staffing schedules and operations, using the generated insights to precisely increase the number of staff during busy times to improve People Counting CameraDocumenting visitor TrafficVisitor flow control is based on the real-time number of people inside, ensuring social distance is maintainedDaily, weekly, and monthly visitor flow reports contribute to improved personnel scheduling and effectively enhance resource utilisationSudden change of sound intensity detectedTrip and fall Congestion FightingPerimeterFalse Alarm ReductionDeepinMind NVRReceives intrusion and line crossing detection information from cameras, and identifies humans and vehicles in the video to reduce false alarms Saves on costs and time compared with conventional CCTV systemsDeepinMind NVRANPR CameraControls vehicle entrance and exit via number plate recognitionNumber plate recognition and recording Automatically releases employee vehiclesWarning on blacklist vehicles (barrier kept closed)Provides reports on passing vehiclesStainless Steel Door StationMake contact with the Control Room Noise suppression and echo cancellation Low illuminationHello?Come on throughSolution IntroductionGateVehicle Entrance & Exit Control + IntercomHikvision’s School Security Applications are designed to increase safety and ensure that your Schoolcan make the students in comfort, with confidence and peace of mind.School BusOnboard Temperature Screening & Mask DetectionApplicationsDormitoryAccess Control Digital DisplayTeaching BuildingsBehaviour Analysis Server Temperature ScreeningControl RoomCentral Monitoring & ManagementGateVehicle Entrance & Exit Control IntercomSports GroundPanoramic ViewLibraryPeople CountingCar ParkPTZ MonitoringPerimeterFalse Alarm Reduction。
IPCAMERA使用教程
第一章硬件安装此部分将介绍如何完成产品硬件部分的安装和物理连接。
安装完成后,接入电源,产品开始正常工作。
1.安装摄像机。
RESET:复位键,机器通电情况下,按下此键保持5 秒后,机器将恢复到出厂设置。
POWER: 电源插座口,插入出厂配备的电源(一般为标配12V 内正外负直流电源)RJ45: 网络接口,插入网线,接入到网络中。
2.连接网络:3.接通电源将包装盒内的电源线一端连接网络摄像机,另一端电源插头接电源插板,然后打开电源插板的开关。
请使用包装盒内提供的电源适配器,否则将有可能引起硬件损坏。
4.检查LED 灯接通电源后,摄像机开始工作,此时摄像机尾部的黄色小灯持续发光,前端的绿色LED 指示灯将闪烁。
在黑暗环境中,你会看到摄相头前部的红外灯发出淡淡的红光,使您可以在黑暗中依然看清摄像机的拍摄的画面。
第二章配置产品第一章部分的安装完成以后,产品需要安装光盘中“”软件后就可以直接在局域网上使用了。
我们通过IPCAM 查找器程序可以找到产品的IP 地址并双击就可以PC 上就可以使用浏览器访问产品(或者在浏览器地址栏输入产品的IP 地址和端口号,例如“http://192.168.1.99:99”,然后敲击“回车”键即可。
最后我们可以通过操作Web 配置页面、对产品进行正确配置,使其可以完成我们需求。
总之,要想通过浏览器观看摄像机监控的画面,或者操作产品的Web 配置页面,我们必须要知道产品的IP 地址以及端口号。
*** 注意:摄像机出厂的缺省设置为动态获取IP(DHCP),如果网络内的路由器没有DHCP 功能或没有启用,则搜索到的摄像机IP 地址将会是169.78.32.56(如果直接连接PC 或笔记本也会出现这种情况,此时需要将PC 或笔记本的自动获取IP 关闭,改为任一的固定IP),此时把摄像机的IP 地址改为手动分配;但摄像机的IP 地址不能与PC 或其它设备完全一样,只要保证最后一位不同即可。
- 1、下载文档前请自行甄别文档内容的完整性,平台不提供额外的编辑、内容补充、找答案等附加服务。
- 2、"仅部分预览"的文档,不可在线预览部分如存在完整性等问题,可反馈申请退款(可完整预览的文档不适用该条件!)。
- 3、如文档侵犯您的权益,请联系客服反馈,我们会尽快为您处理(人工客服工作时间:9:00-18:30)。
EasyView使用手册
2013.2.4
1 简介
EasyView.exe:即插即用软件。
不用在路由器做任何设置,只要输入IPCamera的系列号及账号及口令登录即可远程访问实时图像。
每台IPCamera出厂前会配置一个系列号,此系列号是唯一的且不可更改。
2 安装与运行
2.1 安装
运行EasyView Installer(v1.1.2.1).exe安装本软件,安装完成后桌面上会出现
这个快捷方式。
运行EasyView软件,可以浏览实时图像、录像回放、设置码率等功能.
2.2运行EasyView软件
(1)双击桌面快捷键,弹出如下窗口:
(2)单击,(可以直接右键点击【我的摄像机】添加摄像机)弹出添加IPCamera
系列号、名称、用户账号及口令的窗口,如下图:
(3)输入IPCamera系列号及用户账号及口令(默认用户名是admin.口令是admin),名称可任意填写或直接忽略,单击【确定】.
系列号:输入摄像机的UID,UID是一组有数字和字母组成的20为字符,记录在摄像
机的标签上
名称:输入摄像机的名称,可自定义名称
用户账号:输入摄像机的用户名,出厂默认是:admin
口令:输入摄像机的密码,出厂默认是:admin
(4)在【我的摄像机】下会显示该IPCamera图标,再双击该图标则图像会自动显示在右侧,如下图:
至此,已可正常浏览IPCamera的实时图像。
说明:
①每台IPCamera出厂前会配置一个系列号,此系列号是唯一的且不可更改,序列号
记录在摄像机标签上,或者通过摄像机配置向导搜索摄像机信息得知。
②若访问序列号是出现另外的画面显示,即出现串码现象,则需要检查序列号是否多
次写入,建议联系厂家跟换序列号。
③本地访问正常,外网访问却提示“设备不在线,请稍后重新登录查看”时,请检查
摄像机网关和DNS是否填写正确。
3 EasyView软件界面详细说明
3.1 菜单栏说明
:点此按钮会弹出输入系列号、账号及密码等信息。
:设置录像文件保存路径、图片文件保存路径。
:选择要录像的实时图像,单击此按钮生效。
在左上角有绿色圆点闪烁,表示正在录像。
:选择要拍照的实时图像,单击则会拍照。
:声音。
点此按钮可以接收到IPCamera端的声音。
:对讲。
电脑端说话,IPCamera端可以接收到。
:本地录像回放。
即录在本电脑上的录像文件点此按钮进行回放。
:远程录像回放。
即回放SD/ TF卡中的录像文件。
再次单击返回实时浏览界面。
:显示方式。
可以一屏显示,也可以多屏显示。
:按实际分辨率或放大或缩小显示实时图像。
3.2.本地录像回放
本地录像回放即回放录在本地电脑硬盘上的录像文件,默认路径为C:\Record\,用户可以通过【设置】进行修改。
可以按设备的系列号、日期进行查找,找到的录像文件只要双击
就会在下图中的右侧窗口进行回放。
可通过点击右下角的来调节播放速度,8x时速度最快,1x时速度最慢。
3.4. 云台操作
软件界面左下角是云台操作。
用户可直接控制摄像机PT转动等操作。
3.5 树节点界面操作
右击,则弹出添加组的菜单栏,单击
后屏幕中间弹出下面的菜单栏
,输入组名后可添加分组。
右击组名可进行添加摄像机的操作。
右击摄像机的名称可进行打开,停止,修改,删除,码流选择等操作,如图所示:
在码流选择选项,用户可选用,如果选择较好质量则占用比较多的带宽,如选择较低码流,则对带宽要求不是那么高,但画面质量会相对差一些。