京瓷TASKalfa3050ci3550ci4550ci5550ci零件手册
京瓷维修手册
京瓷维修手册维入方式是10871087 退出按001 维印维U000 维出自我维维告状—U001 退出保维模式—U004 维维机器维号—U005 无维维印—U019 维示 ROM 版本—U020 初始化所有据数—U021 初始化存内—U030 维维维机工作情况—U031 维维维维维维维维—U032 维维合器工作情离况—U034 维定维像打印维位维维前端维位•5.1/0/0/0/0/0• 维维中维-1.2/0/0/0/0/0U035 维定 folio 尺寸维度•330• 维度210U051 维维维维松维度20/0/70/80/80/0U053 微维维机速度维维维机速度维维•0• 多维维机速度维维0• 出维维机速度维维0• 维位维维机速度维维0• 维机速度维维;用于手送供维维中的供维, 0• 维机速度维维;用于维维的供维盒中的供维, 0• 维机速度维维;面模式下, 双0U060 维维维描维维入特性12U061 打维曝光灯—U063 维维遮光位置0U065 维维维描维放大倍率主维描方向•0• 副维描方向-12U066 维维前端维位以维描稿台璃上的原稿玻10U067 维维中维以维描稿台璃上的原稿玻0U068 维维送稿器中原稿的维描位置0U070 维维送稿器放大倍率0 U071 维维送稿器维描维位维维前端维位•0• 维维后端维位0U072 维维送稿器中维0U073 维维维描维工作情况—U074 维维送稿器维入亮度1U087 打维,维维送稿器维描位置维维模式35U088 维定维入维波器;莫维维维少模式, 维条减U089 维出 MIP-PG 维案—U091 维维遮光情况—U092 自维维维维描维—U093 维定曝光维度等维文字,文字和维片,维片模式•0/0/0U099 维维原稿尺寸维维—U100 维定主充维高维维控制维维•极135• 维印维隔60• 维印量数50• 校正量数10U101 维定其高维维影偏维维维维率它•27• 维影偏维维维占空45• 维印控制维维;维大尺寸, 168• 维印控制维维;维小尺寸, 179• 维印充维维出维维定维38• 维印充维维出维定维启34• 分控制维维离1• 分充维维出维定维离启33• 分充维维出维维定维离43U110 维维,除感光鼓维清数—U130 墨粉入模式装—U144 维定墨粉入操作装0U158 维维,除维影维清数—U161 维定定影控制度初维维定的定影度温•温140• 二次维定的定影度温160• 维印操作度温1 170• 维印操作度温2 180• 用于定影控制的维维数5• 用于定影控制的维维;厚维, 数20U162 强制维定定影—U163 重维定影故障的据数—U167 维维,除定影维清数—U199 维维定影度温—U200 打维所有 LED —U202 维定 KMAS 主维维系维—U203 维操作送稿器独—U204 维定是否有维匙维或维匙维器维数卡数U207 维维操作面板维—U243 维维送稿器维机和维磁维的工作情况—U244 维维送稿器各维维—U250 维定保维周期150000U251 维维,除保维维清数0U252 维定地域日本U253 在维、维维之维维行切维双数A3U254 维,维自维维功能维启U255 维定自维除维维清90U258 维维到墨粉用维~切维维印操作维维模式尽U260 改维维印维定维出维后数U265 维定地域维格0U332 维定尺寸维维系数1.0U342 维定出维限制维U345 维定保维到期指示维—U402 维维维像打印的维留维维维装—U403 维维稿台璃上的原稿维描维留维维维玻装—U404 维维送稿器中的原稿维描维留维维维装—U407 维维存维像打印前端维位内—U901 维维,除各供维位置的维印维清数—U903 维维,除维维维维清卡数—U904 维维,除故障维示维清数—U905 维维,除送稿器维清数—U908 维维维维数—U910 除覆盖率据清数—U911 维维,除各维维维尺寸的维印维清数—U927 除清维器数—维维维入维始随数意修改维器30363036---------908-----维入工模式厂维入按维维维入子菜维启维入想修改的维按维维维维你数启确维维机重30653065--908------启即可成功修改维入维修模式在维印界面按维入维修模式维入出维维点黑然后改成数就可10871087 908 0以了然后按到再维入维印建回到维印界面C 000 001U928 维维,除机器维维维维清运数—U990 维维,除曝光亮起维维清灯—U991 维维维描维维数—U993 维出 VTC-PG 维案—KM-1620自维功能断KM-1620配维自维功能。
复印机配件
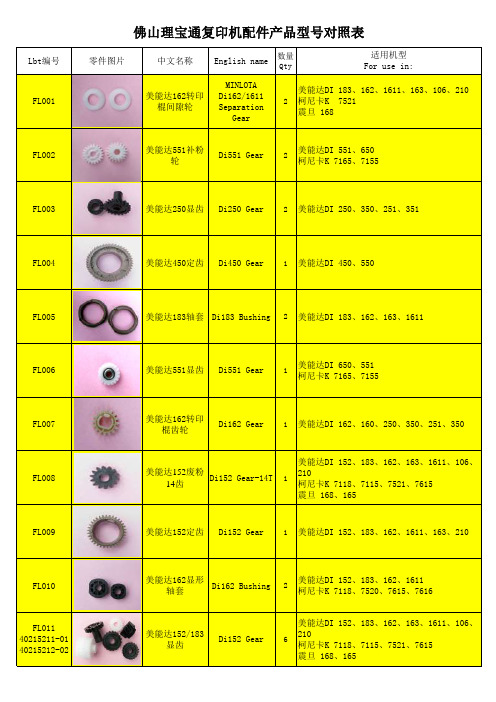
Lbt编号零件图片中文名称English name 数量QtyFL001美能达162转印棍间隙轮MINLOTADi162/1611SeparationGear2FL002美能达551补粉轮Di551 Gear2FL003美能达250显齿Di250 Gear2 FL004美能达450定齿Di450 Gear1 FL005美能达183轴套Di183 Bushing2 FL006美能达551显齿Di551 Gear1FL007美能达162转印棍齿轮Di162 Gear1FL008美能达152废粉14齿Di152 Gear-14T1FL009美能达152定齿Di152 Gear1FL010美能达162显形轴套Di162 Bushing2FL011 40215211-01 40215212-02美能达152/183显齿Di152 Gear6佛山理宝通复印机配件产品型FL012美能达152/162间隙轮Di152 Gear2FL013美能达152/162工字齿Di152 Gear2FL014柯尼卡7171显齿KONICAK7171/7255Gear6FL015柯尼卡7020搓纸轮齿轮K7020Gear;PaperFeed Roller1FL016柯尼卡7135过桥轮K7135 Gear1FL017东芝169轴套TOSHIBAE168/169 Bushing2FL018东芝5570显齿E5570 Gear7FL0196LA55018000东芝168/258定齿E168 Gear1FL020理光1015转印棍齿轮RICOHAF1015/1113Gear2FL021理光1025定齿AF1025 Gear1 FL022B039-3062/3245/3060理光1015显齿AF1015Developer Gear5FL023理光1015下棍轴套AF1015Bushing;LowerRoller2FL024夏普鼓驱动齿轮(数码机通用)SHARPAR160/275 Gear1FL025夏普275显齿AR275 Gear5 FL026NGERH0090QSZ1夏普275定形驱动轮AR275 Gear1FL027NFERH0019QSZ1夏普158定形驱动过桥轮AR158 Gear1FL028NGERH0056QSZZ 夏普160定形驱动轮AR160 Gear1FL029 NGERH09578夏普161定形轴套AR161 Bushing2FL030NGERH0540FC23夏普160/1818定齿AR160 Gear1FL031佳能5000废粉齿轮CANONIR5000/6030Gear2FL032佳能1600定齿IR1600 Gear1FL033佳能1600定形轴套IR1600 Bushing2FL034京瓷1635定齿KYOCERA KM1635Gear1FL035京瓷1635定形轴套KM1635 Bushing2FL036松下1810轴套PANASONICDP1810 Bushing2FL037施乐315定齿XEROX X315/415Gear1FL038美能达162/183/显齿套MINLOTA Di162Gear2FL039美能达250/350带轴承间隙轮BH250 Gear2FL040美能达551显齿套Di551 Gear5FL041美能达BH250/350转印间隙轮BH250 Gear2FL042东芝163间隙轮TOSHIBA E163Gear2FL043佳能IR1600间隙轮CANON IR1600Gear2FL044京瓷K M4530/5530主电机齿KYOCERA KM4530Gear1FL045京瓷KM4530/5530驱动齿轮KYOCERA KM4531Gear1FL046京瓷K M45830/5530过桥齿轮KYOCERA KM4532Gear1FL047佳能IR5000清洁齿轮CANON IR5000Gear1FL048美能达D I551/650显影轴套MINLOTA Di551Gear6轴3棉FL049美能达D I450/550主电机齿MINLOTA Di450Gear1FL050I R3300搓纸轮IR3300Pickup Roller1FL051I R2016搓纸轮IR2016Pickup Roller1FL052理光1045搓纸轮AF1045Pickup Roller3FL053理光1075搓纸轮AF1075Pickup Roller3FL054DI162加强补粉齿DI162 Gear1FL055DI162加强显影轴套Di162 Bushing6FL056A F1015套鼓齿AF1015 Cam1 FL057A F1015废粉齿AF1015 Gear1FL058A F1027显齿AF1027 Developer Gear5FL059A F200显齿AF200 Developer Gear5FL060东芝E163工字轮E163 Gear1 FL061A R350废粉齿AR350 Gear2FL062A R350排纸轮AR350Roller;Paper4FL063I R5800定齿IR5800 Gear1 FL064I R5800显齿IR5800 Gear1FL065松下DP1820显齿DP1820 Developer Gear2FL066A F1075废粉齿轮Af1075 Gear2 FL067I R8500过桥齿轮IR8500 Gear1FZ001美能达450分离爪Stripper5FZ002美能达152分离爪Stripper4FZ003松下1820分离爪Stripper5FZ004松下1510分离爪PANASONICDP1510 Stripper5FZ005施乐315分离爪Stripper4 FZ006理光1015分离爪Stripper5FZ007夏普275上分离爪Stripper4FZ008夏普160上分离爪Stripper4FZ009夏普下分离爪(数码机通用)Stripper4FZ010佳能1600分离爪Stripper5 FZ011京瓷1620分离爪Stripper5 FZ012东芝163分离爪Stripper5 FZ013东芝169分离爪Stripper6FZ014夏普AR350上分离爪Stripper4FZ015夏普AR350下分离爪Stripper4FQ001美能达152分离爪弹簧StripperSpring10FQ002美能达551分离爪弹簧StripperSpring10FQ003美能达152侧密封挡粉片Mixing Vanes2FQ004美能达162转印支架SeparationUnit2FQ005美能达152转印支架SeparationUnit2FQ006美能达250转印棍支架SeparationUnit2FQ007 AA06-6637AF 理光1015分离爪弹簧StripperSpring10FQ008美能达BH250/350转印支架SeparationUnit2FQ009理光1015刮板AF1015 Scraper1 FQ010佳能2016刮板IR2016 Scraper1 FQ011夏普1818刮板1818 Scraper1 FQ012夏普AR350刮板AR350 Scraper1 FQ013美能达152刮板DI152 Scraper1FQ014夏普A R350搅粉辊AR350 SpongeRoller; Toner1FQ015DI162瓷棍插销Di162 Bolt;Mag Roller1FQ016BH250出纸杆BH250Pole;Paper1FQ017K M2035支架KM1635 SupportHook2。
京瓷复印机维修手册保养部分KM303540355035新

复印/打印输出管理 1. 按“部门管理初始设定”键。 2. 选择“复印/打印输出的管理”然后按“变更
设定值”键。 3. 选择“全部”或“个别”键。
打开/关闭扫描管理功能 注:本设定仅在复印机上安装了选购件扫描卡时可 用。
手动浓度调整(图片模式)
当原稿模式选择为图片模式时,调整中间浓度值。 1. 选择“手动浓度调整(图片)”然后按“变更 设定值”键。 2. 使用“浓”键或“淡”键调整浓度。 设定范围:-3 至 3
打开/关闭分页模式
确定分页模式是否为初始模式下的初始设定。 1. 选择“分页”然后按“变更设定值”键。 2. 选择“分页:开”或“分页:关”键。
2FD/2FF/2FG
画面变更(追加功能)
添加经常使用的功能和/或模式,或者更改它们的 显示顺序避免您更方便的使用复印机。
1. 选择“画面变更(追加功能)”然后按“变更 设定值”键。
2. 按上/下光标键和“”键更改它们的显示顺 序。
1-4-5
2FD/2FF/2FG (4)机器初始设定
打开/关闭部门 ID 代码下的总复印数目和/或 一并清除各单独部门代码下的复印计数。
1. 按“各部门的合计”键。 2. 选择要检查其复印计数的部门 ID 代码,然后按
“合计”键。将显示该部门 ID 代码下的总复印 数目。 3. 按“计数清除”键清除该部门 ID 代码的复印计 数。 4. 按“是”键。
纸张类型(自动选纸)
选择在 APS(自动选纸)模式下可选的纸张类型。 1. 选择“选择纸张类型(自动选纸)”然后按 “变更设定值”键。 2. 按“设定”键,然后按对应自动选纸模式下允 许使用的纸张类型的按键。
KYOCERA KM-3035 4035 5035 维修手册
KM-3035 KM-4035 KM-5035维修手册2004 年 3 月出版842FG110小心不正确更换主控板上的旧电池可能存在爆炸的危险。
只能更换与生产商推荐的型号相同或相当的电池。
请按照生产商说明处理旧电池。
安全注意事项本手册规定了维修人员相关的安全警告及注意事项,用于保养过程中确保用户、机器及维修人员自身的安全。
建议维修人员在进行保养前,仔细阅读本手册以便熟悉其中所述警告及注意事项。
表示规定的操作。
规定操作的具体内容在符号内部显示。
一般规定的操作。
拔下墙上插座中的电源插头。
复印机务必接地。
安全警告及注意事项为预防维修人员和用户遭受身体伤害及财产损失,本手册使用了各种符号。
图示及其含义解释如下:危险:对使用本符号表示的警告信息,如果未引起充分注意或未正确遵守,非常可能导致严重的人身伤亡。
警告:对使用本符号表示的警告信息,如果未引起充分注意或未正确遵守,可能导致严重的人身伤亡。
小心:对使用本符号表示的警告信息,如果未引起充分注意或未正确遵守,可能导致人身伤害或财产损失。
符号三角形()符号所表示的警告包含危险与小心符号所指的信息。
具体注意事项在符号内部显示。
一般警告。
触电危险警告。
高温警告。
表示禁止的操作。
具体禁止的内容在符号内部显示。
一般禁止的操作。
禁止拆卸。
1. 安装注意事项警告•请勿使用规定电压以外的电源。
避免在同一插座上进行多项连接:否则可能会导致火灾或触电。
当使用延伸电缆时,请务必检查是否符合额定电流。
...................................................................•请将接地线连接至适合的接地点。
若复印机未接地则可能导致火灾或触电。
若将接地线接至不适合的物体则可能导致爆炸或触电。
请勿将接地电缆连接至以下任何物体:煤气管、避雷针、电话线路的接地缆线以及水管或水龙头。
....................................................................................................小心:•请勿将复印机置于不牢固或倾斜的表面:复印机可能会翻倒,造成人身伤害。
Kyocera SmartFax 设置和操作指南说明书
SET UP ANDOPERATION GUIDESET-UP AND OPERATION GUIDEDezember 2019© KYOCERA Document Solutions EuropeContents Introduction (3)What’s New? (3)Part 1: Administration (4)Installation (5)Trial period and activation (6)Activation (6)Supported Devices (7)Setting as default application (8)Removing SmartFax from the device (8)Setting up SmartFax (9)Application Settings (9)Scan Settings (10)Defining if OCR and PDFA available (10)Defining default scan settings (10)Defining default document name (11)Destination Settings (11)Defining default fax settings (prefix, suffix) (11)Fax Settings - Defining allowed domains (12)Login Settings (12)Defining an application login (12)Misc Settings (13)Defining miscellaneous settings (13)Soft Numeric Keypad (13)Access Code (13)Address Book Settings (14)Activating the local address book (14)Determining LDAP settings (16)Part 2: Usage (17)Using SmartFax (17)The User Interface (17)Sending a fax (19)The Address Book (20)Appendix (20)Updating the SmartFax application remotely (20)Preparing File with Application Settings (20)Remote update of the application (22)IntroductionSmartFax connects your MFP to your fax server and enables to use the MFP like a regular fax machine. Users only have to enter the fax number or select it from the address book. There is no need to enter prefix or suffix or other fax server parameters. Additional fax cards or cables are unnecessary, and there are no monthly costs for the devices as all faxes are sent through the fax server.SmartFax also greatly simplifies the changing of file format, page size, resolution, duplex or simplex and other scan settings, making scanning easy and fast for everyone.What’s New?Version 1.6.78∙Support for new devices: TASKalfa 2553ci, TASKalfa 3253ci, TASKalfa 4053ci, TASKalfa 5053ci, TASKalfa 6053ci,TASKalfa 4003i, TASKalfa 5003i, TASKalfa 6003i∙Administrator is able to define the default Soft Numeric Keypad positionVersion 1.6.76∙Expanded local address book access.As in the previous version the application will be able to read the fax recipient’s from the local address book of the device. Additional the address groups now will be read fromthe address book. When an address group is found, the application shows the name of the address group and the amount of members of this group. This expanded localaddress book functionality is available for devices with the HyPAS API Vers. 2.1.4 orhigher.Version 1.6.64∙Administrator is now able to define the allowed email domains in the destination settings of the application.Version 1.6.54∙Support of the Soft Numeric Key Pad∙We have added a setting that a job will automatically send or canceled, when in the continuous scan mode the user adds no new document during a scan process.∙We added further the following features:o PDF A levelo Searchable PDFo User is able to define the file name of the scan resultso Skip Blank Pages (Supported since API Version 2.1.5)o Application login against LDAP. (Can only be used if no other device authentication is implemented).Version 1.6.16∙FaxHub support∙Administrator can store the Application Settings on a USB stick. The prepared file, that contains all application settings, can be used to rollout the settings to all selected devices. The administrator can transfer the application settings with help of the KYOCERA Net Viewer to the application.Version 1.6.03∙The user can rotate scans∙The user can set continuous scan ON or OFF∙The administrator can set an access code for the admin settingsVersion 1.6∙Support for new scan settings, e.g. continuous scan on/off, rotation of scans (orientation)∙Possibility to change the admin code (inside admin settings)∙Admin can define whether the user shall be allowed to change the scan settings in the various screens∙The admin settings are now structured for better orientation and faster navigation∙Support for new devices: ECOSYS M6026cidn, ECOSYS M6526cidn, TASKalfa 266ci, ECOSYS M3040idn, ECOSYS M3560idn, ECOSYS M3550idn, ECOSYS M3540idnVersion 1.5.01∙Remote configuration of the SmartFax Admin settings from the Command Center∙Density support in the Scan settings∙Support of apostrophes in emailaddressesi.e.graham.o’******************Part 1: AdministrationThis section describes how to install and set up the application. It is relevant for administrators and service technicians.InstallationRequired file: SmartFax-1.6.03.pkg or SmartFax-1.5.pkgPlease use SmartFax-1.5.pkg for the following devices:∙TASKalfa 250ci∙TASKalfa 300ci∙TASKalfa 400ci∙TASKalfa 500ci∙TASKalfa 552ci∙TASKalfa 300i∙TASKalfa 420i∙TASKalfa 520iFor all other devices, please use SmartFax-1.6.64.pkg or newer.∙Copy the SmartFax.pkg file to the root folder of an empty USB flash drive.Note that the USB flash drive needs to be compatible with the requirements of thedevice.∙Open the System Menu, scroll to the next page and press the Application button. If prompted to authenticate, login with an administrator account. The application screen will list all applications currently installed on the MFP.∙Press the Add button to open the Application-Add screen. Then insert the USB flash drive into the USB slot at the side of the panel. Within a few seconds, the MFP willdisplay SmartFax in the list of applications found on the USB flash drive.∙Select SmartFax and press the Install button. When prompted to confirm, press Yes.The MFP will confirm that the application installed correctly.∙Then, press the Remove Memory button. After the MFP confirms that it is safe to remove the USB memory device, remove it from the MFP.∙Press the Close button to exit back to the Application page.∙Select SmartFax and press the Activate button. When prompted to confirm activation, press the Yes button.Updating the application:In case of release of a newer version, please proceed as follows:∙Open the System Menu, scroll to the next page and press the Application button. If prompted to authenticate, login with an administrator account. The application screen will list all applications currently installed on the MFP.∙Press the Add button to open the Application-Add screen. Then insert the USB flash drive into the USB slot at the side of the panel. Within a few seconds, the MFP willdisplay SmartFax in the list of applications found on the USB flash drive.∙Select SmartFax and press the Update button. When prompted to confirm, press Yes.The MFP will confirm that the application updated correctly.∙Then, press the Remove Memory button. After the MFP confirms that it is safe to remove the USB memory device, remove it from the MFP.∙Press the Close button to exit back to the Application page.Trial period and activationA license for SmartFax needs to be purchased per device. For testing purposes, a trial period is available.∙Available Days: 30∙Trial Count: 3∙After expiration of trial period, activation is required.Activation∙Login as administrator∙Open the System Menu∙Select Application (2nd page of System Menu)∙Select SmartFax∙Select Activate∙Enter License Number and select 'Run'(You can also select Trial)∙Turn off/on deviceSupported DevicesSmartScan supports all HyPAS enabled and HyPAS capable devices.HyPAS-Enabled MFPs Colour MFPs∙TASKalfa 307ci∙TASKalfa 2470ci∙TASKalfa 5550ci∙TASKalfa 4550ci∙TASKalfa 3550ci∙TASKalfa 3050ci∙TASKalfa 7550ci∙TASKalfa 6550ci∙TASKalfa 2550ci∙TASKalfa 5551ci∙TASKalfa 4551ci∙TASKalfa 3551ci∙TASKalfa 3051ci∙TASKalfa 7551ci∙TASKalfa 6551ci∙TASKalfa 2551ci∙TASKalfa 6052ci∙TASKalfa 5052ci∙TASKalfa 4052ci∙TASKalfa 3252ci∙TASKalfa 2552ci∙TASKalfa 2553ci∙TASKalfa 3253ci∙TASKalfa 4053ci∙TASKalfa 5053ci∙TASKalfa 6053ci∙TASKalfa 7353ci∙TASKalfa 8353ci∙TASKalfa 552ci†∙TASKalfa 500ci†∙TASKalfa 400ci†∙TASKalfa 300ci†∙TASKalfa 250ci†B&W MFPs∙TASKalfa 2520i∙TASKalfa 4012i∙TASKalfa 3212i∙TASKalfa 5500i∙TASKalfa 4500i∙TASKalfa 3500i∙TASKalfa 8000i∙TASKalfa 6500i∙TASKalfa 5501i∙TASKalfa 4501i∙TASKalfa 3501i∙TASKalfa 8001i∙TASKalfa 6501i HyPAS-Capable MFPs*Colour MFPs*∙ECOSYS M6230cidn∙ECOSYS M6630cidn∙ECOSYS M6235cidn∙ECOSYS M6635cidn∙ECOSYS M8130cidn∙ECOSYS M8124cidn∙ECOSYS M6230cidn∙ECOSYS M6235cidn∙ECOSYS M6630cidn∙ECOSYS M6635cidn∙TASKalfa 350ci∙TASKalfa 351ci∙FS-C2526MFP∙FS-C2626MFP∙TASKalfa 265ci∙TASKalfa 256ci∙TASKalfa 206ci∙ECOSYS FS-C8525MFP∙ECOSYS FS-C8520MFP∙ECOSYS M6026cidn∙ECOSYS M6526cidn∙TASKalfa 266ci∙TASKalfa 306ci∙TASKalfa 356ci∙TASKalfa 406ci∙TASKalfa 6035cidn∙TASKalfa 6535cidn∙TASKalfa 308ci∙TASKalfa 358ci∙TASKalfa 408ci∙TASKalfa 508ciB&W MFPs*∙ECOSYS-M3145idn∙ECOSYS -M3645idn∙ECOSYS -M3655idn∙ECOSYS -M3660idn∙ECOSYS M4132idn∙ECOSYS M4125idn∙FS-3540MFP∙FS-3640MFP∙TASKalfa 306i∙TASKalfa 256i∙ECOSYS FS-6530MFP∙ECOSYS FS-6525MFP∙ECOSYS M3040idn∙ECOSYS M3560idn∙ECOSYS M3550idn∙TASKalfa 3510i ∙TASKalfa 3010i ∙TASKalfa 6002i ∙TASKalfa 5002i ∙TASKalfa 4002i ∙TASKalfa 3511i ∙TASKalfa 3011i ∙TASKalfa 8052i ∙TASKalfa 7052i ∙TASKalfa 8002i ∙TASKalfa 7002i ∙TASKalfa 4003i ∙TASKalfa 5003i ∙TASKalfa 6003i ∙TASKalfa 7003i ∙TASKalfa 8003i ∙TASKalfa 9003i ∙TASKalfa 520i†∙TASKalfa 420i†∙TASKalfa 300i†∙ECOSYS M3540idn ∙ECOSYS M2640idw ∙ECOSYS M3860idn ∙ECOSYS M3860idnf*Note that HyPAS capable devices don’t have an integrated hard disc and require an external memory card (CF card) to execute HyPAS applications.Setting as default applicationSmartFax can be set up as default application on the device. This means it is displayed as default on the panel when the device is switched on.∙Login as administrator∙Open the Common Settings∙Select Default Screen∙Click Change∙Select SmartFax from the list of applications and click OK∙Log outRemoving SmartFax from the deviceRemoving or deactivating the application should be done by your authorized KYOCERA service technician.∙Open the System Menu, scroll to the next page and press the Application button. If prompted to authenticate, login with an administrator account. The application screen will list all applications currently installed on the MFP.∙Select the application SmartFax.∙Press the Deactivate button in order to deactivate the Application.∙Press the Delete button to remove the Application.Setting up SmartFaxWhen SmartFax is started for the first time, the settings pages will automatically open and you can perform all required settings.To define or change the administrator settings later, you can always access the administrator settings.∙Open SmartFax∙Press the key combination (administrator code) 23646∙The admin settings will open.Application SettingsBy entering the administrator code, the settings can be accessed. Here the administrator has the following options:∙Defining default values (prefix, suffix and separators) for fax∙Deciding whether prefix, suffix and separators should be visible to the end user (shown) ∙Deciding whether default values can be changed by the end user (writable)∙Defining LDAP or Active Directory for address book (if desired)∙Specifying the LDAP or Active Directory parameterso Host address of the LDAP or Active Directory servero Port of LDAP or Active Directory servero Base DN of Active Directory treeo User DN and password that will handle LDAP lookupsScan SettingsDefining if OCR and PDFA availableHere the administrator is able to define if OCR and PDFA are available.Defining default scan settingsThe scan settings can be opened from the main interface. In this administrator screen you can define the default scan settings.Defining default document nameEnter the default file name that should be automatically entered when scanning. Further you can set the document name changeable.Destination SettingsDefining default fax settings (prefix, suffix)Specify whether the application supports the usage of FaxHub or enter the fax server settings like prefix and suffix for sending faxes.Fax Settings - Defining allowed domainsAdministrator is now able to define the allowed email domains in the destination settings of the application.Login SettingsDefining an application loginIf no other authentication method is implemented, you are able to activate the application login.Misc SettingsDefining miscellaneous settingsSoft Numeric KeypadHere you are able to define the default position of the Soft Numeric Keypad. The Soft Numeric Keypad will be only shown automatically in the main screen of the application, if it is supported by the device.Access CodeHere you can change the default access code for the administrator settings.Further you can define here the period of time when the scan job will automatically be sent or terminated. This will happen when in the case of continuous scan mode the user adds no new document during a scan process.Address Book SettingsActivating the local address bookConfiguring the external address book (3 steps)In the external address book configuration the administrator can specify the LDAP settings that are used for the address book.The LDAP field displayName will be used from the application automatically to show the names of the different persons in the address book.Now the administrator has to define the second required LDAP field. If the administrator selects for instance the LDAP field mail as destination, the user will get as destination the value the from the LDAP field mail when he selects an entry from the address book.Likewise, if the administrator selects the LDAP field faxID as destination, the fax number of the person selected from the address book will automatically be entered as destination.Determining LDAP settingsAn LDAP browser can be helpful to determine the LDAP settings e.g. the Base DN of your LDAP / Active Directory tree.Part 2: UsageThis section describes the usage of the application. It is relevant for end users.Using SmartFaxIf SmartFax is not set as default application and does not open automatically, it has to be started manually.∙Press the Application button. All applications currently installed on the MFP are listed.∙Press the SmartFax logo in order to start the application.∙SmartFax starts with the default screen.The User InterfaceOn the top of the screen you will find the general status information and buttons for help file, settings and exit.Click here to access the help text. You will find always the help text that refers to the current page.Click here to open the Settings.In the next settings screen, you have additional options, like changing density, image quality and orientation, and you can activate or deactivate “Continuous Scan”.Further in the following settings screen, you are able to define, whether the generated PDF is a searchable PDF. Additional you can decide if the PDF is generated in the PDF/A format.If you want to change any of the default settings, click the relevant button and confirm the change with Save.Click here to exit the application.Sending a faxYou can use SmartFax like you would use a fax machine. To use the function, the settings of your fax server need to be correctly defined by your administrator.∙Click on the Fax button in the Function bar∙Enter the fax number into the entry field∙Insert the documents into the paper feeder and press the start button∙The fax will be sentThe Address BookThe address books (local and external) are only available in the fax and e-mail functions, and they have to be activated and configured in the settings.To access the relevant address book, tap the button External or Local.∙Select an entry in order to define the e-mail / fax destination.∙You can use the search function in order to find the required entry more quickly.AppendixUpdating the SmartFax application remotelyThe administrator can transfer the application settings with help of the KYOCERA Net Viewer to the application.Preparing File with Application SettingsHere it is necessary to prepare a file that contains all values in order to rollout it to all selected devices. The Application Settings should be stored on a USB stick. Please see figure below.Remote update of the applicationApplication will receive the application settings from KYOCERA Net Viewer. The following Points must be defined.∙Port must be defined. The application listen on Port No is 40005.∙File with the stored application setting must be set.You find the dialog under:Select Device > Right Mouse Click > Advanced > Send TCP/IP – Data。
京瓷零件手册TASKalfa 3050ci 3550ci 4550ci 5550ci零件手册

Part.No.
302LC04031 302LC04051 302LC04063 302LC04071 302LC04191 302LC04200 302LC04212 302LC04250 302LC04260 302LC04280 302LC04290 302LC04410 302LC04720 302LC04651 302LC34050 302LC04271 302LC34010 302LM34010 302LN34010 302LK34010 2FB04270 302FZ04950 302LC04011 302LC94520 302LC04460 302LC04490 302LC04500 302H094300 302LC02710 302LC02720 302LC02730 302LC02760 302LC04240 302LC46230 302LC04730 302LC04751 302LW04260 302LC04740
-1-
FIG. 1 Covers 1
2LK/2LN/2LM/2LC-3
6
101
13
1
101ALeabharlann 5 71013
8
104
35 22 22 34 33 23 18 24
104 104 104 104 102 A 105 104 104 102 101
104
12 11
34 14 32
22
22
15 28 30 27 25 26
Description
COVER TOP TRAY COVER RIGHT LOWER F COVER RIGHT MIDDLE R COVER RIGHT LOWER R COVER EXIT COVER TRAY REAR COVER ISU BOTTOM COVER INNER LEFT COVER INNER FEED F COVER HANDLE COVER MAIN SWITCH MOUNT FRONT COVER LEFT STOPPER ORIGINAL STRAP FRONT COVER LABEL SW CAUTION EN EMBLEM SHEET EMBLEM 5550C SHEET EMBLEM 4550C SHEET EMBLEM 3550C SHEET EMBLEM 3050C PLATE MAGNET SPONGE TRAY WASTE COVER FRONT A PARTS COVER FRONT SP STOPPER CONTAINER PLATE FRONT COVER SPONGE COVER FRONT PARTS,HUMIDITY SENSOR,SP COVER HUMIDITY SENSOR SHEET HUMIDITY SENSOR A SHEET HUMIDITY SENSOR B SHEET COVER HUMIDITY SENSOR COVER FRONT RIGHT LOWER WIRE FRONT LOW SHEET COVER FRONT SPONGE COVER FRONT B SPACER USB SHEET COVER FRONT B
京瓷维修手册
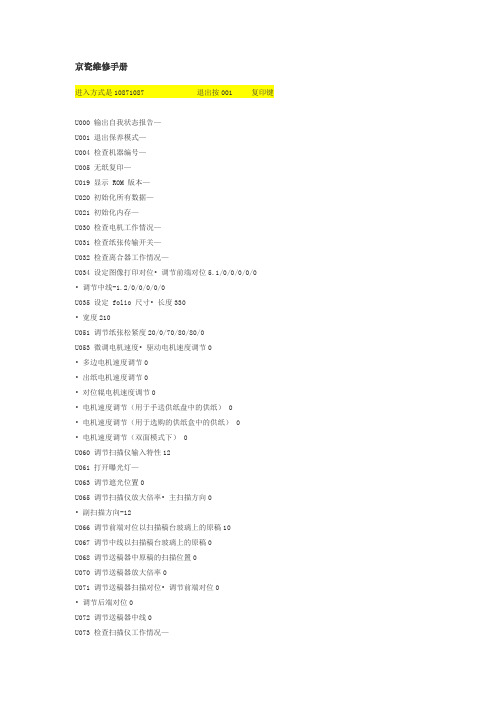
京瓷维修手册进入方式是10871087 退出按001 复印键U000 输出自我状态报告—U001 退出保养模式—U004 检查机器编号—U005 无纸复印—U019 显示 ROM 版本—U020 初始化所有数据—U021 初始化内存—U030 检查电机工作情况—U031 检查纸张传输开关—U032 检查离合器工作情况—U034 设定图像打印对位• 调节前端对位5.1/0/0/0/0/0 • 调节中线-1.2/0/0/0/0/0U035 设定 folio 尺寸• 长度330• 宽度210U051 调节纸张松紧度20/0/70/80/80/0U053 微调电机速度• 驱动电机速度调节0• 多边电机速度调节0• 出纸电机速度调节0• 对位辊电机速度调节0• 电机速度调节(用于手送供纸盘中的供纸) 0• 电机速度调节(用于选购的供纸盒中的供纸) 0• 电机速度调节(双面模式下) 0U060 调节扫描仪输入特性12U061 打开曝光灯—U063 调节遮光位置0U065 调节扫描仪放大倍率• 主扫描方向0• 副扫描方向-12U066 调节前端对位以扫描稿台玻璃上的原稿10U067 调节中线以扫描稿台玻璃上的原稿0U068 调节送稿器中原稿的扫描位置0U070 调节送稿器放大倍率0U071 调节送稿器扫描对位• 调节前端对位0• 调节后端对位0U072 调节送稿器中线0U073 检查扫描仪工作情况—U074 调节送稿器输入亮度1U087 打开/关闭送稿器扫描位置调节模式35U088 设定输入滤波器(莫尔条纹减少模式)关U089 输出 MIP-PG 图案—U091 检查遮光情况—U092 自动调节扫描仪—U093 设定曝光浓度等级• 文字/文字和图片/图片模式0/0/0 U099 检查原稿尺寸检测—U100 设定主充电高压• 栅极控制电压135• 复印间隔60• 复印数量50• 校正数量10U101 设定其它高压• 显影偏压时钟频率27• 显影偏压时钟占空45• 转印控制电压(较大尺寸) 168• 转印控制电压(较小尺寸) 179• 转印充电输出关闭定时38• 转印充电输出开启定时34• 分离控制电压1• 分离充电输出开启定时33• 分离充电输出关闭定时43U110 检查/清除感光鼓计数—U130 墨粉装入模式—U144 设定墨粉装入操作0U158 检查/清除显影计数—U161 设定定影控制温度• 初级稳定的定影温度140• 二次稳定的定影温度160• 复印操作温度 1 170• 复印操作温度 2 180• 用于定影控制的纸张数5• 用于定影控制的纸张数(厚纸) 20U162 强制稳定定影—U163 重设定影故障的数据—U167 检查/清除定影计数—U199 检查定影温度—U200 打开所有 LED —U202 设定 KMAS 主监视系统—U203 单独操作送稿器—U204 设定是否有钥匙计数卡或钥匙计数器关U207 检查操作面板键—U243 检查送稿器电机和电磁铁的工作情况—U244 检查送稿器各开关—U250 设定保养周期150000U251 检查/清除保养计数0U252 设定地域日本U253 在单、双计数之间进行切换A3U254 开/关自动启动功能开U255 设定自动清除时间90U258 检测到墨粉用尽时,切换复印操作单张模式U260 改变复印计数定时出纸后U265 设定地域规格0U332 设定尺寸转换系数1.0U342 设定出纸限制开U345 设定保养到期指示值—U402 调节图像打印的预留装订边—U403 调节稿台玻璃上的原稿扫描预留装订边—U404 调节送稿器中的原稿扫描预留装订边—U407 调节内存图像打印前端对位—U901 检查/清除各供纸位置的复印计数—U903 检查/清除卡纸计数—U904 检查/清除故障显示计数—U905 检查/清除送稿器计数—U908 检查总计数—U910 清除覆盖率数据—U911 检查/清除各种纸张尺寸的复印计数—U927 清除计数器—连续输入30363036-----开始----908-----随意修改计数器30653065进入工厂模式--输入908按启动键进入子菜单---输入你想修改的数值按启动键确认---开关机重启即可成功修改进入维修模式在复印界面按10871087 进入维修模式输入908 出现计数点黑然后改成0就可以了然后按C 到000 再输入001 复印建回到复印界面U928 检查/清除机器运转计数—U990 检查/清除曝光灯亮起时间—U991 检查扫描仪计数—U993 输出 VTC-PG 图案—KM-1620自诊断功能KM-1620配备自诊断功能。
SFU(scan file utility)
SFU(scan file utility)
SFU(scan file utility):基于FTP扫描方式设置的扫描文件实用程序,
适用于客户环境无法实用SMTP、SMB扫描方式的用户。
软件优势:PC端文件夹无需共享设置即可接收来自MFP扫描文件
安装特点:需要在PC端安装SFU(scan file utility)软件。
ⓒ 2017KYOCERA Document Solutions (China) Corporation
2
安装方法
1. 安装SFU(scan file utility)4.11以上软件版本,新建文件夹,将zip文 件,解压缩至该文件夹。
2.选择解压文件夹内setup.exe选项进行安装。
3.根据需要选择语言,点击下一步。
4
安装方法
ⓒ 2017KYOCERA Document Solutions (China) Corporation
5
安装方法
6. 将权限打开(注意勾选3组网络环境下的√)
ⓒ 2017 KYOCERA Document Solutions (China) Corporation
6
安装方法
7. 运行SFU。
ⓒ 2017 KYOCERA Document Solutions (China) Corporation
7
安装方法
8.点击配置。 9.点击建立。
ⓒ 2017 KYOCERA Document Solutions (China) Corporation
8
安装方法
10. 在PC端新建文件夹更改名称:列如scan(不用设置共享),在软 件内输入文档名称(001)、选择该文件夹路径,点击OK。
- 1、下载文档前请自行甄别文档内容的完整性,平台不提供额外的编辑、内容补充、找答案等附加服务。
- 2、"仅部分预览"的文档,不可在线预览部分如存在完整性等问题,可反馈申请退款(可完整预览的文档不适用该条件!)。
- 3、如文档侵犯您的权益,请联系客服反馈,我们会尽快为您处理(人工客服工作时间:9:00-18:30)。
Parts with " • " are component parts or sub-assemblies of the assembly appearing immediately above them. Parts with " • • " are component parts or sub-assembly with " • " appearing immediately above them. Parts with "" indicate regular maintenance parts. -3-
Description
COVER TOP TRAY COVER RIGHT LOWER F COVER RIGHT MIDDLE R COVER RIGHT LOWER R COVER EXIT COVER TRAY REAR COVER ISU BOTTOM COVER INNER LEFT COVER INNER FEED F COVER HANDLE COVER MAIN SWITCH MOUNT FRONT COVER LEFT STOPPER ORIGINAL STRAP FRONT COVER LABEL SW CAUTION EN EMBLEM SHEET EMBLEM 5550C (55 ppm) SHEET EMBLEM 4550C (45 ppm) SHEET EMBLEM 3550C (35 ppm) SHEET EMBLEM 3050C (30 ppm) PLATE MAGNET SPONGE TRAY WASTE COVER FRONT A PARTS COVER FRONT SP STOPPER CONTAINER PLATE FRONT COVER SPONGE COVER FRONT PARTS,HUMIDITY SENSOR,SP COVER HUMIDITY SENSOR SHEET HUMIDITY SENSOR A SHEET HUMIDITY SENSOR B SHEET COVER HUMIDITY SENSOR COVER FRONT RIGHT LOWER WIRE FRONT LOW SHEET COVER FRONT SPONGE COVER FRONT B +BIND T.T S SCREW 4X8 SR +BIND T.T S SCREW 4X10 SR +BIND T.T P SCREW 3X8 +TP-FLAT T.T P SCREW 3X8 +BIND T.T S SCREW 4X8(BLACK)
-1-
FIG. 1 Covers 1
2LK/2LN/2LM/2LC-2
6
101
13
1
101
A
5 7
101
3
8
104 104 104 104
22 22 22
102 104 A
12 11
105
14
33
32 23 18 24
22
104 104 102 101
15 28 30 9 18 27 25 26
101
120
1 1 1 1 1 1 1 1 1 1 1 1 1 2 1 1 1 1 1 1 2 1 1 1 4 1 1 1 1 1 1 1 1 1 2 1
Quantity 230
1 1 1 1 1 1 1 1 1 1 1 1 1 2 1 1 1 1 1 1 2 1 1 1 4 1 1 1 1 1 1 1 1 1 2 1
TASKalfa 3050ci 3550ci 4550ci 5550ci
PARTS LIST
Published in July 2011 2LCPL072 842LC1212 Rev.2
CONTENTS
FIG. 1 FIG. 2 FIG. 3 FIG. 4 FIG. 5 FIG. 6 FIG. 6 FIG. 7 FIG. 8 FIG. 9 FIG. 10 FIG. 11 FIG. 12 FIG. 13 FIG. 14 FIG. 15 FIG. 16 Covers 1 ................................................................. 2 Covers 2 ................................................................. 4 Covers 3 ................................................................. 6 Frames ................................................................... 8 Paper Cassettes ................................................... 10 Paper Feed Section 1 (55/45 ppm) ...................... 12 Paper Feed Section 1 (35/30 ppm) ...................... 14 Paper Feed Section 2 ........................................... 16 Paper Conveying Section 1 .................................. 18 Paper Conveying Section 2 .................................. 20 Paper Conveying Section 3 .................................. 22 Scanner Section ................................................... 24 Laser Scanner Section ......................................... 26 Image Formation & Developer Section ................. 28 Inner Section ........................................................ 30 Transfer Section ................................................... 32 Fuser Section ....................................................... 34 • INDEX .................................................................. 57 FIG. 17 FIG. 18 FIG. 19 FIG. 20 FIG. 21 FIG. 22 FIG. 23 FIG. 24 FIG. 25 FIG. 26 FIG. 27 Drive Section 1 ...................................................... 36 Drive Section 2 ...................................................... 38 Cooling Section ..................................................... 40 Exit Section ........................................................... 42 Electrical Components 1 ........................................ 44 Electrical Components 2 ........................................ 46 Operation Section .................................................. 48 Options 1 ............................................................... 50 Options 2 ............................................................... 52 Options 3 .............................................................. 54 Maintenance Kits ................................................... 56
240
1 1 1 1 1 1 1 1 1 1 1 1 1 2 1 1 1 1 1 1 2 1 1 1 4 1 1 1 1 1 1 1 1 1 2 1
302LC04030 302LC04050 302LC04061 302LC04070 302LC04190 302LC04200 302LC04211 302LC04250 302LC04260 302LC04280 302LC04290 302LC04410 302LC04720 302LC04650 302LC34050 302LC04271 302LC34010 302LM34010 302LN34010 302LK34010 2FB04270 302FZ04950 302LC04011 302LC94520 302LC04460 302LC04490 302LC04500 302H094300 302LC02710 302LC02720 302LC02730 302LC02760 302LC04240 302LC46230 302LC04730 302LC04751 7BB700408H 7BB700410H 7BB200308H 7BB202308H 7BB180408H