SonicWALL_HA配置手册
配置HA(仅供参考)
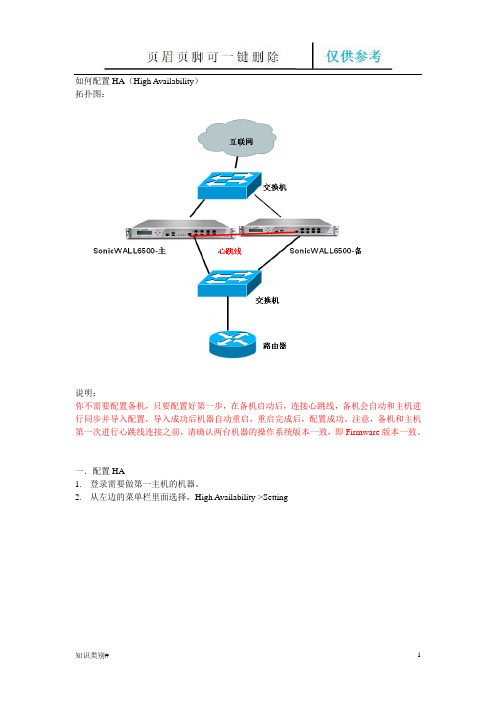
如何配置HA(High Availability)
拓扑图:
说明:
你不需要配置备机,只要配置好第一步,在备机启动后,连接心跳线,备机会自动和主机进行同步并导入配置,导入成功后机器自动重启,重启完成后,配置成功。
注意,备机和主机第一次进行心跳线连接之前,请确认两台机器的操作系统版本一致,即Firmware版本一致。
一.配置HA
1.登录需要做第一主机的机器。
2.从左边的菜单栏里面选择,High Availability->Setting
3.在右边的页面中,选择启用HA(Enable High Availability)选择框
4.在下面的sonicWALL地址选项中,输入第二台机器(备机)的序列号。
(注:备机的序
列号可以在机器的铭牌或者system->status下的serial number信息中找到)
5.点击Accept按钮保存设置
二.配置带状态同步的HA
1.以管理员身份登录防火墙
2. 选择HA->Advance。
SonicWALL 防火墙 HA 配置
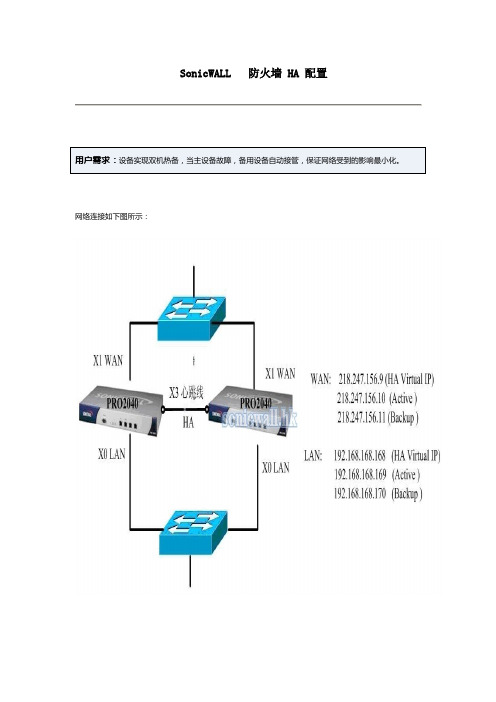
SonicWALL 防火墙 HA 配置网络连接如下图所示:SonicWALL HA是Active/Passive方式的HA,配置界面相当简单,所有配置只需要在主设备上配置,备用设备会自动同步主设备的配置。
配置主设备时,不要打开备用设备电源,待主设备配置完毕之后,连接好物理线路,打开备用设备电源,备用设备自动与主设备同步全部的配置信息。
注意:备用设备要和主设备采用同样的操作系统版本号。
如果备用设备启用UTM的功能,那么备用设备要提前注册,拿到全部的UTM的授权。
主设备的UTM License不会同步到备用设备。
1.进入主设备的管理界面https://192.168.168.168, 默认的LAN口IP地址,用户名是 admin, 密码password2.进入Network->Interfaces界面,配置X1口(WAN),X0口(LAN)的IP地址。
这里X1口是WAN口,IP 地址218.247.156.9, 这个地址将成为HA发生切换之后WAN口的虚拟地址,从WAN外部通过218.247.156.9能访问到当前工作的设备,即如果主设备宕机,那么通过这个地址访问到的是备用设备。
X0 口IP地址用默认的 192.168.168.168. 这个地址将成为HA发生切换之后LAN口的虚拟地址,从LAN 内部通过192.168.168.168能访问到当前工作的设备,即如果主设备宕机,那么通过这个地址访问到的是备用设备。
3.进入Hardware Failover->Setting 界面,选中Enable Hardware Failover激活HA配置,点右上角的Apply按钮使HA生效。
如果希望主设备恢复后立刻切换回到主设备工作,那么选中Enable Preempt Mode,点右上角的Apply按钮使之生效.4.进入Hardware Failover->Monitoring界面,点X0口的配置按钮,5.在Interface X0 Monitoring Settings界面的Primary IP Address, Backup IP Address分别填写主/备设备的管理IP地址。
SonicWALL系列设备配置下
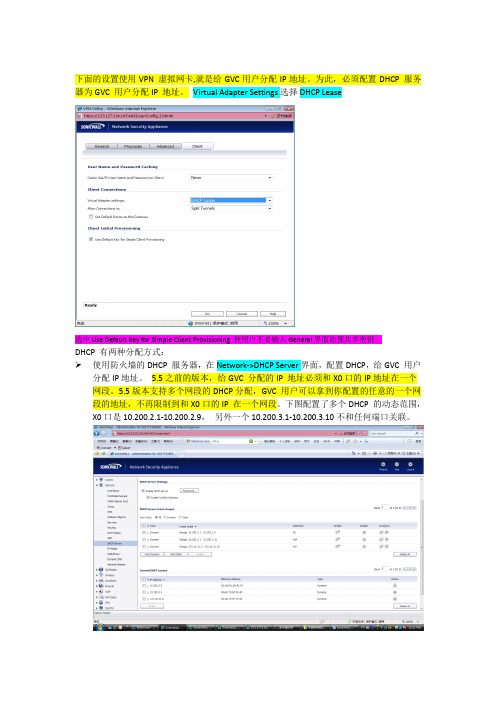
下面的设置使用VPN 虚拟网卡,就是给GVC用户分配IP地址。
为此,必须配置DHCP 服务器为GVC 用户分配IP 地址。
Virtual Adapter Settings选择DHCP Lease选中Use Default Key for Simple Client Provisioning 使用户不必输入General界面的预共享密钥。
DHCP 有两种分配方式:使用防火墙的DHCP 服务器,在Network->DHCP Server界面,配置DHCP,给GVC 用户分配IP地址。
5.5之前的版本,给GVC 分配的IP 地址必须和X0口的IP地址在一个网段。
5.5版本支持多个网段的DHCP分配,GVC 用户可以拿到你配置的任意的一个网段的地址,不再限制到和X0口的IP 在一个网段。
下图配置了多个DHCP 的动态范围,X0口是10.200.2.1-10.200.2.9,另外一个10.200.3.1-10.200.3.10不和任何端口关联。
配置完这个界面之后,需要配置VPN->DHCP Over VPN 界面,选择Use Internal DHCP Server, For Global VPN ClientRelay Agent IP(Optional)是可选的配置。
DHCP 服务器可以分配任意的网段给GVC用户。
Relay Agent IP就是那个网段中的一个保留的IP地址,不会分配给GVC用户。
当DHCP 请求到达DHCP服务器时,DHCP服务器知道要分配这个网段的地址给GVC用户。
DHCP服务器可以是防火墙本身的DHCP服务器,可以是专门的DHCP服务器,也可以是和防火墙互联的L3交换机,L3交换机一般都支持DHCP服务器的功能。
第二种DHCP,见下图。
使用VPN->DHCP over VPN->Configure界面,用内网的DHCP 服务器给用户分配IP地址。
Relay Agent IP(Optional)是可选的配置。
SonicWALL配置手册--
SonicWALL防火墙标准版配置SonicWall标准版网络向导配置 (1)SonicWall标准版规则向导配置 (7)SonicWall标准版一般规则向导配置 (7)SonicWall标准版服务器规则向导配置 (12)SonicWall标准版一般规则直接配置 (15)SonicWall标准版服务器1对1 NA T配置 (18)SonicWall标准版透明模式配置 (19)SonicWall标准版网络向导配置首次接触SonicWALL防火墙设备,我们将电源接上,并开启电源开关,将X0口和你的电脑相连(注:请用交叉线),SonicWALL防火墙默认的IP地址为192.168.168.168,我们也可以通过setuptool.exe这个小工具探知SonicW ALL防火墙的IP地址。
如图所示:当网线和电源等都连接好之后,我们设置一下本机的IP地址,以便和SonicWALL防火墙处于同一个网段。
如图所示:设置好IP地址后,我们在IE浏览器的地址栏输入SonicWALL防火墙的IP地址,点next,提示我们是否修改管理员密码,暂时不修改,点next,提示我们修改防火墙的时区,我们选择中国的时区。
点next,提示我们设置W AN口的地址获取类型,这时候,我们需要和ISP相联系,并选择相关的类型,这里以静态地址为例:我们点next,输入相关的信息,IP地址、掩码、网关、DNS服务器等,如果不知道此处该如何设置,请和你的ISP联系。
点next,提示我们设置LAN口的IP和掩码,我们根据自己的规划和网络的实际情况设置,此处我没有修改。
点next,防火墙询问我们在LAN口是否开启DHCP server的功能,并是否是默认的网段,我们可根据实际情况做调整,决定开始或关闭,以及网段地址等,如下图:点next,防火墙将把前面做的设置做一个摘要,以便我们再一次确认是否设置正确,如果有和实际不符的地方,可以点back返回进行修改。
SonicWall SonicWave系列无线无线访问点说明书

SonicWall SonicWave series wireless access points (APs) combinehigh-performance IEEE 802.11ac Wave 2 wireless technology with flexible deployment options. These APs can be managed via the cloud using SonicWall WiFi Cloud Manager (WCM) or through SonicWall’s industry-leading next-generation firewalls. The resultis a solution that could be untethered from the firewall to provide a superior experience for WiFi users that’s as secure as any wired connection.The SonicWave solution is based on: • SonicWall SonicWave series indoor andoutdoor APs which support the 802.11acWave 2 wireless standard• SonicWall WCM is an intuitive, cloud-managed WiFi network managementsystem suitable for networks of any size • SonicWall TZ, NS a, NS sp, NSA andSuperMassive firewalls, which use deeppacket inspection technology to detectand eliminate threats over wired andwireless networksEnhanced user experience SonicWave APs take advantage of the capabilities in 802.11ac Wave 2 and advanced RF capabilities to deliverhigh-speed wireless performance.MU-MIMO technology allows the APs to communicate to multiple client devicesat the same time, improving the overall network performance, efficiency and user experience. In combination, mesh technology supported on SonicWave APs enables ease of installation and fewer cables and less manpower todeploy, reducing installation costs.With multiple transmitting and receivingantennas, SonicWave APs are engineeredto optimize signal quality, range andreliability for wireless devices. SonicWaveAPs supports fast roaming, so that userscan roam from one location to anotherseamlessly. Feature-rich portfolioincludes air-time fairness, band steering,and signal analysis tools for monitoringand troubleshooting.Best-in-class wireless securitySonicWall firewalls scan all wirelesstraffic coming into and going outof the network using deep packetinspection technology and then removeharmful threats such as malware andintrusions, even over SSL/TLS encryptedconnections. Other security and controlcapabilities such as content filtering,application control and intelligence andCapture Advanced Threat Protection(ATP) provide added layers of protection.Capture ATP is our award-winning multi-engine sandboxing service that featuresSonicWall’s patent-pending Real-TimeDeep Memory Inspection (RTDMI)technology. The RTDMI engine of CaptureATP proactively detects and blocks massmarket, zero-day threats and unknownmalware by inspecting directly in memory.Because of the real-time architecture,SonicWall RTDMI technology is precise,minimizes false positives, and identifiesBenefits:• Enhanced user experience−802.11ac Wave 2−Auto channel selection−RF spectrum analysis−AirTime Fairness−Fast roaming• Best-in-class wireless security−Dedicated third scanning radio−Capture ATP and content filteringservice−Deep packet inspection technology−SSL/TLS decryption andinspection−Wireless intrusion detection andprevention• Intuitive cloud management−Alerts and rich analytics−Automatic firmware updates• Simplified firewall management−Auto-detection and provisioning−Wireless signal analysis tools−Single-pane-of-glass management• Zero-Touch Deployment powered bySonicWiFi app−Easy registration and onboarding−Auto-detection and auto-provisioning−App available on iOS and Android• Design with WiFi Planner−Advanced wireless site survey−Cloud-based tool• Ruggedized outdoor designSonicWave and SonicPoint Series Wireless Access PointsSecure, flexible, high-performance wireless solutionsSonicWave APs perform advancedsecurity services, including the Content Filtering Service (CFS) and Capture ATPsandbox service independently — even where firewalls are not deployed.Most SonicWave APs includes threeradios, where the third radio is dedicated to security and performs rogue APdetection, passive scanning and packet capturing. The SonicWave solution also integrates additional security-related features including wireless intrusion detection and prevention, virtual APsegmentation, wireless guest services, RF monitoring and wireless packet capture.Intuitive cloud managementSonicWall WCM provides an intuitive user interface to manage all SonicWave APs from a single pane of glass via SonicWall Capture Security Center (CSC). Easily monitor and manage networks with alerts and rich analytics updated in real-time. Always stay up-to-date with the current features and enhancements from the latest firmware. Updates are pushed automatically to APs, eliminating manual updates and chances of human error.Simplified firewall managementDeployment and setup of APs aregreatly simplified, reducing total cost of ownership. Optionally, SonicWave APs can be managed by SonicWall next-gen firewalls. Integrated into every SonicWallfirewall is a wireless controller that auto-detects and auto-provisions SonicWave APs across the network.Management and monitoring for wireless and security are handled centrallythrough the firewall or through SonicWall Global Management System, providing network administrators with a single pane of glass from which to manage all aspects of the network.Zero-Touch Deployment (ZTD) powered by SonicWiFi appEasily register and onboard SonicWave APs with the help of SonicWall SonicWiFi mobile app. The APs are automatically detected and provisioned with Zero-Touch Deployment. Available on iOS and Android, SonicWiFi mobile app lets network admins monitor and manage networks, or set up mesh.Design with WiFi PlannerSonicWall WiFi planner is a cloud-based, advanced wireless site survey tool that enables to optimally design and deploy a wireless network for enhanced wireless user experience.Ruggedized outdoor designSonicWave outdoor APs are built towithstand rough outdoor conditions with industrial-grade enclosure. These APs are IP67 rated, which ensures protection against dust and water immersion.LED indicatorsMounting tab lock pointMounting tab insert pointinsert point LAN/POE port12V AdaptorportReset button5GHz RadioSonicWave 224w – The Wall Mount APPortsLED indicatorsMounting tabinsert pointPass through punchLAN 4/PoE out12V adapterinsert pointMounting peg slotMounting peg slotMounting bracketlock pointGround5Ghz antenna connectorport2.4Ghz antenna connectorExternal high-gain antennasLED indicatorsPortsSonicWave 432i - The Indoor APInternal antennasLED indicatorsPortsWLANSonicWave 432o - The Outdoor APExternal 2.4 GHz and 5 GHzExternal 2.4 GHz and 5 GHzhigh-gain antennasOutLED indicators*When used with a SonicWall firewall**When used with SonicWall Secure Mobile Access Series applianceSonicPoint Series SpecificationsFor organizations with a substantial investment in 802.11ac clients, the SonicWall SonicPoint series features dual radios, high-speed 802.11ac performance, 3x3 SU-MIMO and all the security advantages that SonicWall Wireless Network Security solutions offer.SonicPoint Series PoE Injector SpecificationsOperating humidity Maximum 90%, Non-condensing Maximum 90%, non-condensing Storage temperature–4º to 158ºF (–20º to 70ºC)-4 to 158 °F, -20 to 70 °C Storage humidity Maximum 95%, Non-condensing Maximum 95%, non-condensingSonicWave Feature SummaryFeature DescriptionReassembly-Free Deep Packet Inspection technology SonicWall next-generation firewalls tightly integrate Reassembly-Free Deep Packet Inspection (RFDPI) technology to scan all inbound and outbound traffic on wired and wireless networks and eliminate intrusions, ransomware, spyware, viruses and other threats before they enter the network.Real-Time Deep Memory Inspection (RTDMI) This patent-pending cloud-based technology detects and blocks malware that does not exhibit any malicious behavior and hides its weaponry via encryption. By forcing malware to reveal its weaponry into memory, the RTDMI engine proactively detects and blocks mass-market, zero-day threats and unknown malware.SSL/TLS decryption and inspection The SonicWall firewall decrypts and inspects SSL/TLS traffic on the fly, without proxying, for malware, intrusions and data leakage, and applies application, URL and content control policies in order to protect against threats hidden in SSL/TLS-encrypted traffic.Dedicated third scanning radio Most SonicWave access points include a dedicated that performs continual scanning of the wirelessspectrum for rogue access points plus additional security functions that help with PCI compliance.Wireless intrusion detection and prevention Wireless intrusion detection and prevention scans the wireless network for unauthorized (rogue) access points and then the managing firewall automatically takes countermeasures, such as preventing any connections to the device.Wireless guest services Wireless guest services enables administrators to provide internet-only access for guest users. This access is separate from internal access and requires guest users to securely authenticate to a virtual access point before access is granted.Lightweight hotspot messaging Lightweight hotspot messaging extends the SonicWall wireless guest services model of differentiated internet access for guest users, enabling extensive customization of the authentication interface and the use of any kind of authentication scheme.Captive portal Captive portal forces a user’s device to view a page and provide authentication through a web browserbefore internet access is granted.Virtual access point segmentation Administrators can create up to eight SSIDs on the same access point, each with its own dedicated authentication and privacy settings. This provides logical segmentation of secure wireless network traffic and secure customer access.Low TCO Features such as simplified deployment, single pane of glass management for both wireless and security, and no need to purchase a separate wireless controller drastically reduce an organization’s cost to add wireless into a new or existing network infrastructure.MiFi extender MiFi Extender enables the attachment of a 3G/4G/LTE modem to the SonicWave access point for useas either the primary WAN or as a secondary failover WAN link for business continuity.Bluetooth Low Energy SonicWave access points include a Bluetooth Low Energy radio that enables the use of ISM (industrial, scientific and medical) applications for healthcare, fitness, retail beacons, security and home entertainment over a low energy link.USB port Access points with USB port supports 3G/4G failover. Plug in a dongle to the port and networkcontinues to function over cellular connection, in case of WiFi network outage.Green access points SonicWave access points reduce costs by supporting green access points, which enables both radios to enter sleep mode for power saving when no clients are actively connected. The access point will exit sleep mode once a client attempts to associate with it.For a complete list of SKUs please contact your local SonicWall resellerFor a complete list of SKUs please contact your local SonicWall resellerSonicWall Wireless PromoThe SonicWall wireless promo provides next-gen security solutions to protect against advanced threats across wired and wireless networks, making the transformation seamless for businesses and enterprises. Leverage powerful end-to-end security, visibility and control. Ultimately, benefit from superior performance and provide exceptional user experience.Wireless promo ordering informationDescriptionUS SKUINTL SKUSonicWall TZ500 TotalSecure Advanced, Secure Wireless (2 SonicPoint ACe Access Points with PoE) - 3 Year 02-SSC-101002-SSC-1059SonicWall TZ600 TotalSecure Advanced, Secure Wireless (2 SonicPoint ACe Access Points with PoE) - 3 Year 02-SSC-104602-SSC-1060SonicWall NSA 2600 TotalSecure Advanced, Secure Wireless (2 SonicPoint ACe Access Points with PoE) - 3 Year 02-SSC-104702-SSC-1061SonicWall NSA 3600 TotalSecure Advanced, Secure Wireless (2 SonicPoint ACe Access Points with PoE) - 3 Year 02-SSC-104802-SSC-1062SonicWall TZ300 TotalSecure Advanced, Secure Wireless (2 SonicPoint N2 Access Points with PoE) - 3 Year 02-SSC-107402-SSC-1077SonicWall TZ400 TotalSecure Advanced, Secure Wireless (2 SonicPoint N2 Access Points with PoE) - 3 Year 02-SSC-107502-SSC-1078SonicWall TZ500 TotalSecure Advanced, Secure Wireless (2 SonicPoint N2 Access Points with PoE) - 3 Year 02-SSC-107602-SSC-1079SonicWall NSA 2600 TotalSecure Advanced, Secure Wireless (2 SonicWave 432e Access Ponts, No PoE) - 3 Year 02-SSC-105002-SSC-1063SonicWall NSA 3600 TotalSecure Advanced, Secure Wireless (2 SonicWave 432e Access Ponts, No PoE) - 3 Year 02-SSC-105102-SSC-1064SonicWall NSA 4600 TotalSecure Advanced, Secure Wireless (2 SonicWave 432e Access Ponts, No PoE) - 3 Year 02-SSC-105202-SSC-1065SonicWall NSA 2600 TotalSecure Advanced, Secure Wireless (2 SonicWave 432i Access Ponts, No PoE) - 3 Year 02-SSC-105302-SSC-1066SonicWall NSA 3600 TotalSecure Advanced, Secure Wireless (2 SonicWave 432i Access Ponts, No PoE) - 3 Year 02-SSC-105402-SSC-1067SonicWall NSA 4600 TotalSecure Advanced, Secure Wireless (2 SonicWave 432i Access Ponts, No PoE) - 3 Year 02-SSC-105502-SSC-1068SonicWall NSA 2600TotalSecure Advanced, Secure Wireless (2 SonicWave 432o Access Ponts, No PoE) - 3 Year 02-SSC-105602-SSC-1069SonicWall NSA 3600 TotalSecure Advanced, Secure Wireless (2 SonicWave 432o Access Ponts, No PoE) - 3 Year 02-SSC-105702-SSC-1070SonicWall NSA 4600 TotalSecure Advanced, Secure Wireless (2 SonicWave 432o Access Ponts, No PoE) - 3 Year 02-SSC-105802-SSC-1071SonicWall TZ300 PoE TotalSecure Advanced, Secure Wireless (2 SonicPoint N2 Access Points) - 3 Year 02-SSC-136102-SSC-1369SonicWall TZ300 PoE TotalSecure Advanced, Secure Wireless (2 SonicPoint ACe Access Points) - 3 Year 02-SSC-136202-SSC-1370SonicWall TZ600 PoE TotalSecure Advanced, Secure Wireless (2 SonicPoint ACe Access Points) - 3 Year 02-SSC-136302-SSC-1371SonicWall TZ300 PoE TotalSecure Advanced, Secure Wireless (1 SonicWave 432i Access Point) - 3 Year 02-SSC-136402-SSC-1372SonicWall TZ600 PoE TotalSecure Advanced, Secure Wireless (2 SonicWave 432i Access Points) - 3 Year 02-SSC-136502-SSC-1373SonicWall TZ300 PoE TotalSecure Advanced, Secure Wireless (1 SonicWave 432e Access Point) - 3 Year 02-SSC-136602-SSC-1374SonicWall TZ600 PoE TotalSecure Advanced, Secure Wireless (2 SonicWave 432e Access Points) - 3 Year 02-SSC-136702-SSC-1375SonicWall TZ600 PoE TotalSecure Advanced, Secure Wireless (2 SonicWave 432o Access Points) - 3 Year02-SSC-136802-SSC-1376About SonicWallSonicWall has been fighting the cybercriminal industry for over 27 years defending small and medium businesses, enterprises and government agencies worldwide. Backed by research from SonicWall Capture Labs, our award- winning, real-time breach detection and prevention solutions secure more than a million networks, and their emails, applications and data, in over 215 countries and territories. These organizations run more effectively and fear less about security. For more information, visit or follow us on Twitter , LinkedIn , Facebook and Instagram.。
SonicWALL配置手册--

SonicWALL防火墙标准版配置SonicWall标准版网络向导配置 (1)SonicWall标准版规则向导配置 (11)SonicWall标准版一般规则向导配置 (11)SonicWall标准版服务器规则向导配置 (21)SonicWall标准版一般规则直接配置 (25)SonicWall标准版服务器1对1 NAT配置 (29)SonicWall标准版透明模式配置 (31)SonicWall标准版网络向导配置首次接触SonicWALL防火墙设备,我们将电源接上,并开启电源开关,将X0口和你的电脑相连(注:请用交叉线),SonicWALL防火墙默认的IP地址为192.168.168.168,我们也可以通过setuptool.exe这个小工具探知SonicWALL防火墙的IP地址。
如图所示:页脚内容1当网线和电源等都连接好之后,我们设置一下本机的IP地址,以便和SonicWALL防火墙处于同一个网段。
如图所示:设置好IP地址后,我们在IE浏览器的地址栏输入SonicWALL防火墙的IP地址,页脚内容2点next,提示我们是否修改管理员密码,页脚内容3暂时不修改,点next,提示我们修改防火墙的时区,我们选择中国的时区。
页脚内容4点next,提示我们设置WAN口的地址获取类型,这时候,我们需要和ISP相联系,并选择相关的类型,这里以静态地址为例:页脚内容5我们点next,输入相关的信息,IP地址、掩码、网关、DNS服务器等,如果不知道此处该如何设置,请和你的ISP联系。
页脚内容6点next,提示我们设置LAN口的IP和掩码,我们根据自己的规划和网络的实际情况设置,此处我没有修改。
页脚内容7点next,防火墙询问我们在LAN口是否开启DHCP server的功能,并是否是默认的网段,我们可根据实际情况做调整,决定开始或关闭,以及网段地址等,如下图:页脚内容8点next,防火墙将把前面做的设置做一个摘要,以便我们再一次确认是否设置正确,如果有和实际不符的地方,可以点back返回进行修改。
sonicwall快速安装手册配置
SonicWALL 防火墙配置Tunnel Interface VPN简介: SonicWALL 防火墙配置 Tunnel Interface VPN本文适用于:涉及到的 Sonicwall 防火墙Gen5: NSA E7500, NSA E6500, NSA E5500, NSA 5000, NSA 4500, NSA 3500, NSA 2400, NSA 240Gen5 TZ 系列: TZ 100 /W,TZ 200/ W, TZ 210/ Wireless固件/软件版本: SonicOS 增强版以及更新版本服务: Route Based VPN(Tunnel Interface VPN)功能与应用使用 Tunnel Interface VPN(基于路由的 VPN)的两个优势:1. 将网络拓扑的配置从 VPN Policy 中独立出来2. 网络流量的路由更加灵活,用户可以自定义 VPN 流量路径配置步骤配置 TZ210W1. 进入 VPN->Settings 页面,点击 Add 按钮2. 在 General 选项卡,Policy Type 选择 Tunnel Interface,IPSec Primary Gateway Name or Address 中输入 VPN 对端的 WAN 口地址,本例中为在 Proposals 选项卡,VPN 两端保持一致4.进入 Network->Routing 页面,点击 Add 按钮添加一条路由策略,在 Destination选择 Create new address object…,如图所示:Interface 选择之前在 VPN->Settings 页面添加的 VPN Policy5. 点击 OK 完成配置6. 配置完成的路由策略如图所示配置 NSA35001. 进入 VPN->Settings 页面,点击 Add 按钮2. 在 General 选项卡,Policy Type 选择 Tunnel Interface,IPSec Primary GatewayName or Address 中输入VPN 对端的WAN 口地址,本例中为进入 Network->Routing 页面,点击 Add 按钮添加一条路由策略,在 Destination选择 Create new address object…,如图所示:Interface 选择之前在 VPN->Settings 页面添加的 VPN Policy4. 点击 OK 完成配置5. 配置完成的路由策略如图所示SonicWall防火墙快速安装手册声明:本手册是由深圳市福义轩信息技术有限公司制作,未经深圳市福义轩信息技术有限公司授权严禁传播,一经发现深圳市福义轩信息技术有限公司将保留法律手段.1、将本机网卡地址配置为(除外)、子网掩码为:网关和DNS暂时不用配置。
SonicWall SonicOS 6.5系统设置管理指南说明书
SonicWall™ SonicOS 6.5 系统设置管理目录关于设置您的 SonicOS 系统 . . . . . . . . . . . . . . . . . . . . . . . . . . . . . . . . . . . . . . . . . . . . . . . . . . . . . . . . .13关于 SonicOS 管理界面 . . . . . . . . . . . . . . . . . . . . . . . . . . . . . . . . . . . . . . . . . . . . . . . . . . . . . . . . . . . . . . . 13配置基本设置 . . . . . . . . . . . . . . . . . . . . . . . . . . . . . . . . . . . . . . . . . . . . . . . . . . . . . . . . . . . . . . . . . . . . .16关于设备 | 基本设置 . . . . . . . . . . . . . . . . . . . . . . . . . . . . . . . . . . . . . . . . . . . . . . . . . . . . . . . . . . . . . . . . . 17配置防火墙名称 . . . . . . . . . . . . . . . . . . . . . . . . . . . . . . . . . . . . . . . . . . . . . . . . . . . . . . . . . . . . . . . . . 18更改管理员名称和密码 . . . . . . . . . . . . . . . . . . . . . . . . . . . . . . . . . . . . . . . . . . . . . . . . . . . . . . . . . . . 19配置登录安全 . . . . . . . . . . . . . . . . . . . . . . . . . . . . . . . . . . . . . . . . . . . . . . . . . . . . . . . . . . . . . . . . . . . 19配置多管理员访问 . . . . . . . . . . . . . . . . . . . . . . . . . . . . . . . . . . . . . . . . . . . . . . . . . . . . . . . . . . . . . . . 22启用增强的审核记录支持 . . . . . . . . . . . . . . . . . . . . . . . . . . . . . . . . . . . . . . . . . . . . . . . . . . . . . . . . . 26配置管理界面 . . . . . . . . . . . . . . . . . . . . . . . . . . . . . . . . . . . . . . . . . . . . . . . . . . . . . . . . . . . . . . . . . . . 26配置前板管理界面(仅限 SuperMassive 防火墙) . . . . . . . . . . . . . . . . . . . . . . . . . . . . . . . . . . . 31配置客户端证书验证 . . . . . . . . . . . . . . . . . . . . . . . . . . . . . . . . . . . . . . . . . . . . . . . . . . . . . . . . . . . . . 32检查证书过期 . . . . . . . . . . . . . . . . . . . . . . . . . . . . . . . . . . . . . . . . . . . . . . . . . . . . . . . . . . . . . . . . . . . 35配置 SSH 管理 . . . . . . . . . . . . . . . . . . . . . . . . . . . . . . . . . . . . . . . . . . . . . . . . . . . . . . . . . . . . . . . . . . . 36配置高级管理选项 . . . . . . . . . . . . . . . . . . . . . . . . . . . . . . . . . . . . . . . . . . . . . . . . . . . . . . . . . . . . . . . 36手动下载 SonicPoint 镜像 . . . . . . . . . . . . . . . . . . . . . . . . . . . . . . . . . . . . . . . . . . . . . . . . . . . . . . . . . 38选择语言 . . . . . . . . . . . . . . . . . . . . . . . . . . . . . . . . . . . . . . . . . . . . . . . . . . . . . . . . . . . . . . . . . . . . . . . 39管理 SNMP . . . . . . . . . . . . . . . . . . . . . . . . . . . . . . . . . . . . . . . . . . . . . . . . . . . . . . . . . . . . . . . . . . . . . . .41关于设备 | SNMP . . . . . . . . . . . . . . . . . . . . . . . . . . . . . . . . . . . . . . . . . . . . . . . . . . . . . . . . . . . . . . . . . . . . 41关于 SNMP . . . . . . . . . . . . . . . . . . . . . . . . . . . . . . . . . . . . . . . . . . . . . . . . . . . . . . . . . . . . . . . . . . . . . . 41设置 SNMP 访问权限 . . . . . . . . . . . . . . . . . . . . . . . . . . . . . . . . . . . . . . . . . . . . . . . . . . . . . . . . . . . . . 42将 SNMP 配置为服务并添加规则 . . . . . . . . . . . . . . . . . . . . . . . . . . . . . . . . . . . . . . . . . . . . . . . . . . . 50关于 SNMP 日志 . . . . . . . . . . . . . . . . . . . . . . . . . . . . . . . . . . . . . . . . . . . . . . . . . . . . . . . . . . . . . . . . . 50管理证书 . . . . . . . . . . . . . . . . . . . . . . . . . . . . . . . . . . . . . . . . . . . . . . . . . . . . . . . . . . . . . . . . . . . . . . . . .51关于证书 . . . . . . . . . . . . . . . . . . . . . . . . . . . . . . . . . . . . . . . . . . . . . . . . . . . . . . . . . . . . . . . . . . . . . . . . . . . 51关于数字证书 . . . . . . . . . . . . . . . . . . . . . . . . . . . . . . . . . . . . . . . . . . . . . . . . . . . . . . . . . . . . . . . . . . . 51关于证书和证书请求表 . . . . . . . . . . . . . . . . . . . . . . . . . . . . . . . . . . . . . . . . . . . . . . . . . . . . . . . . . . . 52导入证书 . . . . . . . . . . . . . . . . . . . . . . . . . . . . . . . . . . . . . . . . . . . . . . . . . . . . . . . . . . . . . . . . . . . . . . . 54删除证书 . . . . . . . . . . . . . . . . . . . . . . . . . . . . . . . . . . . . . . . . . . . . . . . . . . . . . . . . . . . . . . . . . . . . . . . 56生成证书签名请求 . . . . . . . . . . . . . . . . . . . . . . . . . . . . . . . . . . . . . . . . . . . . . . . . . . . . . . . . . . . . . . . 56配置简单证书注册协议 . . . . . . . . . . . . . . . . . . . . . . . . . . . . . . . . . . . . . . . . . . . . . . . . . . . . . . . . . . . 60配置时间设置 . . . . . . . . . . . . . . . . . . . . . . . . . . . . . . . . . . . . . . . . . . . . . . . . . . . . . . . . . . . . . . . . . . . . .62关于设备 | 时间 . . . . . . . . . . . . . . . . . . . . . . . . . . . . . . . . . . . . . . . . . . . . . . . . . . . . . . . . . . . . . . . . . . . . . 62设置系统时间 . . . . . . . . . . . . . . . . . . . . . . . . . . . . . . . . . . . . . . . . . . . . . . . . . . . . . . . . . . . . . . . . . . . 62配置 NTP 设置 . . . . . . . . . . . . . . . . . . . . . . . . . . . . . . . . . . . . . . . . . . . . . . . . . . . . . . . . . . . . . . . . . . . 64设置日程 . . . . . . . . . . . . . . . . . . . . . . . . . . . . . . . . . . . . . . . . . . . . . . . . . . . . . . . . . . . . . . . . . . . . . . . . .66关于日程 . . . . . . . . . . . . . . . . . . . . . . . . . . . . . . . . . . . . . . . . . . . . . . . . . . . . . . . . . . . . . . . . . . . . . . . . . . . 66SonicWall SonicOS 6.5 管理指南关于设备 | 日程 . . . . . . . . . . . . . . . . . . . . . . . . . . . . . . . . . . . . . . . . . . . . . . . . . . . . . . . . . . . . . . . . . . . . . 66添加自定义日程 . . . . . . . . . . . . . . . . . . . . . . . . . . . . . . . . . . . . . . . . . . . . . . . . . . . . . . . . . . . . . . . . . 67修改日程 . . . . . . . . . . . . . . . . . . . . . . . . . . . . . . . . . . . . . . . . . . . . . . . . . . . . . . . . . . . . . . . . . . . . . . . 68删除自定义日程 . . . . . . . . . . . . . . . . . . . . . . . . . . . . . . . . . . . . . . . . . . . . . . . . . . . . . . . . . . . . . . . . . 69关于管理用户 . . . . . . . . . . . . . . . . . . . . . . . . . . . . . . . . . . . . . . . . . . . . . . . . . . . . . . . . . . . . . . . . . . . . .72关于用户管理 . . . . . . . . . . . . . . . . . . . . . . . . . . . . . . . . . . . . . . . . . . . . . . . . . . . . . . . . . . . . . . . . . . . . . . 72使用本地用户和群组进行验证 . . . . . . . . . . . . . . . . . . . . . . . . . . . . . . . . . . . . . . . . . . . . . . . . . . . . 73使用 RADIUS 进行身份验证 . . . . . . . . . . . . . . . . . . . . . . . . . . . . . . . . . . . . . . . . . . . . . . . . . . . . . . . 76使用 LDAP/Active Directory/eDirectory 验证 . . . . . . . . . . . . . . . . . . . . . . . . . . . . . . . . . . . . . . . . . . 76关于单点登录 . . . . . . . . . . . . . . . . . . . . . . . . . . . . . . . . . . . . . . . . . . . . . . . . . . . . . . . . . . . . . . . . . . . 80安装单点登录代理和/或终端服务代理 . . . . . . . . . . . . . . . . . . . . . . . . . . . . . . . . . . . . . . . . . . . . . 90关于多管理员支持 . . . . . . . . . . . . . . . . . . . . . . . . . . . . . . . . . . . . . . . . . . . . . . . . . . . . . . . . . . . . . . 107配置多管理员支持 . . . . . . . . . . . . . . . . . . . . . . . . . . . . . . . . . . . . . . . . . . . . . . . . . . . . . . . . . . . . . . 108配置用于管理用户的设置 . . . . . . . . . . . . . . . . . . . . . . . . . . . . . . . . . . . . . . . . . . . . . . . . . . . . . . . . . .111用户 | 设置 . . . . . . . . . . . . . . . . . . . . . . . . . . . . . . . . . . . . . . . . . . . . . . . . . . . . . . . . . . . . . . . . . . . . . . . . 111配置用户验证和登录设置 . . . . . . . . . . . . . . . . . . . . . . . . . . . . . . . . . . . . . . . . . . . . . . . . . . . . . . . 112配置用户会话 . . . . . . . . . . . . . . . . . . . . . . . . . . . . . . . . . . . . . . . . . . . . . . . . . . . . . . . . . . . . . . . . . . 120自定义 . . . . . . . . . . . . . . . . . . . . . . . . . . . . . . . . . . . . . . . . . . . . . . . . . . . . . . . . . . . . . . . . . . . . . . . . 123配置 RADIUS 身份验证 . . . . . . . . . . . . . . . . . . . . . . . . . . . . . . . . . . . . . . . . . . . . . . . . . . . . . . . . . . 129配置 SonicWall 以支持 LDAP . . . . . . . . . . . . . . . . . . . . . . . . . . . . . . . . . . . . . . . . . . . . . . . . . . . . . . 134关于对多个 LDAP 服务器的扩展支持 . . . . . . . . . . . . . . . . . . . . . . . . . . . . . . . . . . . . . . . . . . . . . . 140关于从 LDAP 导入和镜像 . . . . . . . . . . . . . . . . . . . . . . . . . . . . . . . . . . . . . . . . . . . . . . . . . . . . . . . . . 141关于增强版 LDAP 测试 . . . . . . . . . . . . . . . . . . . . . . . . . . . . . . . . . . . . . . . . . . . . . . . . . . . . . . . . . . . 143配置 SonicOS 以使用 SonicWall SSO 代理 . . . . . . . . . . . . . . . . . . . . . . . . . . . . . . . . . . . . . . . . . . . 143管理身份验证分区 . . . . . . . . . . . . . . . . . . . . . . . . . . . . . . . . . . . . . . . . . . . . . . . . . . . . . . . . . . . . . . . .165关于身份验证分区 . . . . . . . . . . . . . . . . . . . . . . . . . . . . . . . . . . . . . . . . . . . . . . . . . . . . . . . . . . . . . . . . . . 165关于用户身份验证分区 . . . . . . . . . . . . . . . . . . . . . . . . . . . . . . . . . . . . . . . . . . . . . . . . . . . . . . . . . . . . . 166关于子分区 . . . . . . . . . . . . . . . . . . . . . . . . . . . . . . . . . . . . . . . . . . . . . . . . . . . . . . . . . . . . . . . . . . . . 167关于分区间用户漫游 . . . . . . . . . . . . . . . . . . . . . . . . . . . . . . . . . . . . . . . . . . . . . . . . . . . . . . . . . . . . 169关于身份验证分区选择 . . . . . . . . . . . . . . . . . . . . . . . . . . . . . . . . . . . . . . . . . . . . . . . . . . . . . . . . . . 170关于对多个 LDAP 服务器的扩展支持 . . . . . . . . . . . . . . . . . . . . . . . . . . . . . . . . . . . . . . . . . . . . . . 172每个分区的 DNS 服务器和分割 DNS . . . . . . . . . . . . . . . . . . . . . . . . . . . . . . . . . . . . . . . . . . . . . . . 172关于 RADIUS 身份验证 . . . . . . . . . . . . . . . . . . . . . . . . . . . . . . . . . . . . . . . . . . . . . . . . . . . . . . . . . . . 172从非分区配置升级 . . . . . . . . . . . . . . . . . . . . . . . . . . . . . . . . . . . . . . . . . . . . . . . . . . . . . . . . . . . . . . 173配置身份验证分区和策略 . . . . . . . . . . . . . . . . . . . . . . . . . . . . . . . . . . . . . . . . . . . . . . . . . . . . . . . . . . . 173显示和过滤用户/分区 . . . . . . . . . . . . . . . . . . . . . . . . . . . . . . . . . . . . . . . . . . . . . . . . . . . . . . . . . . . 173配置和管理分区 . . . . . . . . . . . . . . . . . . . . . . . . . . . . . . . . . . . . . . . . . . . . . . . . . . . . . . . . . . . . . . . . 175配置分区选择策略 . . . . . . . . . . . . . . . . . . . . . . . . . . . . . . . . . . . . . . . . . . . . . . . . . . . . . . . . . . . . . . 186配置进行身份验证分区的服务器、代理和客户端 . . . . . . . . . . . . . . . . . . . . . . . . . . . . . . . . . . . 189配置本地用户和群组 . . . . . . . . . . . . . . . . . . . . . . . . . . . . . . . . . . . . . . . . . . . . . . . . . . . . . . . . . . . . . .191配置本地用户 . . . . . . . . . . . . . . . . . . . . . . . . . . . . . . . . . . . . . . . . . . . . . . . . . . . . . . . . . . . . . . . . . . . . . . 191SonicWall SonicOS 6.5 管理指南添加本地用户 . . . . . . . . . . . . . . . . . . . . . . . . . . . . . . . . . . . . . . . . . . . . . . . . . . . . . . . . . . . . . . . . . . 192编辑本地用户 . . . . . . . . . . . . . . . . . . . . . . . . . . . . . . . . . . . . . . . . . . . . . . . . . . . . . . . . . . . . . . . . . . 197从 LDAP 导入本地用户 . . . . . . . . . . . . . . . . . . . . . . . . . . . . . . . . . . . . . . . . . . . . . . . . . . . . . . . . . . . 198配置访客管理员 . . . . . . . . . . . . . . . . . . . . . . . . . . . . . . . . . . . . . . . . . . . . . . . . . . . . . . . . . . . . . . . . 198配置本地群组 . . . . . . . . . . . . . . . . . . . . . . . . . . . . . . . . . . . . . . . . . . . . . . . . . . . . . . . . . . . . . . . . . . . . . . 199创建或编辑本地群组 . . . . . . . . . . . . . . . . . . . . . . . . . . . . . . . . . . . . . . . . . . . . . . . . . . . . . . . . . . . . 200从 LDAP 导入本地群组 . . . . . . . . . . . . . . . . . . . . . . . . . . . . . . . . . . . . . . . . . . . . . . . . . . . . . . . . . . . 208按 LDAP 位置设置用户成员身份 . . . . . . . . . . . . . . . . . . . . . . . . . . . . . . . . . . . . . . . . . . . . . . . . . . 208管理访客服务 . . . . . . . . . . . . . . . . . . . . . . . . . . . . . . . . . . . . . . . . . . . . . . . . . . . . . . . . . . . . . . . . . . . .209用户 | 访客服务 . . . . . . . . . . . . . . . . . . . . . . . . . . . . . . . . . . . . . . . . . . . . . . . . . . . . . . . . . . . . . . . . . . . . 209全局访客设置 . . . . . . . . . . . . . . . . . . . . . . . . . . . . . . . . . . . . . . . . . . . . . . . . . . . . . . . . . . . . . . . . . . 209访客配置文件 . . . . . . . . . . . . . . . . . . . . . . . . . . . . . . . . . . . . . . . . . . . . . . . . . . . . . . . . . . . . . . . . . . 210管理访客帐户 . . . . . . . . . . . . . . . . . . . . . . . . . . . . . . . . . . . . . . . . . . . . . . . . . . . . . . . . . . . . . . . . . . . .213用户 | 访客帐户 . . . . . . . . . . . . . . . . . . . . . . . . . . . . . . . . . . . . . . . . . . . . . . . . . . . . . . . . . . . . . . . . . . . . 213查看访客帐户统计 . . . . . . . . . . . . . . . . . . . . . . . . . . . . . . . . . . . . . . . . . . . . . . . . . . . . . . . . . . . . . . 213添加访客帐户 . . . . . . . . . . . . . . . . . . . . . . . . . . . . . . . . . . . . . . . . . . . . . . . . . . . . . . . . . . . . . . . . . . 215启用访客帐户 . . . . . . . . . . . . . . . . . . . . . . . . . . . . . . . . . . . . . . . . . . . . . . . . . . . . . . . . . . . . . . . . . . 221启用访客帐户自动删除 . . . . . . . . . . . . . . . . . . . . . . . . . . . . . . . . . . . . . . . . . . . . . . . . . . . . . . . . . . 221编辑访客帐户 . . . . . . . . . . . . . . . . . . . . . . . . . . . . . . . . . . . . . . . . . . . . . . . . . . . . . . . . . . . . . . . . . . 221删除访客帐户 . . . . . . . . . . . . . . . . . . . . . . . . . . . . . . . . . . . . . . . . . . . . . . . . . . . . . . . . . . . . . . . . . . 221打印帐户详细信息 . . . . . . . . . . . . . . . . . . . . . . . . . . . . . . . . . . . . . . . . . . . . . . . . . . . . . . . . . . . . . . 222配置接口 . . . . . . . . . . . . . . . . . . . . . . . . . . . . . . . . . . . . . . . . . . . . . . . . . . . . . . . . . . . . . . . . . . . . . . . .224关于接口 . . . . . . . . . . . . . . . . . . . . . . . . . . . . . . . . . . . . . . . . . . . . . . . . . . . . . . . . . . . . . . . . . . . . . . . . . . 225物理和虚拟接口 . . . . . . . . . . . . . . . . . . . . . . . . . . . . . . . . . . . . . . . . . . . . . . . . . . . . . . . . . . . . . . . . 225 SonicOS 安全对象 . . . . . . . . . . . . . . . . . . . . . . . . . . . . . . . . . . . . . . . . . . . . . . . . . . . . . . . . . . . . . . . 227透明模式 . . . . . . . . . . . . . . . . . . . . . . . . . . . . . . . . . . . . . . . . . . . . . . . . . . . . . . . . . . . . . . . . . . . . . . 228 IPS 探查器模式 . . . . . . . . . . . . . . . . . . . . . . . . . . . . . . . . . . . . . . . . . . . . . . . . . . . . . . . . . . . . . . . . . 228 Firewall Sandwich . . . . . . . . . . . . . . . . . . . . . . . . . . . . . . . . . . . . . . . . . . . . . . . . . . . . . . . . . . . . . . . 230 HTTP/HTTPS 重定向 . . . . . . . . . . . . . . . . . . . . . . . . . . . . . . . . . . . . . . . . . . . . . . . . . . . . . . . . . . . . . 230在接口上启用 DNS 代理 . . . . . . . . . . . . . . . . . . . . . . . . . . . . . . . . . . . . . . . . . . . . . . . . . . . . . . . . . 230网络 | 接口 . . . . . . . . . . . . . . . . . . . . . . . . . . . . . . . . . . . . . . . . . . . . . . . . . . . . . . . . . . . . . . . . . . . . . . . . 230显示/隐藏 PortShield 接口(仅限 IPv4) . . . . . . . . . . . . . . . . . . . . . . . . . . . . . . . . . . . . . . . . . . . 232接口设置 . . . . . . . . . . . . . . . . . . . . . . . . . . . . . . . . . . . . . . . . . . . . . . . . . . . . . . . . . . . . . . . . . . . . . . 233接口流量统计 . . . . . . . . . . . . . . . . . . . . . . . . . . . . . . . . . . . . . . . . . . . . . . . . . . . . . . . . . . . . . . . . . . 233配置接口 . . . . . . . . . . . . . . . . . . . . . . . . . . . . . . . . . . . . . . . . . . . . . . . . . . . . . . . . . . . . . . . . . . . . . . . . . . 234配置静态接口 . . . . . . . . . . . . . . . . . . . . . . . . . . . . . . . . . . . . . . . . . . . . . . . . . . . . . . . . . . . . . . . . . . 234配置路由模式 . . . . . . . . . . . . . . . . . . . . . . . . . . . . . . . . . . . . . . . . . . . . . . . . . . . . . . . . . . . . . . . . . . 239在接口上启用带宽管理 . . . . . . . . . . . . . . . . . . . . . . . . . . . . . . . . . . . . . . . . . . . . . . . . . . . . . . . . . . 241配置透明 IP 模式下的接口(连接 L3 子网) . . . . . . . . . . . . . . . . . . . . . . . . . . . . . . . . . . . . . . . . 242配置无线接口 . . . . . . . . . . . . . . . . . . . . . . . . . . . . . . . . . . . . . . . . . . . . . . . . . . . . . . . . . . . . . . . . . . 245配置 WAN 接口 . . . . . . . . . . . . . . . . . . . . . . . . . . . . . . . . . . . . . . . . . . . . . . . . . . . . . . . . . . . . . . . . 248SonicWall SonicOS 6.5 管理指南配置链路聚合和端口冗余 . . . . . . . . . . . . . . . . . . . . . . . . . . . . . . . . . . . . . . . . . . . . . . . . . . . . . . . 255配置虚拟接口(VLAN 子接口) . . . . . . . . . . . . . . . . . . . . . . . . . . . . . . . . . . . . . . . . . . . . . . . . . . . 259配置 IPS 探查器模式 . . . . . . . . . . . . . . . . . . . . . . . . . . . . . . . . . . . . . . . . . . . . . . . . . . . . . . . . . . . . 260配置安全服务(统一威胁管理) . . . . . . . . . . . . . . . . . . . . . . . . . . . . . . . . . . . . . . . . . . . . . . . . . 263配置有线和 Tap 模式 . . . . . . . . . . . . . . . . . . . . . . . . . . . . . . . . . . . . . . . . . . . . . . . . . . . . . . . . . . . . 264带有链路聚合的有线模式 . . . . . . . . . . . . . . . . . . . . . . . . . . . . . . . . . . . . . . . . . . . . . . . . . . . . . . . 267二层桥接模式 . . . . . . . . . . . . . . . . . . . . . . . . . . . . . . . . . . . . . . . . . . . . . . . . . . . . . . . . . . . . . . . . . . 267配置二层桥接模式 . . . . . . . . . . . . . . . . . . . . . . . . . . . . . . . . . . . . . . . . . . . . . . . . . . . . . . . . . . . . . . 283非对称路由 . . . . . . . . . . . . . . . . . . . . . . . . . . . . . . . . . . . . . . . . . . . . . . . . . . . . . . . . . . . . . . . . . . . . 290配置 IPv6 接口 . . . . . . . . . . . . . . . . . . . . . . . . . . . . . . . . . . . . . . . . . . . . . . . . . . . . . . . . . . . . . . . . . . 29131 位网络 . . . . . . . . . . . . . . . . . . . . . . . . . . . . . . . . . . . . . . . . . . . . . . . . . . . . . . . . . . . . . . . . . . . . . . 291PPPoE 未编号接口支持 . . . . . . . . . . . . . . . . . . . . . . . . . . . . . . . . . . . . . . . . . . . . . . . . . . . . . . . . . . 292PortShield 配置接口 . . . . . . . . . . . . . . . . . . . . . . . . . . . . . . . . . . . . . . . . . . . . . . . . . . . . . . . . . . . . . . .295网络 | PortShield 群组 . . . . . . . . . . . . . . . . . . . . . . . . . . . . . . . . . . . . . . . . . . . . . . . . . . . . . . . . . . . . . . . 295关于 PortShield . . . . . . . . . . . . . . . . . . . . . . . . . . . . . . . . . . . . . . . . . . . . . . . . . . . . . . . . . . . . . . . . . 295 X -系列交换机的 SonicOS 支持 . . . . . . . . . . . . . . . . . . . . . . . . . . . . . . . . . . . . . . . . . . . . . . . . . . . . 296管理端口 . . . . . . . . . . . . . . . . . . . . . . . . . . . . . . . . . . . . . . . . . . . . . . . . . . . . . . . . . . . . . . . . . . . . . . 305配置 PortShield 群组 . . . . . . . . . . . . . . . . . . . . . . . . . . . . . . . . . . . . . . . . . . . . . . . . . . . . . . . . . . . . . 313设置故障切换和负载均衡 . . . . . . . . . . . . . . . . . . . . . . . . . . . . . . . . . . . . . . . . . . . . . . . . . . . . . . . . . .319网络 | 故障切换和负载均衡 . . . . . . . . . . . . . . . . . . . . . . . . . . . . . . . . . . . . . . . . . . . . . . . . . . . . . . . . . 319关于故障切换和负载均衡 . . . . . . . . . . . . . . . . . . . . . . . . . . . . . . . . . . . . . . . . . . . . . . . . . . . . . . . . 319故障切换和负载均衡的工作原理 . . . . . . . . . . . . . . . . . . . . . . . . . . . . . . . . . . . . . . . . . . . . . . . . . 320多个 WAN (MWAN) . . . . . . . . . . . . . . . . . . . . . . . . . . . . . . . . . . . . . . . . . . . . . . . . . . . . . . . . . . . . . . 321网络 | 故障切换和负载均衡 . . . . . . . . . . . . . . . . . . . . . . . . . . . . . . . . . . . . . . . . . . . . . . . . . . . . . . 321配置故障切换和负载均衡组 . . . . . . . . . . . . . . . . . . . . . . . . . . . . . . . . . . . . . . . . . . . . . . . . . . . . . . 324配置群组成员的探测设置 . . . . . . . . . . . . . . . . . . . . . . . . . . . . . . . . . . . . . . . . . . . . . . . . . . . . . . . . 327配置网络区域 . . . . . . . . . . . . . . . . . . . . . . . . . . . . . . . . . . . . . . . . . . . . . . . . . . . . . . . . . . . . . . . . . . . .329关于区域 . . . . . . . . . . . . . . . . . . . . . . . . . . . . . . . . . . . . . . . . . . . . . . . . . . . . . . . . . . . . . . . . . . . . . . . . . . 329区域的工作方式 . . . . . . . . . . . . . . . . . . . . . . . . . . . . . . . . . . . . . . . . . . . . . . . . . . . . . . . . . . . . . . . . 330预定义区域 . . . . . . . . . . . . . . . . . . . . . . . . . . . . . . . . . . . . . . . . . . . . . . . . . . . . . . . . . . . . . . . . . . . . 330安全类型 . . . . . . . . . . . . . . . . . . . . . . . . . . . . . . . . . . . . . . . . . . . . . . . . . . . . . . . . . . . . . . . . . . . . . . 331允许接口信任 . . . . . . . . . . . . . . . . . . . . . . . . . . . . . . . . . . . . . . . . . . . . . . . . . . . . . . . . . . . . . . . . . . 331对区域启用 SonicWall 安全服务 . . . . . . . . . . . . . . . . . . . . . . . . . . . . . . . . . . . . . . . . . . . . . . . . . . . 331网络 | 区域 . . . . . . . . . . . . . . . . . . . . . . . . . . . . . . . . . . . . . . . . . . . . . . . . . . . . . . . . . . . . . . . . . . . . . . . . 332区域设置表 . . . . . . . . . . . . . . . . . . . . . . . . . . . . . . . . . . . . . . . . . . . . . . . . . . . . . . . . . . . . . . . . . . . . 333添加新区域 . . . . . . . . . . . . . . . . . . . . . . . . . . . . . . . . . . . . . . . . . . . . . . . . . . . . . . . . . . . . . . . . . . . . 333配置访客访问的区域 . . . . . . . . . . . . . . . . . . . . . . . . . . . . . . . . . . . . . . . . . . . . . . . . . . . . . . . . . . . 335配置用于开放式验证和社交登录的区域 . . . . . . . . . . . . . . . . . . . . . . . . . . . . . . . . . . . . . . . . . . . 338配置 WLAN 区域 . . . . . . . . . . . . . . . . . . . . . . . . . . . . . . . . . . . . . . . . . . . . . . . . . . . . . . . . . . . . . . . . 338删除区域 . . . . . . . . . . . . . . . . . . . . . . . . . . . . . . . . . . . . . . . . . . . . . . . . . . . . . . . . . . . . . . . . . . . . . . 340配置有线模式 VLAN 转换 . . . . . . . . . . . . . . . . . . . . . . . . . . . . . . . . . . . . . . . . . . . . . . . . . . . . . . . . . .341SonicWall SonicOS 6.5 管理指南网络 | VLAN 转换 . . . . . . . . . . . . . . . . . . . . . . . . . . . . . . . . . . . . . . . . . . . . . . . . . . . . . . . . . . . . . . . . . . . 341关于 VLAN 转换 . . . . . . . . . . . . . . . . . . . . . . . . . . . . . . . . . . . . . . . . . . . . . . . . . . . . . . . . . . . . . . . . . 341创建和管理 VLAN 映射 . . . . . . . . . . . . . . . . . . . . . . . . . . . . . . . . . . . . . . . . . . . . . . . . . . . . . . . . . . 342配置 DNS 设置 . . . . . . . . . . . . . . . . . . . . . . . . . . . . . . . . . . . . . . . . . . . . . . . . . . . . . . . . . . . . . . . . . . . .349网络 | DNS . . . . . . . . . . . . . . . . . . . . . . . . . . . . . . . . . . . . . . . . . . . . . . . . . . . . . . . . . . . . . . . . . . . . . . . . . 349关于分割 DNS . . . . . . . . . . . . . . . . . . . . . . . . . . . . . . . . . . . . . . . . . . . . . . . . . . . . . . . . . . . . . . . . . . 351管理 DNS 服务器 . . . . . . . . . . . . . . . . . . . . . . . . . . . . . . . . . . . . . . . . . . . . . . . . . . . . . . . . . . . . . . . . 352 DNS 和 IPv6 . . . . . . . . . . . . . . . . . . . . . . . . . . . . . . . . . . . . . . . . . . . . . . . . . . . . . . . . . . . . . . . . . . . . 357 DNS 和 IPv4 . . . . . . . . . . . . . . . . . . . . . . . . . . . . . . . . . . . . . . . . . . . . . . . . . . . . . . . . . . . . . . . . . . . . 358配置 DNS 代理设置 . . . . . . . . . . . . . . . . . . . . . . . . . . . . . . . . . . . . . . . . . . . . . . . . . . . . . . . . . . . . . . .361网络 > DNS 代理 . . . . . . . . . . . . . . . . . . . . . . . . . . . . . . . . . . . . . . . . . . . . . . . . . . . . . . . . . . . . . . . . . . . . 362关于 DNS 代理 . . . . . . . . . . . . . . . . . . . . . . . . . . . . . . . . . . . . . . . . . . . . . . . . . . . . . . . . . . . . . . . . . . 363启用 DNS 代理 . . . . . . . . . . . . . . . . . . . . . . . . . . . . . . . . . . . . . . . . . . . . . . . . . . . . . . . . . . . . . . . . . . 365配置 DNS 代理设置 . . . . . . . . . . . . . . . . . . . . . . . . . . . . . . . . . . . . . . . . . . . . . . . . . . . . . . . . . . . . . . 367监控 DNS 服务器状态 . . . . . . . . . . . . . . . . . . . . . . . . . . . . . . . . . . . . . . . . . . . . . . . . . . . . . . . . . . . 367监控分割 DNS 服务器状态 . . . . . . . . . . . . . . . . . . . . . . . . . . . . . . . . . . . . . . . . . . . . . . . . . . . . . . . 368查看和管理静态 DNS 缓存条目 . . . . . . . . . . . . . . . . . . . . . . . . . . . . . . . . . . . . . . . . . . . . . . . . . . . 369查看 DNS 代理缓存条目 . . . . . . . . . . . . . . . . . . . . . . . . . . . . . . . . . . . . . . . . . . . . . . . . . . . . . . . . . 370配置路由通告和路由策略 . . . . . . . . . . . . . . . . . . . . . . . . . . . . . . . . . . . . . . . . . . . . . . . . . . . . . . . . . .372关于路由 . . . . . . . . . . . . . . . . . . . . . . . . . . . . . . . . . . . . . . . . . . . . . . . . . . . . . . . . . . . . . . . . . . . . . . . . . . 372关于度量和管理距离 . . . . . . . . . . . . . . . . . . . . . . . . . . . . . . . . . . . . . . . . . . . . . . . . . . . . . . . . . . . . 373路由通告 . . . . . . . . . . . . . . . . . . . . . . . . . . . . . . . . . . . . . . . . . . . . . . . . . . . . . . . . . . . . . . . . . . . . . . 374 ECMP 路由 . . . . . . . . . . . . . . . . . . . . . . . . . . . . . . . . . . . . . . . . . . . . . . . . . . . . . . . . . . . . . . . . . . . . . 374基于策略的路由 . . . . . . . . . . . . . . . . . . . . . . . . . . . . . . . . . . . . . . . . . . . . . . . . . . . . . . . . . . . . . . . . 375基于策略的 TOS 路由 . . . . . . . . . . . . . . . . . . . . . . . . . . . . . . . . . . . . . . . . . . . . . . . . . . . . . . . . . . . . 375基于 PBR 度量值的优先级 . . . . . . . . . . . . . . . . . . . . . . . . . . . . . . . . . . . . . . . . . . . . . . . . . . . . . . . . 376基于策略的路由和 IPv6 . . . . . . . . . . . . . . . . . . . . . . . . . . . . . . . . . . . . . . . . . . . . . . . . . . . . . . . . . . 377 OSPF 和 RIP 高级路由服务 . . . . . . . . . . . . . . . . . . . . . . . . . . . . . . . . . . . . . . . . . . . . . . . . . . . . . . . 377丢弃隧道接口 . . . . . . . . . . . . . . . . . . . . . . . . . . . . . . . . . . . . . . . . . . . . . . . . . . . . . . . . . . . . . . . . . . 384网络 | 路由 . . . . . . . . . . . . . . . . . . . . . . . . . . . . . . . . . . . . . . . . . . . . . . . . . . . . . . . . . . . . . . . . . . . . . . . . 384网络 | 路由 > 设置 . . . . . . . . . . . . . . . . . . . . . . . . . . . . . . . . . . . . . . . . . . . . . . . . . . . . . . . . . . . . . . 384网络 | 路由 > 路由策略 . . . . . . . . . . . . . . . . . . . . . . . . . . . . . . . . . . . . . . . . . . . . . . . . . . . . . . . . . . 385网络 | 路由 > 路由通告 . . . . . . . . . . . . . . . . . . . . . . . . . . . . . . . . . . . . . . . . . . . . . . . . . . . . . . . . . . 386网络 | 路由 > OSPFv2 . . . . . . . . . . . . . . . . . . . . . . . . . . . . . . . . . . . . . . . . . . . . . . . . . . . . . . . . . . . . 387网络 | 路由 > RIP . . . . . . . . . . . . . . . . . . . . . . . . . . . . . . . . . . . . . . . . . . . . . . . . . . . . . . . . . . . . . . . . 388网络 | 路由 > OSPFv3 . . . . . . . . . . . . . . . . . . . . . . . . . . . . . . . . . . . . . . . . . . . . . . . . . . . . . . . . . . . . 389网络 | 路由 > RIPng . . . . . . . . . . . . . . . . . . . . . . . . . . . . . . . . . . . . . . . . . . . . . . . . . . . . . . . . . . . . . . 391配置路由 . . . . . . . . . . . . . . . . . . . . . . . . . . . . . . . . . . . . . . . . . . . . . . . . . . . . . . . . . . . . . . . . . . . . . . . . . . 392按度量值设置路由的优先级 . . . . . . . . . . . . . . . . . . . . . . . . . . . . . . . . . . . . . . . . . . . . . . . . . . . . . 392为通过路由公告学习的默认路由配置度量值 . . . . . . . . . . . . . . . . . . . . . . . . . . . . . . . . . . . . . . 393配置路由通告 . . . . . . . . . . . . . . . . . . . . . . . . . . . . . . . . . . . . . . . . . . . . . . . . . . . . . . . . . . . . . . . . . . 393配置静态和基于策略的路由 . . . . . . . . . . . . . . . . . . . . . . . . . . . . . . . . . . . . . . . . . . . . . . . . . . . . . . 394SonicWall SonicOS 6.5 管理指南。
关于SonicWALL防火墙的连接数说明
关于SonicWALL防火墙的连接数说明:
5.5版本,默认:
因为默认在设备上开启了UTM DPI引擎(即使UTM没有配置或者用户没有购买UTM,DPI 引擎默认还是在后台启动的,这个会占用一部分防火墙的最大并发连接数(内存))
如果关闭了上述选项,即彻底关闭了DPI引擎。
关闭后(需要重新启动)的系统连接数会增大,如下图:
5.6以后的版本,增加了配置选项
下面是关闭DPI后的总体连接数:
对应的选项:UTM services (Application Firewall, Anti‐Spyware, Gateway AV, and IPS Engine)
disabled for highest number of SPI connections
下图是开启UTM DPI引擎后的连接数:(系统默认配置)
对应的选项:
Recommended for normal deployments with UTM services enabled
下面是增加系统UTM连接数的配置:
对应的选项:
Optimized for deployments requiring more UTM connections but less performance critical
截图如下:
另外,在防火墙的配置界面,还有开启UTM后增加设备吞吐性能的配置页面(配置后部需要重启)。
如何在SonicWALL防火墙上配置静态路由
如何在SonicWALL防⽕墙上配置静态路由如何在SonicWALL防⽕墙上配置静态路由配置⼿册版本1.0.0Question/TopicUTM: 如何在SonicW ALL防⽕墙上配置静态路由Answer/Article本⽂适⽤于:涉及到的Sonicwall防⽕墙Gen5: NSA E8500, NSA E7500, NSA E6500, NSA E5500, NSA 5000, NSA 4500, NSA 3500, NSA 2400, NSA 2400MX, NSA 240Gen5 TZ系列:TZ 100, TZ 100 Wireless, TZ 200, TZ 200 W, TZ 210, TZ 210 WirelessGen4: PRO系列: PRO 5060, PRO 4100, PRO 4060,PRO 3060, PRO 2040, PRO 1260Gen4: TZ系列: TZ 190, TZ 190 W, TZ 180, TZ 180 W, TZ 170, TZ 170 W, TZ 170 SP, TZ 170 SP Wireless, TZ 150, TZ 150 W, TZ 150 Wireless(RevB)Gen3:PRO系列: PRO 330, PRO 300, PRO 230, PRO 200, PRO 100SOHO3/TELE3/GX series: SOHO TZW, SOHO3, TELE3, TELE3 SP, TELE3 TZ, TELE3 TZX, GX 650, GX 250固件/软件版本: 所有Gen5和Gen4固件版本, Gen3 6.5.X.X以及更新固件版本服务: Routing - Static Routes功能与应⽤如果SonicWALL防⽕墙下⾯连接路由器,那么要访问路由器下⾯的PC必须要在防⽕墙的Network->Routing页⾯添加静态路由步骤本例中SonicWALL防⽕墙:X0 IP:192.168.168.168/24本地路由器:接⼝1 IP:192.168.168.254/24 ⽹关:192.168.168.168 接⼝2 IP:10.10.20.1/24在Fireware 6.X上配置静态路由1.进⼊Advanced->Routes页⾯2.Destionation network:10.10.20.0Subnet mask:255.255.255.0Gateway:192.168.168.254Link:LAN在SonicOS Standard上配置静态路由1.进⼊Network->Routing页⾯,点击Add Static Route按钮2.Destionation network:10.10.20.0Subnet mask:255.255.255.0Gateway:192.168.168.254Interface:LAN(X0)3.点击OK按钮完成配置在SonicOS Enhanced上配置静态路由1.进⼊Network->Routing页⾯,点击Add按钮2.如下进⾏配置:-Source = Any-Destination = Create new address object…-Name = Network Behind Router-Zone Assignment = LAN-Type = Network-Network = 10.10.20.0-Netmask = 255.255.255.0-点击OK完成配置-Service = Any-Gateway = Create new address object…-Name = 192.168.168.254-Zone Assignment = LAN-Type = Host-IP Address = 192.168.168.254-点击OK完成配置-Interface = X0-metric = 1-点击OK完成配置注意:1.Destination⽹络不能与Source中的⽹络重复2.在内部路由器上必须有去往SonicWALL防⽕墙的路由,允许路由器下的主机通过SonicWALL防⽕墙上⽹3.你可以为WAN,DMZ以及其他接⼝配置静态路由,但是如果防⽕墙是作为⼀个次级路由器,那么不需要添加静态路由。
- 1、下载文档前请自行甄别文档内容的完整性,平台不提供额外的编辑、内容补充、找答案等附加服务。
- 2、"仅部分预览"的文档,不可在线预览部分如存在完整性等问题,可反馈申请退款(可完整预览的文档不适用该条件!)。
- 3、如文档侵犯您的权益,请联系客服反馈,我们会尽快为您处理(人工客服工作时间:9:00-18:30)。
SonicWALL HA配置
用户需求:
设备实现双机热备,当主设备故障,备用设备自动接管,保证网络受到的影响最小化。
网络连接如下图所示:
SonicWALL HA是Active/Passive方式的HA,配置界面相当简单,所有配置只需要在主设备上配置,备用设备会自动同步主设备的配置。
配置主设备时,不要打开备用设备电源,待主设备配置完毕之后,连接好物理线路,打开备用设备电源,备用设备自动与主设备同步全部的配置信息。
注意:备用设备要和主设备采用同样的操作系统版本号。
如果备用设备启用UTM的功能,那么备用设备要提前注册,拿到全部的UTM的授权。
主设备的UTM License不会同步到备用设备。
1.进入主设备的管理界面
https://192.168.168.168, 默认的LAN口IP地址,用户名是 admin, 密码password
2.进入Network->Interfaces界面,配置X1口(WAN),X0口(LAN)的IP 地址。
这里X1口是WAN口,IP 地址218.247.156.9, 这个地址将成为HA发生切换之后WAN口的虚拟地址,从WAN外部通过218.247.156.9能访问到当前工作的设备,即如果主设备宕机,那么通过这个地址访问到的是备用设备。
X0 口IP地址用默认的 192.168.168.168. 这个地址将成为HA发生切换之后LAN口的虚拟地址,从LAN内部通过192.168.168.168能访问到当前工作的设备,即
如果主设备宕机,那么通过这个地址访问到的是备用设备。
3.进入Hardware Failover->Setting 界面,选中Enable Hardware Failover激活HA配置,点右上角的Apply按钮使HA生效。
如果希望主设备恢复后立刻切换回到主设备工作,那么选中Enable Preempt Mode,点右上角的Apply按钮使之
生效.
4.进入Hardware Failover->Monitoring 界面,点X0口的配置按钮,
5.在Interface X0 Monitoring Settings 界面的Primary IP Address, Backup IP Address分别填写主/备设备的管理IP地址。
通过192.168.168.169访问到的永远是主设备, 通过192.168.168.170访问到的永远是备用设备。
即使因为主设备故障发生了切换也是如此(如果主设备故障时间还可以被访问的话)。
Probe IP Address是探测地址,通常设置成与防火墙相连的三层交换的端口地址,探测此条路径是否正常。
这个探测结果也可以触发HA切换。
如主设备到与防火墙相连的三层交换的端口探测失败,而备用设备的探测成功,那么将发生主备切换。
6.在Interface X1 Monitoring Settings 界面的Primary IP Address, Backup IP Address分别填写主/备设备的管理IP地址。
通过218.24
7.156.10访问到的永远是主设备, 通过21
8.247.156.11访问到的永远是备用设备。
即使因为主设备故障发生了切换也是如此(如果主设备故障时间还可以被访问的话)
Probe IP Address是探测地址,通常设置成防火墙上游路由器的IP地址,探测此条路径是否正常。
这个探测结果也可以触发HA切换。
如主设备到上游路由器的IP地址探测失败,而备用设备的探测成功,那么将发生主备切换。
7. 如图连接好线路,打开备用设备的电源。
备用设备的配置会与主设备同步,然后自动重新启动。
HA配置全部完成。
总结:
在第五,六两个步骤里配置的X0和X1口的Primary IP Address, Backup IP Address只是用来管理主设备和备用设备。
本例中的192.168.168.168,
218.247.156.9在发生切换时,在两个设备上浮动,既备用设备处于活动状态时,内部发给192.168.168.168的数据将被处于活动状态的备用设备处理。
那么是如何实现的呢?
ARP表的更新
当发生主备设备切换时,由于主设备和备用设备的Ethernet网卡的MAC地址不同,防火墙上游路由器和下游的三层交换机(如果有的话)的ARP表必须及时更新。
否则发生切换之后,如果下游三层交换机送给地址 192.168.168.168的数据仍然使用主设备X0 口的MAC地址,那么放火墙将丢弃所有的数据,因为
MAC地址不是备用设备X0口的MAC地址。
同样,上游的路由器的ARP表也必须更新,否则送给218.247.156.9的数据如果采用主设备的X1口的MAC地址,放火墙也会丢弃全部到达的数据。
SonicWALL 强制 ARP 表更新
为了避免上述讨论的ARP可能导致的问题,发生主备设备切换的同时,SonicWALL切换到活动状态的设备会在X0 口,X1 口分别广播ARP包,告诉上游路由器和下游的三层交换机或其它服务器更新ARP表,使它们知道到达虚拟IP地址 192.168.168.168, 218.247.156.9,分别发送到备用设备的X0口和X1口的MAC地址。
注意:
目前的HA操作不是全状态切换。
发生HA切换时,TCP连接要重新建立。
现有的TCP连接,如FTP将会断开。
IPSec VPN隧道也要重新建立,IPSec数据传输会短暂的中断,带新的VPN隧道协商完成后继续。
对于要求严格的环境,如银行要求的防火墙和VPN的全状态切换,发生切换时防火墙TCP连接,VPN隧道都不中断,目前的版本还不支持。