Cobbler安装配置手册
Cobbler安装配置文档

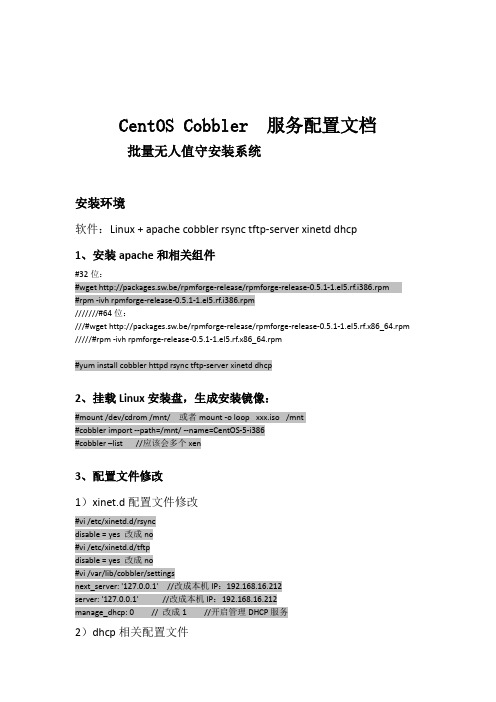
CentOS Cobbler 服务配置文档批量无人值守安装系统安装环境软件:Linux + apache cobbler rsync tftp-server xinetd dhcp1、安装apache和相关组件#32位:#wget http://packages.sw.be/rpmforge-release/rpmforge-release-0.5.1-1.el5.rf.i386.rpm#rpm -ivh rpmforge-release-0.5.1-1.el5.rf.i386.rpm///////#64位:///#wget http://packages.sw.be/rpmforge-release/rpmforge-release-0.5.1-1.el5.rf.x86_64.rpm /////#rpm -ivh rpmforge-release-0.5.1-1.el5.rf.x86_64.rpm#yum install cobbler httpd rsync tftp-server xinetd dhcp2、挂载Linux安装盘,生成安装镜像:#mount /dev/cdrom /mnt/ 或者mount -o loop xxx.iso /mnt#cobbler import --path=/mnt/ --name=CentOS-5-i386#cobbler –list //应该会多个xen3、配置文件修改1)xinet.d配置文件修改#vi /etc/xinetd.d/rsyncdisable = yes 改成no#vi /etc/xinetd.d/tftpdisable = yes 改成no#vi /var/lib/cobbler/settingsnext_server: '127.0.0.1' //改成本机IP:192.168.16.212server: '127.0.0.1' //改成本机IP:192.168.16.212manage_dhcp: 0 // 改成1 //开启管理DHCP服务2)dhcp相关配置文件#vi /etc/cobbler/dhcp.templateddns-update-style interim;allow booting;allow bootp;ignore client-updates;set vendorclass = option vendor-class-identifier;subnet 192.168.16.0 netmask 255.255.255.0 {option routers 192.168.16.1;#option domain-name-server 192.168.0.100;option subnet-mask 255.255.255.0;range dynamic-bootp 192.168.16.185 192.168.16.189;filename "/pxelinux.0";default-lease-time 21600;max-lease-time 43200;next-server 192.168.16.212;}#vi /etc/cobbler/default.ks ////安装自动关键配置文件见最后说明4、关闭防火墙和SElinux#setup5、同步cobbler配置,使修改生效:#cobbler sync//目地是指把/etc/cobble/下面的配置文件,同步到相应的目录下面6、重启各种服务#service xinetd restart#service dhcpd restart#service cobblerd restar#service httpd restart一、客服端新安装的启动另一台新服务器,通过 PXE 启动进入,提示"boot:"时输入"menu"即可进入蓝色的Cobbler 安装界面,选择CentOS-5-i386安装项,自动完成系统安装。
DHCPPXECobbler简单实现

DHCPPXECobbler简单实现DHCP&PXE&Cobbler⼀、DHCP简介(⼀)DHCP⼯作流程DHCP: Dynamic Host Configuration Protocol 简⽽⾔之动态主机配置协议,即然英⽂没有说是IP配置协议,那么就是说除了给客户机配置IP 外它还能⼲点⼉别的。
下⾯来看看⼀个简单的流程说明第⼀步,客户端启动后暂未获得IP地址,向所在局域⽹⼴播⼀个DHCP discover报⽂。
第⼆步,本地局域⽹中的DHCP服务器(可能不⽌⼀台)收到客户端的discover报⽂后,向本地⽹络⼴播(为了让其他服务器也收到)发送DHCP offer报⽂,包含服务器从⾃⼰掌管的IP地址范围内取出的⼀个IP。
第三步,客户端收到服务器的offer后,(如果有多台服务器发送了offer,当然是采⽤最先到达的)。
然后客户端再向本地局域⽹⼴播(让所有服务器收到它已经拟采⽤某个IP)⼀个DHCP request报⽂。
第四步,提供IP的服务器收到客户端发来的request报⽂后,再次向本地⽹络⼴播发送acknowledgement报⽂,即ACK确认。
DHCP协议报⽂格式如下:Op:报⽂类型,分为两⼤类: Request(1)和 Reply(2)HW Type:硬件类型,⼀般是以太⽹:1HW Len:硬件地址长度,单位字节。
对应以太⽹:6(mac地址长度为6字节48bit)**Transaction ID** :事务ID,随机数,由客户端⽣成,服务器Reply时,会把Request中的Transaction拷贝到Reply报⽂中。
Secs:距离第⼀次发送IP请求或Renew请求过去的秒数**Flags** :标志位,⽬前仅第⼀个bit有使⽤,置1 标明⼴播**Client IP Address** :当前客户端的IP地址,客户端初始时没有IP地址,则置0,即0.0.0.0Your IP Address:服务器想客户端提供IP地址时,会把IP地址填⼊本字段**Next Server IP Address**:客户端获取⽹络引导⽂件的服务器,⽐如TFTP的IP地址Gateway (Relay) IP Address:⽹关(中继)IP地址,有DHCP 中继器在转发DHCP报⽂的时候填⼊Server Name: Server名字,有64bytes,⼀般不使⽤,填充为0Boot File name:⽹络启动的引导⽂件名Option:选项,不定长度。
Cobbler安装配置手册

目录1.Cobbler的安装 (2)2.Cobbler的配置 (2)3.配置Cobbler_web (4)4.导入光盘及建立Profile (5)5.配置Kickstart的启动文件 (5)6.安装系统 (7)1.Cobbler的安装1.下载rpmforge的repository RPM# wget /rpmforge-release/rpmforge-release-0.5.2-\2.el6.rf.i686.rpm2.安装rpmforge-release-0.5.2-2.el6.rf.i686.rpm# rpm-ivhrpmforge-release-0.5.2-2.el6.rf.i686.rpm3.安装semanage命令的包policycoreutils-python# yum-y installpolicycoreutils-python4.安装pykickstart#yum -y installpykickstart5.执行cobbler check# cobbler check6.如果报下面错误,则先择selinux关闭# cobbler checkhttpd does not appear to be running and proxying cobbler# setenforce 07.再执行cobbler check,并按照提示下的项进行配置# cobbler check2.Cobbler的配置执行cobbler check,并按照提示下的项进行配置,通常的配置项如下:# cobbler check1.启动cobbler,httpd,xinetd,dhcpd服务# servicehttpd start# servicexinetd start# servicecobblerd start2.执行cobbler check并按照提示下的项进行配置,通常的配置项如下从第3项开始:# cobbler check1 : The 'server' field in /etc/cobbler/settings must be set to something other than localhost,or kickstarting features will not work. This should be a resolvable hostname or IP for the boot server as reachable by all machines that will use it.2 : For PXE to be functional, the 'next_server' field in /etc/cobbler/settings must be set tosomething other than 127.0.0.1, and should match the IP of the boot server on the PXE network.3 : Must enable a selinuxboolean to enable vital web services components, run: setsebool-P httpd_can_network_connect true4 : you need to set some SELinux content rules to ensure cobbler serves content correctlyin your SELinux environment, run the following: /usr/sbin/semanagefcontext -a -t public_content_t "/var/lib/tftpboot/.*" && /usr/sbin/semanagefcontext -a -t public_content_t "/var/www/cobbler"/images/.*5 : you need to set some SELinux rules if you want to use cobbler-web (an optionalpackage), run the following: /usr/sbin/semanagefcontext -a -t httpd_sys_content_rw_t "/var/lib/cobbler/webui_sessions/.*"6 : some network boot-loaders are missing from /var/lib/cobbler/loaders, you may run 'cobbler get-loaders' to download them, or, if you only want to handle x86/x86_64 netbooting, you may ensure that you have installed a *recent* version of the syslinux package installed and can ignore this message entirely. Files in this directory, should you want to support all architectures, should include pxelinux.0, menu.c32, elilo.efi, and yaboot. The 'cobbler get-loaders' command is the easiest way to resolve these requirements.7 : change 'disable' to 'no' in /etc/xinetd.d/rsync8 : since iptables may be running, ensure 69, 80, and 25151 are unblocked9 :debmirror package is not installed, it will be required to manage debian deployments and repositories10 :ksvalidator was not found, install pykickstart11 : The default password used by the sample templates for newly installed machines (default_password_crypted in /etc/cobbler/settings) is still set to 'cobbler' and should be changed, try: "opensslpasswd -1 -salt 'random-phrase-here' 'your-password-here'" to generate new oneRestart cobblerd and then run 'cobbler sync' to apply changes.3.编辑/etc/cobbler/settings,修改如下项:server: 172.16.3.1此处IP改为cobbler服务器的本机IPnext_server: 172.16.3.1此处IP改为cobbler服务器的本机IPmanage_dhcp: 1此处原本为0,修改为1打开DHCP服务4.编辑/etc/xinetd.d/tftp,修改disable = no 此处原本为“yes”,修改为“no”5.编辑/etc/xinetd.d/rsync,修改disable = no 此处原本为“yes”,修改为“no”6.编辑/etc/cobbler/dhcp.template,修改subnet部分如下:配置两个subnet 172.16.3.0/24和172.16.1.0/24,如有其它subnet的主机需要使用cobbler安装OS,则增加此subnet。
运维自动化之Cobbler安装配置

运维自动化之Cobbler安装配置Cobbler是一个快速网络安装linux的服务,而且在经过调整也可以支持网络安装windows。
该工具使用python 开发,小巧轻便(才15k行代码),使用简单的命令即可完成PXE网络安装环境的配置,同时还可以管理DHCP,DNS,以及yum包镜像。
Cobbler支持命令行管理,web界面管理,还提供了API接口,可以方便二次开发使用。
和Kickstart不同的是,使用cobbler不会因为在局域网中启动了dhcp而导致有些机器因为默认从pxe启动在重启服务器后加载tftp内容导致启动终止。
一、cobbler的安装部署配置环境准备:1、安装epelrpm -Uvh '/pub/epel/6/i386/epel-release-6-7.noarch.rpm'2、安装dhcp服务yum -y install dhcp3、其他服务的安装额外需要的服务还有tftp,rsync,xinetd,httpd。
所以如果安装系统的时候如果这几个包没装上,请手动安装。
4、关闭selinuxsed -i '/SELINUX/s/enforcing/disabled/' /etc/selinux/config关闭后最好重启一下,让selinux的设置生效cobbler安装配置1、cobbler安装yum -y install cobbler2、cobbler的配置启动cobbler# /etc/init.d/cobblerd start启动httpd服务# /etc/init.d/httpd start检查配置,执行cobbler check检查后会出现类似于这样的日志主要的修改:1,编辑/etc/cobbler/settings文件,找到server选项,修改为适当的ip地址,本实例配置ip为:192.168.10.12,编辑/etc/cobbler/settings文件,找到next_server选项,修改为适当的ip地址,本实例配置ip为:192.168.10.1 3,SELinux的设置。
Cobbler自动化批量部署系统(1)_ks配置文件

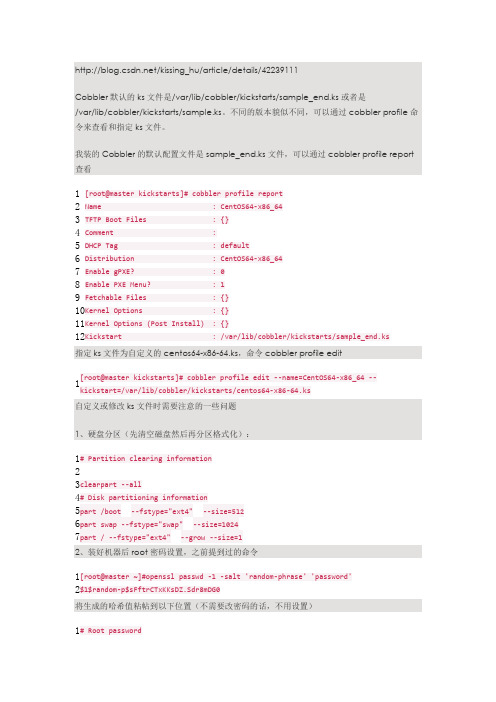
/kissing_hu/article/details/42239111Cobbler 默认的ks 文件是/var/lib/cobbler/kickstarts/sample_end.ks 或者是/var/lib/cobbler/kickstarts/sample.ks 。
不同的版本貌似不同,可以通过cobbler profile 命令来查看和指定ks 文件。
我装的Cobbler 的默认配置文件是sample_end.ks 文件,可以通过cobbler profile report 查看 1 2 3 4 5 6 7 8 9 10 11 12[root@master kickstarts]# cobbler profile reportName : CentOS64-x86_64TFTP Boot Files : {}Comment :DHCP Tag : defaultDistribution : CentOS64-x86_64Enable gPXE? : 0Enable PXE Menu? : 1Fetchable Files : {}Kernel Options : {} Kernel Options (Post Install) : {} Kickstart : /var/lib/cobbler/kickstarts/sample_end.ks 指定ks 文件为自定义的centos64-x86-64.ks ,命令cobbler profile edit1[root@master kickstarts]# cobbler profile edit --name=CentOS64-x86_64--kickstart=/var/lib/cobbler/kickstarts/centos64-x86-64.ks 自定义或修改ks 文件时需要注意的一些问题1、硬盘分区(先清空磁盘然后再分区格式化):12 3 45 6 7 # Partition clearing informationclearpart --all # Disk partitioning information part /boot --fstype="ext4" --size=512part swap --fstype="swap" --size=1024part / --fstype="ext4" --grow --size=12、装好机器后root 密码设置,之前提到过的命令12[root@master ~]#openssl passwd -1 -salt 'random-phrase' 'password' $1$random-p$sFftrCTxKKsDZ.Sdr8mDG0 将生成的哈希值粘帖到以下位置(不需要改密码的话,不用设置)1# Root password2r ootpw --iscrypted $1$random-p$sFftrCTxKKsDZ.Sdr8mDG0 3、指定安装组件或包(如下所示@开头的是功能套件,单独的安装包直接写) 1 2 3 4 5 6 7 8 9%packages @additional-devel @base ...... ...... ...... net-snmp net-snmp-devel ...... ...... ...... python-netaddr %end 4、安装系统完成后指定执行bash 命令(写在最后%post 与%end 标签之间)1 2 3 4 5 6 7 8 9 10 11 12 13%post# service off on bootchkconfig abrt-ccpp offchkconfig abrt-oops offchkconfig abrtd offchkconfig acpid off# service open on bootchkconfig crond onchkconfig haldaemon on chkconfig iptables on chkconfig irqbalance on %end 其实这部分和写脚本差不多,哈哈。
cobbler安装部署

cobbler安装部署一、Cobbler 介绍1、关于CobblerCobbler是一个快速的构建和部署系统的服务,改变了管理员的装机民工身份。
该工具使用python开发,小巧轻便(才15K行代码),使用简单的命令即可完成PXE网络安装环境的配置,同时还可以管理DHCP、DNS、以及yum包镜像,通过配置可以集成越来越多的配置管理系统和远程脚本实用程序,同时可以部署许多不同的操作系统类型。
Cobbler支持命令行管理,Web界面管理,同时还提供了API接口,可以方便二次开发使用。
Cobbler提供以下服务集成:PXE服务支持DHCP服务管理DNS服务管理电源管理Kickstart服务支持yum仓库管理等。
和Kickstart不同的是,使用cobbler不会因为在局域网中启动了dhcp而导致有些机器因为默认从pxe启动在重启服务器后加载tftp内容导致启动终止。
2、系统版本支持Red Hat、CentOS、Debian、Ubuntu、SUSE、FreeBSD、ESXI等3、Cobbler模型摘自:/manuals/2.2.3/1/1_-_How_We_Model_Things.html4、文件系统信息Cobbler 的文件系统信息如下:/var/log/cobbler所有的Cobbler的日志信息的存放位置。
Cobbler的日志信息并不会转存到/var/log/message 文件里面。
/var/www/cobbler这是Cobbler通过http服务实现的管理所拥有的不同内容的服务,This is a directory where modules can be dropped to extend Cobbler without modifying the core. See Modules for more information.二、Cobbler 快速指南1. 系统版本:yum –y install redhat-lsb#lsb_release –aLSBVersion: :base-4.0-amd64:base-4.0-noarch:core-4.0-amd64:core-4.0-noarch:graphics-4.0-amd64: graphics-4.0-noarch:printing-4.0-amd64:printing-4.0-noarchDistributor ID: CentOSDescription: CentOS release 6.2 (Final)Release: 6.2Codename: Final2. 软件版本:Cobbler 版本: Cobbler 2.2.33. 禁用selinux#setenforce 04. 安装Cobbler# yum –y install cobbler5. 修改配置文件在启动Cobbler服务之前,你需要修改一些配置文件. 在修改每一个文件之前最好先备份下当前的文件.Cobblerd的配置文件为/etc/cobbler/settings ,这个文件是YAML信息的格式文件. 1) .默认的加密密码: 设置一个控制kickstart的root 密码default_password_crypted: "$1$mF86/UHC$WvcIcX2t6crBz2onWxyac."# opensslpasswd -1 \\\修改密码(是数字1 不是字母L)2). Server 和Next_Serverserver 选项设置IP用于为cobbler 服务器指定地址,请不要使用0.0.0.0, 设置一个你希望和cobbler服务器通过http和tftp等协议链接的IP.# default, localhostserver: 127.0.0.1next_server选项是DHCP/PXE网络引导文件被下载的TFTP服务器的IP, 它将和server设置为同一个IP# default, localhostnext_server: 127.0.0.13). DHCP Management and DHCP Server Template为了pxe的启动,需要一个DHCP服务器地址,并直接引导系统,它可以在网络中下载的引导文件到TFTP的服务器,cobbler可以通过manage_dhcp的设置来进行管理#default: don’t managemanage_dhcp: 0修改manage_dhcp为1 ,cobbler 将管理dhcp, 可以通过修改dhcp.template来进行管理# vim /etc/cobbler/dhcp.templatesubnet 192.168.0.0 netmask 255.255.255.0 {option routers 192.168.0.1;option domain-name-servers 192.168.0.210,192.168.0.211;option subnet-mask 255.255.255.0;filename "/pxelinux.0";default-lease-time 21600;max-lease-time 43200;next-server $next_server;}4). 开启cobbler开机自动启动,并启动服务chkconfigcobblerd on &&service cobblerd start5). 在第一次执行同步之前,请先执行检查# cobbler check# cobbler sync6). cobbler 导入cobbler import --name=<name> --arch=<x86_64/i386> --path=<path>其它命令可通过cobbler --help 来进行查看三、安装Cobbler1 . 安装cobbler/cobblerd的先决条件:cobbler是基于python ,所以需要版本为2.3+ 的python,和以下软件包的支持: createrepo、httpd、mkisofs、mod_wsgi、python-cheetah、python-netaddr、python-simplejson、python-urlgrabber、vPyYAML(python-yaml)、rsync、tftp-server、yum-utils2 . 安装EPEL源查看系统信息:# uname -r2.6.32-220.el6.x86_64 \\\ 当前系统为X86_64的# lsb_release -rRelease: 6.2 \\\ 当前系统为6.2的系统从/pub/epel/ 这里找到6.X的系统X86_64位epel-release根据此方法查看您的系统所需要下载的EPEL源# rpm -ivh /pub/epel/6/x86_64/epel-release-6-8.noarch.rpm3 . yum 安装Cobbler# yum -y install cobbler httpdrsynctftp-server xinetddhcp python-ctypespykickstartdebmirror 4 . 配置Cobbler4.1 配置cobbler主配置文件# vim /etc/cobbler/settings### 暂且修改以下几项::manage_dhcp: 0 \\ 默认为0 ,表示不进行管理dhcp服务,可以修改为1,对其进行管理manage_rsync: 0 \\ 默认为0,不对rsync进行管理,可以修改为1 进行管理server: 192.168.0.7 \\ cobbler 服务器地址next_server: 192.168.0.7 \\ dhcp服务地址4.2 配置tftp rsync修改rsync和tftp的配置文件:将disable = yes 修改为disable = nocat /etc/xinetd.d/tftpservice tftp{disable = no........ (以下内容省略)cat /etc/xinetd.d/rsyncservice rsync{disable = no........ (以下内容省略)4.3 启用wsgi模块取消/etc/httpd/conf.d/wsgi.conf文件中LoadModulewsgi_module modules/mod_wsgi.so 行的注释4.4 生成Cobbler安装系统root初始密码# openssl passwd -1 -salt ‘root’‘minunix’$1$root$oZ2U5GhxaJ1b4q4tpPQnE0将密码加入cobbler配置vim /etc/cobbler/settingsdefault_password_crypted: “$1$root$oZ2U5GhxaJ1b4q4tpPQnE0”4.5 配置DHCP 及modules模块cp /etc/cobbler/dhcp.template{,.bak}vim /etc/cobbler/dhcp.templatesubnet 192.168.0.0 netmask 255.255.255.0 {option routers 192.168.0.1;option domain-name "";option domain-name-servers 192.168.0.1;option subnet-mask 255.255.255.0;range dynamic-bootp 192.168.0.100 192.168.0.254;filename "/pxelinux.0";default-lease-time 600;max-lease-time 7200;next-server $next_server;}4.6 配置开机启动chkconfig httpd on && service htpd startchkconfig dhcpd on && service dhcpd startchkconfig xinetd on && service xinetd startchkconfig cobblerd on && service cobblerd start4.7 下载引导操作系统文件cobbler get-loaders4.8 配置debmiroryum -y install debmiror修改/etc/debmirror.conf文件, 注释掉:@dists和@arches 两行4.9 检查Cobbler配置cobbler check同步配置: cobbler sync四、配置管理Cobbler至于Cobbler的配置文件、日志文件等的存放位置在前面已经简述过,这里不再啰嗦了!1. 导入系统镜像文件上传ISO 镜像文件到服务器/var/iso/linux目录下mkdir -p /var/iso/linuxmkdir -p /var/Linux/CentOS/X86_64/6.2mkdir -p /var/Linux/CentOS/X86_64/6.0mount -o loop /var/iso/linux/CentOS-6.2-x86_64-bin-DVD1.iso /var/Linux/CentOS/X86_64/6 .22. 从镜像中导入OS数据注: 导入时间较长, 请耐心等待!!!cobbler import --path=/var/Linux/CentOS/X86_64/6.2 –name=CentOS-6.2 --arch=x86_64在正常导完之后会给出如下提示:associating kickstarts*** TASK COMPLETE ***有时可能会出现卡住的现象,如果导入时间过长,可通过比对文件大小来确定是否已经正常导入比对文件大小:du -sh /var/Linux/CentOS/X86_64/6.2du -sh /var/www/cobbler/ks_mirror/centos-6.2-x86_64如果上述两个命令执行过显示的结果出入较大, 则可能文件没有正常导入在重新导入之前最好先把之前的内容删除再导入cobbler [distro] remove --name=[centos6.2] 方括号中的内容根据自己的情况来填写, 更多命令通过cobbler --help 来查看剩下其它系统导入方法类似,只是名字和路径更改下即可,导入完成之后,可通过cobbler list 来查看导入的结果.五、Web界面web 界面的管理是一个非常简便的方法, 只需要安装cobbler_web软件包即可1. yum -y install cobbler_web2. 设置用户名密码为cobbler添加minunix用户,并设置密码htdigest /etc/cobbler/users.digest “cobbler”minunix3. 开启cobbler web 登录vim /etc/cobbler/modules.conf修改authentication 部分中的module,修改后如下:module = authn_configfile4. 重启cobbler 与http5. 访问: https://192.168.0.7/cobbler_web注: 因软件包的依赖关系笔者暂没成功完成web访问, 但步骤就是这样的!六、Cobbler安装操作系统1. 为了增加装机的安全,可设置装机密码openssl passwd -1 -salt ‘root’ minunix$1$root$oZ2U5GhxaJ1b4q4tpPQnE0编辑pxedefault.template , 加入密码部分vim /etc/cobbler/pxe/pxedefault.template在TIMEOUT 上面加入一行MENU MASTER PASSWD $1$root$oZ2U5GhxaJ1b4q4tpPQnE0vim /etc/cobbler/pxe/pxeprofile.template在LABEL 标签中加入一行MENU PASSWD修改完之后记得同步配置, cobbler check && cobbler sync2. 自定义PXE 菜单TITLE修改pxedefault.template文件修改MENU TITLE 后面的内容为自己想要的内容eg: MENU TITLE MinUnix Install System| 修改完之后记得同步配置, cobbler check && cobbler sync3. 自定义安装系统可以通过命令cobbler system add 进行自定义安装某个版本的系统,更多命令可通过cobbler system add --help 获得帮助。
Cobbler介绍及搭载

Cobbler介绍及搭载Cobbler介绍Cobbler是⼀个Linux服务器安装的服务,可以通过⽹络启动(PXE)的⽅式来快速安装、重装物理服务器和虚拟机,同时还可以管理DHCP,DNSCobbler可以使⽤命令⾏⽅式管理,也提供了基于Web界⾯管理⼯具(cobbler-web),同时提供API接⼝⽤于⼆次开发。
Cobbler是较早前的Kickstart的升级版本,向较与Kickstart优点为更容易配置,且⾃带WEB界⾯。
易于管理。
Cobbler原理Cobbler是通过将DHCP、TFTP、DNS、HTTP等服务进⾏集成,创建⼀个中央管理节点,其可以实现的功能有配置服务,创建存储库,解压缩操作系统媒介,代理或集成⼀个配置管理系统,控制电源管理等。
Cobbler的最终⽬的是实现⽆需进⾏⼈⼯⼲预即可安装机器。
在进⾏进⼀步的操作之前,我们有必要先了解下pxe和kickstart 。
Pxe(预执⾏环境)PXE是让计算机通过⽹卡独⽴地使⽤数据设备(如硬盘)或者安装操作系统。
PXE主要通过⼴播的⽅式发送⼀个包,并请求获取⼀个地址,⽽后交给TFTP程序下载⼀个引导⽂件。
KickstartKickstart 是红帽开发的⼀种⼯具,我们可以简单理解为⼀个⾃动安装应答配置管理程序。
通过读取这个配置⽂件,系统知道怎么去分区,要安装什么包,配什么IP,优化什么内核参数等等原理视图及步骤Server端启动Cobbler及相关服务cobbler check检查错误进⾏配置然后同步 cobbler syncDHCP配置TFTP传输启动⽂件Server端发送ISO镜像与Kickstart给客户端Client端以PXE启动根据DHCP⾃动获取IP地址加载Kickstart⽂件进⾏系统安装Cobbler部署安装cobbler环境[root@localhost ~]# yum install -y httpd dhcp tftp python-ctypes cobbler xinetd cobbler-web pykickstart epel-release......开启并⾃启服务[root@localhost ~]# systemctl enable --now cobblerdCreated symlink from /etc/systemd/system/multi-user.target.wants/cobblerd.service to /usr/lib/systemd/system/cobblerd.service.[root@localhost ~]# systemctl enable --now httpdCreated symlink from /etc/systemd/system/multi-user.target.wants/httpd.service to /usr/lib/systemd/system/httpd.service.修改server IP[root@localhost ~]# vim /etc/cobbler/settings......# (dual homed, etc), you need to read the --server-override section# of the manpage for how that works.server: 192.168.197.144 ## 修改为本地IP......# of the cobbler server here so that PXE booting guests can find it# if you do not set this correctly, this will be manifested in TFTP open timeouts.next_server: 192.168.197.144 ## tftp服务的ip地址也填写为本地IP开启tftp服务[root@localhost ~]# vim /etc/xinetd.d/tftp......service tftp{socket_type = dgramprotocol = udpwait = yesuser = rootserver = /usr/sbin/in.tftpdserver_args = -s /var/lib/tftpbootdisable = no ## 将状态修改为NO ,表⽰开启此服务per_source = 11cps = 100 2flags = IPv4下载cobbler相关缺失⽂件[root@localhost ~]# cobbler get-loaders......path /var/lib/cobbler/loaders/grub-x86_64.efi already exists, not overwriting existing content, use --force if you wish to update*** TASK COMPLETE ***开启rsync共享服务[root@localhost ~]# systemctl enable --now rsyncdCreated symlink from /etc/systemd/system/multi-user.target.wants/rsyncd.service to /usr/lib/systemd/system/rsyncd.service.修改默认密码(默认密码为cobbler)[root@localhost ~]# openssl passwd -1 -salt "$RANDOM" '123456' # 先加密$1$2512$pppPAr0KZoqb.iwWcOVFu0## 写⼊配置⽂件[root@localhost ~]# vim /etc/cobbler/settings......## 重启服务[root@localhost ~]# systemctl restart cobblerdcobbler check 检查是否还有错误[root@localhost ~]# cobbler checkThe following are potential configuration items that you may want to fix:1 : debmirror package is not installed, it will be required to manage debian deployments and repositories2 : fencing tools were not found, and are required to use the (optional) power management features. install cman or fence-agents to use them Restart cobblerd and then run 'cobbler sync' to apply changes.注意:1的错误为需要Debian的必备包,如果安装的客户机的系统没有Debian,则不需要处理。
cobra安装指南——2

COBRA 安装指南1、安装这一系列软件时,要注意版本之间的兼容性否则...........可能现在的CORBRA版本只能用libSBML3.41及更低的版本,SBMLtoolbox的版本兼容性不知道2、安装软件的时候,先要搞清楚这些软件之间的依赖性。
在Windows XP 环境下,安装过程如下:步骤一,Install your LP solver of choice following the instructions for each solver. Test the functionality of the solver using examples provided with the solver and add the relevant folders to your Matlab path.首先,要下载线性规划(Linear Programing)的解题器(Solver),我是用glpk solver的。
* Download the precompiled version of glpkmex下载glpkmex 网址是/* Unzip the files to a folder of your choice解压下载的文件夹到目的文件夹* Add this folder to your matlab path添加目的文件夹到Matlab路径* Test with the examples that come with glpkmex (glpktest1.m,glpktest2.m)测试glpkmex(有两个demo包括glpktest1,glpktest2)步骤二,Install the SBML Toolbox following the instructions included in the installation package. Test the functionality of the Toolbox and add the relevant folders to your Matlab path.首先要安装libXML,然后安装SBML 工具箱,将文件夹添加到Matlab路径。
- 1、下载文档前请自行甄别文档内容的完整性,平台不提供额外的编辑、内容补充、找答案等附加服务。
- 2、"仅部分预览"的文档,不可在线预览部分如存在完整性等问题,可反馈申请退款(可完整预览的文档不适用该条件!)。
- 3、如文档侵犯您的权益,请联系客服反馈,我们会尽快为您处理(人工客服工作时间:9:00-18:30)。
目录1.Cobbler的安装 (2)2.Cobbler的配置 (2)3.配置Cobbler_web (4)4.导入光盘及建立Profile (5)5.配置Kickstart的启动文件 (5)6.安装系统 (7)1.Cobbler的安装1.下载rpmforge的repository RPM# wget /rpmforge-release/rpmforge-release-0.5.2-\2.el6.rf.i686.rpm2.安装rpmforge-release-0.5.2-2.el6.rf.i686.rpm# rpm -ivh rpmforge-release-0.5.2-2.el6.rf.i686.rpm3.安装semanage命令的包policycoreutils-python# yum -y install policycoreutils-python4.安装pykickstart#yum -y install pykickstart5.执行cobbler check# cobbler check6.如果报下面错误,则先择selinux关闭# cobbler checkhttpd does not appear to be running and proxying cobbler# setenforce 07.再执行cobbler check,并按照提示下的项进行配置# cobbler check2.Cobbler的配置执行cobbler check,并按照提示下的项进行配置,通常的配置项如下:# cobbler check1.启动cobbler,httpd,xinetd,dhcpd服务# service httpd start# service xinetd start# service cobblerd start2.执行cobbler check并按照提示下的项进行配置,通常的配置项如下从第3项开始:# cobbler check1 : The 'server' field in /etc/cobbler/settings must be set to something other than localhost,or kickstarting features will not work. This should be a resolvable hostname or IP for the boot server as reachable by all machines that will use it.2 : For PXE to be functional, the 'next_server' field in /etc/cobbler/settings must be set tosomething other than 127.0.0.1, and should match the IP of the boot server on the PXE network.3 : Must enable a selinux boolean to enable vital web services components, run: setsebool-P httpd_can_network_connect true4 : you need to set some SELinux content rules to ensure cobbler serves content correctlyin your SELinux environment, run the following: /usr/sbin/semanage fcontext -a -t public_content_t "/var/lib/tftpboot/.*" && /usr/sbin/semanage fcontext -a -t public_content_t "/var/www/cobbler"/images/.*5 : you need to set some SELinux rules if you want to use cobbler-web (an optionalpackage), run the following: /usr/sbin/semanage fcontext -a -t httpd_sys_content_rw_t "/var/lib/cobbler/webui_sessions/.*"6 : some network boot-loaders are missing from /var/lib/cobbler/loaders, you may run 'cobbler get-loaders' to download them, or, if you only want to handle x86/x86_64 netbooting, you may ensure that you have installed a *recent* version of the syslinux package installed and can ignore this message entirely. Files in this directory, should you want to support all architectures, should include pxelinux.0, menu.c32, elilo.efi, and yaboot. The 'cobbler get-loaders' command is the easiest way to resolve these requirements.7 : change 'disable' to 'no' in /etc/xinetd.d/rsync8 : since iptables may be running, ensure 69, 80, and 25151 are unblocked9 : debmirror package is not installed, it will be required to manage debian deployments and repositories10 : ksvalidator was not found, install pykickstart11 : The default password used by the sample templates for newly installed machines (default_password_crypted in /etc/cobbler/settings) is still set to 'cobbler' and should be changed, try: "openssl passwd -1 -salt 'random-phrase-here' 'your-password-here'" to generate new oneRestart cobblerd and then run 'cobbler sync' to apply changes.3.编辑/etc/cobbler/settings,修改如下项:server: 172.16.3.1此处IP改为cobbler服务器的本机IPnext_server: 172.16.3.1此处IP改为cobbler服务器的本机IPmanage_dhcp: 1此处原本为0,修改为1打开DHCP服务4.编辑/etc/xinetd.d/tftp,修改disable = no 此处原本为“yes”,修改为“no”5.编辑/etc/xinetd.d/rsync,修改disable = no 此处原本为“yes”,修改为“no”6.编辑/etc/cobbler/dhcp.template,修改subnet部分如下:配置两个subnet 172.16.3.0/24和172.16.1.0/24,如有其它subnet的主机需要使用cobbler安装OS,则增加此subnet。
subnet 172.16.3.0 netmask 255.255.255.0 {option routers 172.16.3.254;option domain-name-servers 172.16.3.1;option subnet-mask 255.255.255.0;range dynamic-bootp 172.16.3.100 172.16.3.120;filename "/pxelinux.0";default-lease-time 21600;max-lease-time 43200;next-server 172.16.3.1;}subnet 172.16.1.0 netmask 255.255.255.0 {option routers 172.16.1.254;option domain-name-servers 172.16.3.1;option subnet-mask 255.255.255.0;range dynamic-bootp 172.16.1.100 172.16.1.120;filename "/pxelinux.0";default-lease-time 21600;max-lease-time 43200;next-server 172.16.3.1;}7.把上面的配置复制到/etc/dhcp/dhcpd.conf中。
8.编辑/etc/sysconfig/iptables,添加下面几行以打开端口80,69和25151-A INPUT -m state --state NEW -m tcp -p tcp --dport 80 -j ACCEPT-A INPUT -m state --state NEW -m tcp -p tcp --dport 69 -j ACCEPT-A INPUT -m state --state NEW -m udp -p udp --dport 69 -j ACCEPT-A INPUT -m state --state NEW -m tcp -p tcp --dport 25151 -j ACCEPT然后再重启iptables# service iptables restart9.如果selinux开启,则根据cobbler check的提示,执行相应的命令以开启selinux相关权限。
