ScanHomeST2200二维码扫描枪_说明书
2D 条码扫描器用户手册说明书

2D Barcode ScannerUser’s ManualV1.0.3CONTENTSChapter IProduct Introudction. (4)Chapter IIQuick to use (4)2.1 Install method (4)2.2 Quick to use (4)2.3 Settings method (4)Chapter III Function settings (5)3.1 Interface selection (5)3.2 Scan mode (5)3.3 Senstivity: (6)3.4 Language settings (6)3.5 Caps lock Function (7)3.5.1 Number lock Function (7)3.5.2 Character prompt (7)3.5.3 Character delay (7)3.5.4 Alt Key Caps (8)3.5.5 Shift Function (8)3.6 Serial Port function (8)3.6.1 Baud rate (8)3.6.2 Parity (9)3.6.3 Stop bits (9)3.6.4 Data bits (9)3.6.5 Control flow (9)3.7 Data Edit (10)3.7.1 Prefix and Suffix settings (10)3.7.2 Convert Case (10)3.7.3 AIMFunction (10)3.8 Sound Settings (10)3.8.1 Decode indicate (11)3.8.2 Decode Indicate type (11)3.9 Advance function settings (11)3.9.1 Illumination (11)3.9.2 Sharp Focusing (12)3.9.3 Scan Delay Function (12)3.9.4 Scan same barcode delay function (12)3.9.5 Anti-color code read (12)Chapter IV Barcode function settings (12)4.1 Code 128 (12)4.2 EAN8 (13)4.3 EAN13 (13)4.4 UPC-E (14)4.5 UPC-A (15)4.6 Interleaved 25 (16)4.7 MATRIX 25 (16)4.8 CODE 39 (17)4.9 CODE 32 (18)4.10 CODABAR (18)4.11 CODE 93 (19)4.12 RSS (19)4.13 Industrial 25 (19)4.14 Standard 25 (20)4.15 Plessey (20)4.16 MSI (21)4.17 QR (21)4.18 PDF 417 (22)4.19 DM (22)Appendix I Factory Defaults Table (23)Appendix II Code ID Table (23)Appendix III ASCII Table (25)Appendix IV Set parameter table (28)I. Product IntroductionThis user guide is only suitable for 2D barcode scanner. The purpose is to know all knowledge with barcode identification equipment for customers. This manual is mainly for the software engineers and some customers who want to know the device in further.This manual lists the main function of the scanner, including: barcode reading, supported barcode type, data edition, command setting and advance setting.II Quick to use2.1 Install methodFor USB device, it is plug and play, no need extra power supply to identify HID device. That’s convenient appropriate for Windows, Linux, Android and other system. Also, support Virtual COM port, just need an extra drive supply, which can be supported by this company or dealers to offer .The physical serial port conforms to standard RS-232 interfaces, which can directly communicate with standard RS232 device. Note ,in case of serial port, additional Power DC 5V is generally required. For details, please refer to the serial port function section. Some of models support for KB interface. Need to power off the device and plug in the device with common keyboard, then power on again and start to communicate.2.2 Quick to useAfter connecting in a short time on device, the scanner will be on by itself, include interface, power on indicate, volume indicate, configuration, parameters setting. Normally, directly pressing the button can activate decoding. In additional, some models also support automation induction trigger, serial command trigger.2.3 Settings methodThere are two methods for set up.One method is without parameter set up which scan one barcode is ok.Example: “enable successful reading voice prompt”, or “enable Code 39”.The other method needs to set up parameter.Example: set “98” as suffix.Setting steps: “custom suffix”, “3”, “9”, “3”, “8”,”Save”.III Function settingsDefaultEnable All Codes Disable All CodesEnable All 1D Codes Disable All 1D CodesEnable All 2D Codes Disable All 2D CodesVersion Information3.1 Interface selectionRS232 USB-KB USB Virtual COM 3.2 Scan modeManual Sense ContinuousSingle Continuous3.3 SensitivityLow Medium HighKeyboard functionThe scanner is essentially an input device and can be understood as a keyboard device. Different countries use different keyboard layouts, and corresponding keyboard function.3.4 Language settingsUSA Japan BrazilCzech Denmark SwedenFrance Italy NorwaySpain Slovakia TurkeyUK Germany GreeceHungary Russia ALT3.5 Caps lock FunctionThis function can lock “Caps lock” function key, and keep the letter format without change.Off On3.5.1 Number lock FunctionThis function can move the numeric keypad in the letter area to the keypad area and enter the numeric keypad with keypad.Off On3.5.2 Character promptFor non-visual characters, you can set the prompt tone, indicating that there are non-printable characters in the data.Enable Disable3.5.3 Character delayFor some systems with slower processing speed, can set character delay.Not Delay Short Delay(20ms) Long Delay(40ms)3.5.4 Alt Emulate keyboardThis feature can simulate the ASCII mode of sending keyboard data, without the keyboard layout affection.ALT Mode OFF ALT Mode ON3.5.5 Shift FunctionShift Lock Off Shift Lock On3.6 Serial Port functionThe serial port supports the standard RS-232 interface and TTL-232 standard. The virtual serial port function is not affected by this section.3.6.1 Baud rate1200 bps 2400 bps4800 bps 9600 bps19200 bps 38400 bps57600 bps 115200 bps3.6.2 ParityNone Even Odd 3.6.3 Stop bits1 Bit2 Bit3.6.4 Data bits7 Bit 8 Bit3.6.5 Control flowOff On3.7 Data Edit3.7.1 Prefix and Suffix settingsPrefix and suffix are the basic data edit function , including terminal characters setting are also included in this section,Example: set “a” as prefix.Step: “Enable custom prefix”, “set custom prefix”, “6”, “1”, “Save”.Disable Custom Prefix Enable Custom Prefix Set Custom PrefixDisable Custom Suffix Enable Custom Suffix Set Custom SuffixTerminating Character 0x0D Terminating Character 0x0D 0x0A3.7.2 Convert CaseNot Convert All to Convert Upper Case All To Convert Lower Case 3.7.3 AIM FunctionAIM Disable AIM Enable3.8 Sound SettingsStarting-up indicatorOff On3.8.1 Decode indicatorOff OnHigh Medium Low 3.8.2 Decode Indicate typeType1 Type2 Type33.9 Advance function settings3.9.1 IlluminationAlways On Flashing Off3.9.2 AimingAlways On Flashing Off3.9.3 Scan Delay FunctionDifferent Barcode Scan Delay On Same Barcode Scan Delay On Same Barcode Scan Delay Off 3.9.4 same barcode delay functionOff On Parameter Setting3.9.5 Anti-color code readOnly Read Black Code Only Read Anti-color Code Read Black And Anti-color Code Both IV Barcode function settings4.1 Code 128Disable EAN128 Enable EAN128Disable Code128 Enable Code128Set The Minimum Length Set The Maximum Length 4.2 EAN-8Disable EAN-8 Enable EAN-8Not Transmit Check Digit Transmit Check DigitNot Convert EAN-8 To EAN-13 Convert EAN-8 To EAN-13Disable 2-Digit Add-On Code Enable 2-Digit Add-On CodeDisable 5-Digit Add-On Code Enable 5-Digit Add-On Code 4.3 EAN13Disable ISBN Enable ISBNISBN Send 13 Digits ISBN Send 10 DigitsDisable EAN-13 EnableEAN-13Not Transmit Check Digit Transmit Check DigitDisable 2-Digit Add-On Code Enable 2-Digit Add-On CodeDisable 5-Digit Add-On Code Enable 5-Digit Add-On Code 4.4 UPC-EDisable UPC-E Enable UPC-ENot Transmit Check Digit Transmit Check DigitNot T ransmit System Character”0”Transmit System CharacterNot Convert UPC-E To UPC-A Convert UPC-E To UPC-ATransmit UPC-E To UPC-A Transmit UPC-E Country Code + System CharacterDisable 2-Digit Add-On Code Enable 2-Digit Add-On CodeDisable 5-Digit Add-On Code Enable 5-Digit Add-On Code4.5 UPC-ADisable UPC-A Enable UPC-ANot Transmit Check Digit Transmit Check DigitNo Transmit System Character”0” Transmit System Character”0” No PreambleDisable 2-Digit Add-On Code Enable 2-Digit Add-On CodeDisable 5-Digit Add-On Code Enable 5-Digit Add-On Code4.6 Interleaved 25Disable Interleaved 25 Enable Interleaved 25Set The Minimum Length Set The Maximum LengthNot Check Check , Not Transmit Check Digit Check, Transmit Check digitITF14 Transmit Check Digit ITF14 Not Transmit Check DigitITF16 Transmit Check Digit ITF16 Not Transmit Check Digit4.7 MATRIX 25Disable Matrix 25 Enable Matrix 25Set The Minimum Length Set The Maximum LengthNot Check Check, Not Transmit Check Digit Check, Transmit Check Digit 4.8 CODE 39Disable CODE 39 Enable CODE 39Set The Minimum Length Set The Maximum LengthNot Check CheckNot Transmit Start-Stop Character Transmit Start-Stop CharacterFull ASCII code39 Standard code 39Enable Code32 Disable Code32Enable Prefix “0”Disable Prefix”0”Transmit Check Digit Not Transmit Check Digit4.10 CODABARDisable Codabar Enable CodabarSet The Minimum Length Set The Maximum LengthNot check Check, Not Transmit Check DigitTransmit Check Digit Not Transmit Start-Stop Characters Transmit Start-Stop CharactersABCD As Start-Stop Character ABCD/TNE As Start-Stop CharacterStart-Stop Characters In Upper Case Start-stop Characters In Lower CaseDisable Code 93 Enable Code 93Set The Minimum Length Set The Maximum LengthNo Check Check, Not Transmit Check Digit Check, Transmit Check Digit 4.12 RSSDisable RSS Enable RSSNot Transmit AL(01)Character Transmit AL(01) Character4.13 Industrial 25Disable Industrial 25 Enable Industrial 25Set The Minimum Length Set The Maximum LengthNo Check Check, Not Transmit Check Digit Check, Transmit Check Digit 4.14 Standard 25Disable Standard 25 Enable Standard 25Set the Minimum Length Set the Maximum LengthNo Check Check, Not Transmit Check Digit Check, Transmit Check Digit 4.15 PlesseyDisable Plessey Enable PlesseySet The Minimum Length Set The Maximum LengthNo Check Check, Not Transmit Check Digit Check, Transmit Check Digit4.16 MSIDisable MSI Enable MSISet The Minimum Length Set The Maximum LengthNo Check Single Check Digit,MOD10Double Check Digit:MOD10 Double Check Digit,MOD10/MOD11Not Transmit Check Digits Transmit Check Digits4.17 QRDisable QR Enable QRSet The Minimum Length Set The Maximum LengthRead Single QR Only Read Double QR Only4.18 PDF 417Disable PDF417 Enable PDF417Set The Minimum Length Set The Maximum LengthRead Single PDF417 Only Read Double PDF417 Only 4.19 DMDisable Data Matrix Enable Data MatrixSet The Minimum Length Set The Maximum LengthRead Single Data Matrix Only Read Double Data Matrix OnlyAppendix I Factory Defaults TableAppendix II Code ID TableWhen the setting parameter turns on the function of CODE ID, the corresponding barcode data will be preceded by CID CODE, as shown below:Appendix III ASCII TableAppendix IV Set parameter table0 12 34 56 78 9A BC DE FSave Cancel One DigitCancel A Group Of Digits Cancel All Digits。
扫描器 说明书

掃描器使用手冊目錄使用控制面板上的掃描按鍵 (3)掃描器硬體按鍵設定 (3)SCAN 掃描鍵 (5)COPY 影印鍵 (5)FAX 傳真鍵 (6)E-MAIL 電子郵件鍵 (7)掃描器軟體面板 (8)軟體面板設定 (8)掃描 (9)影印 (10)傳真 (11)電子郵件 (12)OCR文字辨識 (12)個性化功能 (12)附屬軟體連結 (14)其他設定 (15)擷取TWAIN對話框 (16)使用TWAIN對話框 (17)使用控制面板上的掃描按鍵請確認是否已開啟直接掃描直接掃描直接掃描的功能(顯示在 Windows ® 工作列右下角的位置)。
若您未開啟直接掃描的功能,請依照下列步驟將它開啟::1.點選工作列的「開始」「開始」。
2.選擇「程式集」「程式集」「程式集」後再選擇B e a r P a w 。
3.按一下「直接掃描」。
掃描器硬體按鍵設定在直接掃描的圖示上按一下右鍵會出現下方的選單:點選掃描器設定掃描器設定掃描器設定後會出現以下的對話框,您可以在此對話框中更改掃描器的各項預設值。
本掃描器配備多樣功能先進的直接控制按鍵,您只要運用手指輕觸,即可快速使用掃描器的各項功能。
直接掃描掃描器設定對話框掃描器的出廠設定值音效控制鍵按下此鍵即可開啟或關閉BearPaw 面板的音效功能。
SCAN 掃描鍵欲使用掃描鍵掃描文件,請如下列方式操作:1.將您要掃描的文件或圖像正面朝下,輕貼在掃描器的玻璃面板上。
掃描鍵,掃描器即開始進行掃描,2.按下掃描鍵掃描鍵掃描時螢幕上會出現工作進度顯示,告訴您目前掃描工作完成度,當掃描結束,系統會自動開啟Photo Express TM將您剛剛所掃描的圖像載入。
COPY 影印鍵欲使用影印鍵複製文件,請如下列方式操作:1.將您要掃描的文件或圖像正面朝下,輕貼在掃描器的玻璃面板上。
影印鍵,掃描器即開始進行掃描,2.按下影印鍵影印鍵掃描時螢幕上會出現工作進度顯示,告訴您目前掃描工作完成度,當掃描結束,系統會自動將您剛剛所掃描的圖像從印表機輸出。
扫描枪说明书
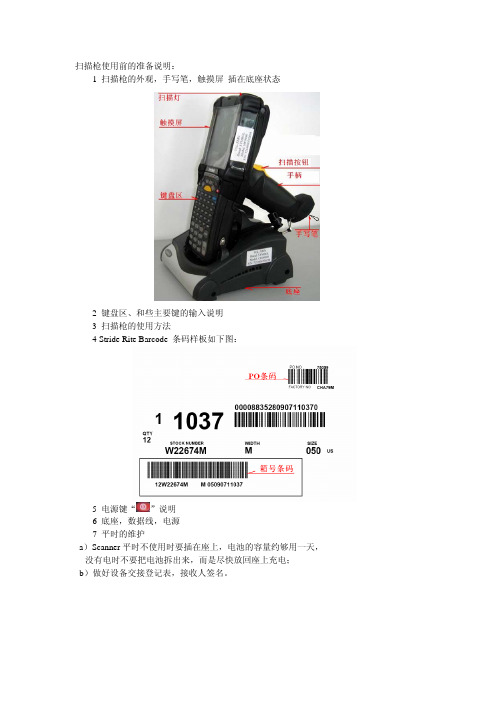
扫描枪使用前的准备说明:1 扫描枪的外观,手写笔,触摸屏插在底座状态2 键盘区、和些主要键的输入说明3 扫描枪的使用方法4 Stride Rite Barcode 条码样板如下图:5 电源键“”说明6 底座,数据线,电源7 平时的维护a)Scanner平时不使用时要插在座上,电池的容量约够用一天,没有电时不要把电池拆出来,而是尽快放回座上充电;b)做好设备交接登记表,接收人签名。
现在我们尝试开机后扫描枪电源,所看到的界面如下图:(Click on the button “New Balance”/Or Press “1” on the keypad /OrPress , , , on the keypad to highlight the button, and then press “Enter”)用手写笔双击“2)Stride Rite”按钮,打开Stride Rite的标签扫描系统,如下图:Input Data:用来扫描标签时用的功能块;View Data:可以检查之前所扫描的Carton No资料,核对资料;Upload Data:用来放到底座,抽取数据;Amend Data:主要用来修改箱数;Rollback Data:恢复数据,不过做这一步前要先Upload备份好枪现有的数据;因为数据只能恢复一次。
下面我们具体说明下上面所提到的5个功能的使用:Input Data:(扫描数据)进入“Input Data”界面,如下图:输入 HAWB No 和 Carton 数,点击“OK”到了这里就可以对这箱子的Barcode进行扫描啦,先扫PO条码,再扫Stock No 条码。
每张条形码的这两个条码都要扫描,当你扫描完所有箱子的条形后,系统提示你扫描完毕,提示如下界面:通常这里会遇到的问题:1、扫描完了箱子,但没有又提示Completed的界面,是因为有漏扫,可以看统计,检查出漏扫的或全部重新扫描。
Datalogic QuickScan QBT2400 2D条形码扫描器说明书

• Bluetooth wireless technology with up to 25.0 m / 82.0 ft range
• Compatible with Android and iOS devices through the Bluetooth HID profile
• Easy, tool-free, user-replaceable, long-lasting lithium-ion battery
• Alternative battery recharging through USB / microUSB cable
• Latch mechanism secures reader in cradle providing stable mobility for use on carts
• New battery package allows simultaneous charging contacts change at battery replacement
ENVIRONMENTAL COMPLIANCE UTILITIES DATALOGIC ALADDIN™ OPOS / JAVAPOS
REMOTE HOST DOWNLOAD WARRANTY WARRANTY
Wide VGA: 752 x 480 pixels Aiming: 2 Blue LED’s; Illumination: Red LED 610 - 650 nm 25 IPS 25% Pitch: +/- 65°; Roll (Tilt): 360°; Skew (Yaw): +/- 60° Beeper (Adjustable Tone and Volume); Datalogic ‘Green Spot’ Good Read Feedback; Good Read LED 0.102 mm / 4 mils (Linear Codes)
无线扫描枪设置手册
ii
安全注意事项–警告!
警告!
此符号表示:如果忽视规定的要求或使用不当,有造成人员死亡或者严重伤害的可能性。
拆卸和改装
切勿以任何方式拆卸或改装装置。内部的高电压可能引起触电的危险。
内部元件和部件
切勿触碰内部的高压元件或者部件。否则可能引起触电的危险。
异常情况
如果装置发热或开始冒烟或发出异味,应立即关闭电源,并与原经销商联系。若继续使用,可能引起着 火和触电的危险。
iv
目录
注意 .........................................................................................................................................................i 安全注意事项–危险! ...............................................................................................
紫光扫描仪说明书

Uniscan A688 扫描仪 用户手册目录一、扫描仪的安装与设定 ............................................................................ 3设备清点: ..................................................................................................................... 3 安装与设定扫描仪 ......................................................................................................... 4步骤一: 扫描仪保护锁...................................................................................................................... 4 步骤二: 安装软件.............................................................................................................................. 5 步骤三: 连接您的扫描仪和计算机 .................................................................................................. 7测试扫描仪 ..................................................................................................................... 7二.扫描仪的使用与维护 ............................................................................... 9使用扫描仪上的功能按键 ............................................................................................. 9OCR 文字识别按键............................................................................................................................... 9 E-Mail 电子邮件按键 ......................................................................................................................... 10 Copy 复印按键 .................................................................................................................................... 10 Scan 扫描按键..................................................................................................................................... 10维护 ............................................................................................................................... 11三.设定扫描仪按键 ..................................................................................... 12设定【文件】按键 ....................................................................................................... 12 设定【应用程序】按键 ............................................................................................... 13 设定【传真】按键 ....................................................................................................... 14 设定【邮件】按键 ....................................................................................................... 15 设定【复印】按键 ....................................................................................................... 16 设定【文字识别】按键 ............................................................................................... 17 设定【设置】按键 ....................................................................................................... 18四、Twain 界面........................................................................................... 19(一)简单模式 ........................................................................................................... 19 (二)高级模式 ........................................................................................................... 21附录:规格 .................................................................................................. 30一、扫描仪的安装与设定设备清点:安装该型号扫描仪前,请确定所有的附件都齐全:1 平台式扫描仪 2 接口电缆 3 电源适配器 4 紫光三包卡 5 快速安装指南 6 扫描仪驱动程序,用户手册光盘 7 合格证安装与设定扫描仪步骤一: 扫描仪保护锁您所购买的扫描仪设计有一保护锁,用于搬运过程中保护光学组件。
有线二维条码扫描器 使用说明书

使用说明书有线二维条码扫描器尊敬的用户,感谢您选用本公司产品。
我们将以优质的产品为您服务,为确保您更好的使用本产品,使用前请认真阅读本手册!简介说明通用型手持影像式2D条码扫描器,采用国际上先进的图像传输技术,配以双向通讯即时纠错反馈,完成各种常用一维码和二维码的识读。
配备辅助光照,可在不同光照的环境下使用,夜间也可以使用,适用性强。
360°任意方向识读条码,识读更快速,操作更高效,适用于商业POS系统、超市、仓储物流、图书、银行、交通运输、邮政、以及工业,制造业的生产流程管理等多个领域。
产品各项功能未全部在本手册中列出,请您与供应商联系以获得更多详细资料。
本产品所用权利,包括本说明手册最终解释权由本公司保留(本说明手册的内容修改,恕不另行通知)。
产品特点1.本产品采用CMOS摄像模组,能识别一、二维码和屏幕码。
2.阅读距离可高达20cm,能快速读出条码中的信息。
3.无需驱动,直接插上就能使用,安装简单。
技术参数一、打开/关闭配置码设置恢复出厂设置软件版本号允许识读所有条码二、接口设置USB HID模式虚拟串口模式TTL串口模式HID+TTL串口模式三、HID设备数据发送间隔**USB数据间隔-1ms USB数据间隔-2msUSB数据间隔-4ms USB数据间隔-8msUSB数据间隔-16ms四、识读模式设置手动识读模式感应模式五、常用结束符设置回车回车换行Tab禁止添加结束符六、开票模式为了便于在开票系统中使用本模块,用户可以通过识读设置码进行开票模式配置,实现发票码格式转换及输出。
**开票模式使能开票模式禁能七、数据输出编码格式用户可通过以下设置码对识读模块进行输出格式的设置,以便主机按照指定编码格式进行中文数据输出。
注:GBK格式用于记事本,UNICODE格式用于Word及常用聊天工具输入框。
**数据编码格式UTF-8数据编码格式Unicode数据编码格式GBK八、语言设置**美国比利时巴西加拿大克罗地亚捷克斯洛伐克丹麦芬兰法国德国匈牙利意大利拉丁美洲荷兰挪威波兰葡萄牙塞尔维亚斯洛文尼亚西班牙瑞典瑞士-法语瑞士-德语英国土耳其-F 土耳其-Q日语罗马尼亚九、虚拟键盘设置**标准键盘模式虚拟键盘模式十、反相识读摸式允许反色识别禁止反色识别十一、故障排除十二、简易保养方法:1.扫描窗上的污渍和灰尘有时会影响扫描器的工作。
视景扫描器快速起步指南说明书

Premium Quick Start GuideTable of ContentsIncluded Parts (2)Assembly Instructions: (3)Camera Setup (7)Startup Instructions (9)Login Instructions (10)Import License (11)Add Portal (12)Aligning Camera (12)Included Parts•2x ViewScan monolith pillars•2x ViewScan feet•1x ViewScan brace crossbar bottom channel •1x ViewScan brace crossbar cover•1x ViewScan power supply•1x C7 Power Cable•6x Leveling screws for feet and monolith•4x Large threaded wing screw for legs•4x Black thumb screws for camera boom•4x Silver thumb screws for crossbar•4x Silver captive thumb screw for monoliths •1x Traveling case (Optional)•1x Handheld wand•1x Camera boom•1x PoE camera•1x PoE switch•1x PoE switch power supply•3x Ethernet patch cables•1x Laptop•1x Laptop power supplyAssembly Instructions:1. Install leveling screws in ViewScan feet.2. Mount ViewScan feet to ViewScan monolith pillars using large thread wing screws.3.Unfold ViewScan monoliths and install silver captive thumb screws to secure them inthe unfolded position.4.Feed the cables through the ViewScan brace crossbar bottom channel on either side inthe provided cutout.5.Connect top crossbar to Monolith using x4 silver thumb screws6.Connect cables on either side of the ViewScan brace crossbar with the data cable.7.Plug an ethernet cable into the ViewScan monolith’s top (Scanner) RJ45terminaland terminate into either the provided PoE network switch or local network.8.Plug an ethernet cable into the ViewScan monolith’s bottom (Camera) RJ45terminal and terminate into either the provided PoE network switch or localnetwork.9.Connect the provided 12V DC power supply into the ViewScan.10.Turn on ViewScan power using the switch located on the side of the unit.Camera Setup1.Attach the camera boom to the pillar that you are applying power and data to using the Largeblack knurled thumb screws.2.Connect the ethernet cable running through the boom to the side of theViewScan monolith right next to the boom mounting location.3.Connect an ethernet patch cable from the laptop to the provided PoE network switch.4.Refer to the figure below for logical layout.Startup Instructions1.Turn on the Laptop and start the ViewScan Controller from the desktop.2.When it opens wait for it to connect to the Server.a.If a server connection is unsuccessful click Start Server. Allow the controller tomake a connection while the server starts up.3.Once connected it will change the server status icon to green.Login Instructions1.Visit the Web Page by opening the ViewScan Web Portal shortcut on the desktop.2.Sign in with the set admin credentials, these are changed on the first login.3.You will be prompted to accept and EULA & to change the password. Complete both.Note: Store the new password in a safe place.Import LicenseA ViewScan license allows for the application to run on a designated system. If you do not currently have a license, please reach out to our support for one.1.Log into the Web Portal and visit the Settings page, then Other, then License FileUpload.2.Choose the license file with the type ‘vs_license’.3.Click Upload License. A message will appear and alert you of a valid license format.Add Portal1.Log into the Web Portal and visit the Settings page, then Portals then Add Portal.2.Fill in the given Portal attributes with or without a camera then click Confirm.•The Portal should now be visible on the controller.3.Check that the Monolith & Camera is turned on and go to the ViewScan Controller.4.Check the box next to the name of the Portal.5.Click Start Scanner.•Allow the scanner to fully initialize until the status icons turn green.6.In a few short moments, the portal will start, connect to the server, start up thecamera & scanner, and will be ready to take passengers.7.To take a snapshot or to stop a portal click the corresponding button.8.To view scans from any networked computer, open the Web Portal and select aportal from the dropdown.Aligning Camera1.If a scanner is not already active check the box next to a name in the Controller.2.Click Start Scanner.•Allow the scanner to fully initialize until the status icons turn green.3.Visit the Web Portal and click Settings, then Camera, then Align ViewScan Camera.4.Click the following locations in this order:•Top-Left inner corner•Top-Right inner corner•Bottom-Right stabilizing foot edge•Bottom-Left stabilizing foot edge5.Click Confirm Alignment, then Save Camera Settingsand finally Restart Scanner.6.Allow the Scanner to perform a quick Restart.7.Either walk through the scanner or take a Snapshotfrom the Monitor or Controller to confirm properalignment.。