cisco,思科,网络工程师,实验 (300)
大学生网络工程师实习总结(精选5篇)

大学生网络工程师实习总结(精选5篇)大学生网络工程师实习总结1我实习的单位是学院,这是一所由市教委、(集团)公司与德国基金会合作的一所探索、实践德国“双元制”职业教育模式的全日制中等专业学校。
我在学校里主要是负责校园内网的管理,其涉及到校园网网站的正常登陆和访问,校园内各系部主机是否正常互联,有无被病毒感染、传播。
使得校园网内的计算机能够正常运行,做好校园网的管理和维护工作。
从学生到实习工程师,短短几个月的工作过程使我受益匪浅。
不仅是在专业知识方面,最主要是在为人处事方面。
社会在加速度地发生变化,对人才的要求也越来越高,要用发展的眼光看问题,得不断提高思想认识,完善自己。
作为一名it从业者,所受的社会压力将比其他行业更加沉重,要学会创新求变,以适应社会的需要。
在单位里,小到计算机的组装维修,大到服务器的维护与测试,都需要一个人独立完成。
可以说,近3个月的工作使我成长了不少,从中有不少感悟,下面就是我的一点心得:第一是要真诚:你可以伪装你的面孔你的心,但绝不可以忽略真诚的力量。
第一天去网络中心实习,心里不可避免的有些疑惑:不知道老师怎么样,应该去怎么做啊,要去干些什么呢等等吧!踏进办公室,只见几个陌生的脸孔。
我微笑着和他们打招呼。
从那天起,我养成了一个习惯,每天早上见到他们都要微笑的说声:“老师早”,那是我心底真诚的问候。
我总觉得,经常有一些细微的东西容易被我们忽略,比如轻轻的一声问候,但它却表达了对老师同事对朋友的尊重关心,也让他人感觉到被重视与被关心。
仅仅几天的时间,我就和老师们打成一片,很好的跟他们交流沟通学习,我想,应该是我的真诚,换得了老师的信任。
他们把我当朋友也愿意指导我,愿意分配给我任务。
第二是沟通:要想在短暂的实习时间内,尽可能多的学一些东西,这就需要跟老师有很好的沟通,加深彼此的了解,刚到网络中心,老师并不了解你的工作学习能力,不清楚你会做那些工作,不清楚你想了解的知识,所以跟老师很好的沟通是很必要的。
思科网络学院网络基础知识实训(实习、学习)报告

学生实训(验)报告单课程名称:思科网络基础实训指导教师:***班级名称:2013级计算机网络技术2班学年学期: 2013-2014-1信息科学与工程学院信息科学与工程学院学生实训(验)报告单学号:201315030214 姓名:李涛项目名称Prcket Tracer综合技巧练习- 配置主机和服务实训目的在Packet Tracer 中使用由实际PC、服务器、路由器和交换机组成的标准实验配置来学习网络概念实训内容配置主机和服务;添加、配置并连接主机和服务器;了解DNS 与HTTP 如何协同工作;使用模拟模式查看DNS 和HTTP 生成的数据包详细信息实训步骤任务1:“修复”和测试拓扑在拓扑中加入一台PC,以"1B"(不含引号)作为其显示名称。
使用以下设置进行配置:IP 地址为172.16.1.2,子网掩码为255.255.0.0,默认网关为172.16.255.254,DNS 服务器为192.168.254.254。
将PC 1B 连接到S1-Central 交换机的Fa0/2 端口。
将Eagle Server 连接到R1-ISP 路由器的Fa0/0 端口。
启用HTTP,打开服务器上的Web 服务。
启用DNS 服务,添加一个将""(不含引号)与服务器IP 地址关联的DNS 条目。
任务2:了解DNS 与HTTP 如何协同工作从实时模式切换到模拟模式。
从PC 1B 的桌面打开Web 浏览器。
在地址栏中键入""(不含引号),按Enter,然后用Event List(事件列表)中的Capture / Forward(捕获/转发)按钮捕获DNS 与HTTP 的交互。
播放此动画,检查事件列表中每个事件的数据包内容(PDU Information(PDU 信息)窗口、Inbound PDU Details(入站PDU 详细数据)、Outbound PDU Details(出站PDU 详细数据)),特别是当数据包在PC 1B 或Eagle Server 上时。
网络工程师思科实训报告doc

网络工程师思科实训报告我于年月日受系部委派参加了为期五天的上海xxXX年度高校网络工程师职业体验竞赛学习。
这次活动的地址位于xx实训基地的江苏xx市,该实训基地由政府和xx一路投资和政府补助。
下面我谈一下参加这次学习进程的几点心得。
一、大赛目的这次竞赛由上海xx计算机科技举行,体验进程分为两个部份:网络职业体验竞赛和赛前免费培训。
举行该活动的目的是以提升大学生职业能力为目标,旨在通过优化整合中外优质教育培训资源,把高新技术培训和职业资格认证相结合,探索培训教育的有效途径,培育符合行业发展和企业需要的人材,增进大学生就业和创业。
xx为中国十大品牌it教育机构和中国it职业行业最具影响力的十大品牌,拥有一流的实训基地、配备超大机房、一流的师资水平的高品质就业技术培训。
在整个活动中,这一点是取得了充分的肯定的。
xx对这次体验赛给予了高度的重视,提供了最好的服务环境和教学师资,使这次体验变得尤其宝贵。
二、学习进程这次活动中前四天为免费实训阶段,最后一天为竞赛单元。
主要学习了思科网络技术(level 1)、微软网络技术(level 1)、网络系统集成项目(level 1)等内容。
整个进程学习强度比较大,内容比较多,属于高度浓缩的精华,通过理论和实验的方式,反复实践,辅导,使参加者不但了解了原理、思路,更让咱们实践操作,强化学习。
应该说,这是一套比较合理的培训模式。
在硬件上,xx的超大机房,为每一个参加者配备了两个路由器,和实验操作电脑。
解决理论和实践脱节的问题。
在师资上,xx提供的都是该行业权威的专业人材,这次为咱们上课的张硕淳老师是中国声誉最高的大师级认证:rhca的13个成员之一,另外,他还同时拥有四个ie。
能让他为咱们上课,是一件超级荣幸的事情。
在整个上课进程中,思维灵敏,节拍轻快,娓娓道来,让人感觉有点神通的感觉。
三、体会意得这次活动对我来讲,必然是收获颇丰的。
一、xx应该是一个可让你真正学到东西的地方。
思科实训报告

思科实训路由器操作及配置班级:网络1031姓名:闫晓彤学院:轻工山西轻工职业技术学院2011年6月17日实验 1 简单的路由配置与抓包工具的使用实验目的1 学习使用CISCO仿真软件;2 学习使用路由配置基本命令.实验要求单独配置自己的路由器,完成路由的配置后,各路由器要能够ping通拓扑图中的所有网段。
并且使用抓包工具观察ping的数据流.实验项目性质设备的连通性。
实验设备计算机及CISCO仿真软件。
连接方式IP配置表名称地址网关PC0 172.168.1.12172.168.1.1PC1 172.168.1.22172.168.1.1路由器172.168.1.23172.168.1.1实验步骤1 将路由器、交换机和两台终端设备拖拽出来。
2 连接路由器和交换机,连接交换机和两台终端设备。
3 配置PC0,PC1 的IP地址,4 用抓包软件来看数据流的传输方向是否连通。
5 在PC0上使用PING命令去检测是否和PC1相连通.实验数据及结果数据流:先从PC0发送数据包到交换机,再从交换机将数据包发送到PC1,然后数据包从PC1返回到交换机,交换机将数据包发送到PC0,完成数据流的流通。
实验总结在试验的过程中我学会了用思科仿真软件来使用简单的路由配置和抓包操作。
通过使用PING命令来配置路由器等。
实验二简单的路由配置与抓包工具的使用一:实验目的1 学习使用CISCO仿真软件;2 学习使用路由配置基本命令。
二:实验要求单独配置自己的路由器,PC,完成路由与PC的配置后,各路由器要能够ping通拓扑图中的所有网段。
三:实验项目性质检测设备之间的连通性。
四:实验设备计算机及CISCO仿真软件。
五:连接方式IP配置表名称地址网关PC0 172.16.1.23 172.16.1.1PC1 172.16.1.13 172.16.1.1PC2 172.17.1.23 172.17.1.1PC3 172.17.1.13 172.17.1.1Router0 172.16.1.1 2172.16.1.1Router1 172.17.1.1 172.17.1.1六:实验步骤1 将两台路由器、两台交换机、以及四台PC机拖到思科仿真软件中。
cisco,思科,网络工程师,实验 (330)
Lab 1.3.3 Determining the Screen Resolution of a ComputerObjectives•Determine the current screen resolution of a PC monitor. •Determine the maximum resolution for the highest color quality. •Calculate the number of pixels needed for resolution settings. • Identify the type of monitor and graphics card installed.Background / PreparationThe resolution of a monitor determines the quality of the screen display. The resolution is determined by the number of horizontal and vertical picture elements (pixels) that are used to produce the image on the monitor. The number of pixels is typically predefined by the manufacturers of graphics cards and PC monitors. The highest number of pixels that a monitor and graphics card can support is referred to as maximum resolution. An example of maximum resolution is 1280 x1024, which means the display is composed of 1280 horizontal pixels and 1024 vertical pixels. The higher the resolution is set, the sharper the display image. The maximum resolution of a PC monitor and the number of colors the monitor can display are determined by two factors:•Capability of the monitor •Capability of the graphics card, especially the amount of onboard memory The following resources are required:• Computer with Windows XP installed Step 1: Determine the current screen resolutiona. To view the current screen resolution and color quality settings, right-click on any empty space on thedesktop and select Properties from the context menu. In the Display Properties window, select the Settings tab.You can also access Display Properties by opening the Control Panel and clicking the Displayicon.CCNA DiscoveryNetworking for Home and Small Businesses v4.0: Personal Computer Hardwareb. Use the Display Properties Settings tab to record the current settings on your PC:The screen resolution is (H by V) ______________________________________________The horizontal resolution is: __________________________________________________The vertical resolution is: ____________________________________________________The color quality value is: ____________________________________________________Step 2: Determine the maximum resolution for the highest color qualityThe slide bar under Screen resolution is used to configure the desired resolution.a. Move the slide bar to see the range of screen resolutions that are available on your PC. (The range isdetermined by the operating system when it identifies the display card and the monitor.)b. Use the Display Properties Settings tab to fill out the following table for the current settings on yourPC:Minimum screen resolutionMaximum screen resolutionAvailable color quality settingsStep 3: Calculate the pixels for current and maximum resolution settingsThe display on the screen consists of rows of pixels. The number of pixels in each row is the horizontal resolution. The number of rows is the vertical resolution. To determine the total number of pixels in a screen resolution, you multiply the horizontal resolution by the vertical resolution. For example, if the currentresolution is 1280 x 1024, the total number of pixels is 1280 times 1024, or 1,310,720.a. Calculate the total number of pixels for the lowest resolution: ___________________________b. Calculate the total number of pixels for the maximum resolution: ________________________ Step 4: Identify the type of graphics card installedYou can get detailed information about the graphics card (also called the display adapter) in the Display Properties screen.a. In the Display Properties screen, click the Advanced button.b. Select the Adapter tab.c. Use the information found in the Adapter tab to complete the following table:Graphics card manufacturer and model(Adapter Type)Graphics memory on card(Memory Size)Step 5: Identify the type of monitor and available refresh ratesYou can get detailed information about the monitor in the Display Properties screen. The screen refresh rate determines the number of times per second the screen is illuminated or redrawn. A refresh rate of 60 hertz means the screen is illuminated 60 times per second. Higher refresh rates provide less screen flicker, which reduces eye strain, but may adversely affect the monitor. You should set the refresh rate to the highest level the monitor can safely support.a. Click on the Monitor tab to see the monitor type and current refresh rate.b. Use the information found in the Monitor tab to complete the following table:Monitor typeSupported refresh ratesc. What can occur if you select a refresh rate that is higher than what the monitor can safely display?____________________________________________________________________________。
cisco,思科,网络工程师,实验 (340)

CCNA DiscoveryNetworking for Home and Small BusinessesLab 6.2.3 Exploring FTPObjective•Demonstrate how to use FTP from the command prompt and GUI.Background / PreparationFile Transfer Protocol (FTP) is part of the TCP/IP suite. FTP is used to transfer files from one network device to another network device. Windows includes an FTP application that you can execute from the command prompt. There are also many free GUI versions of FTP that you can download. The GUI versions are easier to use than typing from a command prompt.When using FTP, one computer is normally the server and the other computer is the client. When accessing the server from the client, you need to provide a username and password. Some FTP servers have a userID named anonymous. You can access these types of sites by simply typing “anonymous” for the userID, withouta password. Usually, the site administrator has files that can be copied but does not allow files to be postedwith the anonymous userID.If your class does not have an FTP server available, you can download and install a freeware version, such as Home FTP Server or Cerberus FTP server. The FTP Server on a computer running the CCNA Discovery Live CD may also be used. Another computer will act as the FTP client by using FTP from the command line,a web browser, or download a freeware version of an FTP client, such as SmartFTP Client or Core FTP LEclient. Work in teams of two to complete this lab.The following resources are required:•Windows-based computer with an FTP client•FTP server (Existing FTP server, downloaded freeware, or use Live CD)Step 1: Examine FTP from the command prompta. Click the Start button, select Run, type cmd on the command line, and then click OK.to start the FTP application. The prompt changes.b. At the prompt, type ftpc. From the ftp prompt, type ? to see a list of the commands that can be used in this mode.CCNA DiscoveryNetworking for Home and Small Businessesd. List three FTP commands. _______________________________________________________e. At the prompt, type help put to see a short description of the put command.f. What is the purpose of the put command? ___________________________________________g. Use the help command again to get the purpose of the get, send, and recv commands.get __________________________________________________________________________send _________________________________________________________________________recv _________________________________________________________________________NOTE: The original FTP commands were PUT to send a file to an FTP server and GET to downloada file from the FTP server. You also had to select ASCII or binary file mode. If you downloada binary file in ASCII mode it could end up being corrupted. Some of the newer graphicalprograms now use send and receive in their place.h. Partner with another student. Using procedures demonstrated in previous labs, write down the namesand IP addresses of each partner computer. It is very important to get these names correct. SomeFTP applications allow you to use either the IP address or the computer name.Computer 1: __________________________________________________________________Computer 2: __________________________________________________________________ Step 2: Use a GUI FTP client or web browsera. If you are using a web browser as the FTP client, open the web browser and typeftp://ip_address_of_FTP_server. If the FTP server is configured to use an anonymous userID,connect directly to the FTP server. Using the FTP client, download an available file from the server.b. If you are using a GUI FTP client, open the application. For most FTP clients, you must configure anew connection by giving it a name, the IP address of the FTP server, and a username andpassword. You may have to type anonymous if the FTP server allows this type of connection. Someapplications have a checkbox that allows an anonymous login. When you have configured theconnection, connect to the FTP server and download a file.c. What is the name of the file you downloaded from the FTP server? ______________________d. List one example of when FTP might be beneficial to a computer technician. _______________________________________________________________________________________________________________________________________________________________________ Step 3: (Optional) Use both an FTP server and clienta. If you control both the FTP server and client, practice sending files to and getting files from the clientand the server.b. Show your transferred files to another group of students.c. Close the FTP server and client applications.。
cisco,思科,网络工程师,实验 (318)

CCNA Discovery计算机网络设计和支持实验 9.2.4 制定安装时间表目标•根据维护时段和允许停机时间制定安装时间表。
预期结果和成功标准开始本实验前,请仔细阅读所要执行的任务。
您预计在执行完这些任务后会有什么样的结果?______________________________________________________________________________________ ______________________________________________________________________________________ ______________________________________________________________________________________ 确保客户和用户获悉网络和服务的中断时间为什么是项目实施的重要部分?______________________________________________________________________________________ ______________________________________________________________________________________ ______________________________________________________________________________________背景/准备工作安装时间表中需要包括维护时段和计划停机时间。
如果每天只有几个小时可用于更改网络,那么项目时间表必须反映此限制。
否则,时间估算就不准确,而项目也可能会延迟。
网络的停机安排需要仔细规划,以免对客户造成严重的业务中断。
在本实验中,您将制定一份维护时间表,包括涉及的设备、所需时间以及对 FilmCompany 日常运营影响最小的维护安排建议。
cisco,思科,网络工程师,实验
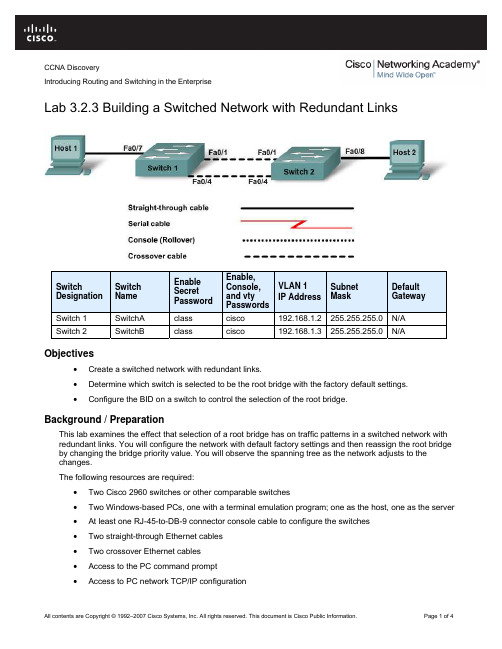
CCNA DiscoveryIntroducing Routing and Switching in the EnterpriseLab 3.2.3 Building a Switched Network with Redundant LinksSwitch Designation SwitchNameEnableSecretPasswordEnable,Console,and vtyPasswordsVLAN 1IP AddressSubnetMaskDefaultGatewaySwitch 1 SwitchA class cisco 192.168.1.2 255.255.255.0 N/ASwitch 2 SwitchB class cisco 192.168.1.3255.255.255.0N/A Objectives•Create a switched network with redundant links.•Determine which switch is selected to be the root bridge with the factory default settings.•Configure the BID on a switch to control the selection of the root bridge.Background / PreparationThis lab examines the effect that selection of a root bridge has on traffic patterns in a switched network with redundant links. You will configure the network with default factory settings and then reassign the root bridge by changing the bridge priority value. You will observe the spanning tree as the network adjusts to thechanges.The following resources are required:•Two Cisco 2960 switches or other comparable switches•Two Windows-based PCs, one with a terminal emulation program; one as the host, one as the server •At least one RJ-45-to-DB-9 connector console cable to configure the switches•Two straight-through Ethernet cables•Two crossover Ethernet cables•Access to the PC command prompt•Access to PC network TCP/IP configurationNOTE: Make sure that the routers and the switches have been erased and have no startup configurations.Instructions for erasing both switch and router are provided in the Lab Manual, located on AcademyConnection in the Tools section.NOTE: SDM Enabled Routers - If the startup-config is erased in an SDM enabled router, SDM will no longer come up by default when the router is restarted. It will be necessary to build a basic router configuration using IOS commands. The steps provided in this lab use IOS commands and do not require the use of SDM. If you wish to use SDM, refer to the instructions in the Lab Manual, located on the Academy Connection in the Tools section or contact your instructor if necessary.Step 1: Cable the networka. Connect Host 1 to Switch 1 Fast Ethernet port Fa0/7, using a straight-through Ethernet cable.b. Connect Host 2 to Switch 2 Fast Ethernet port Fa0/8, using a straight-through Ethernet cable.c. Connect Switch 1 Fast Ethernet port Fa0/1 to Switch 2 Fast Ethernet port Fa0/1, using a crossoverEthernet cable.d. Create a redundant link between the switches by connecting Switch 1 Fast Ethernet port Fa0/4 toSwitch 2 Fast Ethernet port Fa0/4, using a crossover Ethernet cable.What typically undesirable traffic pattern have you created by using the two crossover cablesbetween the two switches? __________________________________________________Predict: What do you think the switches will do to keep this from becoming a problem?__________________________________________________________________________________________________________________________________________________Step 2: Configure the switchesa. Establish a terminal emulation session to Switch 1 from Host 1.b. Configure the switch hostname, passwords, interface VLAN 1 IP address, and subnet mask onSwitch 1.c. Save the configuration.d. Establish a terminal emulation session to Switch 2 from either Host 1 or Host 2.e. Configure the switch hostname, passwords, interface VLAN 1 IP address, and subnet mask onSwitch 2.f. Save the configuration.Step 3: Configure the hostsa. Configure each host to use an IP address in the same network as the switches.b. Configure each host to use the same subnet mask as the switches.Why is no default gateway specified for this network?_________________________________________Step 4: Verify connectivitya.b. To verify that the network is set up successfully, ping from Host 1 to Host 2.Was the ping successful? _____________If the ping is not successful, verify the connections and configurations again. Check to ensure that all cables are correct and that connections are seated.If the ping is not successful, what utility could you use to determine where the connection is failing?__________________________Step 5: Examine interface VLAN 1 informationa. From the terminal emulation session on either switch, enter the command show interface vlan1? at the privileged EXEC mode prompt.SwitchA#show interface vlan1 ?List some of the options that are available.____________________________________________________________________b. On SwitchA, enter the command show interface vlan1 at the privileged EXEC mode prompt.SwitchA#show interface vlan1What is the MAC address of the switch? ____________________________________What other term for MAC address is used? ________c. On SwitchB, enter the command show interface vlan1 at the privileged EXEC mode prompt.What is the MAC address of the switch? ____________________________________Which switch should be the root of the spanning tree for this network? _____________Step 6: Examine the spanning-tree tables on each switcha. On SwitchA, enter the command show spanning-tree at the privileged EXEC mode prompt.b. On SwitchB, enter the command show spanning-tree at the privileged EXEC mode prompt.c. Examine the outputs and answer the following questions:Which switch is the root bridge? _____________What is the priority of the root bridge? ____________What is the bridge ID of the root bridge? ____________________Which ports are forwarding on the root bridge? _________________________Which ports are blocking on the root bridge? ___________________________What is the priority of the non-root bridge? ____________________________What is the bridge ID of the non-root bridge? _________________________Which ports are forwarding on the non-root bridge? _________________________________Which ports are blocking on the non-root bridge? ___________________________________d. Examine the link lights on both switches.Can you tell which port is in blocking state? ________________________________________Why is there no change in the link lights? __________________________________________Step 7: Reassign the root bridgeWhat would you do if you wanted a different switch to be the root bridge for this network?__________________________________________________________________________________ Why might you want to do this?__________________________________________________________________________________ For the purposes of this lab, assume that the switch that is currently the root bridge is undesirable.The example assumes that SwitchB is preferred as the root switch. To “force” SwitchB to become the new root bridge, you need to configure a new priority for it.a. Go to the console and enter configuration mode on SwitchB.b. Determine the options that can be configured for the Spanning Tree Protocol by issuing thiscommand:SwitchB(config)#spanning-tree ?c. List the options that are available: ____________________________________________________________________________________________________________d. Set the priority of the switch to 4096.SwitchB(config)#spanning-tree vlan 1 priority 4096SwitchB(config)#exitStep 8: Look at the spanning-tree tablea. On SwitchA, enter show spanning-tree at the privileged EXEC mode prompt.b. On SwitchB, enter show spanning-tree at the privileged EXEC mode prompt.c. Examine the outputs and answer the following questions:Which switch is the root bridge? _______________________________________________What is the priority of the root bridge? __________________________________What is the bridge ID of the root bridge? _________________________________________Which ports are forwarding on the root bridge? ____________________________________Which ports are blocking on the root bridge? _________________________________What is the priority of the non-root bridge? ________________________________________What is the bridge ID of the non-root bridge? ______________________________________Which ports are forwarding on the non-root bridge? _________________________________Which ports are blocking on the non-root bridge? __________________________________Step 9: Verify the running configuration file on the root bridgea. On the switch that was changed to be the root bridge, enter the show running-config commandat the privileged EXEC mode prompt.b. Locate the spanning-tree priority information for this switch.c. How can you tell from the information given that this switch is the root bridge?_______________________________________________________________________________ Step 10: ReflectionSuppose that you are adding new switches to a company’s network. Why should you plan the physicaldesign carefully? Why should you be prepared to make adjustments to factory default settings?____________________________________________________________________________________________________________________________________________________________________________________________________________________________________________________________________________________________________________________________。
- 1、下载文档前请自行甄别文档内容的完整性,平台不提供额外的编辑、内容补充、找答案等附加服务。
- 2、"仅部分预览"的文档,不可在线预览部分如存在完整性等问题,可反馈申请退款(可完整预览的文档不适用该条件!)。
- 3、如文档侵犯您的权益,请联系客服反馈,我们会尽快为您处理(人工客服工作时间:9:00-18:30)。
CCNA Discovery计算机网络设计和支持实验 5.5.3 创建 ACL 以实施防火墙规则集设备接口IP 地址SFC-ASW VLAN110.1.1.253/24SR1 Fa0/1S0/1/010.1.1.254/2410.1.0.1/30Edge2 S0/1/0S0/1/110.1.0.2/3010.3.0.1/30BR4 S0/1/1Fa0/0Fa0/110.3.0.2/30172.17.0.1/1610.3.1.254/24FC-ASW-2 VLAN1172.17.1.25/16 FC-ASW-1 VLAN110.3.1.253/24PC1 —10.1.1.1/24PC2 —10.3.1.1/24Production Server —172.17.1.1/16目标•解释安全策略以定义防火墙规则。
•创建 ACL 语句以实施防火墙规则。
•配置并测试 ACL。
640-802 CCNA 考试目标本实验包含与下列 CCNA 考试目标相关的技能:•说明 ACL 的用途和类型。
•根据网络过滤要求配置并应用 ACL(包括 CLI/SDM)。
•配置并应用 ACL 来限制使用 SDM/CLI 对路由器进行 Telnet 和 SSH 访问。
•在网络环境中验证和监控 ACL。
•排查 ACL 问题。
预期结果和成功标准开始本实验前,请仔细阅读所要执行的任务。
您预计在执行完这些任务后会有什么样的结果?______________________________________________________________________________________ ______________________________________________________________________________________ ______________________________________________________________________________________ 不使用 ACL 保护网络流量有何内在风险?______________________________________________________________________________________ ______________________________________________________________________________________ ______________________________________________________________________________________可以使用哪几种方法来限制流量传入和传出 LAN 或 WAN?______________________________________________________________________________________ ______________________________________________________________________________________ ______________________________________________________________________________________背景/准备工作FilmCompany 为分支机构(例如位于体育馆的分支机构)提供服务。
该分支机构有一些比轻微的安全和性能问题,要求网络设计人员合并多个 ACL 来保护网络。
这些 ACL 必须成为控制流量的简单、有效工具。
根据 FilmCompany 的安全策略,创建防火墙规则集,并且实施命名式扩展 ACL 来实施该规则集。
在 FilmCompany 的安全策略中,有一个章节与远程站点的访问相关。
安全策略的具体内容如下:安全策略从远程地点(包括远程分支机构)访问网络的用户需要对站点网络资源进行以下访问:1. 远程用户必须能够访问 Production Server,以便在网上查看他们的日程安排以及输入新订单。
2. 远程用户必须能够通过 FTP 上传文件到 Production Server 或从中下载文件。
3. 远程用户可以使用 Production Server、通过 IMAP 和 SMTP 协议发送并查收电子邮件。
4. 不允许远程用户访问 Production Server 上的任何其它服务。
5. 不允许流量从总部中的工作站传输到远程员工工作站。
需要在两个站点之间传输的所有文件都必须存储在 Production Server 中,并且通过 FTP 检索。
6. 不允许流量从远程工作站传输到总部的工作站。
7. 不允许 Telnet 流量从远程工作站传输到除本地交换机以外的任何设备。
步骤 1:如拓扑图所示为网络布线注:如果本实验中使用的 PC 还连接到 Academy LAN 或 Internet,请务必记录电缆连接和 TCP/IP 设置,以便实验结束后将其恢复。
a. 根据所给的拓扑图和配置,连接和配置设备。
必须在串行链路间配置路由以建立数据通信。
注:在本实验中,您的指导教师可能会使用同类服务器来代替 Production Server。
b. 在每台路由器上配置 Telnet 访问。
c. 在 Host1、Host2 和 Production Server 之间执行 ping,确保网络连通。
如果 ping 或 Telnet 失败,请排查问题,然后建立连接。
步骤 2:执行基本路由器配置a. 按照以下原则配置网络设备:•在每台设备上配置主机名。
•配置执行模式口令class。
•为控制台连接配置口令cisco。
•为 vty 连接配置口令cisco。
•在所有设备上配置 IP 地址。
•在所有路由器上启用 EIGRP,并且将每台路由器配置为通告连接的所有网络。
•使用ping命令检验 IP 是否完全连通。
b. 通过 telnet 访问所有路由器,确认应用层连通。
步骤 3:创建防火墙规则集和访问列表语句使用 FilmCompany 远程访问的安全策略信息,创建实施该策略所必须采用的防火墙规则。
在记录防火墙规则之后,创建用于实施防火墙规则的访问列表语句。
实施一个规则可能需要多条语句。
下面以一个防火墙规则为例:安全策略 1:远程用户必须能够访问 Production Server,以便在网上查看他们的日程安排以及输入新订单。
防火墙规则:允许 10.1.1.0/24 上的用户访问 Production Server (172.17.1.1) 的 TCP 端口 80。
访问列表语句:permit tcp 10.1.1.0 0.0.0.255 host 172.17.1.1 eq 80访问列表的位置:路由器 SR1 Fa0/1 的入站方向(请记住,扩展 ACL 应尽可能靠近流量的源)对于下列每一项安全策略:a. 创建一个防火墙规则。
b. 创建一条访问列表语句。
c. 确定访问列表应放到哪个位置来实施防火墙规则。
安全策略 2:远程用户必须能够通过 FTP 上传文件到 Production Server 或从中下载文件。
防火墙规则:______________________________________________________________________________________________________________________________________________________________访问列表语句:______________________________________________________________________________________________________________________________________________________________访问列表的位置:______________________________________________________________________________________________________________________________________________________________ 安全策略 3:远程用户可以使用 Production Server、通过 IMAP 和 SMTP 协议发送并查收电子邮件。
防火墙规则:______________________________________________________________________________________________________________________________________________________________访问列表语句:______________________________________________________________________________________________________________________________________________________________访问列表的位置:_______________________________________________________________________________ _______________________________________________________________________________ 安全策略 4:远程用户不能访问 Production Server 上的任何其它服务。
防火墙规则:_______________________________________________________________________________ _______________________________________________________________________________ 访问列表语句:_______________________________________________________________________________ _______________________________________________________________________________ 访问列表的位置:_______________________________________________________________________________ _______________________________________________________________________________安全策略 5:不允许总部工作站的流量传输到远程员工的工作站。