手持终端使用说明
神舟链威C4000手持终端用户手册说明书
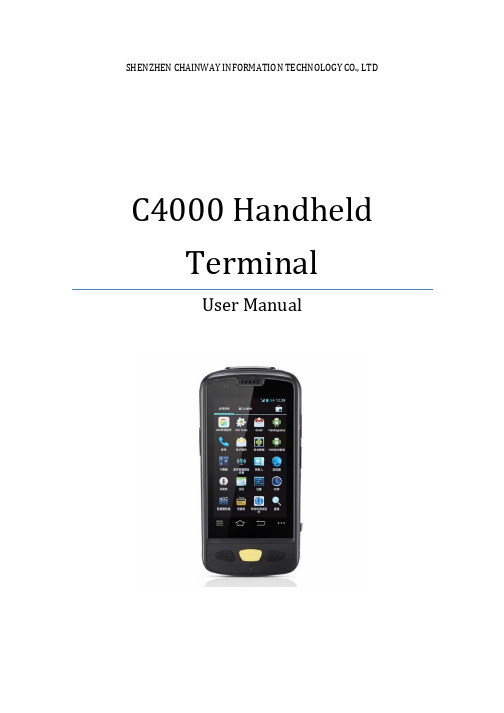
SHENZHEN CHAINWAY INFORMATION TECHNOLOGY CO., LTDC4000 Handheld TerminalUser Manual1ContentsStatement (4)1.Getting Started (6)1.1 Brief Instruction (6)1.2Precaution before Using Battery (7)2.About The Device (8)2.1 Structure (8)2.2 SD Card Installation (10)2.3 SIM Card Installation (11)2.4 Battery Installation (12)2.5 Battery Charging (13)2.5.1 Direct Charging (13)2.5.2 Cradle Charging (13)2.6 Device Power on/off (13)3.Call Function (14)3.1 Phone (14)3.2 Contacts (15)3.3 Messaging (16)4. Barcode Reader (17)4.1 1D Barcode (17)4.2 2D Barcode (18)4.3 2D(S) Barcode (19)5.RFID Reader (20)5.1 Low Frequency (20)25.2 High Frequency (22)5.2.1 14443A (22)5.2.215693 (23)5.3 Ultra High Frequency (24)6.Fingerprint Reader (26)7.Other Functions (27)7.1 PING (27)7.2Bluetooth (28)7.3 GPS (30)7.4 Volume Settings (31)7.5 Sensor (32)7.6 Keyboard (33)7.7 Network (34)7.8 Keyboardemulator (35)8. Device Specifications (36)3Statement2013 by Shenzhen Chainway Information Technology Co., Limited. All rights reserved.No part of this publication may be reproduced or used in any form, or by any electrical or mechanical means, without permission written from Shenzhen Chainway. This includes electronic or mechanical means, such as photocopying, recording, or information storage and retrieval systems. The material in this manual is subject to change without notice.The software is provided strictly on an “as is” basis. All software, including firmware, furnished to the user is on a licensed basis. Shenzhen Chainway grants to the user a non-transferable and non-exclusive license to use each software or firmware program delivered hereunder (licensed program). Except as noted below, such license may not be assigned, sublicensed, or otherwise transferred by the user without prior written consent of Shenzhen Chainway. No right to copy a licensed program in whole or in part is granted, except as permitted under copyright law. The user shall not modify, merge, or incorporate any form or portion of a licensed program with other program material, create a derivative work from a licensed program, or use a licensed program in a network without written permission from Shenzhen Chainway.Shenzhen Chainway reserves the right to make changes to any software or product to improve reliability, function, or design.Shenzhen Chainway does not assume any product liability arising out of, or in connection with, the application or use of any product, circuit, or application described herein.No license is granted, either expressly or by implication, estoppel, or otherwise under any Shenzhen Chainway intellectual property rights. An implied license only exists for equipment, circuits, and subsystems contained in Shenzhen Chainway products.Shenzhen Chainway Information Technology Co., LtdAddress: 9/F, Building 2, Phase 2, Gaoxinqi Industrial Park, Liuxian 1st Rd, District 67, Bao’an, Shenzhen, Guangdong, ChinaTelephone:+0086-755-23223300 Fax: +0086-755-23223310Web Site: Email:*******************451. G etting Started1.1 Brief InstructionChainway C4000 is a series of Android powered smart terminals, with data capture, data processing, wireless communication. It is with high-reliability &high-expansibility. Auto & Accurate data collection is achieved in various business fields via a complete solution of premium options, the flexible solution among options and operators is suited-up. You will find out with C4000, much easier deployment, reduced complexity, decreased maintenance, are the benefits for enterprises.C4000 meets industrial level IP64 (IEC sealing), is sufficient to routine applications, eg, railway inspection, road parking toll, vehicle inspection, logistics express, power inspection, warehousing management, chain retail, etc. Whether the mobile operators are working indoor or outdoor, with Chainway C4000, your business is always &highly efficient on-line.Meeting industrial standards, designed to support a various of mobile solutions. With the build-in high performance Cortex-A7 1.3GHZ quad core processor technology, the operators need only one device to enjoy a convenient and easy job, C4000 will be the ideal choice for key-fact business in mobile solutions, for simplified task flow, enhanced work efficiency, for shortened time to customer response, more satisfied customer care service.Chainway C4000 comes with world wide band WCDMA technology. Multi channels data and voice communication guarantees the real-time communication and data efficiency, C4000 brings you the best ROI.61.2 Precaution before Using Battery•Do not leave batteries unused for extended periods of time, either in the product or in storage. When the battery has been unused for 6 months, check the charge status and charge or dispose of the battery as appropriate. •The typical estimated life of a Lithium-Ion battery is about two to three years or 300 to 500 charge cycles, whichever occurs first. One charge cycle is a period of use from fully charged, to fully discharged, and fully recharged again. Use a two to three year life expectancy for batteries that do not run through complete charge cycles.•Rechargeable Lithium-Ion batteries have a limited life and will gradually lose their capacity to hold a charge. This loss of capacity (aging) is irreversible. As the battery loses capacity, the length of time it will power the product (run time) decreases.•Lithium-Ion batteries continue to slowly discharge (self-discharge) when not in use or while in storage. Routinely check the battery’s charge status. The user manual typically includes information on how to check battery status, as well as battery charging instructions.•Observe and note the run time that a new fully-charged battery provides for powering your product. Use the new battery run time as a basis to compare run times for older batteries. The run time of your battery will vary depending on the product’s configuration and the applications that you run. •Routinely check the battery’s charge status. Carefully monitor batteries that are approaching the end of their estimated life.Consider replacing the battery with a new one if you note either of thefollowing conditions:The battery run time drops below about 80% of the original run time.•The battery charge time increases significantly.•If a battery is stored or otherwise unused for an extended period, be sure to follow the storage instructions in this document. If you do not follow theinstructions, and the battery has no charge remaining when you check it,consider it to be damaged. Do not attempt to recharge it or to use it. Replace it with a new battery.•Always follow the charging instructions provided with your product. Refer to your product’s user manual and/or online help for detailed information about charging its battery.•Charge or discharge the battery to approximately 50% of capacity before storage. Charge the battery to approximately 50% of capacity at least once every six months.•Remove the battery and store it separately from the product.•Store the battery at temperatures between 5 °C and 20 °C (41 °F and 68 °F).72. A bout The Device2.1 Structure<Front>89<Back>Buttons:ButtonFunctionPower ButtonPress and hold to turn the device on or off App List View Button View a list of apps running Home ButtonPress to return to the home screen Cancel ButtonTap to return to the previous screenDetailed installation steps are as follows:•Open the SIM slot as the direction of ‘Open/Lock’ labeled.•Open the SD slot as the direction of ‘Open/Lock’ labeled.•Install the SD card properly.•Lock the SD slot and SIM slot properly.101. Open the SIM slot as the direction of ‘Open/Lock’ labeled.2. Install the SIM card correctly.3. Lock the SIM slot properly.2 3112.4 Battery Installation1. Push the battery down into the bottom of the battery.2. Push the battery to the direction of the array.3. Turn the battery lock.122.5 Battery Charging2.5.1 Direct ChargingUse the adapter to charge the battery via the USB connector of the snap-on. 2.5.2 Cradle ChargingConnect the adapter with the power cable to charge the device.2.6 Device Power on/offPress the ‘Power’ button on the side shortly due to turn on/off.13143. C all Function3.1 Phone1. Click this icon.2. Click the number button to input the numbers.3. Click the button to confirm and dial.4. Click theto end the calling.Contacts LogsVoice CallingEmulated Numeric Keypad3.2 Contacts1. Click ‘Contacts’ to open the contacts list.2. Click ‘’ to add the new contact.3. Click ‘’ to import/export or delete the contact list.FavoritesContact List Group153.3 Messaging1. Click ‘’ to open the message list.2. Click ‘’ to input the content.3. Click ‘’ to send the message.4. Click ‘’ to add photos, videos.164. Barcode Reader4.1 1D Barcode1. Open the 1D Barcode Demo in Appcenter.2. Press the ‘Scan’ button to start scanning, then the auto interval parameterscan also be set.174.2 2D Barcode1. Open the 2D Barcode Demo in Appcenter.2. Press the ‘Scan’ button to start scanning, then the auto interval parameterscan also be set.184.3 2D(S) Barcode1. Open the 2D(S) Barcode Demo in Appcenter.2. Press the ‘Scan’ button to start scanning, then the auto interval parameterscan also be set.3. Also, the barcode types enabling/disabling can also be set.Note: Please scan the barcode in a correct way, otherwise the scanningmight be failed.19205. R FID Reader5.1 Low Frequency1. Open the RFID_LF Demo within Appcenter and then press the ‘Scan’ button tostart reading.2. Tag types including ID Card/Animal Tag/Hitag/HDX Tag/EM4450 can be alsoselected, and Hitag-S and EM4305 reading/writing are already supported by the device.Please ensure that the LF module is embedded in the device, also please select the tag type correctly, otherwise the operation might not work. Meanwhile, please pay attention to the HDX and FDX-B since they are using different hardware due to the different working principles.215.2 High Frequency5.2.1 14443A1. Open the 14443A demo within Appcenter, and press the ‘Scan’ button to startreading.2. Mifare and Ultra Light reading/writing are also supported.225.2.2 156931. Open the RFID_15693 demo within Appcenter, and press the ‘Scan’ button tostart scanning.2. 15693 writing are also supported.235.3 Ultra High Frequency1. Open the UHF demo within Appcenter, and press the ‘Start’ button to startscanning.2. Multiple tags reading and single tag reading/writing are also supported.2425266. F ingerprint Reader1. Open the Fingerprint Demo in Appcenter.2. Put the finger to the fingerprint module and set the ID/name of the templateunder ‘ACQUISITION’.3. Put the finger to the fingerprint module properly and identify by ID/Name/Scoreunder ‘IDENTIFICATION’.4. The local templates can also be checked under ‘Data’.Please be aware that ISO standards are only supported by devices with ISO fingerprint hardware modules.7. O ther Functions7.1 PING1. Open the Ping in Appcenter.2. Set the Ping parameters and select the internal/external addresses.277.2 Bluetooth1. Open the Bluetooth demo in Appcenter and turn on the Bluetooth.2. Input the content or select the file, then scan the nearby Bluetooth printer andpair them.3. Select the printer and click ‘Print’ to print the content.2829307.3 GPS1. Open the GPS demo in Appcenter and turn on GPS module.2. Set the GPS parameters and get the GPS data information.7.4 Volume Settings1. Open the Volume Setting demo in Appcenter.2. Set the volumes based on the requirements.317.5 Sensor1. Open the Sensor demo in Appcenter.2. Test the sensor based on the requirements.321. Open the Keyboard demo in Handset Appcenter.2. Set and test the key values of the device.331. Open the Network demo in Appcenter.2. Test the WIFI/Mobile signal based on the requirements.34357.8 KeyboardemulatorKeyboard Emulator can be used directly for multiple using environments and the output formats can include prefix/suffix/enter/tap can also be defined, please define the options properly based on the features of the device.1. Open the Keyboardemulator which is preinstalled in the device.2. Click the options correctly based on the features of the device hardware,please also press the physical button to define the scan button, then please define the output formats based on the requirements, finally click ‘Open’ to save and enable it.8. Device SpecificationsPhysical CharacteristicsDimensions 153mm*75mm*29mm/6.02*2.95*1.14in.Weight 286g/10.09oz. (includes main battery)Screen 4in.WVGA (480*800) TFT-LCD, capacitive dual touchKeyboard 3 function keys, 3 side buttonsBattery Main bat. (rechargeable li-ion polymer, 3.7V, 3200 mAh)Pistol bat. (rechargeable li-ion polymer, 3.7V, 5200 mAh)Expansion Slot MicroSD/TF, maximum capacity of 32GSIM Slot 1 PSAM, 1 SIM, 1 MicroSDAudio 0.5WCamera OV 8M pixels, auto focus with LED flashPerformance CharacteristicsCPU Cortex-A7 1.3GHz quad coreOS Android 4.4.2Memory 1GB RAM, Build-in 4GB FlashInterface USB Micro-B, serial port RS-232(TTL)Storage Card Type MicroSD cardMaximum Expansion Storage 32GBUser Environmental CharacteristicsOperating Temperature -10℃to 50℃Storage Temperature -40℃to 70℃Humidity 5%RH-95%RH(non-condensing)Dropping Survive 1.2m/3.9ft. drop, 6 sides (concrete floor under operating temp.)Sealing IP64, IEC complianceWireless CommunicationWAN WCDMA/HSDPA/HSPA+ (850/1900/2100MHz)GSM/GPRS/EDGE (850/900/1800/1900MHz)WLAN IEEE802.11b/g/n, internal antenna36WPAN Bluetooth v4.0 Low EnergyBluetooth 3.0+HSBluetooth v4.0 Low Energy (LE)Data CollectionBarcode Scan Engine 1D barcode(Symbol SE955, laser)(optional)2D CMOS laser scanner: Symbol SE4750(optional) Sensor resolution: 750 * 480Roll tolerance: 360ºRFID LF 125KHz/134.2KHz, HDX/FDX-B(optional)HF 13.56MHz, ISO14443A/ISO15693(optional)UHF 860-960MHz, EPC C1 GEN2/ISO18000-6C(optional) Developing EnvironmentSDK Chainway SDKProgramming Language JavaDeveloping Tool Eclipse37。
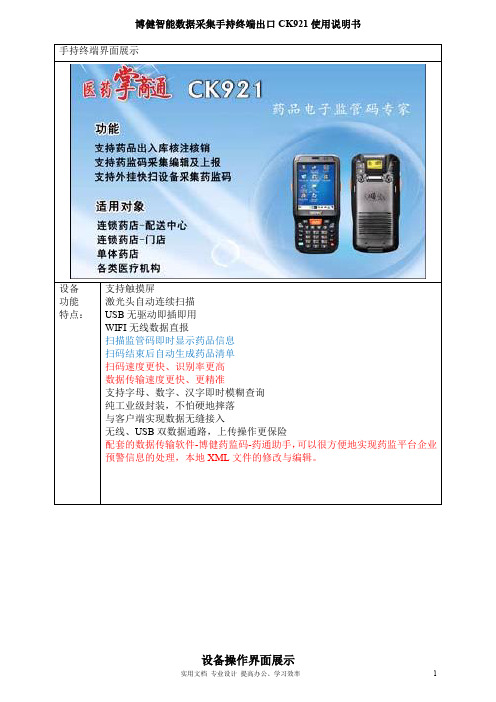
博健智能数据采集手持终端出口CK921使用说明书
博健智能数据采集手持终端出口CK921使用说明书设备支持触摸屏设备操作界面展示初始用户名为1,密码为配合电脑端软件直接按此界面可以通过上下左右箭头设置日期时间主菜单5.系统设置1.出入库监管码扫描2.查询已扫描单号及条码,可单条删除、单据号查询修改3.监管码数据上传、往来单位信息下载初次使用先进行系统设置!设置药品类型:普药、特药设置企业类型:生产、批发、物流、使用等类型5.1药品类型选择5.2企业类型选择请按企业经营范围设置。
无特药请选“2、普药” 依企业经营方式设置,批发企业请选“2、批发企业”为了防止同一单据不同终端扫码造成数据覆盖,不同终这里主要设置扫描时是否可以跳过往来的单有线通讯:通过USB线将数据导入电脑;无线通讯:可以通过无线方式将数据导入电脑或者直接传入监管网两种方式供选择,选择方式见?无线已开启连续扫描:只需按一次扫描键;请设置合适自己的时间间隔,初学者建议使用手动扫描。
手动扫描:每次扫描都需要按扫描键(两个黄色按键为扫描件)如果无线未开启,进行无线设置时提示是否开启无线。
开启无线后,无线卡自动检测无线网络,此时需进行无线网络设置(设置wifi密码等)。
5.8高速设置5.9单号设置电脑左下端通知区域图标中有橙色图标,右键,弹出小菜单如上图,如果勾选xml 单号快速处理(直报模式)需要在这里设置监管网密码,在弹出的菜单中输入监管网的数字证书密码,点击确定,成功后自动退出设置页面。
,无线退出方法:右键该图标后选择“退出”!高速操作是不解析扫描品种信息以及扫描完成后跳过数量统计。
普通扫描时:扫描时解析品种,完成后先生成扫描品种数量明细单。
单据号自动生成时比较适2.操作员导入及往来单位管理操作员的导入(需要分别操作监管网设置并把数据导入电脑、手持终端与电脑端工具进行通讯) 功能模块“信“操作人员管理”,没有设置的点击页面的新增按钮进行操作员查询出来后可以点击界面右下方的设置密码个功能模块,点击右侧的“导出”按钮,开启电脑端无线功能;手持终端选择:主菜单--3、数据通讯—4数据同步。
MC32N0手持终端使用说明
MC32N0手持终端使用说明一.常用快捷方式1.PDA死机后,热启动快捷方式:长按红色电源键5秒以上。
PDA开始执行热启动时,松开电源按钮。
2.PDA死机后,冷启动快捷方式:按住数字1和9不放,再按红色电源键。
3.屏幕重新校验快捷方式:FUNC+ESC键;在检验屏幕中不想进行校验,按esc键取消即可。
4.PDA发送程序快捷方式到桌面的步骤:a.双击桌面“我的设备”→双击“Application”磁盘→双击新建的“WXWS_PDA”文件夹(根据实际情况新建文件夹)→单击选中“WXWS_PDA"程序;b.打开菜单栏“文件”→“发送到”→“桌面快捷方式”。
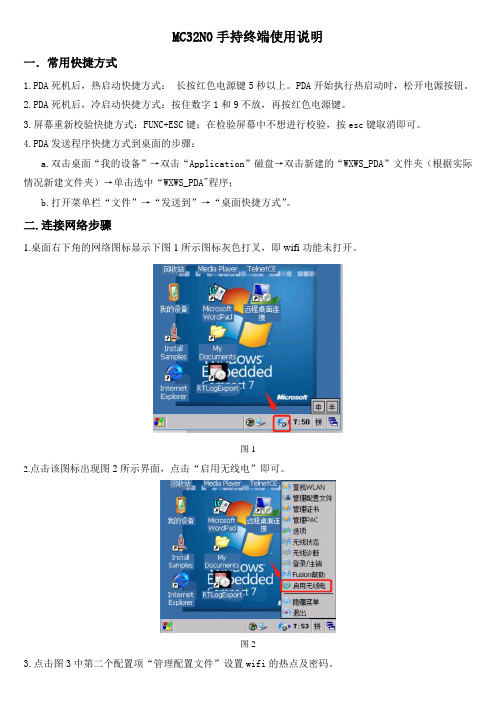
二.连接网络步骤1.桌面右下角的网络图标显示下图1所示图标灰色打叉,即wifi功能未打开。
图12.点击该图标出现图2所示界面,点击“启用无线电”即可。
图23.点击图3中第二个配置项“管理配置文件”设置wifi的热点及密码。
图34.在弹出界面图4所示根据实际情况选择对应的wifi热点,长按该热点2秒以上弹出菜单界面,点击“创建配置文件”。
图45.配置热点有9到10个步骤,每个步骤都有一张截图,截图中没有说明即默认接着点击下一步即可。
6.有时显示已经成功连上wifi,但实际就是连不上网络,此时可以通过如下步骤进行设置下(如果wifi 可以正常访问网络就忽略该步骤)。
7.该步骤是实现冷启动后wifi配置不丢失的功能,一劳永逸。
三.打开DataWedge扫码程序步骤四.把项目PDA程序拷贝到设备中1.设备冷启动后,application磁盘下的文件不会丢失,所以需将项目PDA程序拷贝到该磁盘下。
2.设备需要通过底座及数据线连到电脑上,安装Windows Mobile设备中心驱动。
3.设备连接成功的标志是在电脑里能看到如下Compact的磁盘图标(类似U盘图标)4.在application目录下根据实际情况新建一个文件夹,比如这里新建了一个“WXWS_PDA”的文件夹5.将项目PDA程序文件从电脑上拷贝到上述新建的文件夹中6.发送pda程序快捷方式到桌面。
MC32N0手持终端使用说明
MC32N0手持终端使用说明一.常用快捷方式1.PDA死机后,热启动快捷方式:长按红色电源键5秒以上。
PDA开始执行热启动时,松开电源按钮。
2.PDA死机后,冷启动快捷方式:按住数字1和9不放,再按红色电源键。
3.屏幕重新校验快捷方式:FUNC+ESC键;在检验屏幕中不想进行校验,按esc键取消即可。
4.PDA发送程序快捷方式到桌面的步骤:a.双击桌面“我的设备”→双击“Application”磁盘→双击新建的“WXWS_PDA”文件夹(根据实际情况新建文件夹)→单击选中“WXWS_PDA"程序;b.打开菜单栏“文件”→“发送到”→“桌面快捷方式”。
二.连接网络步骤1.桌面右下角的网络图标显示下图1所示图标灰色打叉,即wifi功能未打开。
图12.点击该图标出现图2所示界面,点击“启用无线电”即可。
图23.点击图3中第二个配置项“管理配置文件”设置wifi的热点及密码。
图34.在弹出界面图4所示根据实际情况选择对应的wifi热点,长按该热点2秒以上弹出菜单界面,点击“创建配置文件”。
图45.配置热点有9到10个步骤,每个步骤都有一张截图,截图中没有说明即默认接着点击下一步即可。
6.有时显示已经成功连上wifi,但实际就是连不上网络,此时可以通过如下步骤进行设置下(如果wifi 可以正常访问网络就忽略该步骤)。
7.该步骤是实现冷启动后wifi配置不丢失的功能,一劳永逸。
三.打开DataWedge扫码程序步骤四.把项目PDA程序拷贝到设备中1.设备冷启动后,application磁盘下的文件不会丢失,所以需将项目PDA程序拷贝到该磁盘下。
2.设备需要通过底座及数据线连到电脑上,安装Windows Mobile设备中心驱动。
3.设备连接成功的标志是在电脑里能看到如下Compact的磁盘图标(类似U盘图标)4.在application目录下根据实际情况新建一个文件夹,比如这里新建了一个“WXWS_PDA”的文件夹5.将项目PDA程序文件从电脑上拷贝到上述新建的文件夹中6.发送pda程序快捷方式到桌面。
手持终端药监系统功能操作说明(附)

手持终端药监系统功能操作说明一、登录,三个仓库编号、密码分别为:(如图1)(图1)一库(外库):编号0162 密码:0162二库(二楼):编号0163 密码:0163三库(一楼):编号0164 密码:0164登录进去后,即显示‘是否要同步基础数据’,选择‘是’,开始同步数据,同步完成后返回‘监管码采集系统’。
采集系统具体功能说明(图2)(图2)点击图标进入“入库单据”子业务。
一、“入库单据”业务分为四个子业务,我公司涉及的只需以下两种单据形式1. “采购入库” ;2. “退货入库”点击相应的图标进入对应单据的操作界面。
1、采购入库流程说明。
(如图3)(图3)入库单据>> 采购入库界面依次填写或扫描“单号”、“发货单位”、“入出库日期” 、“监管码”字段。
流程说明如下:1)、单号:输入电脑入库单上右上角单号,如:11030100004在一推入库单据里面怎样判断哪些单据需要进行扫描呢?凡是品名前带有‘#’标记的,均需要扫描,电脑入库单右上角均有明显的标记:‘扫描人签字’,另外在进行出入库复核时,电脑点单程序有提示‘此单需要扫描’。
注意:单号不能重复,如果一张单号上有几个需要扫描的品种,则需要一次性扫完。
2)、发货单位:输入汉字拼音的首字母,然后按OK键查询。
如没有查找到该发货单位,请先在电脑药监系统里添加该往来单位,(添加方法再客户端操作中说明)然后在手持设备中选择“基础数据”同步功能同步数据后在进行采购入库操作。
(注意:按Fn键转换输入法状态。
“数字”、“大写字母”、“小写字母”之间转换。
)3)、货主不需要填。
4)、入出库日期:该字段默认为当前时间,如果不对,请根据单据自行修改。
5)、监管码:直接按‘SCAN’键或两侧的扫描键,对准药品包装进行扫描,扫码过程中药品列表会显示扫入监管码对应的药品信息。
包括、“产品信息”、“包装规格” 和“码数”。
选中列表中的一行后可点击查看产品的详细信息。
PD560数字手持终端使用说明书

数字手持终端PD560 使用说明书非常感谢您对我们产品的青睐!本手册旨在让您快速掌握本产品的使用,了解产品详细功能和操作。
为了避免因不当操作而给您带来身体伤害或财产损失,请于使用本产品前详细阅读《安全信息手册》。
本手册适用于以下机型:PD560 数字手持终端版权信息Hytera为海能达通信股份有限公司(以下简称“我司”)在中华人民共和国和世界其他国家和/或地区的商标或注册商标。
我司仅对自有商标及产品名称享有所有权,本手册中可能提及的其他商标和产品名称为各自所有者所有。
本手册介绍的产品中可能包括存储于内存或其他媒介中的计算机程序。
我司对此等程序享有的专有权利受中华人民共和国或其他国家及相关国际法的保护。
购买本产品并不意味着我司以明示或暗示方式向购买者授予有关此等电脑程序的权益。
未经我司事先书面授权,任何企业、组织或个人不得对计算机程序进行任何形式的复制、更改、散发、反编译和反向工程。
免责声明本手册在编制过程中力求内容的准确性与完整性,但对于可能出现的错误或疏漏,我司不承担任何责任。
由于技术的不断发展,我司保留不予通知而更改产品设计与规格的权利。
未经我司事先书面授权,不得以任何形式对本手册进行复制、修改、翻译和散发。
本手册中涉及的第三方产品和内容归第三方所有,我司对其准确性、有效性、及时性、合法性或完整性均不提供保证。
如需更多信息或对本手册有任何建议,欢迎访问我们的网站:,或拨打我司服务热线:400-830-7020。
美国联邦通信委员会监管要求按照美国联邦通信委员会的监管要求,终端必须符合美国联邦通信委员会射频辐射限制规定,否则不能在美国市场上销售。
并要求制造商可通过在产品上张贴标签的方式,告知用户应注意的事项,提高用户的防辐射意识。
射频辐射控制及操作说明为了使产品发挥最佳性能及确保符合上述标准中有关职业或受控环境中的辐射限制要求,发送时间不得超过额定因数的50%(最高50%的时间发射),且需遵照下列说明:l 仅在发射(讲话)时产生射频能量辐射,接收(收听)和待机时均不会产生。
电压监测装置手持蓝牙终端操作说明

二、手持蓝牙终端操作说明
(一)国电新源手持蓝牙终端操作说明 c 数据查询
进入03菜单:按Ent进入界面,首先输入要查询的年月,然后按Ent进入查询界面, 再按Ent刷新即可看到月统计数据。(其他数据和此类似)
注意:当出现“成功启动蓝牙 第N次”说明 蓝牙连接成功;然后按照界面的提示操作!
二、手持蓝牙终端操作说明
二、手持蓝牙终端操作说明
(二)武汉豪迈手持蓝牙终端操作说明 d、电压监测仪升级
• 1、电压监测仪器的升级。升级前,先将升级文件拷贝到手持设备(平板)上,进入到 【升级】界面,然后点击【读取文件】,寻找该升级文件。I、先点击【 mnt 】 文档
二、手持蓝牙终端操作说明
(二)武汉豪迈手持蓝牙终端操作说明 d、电压监测仪升级
二、手持蓝牙终端操作说明
(一)国电新源手持蓝牙终端操作说明 b 扫描、连接装置
1、WP-DT10掌机蓝牙设置 选中WP-DT10掌机蓝牙设置,按“Ent”键进入,选择主机模式,然后进行 “扫描”当找到蓝牙时,可输入配对密码进行配对;当“配对成功”后,确 定点击 “退出”按钮; 注意: 电压监测仪 原始蓝牙密码是“1234”;掌机屏幕为触摸屏,可触摸 操蓝牙终端操作说明 b 扫描、连接装置
1、进入主界面后,点击右上角的【菜单】,出现【Scanning】、【Setting】两 个选项。其中【Scanning】是扫描搜索周边的蓝牙设备,【Setting】是设置电 压监测装置的ID号。
二、手持蓝牙终端操作说明
• • •
注意:当出现“成功启动蓝牙 第N次” 说明蓝牙连接成功;然后按照界面的 提示操作!
二、手持蓝牙终端操作说明
(二)武汉豪迈手持蓝牙终端操作说明 a 启动软件
1、打开手持设备(平板)后,点击如下图【电压监测仪】图标,启动软件。
手持终端操作说明书

手持终端操作说明操作说明书中关村工信二维码技术研究院2013年12月1日目录一.产品介绍 (3)二.操作流程 (3)2.1登录流程 (3)2.2连接蓝牙打印机 (4)2.3上班 (5)单路段上班 (5)多路段上班 (5)2.4交易 (7)车辆进场-1 (7)车辆进场-2 (10)车辆离场 (10)未缴费 (13)2.5打印 (15)2.6逃费补交 (15)2.7信息查询 (16)2.8系统设置 (19)2.9关于 (22)三.故障排除 (23)手持终端使用说明书一·产品介绍产品外观图如下:二·操作流程2·1登录流程开机后系统自动进入登录界面(图1-1),等待网络连接成功后点击登录,登录时后台服务器会将交班信息下载更新到POS机中,参数有变动时系统会自动下载并更新参数,联机登录完成后会提示登录成功(图1-2)。
2-1登录界面2-2 登录成功2·2连接蓝牙打印机登录完成后,如果蓝牙打印机没有绑定(图2-3),根据提示点确定先绑定蓝牙mac,选择可用设备,输入pin密码0000,完成绑定。
绑定完成后返回自动连接蓝牙打印机。
如果打印机已绑定,则开机自动连接。
进入主界面。
2-3 2-42·3上班单路段上班收费员在签退状态下点击“上班”图标,进入系统主菜单界面(图2-5),打印机打印签到凭据(图2-6)。
(注:上班成功后,才能使用停车收费、逃费补交、信息查询、打印等相关功能,并且图标会由灰色不可点击变成彩色可点击的状态)2-5 2-6多路段上班点击上班,可以选择相应的路段上班(图2-7),实现收费员轮岗操作。
2-7占道停车上班凭证执收单位:停车收费管理中心终端序列号:2A002757终端号:00000015工号:PB0020 姓名:XXX批次号:000001 流水号:000003收费路段:国际大厦日期时间:2013/07/26 12:00交班预收款:¥30.00车位序号车位唯一号车牌01 00000577 冀A1234502 00000578 冀A1234603 00000579 冀A1234704 00000580 冀A1234805 00000581 冀A1234906 00000582 冀A12340签到凭据说明:收费员完成上班操作后,POS机自动连接管理平台下载上一班没有离场的车辆信息,包括车辆停放的泊位、车牌号等信息、上一班预收。
- 1、下载文档前请自行甄别文档内容的完整性,平台不提供额外的编辑、内容补充、找答案等附加服务。
- 2、"仅部分预览"的文档,不可在线预览部分如存在完整性等问题,可反馈申请退款(可完整预览的文档不适用该条件!)。
- 3、如文档侵犯您的权益,请联系客服反馈,我们会尽快为您处理(人工客服工作时间:9:00-18:30)。
Copyright ◎ 2010 Beijing XinChuangJiaYe Information System Engineering Co.Ltd. All Rights Reserved 北京鑫创佳业信息系统工程有限公司 保留所有权利
鑫创佳业 XC-DMS 手持终端用户使用手册
V2.0
图 3.8 上传出库单文件到中信平台,拷贝出库单文件到电脑“D:\SFDA\InData\Business”目录 下,登录中信客户端进行操作。
鑫创佳业 XC-DMS 手持终端用户使用手册
V2.0
图 5.1 点击“退出”按钮退出当前操作,输入出库单号并选择收货方后点击按钮“下一步” , 如图 5.2
鑫创佳业 XC-DMS 手持终端用户使用手册
V2.0
图 3.4 按终端“SCAN”扫描键,激光对准条码,扫描大箱监管码,扫描后界面如图 3.5,监 管码重复扫描只记录一次
图 3.5 点击“退出”按钮退出当前入库操作,点击按钮“下一步”转到完成界面,如图 3.6
Copyright ◎ 2010 Beijing XinChuangJiaYe Information System Engineering Co.Ltd. All Rights Reserved 北京鑫创佳业信息系统工程有限公司 保留所有权利
鑫创佳业 XC-DMS 手持终端用户使用手册
V2.0
图 4.2
图 4.3
Copyright ◎ 2010 Beijing XinChuangJiaYe Information System Engineering Co.Ltd. All Rights Reserved 北京鑫创佳业信息系统工程有限公司 保留所有权利
3. 产品出库
登录成功后点击“产品出库” ,界面如图 3.1
图 3.1 点击“退出”按钮点击“是(Y) ”退出当前出库操作,如图 3.2,;点击按钮“下一步” , 选择往来单位,如图 3.3;如果没有往来单位请导入,操作步骤请查看 “9.数据导入”
Copyright ◎ 2010 Beijing XinChuangJiaYe Information System Engineering Co.Ltd. All Rights Reserved 北京鑫创佳业信息系统工程有限公司 保留所有权利
鑫创佳业 XC-DMS 手持终端用户使用手册
V2.0
2. 产品入库
登录成功后点击“产品入库” ,界面如图 2.1
图 2.1 点击“退出”按钮,点击“是(Y)”取消当前入库操作,如图 2.2,输入或修改入库单号, 点击下一步,开始扫描大箱监管码,如图 2.3
图 2.2
Copyright ◎ 2010 Beijing XinChuangJiaYe Information System Engineering Co.Ltd. All Rights Reserved 北京鑫创佳业信息系统工程有限公司 保留所有权利
Copyright ◎ 2010 Beijing XinChuangJiaYe Information System Engineering Co.Ltd. All Rights Reserved 北京鑫创佳业信息系统工程有限公司 保留所有权利
鑫创佳业 XC-DMS 手持终端用户使用手册
V2.0
1. 登录
鑫创佳业 XC-DMS 手持终端用户使用手册
V2.0
目录
鑫创 XC-DMS 手持终端 ................................................................................................................ 1 使用手册................................................................................................................................... 1 1. 2. 3. 4. 5. 6. 7. 8. 9. 登录................................................................................................................................... 3 产品入库........................................................................................................................... 4 产品出库........................................................................................................................... 7 快速入库......................................................................................................................... 11 快速出库......................................................................................................................... 14 库存盘点......................................................................................................................... 16 监管码替换..................................................................................................................... 18 监管码注销..................................................................................................................... 19 数据导入......................................................................................................................... 20
图 4.7
5. 快速出库
登录成功后点击“快速出库” ,界面如图 5.1
Copyright ◎ 2010 Beijing XinChuangJiaYe Information System Engineering Co.Ltd. All Rights Reserved 北京鑫创佳业信息系统工程有限公司 保留所有权利
鑫创佳业 XC-DMS 手持终端用户使用手册
V2.0
鑫创 XC-DMS 手持终端
使用手册
Copyright ◎ 2010 Beijing XinChuangJiaYe Information System Engineering Co.Ltd. All Rights Reserved 北京鑫创佳业信息系统工程有限公司 保留所有权利
系统开机后软件自动运行,输入用户名、密码后点击“登录”按钮,如图:1.1
图 1.1 输入正确的用户名、密码后界面如图 1.2
图 1.2
Copyright ◎ 2010 Beijing XinChuangJiaYe Information System Engineering Co.Ltd. All Rights Reserved 北京鑫创佳业信息系统工程有限公司 保留所有权利
4. 快速入库
登录成功后点击“快速入库” ,界面如图 4.1
图 4.1 点击“退出”按钮,点击“是(Y)”取消当前入库操作,如图 4.2,输入或修改入库单号, 点击下一步,选择货物存放的仓库及货位信息,如果没有货位信息,如图 4.3,如果有 货位信息如图 4.4
Copyright ◎ 2010 Beijing XinChuangJiaYe Information System Engineering Co.Ltd. All Rights Reserved 北京鑫创佳业信息系统工程有限公司 保留所有权利
鑫创佳业 XC-DMS 手持终端用户使用手册
V2.0
图 4.6 拷贝快速入库单 XML 文件到电脑,快速入库单文件在终端“\SFDA\InData\Fast”目录 下,如图 4.7 ; ,打开 B/S 管理系统,打开“业务管理”“快速出入库”模块,打开 “快速入库” ,选择导入快速入库单文件执行后续操作。
鑫创佳业 XC-DMS 手持终端用户使用手册
V2.0
图 2.3 按终端“SCAN”扫描键,激光对准条码,扫描大箱监管码,扫描后界面如图 2.4;监管 码重复扫描只记录一次
图 2.4 点击“退出”按钮退出当前入库操作,点击按钮“下一步”转到完成界面,如图 2.5
Copyright ◎ 2010 Beijing XinChuangJiaYe Information System Engineering Co.Ltd. All Rights Reserved 北京鑫创佳业信息系统工程有限公司 保留所有权利
鑫创佳业 XC-DMS 手持终端用户使用手册
V2.0
图 3.2
图 3.3 点击“返回”按钮返回出库单输入界面,点击按钮“下一步”执行扫描操作,如图 3.4
Copyright ◎ 2010 Beijing XinChuangJiaYe Information System Engineering Co.Ltd. All Rights Reserved 北京鑫创佳业信息系统工程有限公司 保留所有权利