VAOneReleaseNotes_v2006.1
Sun ONE Web Server 6.1 用户指南说明书
Administrator’s GuideSun™ ONE Web Server Version 6.1819-0130-10September 2004Sun Microsystems, Inc.4150 Network CircleSanta Clara, CA 95054 U.S.A.Copyright 2004 Sun Microsystems, Inc. All rights reserved.Sun, Sun Microsystems, the Sun logo, Java, Solaris, Sun ONE, iPlanet, and all Sun, Java, and Sun ONE based trademarks and logos are trademarks or registered trademarks of Sun Microsystems, Inc. in the United States and other countries.UNIX is a registered trademark in the United States and other countries, exclusively licensed through X/Open Company, Ltd. Adobe GoLive is a trademark or registered trademark of Adobe Systems Incorporated in the United States and other countries. Macromedia DreamWeaver is a trademark or registered trademark of Macromedia, Inc. in the United States and other countries. Netscape is a trademark or registered trademark of Netscape Communications Corporation in the United States and other countries. Federal Acquisitions: Commercial Software—Government Users Subject to Standard License Terms and ConditionsThe product described in this document is distributed under licenses restricting its use, copying, distribution, and decompilation. No part of the product or this document may be reproduced in any form by any means without prior written authorization of Sun Microsystems, Inc. and its licensors, if any.THIS DOCUMENTATION IS PROVIDED “AS IS” AND ALL EXPRESS OR IMPLIED CONDITIONS, REPRESENTATIONS AND WARRANTIES, INCLUDING ANY IMPLIED WARRANTY OF MERCHANTABILITY, FITNESS FOR A PARTICULAR PURPOSE OR NON-INFRINGEMENT, ARE DISCLAIMED, EXCEPT TO THE EXTENT THAT SUCH DISCLAIMERS ARE HELD TO BE LEGALLY INVALID.________________________________________________________________________________________Copyright 2004 Sun Microsystems, Inc. Tous droits réservés.Sun, Sun Microsystems, le logo Sun, Java, Solaris, Sun ONE, et iPlanet sont des marques de fabrique ou des marques déposées de Sun Microsystems, Inc. aux Etats-Unis et d’autre pays.UNIX est une marque enregistree aux Etats-Unis et dans d'autres pays et licenciée exclusivement par X/Open Company Ltd. Adobe GoLive est une marque enregistree de Adobe Systems Incorporated, Inc aux Etats-Unis et dans d'autres pays.Macromedia DreamWeaver est une marque enregistree de Macromedia, Inc aux Etats-Unis et dans d'autres pays.Netscape est une marque de Netscape Communications Corporation aux Etats-Unis et dans d'autres pays.Le produit décrit dans ce document est distribué selon des conditions de licence qui en restreignent l'utilisation, la copie, la distribution et la décompilation. Aucune partie de ce produit ni de ce document ne peut être reproduite sous quelque forme ou par quelque moyen que ce soit sans l’autorisation écrite préalable de Sun Microsystems, Inc. et, le cas échéant, de ses bailleurs de licence. CETTE DOCUMENTATION EST FOURNIE “EN L'ÉTAT”, ET TOUTES CONDITIONS EXPRESSES OU IMPLICITES, TOUTES REPRÉSENTATIONS ET TOUTES GARANTIES, Y COMPRIS TOUTE GARANTIE IMPLICITE D'APTITUDE À LA VENTE, OU À UN BUT PARTICULIER OU DE NON CONTREFAÇON SONT EXCLUES, EXCEPTÉ DANS LA MESURE OÙ DE TELLES EXCLUSIONS SERAIENT CONTRAIRES À LA LOI.ContentsAbout This Guide . . . . . . . . . . . . . . . . . . . . . . . . . . . . . . . . . . . . . . . . . . . . . . . . . . . . . . . . . . . . . . 21 What’s In This Guide? . . . . . . . . . . . . . . . . . . . . . . . . . . . . . . . . . . . . . . . . . . . . . . . . . . . . . . . . . . . . . . . . . . 21 How This Guide Is Organized . . . . . . . . . . . . . . . . . . . . . . . . . . . . . . . . . . . . . . . . . . . . . . . . . . . . . . . . . . . 22 Part I: Server Basics . . . . . . . . . . . . . . . . . . . . . . . . . . . . . . . . . . . . . . . . . . . . . . . . . . . . . . . . . . . . . . . . . . 22Part II: Using the Administration Server . . . . . . . . . . . . . . . . . . . . . . . . . . . . . . . . . . . . . . . . . . . . . . . . 22Part III: Configuring and Monitoring . . . . . . . . . . . . . . . . . . . . . . . . . . . . . . . . . . . . . . . . . . . . . . . . . . . 23Part IV: Managing Virtual Servers and Services . . . . . . . . . . . . . . . . . . . . . . . . . . . . . . . . . . . . . . . . . . 24Part V: Appendixes . . . . . . . . . . . . . . . . . . . . . . . . . . . . . . . . . . . . . . . . . . . . . . . . . . . . . . . . . . . . . . . . . . 24 Using the Sun ONE Web Server Documentation . . . . . . . . . . . . . . . . . . . . . . . . . . . . . . . . . . . . . . . . . . . . 25 Documentation Conventions . . . . . . . . . . . . . . . . . . . . . . . . . . . . . . . . . . . . . . . . . . . . . . . . . . . . . . . . . . . . 27 Product Support . . . . . . . . . . . . . . . . . . . . . . . . . . . . . . . . . . . . . . . . . . . . . . . . . . . . . . . . . . . . . . . . . . . . . . . 28 Part1 Server Basics . . . . . . . . . . . . . . . . . . . . . . . . . . . . . . . . . . . . . . . . . . . . . . . . . . . . . . . . 29Chapter1Introduction to Sun ONE Web Server . . . . . . . . . . . . . . . . . . . . . . . . . . . . . . . . . . . 31 Sun ONE Web Server . . . . . . . . . . . . . . . . . . . . . . . . . . . . . . . . . . . . . . . . . . . . . . . . . . . . . . . . . . . . . . . . . . . 31 What’s New in Sun ONE Web Server 6.1 . . . . . . . . . . . . . . . . . . . . . . . . . . . . . . . . . . . . . . . . . . . . . . . . . . 32 Java Servlet 2.3 and JavaServer Pages (JSP) 1.2 Support . . . . . . . . . . . . . . . . . . . . . . . . . . . . . . . . 32JDK 1.4.1_03 Support . . . . . . . . . . . . . . . . . . . . . . . . . . . . . . . . . . . . . . . . . . . . . . . . . . . . . . . . . . . . . . 32WebDAV Support . . . . . . . . . . . . . . . . . . . . . . . . . . . . . . . . . . . . . . . . . . . . . . . . . . . . . . . . . . . . . . . .32NSAPI Filters Support . . . . . . . . . . . . . . . . . . . . . . . . . . . . . . . . . . . . . . . . . . . . . . . . . . . . . . . . . . . . . 33HTTP Compression Support . . . . . . . . . . . . . . . . . . . . . . . . . . . . . . . . . . . . . . . . . . . . . . . . . . . . . . . 33New Search Engine Support . . . . . . . . . . . . . . . . . . . . . . . . . . . . . . . . . . . . . . . . . . . . . . . . . . . . . . . . 33Enhanced Security . . . . . . . . . . . . . . . . . . . . . . . . . . . . . . . . . . . . . . . . . . . . . . . . . . . . . . . . . . . . . . . .34JNDI Support . . . . . . . . . . . . . . . . . . . . . . . . . . . . . . . . . . . . . . . . . . . . . . . . . . . . . . . . . . . . . . . . . . . . 343JDBC Support . . . . . . . . . . . . . . . . . . . . . . . . . . . . . . . . . . . . . . . . . . . . . . . . . . . . . . . . . . . . . . . . . . . . 34Sun ONE Studio 5 Support . . . . . . . . . . . . . . . . . . . . . . . . . . . . . . . . . . . . . . . . . . . . . . . . . . . . . . . . . 34NSS 3.3.5 and NSPR 4.1.5 Support . . . . . . . . . . . . . . . . . . . . . . . . . . . . . . . . . . . . . . . . . . . . . . . . . . . 35PHP Compatibility . . . . . . . . . . . . . . . . . . . . . . . . . . . . . . . . . . . . . . . . . . . . . . . . . . . . . . . . . . . . . . . .35Enhanced Hardware Accelerator Encryption Support . . . . . . . . . . . . . . . . . . . . . . . . . . . . . . . . . . 35Start on Boot Option . . . . . . . . . . . . . . . . . . . . . . . . . . . . . . . . . . . . . . . . . . . . . . . . . . . . . . . . . . . . . . 35Additional Features . . . . . . . . . . . . . . . . . . . . . . . . . . . . . . . . . . . . . . . . . . . . . . . . . . . . . . . . . . . . . . . 36 Administering and Managing Sun ONE Web Servers . . . . . . . . . . . . . . . . . . . . . . . . . . . . . . . . . . . . 36 Sun ONE Web Server Configuration . . . . . . . . . . . . . . . . . . . . . . . . . . . . . . . . . . . . . . . . . . . . . . . . . . . . . . 36 Administration Server . . . . . . . . . . . . . . . . . . . . . . . . . . . . . . . . . . . . . . . . . . . . . . . . . . . . . . . . . . . . . . . . . . 37 Server Manager . . . . . . . . . . . . . . . . . . . . . . . . . . . . . . . . . . . . . . . . . . . . . . . . . . . . . . . . . . . . . . . . . . . . . . . . 38 Class Manager . . . . . . . . . . . . . . . . . . . . . . . . . . . . . . . . . . . . . . . . . . . . . . . . . . . . . . . . . . . . . . . . . . . . . . . . . 39 Virtual Server Manager . . . . . . . . . . . . . . . . . . . . . . . . . . . . . . . . . . . . . . . . . . . . . . . . . . . . . . . . . . . . . . . . . 40 Using the Resource Picker . . . . . . . . . . . . . . . . . . . . . . . . . . . . . . . . . . . . . . . . . . . . . . . . . . . . . . . . . . . . . . . 41 Wildcards Used in the Resource Picker . . . . . . . . . . . . . . . . . . . . . . . . . . . . . . . . . . . . . . . . . . . . . . 41 Chapter2Administering Sun ONE Web Servers . . . . . . . . . . . . . . . . . . . . . . . . . . . . . . . . . . 45 Starting the Administration Server . . . . . . . . . . . . . . . . . . . . . . . . . . . . . . . . . . . . . . . . . . . . . . . . . . . . . . . 45 UNIX/Linux Platforms . . . . . . . . . . . . . . . . . . . . . . . . . . . . . . . . . . . . . . . . . . . . . . . . . . . . . . . . . . . . . . . 45Windows Platforms . . . . . . . . . . . . . . . . . . . . . . . . . . . . . . . . . . . . . . . . . . . . . . . . . . . . . . . . . . . . . . . . . . 46 Running Multiple Servers . . . . . . . . . . . . . . . . . . . . . . . . . . . . . . . . . . . . . . . . . . . . . . . . . . . . . . . . . . . . . . . 47 Virtual Servers . . . . . . . . . . . . . . . . . . . . . . . . . . . . . . . . . . . . . . . . . . . . . . . . . . . . . . . . . . . . . . . . . . . . . . 47Installing Multiple Instances of the Server . . . . . . . . . . . . . . . . . . . . . . . . . . . . . . . . . . . . . . . . . . . . . . 47 Removing a Server . . . . . . . . . . . . . . . . . . . . . . . . . . . . . . . . . . . . . . . . . . . . . . . . . . . . . . . . . . . . . . . . . . . . . 48 Migrating a Server From a Previous Version . . . . . . . . . . . . . . . . . . . . . . . . . . . . . . . . . . . . . . . . . . . . . . . 49 Part2 Using the Administration Server . . . . . . . . . . . . . . . . . . . . . . . . . . . . . . . . . . . . . . . . . 51 Chapter3Managing Users and Groups . . . . . . . . . . . . . . . . . . . . . . . . . . . . . . . . . . . . . . . . . . 53 Accessing Information About Users and Groups . . . . . . . . . . . . . . . . . . . . . . . . . . . . . . . . . . . . . . . . . . . 53 About Directory Services . . . . . . . . . . . . . . . . . . . . . . . . . . . . . . . . . . . . . . . . . . . . . . . . . . . . . . . . . . . . . . . .54 Types of Directory Services . . . . . . . . . . . . . . . . . . . . . . . . . . . . . . . . . . . . . . . . . . . . . . . . . . . . . . . . . . . 54 Configuring a Directory Service . . . . . . . . . . . . . . . . . . . . . . . . . . . . . . . . . . . . . . . . . . . . . . . . . . . . . . . . . . 55 Understanding Distinguished Names (DNs) . . . . . . . . . . . . . . . . . . . . . . . . . . . . . . . . . . . . . . . . . . . . 56Using LDIF . . . . . . . . . . . . . . . . . . . . . . . . . . . . . . . . . . . . . . . . . . . . . . . . . . . . . . . . . . . . . . . . . . . . . . . . . 57 Creating Users . . . . . . . . . . . . . . . . . . . . . . . . . . . . . . . . . . . . . . . . . . . . . . . . . . . . . . . . . . . . . . . . . . . . . . . . . 57 Creating a New User in an LDAP-based Authentication Database . . . . . . . . . . . . . . . . . . . . . . . . . . 58 Guidelines for Creating LDAP-based User Entries . . . . . . . . . . . . . . . . . . . . . . . . . . . . . . . . . . . . . 58How to Create a New User Entry . . . . . . . . . . . . . . . . . . . . . . . . . . . . . . . . . . . . . . . . . . . . . . . . . . . 59Directory Server User Entries . . . . . . . . . . . . . . . . . . . . . . . . . . . . . . . . . . . . . . . . . . . . . . . . . . . . . . . 59 Creating a New User in a Key File Authentication Database . . . . . . . . . . . . . . . . . . . . . . . . . . . . . . . 61 4Sun ONE Web Server 6.1•Administrator’s Guide•September 2004Creating a New User in a Digest File Authentication Database . . . . . . . . . . . . . . . . . . . . . . . . . . . . . 61 Managing Users . . . . . . . . . . . . . . . . . . . . . . . . . . . . . . . . . . . . . . . . . . . . . . . . . . . . . . . . . . . . . . . . . . . . . . . 62 Finding User Information . . . . . . . . . . . . . . . . . . . . . . . . . . . . . . . . . . . . . . . . . . . . . . . . . . . . . . . . . . . . . 63 Building Custom Search Queries . . . . . . . . . . . . . . . . . . . . . . . . . . . . . . . . . . . . . . . . . . . . . . . . . . . . 64 Editing User Information . . . . . . . . . . . . . . . . . . . . . . . . . . . . . . . . . . . . . . . . . . . . . . . . . . . . . . . . . . . . . 66 Managing a User’s Password . . . . . . . . . . . . . . . . . . . . . . . . . . . . . . . . . . . . . . . . . . . . . . . . . . . . . . . . . . 66 Renaming Users . . . . . . . . . . . . . . . . . . . . . . . . . . . . . . . . . . . . . . . . . . . . . . . . . . . . . . . . . . . . . . . . . . . . . 67 Removing Users . . . . . . . . . . . . . . . . . . . . . . . . . . . . . . . . . . . . . . . . . . . . . . . . . . . . . . . . . . . . . . . . . . . . . 68 Creating Groups . . . . . . . . . . . . . . . . . . . . . . . . . . . . . . . . . . . . . . . . . . . . . . . . . . . . . . . . . . . . . . . . . . . . . . . 68 Static Groups . . . . . . . . . . . . . . . . . . . . . . . . . . . . . . . . . . . . . . . . . . . . . . . . . . . . . . . . . . . . . . . . . . . . . . . 69 Guidelines for Creating Static Groups . . . . . . . . . . . . . . . . . . . . . . . . . . . . . . . . . . . . . . . . . . . . . . . 69 To Create a Static Group . . . . . . . . . . . . . . . . . . . . . . . . . . . . . . . . . . . . . . . . . . . . . . . . . . . . . . . . . . . 69 Dynamic Groups . . . . . . . . . . . . . . . . . . . . . . . . . . . . . . . . . . . . . . . . . . . . . . . . . . . . . . . . . . . . . . . . . . . . 70 How Sun ONE Web Server Implements Dynamic Groups . . . . . . . . . . . . . . . . . . . . . . . . . . . . . . 70 Groups Can Be Static and Dynamic . . . . . . . . . . . . . . . . . . . . . . . . . . . . . . . . . . . . . . . . . . . . . . . . . 71 Dynamic Group Impact on Server Performance . . . . . . . . . . . . . . . . . . . . . . . . . . . . . . . . . . . . . . . 71 Guidelines for Creating Dynamic Groups . . . . . . . . . . . . . . . . . . . . . . . . . . . . . . . . . . . . . . . . . . . . 71 To Create a Dynamic Group . . . . . . . . . . . . . . . . . . . . . . . . . . . . . . . . . . . . . . . . . . . . . . . . . . . . . . . . 73 Managing Groups . . . . . . . . . . . . . . . . . . . . . . . . . . . . . . . . . . . . . . . . . . . . . . . . . . . . . . . . . . . . . . . . . . . . . . 73 Finding Group Entries . . . . . . . . . . . . . . . . . . . . . . . . . . . . . . . . . . . . . . . . . . . . . . . . . . . . . . . . . . . . . . . 74 The “Find all groups whose” Field . . . . . . . . . . . . . . . . . . . . . . . . . . . . . . . . . . . . . . . . . . . . . . . . . . 74 Editing Group Attributes . . . . . . . . . . . . . . . . . . . . . . . . . . . . . . . . . . . . . . . . . . . . . . . . . . . . . . . . . . . . . 75 Adding Group Members . . . . . . . . . . . . . . . . . . . . . . . . . . . . . . . . . . . . . . . . . . . . . . . . . . . . . . . . . . . . . 75 Adding Groups to the Group Members List . . . . . . . . . . . . . . . . . . . . . . . . . . . . . . . . . . . . . . . . . . . . . 77 Removing Entries from the Group Members List . . . . . . . . . . . . . . . . . . . . . . . . . . . . . . . . . . . . . . . . 77 Managing Owners . . . . . . . . . . . . . . . . . . . . . . . . . . . . . . . . . . . . . . . . . . . . . . . . . . . . . . . . . . . . . . . . . . . 77 Managing See Alsos . . . . . . . . . . . . . . . . . . . . . . . . . . . . . . . . . . . . . . . . . . . . . . . . . . . . . . . . . . . . . . . . . 78 Removing Groups. . . . . . . . . . . . . . . . . . . . . . . . . . . . . . . . . . . . . . . . . . . . . . . . . . . . . . . . . . . . . . . . . . . 78 Renaming Groups . . . . . . . . . . . . . . . . . . . . . . . . . . . . . . . . . . . . . . . . . . . . . . . . . . . . . . . . . . . . . . . . . . . 79 Creating Organizational Units . . . . . . . . . . . . . . . . . . . . . . . . . . . . . . . . . . . . . . . . . . . . . . . . . . . . . . . . . . . 79 Managing Organizational Units . . . . . . . . . . . . . . . . . . . . . . . . . . . . . . . . . . . . . . . . . . . . . . . . . . . . . . . . . . 80 Finding Organizational Units . . . . . . . . . . . . . . . . . . . . . . . . . . . . . . . . . . . . . . . . . . . . . . . . . . . . . . . . . 80 The “Find all units whose” Field . . . . . . . . . . . . . . . . . . . . . . . . . . . . . . . . . . . . . . . . . . . . . . . . . . . . 81 Editing Organizational Unit Attributes . . . . . . . . . . . . . . . . . . . . . . . . . . . . . . . . . . . . . . . . . . . . . . . . . 81 Renaming Organizational Units . . . . . . . . . . . . . . . . . . . . . . . . . . . . . . . . . . . . . . . . . . . . . . . . . . . . . . . 82 Deleting Organizational Units . . . . . . . . . . . . . . . . . . . . . . . . . . . . . . . . . . . . . . . . . . . . . . . . . . . . . . . . . 82 Chapter4J2EE-based Security for Web Container and Web Applications . . . . . . . . . . . . . . 83 About Sun ONE Web Server Security . . . . . . . . . . . . . . . . . . . . . . . . . . . . . . . . . . . . . . . . . . . . . . . . . . . . . 84 Overview of ACL-based Access Control . . . . . . . . . . . . . . . . . . . . . . . . . . . . . . . . . . . . . . . . . . . . . . . . . . . 85 Overview of J2EE/Servlet-based Access Control . . . . . . . . . . . . . . . . . . . . . . . . . . . . . . . . . . . . . . . . . . . 86 Realm-based Security . . . . . . . . . . . . . . . . . . . . . . . . . . . . . . . . . . . . . . . . . . . . . . . . . . . . . . . . . . . . . . . . . . . 87 Realm-based User Authentication . . . . . . . . . . . . . . . . . . . . . . . . . . . . . . . . . . . . . . . . . . . . . . . . . . . . . 885LDAP realm . . . . . . . . . . . . . . . . . . . . . . . . . . . . . . . . . . . . . . . . . . . . . . . . . . . . . . . . . . . . . . . . . . . . . . 88File realm . . . . . . . . . . . . . . . . . . . . . . . . . . . . . . . . . . . . . . . . . . . . . . . . . . . . . . . . . . . . . . . . . . . . . . . . 88Solaris realm . . . . . . . . . . . . . . . . . . . . . . . . . . . . . . . . . . . . . . . . . . . . . . . . . . . . . . . . . . . . . . . . . . . . . 89Certificate realm . . . . . . . . . . . . . . . . . . . . . . . . . . . . . . . . . . . . . . . . . . . . . . . . . . . . . . . . . . . . . . . . . . 89Custom Realm . . . . . . . . . . . . . . . . . . . . . . . . . . . . . . . . . . . . . . . . . . . . . . . . . . . . . . . . . . . . . . . . . . . . 89Native Realm . . . . . . . . . . . . . . . . . . . . . . . . . . . . . . . . . . . . . . . . . . . . . . . . . . . . . . . . . . . . . . . . . . . . . 90 Role-based Authorization . . . . . . . . . . . . . . . . . . . . . . . . . . . . . . . . . . . . . . . . . . . . . . . . . . . . . . . . . . . . . 90 Mapping Roles to Restricted Areas . . . . . . . . . . . . . . . . . . . . . . . . . . . . . . . . . . . . . . . . . . . . . . . . . . 90Defining Access Control by Roles . . . . . . . . . . . . . . . . . . . . . . . . . . . . . . . . . . . . . . . . . . . . . . . . . . . 91 How to Configure a Realm . . . . . . . . . . . . . . . . . . . . . . . . . . . . . . . . . . . . . . . . . . . . . . . . . . . . . . . . . . . . . . 92 Using the Administration Interface . . . . . . . . . . . . . . . . . . . . . . . . . . . . . . . . . . . . . . . . . . . . . . . . . . . . 92Editing the server.xml File . . . . . . . . . . . . . . . . . . . . . . . . . . . . . . . . . . . . . . . . . . . . . . . . . . . . . . . . . . . . 92 Configuring the Native Realm . . . . . . . . . . . . . . . . . . . . . . . . . . . . . . . . . . . . . . . . . . . . . . . . . . . . . . 93 Specifying the Default Realm . . . . . . . . . . . . . . . . . . . . . . . . . . . . . . . . . . . . . . . . . . . . . . . . . . . . . . . . . . . . 94 Using Programmatic Security . . . . . . . . . . . . . . . . . . . . . . . . . . . . . . . . . . . . . . . . . . . . . . . . . . . . . . . . . . . . 95 Deciding When to Use the J2EE/Servlet Authentication Model . . . . . . . . . . . . . . . . . . . . . . . . . . . . . . . 96 Chapter5Setting Administration Preferences . . . . . . . . . . . . . . . . . . . . . . . . . . . . . . . . . . . . 97 Shutting Down the Administration Server . . . . . . . . . . . . . . . . . . . . . . . . . . . . . . . . . . . . . . . . . . . . . . . . . 97 Editing Listen Socket Settings . . . . . . . . . . . . . . . . . . . . . . . . . . . . . . . . . . . . . . . . . . . . . . . . . . . . . . . . . . . . 98 Changing the User Account (UNIX/Linux) . . . . . . . . . . . . . . . . . . . . . . . . . . . . . . . . . . . . . . . . . . . . . . . . 98 Changing the Superuser Settings . . . . . . . . . . . . . . . . . . . . . . . . . . . . . . . . . . . . . . . . . . . . . . . . . . . . . . . . . 99 Allowing Multiple Administrators . . . . . . . . . . . . . . . . . . . . . . . . . . . . . . . . . . . . . . . . . . . . . . . . . . . . . . 100 Specifying Log File Options . . . . . . . . . . . . . . . . . . . . . . . . . . . . . . . . . . . . . . . . . . . . . . . . . . . . . . . . . . . . 102 Viewing Log Files . . . . . . . . . . . . . . . . . . . . . . . . . . . . . . . . . . . . . . . . . . . . . . . . . . . . . . . . . . . . . . . . . . 102 The Access Log File . . . . . . . . . . . . . . . . . . . . . . . . . . . . . . . . . . . . . . . . . . . . . . . . . . . . . . . . . . . . . . 103The Error Log File . . . . . . . . . . . . . . . . . . . . . . . . . . . . . . . . . . . . . . . . . . . . . . . . . . . . . . . . . . . . . . . 103 Archiving Log Files . . . . . . . . . . . . . . . . . . . . . . . . . . . . . . . . . . . . . . . . . . . . . . . . . . . . . . . . . . . . . . . . . 103 Using schedulerd Control-based Log Rotation (UNIX/Linux) . . . . . . . . . . . . . . . . . . . . . . . . . . 104 Configuring Directory Services . . . . . . . . . . . . . . . . . . . . . . . . . . . . . . . . . . . . . . . . . . . . . . . . . . . . . . . . . 104 Restricting Server Access . . . . . . . . . . . . . . . . . . . . . . . . . . . . . . . . . . . . . . . . . . . . . . . . . . . . . . . . . . . . . . . 105 Chapter6Using Certificates and Keys . . . . . . . . . . . . . . . . . . . . . . . . . . . . . . . . . . . . . . . . . 107 Certificate-based Authentication . . . . . . . . . . . . . . . . . . . . . . . . . . . . . . . . . . . . . . . . . . . . . . . . . . . . . . . . 108 Using Certificates for Authentication . . . . . . . . . . . . . . . . . . . . . . . . . . . . . . . . . . . . . . . . . . . . . . . . . . 108 Server Authentication . . . . . . . . . . . . . . . . . . . . . . . . . . . . . . . . . . . . . . . . . . . . . . . . . . . . . . . . . . . . 108Client Authentication . . . . . . . . . . . . . . . . . . . . . . . . . . . . . . . . . . . . . . . . . . . . . . . . . . . . . . . . . . . . . 108Virtual Server Certificates . . . . . . . . . . . . . . . . . . . . . . . . . . . . . . . . . . . . . . . . . . . . . . . . . . . . . . . . . 109 Creating a Trust Database . . . . . . . . . . . . . . . . . . . . . . . . . . . . . . . . . . . . . . . . . . . . . . . . . . . . . . . . . . . . . . 109 Creating a Trust Database . . . . . . . . . . . . . . . . . . . . . . . . . . . . . . . . . . . . . . . . . . . . . . . . . . . . . . . . . 109 Using password.conf . . . . . . . . . . . . . . . . . . . . . . . . . . . . . . . . . . . . . . . . . . . . . . . . . . . . . . . . . . . . . . . .110 Start an SSL-enabled Server Automatically . . . . . . . . . . . . . . . . . . . . . . . . . . . . . . . . . . . . . . . . . . 110 6Sun ONE Web Server 6.1•Administrator’s Guide•September 2004Requesting and Installing a VeriSign Certificate . . . . . . . . . . . . . . . . . . . . . . . . . . . . . . . . . . . . . . . . . . . 111 Requesting a VeriSign Certificate . . . . . . . . . . . . . . . . . . . . . . . . . . . . . . . . . . . . . . . . . . . . . . . . . . . . . 111 Installing a VeriSign Certificate . . . . . . . . . . . . . . . . . . . . . . . . . . . . . . . . . . . . . . . . . . . . . . . . . . . . . . . 112 Requesting and Installing Other Server Certificates . . . . . . . . . . . . . . . . . . . . . . . . . . . . . . . . . . . . . . . . 112 Required CA Information . . . . . . . . . . . . . . . . . . . . . . . . . . . . . . . . . . . . . . . . . . . . . . . . . . . . . . . . . . . . 113 Requesting Other Server Certificates . . . . . . . . . . . . . . . . . . . . . . . . . . . . . . . . . . . . . . . . . . . . . . . . . . 114 Installing Other Server Certificates . . . . . . . . . . . . . . . . . . . . . . . . . . . . . . . . . . . . . . . . . . . . . . . . . . . . 116 Installing a Certificate . . . . . . . . . . . . . . . . . . . . . . . . . . . . . . . . . . . . . . . . . . . . . . . . . . . . . . . . . . . . 116 Migrating Certificates When You Upgrade . . . . . . . . . . . . . . . . . . . . . . . . . . . . . . . . . . . . . . . . . . . . . . . 118 Using the Built-in Root Certificate Module . . . . . . . . . . . . . . . . . . . . . . . . . . . . . . . . . . . . . . . . . . . . . 118 Managing Certificates . . . . . . . . . . . . . . . . . . . . . . . . . . . . . . . . . . . . . . . . . . . . . . . . . . . . . . . . . . . . . . . . . 119 Installing and Managing CRLs and CKLs . . . . . . . . . . . . . . . . . . . . . . . . . . . . . . . . . . . . . . . . . . . . . . . . . 121 Installing a CRL or CKL. . . . . . . . . . . . . . . . . . . . . . . . . . . . . . . . . . . . . . . . . . . . . . . . . . . . . . . . . . . . . 121 Managing CRLs and CKLs . . . . . . . . . . . . . . . . . . . . . . . . . . . . . . . . . . . . . . . . . . . . . . . . . . . . . . . . . . . 122 Setting Security Preferences . . . . . . . . . . . . . . . . . . . . . . . . . . . . . . . . . . . . . . . . . . . . . . . . . . . . . . . . . . . . 123 SSL and TLS Protocols . . . . . . . . . . . . . . . . . . . . . . . . . . . . . . . . . . . . . . . . . . . . . . . . . . . . . . . . . . . . . . 124 Using SSL to Communicate with LDAP . . . . . . . . . . . . . . . . . . . . . . . . . . . . . . . . . . . . . . . . . . . . . . . 124 Enabling Security for Listen Sockets . . . . . . . . . . . . . . . . . . . . . . . . . . . . . . . . . . . . . . . . . . . . . . . . . . . 124 Turning Security On . . . . . . . . . . . . . . . . . . . . . . . . . . . . . . . . . . . . . . . . . . . . . . . . . . . . . . . . . . . . . 125 Selecting a Server Certificate for a Listen Socket . . . . . . . . . . . . . . . . . . . . . . . . . . . . . . . . . . . . . . 126 Selecting Ciphers . . . . . . . . . . . . . . . . . . . . . . . . . . . . . . . . . . . . . . . . . . . . . . . . . . . . . . . . . . . . . . . .127 Configuring Security Globally . . . . . . . . . . . . . . . . . . . . . . . . . . . . . . . . . . . . . . . . . . . . . . . . . . . . . . . . 129 SSLSessionTimeout . . . . . . . . . . . . . . . . . . . . . . . . . . . . . . . . . . . . . . . . . . . . . . . . . . . . . . . . . . . . . . 130 SSLCacheEntries . . . . . . . . . . . . . . . . . . . . . . . . . . . . . . . . . . . . . . . . . . . . . . . . . . . . . . . . . . . . . . . . . 130 SSL3SessionTimeout . . . . . . . . . . . . . . . . . . . . . . . . . . . . . . . . . . . . . . . . . . . . . . . . . . . . . . . . . . . . . 130 Using External Encryption Modules . . . . . . . . . . . . . . . . . . . . . . . . . . . . . . . . . . . . . . . . . . . . . . . . . . . . . 130 Installing the PKCS#11Module . . . . . . . . . . . . . . . . . . . . . . . . . . . . . . . . . . . . . . . . . . . . . . . . . . . . . . . 131 Using modutil to Install a PKCS#11 Module . . . . . . . . . . . . . . . . . . . . . . . . . . . . . . . . . . . . . . . . . 131 Using pk12util . . . . . . . . . . . . . . . . . . . . . . . . . . . . . . . . . . . . . . . . . . . . . . . . . . . . . . . . . . . . . . . . . . . 132 Selecting the Certificate Name for a Listen Socket . . . . . . . . . . . . . . . . . . . . . . . . . . . . . . . . . . . . 134 FIPS-140 Standard. . . . . . . . . . . . . . . . . . . . . . . . . . . . . . . . . . . . . . . . . . . . . . . . . . . . . . . . . . . . . . . . . . 135 Setting Client Security Requirements . . . . . . . . . . . . . . . . . . . . . . . . . . . . . . . . . . . . . . . . . . . . . . . . . . . . 136 Requiring Client Authentication . . . . . . . . . . . . . . . . . . . . . . . . . . . . . . . . . . . . . . . . . . . . . . . . . . . . . . 136 To Require Client Authentication . . . . . . . . . . . . . . . . . . . . . . . . . . . . . . . . . . . . . . . . . . . . . . . . . . 137 Mapping Client Certificates to LDAP . . . . . . . . . . . . . . . . . . . . . . . . . . . . . . . . . . . . . . . . . . . . . . . . . . 138 Using the certmap.conf File . . . . . . . . . . . . . . . . . . . . . . . . . . . . . . . . . . . . . . . . . . . . . . . . . . . . . . . . . . 139 Creating Custom Properties . . . . . . . . . . . . . . . . . . . . . . . . . . . . . . . . . . . . . . . . . . . . . . . . . . . . . . . 142 Sample Mappings . . . . . . . . . . . . . . . . . . . . . . . . . . . . . . . . . . . . . . . . . . . . . . . . . . . . . . . . . . . . . . . .143 Setting Stronger Ciphers . . . . . . . . . . . . . . . . . . . . . . . . . . . . . . . . . . . . . . . . . . . . . . . . . . . . . . . . . . . . . . . 145 Considering Additional Security Issues . . . . . . . . . . . . . . . . . . . . . . . . . . . . . . . . . . . . . . . . . . . . . . . . . . 146 Limit Physical Access . . . . . . . . . . . . . . . . . . . . . . . . . . . . . . . . . . . . . . . . . . . . . . . . . . . . . . . . . . . . . . . 147 Limit Administration Access . . . . . . . . . . . . . . . . . . . . . . . . . . . . . . . . . . . . . . . . . . . . . . . . . . . . . . . . . 147 Choosing Solid Passwords . . . . . . . . . . . . . . . . . . . . . . . . . . . . . . . . . . . . . . . . . . . . . . . . . . . . . . . . . . . 1487。
ReleaseNotes_EnterpriseHomeScreen_v3.1_chinese说明书

发行说明 - Enterprise Home Screen v3.1目录·重要新闻·以前的公告·简介·说明·设备兼容性·安装要求·安装说明·使用说明·已知问题·部件号和发布日期重要新闻Android 支持:EHS 3.1 现在支持Android 8.1.0 (Oreo) 和 Android 7.1.2 (Nougat)。
针对运行 Android 6.0.1 (Marshmallow) 的设备的 EHS 支持结束了 - EHS v3.1 仅支持Nougat 和 Oreo 设备。
EHS v3.0 是支持 Android Marshmallow 设备的最后一个版本。
支持门户上仍然提供 EHS v3.0 及更早版本,供在 Marshmallow 设备上使用。
以前的公告从Android Nougat/Marshmallow 升级到Oreo:将设备从Android Nougat/Marshmallow 升级到 Oreo 之后,必须卸载现有 EHS 版本,并且必须在原处安装EHS_03XXXX_B.apk。
来自以前 EHS 安装的配置会保留下来并自动应用。
这不适用于现有版本为类型 B 的 EHS 3.X (EHS_03XXXX_B.apk) 的设备绕过锁屏功能已弃用。
安全模式功能已弃用。
已终止针对所有 Lollipop (Android 5.x) 设备的 EHS 支持 - 从 EHS v3.0 开始,仅支持Marshmallow 及更高版本设备。
EHS v2.8 是支持 Android Lollipop 设备的最后一个版本。
支持门户上仍然提供 EHS v2.8 及更早版本,供在 Lollipop 设备上使用。
从版本 2.8 开始,简体中文语言支持在 EHS 中可用从 EHS 版本 2.7 开始,在支持门户中提供两个独立的 APK(EHS_XXXXXX_A.apk 和EHS_XXXXXX_B.apk),供用户根据所使用的 Zebra 设备进行选择。
ReleaseNotes

CP210x Windows XP/2003/Vista(32/64)/7(32/64) Driver v6.3a - February 1, 2011
CP210x Windows Driver Revision History
--------------------------------------
-------------------------
Created IO queueing mechanism so that multiple reads, writes, etc. can be queued and
waited on
version 5.4.29
Corrections
to the queue
Corrected a condition which would blue screen on cancelling write request that hasn't been
fully sent out USB
Corrected the Capabilites return value, which incorrectly reported that timeouts are not supported
Corrected a problem where an IO reqest would sometimes return a busy status to
user mode, instead the queue is restarted if necessary before adding an IO request
* x64 directory
AADEBUG2003 XXX1 Instrumenting self-modifying code
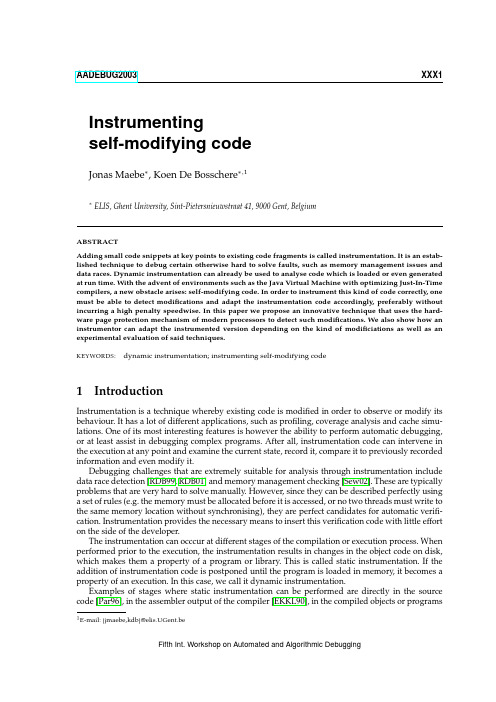
AADEBUG2003XXX1 Instrumentingself-modifying codeJonas Maebe∗,Koen De Bosschere∗,1∗ELIS,Ghent University,Sint-Pietersnieuwstraat41,9000Gent,BelgiumABSTRACTAdding small code snippets at key points to existing code fragments is called instrumentation.It is an estab-lished technique to debug certain otherwise hard to solve faults,such as memory management issues and data races.Dynamic instrumentation can already be used to analyse code which is loaded or even generated at run time.With the advent of environments such as the Java Virtual Machine with optimizing Just-In-Time compilers,a new obstacle arises:self-modifying code.In order to instrument this kind of code correctly,one must be able to detect modifications and adapt the instrumentation code accordingly,preferably without incurring a high penalty speedwise.In this paper we propose an innovative technique that uses the hard-ware page protection mechanism of modern processors to detect such modifications.We also show how an instrumentor can adapt the instrumented version depending on the kind of modificiations as well as an experimental evaluation of said techniques.KEYWORDS:dynamic instrumentation;instrumenting self-modifying code1IntroductionInstrumentation is a technique whereby existing code is modified in order to observe or modify its behaviour.It has a lot of different applications,such as profiling,coverage analysis and cache simu-lations.One of its most interesting features is however the ability to perform automatic debugging, or at least assist in debugging complex programs.After all,instrumentation code can intervene in the execution at any point and examine the current state,record it,compare it to previously recorded information and even modify it.Debugging challenges that are extremely suitable for analysis through instrumentation include data race detection[RDB99,RDB01]and memory management checking[Sew02].These are typically problems that are very hard to solve manually.However,since they can be described perfectly using a set of rules(e.g.the memory must be allocated before it is accessed,or no two threads must write to the same memory location without synchronising),they are perfect candidates for automatic verifi-cation.Instrumentation provides the necessary means to insert this verification code with little effort on the side of the developer.The instrumentation can occcur at different stages of the compilation or execution process.When performed prior to the execution,the instrumentation results in changes in the object code on disk, which makes them a property of a program or library.This is called static instrumentation.If the addition of instrumentation code is postponed until the program is loaded in memory,it becomes a property of an execution.In this case,we call it dynamic instrumentation.Examples of stages where static instrumentation can be performed are directly in the source code[Par96],in the assembler output of the compiler[EKKL90],in the compiled objects or programs 1E-mail:{jmaebe,kdb}@elis.UGent.beXXX2JONAS MAEBE,KOEN DE BOSSCHERE (e.g.EEL[LS96],ATOM[SE94],alto[DBD96]).The big advantage of static instrumentation is that it must be done only once,after which one can perform several executions without having to reinstru-ment the code every time.This means that the cost of instrumenting the code can be relatively high without making such a tool practically unusable.The larges disadvantage of static instrumentation is that it requires a complex analysis of the tar-get application to detect all possible execution paths,which is not always possible.Additionally,the user of a static instrumentation tool must know which libraries are loaded at run time by programs he wants to observe,so that he can provide instrumented versions of those.Finally,every time a new type of instrumentation is desired,the application and its libraries must be reinstrumented.Most of the negative points of static instrumentation are solved in its dynamic counterpart.In this case,the instrumentation is not performed in advance,but gradually at run time as more code is executed.Since the instrumentation can continue while the program is running,no prior analysis of all possible execution paths is required.It obviously does mean that the instrumentation must be redone every time the program is executed.This is somewhat offset by having to instrument only the part of the application and its libraries that is covered by a particular execution though.One can even apply dynamic optimization techniques[BDA01]to further reduce this overhead.When using dynamic instrumentation,the code on disk is never modified.This means that a single uninstrumented copy of an application and its libraries suffices when using this technique,no matter how many different types of instrumentation one wants to perform.Another consequence is that the code even does not have to exist on disk.Indeed,since the original code is read from memory and can be instrumented just before it is executed,even dynamically loaded and generated code pose no problems.However,when the program starts modifying this code,the detection and handling of these modifications is not possible using current instrumentation techniques.Yet,being able to instrument self-modifying code becomes increasingly interesting as run time systems that exhibit such behaviour gain more and more popularity.Examples include Java Virtual Machines, environment and emulators with embedded Just-in-Time compilers in general. These environments often employ dynamic optimizing compilers which continuously change the code in memory,mainly for performance reasons.Instrumenting the programs running in such an environment is often very easy.After all,the dynamic compiler or interpreter that processes said programs can do the necessary instrumentation most of the time.On the other hand,observing the interaction of the environments themselves with the applications on top and with the underlying operating system is much more difficult.Never-theless,this ability is of paramount importance when analysing the total workload of a system and debugging and enhancing these virtual machines.Even when starting from a system that can already instrument code on thefly,supporting self-modifying code is a quite complex undertaking.First of all,the original program code must not be changed by the instrumentor,since otherwise program’s own modifications may conflict with these changes later on.Secondly,the instrumentor must be able to detect changes performed by the pro-gram before the modified code is executed,so that it can reinstrument this code in a timely manner. Finally,the reinstrumentation itself must take into account that an instruction may be changed using multiple write operations,so it could be invalid at certain points in time.In this paper we propose a novel technique that can be used to dynamically instrument self-modifying code with an acceptable overhead.We do this by using the hardware page protection facilities of the processor to mark pages that contain code which has been instrumented as read-only.When the program later on attempts to modify instrumented code,we catch the resulting pro-tection faults which enables us to detect those changes and act accordingly.The described method has been experimentally evaluated using the DIOTA(Dynamic Instrumentation,Optimization and Transformation of Applications[MRDB02])framework on the Linux/x86platform by instrumenting a number of JavaGrande[Gro]benchmarks running in the Sun1.4.0Java Virtual Machine.The paper now proceeds with an overview of dynamic instrumentation in general and DIOTA in particular.Next,we show how the detection of modified code is performed and how to reinstru-ment this code.We then present some experimental results of our implementation of the describedINSTRUMENTING SELF-MODIFYING CODE XXX3Figure1:Dynamic instrumentation the DIOTA waytechniques and wrap up with the conclusions and our future plans.2Dynamic instrumentation2.1OverviewDynamic instrumentation can be be done in two ways.One way is modifying the existing code,e.g. by replacing instructions with jumps to routines which contain both instrumentation code and the replaced instruction[MCC+95].This technique is not very usable on systems with variable-length instructions however,as the jump may require more space than the single instruction one wants to replace.If the program later on transfers control to the second instruction that has been replaced, it will end up in the middle of this jump instruction.The technique also wreaks havoc in cases of data-in-code or code-in-data,as modifying the code will cause modifications to the data as well.The other approach is copying the original code into a separate memory block(this is often called cloning)and adding instrumentation code to this copy[BDA01,SKV+03,MRDB02].This requires special handling of control-flow instructions with absolute target addresses,since these addresses must be relocated to the instrumented version of the code.On the positive side,data accesses still occur correctly without any special handling,even in data-in-code situations.The reason is that when the code is executed in the clone,only the program counter(PC)has a different value in an instrumented execution compared to a normal one.This means that when a program uses non-PC-relative addressing modes for data access,these addresses still refer to the original,unmodified copy of the program or data.PC-relative data accesses can be handled at in-strumentation time,as the instrumentor always knows the address of the instruction it is currently instrumenting.This way,it can replace PC-relative memory accesses with absolute memory accesses based on the value the PC would have at that time in a uninstrumented execution.2.2DIOTADIOTA uses the cloning technique together with a cache that keeps track of already translated in-struction blocks.It is implemented as a shared library and thus resides in the same address space as the program it instruments.By making use of the LD_PRELOAD environment variable under Linux, the dynamic linker(ld.so)can be forced to load this library,even though an application is not ex-plicitly linked to it.The init routines of all shared libraries are executed before the program itself is started,providing DIOTA an opportunity to get in control.As shown in Figure1,the instrumentation of a program is performed gradually.First,the instruc-tions at the start of the program are analysed and then copied,along with the desired instrumentation code,to the clone(a block of memory reserved at startup time,also residing in the program’s address space).During this process,direct jumps and calls are followed to their destination.The instrumenta-tion stops when an instruction is encountered of which the destination address cannot be determined unequivocally,such as an indirect jump.XXX4JONAS MAEBE,KOEN DE BOSSCHERECloneOriginal programInstrumentedcodeMarkertableInstrumentedcodeMarkerFigure2:Data structures used by DIOTAAt this point,a trampoline is inserted in the clone.This is a small piece of code which will pass the actual target address to DIOTA every time the corresponding original instruction would be executed. For example,in case of a jump with the target address stored in a register,the trampoline will pass the value of that specific register to DIOTA every time it is executed.When DIOTA is entered via such a trampoline,it will check whether the code at the passed address has already been instrumented.If that is not the case,it is instrumented at that point.Next,the instrumented version is executed.Figure2shows how DIOTA keeps track of which instructions it has already instrumented and where the instrumented version can be found.A marker consisting of illegal opcodes is placed after every block of instrumented code(aligned to a4-byte boundary),followed by the translation table. Such a translation table starts with two32bit addresses:the start of the block in the original code and its counterpart in the clone.Next,pairs of8bit offsets between two successive instructions in the respective blocks are stored,with an escape code to handle cases where the offset is larger than255 bytes(this can occur because we follow direct calls and jumps to their destination).In addition to those tables,an AVL tree is constructed.The keys of its elements are the start and stop addresses of the blocks of original code that have been instrumented.The values are the start addresses of the translation tables of the corresponding instrumented versions.Every instruction is instrumented at most once,so the keys never overlap.This means thatfinding the instrumented version of an instruction boils down tofirst searching for its address in the AVL tree and if found, walking the appropriate translation table.To speed up this process,a small hash table is used which keeps the results of the latest queries.A very useful property of this system is that it also works in reverse:given the address of an instrumented instruction,it is trivial tofind the address of corresponding original instruction.First, the illegal opcodes marker is sought starting from the queried address and next the table is walked just like before until the appropriate pair is found.This ability of doing two-way translations is indispensable for the self-modifying code support and proper exception handling.Since the execution is followed as it progresses,code-in-data and code loaded or generated at run time can be handled without any problems.When a trampoline passes an address to DIOTA of code it has not yet instrumented,it will simply instrument it at that time.It is irrelevant where this code is located,when it appeared in memory and whether or not it doubles as dataDIOTA has several modes of operation,each of which can be used separately,but most can be combined as well.Through the use of so-called backends,the different instrumentation modes can be activated and the instrumentation parameters can be modified.These backends are shared libraries that link against DIOTA and which can ask to intercept calls to arbitrary dynamically linked routines based on name or address,to have a handler called whenever a memory access occurs,when a basic block completes or when a system call is performed(both before and after the system call,with the ability to modify its parameters or return value).Several backends can be used at the same time.INSTRUMENTING SELF-MODIFYING CODE XXX5 Other features of the DIOTA framework include the ability to handle most extensions to the80x86 ISA(such as MMX,3DNow!and SSE)and an extensible and modular design that allows easy im-plementation of additional backends and support for newly introduced instructions.This paper de-scribes the support for instrumenting self-modifying code in DIOTA.For other technical details about DIOTA we refer to[MRDB02].2.3Exception handlingAn aspect that is of paramount importance to the way we handle self-modifying code,is the handling of exceptions(also called signals under Linux).The next section will describe in more detail how we handle the self-modifying code,but since it is based on marking the pages containing code that has been instrumented as read-only,it is clear that every attempt to modify such code will cause a protection fault(or segmentation fault)exception.These exceptions and those caused by other operations must be properly distinguished,in order to make sure that the program still receives signals which are part of the normal program execution while not noticing the other ones.This is especially important since the Java Virtual Machine that we used to evaluate our implementation uses signals for inter-thread communication.When a program starts up,each signal gets a default handler from the operating system.If a program wants to do something different when it receives a certain signal,it can install a signal handler by performing a system call.This system call gets the signal number and the address of the new handler as arguments.Since we want to instrument these user-installed handlers,we have to intercept these system calls.This can be achieved by registering a system call analyser routine with DIOTA.This instructs DIOTA to insert a call to this routine after every system call in the instrumented version of the pro-gram.If such a system call successfully installed a new signal handler,the analyser records this handler and then installs a DIOTA handler instead.Next,when a signal is raised,DIOTA’s handler is activated.One of the arguments passed to a signal handler contains the contents of all processor registers at the time the signal occurred,in-cluding those of the instruction pointer register.Since the program must not be able to notice it is being instrumented by looking at at that value,it is translated from a clone address to an original program address using the translation tables described previously.Finally,the handler is executed under control of DIOTA like any other code fragment.Once the execution arrives at the sig_return or sig_rt_return system call that ends this signal’s execution,DIOTA replaces the instruction pointer in the signal context again.If the code at that address is not yet instrumented,the instruction pointer value in the context is replaced with the address of a trampoline which will transfer control back to DIOTA when returning from the signal’s execution.Otherwise,the clone address corresponding to the already instrumented version is used. 3Detecting modificationsDynamically generated and loaded code can already be handled by a number of existing instrumen-tors[BDA01,MRDB02].The extra difficulty of handling self-modifying code is that the instrumen-tation engine must be able to detect modifications to the code,so that it can reinstrument the new code.Even the reinstrumenting itself is not trivial,since a program may modify an instruction by performing two write operations,which means the intermediate result could be invalid.There are two possible approaches for dealing with code changes.One is to detect the changes as they are made,the other is to check whether code has been modified every time it is executed.Given the fact that in general code is modified far less than it is executed,thefirst approach was chosen.The hardware page protection facilities of the processor are used to detect the changes made page.Once a page contains code that has been instrumented,it will be write-protected.The consequence is thatXXX6JONAS MAEBE,KOEN DE BOSSCHEREFigure3:Exception handling in the context of self-modifying code supportany attempt to modify such code will result in a segmentation fault.An exception handler installed by DIOTA will intercept these signals and take the appropriate action.Since segmentation faults must always be caught when using our technique to support self-modifying code,DIOTA installs a dummy handler at startup time and whenever a program installs the default system handler for this signal(which simply terminates the process if such a signal is raised),or when it tries to ignore it.Apart from that,no changes to the exception handling support of DIOTA have been made,as shown in Figure3.Whenever a protection fault occurs due to the program trying to modify some previously in-strumented code,a naive implementation could unprotect the relevant page,perform the required changes to the instrumented code inside the signal handler,reprotect the page and continue the pro-gram at the next instruction.There are several problems with this approach however:•On a CISC architecture,most instructions can access memory,so decoding the instruction that caused the protection fault(to perform the change that caused the segmentation fault in the handler)can be quite complex.•It is possible that an instruction is modified by means of more than one memory write opera-tion.Trying to reinstrument after thefirst write operation may result in encountering an invalid instruction.•In the context of a JiT-compiler,generally more than one write operation occurs to a particular page.An example is when a page was already partiallyfilled with code which was then exe-cuted and thus instrumented,after which new code is generated and placed on that page as well.A better way is to make a copy of the accessed page,then mark it writable again and let the program resume its execution.This way,it can perform the changes it wanted to do itself.After a while,the instrumentor can compare the contents of the unprotected page and the the buffered copy tofind the changes.So the question then becomes:when is this page checked for changes,how long will it be kept unprotected and how many pages will be kept unprotected at the same time.INSTRUMENTING SELF-MODIFYING CODE XXX7 All parameters are important for performance,since keeping pages unprotected and checking them for changes requires both processing and memory resources.The when-factor is also important for correctness,as the modifications must be incorporated in the clone code before it is executed again.On architectures with a weakly consistent memory model(such as the SPARC and PowerPC), the program must make its code changes permanent by using an instruction that synchronizes the instruction caches of all processors with the current memory contents.These instructions can be intercepted by the instrumentation engine and trigger a comparison of the current contents of a page with the previously buffered contents.On other architectures,heuristics have be used depending on the target application that one wants to instrument to get acceptable performance.For example,when using the Sun JVM1.4.0running on a80x86machine under Linux,we com-pare the previously buffered contents of a page to the current contents whenever the thread that caused the protection fault does one of the following:•It performs a kill system call.This means the modifier thread is sending a signal to another thread,which may indicate that it hasfinished modifying the code and that it tells the other thread that it can continue.•It executes a ret or other instruction that requires a lookup tofind the appropriate instru-mentation code.This is due to the fact that sometimes the modifying and executing threads synchronise using a spinlock.The assumption here is that before the modifying thread clears the spinlock,it will return from the modification routine,thus triggering aflush.Although this method is by no means a guarantee for correct behaviour in the general case,in our experience it always performs correctly in the context of instrumenting code generated by the Sun JVM1.4.0.The unprotected page is protected again when it has been checked N successive times without any changes having been made to it,or when another page has to be unprotected due to a protection fault.Note that this optimisation only really pays off in combination with only checking the page contents in the thread that caused the initial protection fault.The reason is that this ensures that the checking limit is not reached prematurely.Otherwise,the page is protected again too soon and a lot of extra page faults occur,nullifying any potential gains.Finally,it is possible to vary the number of pages that are being kept unprotected at the same time.Possible strategies are keeping just one page unprotected for the whole program in order to minimize resources spent on buffering and comparing contents,keeping one page unprotected per thread,or keeping several pages unprotected per thread to reduce the amount of protection faults. Which strategy performs best depends on the cost of a page fault and the time necessary to do a page compare.4Handling modificationsDifferent code fragments in the clone are often interconnected by direct jumps.For example,when –while instrumenting–we arrive at an instruction which was already instrumented before,we generate a direct jump to this previously instrumented version instead of instrumenting that code again.This not only improves efficiency,but it also makes the instrumentation of modified code much easier,since there is only one location in the clone we have to adapt in case of a code modification.Because of these direct jump interconnections,merely generating an instrumented version of the modified code at a different location in the clone is not enough.Even if every lookup for the in-strumented version of the code in that fragment returns one of the new addresses in the clone,the old code is still reachable via de direct jumps from other fragments.Removing the direct jumps and replacing them with lookups results in a severe slowdown.Another solution would be keeping track of to which other fragments each fragment refers and adapting the direct jumps in case of changes.This requires a lot of bookkeeping however,and chang-XXX8JONAS MAEBE,KOEN DE BOSSCHERE Program Normal Instrumented Slowdown Relative#of Relative# name execution(s)execution(s)protection faults of lookups FFT40.2895.86 2.382305409609 MolDyn22.0365.57 2.985105423174 SparseMatmult24.2991.09 3.753751874669 HeapSort 5.2541.037.82147791700553 LUFact 4.5338.178.43174021655753 SearchBench23.92429.1017.9481446337596 Crypt8.91175.1519.66128456696704 RayTraceBench28.87652.1122.5966118026878Table1:Test results for a number of sequential JavaGrande2.0benchmarksing one fragment may result in a cascade effect,requiring a lot of additional changes elsewhere in the clone.For these reasons,we opted for the following three-part strategy.The optimal way to handle the modifications,is to reinstrument the code in-place.This means that the previously instrumented version of the instructions in the clone are simply replaced by the new ones.This only works if the new code has the same length as(or is shorter than)the old code however,which is not always the case.A second way to handle modifications can be applied when the instrumented version of the previous instruction at that location was larger than the size of an immediate jump.In this case,it is possible to overwrite the previous instrumented version with a jump to the new version.At the end of this new code,another jump can transfer control back to rest of the original instrumentation code.Finally,if there is not enough room for an immediate jump,the last resort isfilling the room originally occupied by the instrumented code with breakpoints.The instrumented version of the new code will simply be placed somewhere else in the code.Whenever the program then arrives at such a breakpoint,DIOTA’s exception handler is entered.This exception handler has access to the address where the breakpoint exception occurred,so it can use the translation table at the end of the block to look up the corresponding original program address.Next,it can lookup where the latest instrumented version of the code at that address is located and transfer control there.5Experimental evaluation5.1General observationsWe evaluated the described techniques by implementing them in the DIOTA framework.The perfor-mance and correctness were verified using a number of tests from the JavaGrande[Gro]benchmark, running under the Sun JVM1.4.0on a machine with two Intel Celeron processors clocked at500MHz. The operating system was Redhat Linux7.3with version2.4.19of the Linux kernel.Several practical implementation issues were encountered.The stock kernel that comes with Red-hat Linux7.3,which is based on version2.4.9of the Linux kernel,contains a number offlaws in the exception handling that cause it to lock up or reboot at random times when a lot of page protection exceptions occur.Another problem is that threads in general only have limited stack space and al-though DIOTA does not require very much,the exception frames together with DIOTA’s overhead were sometimes large enough to overflow the default stacks reserved by the instrumented programs. Therefore,at the start of the main program and at the start of every thread,we now instruct the kernel to execute signal handlers on an alternate stack.DIOTA’s instrumentation engine is not re-entrant and as such is protected by locks.Since a thread can send a signal to another thread at any time,another problem we experienced was that sometimes a thread got a signal while it held the instrumentation lock.If the triggered signal handler was not。
ReleaseNote
*** Topaz Adjust™ for Windows V4.1 Release Notes ***Contents1. Installation2. Running Topaz Adjust3. Registration4. System requirements5. Program Features6. More information1. InstallationTopaz Adjust 4.1™ is a plug-in for Adobe Photoshop and other photo-editing / imaging software programs (called host programs) that support Photoshop plug-ins. It has been tested with:Adobe Photoshop 7/CS/CS2/CS3/CS4/CS5Adobe Photoshop Elements 1-9Paint Shop ProPainter X/11 (preview zoom is not supported)PhotoImpactIrfanview (freeware)The installer will automatically detect and install the plug-in for Adobe Photoshop7/CSx and Elements users. However, if you are using another host program, you will need to take some additional steps.In Paint Shop Pro / PhotoImpact: You will need to specify the Topaz Adjust 4 Plug-ins folder as an additional plug-ins folder to using menu File \ Preference \ Folder and then add Topaz Adjust “Plug-ins” folder, usually located at “C:\Program Files \ Topaz Labs \ Topaz Adjust \ Plugins”In Irfanview, Make sure you’ve downloaded and installed the 8BF plug-in add-on, available on the Irfanview webpage. Go to menu \ Image \ Effects \Adobe 8BF filters and add Topaz Adjust 4 “Plug-ins” folder.For other host programs, you may need to copy “Topaz Adjust 4” “Plug-in”folder to the required location of that host program. Make sure you do notmove the “Presets” folder, however.2. Running Topaz AdjustTopaz Adjust is a Photoshop plug-in, not a stand alone program, which means that you are not able to run it directly. To use Topaz Adjust, open up an image in Photoshop (or your other compatible image-editing software). Topaz Adjust will be located in the “Filters -> Topaz Labs” menu. (You will need to open or create a new image in order to access the filters menu).3. RegistrationWhen you first install the plug-ins, Topaz Adjust will be in demo mode. All functions are available except the ability to save the processed image. In order to save your processed image, you will need to enter either a purchased license key or a 30-day fully functional trial key, which you can obtain here:/downloadsYou may purchase the product online through our secure ordering system at:/storeTo enter your key, open Topaz Adjust, click the Menu… button and then select Enter Key…. You can then copy & paste or type your key in.4. System RequirementsIt is recommended that you have at least 1 GB of RAM. Topaz Adjust is very computationally intensive and you'll need a fast computer to run it at acceptable speeds. Topaz Adjust supports multi-core CPUs, which increases rendering speed substantially.This installer is for Windows only. For the Mac version please visit our website at: /downloads5. Program FeaturesTopaz Adjust has many valuable tools to help make your photos pop.New Adjust V4 Features:•Auto Updater. Get software updates instantly.•New user interface. Includes the ability to easily expand and collapseside panelsand parameter tabs for an adjustable workspace.•Snap / Recall buttons. Save up to 99 snapshot settings for comparison.•Preset enable / disable option. Option to enable or disable the presetpreview processing at program startup.•New presets layout. The new preset format features its own preview。
ReleaseNotes

Mapmatrix部分1.目前断面编辑只是提供显示、查看断面效果,不提供编辑功能,其程序总是默认将断面显示模型的最左侧,可以使用键盘中的<和>进行操作,即逗号和句点键。
2.dom修补中修补效果和生成效果偶有不一致的现象,主要是由于修补的区域是采用双线型插值生成影像,而生成的dom时使用的双三次卷积方式生成的,只要在生成的时候将双三次修改为双线型插值即可。
3.重启系统后,启动液晶立体勾选且进程也已经开启了,但是开启立体时依然会黑屏,通常只需手工关闭StereoBuddyWnd进程,再重新将启动液晶立体勾选即可。
4.英文系统下安装的英文版本程序,“启动液晶立体”功能暂无法正常启动。
5.多模型进行实时核线编辑DEM,出现立体来回切换,立体上有时有块区域被其它方块区域覆盖显示,无法刷新,只需要将立体缩小到025倍时即可。
6.使用工具中的DEM格式转换,如果线将一nsdtf格式的DEM转换为tif格式(32位),再将该32位tifDEM转换为nsdtf格式,发现坐标发生了大概半个格网距离的偏移。
这个是由于DEM与TIFF起点不同导致,TIFF格式起点的在像素中心,如果可能的话也可以手工将转换后的DEM起点坐标进行修改。
7.DEM编辑中实时核线立体使用"切换立体"功能时,有的数据切换立体显示不对,通常是自动切换是正常的,用标记定位到其它立体也正常,建议实时核线不要使用手动切换。
8.南半球数据支持,由于手中无相关数据验证,所以如果有问题希望及时反馈。
9.数码相机校正功能扩展支持jpg等常用格式目前该功能输出格式只支持tif,没有提供输出jpg的功能,如果一定要输出jpg文件的话,需要手工在影像列表中双击影像,在弹出的界面中将文件后缀手工修改为jpg即可,所有的影像都需要一个个手工进行修改。
10.ADS40模型裁切里“合并ads”, “合并并且裁切”,“可视化选模型”三个按钮不要使用。
ReleaseNote模板

Revision History阅读说明:蓝色字为注释,范例,或者说明,黑色字为必须要的条目TABLE OF CONTENTS1.INTRODUCTION 32.RELEASE CONTENT 3 2.1S OURCE CODE DEPOSITORY3 2.2D IRECTORY STRUCTURE3 2.3L ABEL INFO4 2.4G ET THE INFORMATION FOR LABEL4 2.5B UILD ENVIRONMENT(编译环境) 4 2.6U SER PROFILE ENVIRONMENT (用户环境变量) 42.6.1wacos user profile 42.7B UILD PROCESS(编译过程介绍)43.TARGET ENVIRONMENT(部署环境需求) 5 3.1H ARDWARE REQUIREMENTS(硬件需求)5 3.2S OFTWARE REQUIREMENT(软件需求)5 3.3R UNNING CMS(启动须知,说明启动脚步的含义)53.3.1单机版53.3.2分布式53.4L IMITATION(局限性说明) 54.CONFIGURATION OF CMS(项目配置文件说明) 5 4.1配置文件54.1.1cms.properties55.EXECUTION OF DB SCRIPT(数据库脚步执行说明) 6 1.INTRODUCTION(主要简略介绍工程实现的功能,或者修复的bug)2.RELEASE CONTENT2.1Source code depositoryThe source code of software is stored in the SVN2.2Directory structureThe cms(子项目) application for FollowGood Platform is organized as a tree depicted below: the tar package is cms_demo1.tar.Z(包), uncompress it , the dir is :/opt/wacos/server /cms|-----bin|-----home|-----logs|-----tools|-----tomcat6|-----lib|-----datadb|-----metadata|-----metadatatmp|-----webapps2.3Label infoCMS_DEMO2.4Get the information for labelYou can get the information byhttp://host:8080/cms/version.htmlThe history for label(主要介绍以往版本主要功能,修复bug清单,以及解决的问题等,尽量详细,按版本倒序排列,最新版本放前面)●CMS_DEMO2因地方分类中部分省份页面变更,更新解析配置以正确解析内容●CMS_DEMO2修复BugList :Software003:解决空指针异常问题Softeare009:解决用户名没有校验问题(此部分内容为追加内容,以往的版本信息都要保留)2.5Build environment(编译环境)2.6User profile environment (用户环境变量)2.6.1wacos user profileAdd these lines in wacos user profileJAVA_HOME=$HOME/tools/ jdk1.6.0export JAVA_HOME;Notice: wacos should be the owner of “/opt/wacos/server”The Tomcat’s version is 6.02.7Build process(编译过程介绍)Now , cms only support ANT’s Compile.3.TARGET ENVIRONMENT(部署环境需求)3.1Hardware requirements(硬件需求)-Sun Ultra 10 workstation or above3.2Software requirement(软件需求)-Java Developemnt Kit(JDK) 1.6.03.3Running CMS(启动须知,说明启动脚步的含义)3.3.1单机版$cd /opt/wacos/server/cms$chmod +x *// Start CMS as root$./start.sh// Stop CMS$./stop.sh3.3.2分布式$cd /opt/wacos/server/cms$chmod +x *// Start CMS as root$./start-all.sh// Stop CMS$./stop-all.sh3.4Limitation(局限性说明)1.Now only support JDK 1.6.0 or above2.Now support above Tomcat 6.04.CONFIGURATION OF CMS(项目配置文件说明) 4.1配置文件4.1.1cms.properties目录:/opt/wacos/server/cms/home/WEB-INF/classes内容:crawl.startTime=08:00 ----爬虫开始时间crawl.intervalHour=24 ----爬虫周期crawl.depth=3 ----爬虫深度crawl.threadNum=10 ----爬虫并发线程数crawl.topNum=100 ----爬虫抓取记录数crawl.targetDir=d:/spiderdata/datadb ----爬虫数据存放目录parse.tmpDir=d:/spiderdata/metadatatmp ----xml数据临时目录index.disable.mode=0 ----爬虫程序是否要进行索引操作5.EXECUTION OF DB SCRIPT(数据库脚步执行说明)。
nextpad release note

各位,大家下午好。
欢迎各位百忙之中来现场参加这次在线的产品发布会活动,虽然这里说的是一个“产品”的发布会,但是按照产品的定义而言,下面要公布的也不能算是一个产品,因为它是没有价格的,也就是终生免费的一个产品(360?……)。
首先为了防止有人还不知道我是谁,我先自我介绍一下,我的GSDzone ID , sataco ,目前担任 GSDzone 网站的主要负责人以及泛华测控院校产品部的负责人。
因此,从今年开始,我会在试图在中国工程教育这个领域做一些事情,希望能够真正实质性地助力培养更多未来的卓越工程师。
在本次产品发布会期间,你都可以回帖进行提问或者单纯的顶或踩,在发布会结束时会进行最后的抽奖活动,大奖将是一个以前从来没有发过的奖品,而且不是 GSDzone 的奖品,而是 next 的奖品,尽请期待。
下面,我将用类似意识流的方式给大家阐述一下这个产品 nextpad 的概念是如何形成的。
为了真正助力中国工程教育,我思考了很久,之后想到了有三个方向也许是我以后会奋斗的目标:一个就是在教学方面,目前在工程知识的教学上尚存在着很大的提升空间,很多概念和知识,现在还是通过老一套的纯公式推导或者板书的形式来进行教授,这种方式不利于学生能够真正理解透彻知识点,而且不生动,引不起学生的兴趣和求学欲望;第二个方向就是实验,图腾中那条白色的线指的是理论中所得到的结果,而黄色的线代表的是在实际情况中所得到的结果,你可以明显看出两条线是不一样的,这也代表着也许你理论学得很好,但是作为一个优秀的工程师,你必不可少地要和实际的系统或环境打交道,所以掌握你的理论知识的同时,你更需要的是通过实验来将理论与实践联系在一起,真正做到工程。
第三个方向就是创新,这个图腾也很好理解,每一个框代表的是一门学科,那么在这个方向,是要求同学们能够灵活地将各个学科的知识综合起来解决实际问题,例如你在大一大二可能学习了电工电子、机械原理等基础课程,那么在大三大四甚至研究生时就应该能够将这些基础学科综合起来,从而解决真正的问题。
- 1、下载文档前请自行甄别文档内容的完整性,平台不提供额外的编辑、内容补充、找答案等附加服务。
- 2、"仅部分预览"的文档,不可在线预览部分如存在完整性等问题,可反馈申请退款(可完整预览的文档不适用该条件!)。
- 3、如文档侵犯您的权益,请联系客服反馈,我们会尽快为您处理(人工客服工作时间:9:00-18:30)。
UPGRADING Instructions
VA One 2006.1
3
RELEASE NOTES
© 2007 ESI Group
(released: Feb-07)
4. Ensure that there is a license file for VA One saved locally on the computer (for example c:\Program Files\ESI Software\vaone.lic)
5. From the Control Panel select the Environment Variables button on the Advanced tab of the System utility dialog to define the environment variable PAM_LMD_LICENSE_FILE. Set the environment variable to the location of the license file (e.g. c:\Program Files\ESI Software\vaone.lic)
Advanced Solve Options for Optimizing Memory Use within VA One. ------- 6
General ------------------------------------------------------------------------------------- 8
CORRECTIONS
13
General----------------------------------------------------------------------------------- 13
FE/BEM ---------------------------------------------------------------------------------- 14
Optimizing use of In-core Memory when Working with FE Structural
and FE Acoustic Modal Data ---------------------------------------------------------- 6
- IBM-compatible PC with Intel Pentium 4 processor - Minimum of 512 MB RAM
1 GB recommended for 32bit version 2 GB recommended for 64bit version - Minimum of 100 MB available disk space - 3D graphic acceleration card supporting OpenGL - Ethernet network interface card - 17-inch monitor capable of 16-bit/Hi-color display at 1024x768 resolution - Internet Explorer 6.0 or better - Mouse and Keyboard
VA One 2006.1
RELEASE NOTES
VA One 2006.1
RELEASE NOTES
The documents and related know-how herein provided by ESI Group subject to contractual conditions are to remain confidential. The CLIENT shall not disclose the documentation and/or related know-how in whole or in part to any third party
CONTENTS
VA One 2006.1
1
RELEASE NOTES
© 2007 ESI Group
(released: Feb-07)
UPGRADING
INFORMATION
Installation Requirements
- Windows 2000 (SP4 or later), Windows XP Professional (SP2), or Windows XP x64 Edition
1. Install VA One 2006.1 by inserting your installation CD in the computer’s CD ROM disk drive. The installer for the 32-bit version will run automatically.
2. The VA One installer will launch an installer for Microsoft Visual C++ Runtime, as shown in the figure below. This installer is required and must be allowed to proceed for a proper installation of VA One.
- Binary model files (*.va1) saved with VA One 2006 can be reopened by VA One 2006.1.
- XML neutral files (*.xml) exported by previous versions of VA One and AutoSEA2 can be imported by VA One 2006.1.
without the prior written permission of ESI Group. © 2007 ESI Group. All rights reserved.
January 2007
UM/VA1_/06/13/00/A
VA One 2006.1
i
RELEASE NOTES
© 2007 ESI Group
Scripts ------------------------------------------------------------------------------------ 10
Optional Modules ---------------------------------------------------------------------- 11
6. See the VA One 2006 Licensing and Installation Guide for additional information.
Floating Licenses
1. Install VA One 2006.1 by inserting your installation CD in the computer’s CD ROM disk drive. The installer for the 32-bit version will run automatically.
Instructions --------------------------------------------------------------------------------2
Upgrading from VA One 2005.x, 2006 or AutoSEA2 2005.x-------------------- 2
Installation Folder -------------------------------------------------------------------------- 1
Model File Compatibility ------------------------------------------------------------------ 1
Model File Compatibility
- Binary model files (*.va2) saved with AutoSEA2 cannot be reopened by VA One 2006.1.
- Binary model files (*.va1) saved with VA One 2005 and 2005.1 cannot be reopened by VA One 2006.1.
(released: Feb-07)
CONTENTS
UPGRADING
1
Information --------------------------------------------------------------------------------1
Installation Requirements ---------------------------------------------------------------- 1
3. After the Microsoft Visual C++ Runtime is installed, the VA One installer will proceed. Please read each installer window thoroughly and follow the instructions.
IMPROVEMENTS
5
64-Bit Version of VA One --------------------------------------------------------------5