Linux U盘安装盘制作方法
如何用u盘做linux和windows公用的启动盘

如何用u盘制作linux和windows公用启动盘1、准备工具Windows系统的电脑一台、DiskCenius软件、UltraISO软件、ubuntu系统镜像(ISO)、pe系统(ISO)、8G U盘1个我使用的是老毛桃的iso、ubuntu1504的iso和windows7(64位)系统2、先打开UltraISO 制作一个PE启动盘,单击文件->打开选择老毛桃PE工具的ISO文件,然后如图选择写入硬盘映像如下图,选择默认写入方式USB-HDD+(老机器的可以择USB-ZIP,不行的话就在更换其它的写入方式,一般默认的方式可以满足绝大多数电脑),隐藏启动盘分区:高端隐藏(不隐藏的话容易误删启动盘里面的文件),选择写入就会完成启动盘的制作了,制作完成后记下启动盘分区大小,我的为300.9M(后面需要用这个大小确定新建分区的大小)3、打开DiskCenius软件,新建固定大小分区(我建的为1.1GB)用来安装另外一个ubutnut系统,新建多大规格的分区后面会进行说明如图,选中空白(无启动系统)的分区,右键单击,选中新建分区,当然可以用上面的新建分区了手动调整分区大小,我的后面一个调整为 1.1GB,如果拖动不精确的话就在下面输入1.1GB即可;一般u盘的可移动磁盘放在前面,因此后面一个设为固定大小的分区,设定后开始即可,分区成功后就多了一个分区了4、备份这个u盘的分区表选中整个u盘,右键单击选择备份分区表,备份为Lmt(自定义为方便记忆的英文即可),格式默认即可如图:5、备份完整的老毛桃PE系统选中老毛桃启动盘分区,右键选择备份分区到镜像文件,如图选择路径,命名为Laomaotao,格式为pmf,单击开始就会生成pmf镜像文件了6、再次用该u盘制作一个linux(ubuntu)启动盘,方法同步骤27、Ubuntu启动盘制作好之后,再次使用步骤3的方法,新建一个分区用于还原老毛桃PE系统,分区大小为300.9MB(前面已经说了需要记下的,现在可以使用了吧),分区大小不能比这小,小了就还原不了老毛桃系统8、将新建的分区格式化,然后保存,然后再设置为主分区如图中的1、2、39、备份这个u盘的分区表,方法如步骤4,命名为Ubuntu,格式默认10、还原之前的老毛桃PE系统pmf文件到刚刚新建的300.9MB大小的分区右键选择从镜像文件还原分区,单击开始即可完成还原如图还原后u盘就有3个分区了,分别为可移动磁盘,老毛桃PE和ubuntu1504,如下图若还原后老毛桃pe分区没有显示活动,则ubuntu分区一定为活动(即可以引导u盘启动),此时右键ubuntu,选择取消分区激活状态,然后右键老毛桃pe选择激活当前分区,设为活动,此时保存更改,重启电脑就可以进入老毛桃pe系统了11、再次备份包含两个启动系统的u盘分区表,方法如步骤4,命名为LaomaotaoUbuntu即可12、启动盘切换方法如果需要切换为ubuntu启动盘,只需要打开DiskCenius软件还原u盘分区表,选择上面备份的Ubuntu分区表还原即可,还原方法同上面的备份方法差不多,不多赘述了;同样,要再次切换为老毛桃PE,则用上面的LaomaotoUbuntu进行还原即可(不到一分钟就可以搞定很方便的!!)13、原理总概:此原理是在一个u盘上面建多个分区,每一个分区装不同的启动系统,每次需要使用的时候用DiskCenius软件将对应的分区激活,从而引导对应的系统注意1:极少数u盘不支持linux系统启动盘,因此要选择一个可以单独启动windowsPE和linux的启动盘,如何测试呢?当然是分别制作对应的启动盘啦,两个都行就可以制作公用启动盘了注意2:ubuntu1410之前不会出现输入not a COM32R image提示,可以直接安装,但是,安装ubuntu1410及之后的版本时候,进入启动系统前通常有黑屏(需要输入命令)提示,在boot处输入live 按enter键即可进入启动盘,如图:注意3:网上有人用u盘量产工具,将u盘分为两个启动盘,这个方法的确有人成功过,但是容易把u盘量产报废,而且很多u盘非正规厂商生产,找不到对应型号的量产工具,因此不建议使用。
Linux系统写入U盘方法教程

Linux系统写入U盘方法教程之前我们介绍过怎么把Windows系统放进U盘备份,那么对于Linux系统方法也一样吗?有一些地方不同的,需要注意,所以下面我们就来教大家如何在U盘中安装Linux系统,把Linux系统写入U盘。
操作步骤第一步:首先插入u盘到电脑主机usb接口处(建议插入到主机箱后置的usb接口),然后打开UltraISO软件,再打开选择需要写入u 盘的Ubuntu 10.04或者其他版本的Linux系统的iso镜像包3 第二步:点击“启动光盘”,然后鼠标移动选择到“写入硬盘映像”并点击鼠标左键弹出一个写入硬盘映像的窗口,值得注意的是:硬盘驱动器那里我们要看清楚,是我们刚才插入usb接口的那个u盘,也就是我们需要写入的u盘,千万别搞错了。
写入方式我们默认即可,然后点击“便捷启动”,选择到“写入新的驱动器引导区”,再鼠标右移选择到“Syslinux”项,点击鼠标!u启动温馨提示:“Syslinux”这一项选择很重要,网络上流传的很多关于此类的教程由于都忽略了这一步,导致最终制作失败。
点击“是(Y)”继续接下来会弹出一个“写入引导扇区成功”的提示窗口第三步:也就是继续上一步的操作,我们点击“写入”继续,意思是把整个iso镜像包写入到我们的u盘里面点击了“写入”按钮以后将会弹出一个确定窗口,其表达的意思是让您进一步确认是否将iso镜像包写入到该u盘里面,我们只要点击“是(Y)”按钮即可,如下图:现在开始写入Linux系统的iso镜像包到u盘在写入u盘的时候我们要注意的是:尽量不要去做其他操作,建议耐心等待其写入成功!OK,大功告成,u盘写入Ubuntu Linux系统就完成了,我们接下来可以做的就是利用这个制作好引导的u盘来安装Ubuntu系统了。
补充:系统常用维护技巧1,在“开始” 菜单中选择“控制面板” 选项,打开“控制面板” 窗口,单击“管理工具” 链接2,在打开的“管理工具” 窗口中双击“事件查看器” 图标3,接着会打开“事件查看器” 窗口4,在右侧窗格中的树状目录中选择需要查看的日志类型,如“事件查看器本地--Win日志--系统日志,在接着在中间的“系统” 列表中即查看到关于系统的事件日志5,双击日志名称,可以打开“事件属性” 对话框,切换到“常规” 选项卡,可以查看该日志的常规描述信息6,切换到“详细信息” 选项卡,可以查看该日志的详细信息7,打开“控制面板” 窗口,单击“操作中心” 链接,打开“操作中心” 窗口,展开“维护” 区域8,单击“查看可靠性历史记录” 链接,打开“可靠性监视程序” 主界面,如图所示,用户可以选择按天或者按周为时间单位来查看系统的稳定性曲线表,如果系统近日没出过什么状况,那么按周来查看会比较合适。
用u盘安装红帽系统 linux系统
研究测试了一个早上。
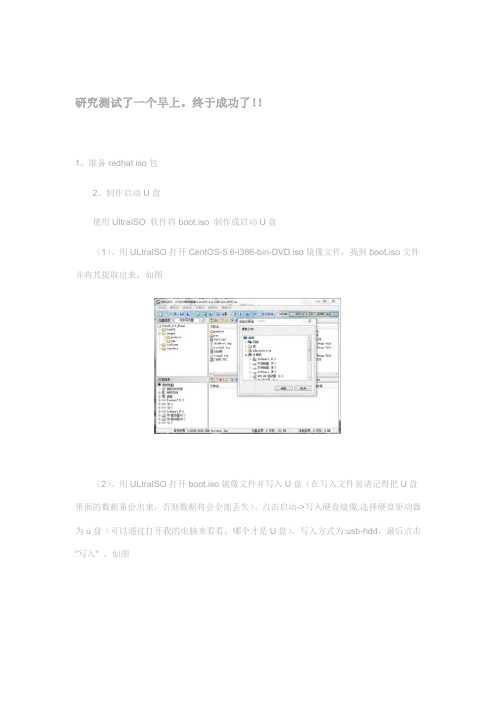
终于成功了!!1、准备redhat iso包2、制作启动U盘使用UltraISO 软件将boot.iso 制作成启动U盘(1)、用ULtraISO打开CentOS-5.6-i386-bin-DVD.iso镜像文件,找到boot.iso文件并将其提取出来,如图(2)、用ULtraISO打开boot.iso镜像文件并写入U盘(在写入文件前请记得把U盘里面的数据备份出来,否则数据将会全部丢失)。
点击启动->写入硬盘镜像,选择硬盘驱动器为u盘(可以通过打开我的电脑来看看,哪个才是U盘),写入方式为:usb-hdd,最后点击"写入" 。
如图(3)、写入完成后即可(可以测试一下,看是否能成功引导,如果可以引导,再把镜像文件拷贝到U盘根目录下)。
3、将redhat iso拷贝到U盘根目录4、启动服务器将启动项首选USB启动5、在一系列的程序运行之后,出现了安装对话框,选择安装的源为硬盘(也就是U盘),通常为以sd开头(通常:sda的是硬盘sdb的是U盘)在选择源这一步可以拔掉U盘在插上确认U盘挂载的设备名称,在选择的挂载的设备后,下面输入路径的对话框是输入iso 所在的目录,如在根目录则输入:/6、按照提示操作到“分区”时选择“在选定磁盘上删除所有分区并创建默认分区结构”在下面的“选择" 本次安装中使用的驱动程序”列表中将U盘去掉通常:sda的是硬盘sdb 的是U盘7、操作到GRUB引导装载程序这一步则需要注意,我们需要将GRUB引导装在硬盘上,而不是U盘。
如果Grub的引导器如果安装在/dev/sdb上,那么,在拔出u盘之后,就无法引导系统。
!!按下面的来操作:改变grub引导顺序,把”配置高级引导装载程序选项”选上.按下一步。
继续,直到安装完成,拔掉U盘后重起。
用U盘安装linux操作系统

制作U盘启动来安装Linux系统一、安装前所需的工具和软件U盘(16G)刻录软件UltraISOLinux系统镜像文件CentOS-6.4-i386-bin-DVD1.iso二、将U盘做成启动盘1、用UltraISO软件打开CentOS-6.4-i386-bin-DVD1.iso镜像2、在启动选项中选择写入硬盘映像,便捷启动--->写入新的硬盘主引导记录(MBR)--->USB-SDD+3、选择USB-HDD+后,弹出一个提示,选择”是”4、点击写入,然后出现提示后选择”是”,然后等待几分钟5、信息框出现刻录成功,代表启动盘已经制作成功6、将CentOS-6.4-i386-bin-DVD1.iso镜像拷贝到U盘下三、戴尔PowerEdge R420安装centOS(注:因为只有一块1G的硬盘,故不需要做RAID)1、插上U盘,启动服务器,按F11进入BIOS选择界面,选择U盘启动2、进入系统的安装界面,选择第一项3、选择语言(亲测选择简体中文不会出现乱码)和启动位置(这里选择Hard drive )选择优盘的盘符。
我这里是/dev/sda4,接着会读取优盘上的数据。
4、按照引导提示选择下一步,选择主机名,根据提示填写管理员密码5、选择安装类型以及分区6、分区时注意,一定要把优盘的勾去掉,我的分区如下图所示然后确认格式化7、我的分区如下图所示然后确认格式化8、引导程序的选择一定要选择硬盘为第一引导,不然默认是优盘启动(装完系统必须要插着优盘才能启动)。
点开更改设备,在下拉“BIOS驱动顺序”里的第一BIOS驱动器处选择硬盘为第一启动9、选择所需安装的系统类型10、进入软件安装进度界面,安装完毕,选择重启11、拔掉U盘,至此linux操作系统安装完成。
如何用u盘安装linux系统

如何用u盘安装linux系统Liux因其开源性收到广大编程爱好者的青睐!,那么如何用u盘安装linux系统呢?接下来大家跟着店铺一起来了解一下用u盘安装linux 系统的解决方法吧。
用u盘安装linux系统方法一1、用【U启动U盘启动盘制作工具】制作U盘启动盘,并下载正版系统镜像或纯净版镜像,下载后缀为ISO的镜像文件拷贝到U盘根目录.2、开机按F2键进入BIOS设置.选择BOOT选项—Secure Boot 设置为“Disabled"选择OS Mode Selection设置为CSM OS.选择Advanced菜单下Fast Bios Mode设置为“Disabled" 按F10键保存退出。
3、重启电脑按F10键进入快速引导启动,选择U盘引导进去Windows PE,用硬盘工具分区格式化,设置主引导分区为C盘,用第三方还原软件还原镜像文件到C盘即可用u盘安装linux系统方法二1,电脑下载一个软碟通U盘启动制作程序2,准备debian的ISO3,用软碟通把ISO写进U盘4,把ISO在拷进U盘,注意,此时U盘内文件约2个ISO镜像大小5,电脑插上U盘,U盘启动,开装,6,分区全删了,重建boot / swap等分区7,安装最后,会有bootloader安装,注意,安装在笔记本硬盘上,别搞错。
8,ok,重启拔U盘用u盘安装linux系统方法三利用WinPE工具可以通过U盘来安装Linux系统,下面以U盘WinPE工具安装Centos6.4版Linux为例,方法如下:1.在U盘上安装好WinPE(可以选择老毛桃U盘工具、大白菜PE 等)2.在U盘根目录建立一个名为LMT的目录,将CentOS-6.4-x86_64-minimal.iso镜像拷入U盘下的LMT目录。
3.将U盘插入电脑。
重启电脑,进入BIOS选择U盘启动,F10保存退出。
4.系统从U盘启动以后显示出老毛桃的启动菜单。
做U盘启动linux

Scientific linux to usb# dd if=/dev/sdb of=/tmp/mbr_sdb.bin bs=512 count=1 # fdisk /dev/sdb Command(m for help):d 1 … (删除分区,当删除完后) Command(m for help): w (保存更改) (如果显示信息不正确,拔出 U 盘重新插入,并找到新的正确的 U 盘标识) # mkfs.vfat /dev/sdb –I (fat 格式化 U 盘)CreateaWindows95/98MBRonUSBmemorystick,usingms-sys(). Ms-sys is available on recent SL LiveCD/DVDs or you can take the rpm for el4 from /packages/ms-sys/.# ms-sys --mbr95b /dev/sdb Create a new partition (enter n): Choose Primary partition (enter p), Partition number (enter 1). The size of the partition should be at least as larger as the LiveCD/DVD you want to install on the USB device. Afterwards, change the type (enter t) of first partition (enter 1) to W95 FAT16 LBA (enter e), and make first partition active (enter a and select 1). Before writing the partition table to the USB flash drive (enter w), you can print the changed settings (enter p).# fdisk /dev/sdb Command(m for help): n (新分区) p1 1 (必须为 1)60 (启动盘空间大小,跟距实际需要填) t (改变分区格式) e a 1 w (保存修改) (FAT16 格式) (做为启动盘)Now format the first partition (/dev/sdb1) as FAT16. If you like, you can set a label with option -n # mkdosfs -n SL-LiveCD /dev/sdb1 下载 syslinux : /pub/linux/utils/boot/syslinux/# wget/pub/linux/utils/boot/syslinux/3.xx/syslinux-3.8 2.tar.gz# tar xfvz syslinux-3.82.tar.gz # cd syslinux-3.82 # make # cd linux # ./syslinux /dev/sdb1此时重启从 USB 启动应该会出现(不出现就要重做上一步,出现拔出 U 盘重新开机进生下 一步):SYSLINUX 3.11 2005-09-02 EBIOS Copyright (C) 1994-2005 H. Peter Anvin Could not find kernel image: linux boot:# mkdir -p /mnt/usbdisk # mount /dev/sdb1 /mnt/usbdisk# ll /mnt/usbdisk total 12 -r-xr-xr-x 1 root root 8236 Apr 27 21:23 ldlinux.sys下载 livecd_sl54_gome_***.iso (只能是 5.x 版本) 地址:http://www.livecd.ethz.ch/download.html# mkdir -p /mnt/iso # mount -o loop livecd_SL54_gnome_2009-11-20.iso /mnt/iso# cp -rv /mnt/iso/* /mnt/usbdisk/# cd /mnt/usbdisk/ # mv boot/* . Rename isolinux.cfg to syslinux.cfg and delete the path "boot/" in syslinux.cfg, splash.cfg and help*.txt: Sed 命今替换,这里用于删除 “boot/”# mv isolinux.cfg syslinux.cfg # sed -i "s|boot/||" syslinux.cfg # sed -i "s|boot/||" splash.cfg # sed -i "s|boot/||" help*.txt # rm isolinux.* -rfFinally, unmount the USB flash drive and the LiveCD iso image Umount U 盘 # cd # umount /mnt/usbdisk # umount /mnt/isoCreate a writable partition on the USB flash drive to store changes permanently创建可写空间(这种 U 盘系统是重启动会恢复原来状态,无没保存更改的,所以要创建可 创建可写空间 写空间)# ls /dev/sd* (先用上面命令看看有没有找到 USB 设备,并确认 USB 设备是 sd*, 一般为 sdb ,也有 sdc 等等 )# umount -a (如果提示有什么 # parted /dev/sdb ... Using /dev/sdb (parted) resize Partition number? 1 Start? End? ... (parted) quit [0.0308]?(直接回车)unmount 等 error 时执行这句)[1983.9995]? 1890(小于前面的数一点点就行了)(如果有警告就输入下面:) i n (如果没警告就会直接 OK,进入下一步) If you get errors during the use of parted, just type "i" for Ignore and do not change the file system to FAT32 - leave it as FAT. Create new partition (n): Primary partition (p), Partition number (2) and choose an appropriate size for the partition. Format /dev/sdb2:# fdisk /dev/sdbn p 2 (回车) (回车) w格式化 sdb2 为 ext3 系统# ls /dev/sd* (如果没有 sdb2 就拔出 U 盘重新插入找到正确的 U 盘标识并执行 umount –a) # mkfs.ext3 /dev/sdb2 ( 等待…… 完毕后 )# tune2fs -c 0 /dev/sdb2# mkdir -p /mnt/usbdisk2 # mount /dev/sdb2 /mnt/usbdisk2 # mkdir /mnt/usbdisk2/my_changes # mount /dev/sdb1 /mnt/usbdisk # cd /mnt/usbdisk # vi syslinux.cfg在 label linux 的append changes=my_changes max_loop=32 initrd=initrd.gz ..... 那句加上changes=my_changes kb=us pw=password……append changes=my_changes kb=us pw=password nox nonet nosound max_loop=32 initrd=initrd.gz ..... ……接下来就可以从 U 盘启动了,然后可以做自己的修改 U 盘 linux 系统制作结束,最下面有参考资料原版和网址系统制作, 前面是可以通用的 U 盘 linux 系统制作,下面是 ibox 项目生产盘制作1,把 ibox 系统打包 打包详细暂不知道 ,打为 tar.gz 包 有打包好的 2.进入 u 盘系统,把 PoweriBox***.tar.gz 两个包 copy 到 /home/sluser/ 下 把 usb_fdisk.sh copy 到 /usr/bin 下,vi /etc/rc.local ,在后面加下 /usr/bin/usb_fdisk.sh &(加 “&” 表示后台运行,不加“&”会直接进入 usb_fdisk.sh )/////////////////////////////////////////////////下面为参考资料原版 下面为参考资料原版//////////////////////////////////////////////////////// 下面为参考资料原版http://www.livecd.ethz.ch/usbdisk_sl4_sl5.htmlScientific Linux Live CD and DVD - Live USB - Diskless ClientOverview Download Usage Software Install Locally Create Live USB Create own LiveCD Boot Parameters Troubleshooting Diskless Client Persistent LiveCD ChangelogFeedbackSL4 and SL5: Live System on USB flash driveIMPORTANT: This description is valid for SL4 and SL5 only. For SL6 see Create Live USB.In order to boot from a USB drive your BIOS has to support booting from an USB device and you need to install a bootloader like grub or syslinux on it. The following description uses syslinux as bootloader and assumes that the USB memory stick is on /dev/sdb. A similar setup can also be done with grub as bootloader. Please note, you must be root to execute most of the following commands. If you don't have a running Linux system, you can do the whole procedure out of a running SL LiveCD/DVD. WARNING: If you change the wrong MBR or if you format the wrong partition, you can destroy your system, which can leave to complete data loss! Please make sure that you know which device corresponds to your USB memory stick (e.g. /dev/sda or /dev/sdb) !!! The following description assumes that the usb stick is on /dev/sdb. To boot from USB memory is not a trivial task. Whether it works or not can depend on the MBR and on the partition of your stick, on the USB memory stick itself and on the BIOS of your PC.Format the USB stickOn Windows There is a useful tool from HP which allows you to format your USB memory stick. Unfortunately it runs only under Windows. Download the HP USB Disk Storage Format Tool from ftp:///pub/softpaq/sp27001-27500/SP27213.exe. Choose as file system FAT (not FAT32) and format the stick. I have to admit that I had more success using the HP tool than doing it under Linux.On Linux Check on which device (dev/sd?) your USB memory stick is recognized by the system. If you have only IDE disks, it will be most probably appear on /dev/sda otherwise it can be on /dev/sdb or higher. See # tail -f /var/log/message while you plug in the USB memory stick. The USB device should also be visible by the command # fdisk -l First you have to overwrite the master boot record (MBR) of your USB flash drive. Caution: Overwriting the wrong MBR (for example the one of your hard disk) can leave to complete data loss! If you are unsure, please back up your MBR(s) to a file and copy this file to a safe place (floppy disk, other USB memory stick, ...). For example to write the MBR of the first SATA disk (/dev/sdb) to a file mbr_sdb.bin, run: # dd if=/dev/sdb of=/tmp/mbr_sdb.bin bs=512 count=1 Create a Windows 95/98 MBR on USB memory stick, using ms-sys (). Ms-sys is available on recent SL LiveCD/DVDs or you can take the rpm for el4 from /packages/ms-sys/. # ms-sys --mbr95b /dev/sdb Windows 95B/98/98SE/ME master boot record successfully written to /dev/sdbThen create a FAT16 partition on the USB flash drive: # fdisk /dev/sdb Create a new partition (enter n): Choose Primary partition (enter p), Partition number (enter 1). The size of the partition should be at least as larger as the LiveCD/DVD you want to install on the USB device. Afterwards, change the type (enter t) of first partition (enter 1) to W95 FAT16 LBA (enter e), and make first partition active (enter a and select 1). Before writing the partition table to the USB flash drive (enter w), you can print the changed settings (enter p). Now format the first partition (/dev/sdb1) as FAT16. If you like, you can set a label with option -n # mkdosfs -n SL-LiveCD /dev/sdb1 Note, this is all done without mounting the partition.Make the USB memory stick bootable using syslinuxYou should have now something like: # fdisk -l /dev/sdbDisk /dev/sdb: 1006 MB, 1006632960 bytes 31 heads, 62 sectors/track, 1022 cylinders Units = cylinders of 1922 * 512 = 984064 bytes Disk identifier: 0x00000000Device Boot /dev/sdb1 *Start 1End 747Blocks 717836IdSystem e W95 FAT16 (LBA)Important: The first partition is active (marked with *) and is a FAT16 partition: ID "e". Now the syslinux boot loader has to be installed on the first FAT partition: # syslinux /dev/sdb1 If you get the error "Cluster sizes larger than 16K not supported", try to use a more recent version of syslinux. Syslinux can be downloaded from :/pub/linux/utils/boot/syslinux/. I have successfully used syslinux > 3.11. Download, unpack and compile syslinux by executing "make". You will find the syslinux binary in the folder unix: # wget /pub/linux/utils/boot/syslinux/syslinux-3.11.tar.gz # tar xfvz syslinux-3.11.tar.gz # cd syslinux-3.11 # make # cd unix # ./syslinux /dev/sdb1 This should create a file "ldlinux.sys" in the sdb1 partition. Now try to boot from the USB memory stick. If this works you should see someting like: SYSLINUX 3.11 2005-09-02 EBIOS Copyright (C) 1994-2005 H. Peter Anvin Could not find kernel image: linux boot: Congratulation, you USB stick is no bootable! If you get "boot failed", "Missing operation system", "Boot error" or just nothing, try to redo the above steps - also try to format the stick under Windows as described above.Copy LiveCD dataFirst mount the partition. Under Scientific Linux /dev/sdb1 will be mountable under /media/"something". or do it manually: # mkdir -p /mnt/usbdisk # mount /dev/sdb1 /mnt/usbdisk Since your have already installed syslinux on the USB memory stick before, you should see # ll /mnt/usbdisk total 12 -r-xr-xr-x 1 root root 8236 Apr 27 21:23 ldlinux.sys Either mount the LiveCD/DVD directly or just mount the ISO image of the LiveCD/DVD: # mkdir -p /mnt/iso # mount -o loop livecd_SL54_gnome_2009-11-20.iso /mnt/iso By the way, if you are doing this on a running LiveCD system, the CD is already mounted under /livecd/live/livecd/hdc, assuming your CD-ROM is the third IDE device (hdc). Now copy everything from the CD/DVD to the USB flash drive: # cp -rv /mnt/iso/* /mnt/usbdisk/ In contrast to grub, syslinux can not access the kernel and the initial RAM disk in the "boot" folder. Therefore you have to move the "boot"-files to the root folder of the USB flash drive: # cd /mnt/usbdisk/ # mv boot/* . Rename isolinux.cfg to syslinux.cfg and delete the path "boot/" in syslinux.cfg, splash.cfg and help*.txt: # mv isolinux.cfg syslinux.cfg # sed -i "s|boot/||" syslinux.cfg # sed -i "s|boot/||" splash.cfg # sed -i "s|boot/||" help*.txt You can also remove the isolinux.bi_, isolinux.bin and isolinux.boot files:# rm isolinux.* Now everything should be ready for booting the USB flash drive. The most important files on the USB flash drive are: |-- base | | | |-- bin.mo |-- etc.mo |-- ....|-- ... |-- help1.txt |-- help2.txt |-- ... |-- initrd.gz |-- ldlinux.sys |-- livecd.sgn |-- memtest |-- splash.cfg |-- splash.lss |-- syslinux.cfg |-- vmlinuz Finally, unmount the USB flash drive and the LiveCD iso image # cd # umount /mnt/usbdisk # umount /mnt/isoCreate a writable partition on the USB flash drive to store changes permanentlyNormally all data that you have created or any software you have installed since the LiveCD was booted, are lost when you shutdown the system, even if the LiveCD is running from USBkey. To save the changes permanently use the "changes=" boot parameter. For information about persistent LiveCD see also Persistent LiveCD. Please note: The following procedure only works for LiveCD/DVD's created after 2008-08-01 ! Please make sure that you know which device corresponds to your USB memory stick (e.g. /dev/sda or /dev/sdb) !!! First you need some free space on your USB memory stick which is not used by the first partition (/dev/sdb1). Either you have already taking this into account when you created the first partition or you can try to resize your first partition with parted. # parted /dev/sdb ... Using /dev/sdb (parted) resize Partition number? 1 Start? End? ... (parted) quit If you get errors during the use of parted, just type "i" for Ignore and do not change the file system to FAT32 - leave it as FAT. Now create a ext3 partition on /dev/sdb: # fdisk /dev/sdb Create new partition (n): Primary partition (p), Partition number (2) and choose an appropriate size for the partition. Format /dev/sdb2: # mkfs.ext3 /dev/sdb2 Maybe you want to disable automatic filesystem check for this partition: # tune2fs -c 0 /dev/sdb2 To create the directory "my_changes" on /dev/sdb2: # mkdir -p /mnt/usbdisk2 # mount /dev/sdb2 /mnt/usbdisk2 # mkdir /mnt/usbdisk2/my_changes [0.0308]? [1983.9995]? 1890The folder name "my_changes" has to be defined in syslinux.cfg using the boot parameter "changes=my_changes". If not yet done, mount the first partion of the USB stick again: # mount /dev/sdb1 /mnt/usbdisk Edit syslinux.cfg in /mnt/usdisk and add changes=my_changes to the append line(s) # cd /mnt/usbdisk # emacs syslinux.cfg ... append changes=my_changes max_loop=32 initrd=initrd.gz ..... Or even more advanced # emacs syslinux.cfg ... append changes=my_changes kb=sg-latin1 pw=mypassword max_loop=32 initrd=initrd.gz ..... See boot parameters for more options.Last modified: Friday, 18-Mar-2011 13:11:09 CET by Urs Beyerle。
u深度u盘装系统教程10

u深度u盘装系统教程10深度u盘装系统教程深度操作系统是一款基于Linux的操作系统,由北京深度科技有限公司开发和维护。
它具有良好的用户界面和丰富的应用程序,适用于个人使用和企业环境。
本教程将介绍如何使用u盘来安装深度操作系统。
一、准备工作1. 下载深度操作系统的安装镜像文件。
你可以在官方网站或其他可信的下载站点上找到它。
2. 获取一个空白的u盘。
确保其容量足够存放安装镜像文件和其他必要的文件。
二、制作启动盘1. 插入u盘到电脑的usb接口。
2. 下载并安装一个u盘启动盘制作工具,例如Rufus。
3. 打开Rufus并选择u盘的驱动器。
4. 在“引导选择”部分,选择“启动镜像”,然后点击右侧的“选择”按钮,浏览到深度操作系统的安装镜像文件并选择它。
5. 在其他设置中,你可以更改卷标和文件系统类型,然后点击“开始”按钮。
6. 等待Rufus制作启动盘的过程完成。
三、设置电脑启动顺序1. 重启电脑并按下相应的热键进入BIOS设置。
通常是按下F2、F10、Delete等键。
2. 进入BIOS设置后,找到启动选项或启动顺序。
3. 将u盘移动到启动顺序列表的首位。
你可以使用热键或菜单选项来进行操作。
4. 保存设置并重启电脑。
四、安装深度操作系统1. 当电脑重启时,系统会从u盘启动。
2. 在深度操作系统引导菜单中,选择“安装深度操作系统”并按下回车键。
3. 选择语言和时区,然后点击“下一步”按钮。
4. 阅读并接受使用许可协议,然后点击“下一步”按钮。
5. 选择安装类型,如“完整安装”、“最小安装”或“自定义安装”。
推荐选择完整安装。
6. 按照提示完成其他设置,如分区、用户名和密码等。
7. 点击“安装”按钮开始安装深度操作系统。
8. 等待安装过程完成。
五、配置深度操作系统1. 当安装完成后,重启电脑。
2. 根据提示输入用户名和密码,然后点击登录。
3. 进入深度操作系统后,你可以根据需要进行进一步的配置,如安装应用程序、设置网络连接等。
CDlinux制作U盘启动
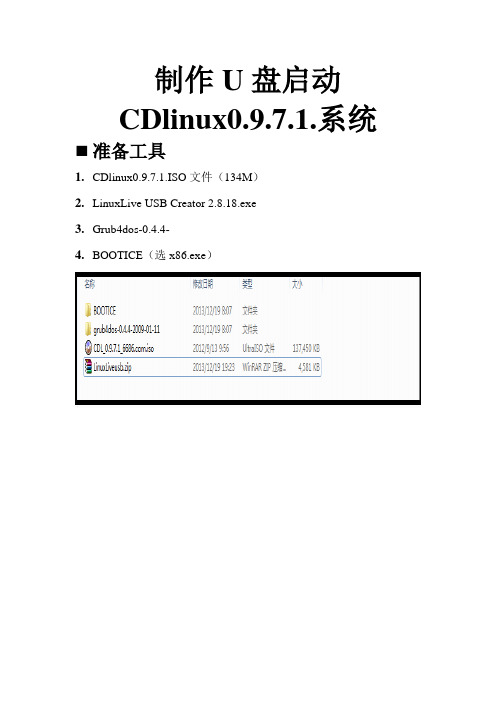
制作U盘启动CDlinux0.9.7.1.系统 准备工具1.CDlinux0.9.7.1.ISO文件(134M)2.LinuxLive USB Creator 2.8.18.exe3.Grub4dos-0.4.4-4.BOOTICE(选x86.exe)制作步骤:1.用LinuxLive USB Creator写入CDlinux ISO文件到优盘。
之前可在Windows系统下用FAT32格式化优盘,也可用USB Creator格式化优盘。
U盘文件写入完成后,将U盘名字改为CDlinux,也就是卷标。
2.将U盘根目录文件删除部分,保留CDlinux文件夹、syslinux文件夹、mkisofs.sh文件,将Grub4dos文件夹里的grldr、menu.lst 拷入U盘根目录下。
将syslinux文件夹复制到CDlinux/boot/文件夹下,打开syslinux文件夹,复制syslinux.cfg到CDlinux/boot/文件下。
3.用记事本打开U盘根目录里的menu.lst文件写入如下内容:timeout 3default 0title CDlinuxfind --set-root /CDlinux/bzImagekernel /CDlinux/bzImage CDL_DEV=LABEL=CDlinux CDL_LANG=zh_CN.UTF-8initrd /CDlinux/initrdboot保存。
4.打开BOOTICEx86.exe,点分区引导记录,选第二个项目:Grub4DOS……,点安装/配置,OK。
5.在Bios里设置启动顺序项,USB不要放在第一启动项,第一启动项可设为CDrom,第二启动项设为USB,硬盘启动在USB之后,OK,重启,就可以进入CDlinux系统了。
总结:搞了3、4天才终于搞好了,网上的资料太多,但都没有成功。
我把我的经验分享给大家,可能并不适合每个人。
我的是联想的笔记本,用虚拟机是用不了内置无线网卡的,听说用虚拟机要用USB的外置无线网卡,希望大家注意,少走弯路。
- 1、下载文档前请自行甄别文档内容的完整性,平台不提供额外的编辑、内容补充、找答案等附加服务。
- 2、"仅部分预览"的文档,不可在线预览部分如存在完整性等问题,可反馈申请退款(可完整预览的文档不适用该条件!)。
- 3、如文档侵犯您的权益,请联系客服反馈,我们会尽快为您处理(人工客服工作时间:9:00-18:30)。
U盘安装Linux 启动盘制作
准备工作:redhat 操作系统镜像ISO文件rhel-server-5.8-x86_64-dvd.iso Ultariso 软件需要注册
第一步:提取引导程序
找到电脑上的rhel-server-5.8-x86_64-dvd.iso 镜像文件。
右键选择用Ultariso 打开。
如图
选择images 在右侧的空白处选择boot.iso ,提取到……提取到桌面。
如图
右键选择boot.iso选择用Ultariso打开
第二步:制作引导启动盘
选择第一步提取的boot.iso文件,右键用ultraiso打开,选择启动下的写入到硬盘映像……
提前备份U盘里面的内容,该操作会格式化U盘
第三步:装载系统
把第一步中的rhel-server-5.8-x86_64-dvd.iso 镜像文件复制到U盘根目录下,即完成!开机选择从U盘启动即可
安装操作系统注意下处的选择。
一定要选择GRUB引导装载程序将会被安装到/dev/sda/上。
如若不是操作系统重启启动时必须插U盘不然无法启动。
(通过勾选配置高级引导装载程序选项可以修改以上的注意点)
其他方面与光盘安装操作系统完全一致。