DRP网上订单操作手册
百胜分销系统ERP DRP用户手册

第一章系统运行环境第一节系统运行环境《BSERP分销管理系统》是基于Windows平台上的应用程序,其软硬件环境必须满足Windows正常运转要求。
所以在安装《BSERP分销管理系统》之前,首先应该对计算机系统硬件环境和软件环境进行检查。
具体要求将在下面的章节中详细说明。
1.1 系统运行的硬件环境1、服务器u Intel Pentium Ⅲ800 MHz 或更高档次的CPU。
u512MB或更高内存。
u1G以上硬盘空间。
2、客户机u Intel Pentium Ⅲ600 MHz 或更高档次的CPU。
u256MB或更高内存。
u400MB以上硬盘空间。
1.2 系统运行的软件环境1、网络操作系统:u中文Windows NT/2000 Server网络系统。
2、客户操作系统:u中文Windows 2000 Professional / Windows XP。
3、数据库系统:u MS SQL Server 7.0/2000中文版。
第二节系统使用前准备2.1 概述在《BSERP服装管理系统》投入运行前,需要完成一些必要的准备工作,以便便顺利完成由手工管理到计算机管理的过渡。
首先,单位领导必须重视并亲自过问。
要求制定一套科学合理的业务流程、协调各部门的责任和协作、培训相关管理和操作人员。
实践证明,系统实施是否顺利,很大程度取决于领导在思想上对计算机管理的重视程度。
安排专门人员负责实施BSERP分销系统。
企业的生产计划和进销存业务一旦依靠计算机软件来完成,要确保有专人负责本系统从硬件、软件、系统、数据备份、病毒防范等方面的工作,也就是一定的了解。
同时,系统管理员要有很强的岗位责任心。
加强对计算机应用的培训。
针对企业的决策层、管理层和操作层培训计算机使用基础知识,培训手工管理与计算机管理的差异,培训怎样使用计算机完成日常业务,培训怎样从计算机获得准确的管理信息等相关知识。
2.2 管理制度准备1、制定应用方案和实施计划。
百胜ERP-DRP-定制业务系统操作手册V1 20130111
百胜ERP系统总部成衣定制手册商品部,销售部版本号:V1.0目录概述 (3)注意事项: (3)适用范围: (3)1.生产计划........................................................................................................................................ 错误!未定义书签。
1.1生产计划流程图 (3)1.2生产计划流程描述 (4)1.3操作说明 (6)1.3.1 客户订单 (6)1.3.2工艺配料单 (7)1.3.3 生产计划 (7)1.3.4生产制造 (8)1.3.5采购建议 (9)概述商品部制定整体号型服的规格,尺寸,部位等,制定顾客的特殊形体,号型服的定制项目列表注意事项:1、定制商品部位的设置2、高级定制项目的定制3、号型服的设置4、顾客体征的设置适用范围:商品部,销售部1.定制基本流程1.1号型服建档流程程图第4页共21页咨询热线:400 - 600 - 9585网址:定制业务基本流程高级定制项目类别高级定制项目服饰爱好体型特征类别体型特征部位定制商品终端定制单定制确认单商品进货单商店配货单终端小票零售销货单1.2 流程描述流程号处理说明规范要求1 部位,根据不同类型的量体部位规则来进行设置。
确定不同大类的量体规则,第一次设置完成后基本不做改变2 高级定制类别作为高级定制的类别分类3高级定制项目隶属高级定制类别下的多个子类别4 服饰爱好顾客的喜好分类5 体型特征类别体型特征分类6 体型特征具体特征7 定制商品号型服,包括标准颜色,尺码,对应部位,以及各个部位标准长度,修正范围,修正基数等设置8顾客定制单终端根据店铺量体信息录入顾客定制单9定制确认单总部量体师确认终端回传定制单,如有需求做修改10商品进货单待定制商品加工完成后,做商品进货单11 商店配货单将定制商品配货至店铺12 零售小票单 销售定制成衣 13 零售销货单结转生成对应销售单据1.3操作说明 1.3.1 部位 1.3.1.1操作图解1、打开DRP 系统,点击基础档案,基础信息,部位,点击新增2、输入部位代码,部位名称,单位退当量,公差,点击保存,继续录入下一个1.3.2高级定制项目类别1.3.2.1操作图解1、登录DRP系统,打开基础档案,商品信息,高级定制项目类别2、点击新增,输入类型代码,类型名称,在下方选择适用范围明细,点击保存,录入下一个1.3.3 高级定制项目1.3.3.1操作图解1、打开基础档案,商品信息,高级定制项目,点击新增2、输入项目代码,输入名称,选择归属类别,是否为默认定制,如勾选则在定制选项中默认带出此项。
利用ERP流程操作整个订单流程

利用ERP流程操作整个订单流程
十一、发货准备
客户服务部每天填写是日发货计划,要求尽可能准确 及减少临时变动
此计划交三个部门: 物料:安排车量及准备货物 品管:尽早准备客户要求随货送的检测报告;及
对是日要发货的产品优先及时检测 生产:保证正在线上生产的要发货产品的及时进
利用ERP流程操作整个订单流程
七、下发物料
物料部根据PPC提供的生产计划安排时间表,在系统中 根据BOM计算得出的材料需求量,来发放物料到指定 工序和机台。
利用ERP流程操作整个订单流程
八、车间订单的执行及报告
车间按生产计划执行生产,并及时向PPC反馈不能按计 划执行的订单原因和特殊情况。
每个工序完成后,各工序利用条码系统来扫描工序文 件进行完工产量报数
的需求及实际库存情况。 -系统内的跟踪:利用客户计划跟踪其需求
利用ERP流程操作整个订单流程
十六、未来流程方向
二、客户计划处理流程
销售与客户签订《客户计划协议》注改成《客户批量 订单》,协议内容包括客户大致周期用量,及实际用 量与计划用量之间可接受的容差范围。注:在协议中 客户必需已确认最近周期的用量,后面的周期用量为 客户的大致预估。 工厂执行客户计划,下达已确认的周期用量,生成客 户订单。生产完成后,根据客户实际的要货时间及数 量发货(需在双方确认的容差范围内)。 这是一个循环的过程,但有时间的界定。
利用ERP流程操作整个订单流程
十六、未来流程方向
一、VMI(Vendor Managed Inventory):
VMI是指由供方替买方管理库存,买方向供方开 放产品需求及库存情况,由供方根据掌握的情 况向买方提出供货建议,并由买方确认后供货。
BSERP_DRP系统用户手册模板

BSERP_DRP系统用户手册模板1第一章前言BSERP/DRP分销管理系统是针对服装产品从进货到销售的分销管理系统, 实现商品的进货、调拨、配货、移仓、调整、零售和批发等进销存物流管理。
BSERP/DRP系统是在BS3000百胜服装管理系统的基础上研发的专业分销系统, 结合了1000多家服装和鞋类用户的各种需求, 业务流程与服装类企业的实际操作完全一致。
BSERP/DRP分销管理系统主要包括进货管理、渠道调拨、商店配货、客户批发、商店零售、调配管理、库存管理、代理商管理和综合统计分析等功能模块。
根据实际运用, 能够分为总部系统、远程渠道子系统和远程商店子系统, 远程渠道和商店系统能够与总部系统联网在线操作, 也能够采用数据传输系统实现与总部系统的联网离线操作。
第 1 节启动和退出BSERP_DRP1.1 BSERP_DRP的启动BSERP_DRP的启动包括两个部分: 服务端启动和BSERP_DRP 客户端的启动。
2第一步启动服务端1) 执行【开始】→【程序】→【BSERP百胜服装ERP系统】→【服务端程序】→2) 执行【开始】→【程序】→【BSERP百胜服装ERP系统】→【服务端程序】→第二步启用BSERP_DRP执行【开始】→【程序】→【BSERP百胜服装ERP系统】→【服务程序】→, 即可启动BSERP_DRP, 界面如图1-1所示。
31.2系统登录登录界面如图1-1所图, 分别输入渠道、用户名、密码, 点击”确定”按钮即可, 否则点击”取消”。
【提示】系统默认的渠道、用户名为”000”, 密码为”SYSTEM”。
具体的设置见相关章节。
1.3加载加载是系统获取基础数据的过程; 根据实际需求, 加载过程能够取消。
界面如图1-2所示。
41.4系统的退出方法一: 单击界面右上角的【关闭】按钮;方法二: 单击界面右上角”退出系统”快捷按钮;;方法二: 选择【工具】→【退出程序】菜单命令;方法三: 按CTRL+F12键, 关闭BSERP_DRP程序。
最新drp6自营店pos操作手册远程直连资料

操作手册目录一、登录好帮手店铺收银系统 (1)二、专卖店基本业务 (4)1.店铺收货 (4)2.销售(收银) (6)3.零售退换货 (8)4.店铺补货 (8)5.店铺退货(退回公司) (10)6.货品盘点 (11)7.店铺销售单查询 (15)8.库存综合查询 (16)9.店仓库存对帐 (18)南京陶玉梅自营店POS操作手册一、登录好帮手店铺收银系统1.操作:在桌面上点击“远程桌面连接”。
如果桌面上找不到,就点“开始→所有程序→附件→远程桌面连接”(有些是“开始→所有程序→附件→通信→远程桌面连接),用户可以发送一个快捷方式到桌面上,这样以后就可以直接从桌面上打开(图1-1)。
(图1-1)2.连接后进入WINDOWS 登录界面(图1-2)(图1-2)3.确定后,进入好帮手系统登录界面(图1-3):如果是本地离线软件,则直接打开好帮手系统2.点“连接”2.点“确定”(图1-3)在系统登录界面,点“高级”,可以在这里选择进不同的帐套(如下图1-4)。
比如,进“练习帐套”,平时的练习开单和试用,可以在学习帐套里做。
(用户名可以用“超级用户”,密码一般是123,如果不对的话,请联系公司的管理员)图1-44.进入系统后,显示“导航界面”(图1-5)1.输入公司分配的用户名和密码。
2.点“进入系统”点“高级”,可以选择不同的帐套。
点“后台专店管理”(图1-5)★导航界面不见了怎么办?点菜单“系统(Q)→打开启动画面(G)”。
二、专卖店基本业务1.店铺收货点击菜单“成品(E)→在途货品管理(I)→在途货收货(C)”进入“在途货收货”(图2-1),直接点“刷新”(默认是本店)就会出现在途的收货单,选择要收货的单号,点“查询明细”,打开“单据浏览明细”(图2-2),核对货品。
最后勾选单号,点“转为收货(C)”,货品就直接增加到本店。
(注意,一定要及时收货,不能漏。
如果收的实货与系统数目不一致,请及时联系公司)图2-1图2-2 单据浏览明细1.选择要收货的单号3.勾选单号4.点“转为收货”2.销售(收银)点击导航界面“后台专店管理”里的“店铺收银-新”,或者点击菜单“商店(F)→店铺收银-新(M)”进入收银界面 (图2-3)。
DRP项目(图片).pptx
上传图片
查看物料明细
查询物料
版权所有:尚学堂科技
尚学堂 手把手教程
Project
DRP—需求分析( 基础数据管理-物料维护-添加物料)
商务代表/主管
DRP系统
选择添加物料 输入待添加物 料的详细信息
[重试]
显示添加物料 界面
验证输入的数 据是否合法?
[不合法]
提示输入的数 据不合法
<<include>>
<<include>>
<<include>>
菜单定义
<<include>>
系统管理
<<include>>
角色菜单分配
<<include>> <<include>>
角色维护
其他。。。
查看在线用户
版权所有:尚学堂科技
尚学堂 手把手教程
DRP—需求分析( 系统管理-系统登录)
用户
输入用户名和密码
<<include>>
修改用户
查询用户
版权所有:尚学堂科技
尚学堂 手把手教程
Project
DRP—需求分析( 系统管理-用户维护-添加用户)
系统管理员
DRP系统
选择添加用户 输入待添加用 户的详细信息
[重试]
显示用户添加 界面
验证用户代码 是否合法?
[用户代码为空、重复或不符合要求]
提示用户代码 错误
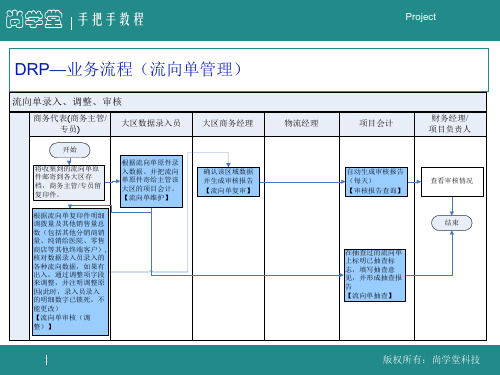
查看审核情况
在抽查过的流向单 上标明已抽查标 志,填写抽查意 见,并形成抽查报 告
数字采购订单用户手册说明书
Digital Purchase Order User ManualContentsGetting Started with DPO and a PO Book (3)What is DPO? (3)What is a PO Book? (3)How to Create a Purchase Order (PO) ............................................................................... 3/3 How to view and filter your POs .. (5)Find a Specific PO with an Advanced Search (5)How to Manage Your Email Notifications. (6)How to Open Your Purchase Order as a PDF (7)How to Add Invoice Information (8)How to Change the Account Code On a PO (9)How to Add Delivery Detail to a PO (10)How to Manage/Add an Attachment to a PO (11)How to temporarily Close and Reopen a Purchase Order (PO) (12)How to Amend a Purchase Order (PO) (12)How to VOID a Purchase Order (PO) (13)How to Approve or Decline a Purchase Order (PO) (14)Understanding the Administration Section of DPO (16)What is the Administration Section? (16)P.O. Book Information (16)Languages (16)Currencies (17)Custom Exchange Rates (17)Departments (17)Expenditure Types (17)Approval Levels (17)Users (18)User Roles (18)Chart of Accounts (19)Suppliers (19)Flags (19)Extra Fields (20)PO Settings (20)PDF Settings (20)Import (21)Export (21)Export PSL (21)Video Tutorials (22)Getting Started with DPO and a PO BookWhat is DPO?DPO, formally known as Digital Purchase Order, is an online application for creating, viewing, approving, editing, and sending purchase orders.You can access DPO by going to its website or download the app onto your mobile device from your available app store (Google play and App Store).With DPO, you can simply request, approve, and track everything on the go!What is a PO Book?A PO (Purchase Order) Book is what you will need to create in order to start using DPO. Each book has its own users, suppliers, and approval chain.A PO Book should be set up per company, per production. When a PO Book has been created for your production, you’ll receive an email with a link to log in and view your book(s) that you have access to. Below is an example of what you will see when you log in to DPO and is a view of all the PO Books you have created and have access to.How to Create a Purchase Order (PO)1. Log in to DPO and click into your PO Book.2. Click on the Create New P.O. tab in the navigation bar.3. Choose your department and supplier. The selections that appear in the dropdownhave been created and saved by an administrator on your production > Click Next.4. If you have the component section set up when creating a PO, this will need to becompleted > Click Next.5. Add the items/detail of your PO by clicking +Add Item.6. Next, enter the name of the item, expenditure type, quantity, and net price.7. These list of types that appear in the dropdown for Expenditure Type have beencreated and saved by an administrator.8. Next, you can choose from 3 options at this point: Save the PO as a “DRAFT”,“TEMPLATE” or Create a new P.O.9. A PO number will only be generated when the PO has been created.How to view and filter your POsYou can view all POs that have been created in the “View P.O.’s” tab in the top navigation bar.POs can be sorted by:•Least & Most Recent•Highest & Lowest PO Number•Approved & Pending•All•Amended•And moreBy default, POs will be sorted by Most Recent and Approved & Pending.They can also be sorted down the left-hand side of the page by:•Budget•Department•Supplier•Expenditure Type•CurrencyYou can also filter your view by “My Purchase Orders” or “All Purchase Orders.” By default, the view will show “All Purchase Orders.”Find a Specific PO with an Advanced SearchTo find a particular PO, you can perform an advanced search.Within the advanced search, you can filter by filters shown below, and also by “PO date created from-to,” and by “PO date approved from-to.”If you know the PO number you are looking for you can type this in the search bar found above the the “Total” column on the right side of the page.How to Manage Your Email Notifications.Each user, no matter what role you have been assigned, can manage your email notification s to determine which ones you’ll receive by email.1. To do this, click on your email in the top right side of the screen.2. Select Settings.3. Click Settings again on the screen below.You can select and unselect the relevant boxes to determine which notifications you would like to receive by email. You can also choose your default language, region, and currency.How to Open Your Purchase Order as a PDF1. On the “View PO” screen, find and click on the PO you would like to open as a PDF.2. In the toolbar at the top right of the screen, click the first icon ().3. You can choose from two options: Download the PDF or Open the PDF.How to Add Invoice InformationTo add invoice information to a PO, click the second icon ($) in the toolbar at the top of the “View PO” screen. Here you can add an invoice number, an invoice date, and an order number, which is usually your PO number.You can then record how much of the PO has been invoiced and add any notes.If you have the additional invoice feature set up, you can attach the invoice itself to an existing PO by clicking Manage Attachments and then either Save or Save & Send for Approval.•Choosing Save allows you to save the invoice detail and attachment for the PO.•Choosing Save & Send for Approval allows you to send the invoice detail and attachment through the approval chain for approval. The invoice will then go through the same approval chain as the PO.Note: Although the PO and invoice go through the same approval chain, they do not have to be approved together. Instead, they can be approved separately and go through the approval chain at different stages.Once the invoice detail has been added to the PO, it will appear in the PO detail when you open the PO, as shown below.You can add more than one invoice to a PO.You can click on the invoice detail shown in yellow to view its details, which shows the status of approval, the approval chain on the left-hand side, and any approval comments.You can delete the invoice information at any time without affecting the PO.How to Change the Account Code On a POAccount codes on POs can be changed at any time.1. Find and click on the PO you would like to edit on the “V iew PO” screen.2. Click in the “edit” box to make your changes.a. If you are unable to perform this action, you may not have the rightpermissions within DPO. This is something an administrator can change inthe administration section under “Users.”How to Add Delivery Detail to a PO1. Find and click on the PO you would like to add delivery info for on the “V iew PO”screen.2. Click on the third icon on the toolbar () to “Add New Delivery.”3. Add your order number and date of delivery.4. You can also input how much of the PO has been delivered and add any commentsor notes.How to Manage/Add an Attachment to a PO1. Find and click on the PO you would like to edit on the “V iew PO” screen.2. Click on the fourth icon on the toolbar () to “Add New Delivery.”3. On the “Manage Appended Attachments” screen, you can manage the existingattachments or add a new attachment by clicking +Add Attachment(s) or drag files in the box to automatically upload.4. Click OK when you’re done.How to temporarily Close and Reopen a Purchase Order (PO)1. Find and click on the PO you would like to edit on the “V iew PO” screen.2. Click on the eighth icon on the toolbar (!).3. This will allow you to temporarily close and reopen the purchase order, withoutaffecting the status of the PO.How to Amend a Purchase Order (PO)1. Find and click on the PO you would like to edit on the “V iew PO” screen.2. Click on the sixth icon on the toolbar ().3. You will see a message box appear asking if you’d like to“Amend Purchase Order?”4. Click Yes, Amend this P.O.5. DPO will bring up the details of this purchase order, which you can then amend.6. If the quantity or price is amended, DPO will redo the calculation.7. If you have the red Amendment Comment box set up in your DPO book, you mustwrite a comment in this box before amending the PO. You will not be able to amend the PO without a comment.8. Once finalized, the amendment comment will appear on the PO detail screen in ablue box.How to VOID a Purchase Order (PO)1. Find and click on the PO you would like to void on the “V iew PO” screen.2. Click on the seventh icon on the toolbar ().3. Next, then click Yes, Void Purchase Order.4. The purchase order will then appear in DPO as VOID.Note: When a PO has been VOID, you can copy the Voided PO to create a new “o pen PO”based on the same detail with a new PO number.To copy a PO, it means you are creating a new PO based on the one you are copying.How to Approve or Decline a Purchase Order (PO)When a PO is created, the first person in the approval chain will receive an email notification that a new PO has been created and awaiting their approval. They can log in to DPO via theweb or use the mobile application to view and accept or decline the PO.When you, the approver, log in to DPO, you will automatically land on the “View PO” screen like any other user. Any POs waiting for your approval will be found in the “Approval List”tab.The POs within this section awaiting approval will show oldest to newest, with the oldest PO at the top and newest PO at the bottom of the page. Unfortunately, you can’t change the view on this screen, but you can search by PO number within the search bar.On the Approval List screen, you can approve invoices if you are using the invoice feature within your DPO book.There are two separate sections within the “Approval List” tab: “PO Approvals” & “Invoice Approvals.”1. To approve a PO, select the PO you would like to approve. This will bring up thedetails of the PO, including the approval chain on the left-hand side.2. As you scroll down the page, you will see an option to Approve or Declineunderneath the comment box.3. You can add a comment relating to the option you choose in the comment box.4. At this point, you can see any user comments in a blue box on the screen, and youcan also see any previous approval comments (if someone approved before you).Understanding the Administration Section of DPOIf you have an administrator role in DPO, you will be able to see the “Administration” section if you click on your email in the top right corner of the screen.What is the Administration Section?The administration section in DPO is where those with the administrator role can make changes to the DPO book, add suppliers, departments, create and amend users, determine what rights and responsibilities each user has within DPO, and much more.P.O. Book InformationP.O. Book Information is the first section in the Administration screen.Within this section you can see all your P.O book information such as:•Book Name•PO Book Duration•Invoice address•PO Book LimitsYour PO Book Duration and Limits is something is discussed with our sales team when you first set up your DPO Book. These can both be extended if and when needed. LanguagesYou can set up your preferred languages in the “Languages” section.There are 3 languages available in DPO: English, German, and French.CurrenciesYou can set up your preferred currencies and determine your base, or default, currency in the “Currencies” section. To choose your base currency:1. Click on the star next to the currency once it has been added.2. In the example below, the base/default currency is USD Dollar, which is why it’sbolded.Custom Exchange RatesThis section is where you can add and customize your own exchange rates for currency conversion.DepartmentsThis section is where you can add departments that can then be used when creating a PO and assigning user’s to specific departments.Expenditure TypesThis section is where you can add Expenditure Types, such as Rental and Purchase. Users must fill out Expenditure Type when creating a PO.Approval LevelsThis section is where you can create your approval levels for your approval chain.You can create as many levels as needed and determine what each level is required to do. For example, Level 1 could be “Apply to ALL PO’s” and Level 3 could be “If the PO net total is => than 10,000 GBP.”UsersThis section is where you can add/invite new users, edit existing users’ visibility and rights in DPO, and assign them an approval level that has been created in the “Approval Levels”section.There are two things that cannot be edited:•T he user’s name•The user’s email addressIf these are wrong, the user will need to be deleted and re-added.1. To edit a user, click on the pencil icon () next to their detail.2. To delete a user, click the trash can icon ()User RolesThis section is where you can create and save user roles, such as User and Administrator, which are assigned to each user in the “Users” section.Chart of AccountsThis section is where you can add and save your chart of accounts, also known as your account codes.You will need to create the account name and then the account code when setting up. SuppliersThis section is where you can add suppliers or amend and delete existing suppliers.You can determine whether users can create a PO with existing suppliers only or create a PO with a supplier that does not exist.When creating a PO, a supplier will need to be added.FlagsIn DPO, you have the option to create colored flags and name them whatever you would like.In this section, you can create a flag by choosing a flag name and a color. If you want the flag to be visible to users so they can use it, select the box next to “Visible.” If you leave this unchecked, this flag will only be visible to you.These flags can then be assigned to POs on the “View PO s” screen to flag them as Urgent, for example.Extra FieldsThis section is where you can enable up to three extra fields, which will appear as three extra text fields when creating a new PO.The three extra fields can be named whatever you would like. For example: Asset, Episode, Tax Credit.PO SettingsThis section is where you can choose what the first PO number will be. You can choose how many digits you would like your POs to be and whether you would like a prefix before your PO number such as “SD.”You can also lock PO settings, such as Lock Purchase Orders after final approval or Lock Account Code after final approval (no amendments will be possible).You can also create a “Special Flag” in this section with a unique name. If you turn this feature on, you will be able to flag PO’s as “special.”PDF SettingsThis section is where you can choose the language and time zone that will reflect the format of dates and times shown on a PDF.You can also choose whether to include your invoice address on the PDF.You can add a CC or CCS recipient for when the PDF gets sent to the supplier by email. ImportThis section is where you can download an imported document to complete, and then we (the DPO team) can import your data into your PO book.We can import the following:•Vendor List•Catalogue Items•Chart of Accounts•Departments•Budgets•UsersExportThis section is where you can export the PO data into a CSV file, which can be viewable with spreadsheet applications like Excel and Google Docs.Export PSLThis section is where you can download an exported file for fully approved POs and then export that file into PSL.DPO creates a daily session which includes all the POs that are fully approved in that day.1. Click Download on a session to create the exported file.2. Once the export has been completed successfully, click the Completed box in green.It will show a date and a time the export was completed. This feature is alsocompatible with Global Vista.Video TutorialsThe last section within administration, is our video tutorials.You can copy the links for each of these videos and send them to anyone who doesn’t have access to the administration section. This will allow them to watch it the helpful vidoesYouTube.。
蓝豹区域DRP系统操作指南
蓝豹区域DRP系统操作指南区域DRP培训:本区域DRP培训不是针对所有的被培训对象,仅在DRP排程中对部分员工培训。
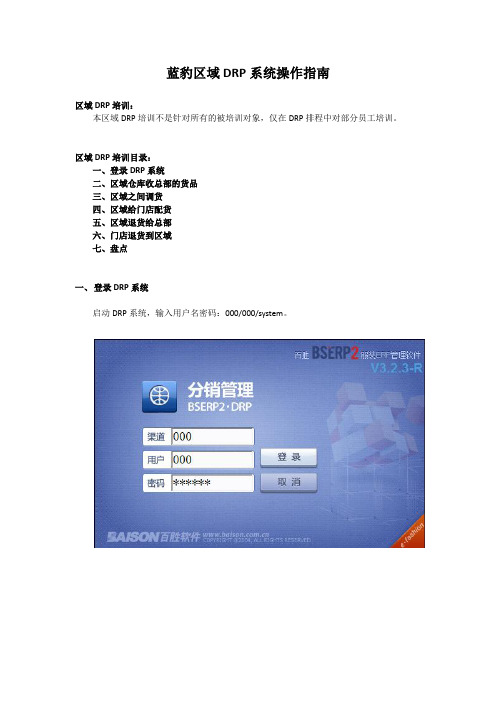
区域DRP培训目录:一、登录DRP系统二、区域仓库收总部的货品三、区域之间调货四、区域给门店配货五、区域退货给总部六、门店退货到区域七、盘点一、登录DRP系统启动DRP系统,输入用户名密码:000/000/system。
二、区域仓库收总部的货品:1)登录后,在左侧菜单空白区域双击鼠标左键。
2)点击“库存管理”,点击“商品移仓库”,点击“商品移仓单”;3)工作页面下部验收选择“未”,点击“查询”,找到未验收的“单据编号”后,点击单据编号。
4)在页面上面找到“入库”按钮,点击“入库”。
5)在弹出的页面左下角点击“获取明细”,在弹出的对话框中点“是”6)(见上图) 在“入库明细”页面,若收到的货品与单据发出的货品存在差异,进行数量修改,填写实际收到的数量。
调整完后点击“确认”按钮。
7)在页面上面,点击“验收”按钮。
再点击“是”,选择当前日期,点击“确认”。
三、区域之间调货(发货和收货):模拟上海分仓将某些货品转移给北京分仓1)登录后,在左侧菜单空白区域双击鼠标左键。
2)点击“库存管理”,点击“商品移仓库”,点击“商品移仓单”。
3)点击页面上面的“新增”。
4)选择“移入仓”(上海区域总库)和“移出仓”(北方区域总库(北京))。
5)在页面下部“商品代码”处点击“…”,选择商品;再点击“数量”处“…”,出入数量;点击页面下面右边的“保存”。
注意:不是页面上面的“保存”,而是页面下面右边的“保存”。
说明:若转移多个商品,则重复本步骤操作。
6)当转移商品录入完毕后,点击页面上面的“保存”按钮来保存单据。
7)再点页面上面的“发出”按钮。
注意:不要忘记了点“发出”按钮。
说明:收货雷同“二、区域仓库收总部的货品”。
四、区域给门店配货1)点击“商店配货”,点击“配货操作”,点击“商店配货订单”。
2)点击页面上部的“新增”按钮。
- 1、下载文档前请自行甄别文档内容的完整性,平台不提供额外的编辑、内容补充、找答案等附加服务。
- 2、"仅部分预览"的文档,不可在线预览部分如存在完整性等问题,可反馈申请退款(可完整预览的文档不适用该条件!)。
- 3、如文档侵犯您的权益,请联系客服反馈,我们会尽快为您处理(人工客服工作时间:9:00-18:30)。
经销商自助模块操作手册
目前在经销商自助模块中有客户对账单、客户余额查询、网上订单、网上订单打印、MVS 订单查询、订单处理进度、订单进展查询7项。
下面将分别对这7项功能进行介绍。
一、客户对账单的操作
操作方法:
1.基本操作:点击①『客户对账单』系统会自动弹出②客户对账单请求页面,输入需查询的区间点击提交,稍等数秒后系统会运行出相关报表。
2.重新提交:在运行出结果后,需要重新提交查询可以点击工具栏上的提交按钮,系统会弹出②客户对账单请求页面,以便用户重新提交查询请求。
3.导出报表:点击工具栏上的导出按钮,在弹出的界面中选择Microsoft Excel 97-2000(XLS),当然也可以导出为其他格式比如PDF等。
4.打印报表:点击工具栏上的打印按钮,在弹出的界面中选择指定打印机,即可打印该报表。
下图为客户查询指定时间段内的对账单样表:
二、客户余额查询的操作
操作方法:
1.查询余额:点击①『客户余额查询』切换到余额查询功能界面,点击工具栏上②查询按钮,在弹出的界面③中选择查询条件,提交即可查询出余额信息。
2.结果导出:点击工具栏上的导出按钮,可直接将查询结果导出至Excel。
下图为客户余额查询结果:
三、网上订单的操作
操作方法:
1.录入网上订单:点击①『网上订单』,然后点击工具栏上面的新建按钮弹出②订单录入窗口和③查询/新订单窗口。
2.可以通过窗口③来查询和新建订单,默认是查询订单。
该模式下可以直接在订单编号中输入需要查询的订单编号,点击确定系统会在窗口②中显示你查询订单的详细信息。
3.也可以通过窗口③新建订单,点击新建订单。
此时该界面的订单编号会被锁定,同时发货仓库、联系电话、订单日期被激活,新建订单必须输入这3个信息。
发货仓库:确定订货的产品是有那个工厂发出,该项目通过点击在弹出窗口中选择对应工厂信息。
联系电话:在提交订单后方便工厂发运人员与之联系的方式。
订单日期:提交订单的日期。
提交上述信息后即产生一个新订单,下步是录入订货的产品行:
4.录入产品订货行:点击
按钮,系统会弹出窗口①,点击产品名称后面
,系统会
弹出一个新窗口,在此窗口中选需要订货的产品。
在选择产品的时候,可以通过窗口右边的口味、规格、含量、容量这四个条件组合进行产品的筛选。
注意查询条件的选择:口味、规格、含量、容量(在选容量时,注意 1L 、1L 苗条的区分;在选择“全有”产品时,不用选择 口味,可在“查询”按钮上方的 % 后面输入“全
有”)。
也可以在“查询”按钮上方的 % 后面输入包装的名称,如:PET、康美等。
条件选择正确后再点击“查询”按钮。
比如:康美200ml100%苹果汁1*24,一般我们只需要选择口味为苹果、含量为100%,然后点击查询即可筛选出对应的产品。
下一步录入需采购的数量,提交后会生成一条新的订单行信息。
如此类推可以采用同样的方法录入第二个产品、第三个产品……。
在提交订货产品行的时候系统会自动进行库存匹配,如果产品不够用户的订货数量系统会给予提示,此时你需要更换产品或者调整订货数量。
当录入完需要订货的产品后,直接点击界面最下方的保存按钮即可完成订单的录入及提交。
与此同时工厂发运人员会接到相关订单信息的提醒,并会在第一时间根据你提供的联系电话与之联系。
根据公司管理需要在提交订单之前还需要录入“货款结算”、“发运信息”、“注意事项”,这3项信息,可分别点击界面位置①的相关按钮执行录入。
货款结算:点击按钮弹出窗口①“货款结算方式”,根据提示录入相关信息点击“确定”保存结算信息。
发运信息:点击按钮弹出窗口②“货物发运信息”,根据实际情况录入相关信息即可。
注意事项:点击按钮弹出窗口③“注意事项提醒”,在表单里面可以录入进货的相关要求,诸如:购进产品的规格,批次,等其他要求。
销售中心相关订单处理人员会根据您的要求给您处理订单。
以上全部信息录入完成后直接可以点击表单右下角的按钮,至此一份网上采购订单就完成了,于此同时系统会通过各种方式通知我们的订单处理员,我们在收到通知的第一时间为您处理。
1.修改网上订单:
点击工具栏上查询按钮,系统会弹出窗口①订单查询,我们可以直接选择开始日期和结束日期进行订单查询,如图选择开始时间为2008-11-01结束时间为2008-11-30这就是查询2008年11月份的全部已提交的订单。
也可以同时组合系统提供的其他几个选择条件,进行精确查找。
提交查询请求后系统会在主界面中显示符合条件的订单信息,如下图所示:
上图中编号为800811240004订单共有5行信息,双击5行中任意一行即可弹出800811240004订单详细界面。
如果在订单生成后发现某个或多个产品需要做调整,可以点击修改按钮对订单进行修改。
在提交订单修改请求的时候可能会弹出①“提醒:[×××××××]订单已经处理,无法修改。
”如果看见这个提示,说明该订单已由工厂发运人员处理完成,所以该订单已生效无法进行其他操作。
允许修改的订单,其订单行信息的修改和录入方法一样,直接双击需要修改的行,在弹出的新窗口①中修改产品或数量即可。
修改完成后直接保存,系统会自动通知该订单处理员做后
续处理。
四、订单打印的操作
操作方法:
1.基本操作:点击①『网上订单打印』系统会自动弹出②网上订单打印请求页面,输入需查询的订单编号点击提交,稍等数秒后系统会运行出相关报表。
2.重新提交:在运行出结果后,需要重新提交查询可以点击工具栏上的提交按钮,系统会弹出②网上订单打印请求页面,以便用户重新提交查询请求。
3.导出报表:点击工具栏上的导出按钮,在弹出的界面中选择Microsoft Excel 97-2000-仅限数据,当然也可以导出为其他格式比如PDF等。
4.打印报表:点击打印按钮,在弹出的界面中选择指定打印机,即可打印该报表。
下图为查询订单编号为【800811240004】订单打印样表:
五、MVS订单查询
此功能主要提供查询经销商在MVS系统中的订单,如下图:
操作方法:
1.基本操作:点击①『MVS订单查询』系统会自动弹出②MVS订单查询请求页面,输入需
查询的期间、经销商名称点击提交,稍等数秒后系统会运行出相关报表。
2.重新提交:在运行出结果后,需要重新提交查询可以点击按钮,系统会弹出②MVS 订单查询请求页面,以便用户重新提交查询请求。
3.导出报表:点击导出按钮,在弹出的界面中选择相应的格式。
4.打印报表:点击打印按钮,在弹出的界面中选择指定打印机,即可打印该报表。
六、订单的处理进度的操作
此功能主要提供查询经销商订单的处理进度,如下图:左边列出的是在ERP系统中的订单号,点击相应的订单号,右边会列出详细信息。
操作方法:
1.基本操作:点击①『订单处理进度』系统会自动弹出②订单处理进度请求页面,输入需查询的期间、经销商名称点击提交,稍等数秒后系统会运行出相关报表。
2.重新提交:在运行出结果后,需要重新提交查询可以点击按钮,系统会弹出②订单处理进度请求页面,以便用户重新提交查询请求。
3.导出报表:点击导出按钮,在弹出的界面中选择相应的格式。
4.打印报表:点击打印按钮,在弹出的界面中选择指定打印机,即可打印该报表。
七、订单的进展查询的操作
此功能主要提供查询经销商订单的进展情况,如下图:左边列出的是在ERP系统中的订单号,点击相应的订单号,右边会列出详细信息。
操作方法:
1.基本操作:点击①『订单进展查询』系统会自动弹出②订单进展查询请求页面,输入需查询的订单号、经销商名称点击提交,稍等数秒后系统会运行出相关报表。
2.重新提交:在运行出结果后,需要重新提交查询可以点击按钮,系统会弹出②订单进展查询请求页面,以便用户重新提交查询请求。
3.导出报表:点击导出按钮,在弹出的界面中选择相应的格式。
4.打印报表:点击打印按钮,在弹出的界面中选择指定打印机,即可打印该报表。