backtrack3 硬盘安装教程
免费无线网络_Backtrack3(BT3)_USB版!下载地址!免费分享
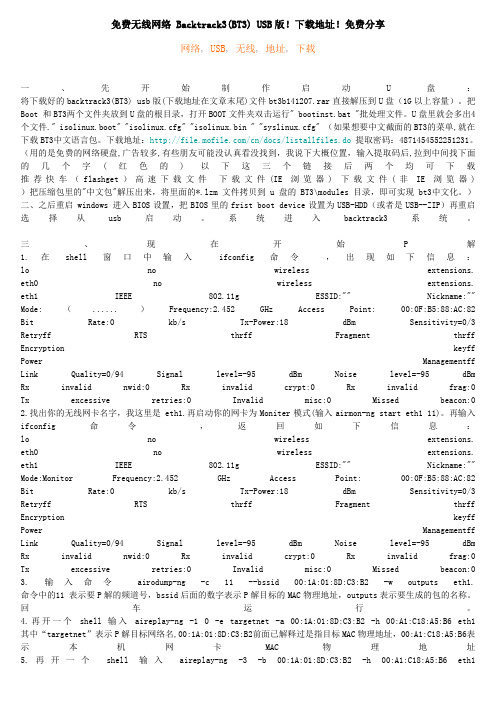
免费无线网络 Backtrack3(BT3) USB版!下载地址!免费分享网络, USB, 无线, 地址, 下载一、先开始制作启动U盘:将下载好的backtrack3(BT3) usb版(下载地址在文章末尾)文件bt3b141207.rar直接解压到U盘(1G以上容量)。
把Boot 和BT3两个文件夹放到U盘的根目录,打开BOOT文件夹双击运行" bootinst.bat "批处理文件。
U盘里就会多出4个文件." isolinux.boot" "isolinux.cfg" "isolinux.bin " "syslinux.cfg" (如果想要中文截面的BT3的菜单,就在下载BT3中文语言包。
下载地址:/cn/docs/listallfiles.do提取密码:4871454552251231。
(用的是免费的网络硬盘,广告较多,有些朋友可能没认真看没找到,我说下大概位置,输入提取码后,拉到中间找下面的几个字(红色的) 以下这三个链接后两个均可下载推荐快车(flashget)高速下载文件下载文件(IE浏览器) 下载文件(非IE浏览器) )把压缩包里的"中文包"解压出来,将里面的*.lzm文件拷贝到u盘的BT3\modules目录,即可实现bt3中文化。
)二、之后重启 windows 进入BIOS设置,把BIOS里的frist boot device设置为USB-HDD(或者是USB--ZIP)再重启选择从usb启动。
系统进入backtrack3 系统。
三、现在开始P解1.在shell窗口中输入ifconfig 命令,出现如下信息:lo no wireless extensions. eth0 no wireless extensions. eth1 IEEE 802.11g ESSID:"" Nickname:"" Mode:(......)Frequency:2.452 GHz Access Point: 00:0F:B5:88:AC:82 Bit Rate:0 kb/s Tx-Power:18 dBm Sensitivity=0/3 Retryff RTS thrff Fragment thrff Encryption keyff Power Managementff Link Quality=0/94 Signal level=-95 dBm Noise level=-95 dBm Rx invalid nwid:0 Rx invalid crypt:0 Rx invalid frag:0 Tx excessive retries:0 Invalid misc:0 Missed beacon:0 2.找出你的无线网卡名字,我这里是 eth1.再启动你的网卡为Moniter模式(输入airmon-ng start eth1 11)。
硬盘安装教程
硬盘安装教程
为了更好地说明如何安装硬盘,以下是具体的步骤:
1. 首先,确保你已经购买了一块适用于你的电脑的硬盘,并准备好了所需的安装工具,如螺丝刀和数据线等。
2. 关闭电脑并拔掉电源插头。
这是为了确保安全,并避免电击等意外情况发生。
3. 打开电脑机箱的侧面盖。
具体的操作方式因不同的机箱而异。
你可能需要用螺丝刀拆卸盖板上的螺丝,或者找到其他固定方式。
4. 在机箱内找到硬盘安装槽。
这通常是一个适合硬盘大小的金属架子或安装板。
5. 将新的硬盘轻轻地推入安装槽中,确保连接口朝向电脑的内部。
确保硬盘与安装槽相连接,并稳固地放置在里面。
6. 使用螺丝将硬盘固定到机箱的安装槽上。
这些螺丝通常位于槽的两侧,使用螺丝刀将其固定。
7. 找到一条适用于硬盘的数据线,一端连接到硬盘上的数据口,另一端连接到主板上的SATA或IDE接口上。
确保连接牢固,没有松动。
8. 根据需要,还可以连接硬盘的电源线。
一般情况下,电源线
由电源供应器连接到硬盘上的电源口。
确保连接稳固。
9. 确保所有连接都已经完成后,将电脑侧面盖重新安装,并用螺丝刀固定盖板上的螺丝。
10. 接通电源插头,重新启动电脑。
在操作系统启动后,你应该能够看到新安装的硬盘。
在安装过程中,请确保小心操作,避免对硬盘和其他零部件造成损坏。
如果你不确定如何进行安装,强烈推荐请专业人士协助。
TMR Tracker 3 安装指南说明书

Installing TMR TrackerYou have received the CD-Rom to install TMR-Tracker on your pc. Before you start you have to make sure that all programs are closed.TO INSTALL THE PROGRAM, COMPLETE THE FOLLOWING STEPS:1. Insert the CD-Rom into the CD-Rom drive of your pc. If the setup does not start automatically, you can click on theStart button on the Taskbar and select Run. Type ‘d:\setup.exe’. If your CD-Rom drive has a different letter, please fill in that one instead of ‘d’. Click OK2. Read the licence agreement and Accept.3. Fill in the Serial Number and click NextYour Serial Number is shipped with the CD. DO NOT LOSE THIS NUMBER! Software license is unique.Please secure for re-installation!4. Select your country and click Next 3 times. If you already installed TMR Tracker 3 before, you can select thecountry with Update behind it.5. If the System check is successful, press Start. The installation starts.6. After this you are asked to restart your pc. Accept and click Finish.7. By double-clicking the TMR-Tracker icon on the desktop you can start the program.8. A screen appears to select a farm. Click on Add Herd and fill in your herds name and number and click OK.9. The new herd is made. The Superpump may be started.10. If you start the program you will see it is not registered yet. Choose Help – Registration – Help in the menu-bar. Here you can find how to register the program. Please do this within 30 days; otherwise you will not be able to enter the program anymore!11. To be able to exchange data with the DataKey, you need to connect the Docking Station to your pc. WINDOWS XP:12. The Wizard New Hardware appears13. Select: ‘No, not this time’ en click Next twice, and Finish14. Repeat step 13.15. The drivers have been installed, de installation is finishedWINDOWS VISTA:16. The screen ‘New Hardware’ appears. You are asked to install leading programs. Click on this and click Next.17. Click ‘Not online’ followed by Next. After the drivers have been installed, press Finish.18. Repeat step 16-17 if prompted again.19. The drivers have been installed, de installation is finishedYou can find the help in the TMR-Tracker program by clicking on the help-icon.Main ScreenWhen you open TMR Tracker, you will see a number of sections on the main screen:• Main Menu• TMR Tracker Quick Icons• TMR Tracker Management Menu• TMR Tracker Screens AreaAdding IngredientsThis chapter describes how to add ingredients to TMR Tracker.1. Select the Ingredient list icon from the Quick Icons:2. The ingredient list is opened now. This screen may be empty if no ingredients are available. Press the button 'New'at the left bottom of the screen, another window is opened. In this screen you can fill in the basics of theingredients you use. Fill in a Display Name (6 characters as appears on the indicator), a Description (longingredient name) and the Dry Matter (%) if you want to use the dry weight of ingredients.You may want to fill in the other details, but for this quick start guide we skip the details.3. Press Ok to save the ingredient and repeat steps 2 and 3 as often as required to add your ingredients.4. Close the Ingredient List with the 'Close' button in the right bottom.You can now proceed with adding rations.Adding RationsThis chapter describes how to add rations to TMR Tracker.1. Select the Ration icon from the Quick Icons:2. The ration list is opened. Press the button 'New' at the left bottom of the screen to add a ration. Fill-in a DisplayName and Description for the new ration. Also fill in a rough estimation of the density (required to build loads). 3. Now you can add ingredients to this ration one-by-one by pressing the Add button. Fill-in the amount you want tofeed (kg/head or lbs/head) in the column 'Actual Load' or 'Dry Matter'.4. Repeat step 6 as often as required to build the ration. You can delete an ingredient using the Delete button andmove ingredients (load order) using the and buttons.5. When finished, press Ok to save the ration. Repeat steps 2-4 as often as required.You can now proceed with adding groups.Adding GroupsThis chapter describes how to add groups to TMR Tracker.1. Before adding groups, it is wise to decide whether you plan to use only one ration per group or more than one (onthe same day). Go to Program Settings > General Settings > Feeding Periods and select either 'Single Feeding' (for just one ration per group). Select 'Ok' to close the settings window.2. Select the Group List icon from the Quick Icons:3. The group list is opened. Press the button 'New' at the left bottom of the screen to add a group. Fill-in a DisplayName and Description for the new group. Set the Global Feeding Factor to 100 and fill in the number of cows.Select a group-type for this group.4. In the next tab part of this screen (the tab 'rations') you can select a ration to feed to this group. In the column'Description', click in the white text field below and then select the button. This will open a search-screen with the rations you just entered. Pick a ration for this group.5. When finished, press Ok to save the group and feeding settings. Repeat steps 3-4 as often as required to add yourgroups.We will need to add at least 1 mixer to send the data to. Adding a Mixer.Adding a MixerThis chapter describes how to add a mixer to TMR Tracker.1. Select the Mixer Control icon from the Quick Icons:2. The mixer control screen is opened. Press the button 'New' at the left bottom of the screen to add a mixer. Fill-in aDisplay Name and Description for the new mixer. Also fill in the load size and set the status to 'Active'. Press Ok to save the new mixer.3. You can add more mixers by repeating step 2, but right now 1 mixer will be sufficient.Before sending the data, we will need to add at least 1 driver, in order to be able to process the data when reading-in again. Adding an User (Driver).Adding an User (Driver)This chapter describes how to add an user (driver) to TMR Tracker.1. Select the User Management icon from the Quick Icons:2. The user management screen is opened. Press the button 'New' at the left bottom of the screen to add an user.Fill-in an ID-number (as used at the indicator) and Name for the driver. Enter a password for this user and repeat the password to prevent errors. Select the checkbox for 'Driver' and press Ok.3. You can add more users by repeating step 2, but right now 1 user will be sufficient.You are now ready to send data to the Indicator.Send DataThis chapter describes how to send data to the DataKey or DataLink system.1. Select the Send Data icon from the Quick Icons (DataKey or DataLink):2. The Send Data screen opened. The layout of this screen may depend on a number of settings, but for now weassume the settings as described in previous steps.Note that the right part of this screen is not available in DataLink, as the DataLink program composes Mixer Loads.3. Normally, this screen consists of 2 or 3 parts; at the left panel an overview of the feeding periods and mixers and inthe center panel all groups with feeding data is shown. In the right panel, the actual Mixer Loads have been composed. The left panel may not be visible in case of a single mixer & single feeding situation, then only 2 panels are available. Before sending the data to the DataKey / DataLink file, you can check a number of things.• Check load composition: Press the expand or collapse button in front of a mixer load to view which deliveries are in the load. Use the expand all or collapse all buttons to control the grid with a single mouse-click.• Feeding Order: Move groups up / down with the arrow-keys & . Don't forget to save the feeding order if you want to re-use this order the next time: .4. Before sending the loads, you'll have to set Communication Settings. Press the button 'Settings' in the left bottomto open the communication-settings screen. On the tab 'Communication', complete the configuration (either com-port setup for DataKey or output folder setup for DataLink). Press Ok to return to the 'Send Data' screen.5. Press the 'Send All Loads' button to send the data to the DataKey or DataLink-file. After sending the data, you canclose the screen and continue with the feeding process.Hint: During your first days, it may be comfortable to print the load sheet (Print Preview) and use it as a backup inorder to get acquainted with the Indicator menu.。
蹭网工具WinAirCrackPack工具包BT3 (BackTrack 3)的使用介绍

蹭网工具WinAirCrackPack工具包\BT3 (BackTrack 3)的使用介绍破解静态WEP KEY全过程发现首先通过NetStumbler确认客户端已在某AP的覆盖区内,并通过AP信号的参数进行‘踩点’(数据搜集)。
NetStumbler 下载地址/downloads/通过上图的红色框框部分内容确定该SSID名为demonalex的AP为802.11b类型设备,Encryption属性为‘已加密’,根据802.11b所支持的算法标准,该算法确定为WEP。
有一点需要注意:NetStumbler对任何有使用加密算法的STA[802.11无线站点]都会在Encryption属性上标识为WEP算法,如上图中SSID为gzpia的AP使用的加密算法是WPA2-AES。
破解下载Win32版AirCrack程序集---WinAirCrackPack工具包(下载地址:/download/wireless/aircrack/WinAircrackPack.zip)。
解压缩后得到一个大概4MB的目录,其中包括六个EXE文件:aircrack.exe 原WIN32版aircrack程序airdecap.exe WEP/WPA解码程序airodump.exe 数据帧捕捉程序Updater.exe WIN32版aircrack的升级程序WinAircrack.exe WIN32版aircrack图形前端wzcook.exe 本地无线网卡缓存中的WEPKEY记录程序我们本次实验的目的是通过捕捉适当的数据帧进行IV(初始化向量)暴力破解得到WEP KEY,因此只需要使用airodump.exe(捕捉数据帧用)与WinAircrack.exe(破解WEP KEY用)两个程序就可以了。
首先打开ariodump.exe程序,按照下述操作:首先程序会提示本机目前存在的所有无线网卡接口,并要求你输入需要捕捉数据帧的无线网卡接口编号,在这里我选择使用支持通用驱动的BUFFALO WNIC---编号‘26’;然后程序要求你输入该WNIC的芯片类型,目前大多国际通用芯片都是使用‘Herme sI/Realtek’子集的,因此选择‘o’;然后需要输入要捕捉的信号所处的频道,我们需要捕捉的AP所处的频道为‘6’;提示输入捕捉数据帧后存在的文件名及其位置,若不写绝对路径则文件默认存在在winaircrack的安装目录下,以.cap结尾,我在上例中使用的是‘last’;最后winaircrack提示:‘是否只写入/记录IV[初始化向量]到cap文件中去?’,我在这里选择‘否/n’;确定以上步骤后程序开始捕捉数据包。
硬盘安装教程
硬盘安装教程硬盘安装教程硬盘是计算机中存储数据的重要组件,它负责存储操作系统、软件程序、用户文件等。
如果你的电脑出现了储存空间不足的问题,或者想要将系统从机械硬盘升级到固态硬盘,都可以选择安装一个新的硬盘。
下面是硬盘安装的步骤:1. 首先,在将硬盘安装到计算机之前,需要关闭计算机的电源并拔掉电源插头,确保安全。
2. 打开机箱,找到硬盘的安装位。
通常来说,机箱内部会有专门的硬盘固定架或槽,将硬盘放入该位置。
3. 确保硬盘的接口朝向机箱后方。
现在大多数硬盘都使用SATA接口,同时也需要检查机箱是否支持SATA接口。
4. 使用螺丝刀将硬盘固定到硬盘固定架或槽上。
确保硬盘与固定架或槽连接紧密。
5. 接下来,需要连接硬盘和电源线以及数据线。
硬盘通常有两个接口,一个是用于供电的SATA电源接口,另一个是用于数据传输的SATA数据接口。
找到电源线和数据线的接口,分别连接到硬盘上。
6. 如果你是将硬盘作为系统盘使用,那么还需要对其进行分区和格式化。
在开机的时候,进入BIOS界面,选择硬盘作为启动设备。
7. 在操作系统安装界面中,选择磁盘管理工具,对硬盘进行分区和格式化操作。
8. 分区和格式化完成后,你就可以将操作系统安装到硬盘上了。
根据提示,进行相应的操作即可。
9. 最后,在操作系统安装完成后,重启计算机,进入系统。
在桌面上会出现新安装的硬盘驱动器,你可以开始使用它了。
总结:硬盘安装可能需要一些技术操作,但只要按照以上步骤依次进行,就能够顺利完成安装。
安装完成后,你可以根据自己的需求,将硬盘用来存储数据或者作为系统盘使用,提升电脑的性能和存储空间。
backtrack

BackTrack3 硬盘安装教程一硬盘安装backtrack31、我的虚拟机设置:256内存,iso文件位置为F:\bt3b141207.iso,硬盘为SCSI: 5G,网络:桥接2、启动虚拟机后,进入"BT3 Text m ode"3、输入用户名:root, 密码:toor 后,开始进行分区,命令如下:fdisk /dev/sdanp1回车+2930M (这个是主分区,想要完全安装的话至少不少于2900M,实际情况根据自己分的硬盘大小而定)np2回车回车wmkfs.ext3 /dev/sda1 (格式化主分区)mkswap /dev/sda2 (格式化交换分区)mkdir /mnt/backtrackmount /dev/sda1 /mnt/backtrackstartx在kde菜单里面的Backtrack下找Install Backtrack(Not Tested)Source(Backtrack CD)、Install Backtrack to、Write New MBR(lilo mbr to)默认即可,不用改动选Real,去掉Restore Original MBR after lilo前的叉按钮即可。
重启虚拟机即可。
虚拟机安装backtrack3重启后黑屏问题有原因在创建交换分区后加入这2步,其实这2步在安装windows98分区的时候就有,1.在创建交换分区后按T设置交换分区格式,这里输入分区的序号我这里是2 然后在输入分区格式,82 这里的82是linux交换分区格式Command (m for help): tPartition number (1-4): 2Hex code (type L to list codes): 82Changed system type of partition 2 to 82 (Linux swap)Command (m for help):2.设置交换分区格式后,按a激活引导分区, 引导分区一般是1分区Command (m for help): aPartition number (1-4): 1The resulting configuration should look like this:Command (m for help): pDisk /dev/hda: 8589 MB, 8589934592 bytes15 heads, 63 sectors/track, 17753 cylindersUnits = cylinders of 945 * 512 = 483840 bytesDevice Boot Start End Blocks Id System/dev/hda1 * 1 7028 3320698+ 83 Linux/dev/hda2 7029 17753 5067562+ 82 Linux swapCommand (m for help):一定要在创建交换分区后操作,如安装后黑屏的朋友请虚拟光盘启动后进入shell 执行这2步!。
如何安装硬盘?过程全显示

如何安装硬盘?过程全显示
(山东新华电脑学院整理供稿)如何安装硬盘?
(1)找到硬盘托架后,拉动扳手将托架取出,如图60所示。
图60 安装硬盘图解(一)
(2)将硬盘有文字标识的一面向上,放入硬盘托架中,并拧紧螺丝,如图61、62所示。
图61 安装硬盘图解(二)
图62 安装硬盘图解(三)
(3)将已装入硬盘的整个硬盘托架重新放入机箱,并将固定扳手拉回原位固定好托架,如图63所示。
图63 安装硬盘图解(四)
(4)正确连线。
硬盘连线包括电源线与数据线两条,其接口如图64所示,两者谁先谁后无所谓。
对于电源的连接,注意图中电源接口上的小缺口,在电源接头上也有类似的缺口,这样的设计是为了防止电源插头插反了。
早期的数据线都是40针40芯的电缆,而自ATA/66就改用40针80芯的接口电缆。
连接时,一般将电缆红线的一端插入硬盘数据线插槽上标有“1”的一端,另一端插入主板IDE口上也标记有“1”的那端。
数据线插反不要紧,如果开机硬盘不转的话(听不到硬盘自举的响声),多半插反了,将其旋转180度后插入即可。
BackTrack5(BT5)硬盘安装
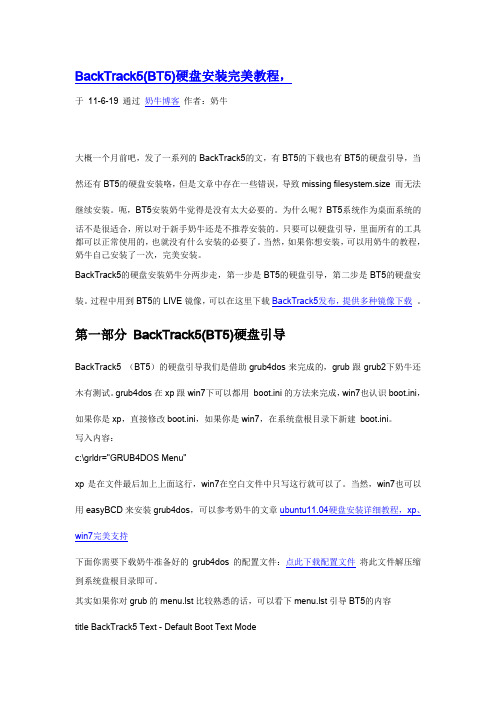
BackTrack5(BT5)硬盘安装完美教程,于11-6-19 通过奶牛博客作者:奶牛大概一个月前吧,发了一系列的BackTrack5的文,有BT5的下载也有BT5的硬盘引导,当然还有BT5的硬盘安装咯,但是文章中存在一些错误,导致missing filesystem.size 而无法继续安装。
呃,BT5安装奶牛觉得是没有太大必要的。
为什么呢?BT5系统作为桌面系统的话不是很适合,所以对于新手奶牛还是不推荐安装的。
只要可以硬盘引导,里面所有的工具都可以正常使用的,也就没有什么安装的必要了。
当然,如果你想安装,可以用奶牛的教程,奶牛自己安装了一次,完美安装。
BackTrack5的硬盘安装奶牛分两步走,第一步是BT5的硬盘引导,第二步是BT5的硬盘安装。
过程中用到BT5的LIVE镜像,可以在这里下载BackTrack5发布,提供多种镜像下载。
第一部分BackTrack5(BT5)硬盘引导BackTrack5 (BT5)的硬盘引导我们是借助grub4dos来完成的,grub跟grub2下奶牛还木有测试。
grub4dos在xp跟win7下可以都用boot.ini的方法来完成,win7也认识boot.ini,如果你是xp,直接修改boot.ini,如果你是win7,在系统盘根目录下新建boot.ini。
写入内容:c:\grldr="GRUB4DOS Menu"xp是在文件最后加上上面这行,win7在空白文件中只写这行就可以了。
当然,win7也可以用easyBCD来安装grub4dos,可以参考奶牛的文章ubuntu11.04硬盘安装详细教程,xp、win7完美支持下面你需要下载奶牛准备好的grub4dos的配置文件:点此下载配置文件将此文件解压缩到系统盘根目录即可。
其实如果你对grub的menu.lst比较熟悉的话,可以看下menu.lst引导BT5的内容title BackTrack5 Text - Default Boot Text Moderoot (hd0,0)kernel /casper/vmlinuz file=/preseed/custom.seed boot=casper text splash vga=791-- initrd /casper/initrd.gzboot下载好CD镜像后,用UltraISO将全部文件解压缩到系统盘根目录(你的系统盘)下即可。
- 1、下载文档前请自行甄别文档内容的完整性,平台不提供额外的编辑、内容补充、找答案等附加服务。
- 2、"仅部分预览"的文档,不可在线预览部分如存在完整性等问题,可反馈申请退款(可完整预览的文档不适用该条件!)。
- 3、如文档侵犯您的权益,请联系客服反馈,我们会尽快为您处理(人工客服工作时间:9:00-18:30)。
backtrack3 硬盘安装教程
文章作者:我还没挂
一硬盘安装backtrack3
1、我的虚拟机设置:256内存,iso文件位置为F:\bt3b141207.iso,硬盘为SCSI: 5G,网络:桥接
2、启动虚拟机后,进入"BT3 Text mode"
3、输入用户名:root, 密码:toor 后,开始进行分区,命令如下:
fdisk /dev/sda
n
p
1
回车
+2930M (这个是主分区,想要完全安装的话至少不少于2900M,实际情况根据自己分的硬盘大小而定)
n
p
2
回车
回车
w
mkfs.ext3 /dev/sda1 (格式化主分区)
mkswap /dev/sda2 (格式化交换分区)
mkdir /mnt/backtrack
mount /dev/sda1 /mnt/backtrack
startx
在kde菜单里面的Backtrack下找Install Backtrack(Not Tested)
选Real,去掉Restore Original MBR after lilo前的叉
按钮即可。
重启虚拟机即可。
虚拟机安装backtrack3重启后黑屏问题有原因
在创建交换分区后加入这2步,其实这2步在安装windows98分区的时候就有,
1.在创建交换分区后按T设置交换分区格式,这里输入分区的序号我这里是2 然后在输入分区格式,82 这里的82是linux交换分区格式
Command (m for help): t
Partition number (1-4): 2
Hex code (type L to list codes): 82
Changed system type of partition 2 to 82 (Linux swap)
Command (m for help):
2.设置交换分区格式后,按a激活引导分区, 引导分区一般是1分区
Command (m for help): a
Partition number (1-4): 1
The resulting configuration should look like this:
Command (m for help): p
Disk /dev/hda: 8589 MB, 8589934592 bytes
15 heads, 63 sectors/track, 17753 cylinders
Units = cylinders of 945 * 512 = 483840 bytes
Device Boot Start End Blocks Id System
/dev/hda1 * 1 7028 3320698+ 83 Linux
/dev/hda2 7029 17753 5067562+ 82 Linux swap
Command (m for help):
一定要在创建交换分区后操作,如安装后黑屏的朋友请虚拟光盘启动后进入shell 执行这2步!。