无外壳7寸触摸屏人机界面
LJD_eWinV5-ST(K)7产品规格书说明书

LJD_eWinV5-ST(K)7产品规格书目录■1. Cortex-A8&Win CE6.0系列嵌入式触控一体机 (2)1.1基本安全注意事项 (2)1.2 修订历史 (2)■2. Cortex-A8&Win CE6.0系列产品规格 (3)2.1 产品规格 (3)2.2 接口设置和功能 (5)2.3 安装尺寸 (6)2.4 安装示意图 (9)LJD_eWinV5-ST7安装示意图 (9)LJD_eWinV5-SK7安装示意图: (9)2.5 Cortex-A8&Win CE6.0系列产品配件及可接外围设备说明 (11)■3. 产品保修及供货周期正常 (12)■4. 后记 (12)■1. Cortex-A8&Win CE6.0系列嵌入式触控一体机本手册包含了LJD_eWinV5-ST(K)7型嵌入式触控一体机的硬件规格、使用和安装过程中的注意事项。
在使用LJD_eWinV5-ST(K)7型人机界面之前请仔细阅读本手册1.1基本安全注意事项1.1.1 注意事项● 请确保所有电缆接头都牢固连接到LJD_eWinV5-ST(K)7上。
●为了保证设备安全,请在接线之前拔下LJD_eWinV5-ST(K)7的电源线。
● 请勿用力或用硬物按压LJD_eWinV5-ST(K)7 的显示屏,以免造成触摸屏和液晶屏的损坏。
● 需要返修的产品,客户需将返修产品包装好避免运输过程中显示屏、触摸屏的碎裂以及产品外壳的损坏。
一切后果由客户承担。
1.1.2 警告(1)系统设计● 请勿在LJD_eWinV5-ST(K)7上制作可能危及设备及人员安全的开关,如紧急停机开关,这些操作应该由独立的硬件开关来执行,以防止电缆以及其它相关设备的损坏导致可能造成重大事故。
● 请勿将LJD_eWinV5-ST(K)7用作可能造成严重人身伤害、设备损坏或系统停机等重要报警的警示设备。
(2)接线● 为了防止触电,请在接线之前拔下LJD_eWinV5-ST(K)7的电源线。
波士恰7英寸触摸屏LCD说明书

Supports various systems7inch HDMI LCD (B) (with bicolor case)Working with Raspberry PiFor the Windows OS on PC, the resolution of the LCD is automatically identified. Hence, you do not need to make the relative settings. When working with Raspberry Pi, you should set the resolution of the LCD by yourself, or else the LCD screen will not work. For more detail information, please read the following section.Turn on the "backlight" switch then connect the LCD to your Pi (HDMI Port of LCD -> HDMI Port of Pi; USB Port of LCD -> USB Port of Pi; 5V~2A power supply). Download the Raspbian image from Raspberry Pi web site (https:///downloads/). Write the image to a TF card and append the following lines to the config.txt file which is located in the root of your TF card:max_usb_current=1hdmi_group=2hdmi_mode=87hdmi_cvt 800 480 60 6 0 0 0hdmi_drive=1You must make sure that there are no spaces on either side of the equal sign.Save and connect the TF card to your Pi then power up.(Touch input working well means that the LED firmware is Rev2.1. If the LCD firmware is 1.1, see#About LCD revision)Note: Resolution of Ubuntu Mate OS or Windows 10 IoT Core OS can also be set properly by editing config.txt.RotationDisplay RotatingTo rotating the display, you can append this statement to the config filedisplay_rotate=1 #1: 90; 2: 180; 3: 270Reboot the Raspberry Pisudo rebootTouch rotatingWith the operation above. The screen could rotate in display. However, the touch works improperly. To rotate the touch as display, you could do as below:1. install libinputsudo apt-get install xserver-xorg-input-libinput2. create an xorg.conf.d foldersudo mkdir /etc/X11/xorg.conf.d3. copy file 40-libinput-conf to the folder which we createdsudo cp /usr/share/X11/xorg.conf.d/40-libinput.conf /etc/X11/xorg.conf.d/4. Append a statement to touchscreen part of the file as below:sudo nano /etc/X11/xorg.conf.d/40-libinput.conf5. save and reboot your Pisudo rebootAfter completing these steps. The LCD could rotate 90 degree both display and touch.Note:90 degree: Option "CalibrationMatrix" "0 1 0 -1 0 1 0 0 1"180 degree: Option "CalibrationMatrix" "-1 0 1 0 -1 1 0 0 1"270 degree: Option "CalibrationMatrix" "0 -1 1 1 0 0 0 0 1"About LCD revisionAn LCD with Rev 2.1 firmware does not require any drivers, that is, touch function works properly without installing any software. So we did not provide any drivers and images for Rev 2.1 LCDs. The following drivers are only available for the LCD with Rev 1.1 firmware. But if you install the driver for the Rev 2.1 one, it will lead touch function not to work.Rev2.1 New FeaturesStandard HID protocol, easy to be integrated into your system.For the Raspberry Pi, supports Raspbian, Ubuntu Mate, single touch, and driver free.When work as a computer monitor, supports Windows 10/8.1/8/7, five-points touch, and driver free.Rev1.1 and beforeFor the Raspberry Pi, comes with Raspbian driver (works with your Raspbian directly), andUbuntu imageWhen work as a computer monitor, touch function is unavailableHow to distinguishSee the backside of your LCD. The Revision number "Rev2.1" printed means that the LCDfirmware is Rev 2.1.However, "Rev1.1" printed on the backside doesn't mean that the LCD firmware must be Rev 1.1.Generally speaking, a LCD shipped after January 1, 2016 may be a Rev 2.1 one, although it was printed "Rev1.1".Note: The only difference between Rev 1.1 and Rev 2.1 is the firmware, but hardware solutions, placement and routing are all the same. (PCB printings might be different due to different production batches.)You can verify the firmware by these steps:1. Using Raspberry Pi: Connect the LCD to your Pi (HDMI Port of LCD -> HDMI Port of Pi; USB Port of LCD -> USB Port of Pi; 5V~2A power supply). Download the image, e.g. Raspbian 2015-11-21 jessie or Raspbian 2015-05-05 wheezy, from Raspberry Pi web site (https:///downloads/). Write the image to a TF card and add the following code to the end of /boot/config.txt:max_usb_current=1hdmi_group=2hdmi_mode=87hdmi_cvt 800 480 60 6 0 0 0hdmi_drive=1You must make sure that there are no spaces on either side of the equal sign.Save and connect the TF card to your Pi then power up. If touch works, that means the firmware revision is Rev 2.1.2. Without Raspberry Pi: A PC (Windows 10/8.1/8/7) is required which cannot connect with other display device. Connect the LCD to your PC (USB Port of LCD -> USB Port of PC; HDMI Port of LCD -> HDMI Port of PC. Please first connect the USB Ports then connect the HDMI Port). If a new touch drive is recognized by Windows, that means the firmware revision is Rev 2.1. In this case, after the driver successfully installed, you can use the LCD as a human interface device.If the touch function doesn't work properly after these steps, the firmware revision is often Rev1.1, which can also work by other methods, see Rev 1.1 Manual.Detailed informationDepending on the firmware, please view the instructions of different revision:[Expand] [Expand]7inch HDMI LCD (B) (Firmware Rev 2.1) User Manual7inch HDMI LCD (B) (Firmware Rev 1.1) User Manual(Not support Raspberry Pi 3 Model B)(/wiki/7inch_HDMI_LCD_(B)_(Firmware_Rev_1.1)_User_Manual)How to install 7inch Bicolor caseResourcesAn LCD with Rev 2.1 firmware does not require any drivers, that is, touch function works properly without installing any software. So we did not provide any drivers for Rev 2.1 LCDs.7inch HDMI LCD (B) image - used for the LCD with firmware Rev2.17inch HDMI LCD (B) image - used for the LCD with firmware Rev1.1Drivers (only support Rev1.1 LCD)Out of date, Not available for any Raspbian OS later than 27-May-2016.RPI2B_B_B+_USB_TOUCH_CAP_7.0_RASPBIAN.tar.gz(https:///file/d/0B5ceUb50sIDnOFhsZ3IteGVGXzA/view?usp=sharing) (For Raspberry Pi 2 Model B)RPIB_B+_USB_TOUCH_CAP_7.0_RASPBIAN_20150605.tar.gz(https:///file/d/0B5ceUb50sIDnbndweF9PMGQ3UHc/view?usp=sharing) (For Raspberry Pi B+/A+/B)3D Drawings7inch HDMI LCD B/C DrawingsLCD Panel Dimension7inch HDMI LCD (B) panel dimension (/w/upload/3/34/7inch-hdmi-lcd-b-panel-dimension.pdf)Anti-PiracySince the first-generation Raspberry Pi released, Waveshare has been working on designing,developing, and producing various fantastic touch LCDs for the Pi. Unfortunately, there are quite a few pirated/knock-off products in the market. They're usually some poor copies of our early hardware revisions, and comes with none support service.To avoid becoming a victim of pirated products, please pay attention to the following features when purchasing:。
WQT系列触摸屏用户手册V4.32(硬件编)

WQT系列触摸屏用户手册(硬件篇)Revision 4.30感谢您购买使用广州市微嵌计算机科技有限公司WQT系列触摸屏产品!广州微嵌是一家自主研发工业自动化设备的高新技术公司,我们一直致力于触摸屏(人机界面)和组态软件核心技术的研发、制造。
自主研发、高性价比、完善的服务体系是我们立足的根本。
微嵌触摸屏产品包含:硬件(WQT系列触摸屏)、软件(组态编辑软件WQT Designer)两个部分。
硬件采用ARM9高速CPU(400MHZ)、数字TFTLCD(LED背光显示)、高精度电阻式触摸屏。
软件可以用于快速构造和生成嵌入式计算机监控系统运行程序,工程以窗口为单位,构造用户运行系统的图形界面,通过对现场数据的采集处理,以动画显示、报警处理、流程控制和报表输出等多种方式显示,用户只需要通过简单的操作就可构造自己的组态,从而把用户从繁琐的编程中解脱出来,让更多的用户在使用人机界面产品时得心应手。
WQT系列触摸屏产品主要应用在工业自动化控制系统领域,在各行业都有越来越广泛的应用,比如纺织机械、卷染机械、塑料橡胶机械、注塑机、包装机械、超声波设备、电子焊接设备、印刷机械、食品机械、医疗机械、木工机械、电力系统、轨道交通、煤炭系统、空调行业、加工车床行业、轮胎行业、测控仪器、先进制造系统与设备等通用装备控制行业等等。
请仔细阅读此手册以保证正确使用。
若您需要进一步的了解我司产品以及获得更多的技术支持请通过电话方式与我们联系,我们将真诚为您服务。
!注意●请勿将电源线与通讯电缆捆缚在一起或靠得太近,应保持10cm 以上距离。
●请不要随意安装实习机的模块,改装接线。
否则会引起故障、误动作、损失、火灾。
●当WQT 产品发出异臭或噪音时,请立即关闭电源开关(上电后蜂鸣器的短促叫声为正常)。
●请不要用前端尖锐的物体,如笔、螺丝刀等按压触摸屏,易导致屏幕破损和故障。
●安装本产品时,请务必拧紧螺丝,避免脱落。
●请正确地运输、安装、存储、装配及维护本产品,否则可能造成触摸屏的损坏。
Eaton 7寸人机界面(HMI)说明书
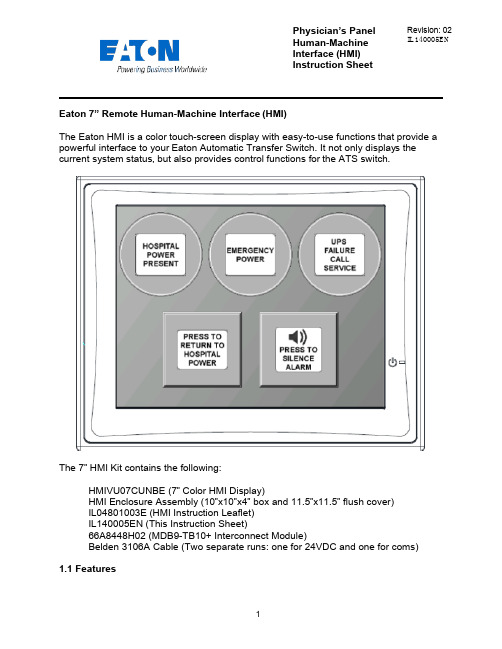
Physician’s Panel Human-Machine Interface (HMI) Instruction Sheet Revision: 02 IL140005ENEaton 7” Remote Human-Machine Interface (HMI)The Eaton HMI is a color touch-screen display with easy-to-use functions that provide a powerful interface to your Eaton Automatic Transfer Switch. It not only displays thecurrent system status, but also provides control functions for the ATS switch.The 7” HMI Kit contains the following:HMIVU07CUNBE (7” Color HMI Display)HMI Enclosure Assembly (10”x10”x4” box and 11.5”x11.5” flush cover)IL04801003E (HMI Instruction Leaflet)IL140005EN (This Instruction Sheet)66A8448H02 (MDB9-TB10+ Interconnect Module)Belden 3106A Cable (Two separate runs: one for 24VDC and one for coms)1.1 FeaturesThere are two types of features incorporated into the HMI: Status and Control. Below are lists of each:StatusHospital Power PresentEmergency PowerUPS Failure – Call ServiceWaiting to Retransfer to Hospital PowerAlarm Muted/Un-mutedControlManual Retransfer to Hospital Power buttonAlarm Silence button1.2 Set-up and WiringTo connect your HMI assembly to your Automatic Transfer Switch, simply follow the wiring diagram S002 (Sheet 3 of 5) or use this quick-reference guide.Each of the supplied Belden 3106A cables (two lengths of 30m) has three insulated wires and one ground connected to the shield of the cable. One cable is for 24VDC power; the other cable is for communications. Stickers are attached to each cable for identification.The UPS Alarm Contact wire max length/size is 92000 ft. (22AWG) to 370000 ft. (16AWG)All wire connections inside the HMI enclosure come pre-assembled from the factory. However, if the wire ever needs to be replaced or serviced, please refe rence the following information:Inside the HMI enclosure, the communication connector (Figure 1) connects to the HMI’s COM2 port (see item “B” on Figure 2). The module has screw-type terminal blocks to terminate the communication cable wiring. After the wires are installed, simply plug the adapter into COM2, and screw in both sides of the connector to the device. A picture of the adapter (Figure 1) is shown below. 24VDC power is done the same way. Wires are terminated in a green screw-type terminal block that plugs directly into the HMI. Termination points noted on drawing S002 (Sheet 3 of 5).Figure 1 - Serial Termination ModuleFigure 2 - HMI Rear-ViewThe communication setpoints on the ATC-300+ should be set from the factory as follows:Baud Rate: 9600Address: 01Terminated: Off (termination micro-switch on back side of ATC-300+)There is a hidden system menu in the HMI that allows the operator to change items like touch screen force, touch screen calibration, time & date, brightness & contrast, alarm and touch volume, and others. The HMI should be set up so the user will not have to adjust anything in the field. If a change is desired, open the HMI enclosure and press the small SYSTEM button (item “H” in Figure 2) on the back of the unit for threeseconds. This will take you to the system menu. The menus are self-explanatory, but if help is required, see instruction leaflet IL04802001E located in the plastic document pouch inside your ATS enclosure. After the adjustments have been made, simply push “Home”, followed by “Run”.1.3 Functional DescriptionThe HMI is programmed with one main screen which shows both status and control of the ATS unit. It also includes an audible alarm.Figure 3 - Main Screen (Indicators ON) Indicator #1Hospital Power Present – Green (ON), Gray (OFF)#4#5This indicator turns green when the main hospital power is present and available. It does not indicate that the ATS is connected to hospital power or not.Indicator #2Emergency Power – Red (ON), Gray (OFF)This indicator turns red when the ATS is connected to UPS backup power.Indicator #3UPS Failure Call Service – Flashing Yellow (ON), Gray (OFF)This indicator starts flashing yellow when the dry contact in the UPS system closes, indicating that there is a system failure at the UPS.Indicating Button #4Press To Return To Hospital Power – Flashing Blue (ON), Gray (OFF)This is a dual purpose indicator/button. The button will start flashing blue when the ATS unit is waiting to manually retransfer back to hospital power. To retransfer, simply press the button on the HMI screen, and the ATS unit will connect to hospital power. Pressing the button while it is gray will have no effect. Note: the transfer switch will automatically transfer back to Hospital Power if Emergency Power becomes unavailable while connected to Emergency Power. This is an automatic failsafe feature.Indicating Button #5Press to Silence/Un-Mute Alarm – Orange (ON), Gray (OFF)This button is used to silence the alarm tone when it is active. Pressing it will change the button color from gray to orange; the speaker icon will change to a muted symbol as well. To un-silence the alarm, press the button again. The alarm will continue to sound, and the button will change back to gray.AlarmsWaiting to Retransfer – Audible (Continuous Tone).The HMI will produce and audible alarm tone whenever the system is waiting for a user input to return to hospital power (Return to Hospital Power button is flashing blue). It will automatically go away as soon as the system transfers back to hospital powe r, or if the system is no longer waiting to return to hospital power. To manually silence the alarm tone, simply press the alarm silence button (Indicating Button #5).CAUTIONThis is a remote control device. Caution should be observed to make sure that appropriate procedures are in place when using manual retransfer. Appropriate procedures include, but are not limited to, switch doors being closed and latched, personnel knowledgeable of transfers, and other site safety recommended procedures.。
Pro-face 5.7英寸触摸屏操作器界面 TouchPanel 产品数据表说明书

Connectivity
(WKHUQHW0XOWL/LQNIXQFWLRQ
0DVWHU
7KH(WKHUQHW0XOWL/LQNIXQFWLRQ DOORZV\RXWRHDVLO\DGGD*3DV DVXEGLVSOD\WRWKHIDFLOLW\ ZLWKRXWFKDQJLQJDQ\VHWWLQJVRI WKHFRQWUROGHYLFH
PLC Cables & Accessories See AGP3000 Connectivity Document
Caution: Before operating any of these products, please be sure to read all related manuals thoroughly. - All product names used in this document are trademarks or registered trademarks of their
-20 to 60 °C [-4 to 140 °F] 800hPa to 1114hPA (2000 meters or lower) CE, UL Listed Cl 1 Div 2, RoHS, ABS (American Bureau of Shipping), DNV (Norway – Marine) 10 to 90 % RH (Wet bulb temperature: 39 °C [102.2 °F] or less - no condensation.) Noise Voltage: 1,000 Vp-p, Pulse Duration: 1 µs, Rise Time: 1 ns (via noise simulator) Natural air circulation Contact Discharge Method: 6 kV (IEC/EN61000-4-2 Level 3) IEC/EN61131-2 compliant, 5 to 9 Hz Single amplitude 3.5 mm [0.14 in.], 9 to 150 Hz Fixed acceleration: 9.8 m/s², X, Y, Z directions for 10 cycles (approx. 100 min) IEC/EN61131-2 compliant 147 m/s2, X, Y, Z directions for 3 times Equivalent to IP65f, Nema #250 Type 4x/13 (Equivalent to NEMA 12 with the addition of “Oil or Spraying and Splashing”) when properly installed in an enclosure 0.8 kg [1.8 lb] or less (display unit only) W169.5 x H137 x D59.5 mm [W6.67 x H5.39 x D2.34 in.] Two-year standard (maximum 4 years)
人机界面-造型手册960822
640*480Pixels 18bit全彩(26萬色) 226(W) * 168(H) mm
400cd/㎡ 冷陰極螢光燈 ( CCFL ) 常溫25℃操作下,壽命長達50,000小時
無 模擬4線式 至少1,000,000次
IP65 12MB PWR(綠)、COM1(紅)、COM2(黃) 9Pin D-Sub母頭 ( RS232 ) 9Pin D-Sub公頭 9針D型公介面 ( RS422 / 485 ) USB 1.1 ( 12Mbps ) Host端 、 Client端 H型:Host + Client E型:IEEE 802.3 Ethernet 10Base-T ( 工業乙太網路10Mbps ) 0℃ to 50℃ 10%RH-90%(不結露) 溫度39℃或更低
彩色TFT液晶顯示器 7.0吋
480 * 234 Pixels 18bit全彩(26萬色) 123.2 (W) * 84.7 (H) mm
380 cd/m2 冷陰極螢光燈 ( CCFL ) 常溫25℃操作下,壽命長達50,000小時
模擬4線式 至少1,000,000次
IP65 12MB PWR(綠)、COM1(紅)、COM2(黃) 9Pin D-Sub母頭 ( RS232 ) 9Pin D-Sub公頭 ( RS422 / 485 ) USB 1.1 ( 12Mbps ) Host端 、 Client端 N型:只有Client端 H型:Host + Client E型:Host + Client E型:IEEE 802.3 Ethernet 10Base-T ( 工業乙太網路10Mbps ) 0℃ to 5℃ 10%RH-90%(不結露) 溫度39℃或更低
市面上常见HMI品牌介绍

一、专业做HMI的品牌:1、Proface(普洛菲斯)普洛菲斯国际贸易(上海)有限公司作为日本迪吉特株式会社(Digital Electronics Corporation)投资的公司,以其创新的科技理念和领先的技术意识为全球客户提供可编程人机界面、工业平板式计算机、图形逻辑控制和工业信息终端等产品,帮助广大用户提高整体生产、经营效率。
Pro-face 这一品牌也在全球范围占主导地位,成为全球HMI行业领袖,在亚洲、美洲、欧洲都占有极高的市场占有率。
自2001年在中国成立公司进入中国市场以来,取得了骄人的业绩,赢得了国内工控领域的良好口碑,现已成为业内主导品牌之一。
Digital在江苏省无锡市设立了工厂,现在Digital已经成为施耐德旗下品牌。
2、HITECH(海泰克)HITECH是台湾的一个品牌,在中国大陆称为海泰克。
它是台湾泉毅电子股份有限公司的品牌,公司成立于1981 年,初期制造用于笔上的电子表。
为了将泉毅转型为以技术导向为主的公司,于1984 年开始研发制造LCD模组。
在当时,泉毅为台湾第一家成功开发LCD模组的厂商。
1990年泉毅成立一个新的R&D部门来积极投入应用于工业自动化领域的人机介面(HMI)研发工作。
泉毅是台湾第一家将嵌入式系统技术结合LCD模组,自行研发出工业级HMI产品的厂商。
经过多年的努力,泉毅已经建立起HMI的自有品牌HMI-Hitech PWS系列,销售据点遍及全世界,包括亚洲、美国及欧洲等。
其已经被瑞典贝尔收购,已经归入贝尔旗下。
其在大陆主要通过天津罗升销售。
目前在国内市场占有率比较高,但已经呈下降趋势。
3、BEIJER(北尔)来自瑞典的BEIJER电子集团,欧洲第一人机品牌,连续3年获得全球工业设计最佳奖IF设计大奖,全系列人机采用铝镁合金外壳设计,纤薄抗干扰能力强,64K TFT真彩显示,画面靓丽清晰,内嵌WinCE操作系统,功能强大,可靠性高,前面板防护等级为IP66,通过UL\DNV\RoHS等多种认证。
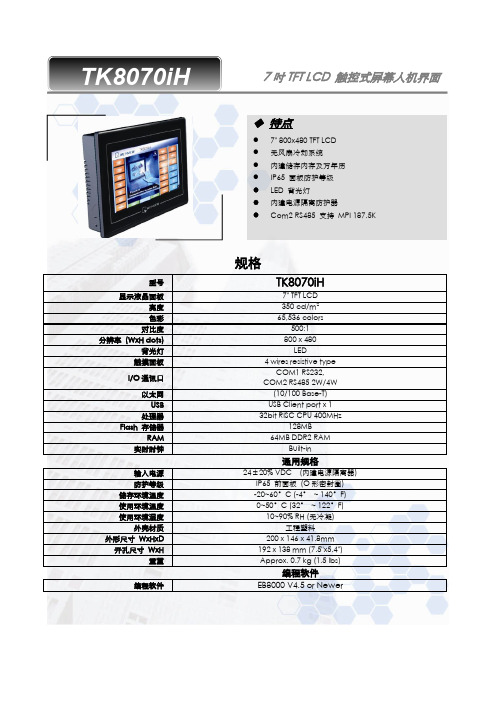
TK8070iH_DataSheet_CHS_120525
规格型号TK8070iH显示液晶面板7"TFT LCD 亮度350cd/m 2色彩65,536colors对比度500:1分辨率(WxH dots)800x 480背光灯LED触摸面板4wires resistive typeI/O 通讯口COM1RS232,COM2RS4852W/4W 以太网(10/100Base-T)USB USB Client port x 1处理器32bit RISC CPU 400MHzFlash 存储器128MBRAM 64MB DDR2RAM实时时钟Built-in通用规格输入电源24±20%VDC (内建电源隔离器)防护等级IP65前面板(O 形密封圈)储存环境温度-20~60°C (-4°~140°F)使用环境温度0~50°C (32°~122°F)使用环境湿度10~90%RH (无冷凝)外壳材质工程塑料外形尺寸WxHxD 200x 146x 41.8mm 开孔尺寸WxH192x 138mm (7.5"x5.4")重量Approx.0.7kg (1.5lbs)编程软件编程软件EB8000V4.5or NewerTK8070iH7吋TFT LCD 触控式屏幕人机界面◆特点●7"800x480TFT LCD ●无风扇冷却系统●内建储存内存及万年历●IP65面板防护等级●LED 背光灯●内建电源隔离防护器●Com2RS485支持MPI 187.5K◆Dimensions Drawing24VDC FGFront ViewRear ViewBottom Viewa Jumper&Reset button d Ethernet portb.Fuse e USB Client portc.Power connector f Com1RS232,Com2RS4852W/4WPin#Symbol Com1[RS232]Com2[RS485] 4w2w1Rx-Rx-Data-2Rx+Rx+Data+ 3Tx-Tx-4Tx+Tx+5GND GND6TxD TxD7RTS RTS8CTS CTS9RxD RxD订货信息❑TK8070iH:7"800x480TFT LCD HMI,128MB flash memory/64MB DDR2RAM on board.❑RZCMT6100:USB download cable/Mini USB to USB2.0100cmTK8070iHTK8070iH_DataSheet_CHS_120524。