37303730xl中文简明使用手册(40页)
ABI3730xl型测序仪日常维护标准操作规程(SOP)
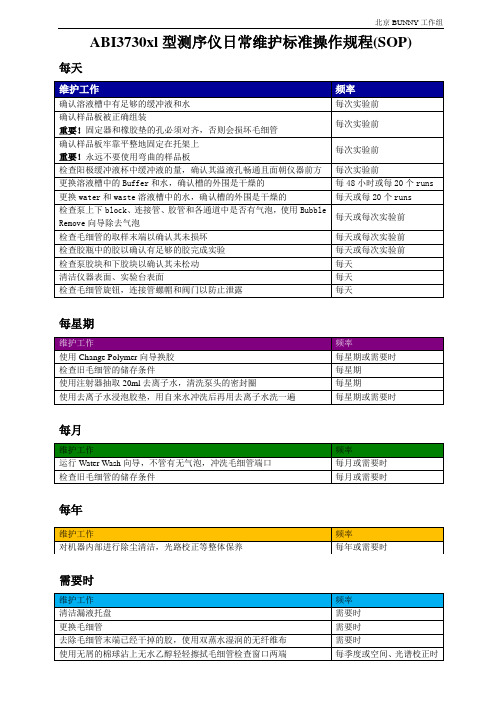
检查胶瓶中的胶以确认有足够的胶完成实验
每天或每次实验前
检查泵胶块和下胶块以确认其未松动
每天
清洁仪器表面、实验台表面
每天
检查毛细管旋钮,连接管螺帽和阀门以防止泄露
每天
每星期
维护工作
频率
使用Change Polymer向导换胶
每星期或需要时
检查旧毛细管的储存条件
每星期
使用注射器抽取20ml去离子水,清洗泵头的密封圈
每次实验前
更换溶液槽中的Buffer和水,确认槽的外围是干燥的
每48小时或每20个runs
更换water和waste溶液槽中的水,确认槽的外围是干燥的
每天或每20个runs
检查泵上下block、连接管、胶管和各通道中是否有气泡,使用Bubble Remove向导除去气泡
每天或每次实验前
检查毛细管的取样末端以确认其未损坏
每星期
使用去离子水浸泡胶垫,用自来水冲洗后再用去离子水洗一遍
每星期或需要时
每月
维护工作
频率
运行Water Wash向导,不管有无气泡,冲洗毛细管端口
每月或需要时
检查旧毛细管的储存条件
每月或需要时
每年
维护工作
频率
对机器内部进行除尘清洁,光路校正等整体保养
每年或需要时
需要时
维工作
频率
清洁漏液托盘
需要时
更换毛细管
需要时
去除毛细管末端已经干掉的胶,使用双蒸水湿润的无纤维布
需要时
使用无屑的棉球沾上无水乙醇轻轻擦拭毛细管检查窗口两端
每季度或空间、光谱校正时
ABI3730xl型测序仪日常维护标准操作规程(SOP)
Epson WF-3730 产品说明书
IMPORTANT: Before using this product, make sure you read these instructions and the safety instructions in the online User’s Guide .The illustrations show the WF-3730, but the steps are the same for all models, unless otherwise specified.Note for Spanish speakers/Nota para hispanohablantes:Para obtener instrucciones de configuración en español, visite la página de soporte de su producto en /support (EE.UU.) o www.epson.ca/support (Canadá) y consulte la Guía de instalación (requiere una conexión a Internet).Important Safety Instructions: When using telephone equipment, you should always follow basic safety precautions to reduce the risk of fire, electric shock, and personal injury, including the following:• Do not use the Epson ® product near water.• Always keep this guide handy.• A void using a telephone during an electrical storm. There may be a remote risk of electric shock from lightning.• Do not use a telephone to report a gas leak in the vicinity of the leak.Caution: To reduce the risk of fire, use only a No. 26 AWG or largertelecommunication line cord.Note: Do not open the ink cartridge packages until you are ready toinstall the ink. Cartridges are vacuum packed to maintain reliability.1 Remove all protective materials from the product.6Lower the scanner unit.7 I approximately 5 minutes. When you see a completion message on the printer’s LCD screen, charging is complete.C aution: Don’t turn off the printer or raise the scanner unit whilethe printer is charging or you’ll waste ink.N ote:• T he printer is designed for use with Epson cartridges only, not third-party cartridges or ink.• T he cartridges included with the printer are designed for printer setup and not for resale. After some ink is used for charging, the rest is available for printing.• A s part of setup, your product’s serial number will be sent to a secure Epson server so that you can be eligible to participate in programs we may offer from time to time, including the Epson ink replenishment program. You will have a separateopportunity to consent to participating in such programs.1 M ake sure the product is done charging the ink, and thenclose the control panel, lift the output tray, and pull out apaper cassette.2 SNote: If you are using a Mac or your computer does not have a CD/DVD drive, an Internet connection is required to obtain the product software.To print from a Chromebook™, go to /support/gcp (U.S.) or www.epson.ca/support/gcp (Canada) for instructions.1 M ake sure the product is NOT CONNECTED to yourcomputer.Windows ®: If you see a Found New Hardware screen, click Cancel and disconnect the USB cable.2 I nsert the product CD (Windows only) or download andrun your product’s software package. For the latestsoftware, visit /support (U.S.) or www.epson.ca/support (Canada) and search for your product.3 F ollow the instructions on the computer screen to run the setup program.4 W hen you see the Select Your Connection screen, selectone of the following and follow the on-screen instructions:• Wireless connectionIn most cases, the software installer automaticallyattempts to set up your wireless connection. If setup is unsuccessful, you may need to enter your network name (SSID) and password.• Direct USB connectionMake sure you have a USB cable (not included).• Wired network connectionMake sure you have an Ethernet cable (not included).Mobile printingConnect wirelessly from your smartphone, tablet, or computer. Print documents and photos from across the room or around the world:• Print directly from your iOS device. Simply connect your device to the printer’s network and tap the action icon to print.• Use Epson Print Enabler (free from Google Play™) with Android™ devices (v4.4 or later). Then connect your printer and device to the same network and tap the menu icon to print.• Print remotely with Epson Connect™ and Google Cloud Print™. See your online User’s Guide for instructions or learn more at /connect (U.S.) or www.epson.ca/connect (Canada).3Insert paper with the glossy or printable side down.N ote: Make sure the paper is loaded against the front edge guide and not sticking out from the end of the cassette.4 S lide the edge guides against the paper, but not tootightly.5 K eep the cassette flat as you insert it all the way, thenlower the output tray.6Pull out the output tray extension.7 S elect the paper settings on the product’s control panel.For information on loading different paper types or envelopes, see the online User’s Guide .press Set Up Laterto set it up later.SupportVisit /support (U.S.) orwww.epson.ca/support (Canada) and search for your product to download drivers, view manuals, get FAQs, or contact Epson.Call (562) 276-4382 (U.S.) or (905) 709-3839 (Canada), 6 am to Need paper and ink?Ensure peak performance and brilliant results with Genuine Epson Ink and specialty papers, engineered specifically for Epson printers. Find Genuine Epson Ink and specialty papers at (U.S. sales) or www.epson.ca (Canadian sales) and at Epson authorizedresellers. Call 800-GO-EPSON (800-463-7766).WF-3730 Series replacement ink cartridgesEPSON and DURABRITE are registered trademarks, EPSON Exceed Your Vision is a registered logomark, and Epson Connect is a trademark of Seiko Epson Corporation.Designed for Excellence is a trademark of Epson America, Inc.Mac is a trademark of Apple Inc., registered in the U.S. and other countries. iOS is a trademark or registered trademark of Cisco in the U.S. and other countries and is used under license.Android, Google Cloud Print, Chromebook, and Google Play are trademarks of Google Inc.General Notice: Other product names used herein are for identification purposes only and may be trademarks of their respective owners. Epson disclaims any and all rights in those marks.CPD-55749This information is subject to change without notice. © 2018 Epson America, Inc., 5/18。
3730xl测序简介PPT课件
Templates
•
模板跳转转移机制
• 利用逆转录酶的末端转移酶活性,经巧妙设计而 成为有力武器。
2021/4/8
43
S M A R T M eth o d
P o ly A + R N A
P o ly A 3 1
51
GGG
M o d ifie d o lig o (d T ) P rim e r
F irs t-stra n d sy n th e sis c o u p le d w ith (d C ) ta ilin g b y R T
胞
• 粘质粒载体(cosmid)
具有质粒和λ噬菌体两种载体的性质
• 人工染色体
能容纳大片段的外源DNA。如YAC(酵母人工染色体),BAC(细菌人工 染色体),PAC(P1来源的人工染色体),MAC(哺乳动物人工染色体)
2021/4/8
35
各种克隆载体的比较
载体
pUC18/19质 粒 λ噬菌体 粘质粒 BAC PAC YAC
2021/4/8
Top beam Blocked
Bottom Beam Blocked
Both Beams 21
检测:光栅+低温CCD
同步成像
低温CCD实时检测
支持4色或5色以上荧光,适用于多种商品化试剂盒。
更新荧光化学时无需更换任何硬 件设备
低温CCD有效提高信噪比,准确度高。
光栅全波长分光
2021/4/8
14
2021/4/8
15
Capillary
2021/4/8
16
3730xl测序仪的特点
2021/4/8
17
2021/4/8
samson 3730系列电气阀门定位器 安装说明

EB 8384-4 ZH13730系列 电气阀门定位器 3730-4型PROFIBUS-PA 通信 图1:3730-4型 安装与操作说明 EB 8384-4 ZH固件版本K 1.12/R 1.45 2008年7月版EB 8384-4 ZH 2目录目录页码1 设计与工作原理 (9)1.1 附加的设备 (10)1.2 通信 (10)1.3 技术数据 (11)2 装配到控制阀-安装件和附件 (14)2.1 直接集成装配 (18)2.1.1 3277-5型执行器 (18)2.1.2 3277型执行器 (20)2.2 根据IEC60534-6标准进行装配 (22)2.3 装配到3510型微流量控制阀 (24)2.4 装配到角行程执行器 (26)2.5 用于双动作执行器的反向放大器 (28)2.5.1 安装压力表 (28)2.6 安装一个分体式阀位传感器 (30)2.6.1 直接集成安装阀位传感器 (30)2.6.2 根据IEC60534-6标准安装阀位传感器 (30)2.6.3 将阀位传感器安装到3510型微流量控制阀 (32)2.6.4 将阀位传感器安装到角行程执行器 (34)2.7 安装有不锈钢壳体的定位器 (36)2.8 单动作执行器的吹扫气功能 (36)3 连接 (38)3.1 气动连接 (38)3.1.1 信号压力表 (38)3.1.2 供气压力 (38)3.2 电气连接 (40)3.2.1 建立通讯 (42)4 操作 (44)4.1 使用调整和显示 (44)4.2 确认和选择参数 (46)4.3 操作模式 (47)4.3.1 自动及手动操作模式 (47)4.3.2 SAFE—故障-安全位置 (48)5 启动与设置 (48)5.1 确定故障-安全位置 (49)EB 8384-4 ZH 3目录5.2 设置输出气量限制Q (49)5.3 调整显示方向 (50)5.4 信号压力限制 (50)5.5 检查定位器的工作范围... (50)5.6 初始化 (52)5.6.1 初始化模式 (54)5.7 出错/故障 (60)5.8 零点校正 (61)5.9 复位到默认值 (61)5.10 通过本机接口启动(SSP) (62)5.11 设定总线地址 (62)6 状态和诊断报警 (64)6.1 标准版EXPERT自诊断 (64)6.2 增强版EXPERT+自诊断 (64)6.3 状态报警的分类和缩写状态 (65)7 调整限位开关 (68)8 快速启动指南 (69)8.1 安装 (69)8.2 启动 (70)8.3 初始化 (71)8.3.1 最简单的方法(M A X) (71)8.3.2 精确方法(NOM) (71)8.3.3 手动方法(MAN) (72)9 安装感应限位开关 (73)10 维护 (74)11 防爆型设备的维护 (74)12 PROFI BUS-PA通信 (75)12.1 综述 (75)12.2 循环数据交换 (75)12.2.1 GSD文件 (76)12.2.2 数据交换 (77)12.2.3 应用在PC37控制系统上 (81)12.2.4 定位器启动常规指导 (81)12.3 CHE CKBACK-设备状态 (81)EB 8384-4 ZH4目录 12.4 所测量数值的状态编码 (83)12.4.1 行规 3.01的状态报警 (83)12.4.2 行规 3.01的状态报警的缩写状态 (87)12.5 带PROFIBUS-DP的自诊断 (92)12.6 非循环数据交换 (98)13 通过TROVIS-VIEW软件设置 (99)13.1 概述 (99)13.1.1 系统要求 (99)13.2 TROVIS-VIE W 软件的安装 (100)13.3 启动TROVIS-VIEW和完成基本设置 (101)13.4 数据传输 (103)13.4.1 离线操作(间接的数据传送) (104)13.4.2 在线操作(直接的数据传输) (104)13.4.3 设定参数 (105)13.5 初始化定位器 (107)14 附录 (110)14.1 代码表 (110)14.2 参数表 (130)15 尺寸mm (184)鉴定证书 (185)EB 8384-4 ZH 5定位器版本修改阀门定位器软硬件版本修改通信旧版本新版本K 1.00 K 1.01内容修改K 1.01 K1.10FEATURE_SELECT参数支持以下设定:激活的诊断功能可以通过GOOD_FUNCTION_CHECK或BAD_FUNCTION_CHECK来报告K1.10 K1.11-更多数据记录状态显示(见144页)-更多附加功能(FEATURE_SELECT)(见144页)-可以按照需求定义离散的阀位(POS_D_LIMIT_LOW,POS_D_LIMIT_UP)(见75页)K1.11 K1.12重新设置设别参数会将控制器内的所有参数复位。
ABI_3730xl测序仪简介-01

基因分型
2008年基因分型样本量为30000个; STR,SNP,CNV遗传标记
ABI 3730xl测பைடு நூலகம்仪简介
生物医学研究院 5楼 联系电话:54237651 联系人:夏明英,李士林
主要特性(一)
- 内置一体化自动进样器及样品孔打孔装置; - 内置样品板条形码自动识别; - 100次(9600个样品)运行试剂一次上机; - 自动碱基识别与质量评分判定; - 动态铂金内镀毛细管壁;
12406G
4833T 10646G 4491C
7028T
12705T 14569G
5301T 15607A 9824A 5178A
4715T 5417G 3010T 4216T 663A 11719A
3730xl的总结
基因检测:
2008年对4万个样本进行测序
检测碱基数达到2千4百万个
现可检测的PCR产物长度为600-1000bp
- 氩离子激光光源; 实现实时的、空间连续的测量;可以保证返回的光信息能够达到探测的量级。 激发波长为488nm和514.5nm
毛细管规格: 96道毛细管 毛细管长度: 50cm 凝胶的规格: POP-7液体分离胶
配套的试剂: 基因测序(BigDye3.1v和5×Sequence buffer)
1000样本
10小时
测序的原理
DNA测序的双脱氧链末端合成终止法. Sanger法测序的原理:
用DNA聚合酶来延伸结合在待定序列模板上的引物,直到掺入一种链终 止核苷酸为止。 每一次序列测定由一套四个单独的反应构成,每个反应含有所有四种脱 氧核苷酸三磷酸(dNTP),并混入限量的一种不同的双脱氧核苷三磷酸 (ddNTP)。 由于ddNTP缺乏延伸所需要的3‘-OH基团,使延长的寡聚核苷酸选择性地 在G、A、T或C处终止,终止点由反应中相应的双脱氧而定。每一种 dNTPs和ddNTPs的相对浓度可以调整,使反应得到一组长几百至几千碱 基的链终止产物。 它们具有共同的起始点,但终止在不同的的核苷酸上,可通过高分辨率 变性凝胶电泳分离大小不同的片段进行检测。
3730系列电气阀门定位器使用手册

M
50
L
70
L
100
XL
200
表1
直接装配到 3277-5 型执行器
订货号
安装件 用于膜片有效面积 120cm2 的执行器,见图 4
1400-7452
切换板(旧)用于 3277-5xxxxxx.00 型执行器(旧),见图 4
1400-6819
切换板(新)用于 3277-5xxxxxx.01 型执行器(新)
要求的供气压力在 1.4 到 6 巴之间。作为 参考变量的电流输入信号应在 4 到 20mA。
定位器可以直接装配在 3277 型执行器 上,或符合 IEC60534-6(NAMUR)标准 装配到相应的执行器上。每种方式都有相 应的安装件。
3730-0 型定位器主要由阀位传感器(阀 位—电阻线性转换)、模拟量电气转换器 和气动放大器以及模拟控制器等部件组 成。
连接…………………………………………………………..23 气动连接……………………………………………………..23 信号压力表…………………………………………………..24 供气压力……………………………………………………..24 电连接………………………………………………………..25
操作…………………………………………………………..27 操作员控制…………………………………………………..27
2 EB 8384-0 ZH
目录
5.12 6 7 8
激活紧闭关断功能……………………………………………….30 维护……………………………………………………………..31 防爆装置的维修………………………………………………..31 尺寸(单位:mm)……………………………………………..32 检测证书…………………………………………………….…33
Snapshot技术平台中文

S n a p s h o t技术平台中文文档编制序号:[KKIDT-LLE0828-LLETD298-POI08]Snapshot技术平台SnaPshot技术平台是Applied Biosystems,ABI公司推出了专为检测 SNP 设计的分析软件和试剂盒可对多个 SNP 位点同时进行基因分型 ,也被称为 minisequencing 。
该方法针对不同突变位点设计不同长度的引物SNaPshot 反应后 ,产物通过电泳分离、五色荧光检测、Gene mapper 分析 ,可在一次电泳胶内检测多个 SNP位点。
这个平台是建立在3730,3130等PCR测序仪上的技术。
3730XL型DNA序列检测仪一. SnaPshot工作原理应用 SNaPshot 进行定点的序列分析 ,其基本原理遵循了DNA 直接测序中的双脱氧终止法 ,所不同的是 PCR 反应中只有不同荧光标记的ddNTP。
由于每个 SNP 位点的引物 3′端都紧靠SNP点 ,因此每一种引物在聚合酶作用下 ,根据模板的的序列 ,只延伸一个核苷酸。
然后用先进的荧光检测系统 ,检测延伸的那个核苷酸的种类。
1.多重SNaPshot反应的工作原理:在一个SNaPshot反应体系中,针对每个待测SNP 位点在其上游或下游设计一条单向的寡核苷酸引物(正向引物或反向引物),引物的Tm 值要求在50度以上,在 AmpliTaq聚合酶和 4种不同荧光标.记的ddNTP存在的情况下,各条引物与各自互补的DNA 模板结合, 聚合酶在引物的3’末端延伸单个碱基反应即告终止,产物的长度为引物长度+1bp。
延伸的碱基就是该样本在该位点上的基因型,其中纯合子表现为单峰,杂合子表现为双峰。
为了能够分辨不同SNP的不同基因型,可在引物的5’末端加上不同长度的Poly C 或Poly T,使各条引物以长度区分。
经电泳将其分开。
最短的引物一般设定为20bp, 相邻两个SNP的引物之间长度一般相差 4-6个核苷酸,以便区分。
快速启动指南 XL370 XL375说明书

XL370/XL375Note * In multi-handset packs, there are additional handsets, chargers and power adapters.** In some countries, you have to connect the line adapter to the line cord, then plug the line cord to the telephone socket.Caution Use only the supplied batteries • and power adapter.What’s in the box*****User manual Quick start guide Guarantee1Connect2Install3 EnjoyCallT o make a call, press • and dial the phone number.T o answer a call, press • when the phone rings.T o end a call, press • .Adjust the earpiece volume Press or to adjust the volume during a call.Add a contact in the phonebook Press 1 MENU .Select 2 [PHONEBOOK] > [NEW ENTRY], then press [OK] to confirm.Enter the name then press 3 [OK] to confirm.Enter the number, then press 4 [OK] to confirm.Record an announcement (for XL375 only)Press 1 MENU .Select 2 [ANSWER MACHINE] > [ANNOUNCEMENT], then press [OK] to confirm.Select 3 [ANSWER & REC.] or [ANSWER ONLY], then press [OK] to confirm.Select 4 [RECORD], then press [OK] to confirm.Start recording close to the microphone after the beep.5 Press 6 [OK] to stop recording.Y ou can listen to the newly recorded »announcement on the handset.Need help?User ManualRefer to the user manual that came with your new phone.Online help /supportWelcome to PhilipsRegister your product at /welcome Reproduction in whole or in part is prohibited without the written consent of the copyright owner.Trademarks are the property of Koninklijke Philips Electronics N.V. or their respective owners.© 2009 Koninklijke Philips Electronics N.V. All rights reserved.Printed in China QSG_XL370-375_05_EN_V1.11WK9491 0168。
- 1、下载文档前请自行甄别文档内容的完整性,平台不提供额外的编辑、内容补充、找答案等附加服务。
- 2、"仅部分预览"的文档,不可在线预览部分如存在完整性等问题,可反馈申请退款(可完整预览的文档不适用该条件!)。
- 3、如文档侵犯您的权益,请联系客服反馈,我们会尽快为您处理(人工客服工作时间:9:00-18:30)。
7. 自动数据提取和分析
工作站会自动地从数据库中提取这些数据,并根据不同的运行模式,完成对样品DNA的碱 基序列或片段信息的分析,然后把分析完成后的结果数据以样品文件的形式保存于计算机的 硬盘中
激光管散热风扇
数据线接口
仪器主电源
激光管散热风扇不能被堵塞! 3. 主要部件功能
电源开关:打开或关闭仪器电源; 照明灯开关:打开或关闭仪器内部的照明灯; 进样器按钮:使进样器抓取缓冲液槽到毛细管针端(或相反); 样品舱:放置等待上样的样品; 阳极缓冲液杯:内装1X缓冲液(约67ml),电泳时作为阳极介质; 缓冲液槽:装1X缓冲液(约80ml),电泳时作为阴极介质; 水槽/废液槽:装去离子水,清洗毛细管用或放置废胶; 泵胶块:泵入胶并将其灌入毛细管; 下胶块:上装有阳极,阳极缓冲液杯装在此处; 恒温加热炉:保证电泳时,毛细管处于一个均一、稳定的温度环境中; 数据线:不是普通Ethernet网线,有一定方向性,主要用于仪器和电脑通讯
Buffer 槽组件
2. 组装灰色橡胶垫和白色固定器的时候,注意橡胶垫要平整以及进样孔要对齐
3. 1XBuffer在2~8℃可保存1个月,室温为1个星期 4. 建议24至48小时或每次实验前,更换Buffer及去离子水,以保证良好的实验灵敏度
第 13 页 共 40 页
Applied Biosystems 3730/3730xl DNA Analyzer 简明使用手册
第 10 页 共 40 页
Applied Biosystems 3730/3730xl DNA Analyzer 简明使用手册 B 安装毛细管
· 打 开 Data Collection 软 件 , 选 择 在 GA Instruments > ga3730 > instrument name ·在菜单栏里选择Wizards> Install Array Wizard ·根据向导提示,完成毛细管的安装 ·运行空间定位(Spatial Calibration),校正毛细管 的位置 注意: 1. 安装毛细管的全程需要带无粉手套 2. 不要拉扯毛细管 3. 拆下来暂时不用的毛细管需要使用原始包装保 存,毛细管末端放在缓冲液槽及玻璃小瓶中,使用 1XBuffer浸泡,使用保护罩保护毛细管的检测窗口
(加热炉内的) Capillary Array
毛细管整列
照明灯开关 状态指示灯
电源开关
进样器 按钮
缓冲液槽 水槽 Buffer Water
第 7 页 共 40 页
样品舱门
加热炉门
废液槽 Waste 样品舱门 指示灯
2. 仪器后视图
Applied Biosystems 3730/3730xl DNA Analyzer 简明使用手册 仪器通风散热风扇
启动3730/3730xl DNA Analyzer流程
Step 1:启动电脑系统
1A. 打开显示器电源 1B. 打开电脑电源,直至出现登录界面 1C. 输入Windows操作系统用户名及密码
Step 2:启动仪器
2A. 确认电脑系统已经启动 2B. 确认仪器
·加热炉门已关闭 ·仪器门已关闭 ·样品舱门已关闭 ·Buffer,Water,Waste槽已安装
是
编制片段分析样品板 第 31 页
上机运行 第 35 页 结果分析,参考相关手册
第 3 页 共 40 页
Applied Biosystems 3730/3730xl DNA Analyzer 简明使用手册
一、DNA 测序或片段分析的流程
1. 样品制备
样品制备即是在DNA片段上用化学的方法标记 荧光素。 标记上荧光素后就可以对DNA片段进 行检测和确认了,一般每一 DNA分子标记一个 荧光素分子,最多有五种荧光素可用于DNA样品 的标记。 不同的样品制备方法选用不同的荧光 素和试剂的组合,样品制备可在96孔或384孔板 进行
毛细管安装图解
第 11 页 共 40 页
Applied Biosystems 3730/3730xl DNA Analyzer 简明使用手册
C 更换POP胶(3730系列仅支持POP7胶)
·打开Data Collection软件,选择在 GA Instruments
> ga3730 > instrument name
第 12 页 共 40 页
Applied Biosystems 3730/3730xl DNA Analyzer 简明使用手册 白色固定器 灰色橡胶垫 溶液槽盖 溶液槽
可加热基座
普通基座
供电接头
Water/Waste 槽组件
Buffer/Water/Waste槽组件组装示意图 注意: 1. 组装溶液槽盖的时候,注意周围的橡皮垫正确安装
荧光信号
电信号
DC 软件数据库
结果文件
第 5 页 共 40 页
Applied Biosystems 3730/3730xl DNA Analyzer 简明使用手册
8. 结果
分析好的样品文件可以用序列分析软件或片段分析软件来打开查看结果,如有必要,这些数 据可以改用不同的分析参数进行重新分析。 电泳信号图的X轴表示时间,Y轴表示相对荧光 强度,图上不同颜色的信号线代表了样品制备时所使用的不同的荧光素(对于测序结果,每 种颜色代表一种碱基),图中的每个峰代表一个DNA片段
5. 激发和检测
当标记有荧光素的DNA片段移动到检测窗口时,荧光素受到激光束的激发而产生荧光信号, 此荧光信号被CCD检测器所检测并被转化为电信号传递到计算机
第 4 页 共 40 页
Applied Biosystems 3730/3730xl DNA Analyzer 简明使用手册
6. 数据采集和处理
黄灯闪烁
红灯长亮
·确认已进入Windows界面 ·确认网线连接正确 ·确认仪器门已关闭 ·确认各溶液槽位置正确 ·确保电脑名未更改,否则请改回原电脑名 ·确保电脑防火墙已关闭 · 确 保 电 脑 与 仪 器 连 接 的 IP 地 址 为 : 192.168.0.1 ·确保电脑用于通讯的用户名3730User,密码 为3730User,并且设置为永不过期 ·确认仪器门及加热炉门已关闭 ·确认毛细管及缓冲液槽已安装
·关闭仪器,30秒后重新启动 ·打开Data Collection软件,在
GA Instruments >
ga3730 >
instrument name > Instrument Status > Event Log察看日志中的信息 ·联系AB技术支持
第 9 页 共 40 页
Applied Biosystems 3730/3730xl DNA Analyzer 简明使用手册 ·点击桌面Data Collection软件快捷方式
第 2 页 共 40 页
Applied Biosystems 3730/3730xl DNA Analyzer Nhomakorabea简明使用手册
仪器准备 第 9 页
是 需要空间定位?
否
进行空间定位 第 14 页
需要光谱校正? 是 否
进行光谱校正 第 16 页
运行测序样品? 是 否
编制测序样品板 第 24 页
运行片段 分析样品?
Applied Biosystems 3730/3730xl DNA Analyzer 简明使用手册
Applied Biosystems 3730/3730xl DNA Analyzer 简明使用手册
爱普拜斯应用生物系统公司
第 1 页 共 40 页
Applied Biosystems 3730/3730xl DNA Analyzer 简明使用手册
测序样品的结果图
片段分析的结果图
第 6 页 共 40 页
二、仪器硬件结构
Applied Biosystems 3730/3730xl DNA Analyzer 简明使用手册
1. 仪器前视图
Polymer Delivery Pump (PDP) 灌胶泵系统
泵胶块 胶管
胶瓶 阳极缓冲液杯
连接管 下胶块
2. 软件设置
操作人员根据所使用的标记方法、电泳的毛细管长度、电泳胶的种类等,在数据采集(Data Collection)软件中选择正确的运行模块和分析模块
3. 开始运行
操作人员把样品板放到仪器上并开始运行,仪器便会根据设定好的顺序,用相应的电泳程序 分析样品板上的样品
4. 电泳
用“电进样”的方法将带电的样品分子 加到灌好电泳胶的毛细管的进样端 (负极), 然后在毛细管两端加上 直流电压,样品中不同大小的DNA片 段开始从负极向正极移动, 移动的 速度受到片段自身大小影响,片段越 短移动得越快。电泳的结果是使长度 不同的 带电 DNA 片段互相分离,并且按片段的长短的顺序通过检测窗口,产生信号,短 片段先到达检测窗口
6. 使用去离子水清洗Buffer/Water/Waste槽
7. 更换Buffer及去离子水(约80ml/槽) 8. 组装Buffer/Water/Waste槽组件,擦干外表面液体 9. 取下阳极杯,将原废液倒入废液缸 10. 使用去离子水清洗阳极杯 10. 更换阳极杯1XBuffer(约67ml) 11. 安装各槽组件及阳极缓冲液杯
或
> All Programs >Applied Biosystems >Unified Data Collection
>Run Unified Data Collection v3.0,运行软件 ·等待Service Console窗口中的指示灯全部变成绿色后,DC软件打开