实验3区域填充算法答案
实验三 区域填充算法的实现

实验三区域填充算法的实现一、实验目的和要求:1、掌握区域填充算法基本知识2、理解区域的表示和类型,能正确区分四连通和八连通的区域3、了解区域填充的实现原理,利用Microsoft Visual C++ 6.0或win-TC实现区域种子填充的递归算法。
二、实验内容:1、编程完成区域填色2、利用画线函数,在屏幕上定义一个封闭区域。
3、利用以下两种种子填充算法,填充上述步骤中定义的区域(1)边界表示的四连通区域种子填充的实现(2)内点表示的四连通区域种子填充的实现4、将上述算法作部分改动应用于八连通区域,构成八连通区域种子填充算法,并编程实现。
三、实验结果分析四连通图的实现:程序代码:#include<graphics.h>#include <conio.h>#include<math.h>#include<time.h>void BoundaryFill4(int x,int y,int Boundarycolor,int newcolor){if(getpixel(x,y) != newcolor && getpixel(x,y) !=Boundarycolor){putpixel(x,y,newcolor);Sleep(1);BoundaryFill4(x-1,y,Boundarycolor,newcolor);BoundaryFill4(x,y+1,Boundarycolor,newcolor);BoundaryFill4(x+1,y,Boundarycolor,newcolor);BoundaryFill4(x,y-1,Boundarycolor,newcolor);}}void polygon(int x0,int y0,int a,int n,float af){int x,y,i;double dtheta,theta;if(n<3)return;dtheta=6.28318/n;theta=af*0.0174533;moveto(x0,y0);x=x0;y=y0;for(i=1;i<n;i++){x=x+a*cos(theta);y=y+a*sin(theta);lineto(x,y);theta=theta+dtheta;}lineto(x0,y0);}void main(){int x=50,y=75;int a,b,c,d,i,j;int graphdriver=DETECT;int graphmode=0;initgraph(&graphdriver,&graphmode," ");cleardevice();setcolor(RGB(0,255,0));setfillstyle(WHITE);polygon(x,y,60,5,0.);a=100;b=100;c=RGB(0,255,0);d=RGB(255,0,255);BoundaryFill4(a,b,c,d);getch();closegraph();}实验结果八连通的实现程序代码:#include<graphics.h>#include<conio.h>#include<time.h>#include <malloc.h>#include <windows.h>#define MaxSize 100typedef struct{int x;int y;}Seed,ElemType;typedef struct{ElemType data[MaxSize];int top; //栈顶指针} SqStack;void InitStack(SqStack *&s){s=(SqStack *)malloc(sizeof(SqStack));s->top=-1;}int StackEmpty(SqStack *s){return(s->top==-1);}int Push(SqStack *&s,ElemType e){if (s->top==MaxSize-1)return 0;s->top++;s->data[s->top]=e;return 1;}int Pop(SqStack *&s,ElemType &e){if (s->top==-1)return 0;e=s->data[s->top];s->top--;return 1;}void floodfill8(int x,int y,int oldcolor,int newcolor) {if(getpixel(x,y)==oldcolor){putpixel(x,y,newcolor);Sleep(2);floodfill8(x,y+1,oldcolor,newcolor);floodfill8(x,y-1,oldcolor,newcolor);floodfill8(x-1,y,oldcolor,newcolor);floodfill8(x+1,y,oldcolor,newcolor);floodfill8(x+1,y+1,oldcolor,newcolor);floodfill8(x+1,y-1,oldcolor,newcolor);floodfill8(x-1,y+1,oldcolor,newcolor);floodfill8(x-1,y-1,oldcolor,newcolor);}}void main(){int a,b,c,d,i,j;int graphdriver=DETECT;int graphmode=0;initgraph(&graphdriver,&graphmode," "); cleardevice();setfillstyle(RGB(255,255,255));setcolor(GREEN);int points[]={320,200,270,290,370,290}; fillpoly(3,points);rectangle(500,420,100,100);a=RGB(255,255,255);b=RGB(255,0,0);floodfill8(320,240,a,b);c=RGB(0,0,0);d=RGB(0,0,255);floodfill8(320,180,c,d);getch();closegraph();}实验结果:2、结果分析:通过以上各算法运行结果分析与对比可知:1.四连通算法的缺点是有时不能通过狭窄区域,因而不能填满多边形。
图形学实验报告四 多边形填充算法

扫描线种子填充:
public void FillField(int x, int y, Color newColor, uint oldColor, Graphics g) {
if ("".Equals(txtx.Text) || "".Equals(txty.Text)) { return; } else { x = Convert.ToInt32(txtx.Text); y = Convert.ToInt32(txty.Text); } int xl, xr; bool spanNeedFill; myStack.Clear();
个交点。如右图,对 y=8 的扫描线排序 x 坐标得到的表是(2,4,9,13),然后对交点 2 与 4 之间、9 与 13 之间 的所有象素点进行填充。 边界上的象素:“左闭右开”,“下闭上开”(将左边界和下边界的点算为内部,而将右边界和上边界 算为外部) 顶点:“上开下闭”。
几种特殊情况: 1.扫描线交于一顶点,共享的两条边分另处于扫描线的两边,这时交点只取一个,如扫描线 y=3,该点被填 充一次。2.共享交点的两条边处于扫描线的上方,这时交点取二个,如扫描线 y=1,该点被填充一次。 3.共享交点的两条边处于扫描线的下方,这时交点取 0 个,如扫描线 y=9,无交点,不填充。 4.水平边在算法中不起任何作用,可不考虑。 活性边表(提高效率): 为了减少求交的计算量,要利用一条边与相继的两条扫描线的交点的连贯性。在处理一条扫描线时只对活 性边(与它相交的多边形的边)进行求交运算。把交点按 x 增加方向存在一个链表(活性边表)中。活性边: 与当前扫描线相交的边。 活性边表(AEL) :按交点 x 的增量顺序存放在一个链表中,该链表称作活性边表(AEL) 。
实验三 区域填充原理

实验三区域填充原理实验目的掌握二维区域填充的填充算法;实验环境计算机、Turbo C、C++等其他语言程序设计环境实验学时2学时,必做实验。
实验内容1.二维封闭区域的种子填充算法和扫描线种子填充算法;2.熟悉多边形扫描线填充算法;内点表示四连通种子填充算法(漫水法)参考代码:#include<graphics.h>void floodfill4(int x,int y,int oldcolor,int newcolor){if(getpixel(x,y)==oldcolor){putpixel(x,y,newcolor);delay(20000);floodfill4(x,y+1,oldcolor,newcolor);floodfill4(x,y-1,oldcolor,newcolor);floodfill4(x-1,y,oldcolor,newcolor);floodfill4(x+1,y,oldcolor,newcolor);}}main(){int a,b,c,d,i,j;int graphdriver=DETECT, graphmode=0;initgraph(&graphdriver,&graphmode," ");cleardevice();setcolor(14);rectangle(100,100,150,150);for(i=101;i<150;i++)for(j=101;j<150;j++){ putpixel(i,j,4);delay(1000);}a=120; b=110; c=4; d=2;floodfill4(a,b,c,d);getch();closegraph();}边界表示的4连通区域的种子填充算法:#include<stdio.h>;#include<graphics.h>;void BoundaryFill4(int x,int y,int boundarycolor,int newcolor) {if(getpixel(x,y)!=boundarycolor&getpixel(x,y)!=newcolor) {putpixel(x,y,newcolor);delay(20000);BoundaryFill4(x,y+1,boundarycolor,newcolor);BoundaryFill4(x,y-1,boundarycolor,newcolor);BoundaryFill4(x-1,y,boundarycolor,newcolor);BoundaryFill4(x+1,y,boundarycolor,newcolor);}}main() {int a,b,c=14,d,i,j;int graphdriver=DETECT,graphmode=0;initgraph(&graphdriver,&graphmode," ");cleardevice();setcolor(c);rectangle(100,100,150,150);for(i=101;i<150;i++)for(j=101;j<150;j++) { putpixel(i,j,4); delay(1000); } a=120; b=130; d=2;BoundaryFill4(a,b,c,d);getch();closegraph();}扫描线种子填充算法参考代码:#include<graphics.h>#include<stdio.h>#include<stdlib.h>#define bordercolor 15#define backcolor 0#define seedcolor 4#define fillcolor 10typedef struct Point{int x;int y;}point;typedef struct Stack{point *base;point *top;}*stack;void initstack(stack s){(*s).base=(point*)malloc(sizeof(point));if(!(*s).base)exit(1);(*s).top=(*s).base;}void push(stack s,point p){*((*s).top)=p;(*s).top++;}int stackempty(stack s){if((*s).top==(*s).base)return(1);else return(0);}point pop(stack s){(*s).top--;return(*((*s).top));}void drawgraphics(){int a[10]={100,140,260,80,300,200,160,240,100,140}; drawpoly(5, a);/*circle(200,200,150);*/}point produceseed(){point p;p.x=200;p.y=200;return(p);}void intostack(stack s,int y0,int xl,int xr){int x,y;point tm;for(x=xl,y=y0;x<=xr&&x<getmaxx();x++){if((x!=xr&&getpixel(x,y)==backcolor&&getpixel(x+1,y)!=backcolor)||(x==xr&&getpixel(x,y)==backcolor)){tm.x=x;tm.y=y;push(s,tm);putpixel(x,y,seedcolor);}if(x==xr&&getpixel(x,y)==backcolor)break;}}void fillgraphics(){int xl=0,xr=getmaxx(),x,y;point seed;stack s=NULL;seed=produceseed();putpixel(seed.x,seed.y,seedcolor);getch();initstack(s);push(s,seed);while(!stackempty(s)){seed=pop(s);for(x=seed.x,y=seed.y;getpixel(x,y)==backcolor||getpixel(x,y)==seedcolor;x++) {putpixel(x,y,fillcolor);}xr=x-1;for(x=seed.x-1,y=seed.y;getpixel(x,y)==backcolor||getpixel(x,y)==seedcolor;x--) {putpixel(x,y,fillcolor);}xl=x+1;intostack(s,seed.y+1,xl,xr);intostack(s,seed.y-1,xl,xr);getch();}}void main(){int gdriver ,gmode ;gdriver = DETECT;initgraph(&gdriver , &gmode ,"" );drawgraphics();fillgraphics();outtextxy(180,20,"Scan line filling graphics finished!"); getch();closegraph();}多边形扫描线填充算法参考代码:/* Note:扫描线填充算法*/#include <graphics.h>#include <conio.h>#include <math.h>#define MAXPOINT 20typedef struct {int y_top;float x_int;int delta_y;float x_cps;}E_ENTRY;void putin_sl(int entry,int x1,int y1,int x2,int y2,int next_y); void sortonby(int n);void updatefl(int count,int scan);void swap(E_ENTRY *x,E_ENTRY *y);void sortonx(int entry,int first_s);void processx(int first_s,int last_s);void drawline(int scan,int x_int_c,int index);void updatesl();E_ENTRY sides[MAXPOINT];int x[MAXPOINT]={0,210,240,230,350,380,340,200,180,150}; int y[MAXPOINT]={0,410,370,200,410,340,140,180,120,300}; int s_count,first_s,last_s,scan,bottom_s,x_int_c;main(){int driver,mode;int v_count=9;driver=DETECT;initgraph(&driver,&mode,"");setcolor(3);fillarea(v_count,x,y);getch();closegraph();}fillarea(int count){sortonby(count);first_s=1;last_s=1;for(scan=sides[1].y_top;scan>bottom_s;scan--){updatefl(count,scan);processx(first_s,last_s);drawline(scan,x_int_c,first_s);updatesl();}}void putin_sl(int entry,int x1,int y1,int x2,int y2,int next_y) {int maxy;float x2_temp,xch_temp;xch_temp=(float)(x2-x1)/(float)(y2-y1);x2_temp=x2;if((y2>y1)&&(y2<next_y)){y2--;x2_temp-=xch_temp;}else{if((y2<y1)&&(y2>next_y)){y2++;x2_temp+=xch_temp;}}maxy=(y1>y2)?y1:y2;while((entry>1)&&(maxy>sides[entry-1].y_top)){sides[entry]=sides[entry-1];entry--;}sides[entry].y_top=maxy;sides[entry].delta_y=abs(y2-y1)+1;if(y1>y2)sides[entry].x_int=x1;elsesides[entry].x_int=x2_temp;sides[entry].x_cps=xch_temp;}void sortonby(int n){int k,x1,y1;s_count=0;y1=y[n];x1=x[n];bottom_s=y[n];for(k=1;k<n+1;k++){if(y1!=y[k]){s_count++;putin_sl(s_count,x1,y1,x[k],y[k],y[k+1]);}else{/* line((short)x1,480-(short)y1,(short)x[k],480-(short)y1);*/moveto((short)x1,480-(short)y1);lineto((short)x[k],480-(short)y1);}if(y[k]<bottom_s) bottom_s=y[k];y1=y[k];x1=x[k];}}void updatefl(int count,int scan){while((sides[last_s+1].y_top>scan)&&(last_s<count))last_s++;while(sides[first_s].delta_y==0) first_s++;}void swap(E_ENTRY *x,E_ENTRY *y){int i_temp;float f_temp;i_temp=x->y_top;x->y_top=y->y_top;y->y_top=i_temp;f_temp=x->x_int;x->x_int=y->x_int;y->x_int=f_temp;i_temp=x->delta_y;x->delta_y=y->delta_y;y->delta_y=i_temp;f_temp=x->x_cps;x->x_cps=y->x_cps;y->x_cps=f_temp;}void sortonx(int entry,int first_s){while((entry>first_s)&&(sides[entry].x_int<sides[entry-1].x_int)) {swap(&sides[entry],&sides[entry-1]);entry--;}}void processx(int first_s,int last_s){int k;x_int_c=0;for(k=first_s;k<last_s+1;k++){if(sides[k].delta_y>0){x_int_c++;sortonx(k,first_s);}}}void drawline(int scan,int x_int_c,int index){int k,x,x1,x2;for(k=1;k<(int)(x_int_c/2+1.5);k++){while(sides[index].delta_y==0)index++;x1=(int)(sides[index].x_int+0.5);index++;while(sides[index].delta_y==0)index++;x2=(int)(sides[index].x_int+0.5);/*line((short)x1,480-(short)scan,(short)x2,480-(short)scan);*/ moveto((short)x1,480-(short)scan);lineto((short)x2,480-(short)scan);index++;}}void updatesl(){int k;for(k=first_s;k<last_s+1;k++){if(sides[k].delta_y>0){sides[k].delta_y--;sides[k].x_int-=sides[k].x_cps;}}}。
4 区域填充

4.编译调试程序,直到通过运行后得到需要的结论. .编译调试程序,直到通过运行后得到需要的结论.
5. 分析总结,并提交实验报告. 分析总结,并提交实验报告.
附录: 附录: 所用各函数说明如下: 所用各函数说明如下: 1.CDC::MoveTo . CPoint MoveTo( int x, int y ); Return Value The x- and y-coordinates of the previous position as a CPoint object. Parameters x Specifies the logical x-coordinate of the new position. y Specifies the logical y-coordinate of the new position. Remarks Moves the current position to the point specified by x and y (or by point).
1. 建立工程: 建立工程: 打开Visual C++; ①打开 ; 选择File→New→Projects→MFC AppWizard[exe],在Project ②选择 , Name内输入工程名(如ThirdP),并在 内输入工程名( ),并在 选择程序文件存储路径, 内输入工程名 ),并在Location选择程序文件存储路径, 选择程序文件存储路径 最后点击OK. 最后点击 .
实验四
一.实验的主要目的: 实验的主要目的:
区域填充
1,检验对区域填充算法是否理解; ,检验对区域填充算法是否理解; 2,培养利用扫描线算法,或种子填充算法,进行基本绘图程序设计的 ,培养利用扫描线算法,或种子填充算法, 能力; 能力; 3,培养利用计算机分析和解决实际问题的能力. ,培养利用计算机分析和解决实际问题的能力.
多边形的填充实验经典
试验实验一:图形的区域填充一、实验目的区域填充是指先将区域内的一点(常称为种子点)赋予给定颜色,然后将这种颜色扩展到整个区域内的过程。
区域填充技术广泛应用于交互式图形、动画和美术画的计算机辅助制作中。
本实验采用递归填充算法或打描线算法实现对光栅图形的区域填充。
通过本实验,可以掌握光栅图形编程的基本原理和方法。
实验内容掌握光栅图形的表示方法,实现种子算法或扫描线算法。
通过程序设计实现上述算法。
建议采用VC++实现OpenGL程序设计。
三、实验原理、方法和手段递归算法在要填充的区域内取一点(X, Y)的当前颜色记为oldcoloo用要填充的颜色ne wcolor去取代,递归函数如下:procedure flood-fill(XXoldcoloLnewcolor:integer); beginif getpixel(fiainebufier,x,y)=oldcolorthen beginsetpixel(fiamebuffer,x,y,newcolor); flood-fill(X.Y+1 .oldcoloLiiewcolor);flood-fill(X.Y^ 1 ,oldcoloi;newcolor); flood-fill(X-l,Y;oldcoloi;newcolor); flood-fill(X+l,Yoldcoloi;newcolor);endend扫描线算法扫描线算法的效率明显高于递归算法,其算法的基本思想如下:(1)(初始化)将算法设置的堆栈置为空,将给定的种子点(x,y)压入堆栈。
(2)(出栈)如果堆栈为空,算法结束;否则取栈顶元素(x,y)作为种子点。
(3)(区段填充)从种子点(x,y)开始沿纵坐标为y的当前扫描线向左右两个方向逐个象素进行填色,其值置为newcoloi;直到抵达边界为止。
(4)(定范围)以XleA和Xn血分别表示在步骤3中填充的区段两端点的横坐标。
(5)(进栈)分别在与当前扫描线相邻的上下两条打描线上,确定位于区间[Xldb Xn 曲]内的给定区域的区段。
计算机图形学实验报告
计算机图形学实验二维填充图的生成1. 图元填充利用多种图元填充的方法绘制一面五星红旗。
方法有: 扫描转换多边形的逐点判断法(编码算法), 扫描线算法, 区域填充的扫描线算法, 自创的向内复制边法。
1.1说明:1.1.1 宏定义和类型定义:#define max 400#define pi 3.14159265#define STACK_INIT_SIZE 100#define STACKINCREMENT 10#define false 0#define true 1#define ok 1#define error 0#define infeasible -1#define overflow -2typedef int Status;typedef int bool;typedef struct {int y,xLeft,xRight;}SElemType;typedef struct{SElemType *base;SElemType *top;int stacksize;}SqStack;typedef struct Edge{int ymax;float x,deltax;struct Edge *nextEdge;}Edge;Edge *EL[max];typedef struct{float x,y;}point;Status SetStackEmpty(SqStack *s){s->base=(SElemType *)malloc(STACK_INIT_SIZE*sizeof(SElemType));if(!s->base) return overflow;s->top=s->base;s->stacksize=STACK_INIT_SIZE;return ok;}Status PushStack(SqStack *s,SElemType e){if(s->top-s->base>=s->stacksize){s->base=(SElemType*)(s->base,(s->stacksize+STACKINCREMENT)*sizeof(SElemType));if(!s->base) return error;s->top=s->base+s->stacksize;s->stacksize+=STACKINCREMENT;}*s->top++=e;return ok;}Status PopStack(SqStack *s,SElemType *e){ if(s->top==s->base) return error;*e=*(--s->top);return ok;}Status IsStackEmpty(SqStack *s){if(s->base==s->top) return true;else return false;}1.1.2其他由于要填充五角星, 我们就要得到五角星的十个顶点。
第3章 填充
3.5.2 多边形域填充 常用的填充方法是按扫描线顺序,计算扫描线 与多边形的相交区间,再用要求的颜色显示这些区 间的像素,即完成填充工作,简称为扫描线填充算 法。区间的端点可以通过计算扫描线与多边形边界 线的交点获得,该方法适用于自动填充。
1.多边形域的填充步骤 一般多边形的填充过程,对于一条扫描线,可以分为 4个步骤: (1) 求交:计算扫描线与多边形各边的交点。 (2) 排序:把所有交点按x递增顺序进行排序。 (3) 交点配对:第1个与第2个,第3个与第4个等两两配对, 每对交点就代表扫描线与多边形的一个相交区间。 (4) 区间填色:把这些相交区间内的像素置成多边形颜色。
对例3.4重新使用改进后的简单种子填充算法步骤如下。 解: (1) 种子像素(3, 2)入栈并着色。 (2) 出栈(3, 2)。入栈(2, 2)、(3, 3)、(4, 2)、(3, 1)并着色。 (3) 出栈(3, 1)。入栈(2, 1)、(4, 1)并着色。 (4) 出栈(4, 1)。 (5) 出栈(2, 1)。 (6) 出栈(4, 2)。 (7) 出栈(3, 3)。入栈(2, 3)并着色。 (8) 出栈(2, 3)。 (9) 出栈(2, 2)。入栈(1, 2)并着色。 (10) 出栈(1, 2),栈空结束。
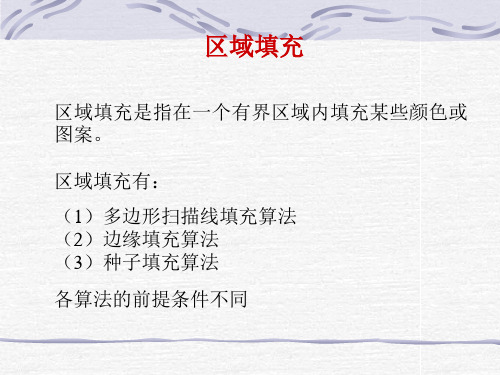
3.5 区域填充
3.5.1 种子填充算法
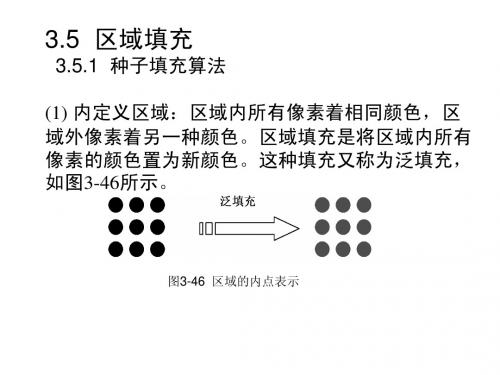
(1) 内定义区域:区域内所有像素着相同颜色,区 域外像素着另一种颜色。区域填充是将区域内所有 像素的颜色置为新颜色。这种填充又称为泛填充, 如图3-46所示。
图3-46 区域的内点表示
(2) 边界定义区域:区域边界像素着特定颜色,区 域内像素不取特定颜色。区域填充是将区域内所有 像素的颜色置为边界像素颜色或新颜色。这种填充 称为边界填充,如图3-47所示。
区域填充算法
7
9 9
9
对边界和内点表示的八连通区域的填充,只要将上述算法的对四 个像素点填充改为八个像素点即可。 四连通区域种子填充算法的缺点是有时不能通过狭窄区域区域, 因而不能填满多边形。八连通算法的缺点是有时会填出多边形的 边界。由于填不满比涂出更容易补救,因此四连通算法比八连通 算法用得更多。
(3)扫描线种子填充算法
(2)内点表示的四连通区域种子填充算法
基本思想:从多边形内部任一点(像素)出发,按照“右 上左下”的顺序判断相邻像素,若是区域内的像素,则对 其填充,并重复上述过程,直至所有像素填充完毕。 可以使用栈结构来实现该算法,种子像素入栈,档栈非空, 重复执行下面操作: 1)栈顶像素出栈; 2)将出栈像素置成多边形填充的颜色;
基本思想:从多边形内部任一点(像素)出发,按照 “右上左下”的顺序判断相邻像素,若不是边界像素 且没被填充过,则对其填充,并重复上述过程,直至 所有像素填充完毕。 可以使用栈结构来实现该算法,种子像素入栈,档栈 非空,重复执行下面操作: 1)栈顶像素出栈; 2)将出栈像素置成多边形填充的颜色; 3)按“右上左下”的顺序检查与出栈像素相邻的四个 像素,若其中某个像素不在边界上且未置成多边形色, 则把该像素入栈。
扫描线算法分析(举例分析)
基本思想:在任意不间断的区间中只取一个像素(不 间断区间指一条扫描线上的一组相邻元素),填充当 前扫描线上的该段区间,然后确定与这一段相邻的上 下两条扫描线位于区域内的区段,并依次把它们保存 起来,反复进行这个过程,指导所有保存的每个区段 都填充完毕。
(3)扫描线种子填充算法
种子像素入栈,当栈非空时,重复以下步骤: (1)栈顶像素出栈 (2)沿扫描线对出栈像素的左右像素进行填充, 直到遇到边界像素为止 (3)将上述区间内最左、最右像素记为xl 和xr (4)在区间[xl ,xr]中检查与当前扫描线相邻的上 下两条扫描线是否全为边界像素、或已填充 的像素,若为非边界、未填充的像素,则把 每一区间的最右像素取为种子像素入栈
- 1、下载文档前请自行甄别文档内容的完整性,平台不提供额外的编辑、内容补充、找答案等附加服务。
- 2、"仅部分预览"的文档,不可在线预览部分如存在完整性等问题,可反馈申请退款(可完整预览的文档不适用该条件!)。
- 3、如文档侵犯您的权益,请联系客服反馈,我们会尽快为您处理(人工客服工作时间:9:00-18:30)。
}
voidSetStackEmpty(linkstack *s)//初始化栈
{
stacknode *p=s->top;
while( s->top != NULL)
{
free(p);
s->top=p->next;
}
}
intIsStackEmpty(linkstack *s)//判空栈
{
if(s->top == NULL)
return1;
else
return0;
}
voidScanLineFill4(intx,inty,intoldColor,intnewColor)
{
intxLeft,xRight,i;
boolisLeftEndSet,spanNeedFill;
Span span;
i++;
}/*end of while( i < xRight) */
}/*end of while( ! isStackEmpty() ) */
}/*end of ScanLineFill4() */
voidmain()
{
intgraphdrive=DETECT;
intgraphmode;
staticintpolypoints[14]={50,50,400,50,400,300,150,300,150,400,50,400,50,50};
intxLeft;
intxRight;
}Span;/*区段*/
typedefstructstacknode
{
Span span;
structstacknode *next;
}acknode;
typedefstruct
{
stacknode *top;
}linkstack;
voidPushStack(linkstack *s, Span *span)//入栈
{
putpixel(i, y, newColor);
i--;
}
if( i != span.xLeft - 1)/*确定区段左边界*/
{
isLeftEndSet = TRUE;
xLeft = i + 1;
}
i = span.xLeft;
while( i < xRight)
{
spanNeedFill = FALSE;
i++;
}/*end of while( i < xRight) */
/*处理下面一条扫描,与处理上面一条扫描线完全类似*/
y = y - 2;
xRight = span.xRight;
i = span.xLeft - 1;
isLeftEndSet = FALSE;
while(getpixel(i,y) == oldColor)/*向左填充*/
i = x - 1;
while(getpixel(i,y) == oldColor)/*向左填充*/
{
putpixel(i,y,newColor);
i--;
}
span.xLeft = i + 1;/*确定区段左边界*/
SetStackEmpty(s);
span.y = y;
PushStack(s,&span);
while(getpixel(i,y) == oldColor)/*向右填充*/
{
if( ! spanNeedFill)
{
spanNeedFill = TRUE;
if( ! isLeftEndSet)
{
isLeftEndSet = TRUE;
xLeft = i;
}
}
putpixel(i,y,newColor);
i++;
}
if( spanNeedFill )
{
span.y = y;
span.xLeft = xLeft;
span.xRight = i - 1;
PushStack(s, &span);
isLeftEndSet = FALSE;
spanNeedFill = FALSE;
}
/* while(getpixel(i,y) != oldColor) */
画多边形的方法通过查阅资料知道有很多方法,比如可用MoveTo、LineTo两个函数配合使用画多边形。然而虽然能编译通过,但是却不能执行。于是就选用了graphics中的drawpoly函数画多边形。在编译时却出现了drawpoly为未定义标识符的情况。上网查询后得知是因为使用的easyX将drawpoly的函数名字修改为了polygon,所以才会出现那样的错误。
2.添加库函数graphics.h。
3.初始化。堆栈置空,将种子点(x, y)入栈。
4.出栈。若栈空则结束;否则取栈顶元素(x, y),以y作为当前扫描线。
5.填充并确定种子点所在区段。从种子点(x, y)出发,沿当前扫描线向左、右两个方向填充,直到边界。分别标记区段的左、右端点坐标为xl和xr。
6.确定新种子点。在区间[xl, xr]中检查与当前扫描线y上、下相邻的两条扫描线上的像素。若存在非边界、未填充的像素,则把每一区间的最右像素作为种子点压入堆栈,返回第4步。
经过不懈的努力,终于初步完成了本次实验。通过本次实验,掌握了区域填充的扫描线算法,进一步了解图形程序设计的方法,掌握了一定的基本绘图程序设计的能力。
附源代码:
#include<graphics.h>
#include<conio.h>
#include<stdio.h>
typedefstruct{
inty;
while(!IsStackEmpty(s))
{
PopStack(s, &span);
/*处理上面扫描线*/
y = span.y + 1;
xRight = span.xRight;
i = span.xLeft - 1;
isLeftEndSet = FALSE;
while(getpixel(i,y) == oldColor)/*向左填充*/
1.掌握区域填充的扫描线算法;
实验内容:
编写图形程序:区域填充扫描线算法程序,并调试运行。
实验步骤:
1.实验原理:区域填充的递归算法和程序都很简单,但由于多次递归,费时、费内存,效率还不高。为了减少递归次数,提高效率,采用了扫描线算法。算法的基本过程如下:当给定种子点(x, y)时,首先填充种子点所在扫描线上位于给定区域的区段,然后确定与这一区段相连通的上、下两条扫描线上位于给定区域内的区段,并依次保存下来。反复这个过程,直到填充结束。
{
putpixel(i, y, newColor);
i--;
}
if( i != span.xLeft - 1)/*确定区段左边界*/
{
isLeftEndSet = TRUE;
xLeft = i + 1;
}
i = span.xLeft;
while( i < xRight)
{
spanNeedFill = FALSE;
《计算机图形学》实验报告(三)
班级:计科系(2)班
姓名:陈露
学号:10410902015
时间:2013.4.28
地点:综合实验楼一楼
实验成绩:优秀□良好□中□及格□不及格□
实验题目:区域填充算法
实验目的:
1.掌握区域填充的扫描线算法。
2.培养学生利用基本图形生成算法,进行基本绘图程序设计的能力;
实验要求:
while(getpixel(i,y) == oldColor)/*向右填充*/
{
if( ! spanNeedFill)
{
spanNeedFill = TRUE;
if( ! isLeftEndSet)
{
isLeftEndSet = TRUE;
xLeft = i;
}
}
putpixel(i,y,newColor);
7.根据思想编写程序代码。
实验结果:
调试并运行程序,多边形的区域应该被填充。运行结果如下:
可以看出,是从(150,150)这个像素点所在的扫描线开始,向上再向下进行填充的。
实验总结:
在本次实验中,主要有两个问题。一是栈的问题,二是画多边形。
栈的每个元素都有两个值x和y,怎么设计比较才合理。这就需要使用结构体来解决。而且对栈的使用总是出错,如何引用里边的值不太熟练。比如有时表达式必须包含指针类型,这是因为对结构体的成员究竟什么时候使用“->”,什么时候使用“.”不太清楚。
linkstack *s=(linkstack*)malloc(sizeof(linkstack));
s->top = NULL;
i = x;
while(getpixel(i,y) == oldColor)/*向右填充*/
{
putpixel(i,y,newColor);
i++;
}
span.xRight = i - 1;/*确定区段右边界*/
{
stacknode *p=(stacknode*)malloc(sizeof(stacknode));
p->span.y = span->y;
p->span.xLeft = span->xLeft;
p->span.xRight = span->xRight;
p->next=s->top;