Windows Server 2012 活动目录项目式教程项目16 OU规划与权限管理
Windows Server活动目录企业应用Windows Server使用组策略管理用户工作环境

Windows Server活动目录企业应用项目四 使用组策略管理用户地工作环境四.一有关知识识组策略是一种能够让系统管理员充分管理与控制用户工作环境地功能通过它来确保用户拥有符合组织要求地工作环境,也通过它来限制用户,这样不但可以让用户拥有适当地环境,也可以减轻系统管理员地管理负担。
本节介绍如何使用组策略来简化在Active Directory环境管理计算机与用户。
将了解组策略对象(GPO)结构以及如何应用GPO,还有应用GPO时地某些例外情况。
本节还将讨论Windows Server 二零一二提供地组策略功能,这些功能也有助于简化计算机与用户管理。
四.一.一组策略组策略是一种技术,它支持Active Directory环境计算机与用户地一对多管理,特点如图六-一所示。
图六-一组策略通过编辑组策略设置,并针对目地用户或计算机设计组策略对象(GPO),可以集管理具体地配置参数。
这样,只更改一个GPO,就能管理成千上万地计算机或用户。
组策略对象是应用于选定用户与计算机地设置地集合。
组策略可控制目地对象地环境地很多方面,包括注册表,NTFS文件系统安全,审核与安全策略,软件安装与限制,桌面环境,登录/注销脚本等。
通过链接,一个GPO可与AD DS地多个容器关联。
反过来,多个GPO也可链接到一个容器。
一.域策略域级策略只影响属于该域地用户与计算机。
默认情况下存在两个域级策略,如表六-一所示。
表六-一默认域级策略(域策略,域控制器策略)可以创建其它域级策略,然后将其链接到AD DS地各种容器,以将具体配置应用于选定对象。
例如,提供额外安全设置地GPO可应用于包含应用程序服务器计算机账户地组织单位。
又如,GPO可限制某个组织单位用户地桌面环境。
二.本地策略运行Windows 二零零零 Server或更高版本操作系统地每台计算机都有本地组策略。
此策略影响本地计算机以及登录到该计算机地任何用户,包括从该本地计算机登录到域地域用户。
windows server 2012活动目录知识点总结
•Domain Directory Partition其中存储着该域内的对象,如用户、组、计算机与组织单元等对象。每个域各自拥有一份域目录分区,它会被复制到同一个域内的所有域控制器,并不会被复制到其他域的域控制器。
•紧急复制,以减少密码复制延迟所造成的问题。任何DC上的密码被修改后,其他DC尽快联系PDC并修改
•负责整个森林的同步时间(kerberos在允许用户访问网络资源之前,检查时间同步)
•net time /setsntp:
•目的:为防用户的密码被猜测,当密码错误次数达到预设值时,该账号将被锁定BadPasswordCount
域:
域是活动目录中逻辑结构的核心单元,是一个有安全边界的计算机集合。一个域包含许多计算机,它们由管理员设定,共用一个目录数据库,一个域有一个唯一的名字。
容器与OU:
–容器与对象相似,有自己的名称,也是一些属性的集合。容器可以包含其它的对象,也可以包含其它的容器。OU是AD中的一个特殊的容器,他可以包含对象、OU和组策略。
–OU可以把对象组织到一个逻辑结构中,使其能最佳适应组织的需要。
–委派OU的管理控制权,必须把OU及OU包含对象的具体的权限指定给一个或几个用户和组。
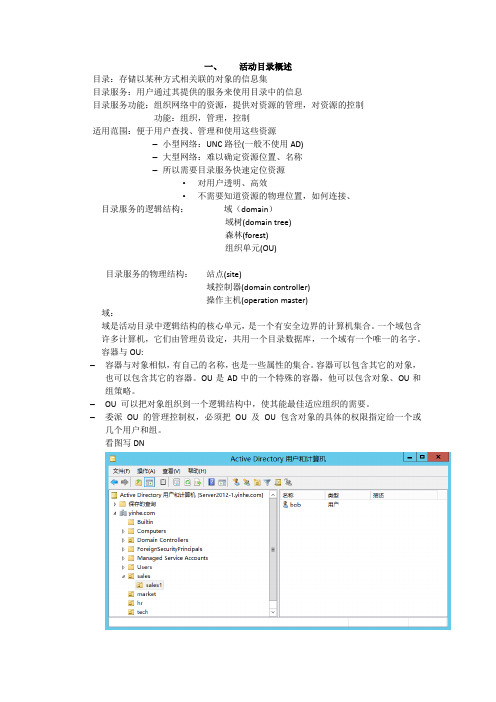
看图写DN
Administrator@UPN的认识。
二、快照准备(无内容)
三、管理域账户和组
账户类型:计算机账户,用户账户,组账户
跟踪尚未写入活动目录数据库文件的数据
Res1.log
Res2.log
Windows Server活动目录企业应用Windows Server管理操作主机

Windows Server 活动目录企业应用项目九 管理操作主机AD DS数据库内绝大部分数据地复制是采用多主机复制模式(multi -master replicationmodel),也就是您可以直接更新任何一台域控制器内绝大部分地AD DS对象,之后这个对象会被自动复制到其它域控制器。
然而只有少部分数据地复制是采用单主机复制模式(single-master replication model)。
在此模式下,当您提出更改对象地请求时,只会由其一台被称为操作主机地域控制器负责接收与处理此请求,也就是说该对象先被更新在这台操作主机内,再由它将其复制到其它域控制器。
Active Directory 域服务(AD DS )内总有五个操作主机角色:架构操作主机(schema operations master )域命名操作主机(domain naming operations master )RID 操作主机(relative identifier operations master )PDC 模拟器操作主机(PDC emulator operations master )基础结构操作主杌(infrastructure operations master )一个林只有一台架构操作主机与一台域命名操作主机,这两个林级别地角色默认都由林根域内地第一台域控制器所扮演。
而每一个域拥有自己地RID操作主机,PDC模拟器操作主机与基础结构操作主机,这三个域级别地角色默认由该域内地第一台域控制器所扮演。
九.一.一架构操作主机扮演架构操作主机角色地域控制器,负责更新与修改架构( schema)内地对象种类与属数据。
隶属于Schema Admins组内地用户才有权利修改架构。
一个林只能有一台架构操作主机。
九.一.二域命名操作主机扮演域命名操作主机角色地域控制器,负责林内域目录分区地新建与删除,即负责林内地域添加与删除工作。
Windows Server 2012 教程:功能和操作指南说明书
About the T utorialWindows Server 2012 codenamed Windows Server 8 is the most recent version of the operating system from Microsoft regarding server management, but not the last one which is Windows Server 2016. Officially it was released on August 1, 2012 and is just a commercial version as of now.Windows Server 2012 has four editions: Foundation, Essentials, Standard and Datacenter. Each one of them has their own limitations except the Datacenter version, which is also the most expensive one.This is an introductory tutorial that explains all the fundamentals of Windows Server 2012.AudienceThis tutorial has been designed for all those readers who want to learn the features of Windows Server 2012. It is especially going to be useful for all those professionals who are required to install and use this operating system to perform various duties in their respective organizations.PrerequisitesWe assume the readers of this tutorial have a practical experience of handling a Windows-based Servers. In addition, it is going to help if the readers have a basic knowledge of how to install and use an operating system.Disclaimer & CopyrightCopyright 2018 by Tutorials Point (I) Pvt. Ltd.All the content and graphics published in this e-book are the property of Tutorials Point (I) Pvt. Ltd. The user of this e-book is prohibited to reuse, retain, copy, distribute or republish any contents or a part of contents of this e-book in any manner without written consent of the publisher.We strive to update the contents of our website and tutorials as timely and as precisely as possible, however, the contents may contain inaccuracies or errors. Tutorials Point (I) Pvt. Ltd. provides no guarantee regarding the accuracy, timeliness or completeness of our website or its contents including this tutorial. If you discover any errors on our website or inthistutorial,******************************************T able of ContentsAbout the Tutorial (1)Audience (1)Prerequisites (1)Disclaimer & Copyright (1)Table of Contents (2)1.WINDOWS SERVER 2012 – OVERVIEW (5)Improvements in Windows Server 2012 (5)2.WINDOWS SERVER 2012 – INSTALLATION (8)System Requirements (8)3.WINDOWS SERVER 2012 – SERVER ROLES (15)4.WINDOWS SERVER 2012 − POWERSHELL (22)PowerShell ISE (24)PowerShell Basic Commands (27)5.WINDOWS SERVER 2012 − REMOTE MANAGEMENT (29)Adding a Server for Remote Management (30)6.WINDOWS SERVER 2012 − WINDOWS FIREWALL (33)How to Create a New Firewall Rule? (36)7.WINDOWS SERVER 2012 − REMOTE DESKTOP MANAGEMENT (45)8.WINDOWS SERVER 2012 − RESOURCE MON ITOR (49)9.WINDOWS SERVER 2012 − ACTIVE DIRECTORY (51)10.WINDOWS SERVER 2012 − DC ACCOUNTS (61)11.WINDOWS SERVER 2012 − FILE SYSTEM (65)12.WINDOWS SERVER 2012 − GROUP MANAGED SERVICE ACCOUNTS (67)13.WINDOWS SERVER 2012 − GROUP POLICY OVERVIEW (70)14.WINDOWS SERVER 2012 − DHCP ROLE (73)Post-deployment Configuration (79)Scope Implementation of DHCP (81)15.WINDOWS SERVER 2012 − DNS ROLE (91)16.WINDOWS SERVER 2012 − PRIMARY ZONES (96)17.WINDOWS SERVER 2012 − MANAGE RECORDS (100)18.WINDOWS SERV ER 2012 − IIS OVERVI EW (105)19.WINDOWS SERVER 2012 − IIS SECURITY (111)20.WINDOWS SERVER 2012 − HYPER-V (119)21.WINDOWS SERVER 2012 − ADVANCED CONFIGURATION (124)22.WINDOWS SERVER 2012 − CONFIGURE WSUS ROLE (130)23.WINDOWS SERVER 2012 – WSUS POLICIES & TUNING (134)24.WINDOWS SERVER 2012 − SHARING OF FILES (144)25.WINDOWS SERVER 2012 − FILE MANAGER (151)26.WINDOWS SERVER 2012 − PRINT SERVER (160)27.WINDOWS SERVER 2012 − EASY PRINTING (163)28.WINDOWS SERVER 2012 − CONFIGURE PRINT DRIVERS (166)29.WINDOWS SERVE R 2012 − NETWORK SER VICES (168)30.WINDOWS SERVER 2012 − BACKUP MANAGEMENT (176)Windows Server 2012 Windows Server 2012 codenamed Windows Server 8 is the most recent version of the operating system from Microsoft regarding server management. But it is not the last one, as the last one is Windows Server 2016. Officially it was released on August 1st, 2012 and is being sold as a commercial version only.Improvements in Windows Server 2012The major Improvements on this version are as follows:∙It is ready to be integrated with cloud systems and it still can maintain the classic features of local datacenters as a result Hyper-V Virtualization has new features Hyper-v replicas, it allows you to create virtual machines replications between clusters and storage systems.∙The Storage migration virtual disks can be moved to different physical storages, Virtual machine snapshots, virtual machines can be deleted from the Hyper-v and also from the virtual disks and it can be used directly without the need to shut down the virtual machine.∙The Core server installation easily switches to GUI installation without the need of reinstallation.∙The file server and storage service improvement is that it eliminates identical copies in the same volumes as such and saves space.∙The Storage pools and storage spaces allows you to group the hard disks to one or more storage pools then it allows to create virtual disks. It can add other disks to the storage pools and make available to the users without impacting them.∙The iSCSI Target Server can offer block storage to other servers and applications on the network using the iSCSI standard.∙Active Directory cloning can deploy additional domain controllers by cloning an existing virtual domain controller.Windows Server 2012 – OverviewThe Windows Server 2012 has four editions: Foundation, Essentials, Standard and Datacenter. Each one of them has their own limitation accept the Datacenter version which is also the most expensive one.The following table will show what is the right one for your business needs:For finding out the cost of licensing you can click on the following link:https:///en-us/server-cloud/products/windows-server-2012-r2/purchasing.aspxWindows Server 2012 – InstallationWindows Server 2012In this chapter, we will discuss regarding the requirements and prerequisites of the Windows Server 2012.System RequirementsAlthough most of the servers nowadays probably have the necessary requirements for Windows Server 2012. It will certainly be useful to know them in case you want to upgrade from an older system.The main requirements are:∙CPU socket minimum 1.4 GHz (64-bit processor) or faster for single core and Microsoft recommends is 3.1 GHz (64-bit processor) or faster multi-core.∙RAM memory minimum is 2GB, but Microsoft recommends 8GB.∙160 GB hard disk with a 60 GB system partition space in your hard disk.One important thing to note here is that the installation process itself will verify your computer hardware and let you know if it qualifies for a Windows Server 2012 installation. If not, then you will need to upgrade your hardware.InstallationThe following steps are to be adhered for the installation of Windows Server 2012.Step 1: We can download the evaluation ISO of Windows Server 2012 R2 from the following link:https:///en-us/evalcenter/evaluate-windows-server-2012-r2But you will need to sign in first with a Microsoft account like Hotmail for example in order to complete the download and the good thing is that the evaluation period will last for 180 days, so you will have enough time to know if it will be the right product for you or not.At the end, if you decide to buy the license of your Windows server 2012 R2. You can purchase it online via a Microsoft online store found in –/store/msusa/en_US/list/Windows-Server/categoryID.70676900?icid=BusinessR_Software_80_Windows_Server_112315 For the Enterprise solution, I would recommend to purchase it via a Microsoft partner that is found in your country.Step 2: After downloading the ISO of Microsoft, create a boot USB driver which can be created with the Microsoft tool called Windows USB/DVD Download Tool and can be downloaded from the following link:https:///en-us/download/windows-usb-dvd-download-toolAfter downloading the EXE file, open it and select the ISO file location and then click next like in the following screenshot, and wait up to the end when the Boot USB is created.Step 3: After completing the above given steps, plug-in the USB to the server and wait for a while till it loads the files. This will continue for about a couple of minutes as shown in the following screenshot.Step 4: After the files are loaded, you will see the screen of language settings of installation, keyboard, time and currency format. Generally, all the default ones are also good enough to start with. Click Next.Step 5: Click “Install now”.Step 6: Once you have clicked on Install Now, the setup will start and it will load all the files and the screen will look as shown in the following screenshot.Step 7: Wait until the files are loaded and then you will see the following screen. Let’s select Windows Server 2012 DataCenter Evaluation (Server with GUI) and click Next.Step 8:Click “I accept the license terms” and the n click on the Next button as shown in the following screenshot.Step 9:The following screen will appear. In “Driver Options” you can create a new partition, delete or format the Hard disk. After you have done this process then you can select the partition where the Windows server 2012 R2 will be installed in our case we have one partition. Once all this is done, then click on Next.Step 10:Let’s wait until this process finishes during this ti me and then the server will reboot.Step 11: Once the reboot is done the following screen will appear. Set the password for the server and then click on “Finish”.Step 12: It will take some minutes until the setup finishes completely.Step 13: Once all this is done, you have completed the installation process and the following screen will appear.CongratulationsWindows Server 2012Like the previous version, Windows Server 2012 has the following roles which can be used and in the subsequent chapter, we will see how to install and configure the most important ones.The following picture shows all the roles. A small reminder! – Roles and Features are the tools that you need to install or activate in order to complete your IT Administration duties, without their installation you cannot do anything.To add a role in the server we should adhere to the following steps:Windows Server 2012 – Server RolesStep 1: Click with the mouse on Server Manager which is found in the task bar as shown in the following screenshot.Step 2: After opening the “Server Manager”, click on the second option “Add roles and features”.Step 3: The following screen will appear, then you can Click on the Next button.Step 4:Select the Role-based or feature-based installation and then click on the Next button.In the next screen that appears, you will have the following two options:Option 1: Select a server from the server pool. This option is –if you want to install the services in the physical server like being done in the following screenshot.Option 2: Select a virtual Hard disk if you want to install the services in a virtual disk that can be somewhere in the network storage. Take a look at the following screenshot for better understanding.Step 5:The last step will be to check the service that you want to install, but in the upcoming chapters we will continue this setup for each and every important services.Windows Server 2012Windows PowerShell is a command-line shell and scripting language designed especially for system administration. It ’s analogue in Linux is called as Bash Scripting. Built on the .NET Framework, Windows PowerShell helps IT professionals to control and automate the administration of the Windows operating system and applications that run on Windows Server environment.Windows PowerShell commands, called cmdlets , let you manage the computers from the command line. Windows PowerShell providers let you access data stores, such as the Registry and Certificate Store, as easily as you access the file system.In addition, Windows PowerShell has a rich expression parser and a fully developed scripting language. So in simple words you can complete all the tasks that you do with GUI and much more.PowerShell Icon can be found in the task bar and in the start menu. Just by clicking on the icon, it will open.To open it, just click on the icon and then the following screen will open and it means that PowerShell is ready for you to work on.Windows Server 2012 − PowerShellThe latest version of PowerShell is 5.0 and to check what is installed in our server we type the following command –:$PSVersionTable as shown in the following screenshot and from the screen we also know that we have PSVersion 4.0To update with the latest version where it has more Cmdlets we have to download Windows Management Framework 5.0 from the following link –https:///en-us/download/details.aspx?id=50395 and install it.PowerShell ISEThe Windows PowerShell Integrated Scripting Environment (ISE) is a host application for Windows PowerShell. In Windows PowerShell ISE, you can run commands and write, test, and debug scripts in a single Windows-based graphic user interface with multiline editing, tab completion, syntax coloring, selective execution, context-sensitive help, and support for right-to-left languages.You can use menu items and keyboard shortcuts to perform many of the same tasks that you would perform in the Windows PowerShell console. For example, when you debug a script in the Windows PowerShell ISE, to set a line breakpoint in a script, right-click the line of code, and then click Toggle Breakpoint.To open it you just go to Start –Search and then Type –PowerShell as shown in the following screenshot.Then click on Windows PowerShell ISE. Or click on the downward Arrow as shown in the following screenshot.It will list all the applications installed on the server and then click on Windows PowerShell ISE.The following table will be open –It has three sections, which include –The PowerShell Console with number 1, then Scripting File number 2 and the third is the Command Module where you can find the module.End of ebook previewIf you liked what you saw…Buy it from our store @ https://。
WindowsServer2012活动目录企业应用项目1 构建活动目录实验实训环境
角色:虚拟机2,独立服务器 主机名:win2012-2 IP地址:192.168.10.2/24 操作系统:Windows Server 2012 R2
图3-1 安装与配置Hyper-V服务器拓扑图
1.3 项目实施
Windows Server 2012 R2安装完成后,默认没有安装 Hyper-V角色,需要单独安装Hyper-V角色。安装Hyper-V角色 可通过“添加角色向导”完成。 1.3.1 任务1 安装和卸载Hyper-V角色
1.2 项目设计及准备
角色:虚拟机1,独立服务服务器 主机名:win2012-1 IP地址:192.168.10.1/24 操作系统:Windows Server 2012 R2
角色:Hyper-V服务器 主机名:win2012-0 IP地址:192.168.10.100/24 操作系统:Windows Server 2012 R2
目前主流的服务器CPU均支持以上要求,只要 支持硬件虚拟化功能,其他两个要求基本都能够满 足。为了安全起见,在购置硬件设备之前,最好事 先到CPU厂商的网站上确认CPU的型号是否满足以上 要求。
1.2 项目设计及准备
① 安装好Windows Server 2012 R2,并利用“服务器 管理器”添加“Hyper-V”角色。 ② 对Hyper-V服务器进行配置。 ③ 利用“Hyper-V管理器”建立虚拟机。 本项目的参数配置及网络拓扑图如图1-1所示。
① 安装Windows Server 2012 R2 Hyper-V功能,基本 硬件需求如下。 CPU:最少1 GHz,建议2 GHz以及速度更快的CPU。 内存:最少512 MB,建议1 GB。 完整安装Windows Server 2012 R2建议2 GB内存。 安装64位标准版或者数据中心版,最多支持2 TB内 存。 磁盘:完整安装Windows Server 2012 R2建议40 GB 磁盘空间,安装Server Core建议10 GB磁盘空间。
windows-server-2012-部署活动目录服务
windows server 2012 部署活动目录服务今天我们来学习如何在Windows Server 2012中创建域.安装前提条件:1.安装者必须具有本地管理员权限2.操作系统版本必须满足条件(Windows Server 2008 除Web版外都满足)3.本地磁盘至少有一个分区是NTFS文件系统4.有TCP/IP设置(IP位置、子网掩码等)5.有相应的DNS服务器支持6.静态的IP位置,并把DNS指向自己的IP位置7.有足够的可用空间注意:Dcpromo.exe 已弃用。
在 Windows Server 2012 中,如果你从命令提示符运行dcpromo.exe(无任何参数),你将收到引导你到服务器管理器的信息,在该服务器管理器中,你可使用“添加角色”向导安装 Active Directory 域服务。
如果你从命令提示符运行 dcpromo /unattend,你仍可执行使用 Dcpromo.exe 的无人参与安装。
这可让组织继续使用基于 dcpromo.exe 的自动化 Active Directory 域服务 (AD DS) 安装例程,直到它们可以使用 Windows PowerShell 重写那些例程。
实验环境使用1台虚拟机,DC的IP是192.168.6.1,DNS位置指向自己.1.首先检查操作系统的版本2.检查网络的IP位置和DNS位置指向3.打开“服务器管理器”,点击“添加角色和功能”4.选择“基于角色或基于功能的安装”5.选择安装角色的服务器6.选择安装“AD域服务”7.完成AD域服务的安装8.开始进行“AD域服务配置向导”9.选择新建林,域名为10.选择林功能级别和域功能级别,指定是否为DNS服务器和全局编目GC11.制定DNS委派12.设置NETBIOS名13.指定AD DS数据库,日志文件和SYSVOL存放位置14.检查安装参数选项15.首先验证后进行AD的安装16.安装AD成功后进行重新启动,打开“服务器管理器”查看17.打开"AD用户和计算机"工具进行查看18.打开"DNS服务器"工具进行查看19.打开"组策略管理"工具进行查看20.打开"AD管理中心"工具进行查看本文出自“微软技术专题”博客,请务必保留此出处bbb://nickzp.blog.51ctoaaa/12728/1064693。
Windows Server 2012服务器配置与实训学习单元2 活动目录配置与用户管理
任务一
建立域控制器
任务实施 Windows Server 2012上安装活动目录域服务
1.在Windows Server 2012上安装活动目录域服务
14)确认制定域控制器的功能和站点信息,并设置DSRM密码,点击“下一 步”。
任务一
建立域控制器
任务实施 Windows Server 2012上安装活动目录域服务
任务一
建立域控制器
任务背景与分析
3.任务工单
客户名称: xx学校网络中心
任务单号:P2014060201
现场地点 客户要求 现场环境及参数
XX学校网络中心机房
日期:
2014年9月2日
1)建立域控制器 2)通过CMD指令行验证AD是否安装成功。 3)确认NetBios域名,指定AD DS数据库、日志和SYSVOL的存储位置 ,并查看配置的详细信息。 4)域控制器名称为“”
任务一
建立域控制器
任务背景与分析
2.任务分析 根据该校校园网络的业务需求并结合该学校的具体网络实 际,可以看出该网络规模还是很大的,客户要求安装域控 制器来对各部门和相关教师的办公电脑进行统一管理。要 完成此任务,就必须了解活动目录及域控制器的有关知识 和操作。本任务实现的工作流程是:确认用户需求与功能 分析-填写安装工单-安装规划-实施域控制器安装-完成配 置基本服务。
任务一
建立域控制器
任务实施 Windows Server 2012上安装活动目录域服务
1.在Windows Server 2012上安装活动目录域服务
1)设置指定AD角色服务器的IP地址和DNS服务器地址,因为是安装活动目 录,所以二者要一致。
2)点击“服务器管理器”。
WindowsServer2012活动目录企业应用项目7 远程桌面连接20171216
如果要增加其他用户也能利用远程桌面连接连接此远程计算机,只要在此远程计 算机上通过上述界面赋予该用户允许通过远程桌面服务登录权限即可。
还可以利用将用户加入到远程计算机的Remote Desktop Users组的方式,让用
户拥有此权限,其方法有以下两种。
Windows Server 2003( R2)、Windows XP:【开始→所有程序→附件→通信 →远程桌面连接】。
1. 连接远程计算机
本范例的本地计算机是Windows Server 2012,其连接远程计算机的步骤如下所示。
在本地计算机win2012-1上,【按开始菜单→单击向下箭头→展开所有应 用→单击Windows附件下的远程桌面连接】
我们通过如图7-2所示的环境练习远程桌面连接,先将这两台计算机准备好,并设 置好TCP/IPv4的值(采用TCP/IPv4)。(远程计算机是非域控制器)
图7-2 远程桌面连接网络拓扑
7.3 项目实施 7.3.1 任务1 设置远程计算机
必须在远程计算机上启用远程桌面,并且赋予用户远程桌面连接的权限,用户才可 以利用远程桌面进行连接。 1. 启用远程桌面
到远程计算机win2012-2上【按开始菜单→控制面板→系统和安全→系统→单击 左侧的高级系统设置→通过如图7-3中所示远程标签下的远程桌面进行设置】。
图7-3 允许远程连接到此计算机
不允许远程连接到此计算机:禁止通过远程桌面进行连接,这是默认值。 允许远程连接到此计算机:如果同时勾选仅允许运行使用网络级别身份验证的远程 桌面的计算机连接(建议),则用户的远程桌面连接必须支持网络级别验证 (Network Level Authentication,NLA),才可以连接。网络级别验证比较安全, 可以避免黑客或恶意软件的攻击。Windows Vista(含)以后版本的远程桌面连接都 是使用网络级别验证。 在单击如图7-3中所示第二个选项后,系统会弹出图7-4所示的对话框提醒你系统会 自动在Windows防火墙内例外开放远程桌面协议,请直接单击确定按钮。
- 1、下载文档前请自行甄别文档内容的完整性,平台不提供额外的编辑、内容补充、找答案等附加服务。
- 2、"仅部分预览"的文档,不可在线预览部分如存在完整性等问题,可反馈申请退款(可完整预览的文档不适用该条件!)。
- 3、如文档侵犯您的权益,请联系客服反馈,我们会尽快为您处理(人工客服工作时间:9:00-18:30)。
项目实训题
新建OU,并委派jack用户对该OU拥有添加、删除、
修改权限,测试jack是否允许对生产部OU进行员工 的添加、修改、删除等操作,并截取实验结果。
项目16 OU规划与权限管理
课程的内容OU的功能 NhomakorabeaOU与组账号的区别
OU与其它AD容器的差异 在AD中,OU的常规管理任务有哪些,其作用是?
项目背景
EDU公司的生产部门员工流动性非常强,生产部主管 product_master经常需要向AD管理员申请注册和注销 员工信息,AD管理员和生产部主管都希望能将生产部
项目分析
可以通过委派控制,将生产部的 OU的用户管理权限委派给 product_master。 生产部主管对生产部OU的用户操 作全部写入日志,并按周报表方式 向AD管理员和企业主管备案。
我问你答
(1) 当OU下有用户能否直接将OU删除?
(2) 请解释一下组织单元和组的区别?
(3) OU下能否再创建OU?
员工的管理权限下放,减少频繁的申请流程。
相关知识
1、OU的功能? AD对象的容器 AD对象的统一管理(组策略) OU的委托管理 2、OU和组的区别 组用于存放用户 组用于配置AD资源访问的ACL 用户和组是逻辑链接关系 用户和OU是物理链接关系
相关知识
3、OU和其它AD容器的区别 其它AD容器不能进行配置组策略 (图标也不同) 4、OU的常规管理任务 设置常规信息 设置OU的安全性 DACL(审计)与SACL(安全) OU的移动与删除 OU的委派控制