东芝TOSHIBAB-EV4T用户手册(使用说明书)
TOSHIBA E 中文手册
★在使用本产品之前请务必认真阅读本资料中的"操作及安全方面的注意事项"。
★本资料中所记载的技术信息仅用于说明产品代表性的动作、应用,而并非是使用时本公司及第三方的工业所有权及其他权利的保证或实施权的许诺。
★记载内容可能在不事先通知的情况下进行更改,使用时请向东芝电子管器件株式会社咨询。
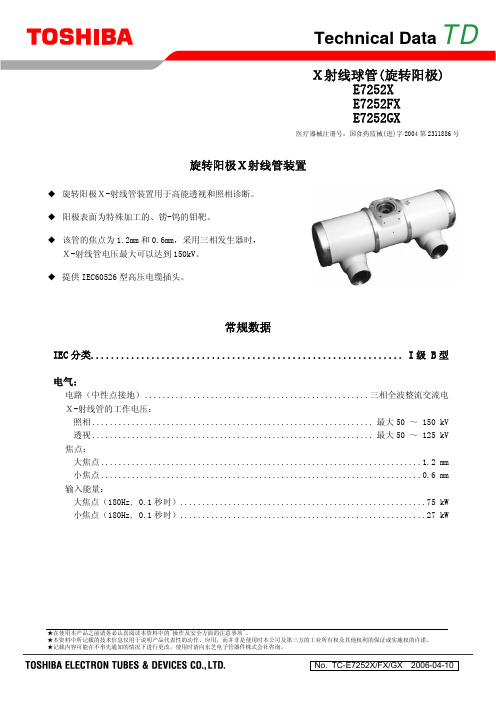
Technical Data TD旋转阳极X射线管装置◆ 旋转阳极X-射线管装置用于高能透视和照相诊断。
◆ 阳极表面为特殊加工的、铹-钨的钼靶。
◆ 该管的焦点为1.2mm 和0.6mm,采用三相发生器时,X-射线管电压最大可以达到150kV。
◆ 提供IEC60526型高压电缆插头。
常规数据IEC 分类..............................................................I 级 B 型电气:电路(中性点接地)...................................................三相全波整流交流电 X-射线管的工作电压:照相................................................................最大50 ~ 150 kV透视................................................................最大50 ~ 125 kV 焦点:大焦点.........................................................................1.2 mm 小焦点.........................................................................0.6 mm 输入能量:大焦点(180Hz, 0.1秒时)........................................................75 kW 小焦点(180Hz, 0.1秒时)........................................................27 kWX射线球管(旋转阳极)E7252X E7252FX E7252GX医疗器械注册号:国食药监械(进)字2004第2311886号E7252X, E7252FX, E7252GX发动机额定值:XS-AL状态 起动 运行电源 (Hz) 180 2)60 180 2)60输入功率 (W) 1100 910 83 83电压 (V) 220 130 60 40电流 (A) 5.7 7.8 1.6 2.3最小增速 1)(s) 1.2 0.8 - -电容器 (μF) 6 44 6 44最小制动时间 2)(s) 3 / 90 V (DC)定子阻抗公共端-主线圈之间的电阻值..................................................... 9.4 Ω 公共端-辅助线圈之间的电阻值...................................................28.3 ΩXS-R状态 起动 运行电源 (Hz) 180 3)50/60 180 3)50/60输入功率 (W) 2300 1450 300 80电压 (V) 460 240 130 58电流 (A) 5.4 6.5 2.0 1.5最小增速1)(s) 1.0 0.6 - -电容器 (μF) 3 24 3 24最小制动时间 2)(s) 1.5 / 90 V (DC) 3)定子阻抗公共端-主线圈之间的电阻值.................................................... 27.5 Ω 公共端-辅助线圈之间的电阻值...................................................58.0 Ω注: 1)从每分钟3000min-1(3600 min-1)的普通转速到每分钟10800转的高转速,提速时间 为所载提速时间(从0到高速)的2/3,其内容已在马达规格中载明。
东芝打印机用户手册

警告
下面的指示表示如果对机器进行不恰当的与指示相违背的操作时,将可能引 起严重伤害或者死亡的危险禁止使用与机器铭牌上 标注不符的电压,否则会 引起火灾或者电击。
禁止
■禁止用湿的手插拔电 源插头,否则会受到电 击。
禁止 禁止
■如果此设备和其他大耗 电量的设备使用同一个插 座,则在使用这些设备的 时候将会引起电流的大幅 度波动。一定要给此设备 提供一个单独的插座,否 则会引起火灾或者电击。
●尽量避免与高电压设备或易于引起电源干扰的设备使用共同的供电电源。
●当你在对机器内部进行处理或清理机器时,请将电源插头拔下。
●保持你的工作环境没有静电干扰。
●不要在机器上放置重物,因为这样可能引起不平衡而跌落,从而伤人。
●不要堵塞机器的通风孔,这样容易使机器内部升温而引起火灾。
●不要将身体斜靠在机器上,以免跌落引起伤害。
与地线相连
■保证本设备安全接好地 线。扩展电缆线也应该接 地。如果接地的方式不恰 当会引起火灾或者电击。
注意
这个符号表示,如果对此设备作不恰当的与提示相违背的操作,将可能引起 严重伤害或者有死亡的危险。
预防措施
下面的提醒将帮助你保证机器连续正常的运行。
●要避免机器处于下面的不利状态:
★温度超出规定
★直接光照
安全性 切勿将此产品用于禁止使用的区域,例如医院内。 如果您不了解存在哪些禁止使用的区域,请咨询医疗机构。否则,医疗设备将受到影响,并造成严重事故。 此产品可能影响到某些植入心脏起搏器和其它医疗植入设备的正常使用。使用心脏起搏器的病人应该意识到,在 心脏起搏器周围使用此产品将可能导致起搏器设备故障。 如果您出于某种原因而怀疑存在信号干扰,请立刻关闭此产品,并联系您的东芝泰格销售代理商。 切勿擅自拆卸、变更或修理此产品。 这样做可能会造成损伤。同时,变更设备也是违反有关无线电设备法律法规的。需要修理时,请联系您的东芝泰 格销售代理商。
使用说明书-Toshiba

注意
• 檢查電流斷路器是否正確安裝。如果電流斷路器未正確安裝,可能會造成 觸電。若要檢查安裝方法是否正確,請聯絡供貨零售經銷商或安裝本機的 專業供應商。 • 在密閉房間使用本機或是與其他燃燒器具搭配使用時,一定要不時打開窗戶 通風。通風不良可導致缺氧而造成窒息。 • 避免讓本機在高濕度(超過80%)的環境中長時間運轉,例如窗戶或門打開 的情況。室內機可能會出現結露,形成的水滴可能會落到傢俱上。 • 如果長時間不使用本機,請關閉主電源或電流斷路器。 • 當空調機運行很長時間後,建議由專業人士 對其進行維護。 • 一年至少檢查一次室外機的安裝台是否有損壞。如果不留心損壞情況,本機 可能會跌落或傾倒,造成受傷。 • 安裝/拆卸前面板/空氣過濾器/空氣淨化過濾器時,請站在穩固的梯子上。 否則可能會因此摔倒或受傷。 • 切勿站在室外機上,或在上面放置任何物品。否則可能會因物品跌落或傾倒 而受傷。本機的任何損壞都可能會造成觸電或起火。 • 切勿在空調機的風口處使用燃燒器具。燃燒器具燃燒不良時,可能會造成 窒息。 • 切勿在室外機周圍放置任何物品或讓落葉在其周圍聚積。如果有落葉或小動 物進入並接觸到內部電子零件,可能會造成本機故障或著起火。 • 切勿在空調器風口處放置動物和植物,否則可能對動物或植物帶來不利影 響。 • 確保流出的水有排出。如果沒有充分排水,可能會漏水,對傢俱造成損壞。 若要檢查使用的安裝方法是否正確,請聯絡供貨零售經銷商或安裝本機的 專業供應商。 • 切勿在本機上放置任何有液體的容器,例如花瓶。這可能會造成本機進水以 及電絕緣退化,造成觸電。 • 本機不得用作特殊用途,例如儲藏食物或動物,或是用來陳列植物、精密設 備或藝術品。切勿在船舶或其他車輛上使用。這可能會造成空調器故障,亦 可能損壞這些物品。 • 切勿在本機下方放置其他電器或傢俱。水滴可能滴落,造成損壞或故障。 • 清潔時,必須關掉本機並關閉電流斷路器。因為內部風扇或許會以高速旋 轉,可能造成受傷。 • 切勿用水清洗空調器的主要機體,這可能會造成觸電。 • 清潔前面板/空氣過濾器後,拭去水份,使其自然風乾。如果有水份殘留, 可能會造成觸電。 • 一旦拆卸前面板後,切勿觸摸本機的金屬零件,這可能會造成受傷。 • 切勿觸摸本機的進氣口或鋁翅片。這可能會造成受傷。 • 當您聽見雷聲,而且有可能打雷時,請關掉本機並斷開電流斷路器。如果遭 受雷擊,可能會造成故障。 • 遙控器電池︰ - 應按照(+)及(-)極的位置裝入。 - 不得再充電。 - 如果電池已過「建議使用期限」,切勿使用。 - 不要在遙控器中使用舊電池。 - 不要混用不同類型的電池或混用新舊電池。 - 切勿直接焊接電池。 - 切勿讓電池短路,或是加以拆卸、加熱或投入火中。如果電池未妥善棄 置,可能會爆炸或漏液,造成灼傷或受傷。如果接觸到電池漏液,請用水 徹底清洗。如果電池漏液滴到其他裝置上,請擦掉以避免直接接觸。 - 不要放置在小孩拿得到的地方。如果不慎吞下電池,請立即就醫。 • 因不遵守此手冊中的描述而造成的損失,製造商概不承擔任何責任。
东芝电器有限公司电子洗衣机指南说明书

E n g l i s hDISHWASHERINSTRUCTION MANUALModel:DW-10F1CIS(W)-UA DW-10F1CIS(S)-UARead these instructions carefully before using your DISHWASHER, and keep it carefully.SAFETY INSTRUCIONSAll instructions described should be carefully read and followed.These instructions are precautions to prevent the risks of serious injury or death of the user, and any damages to property.(*1) Serious injury - injury which requires hospitalization, lengthy treatment, or blindness, hot and cold skin burn, electric shock, broken bones or poisoning.(*2) Injury - injury, skin burn or electric shock which does not require hospitalization or lengthy treatment.(*3) Property loss - extended loss of houses, furniture, domestic animals or pets.02E n g l i s h03040506Handle the package of the dishwasher with extreme care.All packages are recyclables.Plastic parts are marked with abbreviation of international standard;TreatmentsPE Polyethylene, e.g., tableted package material Polystyrene, e.g., packing material Polymethyl, e.g., plastic clip Polymer, e.g., control panel Polypropylene, e.g., inner wallPS POM ABS PPE n g l i s hSuch warning sign is used to prevent dangers to you and others.Please follow it strictly.After reading, please store it properly for use just in case.07Start upCleaning and care Filter cleaning Spray arms cleaning Care and maintenanceRecognize the dishwasher Dishwasher features Control panel Use the dishwasher Water softenerAdding salt to the softener Adding rinse aid to the dispenser 10111301020304Rinse aid and detergent 1617182627281914Please carefully read the instruction manual before using the dishwasher,and this is helpful for the use and maintenance of the product.ContentsProgram Setting Washing program 08Changing the program mid-cycle Put additional dishes in End of washing programBasket used tipsInstall dishwasher bowl basket 2021Adding rinse aid to the dispenser 24141515TroubleshootingBefore connecting customer service center Error code Installation Product dimension Power connection 052930323435Specification06Water connection Connection of drain hoses303109Recognize the dishwasherDishwasher featuresImportant:Before using the dishwasher for the first time, read following instructions to ensure the best results.Salt containerFilterLower spray armDispenserCutlery basket Lower basketUpper basket Upper spray arm Cutlery rackCup rackControl panelE n g l i s hFollowing table shows best cleaning procedures and amount of dishwashing powder required according to the dirty level of the dishes, as well as the Washing programDishwashing powder (g)Highest Water Temperature65℃Time (min)Power (K wh)Water (L)ProgramAUTO1503/221 piece 0.9-1.39.5~1362℃2050.749GLASS60℃1340.811265℃90251 piece1.1511.5RAPID55℃300.71020HYGIENE70℃170 1.2715.5Program SettingE n g l i s h3/221 piece 3/221 piece 3/221 pieceStart upChanging the program mid-cycle1. The plug shall be firstly plugged into the socket. Power supply shall be of 220-240V AC 50Hz type, with socket of 10 A 220-240V AC.2. Make sure that the water supply is turned on to full pressure.3. Close the door, press "ON/OFF" button turn on the dishwasher.4. Press the button of desired program, the corresponding indicator will light up.5. Then, pass”Start/Pause”button to start.A wash cycle can only be changed if it has been running for a short time otherwise, the detergent may have already been released and the dishwasher may have already drained the wash water. If this is the case, the dishwasher needs to be reset and the detergent dispenser must be refilled. To reset the dishwasher, follow the instructions below:1. Press the Start/Pause button to pause the washing.2. Press the Program button for more than 3 seconds, the dishwasher will enter standby mode.3. Press the Program button to select the desired program.4. Press the Start/Pause button, the dishwasher will run after 10 seconds.3 secondsPut dishes inadditional Additional dishes can be placed in at any time before dishwasher program start. If you want to reload dishes in the process of washing, please follow instructions below:1. Press “Start/Pause” button to pause washing program;2. Wait for 5 seconds to open the door;3. Put the additional dishes in;4. Close the door;5. Press “Start/Pause” button and after 10 seconds, the dishwasher will start again.End of washing programAfter the program finishes, the machine show "End" after the buzzer beeps for 8 seconds. Turn off the machinePress ON/OFF button to turn off the dishwasher.Hot dishes are more likely to be damaged. The dishes shall be cool for about 15 minutes and then taken out from the dishwasher.Open the door carefullyClear the dishwasherIt is normal that the dishwasher still remains wet inside.E n g l i s hThe dishwasher is designed to allow for adjustment in the amount of salt consumed based on the hardness of the water used. This is intended to optimise and customise the level of salt consumption.Please follow the steps below for adjustment in salt consumption.0 - 56 - 1112 - 1718 - 2223 - 3435 - 55German dH Salt consumption(gram/cycle)0 - 910 - 2021 - 3031 - 4041 - 6061 - 980 - 67 - 1415 - 2122 - 2829 - 4243 - 690 - 0.941.0 - 2.02.1 - 3.03.1 - 4.04.1 - 6.06.1 - 9.80912203060FrenchfH Mmol/l Water softener level British Clarke WATER HARDNESSH1H2H3H4H5H6dH=1.25Clarke=1.78fH=0.178mmol/l°°°1The water softener must be set manually, using the water hardness dial.The water softener is designed to remove minerals and salts from the water, which would have a detrimental or adverse effect on the operation of the appliance. The more minerals there are, the harder your water is.The softener should be adjusted according to the hardness of the water in your area. Your local Water Authority can advise you on the hardness of the water in your area.1. Close the door and s witch on the appliance .2. Press the Start/Pause button for more than 5 seconds ,when the salt indicator flashes means entering the water softener settings.set model within 60 seconds after the appliance was switched on .3. Press the Start/Pause button to select the proper set according to your local environment, the sets will change in the following sequence: H1->H2->H3->H4->H5->H6.4. Without any operation in five seconds, the machine will exit from set mode, the machine is into standby status.Use the dishwasherWater softenerAdjusting salt consumptionThe manufactory setting: H3Contact your local water board for information on the hardness of your water supply.1. Remove the lower basket and unscrew the reservoir cap.2. Place the end of the funnel (supplied) into the hole and pour in about 1.5kg of dishwasher salt.3. Fill the salt container to its maximum limit with water, It is normal for a small amount of water to come out of the salt container.4. After filling the container, screw back the cap tightly.5. The salt warning light will stop being after the salt container has been filled with salt.6. Immediately after filling the salt into the salt container, a washing program should be started (We suggest to use a short program). Otherwise the filter system, pump or other important parts of the machine may be damaged by salty water. This is out of warranty.Please follow the steps below for adding dishwasher salt:Adding salt to the softenerE n g l i s hFunction of the rinse aid and detergentThe rinse aid is released during the final rinse to prevent water from forming droplets on your dishes, which can leave spots and streaks. It also improves drying by allowing water to roll off the dishes. Your dishwasher is designed to use liquid rinse aids.When to refill the rinse aidThe regularity of the dispenser needing to be refilled depends on how often dishes are washed and the rinse aid setting used.The Low Rinse Aid indicator ( ) will appear in the display when more rinse aid is needed.Do not overfill the rinse aid dispenser.Function of detergentThe chemical ingredients that compose the detergent are necessary to remove, crush and dispense all dirt out of the dishwasher. Most of the commercial quality detergents are suitable for this purpose.To achieve a better drying performance with limited rinse aid, the dishwasher is designed to adjust the consumption by user. Follow the below steps.1. .Close the door and s witch on the appliance 2. Within 60 seconds after step 1, press the Start/Pause button more than 5 seconds, and then press the Delay button to enter the set model, the rinse aid indication blinks as 1 Hz frequency.3. Press the Start/Pause button to select the proper set according to your using habits , the sets will change in the following sequence: D1->D2->D3->D4->D5->D1. The higher the number, the more rinse aid the dishwasher uses.4. Without operation in 5 seconds or press the Power button to exit the set model, the set success.Adjusting the rinse aid reservoirAdding rinse aid to the dispenserE n g l i s h1. Open the cap by sliding the release catch.2. Open the cap by pressing down the release catch.For better cleaning result, especially if you have very dirt items, pour a small amount of detergent onto the door. The additional detergent will activate during the pre-wash phase.Adding detergent to the dispenser20Dishes and knives should not be placed in other utensils, and they can’t overlaid each other.Do not place glass close to each other to avoid damage.For long knives, placing upright is very dangerous.Precautions before and after the bowl basket is placedInstall dishwasher bowl basketSuggestionUse the dishwashing machine rationallyPurchase dishes suitable for dishwasher.Use a suitable mild dishwashing powder. If necessary, consult the manufacturer for more information.For special appliances, try to select a washing program that with a lower temperature.Do not take out the glass dishes immediately after the program ends to prevent damage.Limited use:Not for:Wooden, ivory, porcelain or pearl shank tool Non heat-resistant plastic products Cohesive knives or dishes Tin or copper vessels Crystal glass Rusty steel products Wooden utensils Synthetic fiber productsStale non heat-resistant cutters with glue adhesive partAfter several cleanings, some glassware will become dullColor of smooth dishes may fade out if often washedSilver or aluminum products tend to change color during cleaning(For the best use of dishwasher, follow the instructions below. For different models, the characteristics and appearance of the basket will be different) Clear larger food residues.Soften the residue of burnt food left on the pan. It is not necessary to rinse dishes with water first. Place the dishes in the dishwasher as follows:Cups, glasses, pots and so on are placed face down.For curved or concave and convex vessels, place them diagonally so that the water flows out. All utensils should be placed safely and must not be overturned.All utensils should be placed that the arms can rotate freely during washing.The open of hollow tablewares (such as cups, glasses, pots, etc.) should face downward so that water does not easily remain in the container or grooves.Long or sharp knives (eg. meat cleavers) should be placed horizontally in the basket.Do not use the dishwasher overloaded so that you can get better cleaning performance.E l i 21Loading the lower basketUse the upper rack for small or delicate items such as small plates,cups, saucers, glasses, and dishwasher-safe plastic items.Place items so that the open end faces down for cleaning and drying. Do not stack items on top of each other.The lower rack is recommended for dinner plates, soup bowls, dishes, pots, pans, lids, and grill trays. Plates should be positioned vertically and facing the center of the rack.Make sure that large items do not interfere with the rotation of the spray arms, and do not prevent the detergent dispenser from opening.2289810711977The cutlery rack is best suited for washing flatware and most cooking or serving utensils. The separators on the cutlery racks help keep flatware separated to avoid damage and improve cleaning.E n g l i s h231111111111444874444444Adjusting the upper basketThe height of the upper basket can be easily adjusted to accommodate taller dishes in either the upper or lower basket. We recommend adjust the height of the upper basket before loading dishes.To adjust the height of the upper rack, follow these steps:each side until the basket locks into place in the upper position. It is not necessary to lift the adjuster handle.release the basket and lower it to the lower position.Basket used tips24Folding back the cup shelvesTo make room for taller items in the upper basket, raise the cup rack upwards. You can then lean the tall glasses against it. You can also remove it when it is not required for use.raise upwardsfold backwardsFolding back the rack shelvesThe spikes of the lower basket are used for holding plates and a platter. They can be lowered to make more room for large items.E n g l i s h25Cleaning and careThe filtering system in the base of the wash cabinet retains coarse debris from the washing cycle. The collected coarse debris may cause the filters to clog. Check the condition of the filters regularly and clean them if necessary under running water.Follow the steps below to clean the filters in the wash cabinet.Filter cleaningLift the filter upwards and out of the dishwasher.The coarse filter can be detached from the main filter by gently squeezing thetabs at the top and pulling it away.For a more thorough clean, use a softcleaning brush.filter insert, and rotate clockwise tothe close arrow.26the jets. Replace them after rinsing them thoroughly.It is necessary to clean the spray arms regularly for hard water chemicals will clog the spray arm jets and bearings.To clean the spray arms, follow the instructions below:rotate the spray arm counterclockwise to remove it.Spray arms cleaningE n g l i s h27Care and maintenanceThe door and the door sealClean the door seals regularly with a soft damp cloth to remove food deposits.When the dishwasher is being loaded, food and drink residues may drip onto the sides of the dishwasher door. These surfaces are outside the wash cabinet and are not accessed by water from the spray arms. Any deposits should be wiped off before the door is closed. The control panelControl panel can be wiped with a slightly wet cloth. After cleaning, make sure it iscompletely dry.Do not use Sharp tools, Scratch sponge, or Rough detergent anywhere in the machine.28Height (H)Width (W)Depth (D1)Depth (D2)845mm 448mm600mm (with the door closed)1175mm (with the door opened 90°)InstallationProduct dimensionE n g l i s h29Power connectionPower requirementsPlease check the label of rated value of power supply system for knowing rated voltage and connect the machine to appropriate power supply. 10A fuse is required and time-delay fuse or circuit breaker is recommended. Only separate circuit is suitable for this machine. Machine connectionMake sure that supplied voltage and frequency correspond to those on rating plate. Plug can only be connected to a properly grounded socket. If the socket that the machine must be connected to is not suitable for the plug, replace the socket, and do not use a power adapter that may cause overheating and burning.Water connectionConnect the cold water supply hose to a threaded 3/4(inch) connector and make sure that it is fastened tightly in place.If the water pipes are new or have not been used for an extended period of time, let the water run to make sure that the water is clear. This precaution is needed to avoid the risk of the water inlet to be blocked and damage the appliance.Please securely fix the drain hose in either position A or position BInsert the drain hose into a drain pipe with a minimum diameter of 4 cm, or let it run into the sink, making sure to avoid bending or crimping it. The height of drain pipe must be less than 1000mm. The free end of the hose must not be immersed in water to avoid the back flow of it.Extension hoseWater outletHow to drain excess water from hosesSyphon connectionIf the sink is 1000 higher from the floor, the excess water in hoses cannot be drained directly into the sink. It will be necessary to drain excess water from hoses into a bowl or suitable container that is held outside and lower than the sink.Connect the water drain hose. The drain hose must be correctly fitted to avoid water leaks. Ensure that the water drain hose is not kinked or squashed.The waste connection must be at a height less than 100 cm (maximum) from the bottom of the dish. The water drain hose should be fixed .If you need a drain hose extension, make sure to use a similar drain hose.It must be no longer than 4 meters; otherwise the cleaning effect of the dishwasher could be reduced.Connection of drain hosesE n g l i s hTroubleshootingBefore connecting customer service center Please check the chart below before connecting customer service centerE n g l i s hError codeWhen failure occurs, error code will appear to remind you:SpecificationE n g l i s h。
东芝电型号说明及常用操作
东芝电梯现在最常见的几个型号分别是:CV150;CV160;CV180;CV190;CV300;CV320;CV330;CV330A。
其中:CV150;CV160;CV180;CV190为有齿轮曳引机。
CV300;CV320;CV330;CV330A为无齿轮永磁同步曳引机。
CV300为无机房,分为A、B、C三个型号。
东芝电梯的OBM操作方式:CV150;CV160;CV300;CV320:1、故障调阅:(还没有通俗易懂的话形容)2、故障清除:MODE按两下显示“0.0.”跳动按中间键到“0.E.”按STB键显示“E.1”按STB一下显示“0.E.”然后按STB接着显示“E.1”按中间键加到“E.2”按STB键显示“0.E.”按STB键显示“E.1”NUM键加到“E.3”按STB键显示“0.E.”MODE键就可以看到显示“CL”证明故障清除。
3、井道自学习方法:先将正常转换成检修。
MODE按两下显示“0.0.”跳动按中间键到“1.0”按STB键显示“E.2”按STB键一下显示“1.0”,在按中间键按到“0.E.”,按STB键显示“E.1”,在按中间键按到“E.C”按STB。
然后把检修转换成正常。
电梯向下,进行井道自学习。
CV180;CV190;CV330;CV330A:1、故障调阅:MODE键(也就是第一个键子)按两下显示“0.0.” 此时显示的数字为闪烁的)。
按中间键NUM按到“0.8” 此时8在闪烁)然后按STB确定键(也就是最后一个)一直按确定键什么时候显示“X.X.”两点都出现不在闪烁那个就是故障代码2、故障清除:MODE按两下显示“0.0.”跳动按中间键到“0.E.”按STB键显示“E.1”动按STB一下显示“0.E.”然后按STB接着显示“E.1”按中间键加到“E.2”按STB键显示“0.E.”按STB键显示“E.1”NUM键加到“E.3”按STB键显示“0.E.”MODE键就可以看到显示“CL”证明故障清除。
东芝 B-SA4TM系列热转印打印机 说明书
东芝热转印打印机B-SA4TM 系列E NERGY S TAR 是美国注册商标此产品配备有一台无线通讯装置,TEC-RFID-US1 (B-SA704-RFID-U1-US)TEC-RFID-EU1 (B-SA704-RFID-U1-EU)在使用此产品之前,请务必仔细阅读有关如何使用无线通讯装置的附带的预防措施。
使用无线通讯装置的预防措施RFID包 TEC-RFID-US1 (B-SA704-RFID-U1-US)TEC-RFID-EU1 (B-SA704-RFID-U1-EU)所有适用的国家和地区此产品是一种无线通讯装置,仅限于在以下国家和地区内使用此产品。
如果将此产品用于除此之外的其它国家或地区,则根据这些国家或地区的法律,您将可能受到处罚。
TEC-RFID-US1 (B-SA704-RFID-U1-US)TEC-RFID-EU1 (B-SA704-RFID-U1-EU): 奥地利、比利时、塞浦路斯、捷克共和国、丹麦、爱沙尼亚、芬兰、法国、匈牙利、德国、希腊、爱尔兰、意大利、拉脱维亚、立陶宛、卢森堡、马耳他、荷兰、波兰、葡萄牙、斯洛伐克、斯洛文尼亚、西班牙、瑞典、英国、挪威、列支敦士登、冰岛、瑞士安全性切勿将此产品用于禁止使用的区域,例如医院内。
如果您不了解存在哪些禁止使用的区域,请咨询医疗机构。
否则,医疗设备将受到影响,并造成严重事故。
此产品可能影响到某些植入心脏起搏器和其它医疗植入设备的正常使用。
使用心脏起搏器的病人应该意识到,在心脏起搏器周围使用此产品将可能导致起搏器设备故障。
如果您出于某种原因而怀疑存在信号干扰,请立刻关闭此产品,并联系您的东芝泰格销售代理商。
切勿擅自拆卸、变更或修理此产品。
这样做可能会造成损伤。
同时,变更设备也是违反有关无线电设备法律法规的。
需要修理时,请联系您的东芝泰格销售代理商。
适用于美国此设备符合FCC法规的第15部分。
使用此设备时必须满足以下两个条件:(1) 此设备不会引起有害干扰;2 此设备必须接受任何接收到的干扰,包括可能引起意外操作的干扰。
东芝B-EV4T资料

打印方式:热转印或直热式
打印速度:最高101.6mm/s(4英寸/秒)
最大03dpi(8dots/mm)
内存:8MB SDRAM
通信接口:USB2.0,串行接口,并行接口,网...
字体:Times Roman (6 sizes),Helveti...
电源功率:工作:
100-120V,2.94A,70.6W;200-240V,2.97A,71.3W
待机:
100-120V,0.94A,2.25W,200-240V,0.94A,2.25W纠错
环境参数:工作温度:5-40℃,相对湿度:25-85% RH(无凝结)纠错
可选附件:交流适配器盖,切刀模块,剥离模块,外部介质卷悬架
产品类型:桌面打印机
打印头:平压式
操作方式:批处理(连续)模式,剥离模式(...
条形码类型:EAN8/13,EAN8/13 add on 2&5,U...
主要参数
产品类型:桌面打印机纠错
打印头:平压式纠错
分辨率:203dpi(8dots/mm)纠错
打印方式:热转印或直热式纠错
打印速度:最高101.6mm/s(4英寸/秒)纠错
二维码类型:Data matrix,PDF417,QR Code,Maxi Code,Micro PDF417纠错
字体:Times Roman (6 sizes),Helvetica (6 sizes),Presentation (1 size),Letter Gothic (1 size),Courier (2 sizes),Prestige Elite (2sizes),OCR-A (1 type),OCR-B (1 type),Kanji (3 sizes)纠错
东芝笔记本电脑使用手册说明书
Safety.book Page 1 Friday, March 24, 2017 4:35 PMђ㣓⭫㝇 ⭞⭞ 䈭䰻䈱Safety.book Page 2 Friday, March 24, 2017 4:35 PMSafety.book Page 3 Friday, March 24, 2017 4:35 PM3目录简介 (5)安全使用电脑、组件和附件 (6)电源 (6)通信 (12)主机 (14)系统/外设 (20)如何更舒适地使用电脑 (25)良好的工作姿势 (25)使用外接键盘、鼠标或显示器操作电脑 (26)打字方式 (27)休息及变换工作任务 (27)移动过程中使用电脑的提示 (27)搬运电脑 (27)寻求额外的帮助 (28)检查清单 (28)您购买的电脑系统可能会带有包含最先进的数据存储技术的可刻录和/或可擦写光盘驱动器及相关软件。
同其它新技术一样,您必须先阅读并遵循随附的或以电子方式提供的相关用户指南和/ 或手册中所有的设置及使用指引。
如果不这样做,该产品可能不能正常运行并且您可能会丢失数据或遭受其它损害。
东芝、其附属公司及供应商并不保证本产品的所有运转都不受干扰或无错误。
您同意对由于使用本产品而引起的任何商业、利润、程序、数据或可移动存储媒体的损害或损失,即使已经被告知此可能性,东芝、其附属公司及供应商不应承担任何责任。
为求准确,出版时东芝公司已反复验证提供的信息,但是该信息有可能加以改动,恕不另行通知。
该使用指南或其它的任何书面材料及信息中的描述仅仅是一般性的指导,而不是向您承诺的任何保证。
对任何直接或间接地由于使用指南条款中技术或印刷的错误或遗漏引起的损害,东芝公司不承担任何责任。
在任何情况下,不管是基于民事侵权或与此相关的合同还是其他方面的理由,由于使用指南、其他信息或使用引起的任何意外的、因果的、特殊的或典型的损害,东芝公司不承担任何责任。
Safety.book Page 4 Friday, March 24, 2017 4:35 PM4商标Wi-Fi是Wi-Fi Alliance的注册商标。
- 1、下载文档前请自行甄别文档内容的完整性,平台不提供额外的编辑、内容补充、找答案等附加服务。
- 2、"仅部分预览"的文档,不可在线预览部分如存在完整性等问题,可反馈申请退款(可完整预览的文档不适用该条件!)。
- 3、如文档侵犯您的权益,请联系客服反馈,我们会尽快为您处理(人工客服工作时间:9:00-18:30)。
东芝条码打印机B-EV4T系列北京鑫泰维科技发展有限公司www.bjtw.com.cn特别要警告的内容在符号中左边的符号表示一般的提醒注意禁止接入任何与规定交流电压不符的电源禁止禁止禁止禁止拔掉电源插头拔掉电源插头如果对此设备作不恰当的与提示相违背的操作,预防措施注意禁止拆卸机箱与地线相连目录页码1. 产品概述...................................................................................................................................1-1 1.1 介绍..................................................................................................................................1-1 1.2 特点..................................................................................................................................1-1 1.3 拆箱..................................................................................................................................1-1 1.4 附件..................................................................................................................................1-1 1.5 外观..................................................................................................................................1-3尺寸..............................................................................................................................1-31.5.1前视图..........................................................................................................................1-31.5.2后视图...........................................................................................................................1-31.5.3内部结构.......................................................................................................................1-41.5.4按钮和指示灯................................................................................................................1-51.5.52. 打印机安装.................................................................................................................................2-1 2.1 注意事项...........................................................................................................................2-1 2.2 操作之前的程序................................................................................................................2-2 2.3 开启/关闭打印机...............................................................................................................2-2开启打印机....................................................................................................................2-22.3.1关闭打印机....................................................................................................................2-32.3.22.4 打印机上的电缆连接.........................................................................................................2-4 2.5 连接电流适配器和电源线..................................................................................................2-5 2.6 打开/关闭顶盖...................................................................................................................2-6 2.7 加载打印介质....................................................................................................................2-7 2.8 加载碳带.........................................................................................................................2-14 2.9 介质探测器校准,自动打印测试和倾印模式等功能.........................................................2-17介质探测器校准..........................................................................................................2-172.9.1自动打印测试和倾印模式..........................................................................................2-182.9.2如何使用SD 卡................................................................................................................2-202.103. 维护 ..........................................................................................................................................3-1 3.1 清洁..................................................................................................................................3-1打印头...........................................................................................................................3-13.1.1滚筒/探测器...................................................................................................................3-23.1.2机盖..............................................................................................................................3-23.1.3介质箱...........................................................................................................................3-23.1.4剥离感应器/剥离滚轴(选项)......................................................................................3-33.1.53.2 介质和碳带的保存/使用.....................................................................................................3-34. 故障检修....................................................................................................................................4-14.1 故障检修指南....................................................................................................................4-1 4.2 状态提示灯........................................................................................................................4-2 4.3 去除堵塞的打印介质.........................................................................................................4-3 附录1 规格.....................................................................................................................................A1-1 A1.1 打印机............................................................................................................................A1-1 选购件............................................................................................................................A1-3 A1.2A1.3打印介质........................................................................................................................A1-3 打印介质的类型........................................................................................................A1-3 A1.3.1穿透式探测器的探测区域..........................................................................................A1-4 A1.3.2反射式探测器的探测区域..........................................................................................A1-5 A1.3.3有效打印区域............................................................................................................A1-5 A1.3.4碳带...............................................................................................................................A1-6 A1.4附录2 接口.....................................................................................................................................A2-1 术语表1. 产品概要1.1 介绍1.2 特点1.3 拆箱1.4 附件感谢您选择东芝B-EV4D 系列条码打印机。