交换机路由器配置总结
1.路由器、交换机基本配置
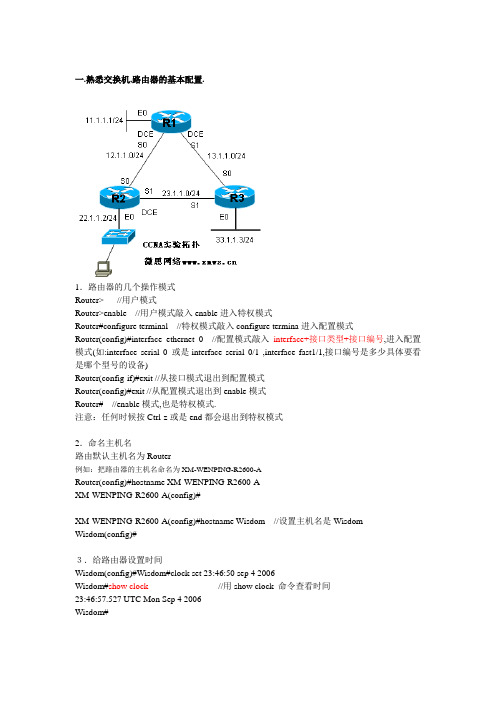
一.熟悉交换机,路由器的基本配置.1.路由器的几个操作模式Router> //用户模式Router>enable //用户模式敲入enable进入特权模式Router#configure terminal //特权模式敲入configure termina进入配置模式Router(config)#interface ethernet 0 //配置模式敲入interface+接口类型+接口编号,进入配置模式(如:interface serial 0 或是interface serial 0/1 ,interface fast1/1,接口编号是多少具体要看是哪个型号的设备)Router(config-if)#exit //从接口模式退出到配置模式Router(config)#exit //从配置模式退出到enable模式Router# //enable模式,也是特权模式.注意:任何时候按Ctrl-z或是end都会退出到特权模式2.命名主机名路由默认主机名为Router例如:把路由器的主机名命名为XM-WENPING-R2600-ARouter(config)#hostname XM-WENPING-R2600-AXM-WENPING-R2600-A(config)#XM-WENPING-R2600-A(config)#hostname Wisdom//设置主机名是WisdomWisdom(config)#3.给路由器设置时间Wisdom(config)#Wisdom#clock set 23:46:50 sep 4 2006Wisdom#show clock //用show clock 命令查看时间23:46:57.527 UTC Mon Sep 4 2006Wisdom#4.给路由器设置banner//登录信息Wisdom(config)#banner motd #Enter TEXT message. End with the character '#'.Welcome to wisdom !!#Wisdom(config)#endWisdom#exit03:12:58: %SYS-5-CONFIG_I: Configured from console by consoleWisdom#exitWisdom con0 is now availablePress RETURN to get started.Welcome to wisdom !!// 配置是banner之后无论谁登录到路由器都会先看到的信息. Wisdom>enableWisdom#Banner信息很多情况下是一些警告的信息:如:banner motd ^C********************************************************** [WARNING] ** If you are not authorised to access this system ** exit immediately. ** Unauthorised access to this system is forbidden by ** company policies, national, and international laws. ** Unauthorised users are subject to criminal and civil ** penalties as well as company initiated disciplinary ** proceedings. ** ** By entry into this system you acknowledge that you ** are authorised to access it and have the level of ** privilege at which you subsequently operate on ** this system ** You consent by entry into this system to the ** monitoring of your activities **********************************************************^C5.路由器,交换机接口的描述Wisdom(config)#interface ethernet 0Wisdom(config-if)#description To Fuzhou-R2600-A//描述ethernet0口是接到福州的路由器A,一般都要尽可以的描述详细一点,这样有利于日后的维护.6.路由器,交换机密码的设置A.enable密码的设置(enable的密码就是从用户模式到特权模式的密码,enable的密码有两种,一种是加密的,一种是不加密码的,建议使用enable secret 设置密码)Wisdom(config)#enable password ciscoWisdom(config)#enable secret cisco1Wisdom(config)#endWisdom#disable03:29:29: %SYS-5-CONFIG_I: Configured from console by consoleWisdom>enablePassword://这里要输入的是cisco1 ,如果enable的两个密码同时设置,只是secret生效.Wisdom#Wisdom#show runBuilding configuration...Current configuration:!enable secret 5 $1$LNtZ$XFAQft5YyTsrXFV AXNp0Y///加密过的enable password cisco //显示为明文,容易被破解.不过可以手工加密,用命令service password-encryption 进行加密Wisdom(config)#service password-encryptionWisdom#show runBuilding configuration...Current configuration:!enable secret 5 $1$LNtZ$XFAQft5YyTsrXFV AXNp0Y///加密过的enable password 7 104D000A0618//手工加密过的B.设置交换机路由器的console 口密码Wisdom(config)#line console 0Wisdom(config-line)#login//启用密码no login 是不启用密码Wisdom(config-line)#password cisco //设置的密码为ciscoWisdom(config-line)#end03:39:51: %SYS-5-CONFIG_I: Configured from console by consoleWisdom#exitWisdom con0 is now availablePress RETURN to get started.Welcome to wisdom !!User Access VerificationPassword://要输入console口密码cisco 才可以进入用户模式Wisdom>C.设置路由器交换机的vty 密码(也是就是远程登陆telnet的密码)Wisdom(config)#line vty 0 4//04的意思是0到4,5个人可以同时登录Wisdom(config-line)#login//启用密码,no login 是不启用密码Wisdom(config-line)#password cisco//设置的密码为cisco测试网络的连通性:telnet+IP addressD:删除enable ,console ,vty 密码Wisdom(config)#no enable passwordWisdom(config)#no enable secretWisdom(config)#line conWisdom(config)#line console 0Wisdom(config-line)#no passwordWisdom(config)#line vty 0 4Wisdom(config-line)#no passwordWisdom(config-line)#E.两条常用的命令阻止会话退出--exec-timeout使光标还原到原来的位置,重新显示被覆盖的命里--logging synchronousWisdom(config)#line console 0Wisdom(config-line)#exec-timeout 0 0//0分0秒表示永远不超时,等同于no exec-timeoutWisdom (config)#line console 0Wisdom (config-line)#logging synchronousF.路由器和交换机的基本配置是一样的.大同小异.这里介绍怎么远程telnet 到交换机. Switch(config)#hostname SW2950 //命名主要机SW2950(config)#interface vlan 1 //在二层的交换机上配置一个三层管理地址SW2950(config-if)#ip add 192.168.10.225 255.255.255.0SW2950(config-if)#no shutdown //启用接口SW2950(config)#line vty 0 4SW2950(config-line)#loginSW2950(config-line)#password ciscoSW2950(config-line)#pc>telnet 192.168.10.225Trying 192.168.10.225 ... OpenUser Access VerificationPassword:SW2950>这证明远程telnet 成功.G:配置R1.R2.R3的基本配置,使得在R1可以ping通12.1.1.2,ping通13.1.1.3配置R1:R1(config)#no ip domain-lookup //关掉域名查找R1(config)#line console 0R1(config-line)#loginR1(config-line)#password ciscoR1(config-line)#logging synchronousR1(config-line)#exec-timeout 0 0R1(config-line)#配置路由器的E0口IP地址Router(config)#hostname R1R1(config)#interface ethernet 0 //配置E0接口的IP地址R1(config-if)#ip address 11.1.1.1 255.255.255.0R1(config-if)#no shutdownR1(config-if)#no keepaliveR1(config-if)#exit配置路由器的S0 口IP地址R1(config)#interface serial 0R1(config-if)#ip address 12.1.1.1 255.255.255.0R1(config-if)#clock rate 4000000 //给DCE接口配置时钟R1(config-if)#no shutdown配置路由器的S1 口IP地址R1(config)#interface serial 1R1(config-if)#ip address 13.1.1.1 255.255.255.0R1(config-if)#clock rate 4000000R1(config-if)#no shutdown配置R2:R2(config)#no ip domain-lookup //关掉域名查找R2(config)#line console 0R2(config-line)#loginR2(config-line)#password ciscoR2(config-line)#logging synchronousR2(config-line)#exec-timeout 0 0R2(config-line)#Router(config)#hostname R2R2(config)#interface ethernet 0R2(config-if)#ip address 22.1.1.2 255.255.255.0R2(config-if)#no shutdownR2(config-if)#no keepaliveR2(config-if)#exiR2(config)#interface serial 0R2(config-if)#ip address 12.1.1.2 255.255.255.0R2(config-if)#no shutdown配置R3:R3(config)#no ip domain-lookup //关掉域名查找R3(config)#line console 0R3(config-line)#loginR3(config-line)#password ciscoR3(config-line)#logging synchronousR3(config-line)#exec-timeout 0 0R3(config-line)#exitRouter(config)#hostname R3R3(config)#interface ethernet 0R3(config-if)#ip address 33.1.1.3 255.255.255.0R3(config-if)#no shutdownR3(config-if)#no keepaliveR3(config)#int serial 0R3(config-if)#ip address 13.1.1.3 255.255.255.0R3(config-if)#no shutdown配置了以前步骤之后用命令show interface 检查接口的状态. R1#show ip interface briefEthernet0 11.1.1.1 YES manual up up Serial0 12.1.1.1 YES manual up up Serial1 13.1.1.1 YES manual up upR1#show interfaces ethernet 0Ethernet0 is up, line protocol is upHardware is Lance, address is 00e0.b05b.018e (bia 00e0.b05b.018e)Internet address is 11.1.1.1/24MTU 1500 bytes, BW 10000 Kbit, DL Y 1000 usec,reliability 255/255, txload 1/255, rxload 1/255Encapsulation ARPA, loopback not setKeepalive not setARP type: ARPA, ARP Timeout 04:00:00…………..…………..R1#show interfaces serial 0Serial0 is up, line protocol is upHardware is HD64570Internet address is 12.1.1.1/24MTU 1500 bytes, BW 1544 Kbit, DL Y 20000 usec,reliability 255/255, txload 1/255, rxload 1/255Encapsulation HDLC, loopback not setKeepalive set (10 sec)………………………….R1#show interfaces serial 1Serial1 is up, line protocol is upHardware is HD64570Internet address is 13.1.1.1/24MTU 1500 bytes, BW 1544 Kbit, DL Y 20000 usec,reliability 255/255, txload 1/255, rxload 1/255Encapsulation HDLC, loopback not setKeepalive set (10 sec)……………..……………………..R1#R2#show ip interface briefEthernet0 22.1.1.2 YES manual up up Serial0 12.1.1.2 YES manual up up Serial1 unassigned YES unset administratively down downR3#show ip interface briefInterface IP-Address OK? Method Status Protocol Ethernet0 33.1.1.3 YES manual up up Serial0 13.1.1.3 YES manual up up Serial1 unassigned YES unset administratively down down在R1测试到R2 R3的连通性,使用ping 的命令Ping + ip address如:R1#ping 12.1.1.2Type escape sequence to abort.Sending 5, 100-byte ICMP Echos to 12.1.1.2, timeout is 2 seconds:!!!!! //5个!表明网络是通的Success rate is 100 percent (5/5), round-trip min/avg/max = 4/4/8 msR1#ping 13.1.1.3Type escape sequence to abort.Sending 5, 100-byte ICMP Echos to 13.1.1.3, timeout is 2 seconds:!!!!! //5个!表明网络是通的Success rate is 100 percent (5/5), round-trip min/avg/max = 4/4/8 msR1#在路由器或是交换机里使用ping命令如果ping的结果是!!!!!则表明网络正常...则表明网络不通.如果ping的结果是…如果ping的结果是U.U.U则表明下一跳不可达.H:路由器交换机几条常用的命令:Show version //查看软件版本show running-config //查看当前运行的配置文件show startup-config //查看已保存过的配置文件show ip int brie //查看接口基本状态show interface //查看接口状态的详细信息copy run star //把当前运行的配置COPY到NVRAM(断电后不丢失)show controller serial 0 //检察s0口的串行线是否连接好R1#show controllers serial 0HD unit 0, idb = 0x29A524, driver structure at 0x2A1AE8buffer size 1524 HD unit 0, V.35 DCE cable, clockrate 4000000…………R1#show controllers serial 1HD unit 0, idb = 0x29A524, driver structure at 0x2A1AE8buffer size 1524 HD unit 0, V.35 DCE cable, clockrate 4000000 //DCE接口要配置时钟…………R2#show controllers serial 0HD unit 0, idb = 0x270B50, driver structure at 0x278108buffer size 1524 HD unit 0, V.35 DTE cable //DTE接口不用配置时钟………………I.清除NVRAM(注:交换机和路由器所用命令一样)SW2950#erase startup-config要重起路由器或是交换机,配置才会丢失.。
H3C交换机路由器配置总结

H3C交换机路由器配置总结本文档涉及附件:无附件。
本文所涉及的法律名词及注释:1. H3C交换机:H3C是一家网络设备供应商,该公司的交换机产品广泛应用于企业网络中,提供可靠的数据交换和通信功能。
2. 路由器:路由器是一种网络设备,用于将数据包从一个网络转发到另一个网络,它通过查看数据包的目标IP地址并使用路由表来确定下一跳的路径。
3. 配置:配置是指对网络设备进行设置和调整,以使其能够适应特定的网络环境和需求。
章节一:交换机基本配置1.1 网络拓扑- 描述网络的物理连线和设备分布情况。
- 提供拓扑图和设备列表。
1.2 IP地址规划- 定义每个交换机接口的IP地址,网关和子网掩码。
- 提供IP地址规划表。
1.3 VLAN配置- 划分交换机的虚拟局域网(VLAN)。
- 设置VLAN间的互联和VLAN端口成员关系。
- 提供VLAN配置命令示例。
章节二:交换机高级配置2.1 交换机端口安全配置- 配置端口安全特性,限制每个端口连接的设备数量或MAC地址。
- 防止未经授权的设备接入网络。
- 提供端口安全配置命令示例。
2.2 交换机链路聚合配置- 配置链路聚合,将多个物理链路聚合成一个逻辑链路。
- 提高链路容量和可靠性。
- 提供链路聚合配置命令示例。
2.3 交换机交换机协议配置- 配置交换机间的协议,如树协议(STP),路由信息协议(RIP),开放最短路径优先(OSPF)等。
- 提供交换机协议配置命令示例。
章节三:路由器基本配置3.1 IP地址配置- 设置路由器接口的IP地址,网关和子网掩码。
- 提供IP地址配置命令示例。
3.2 静态路由配置- 配置静态路由,手动设置路由跳转路径。
- 提供静态路由配置命令示例。
3.3 动态路由配置- 配置动态路由,使路由器能够自动学习和选择最佳的路由路径。
- 提供动态路由配置命令示例。
章节四:路由器高级配置4.1 ACL配置- 配置访问控制列表(ACL),控制数据包的流动。
路由器与交换机配置实训总结(完整版)应付老师必备

路由器与交换机配置实训总结(完整版)应付老师必备1、了解路由器与交换机的基本概念与职能路由器和交换机都是网络的基础设备,它们的作用非常重要,搭建网络必不可少。
路由器是一种用来实现互联网协议路由的网络选择设备,它能够识别一定范围内的数据包,并将其转发到正确的位置,以实现数据传输。
交换机是一种用于内部网络连接的设备,它可以收集,过滤,交换数据包,并将其路由到正确的目的地。
同时,交换机也可以为网络设置访问策略,以保证网络的安全性。
2、掌握网络设备的基本操作在进行网络设备配置之前,最先需要掌握网络设备的基本操作,以便能够对网络设备进行操作及测试。
对于路由器,首先要配置路由器的基本参数,包括IP地址、子网掩码、网关地址等,以便与服务器连接。
另外,还要正确设置路由表,使得路由器能够正确转发数据包。
对于交换机,首先要设置端口类型,一般包括以太网端口、光纤端口和无线端口,根据实际情况确定端口类型。
另外,还要设置交换机的基本参数,包括IP地址、子网掩码、VLAN(虚拟局域网)、端口流量控制等,以便可以在网络中进行数据传输。
3、介绍实训过程中学到的知识实训过程中,我们学习了如何配置路由器与交换机的一些基本知识,包括IP地址、子网掩码、VLAN、端口流量控制等。
我们学习了如何正确配置路由表,将收到的数据包转发到正确的位置,以便实现不同网络节点之间数据的传输。
我们还学习了网络设备的测试方法,如 Ping 命令、 Tracert 命令、 Show 命令等,以便对网络建立连接后对其进行检测和性能检测。
4、总结以上是本次路由器与交换机配置实训的总结,我们通过实训掌握了路由器与交换机的基本概念,并知晓如何正确配置网络设备及其参数,以及介绍了网络设备的测试方法,为为今后设计、配置网络环境打下了基础。
如何正确配置路由器和交换机以实现顺畅的网络安装

如何正确配置路由器和交换机以实现顺畅的网络安装正确配置路由器和交换机可以确保顺畅的网络安装。
本文将介绍如何正确配置路由器和交换机的步骤和要点。
步骤一:选择合适的路由器和交换机首先,选择适合网络规模和需求的路由器和交换机。
路由器负责连接不同网络,并进行数据转发和包过滤,交换机则负责在局域网内进行数据交换。
根据网络规模和需求选择合适的设备,确保其性能和功能能够满足需求。
步骤二:连接设备将路由器和交换机连接起来。
通常情况下,将路由器的一个LAN口连接到交换机的一个端口即可。
确保连接稳固并正确连接,可以使用网线或光纤进行连接。
步骤三:配置路由器1.进入路由器的管理界面。
一般在浏览器中输入路由器IP地址即可进入管理界面。
2.根据网络需求,配置路由器的IP地址、子网掩码和网关。
步骤四:配置交换机1.进入交换机的管理界面。
一般在浏览器中输入交换机的IP地址即可进入管理界面。
2.配置交换机的IP地址和子网掩码。
3.根据需要,对交换机的端口进行配置,如划分不同的虚拟局域网(VLAN),设置端口的速率和双工模式等。
步骤五:设置网络安全1.配置路由器的防火墙和访问控制列表(ACL),通过过滤数据包实现对网络流量的控制。
2.设置交换机的访问控制列表(ACL),限制对交换机的访问,防止未授权的访问和攻击。
步骤六:设置网络服务1.配置路由器的动态主机配置协议(DHCP)服务器,为网络中的设备分配IP地址。
2.设置交换机的端口镜像,实现对特定设备或端口的流量监控。
步骤七:进行测试1.进行网络连接测试,确保路由器和交换机之间的连接正常。
2.进行网络速度测试,确保网络传输速度符合要求。
3.进行安全测试,检查网络安全设备的配置是否正常。
4.检查网络设备的系统日志,查找和解决潜在的问题。
总结:正确配置路由器和交换机是实现顺畅网络安装的关键步骤,包括选择合适的设备、连接设备、配置路由器和交换机、设置网络安全和服务以及进行测试。
通过正确配置,可以提高网络性能和安全性,确保网络的正常运行。
交换机与路由器及其基本配置

交换机与路由器及其基本配置交换机与路由器基本配置⒈介绍交换机(Switch)和路由器(Router)是计算机网络中常见的设备,它们在网络中起着不同的作用。
本文将详细介绍交换机和路由器的基本配置方法。
⒉交换机的基本配置⑴硬件连接首先,将交换机与计算机网络中的其他设备进行适当的物理连接。
确保交换机的电源连接正常,并将计算机、服务器、打印机等设备连接到交换机的相应端口上。
⑵ VLAN配置若需要将网络拆分为多个虚拟局域网(VLAN),则需要进行VLAN的配置。
打开交换机的管理界面,创建所需的VLAN,并将相应的端口分配给各个VLAN。
⑶端口安全配置为了增强网络安全性,可以配置交换机的端口安全功能。
可以限制每个端口的MAC地质数量、启用端口的安全认证、配置远程管理接口等。
⑷交换机端口镜像如果需要监控网络流量或进行网络故障排查,可以配置交换机的端口镜像功能。
通过指定源端口和目标端口,将原始端口的所有流量复制到目标端口,以便进行分析和监控。
⒊路由器的基本配置⑴硬件连接将路由器与交换机或其他网络设备进行适当的物理连接。
确保路由器的电源连接正常,并将网络中的设备连接到路由器的相应端口上。
⑵ IP地质配置为路由器的每个接口配置IP地质。
根据网络拓扑和需求,分配正确的IP地质和子网掩码,并确保每个接口的IP地质不冲突。
⑶静态路由配置若需要手动指定路由表中的路由项,可以配置静态路由。
通过添加路由项,将目的网络与下一跳路由器关联起来,以便数据包能够正确地转发。
⑷动态路由配置如果网络规模较大或需要自动学习和更新路由表,可以配置动态路由协议,如OSPF或BGP。
路由器将通过与其他路由器交换信息来自动学习和更新路由表。
⒋附件本文档附带以下附件:附件1:交换机配置示例截图附件2:路由器配置示例截图⒌法律名词及注释⑴ VLAN(Virtual Local Area Network):虚拟局域网,通过交换机将网络拆分为多个逻辑上隔离的局域网。
路由器与交换机配置实训总结(完整版)应付老师必备

天津电子信息职业技术学院通信网络与数据通信课程实训课题名称通信网络与数据通信姓名学号班级专业所在系指导教师完成日期年月日一、实训目的、要求(概述)二、仿真(命令解释,截图等)三、中兴设备配置(可以拍照,截图)四、总结(收获,不足,体会等)(1)实训目的:1.初步认识packet Tracer软件的工作环境;2.初步认识网络拓扑中的常用设备(路由器、交换机等);3.认识交叉线和直连线(2)、实训要求:1.按照题目要求进行网络拓扑图设计;2.对题目中的拓扑图正确连线,并使所有连线up;3.能够对交换机或路由器添加或删除模块;4.对各主机能够进行IP设置。
图示:如图完成任务要求一对Switch0进行配置:Switch>enSwitch#conf tEnter configuration commands, one per line. End with CNTL/Z. Switch(config)#vlan 10Switch(config-vlan)#exiSwitch(config)#interface fa 0/2Switch(config-if)#switchport access vlan 10Switch(config-if)#exiSwitch(config)#interface fa 0/1Switch(config-if)#switchport mode trunkSwitch(config-if)#exiSwitch(config)#interface fa 0/3Switch(config-if)#switchport mode trunk%LINEPROTO-5-UPDOWN: Line protocol on Interface FastEthernet0/3, changed state to down%LINEPROTO-5-UPDOWN: Line protocol on Interface FastEthernet0/3, changed state to upSwitch(config-if)#exiSwitch(config)#end%SYS-5-CONFIG_I: Configured from console by consoleSwitch#wrBuilding configuration...[OK]二对Switch1进行配置:Switch>enSwitch#conf tEnter configuration commands, one per line. End with CNTL/Z.Switch(config)#vlan 10Switch(config-vlan)#exiSwitch(config)#vlan 20Switch(config-vlan)#exiSwitch(config)#interface fa 0/2Switch(config-if)#switchport access vlan 10Switch(config-if)#exiSwitch(config)#interface fa 0/3Switch(config-if)#switchport access vlan 20Switch(config-if)#exiSwitch(config)#interface fa 0/1Switch(config-if)#switchport mode trunkSwitch(config-if)#exiSwitch(config)#endSwitch#%SYS-5-CONFIG_I: Configured from console by consoleSwitch#wrBuilding configuration...[OK]三对Router0进行配置:Continue with configuration dialog? [yes/no]: noPress RETURN to get started!Router>enRouter#conf tEnter configuration commands, one per line. End with CNTL/Z.Router(config)#interface fa 0/1Router(config-if)#ip add 192.168.12.1 255.255.255.0Router(config-if)#no shutdown%LINK-5-CHANGED: Interface FastEthernet0/1, changed state to up%LINEPROTO-5-UPDOWN: Line protocol on Interface FastEthernet0/1, changed state to upRouter(config-if)#exiRouter(config)#interface fa 0/0Router(config-if)#no shutdown%LINK-5-CHANGED: Interface FastEthernet0/0, changed state to up%LINEPROTO-5-UPDOWN: Line protocol on Interface FastEthernet0/0, changed state to upRouter(config-if)#exiRouter(config)#interface fa 0/0.1%LINK-5-CHANGED: Interface FastEthernet0/0.1, changed state to up%LINEPROTO-5-UPDOWN: Line protocol on Interface FastEthernet0/0.1, changed state to upRouter(config-subif)#encapsulation dot1Q 10Router(config-subif)#ip add 192.168.1.1 255.255.255.0Router(config-subif)#no shutdownRouter(config-subif)#exiRouter(config)#interface fa 0/0.2%LINK-5-CHANGED: Interface FastEthernet0/0.2, changed state to up%LINEPROTO-5-UPDOWN: Line protocol on Interface FastEthernet0/0.2, changed state to upRouter(config-subif)#encapsulation dot1Q 20Router(config-subif)#ip add 192.168.2.1 255.255.255.0Router(config-subif)#no shutdownRouter(config-subif)#exiRouter(config)#router ripRouter(config-router)#network 192.168.12.0Router(config-router)#network 192.168.1.0Router(config-router)#network 192.168.2.0Router(config-router)#endRouter#%SYS-5-CONFIG_I: Configured from console by consoleRouter#wrBuilding configuration...[OK]四对Multilayer Switch0进行配置:Switch>enSwitch#conf tEnter configuration commands, one per line. End with CNTL/Z.Switch(config)#vlan 30Switch(config-vlan)#exiSwitch(config)#vlan 40Switch(config-vlan)#exiSwitch(config)#interface fa 0/1Switch(config-if)#switchport access vlan 30Switch(config-if)#exiSwitch(config)#interface fa 0/2Switch(config-if)#switchport access vlan 40Switch(config-if)#exiSwitch(config)#interface vlan 30%LINK-5-CHANGED: Interface Vlan30, changed state to up%LINEPROTO-5-UPDOWN: Line protocol on Interface Vlan30, changed state to up Switch(config-if)#ip add 192.168.12.2 255.255.255.0Switch(config-if)#no shutdownSwitch(config-if)#exiSwitch(config)#interface vlan 40%LINK-5-CHANGED: Interface Vlan40, changed state to up%LINEPROTO-5-UPDOWN: Line protocol on Interface Vlan40, changed state to up Switch(config-if)#ip add 192.168.4.1 255.255.255.0Switch(config-if)#no shutdownSwitch(config-if)#exiSwitch(config)#router ripSwitch(config-router)#network 192.168.12.0Switch(config-router)#network 192.168.4.0Switch(config-router)#endSwitch#%SYS-5-CONFIG_I: Configured from console by consoleSwitch#wrBuilding configuration...[OK]Ping 192.168.1.10Ping 192.168.2.10中兴设备配置实训总结:经过这段时间赵老师给我们实训关于思科的路由器与交换机的知识,如交换机配置(vlan trunk vtp),静态路由,动态路由,访问列表, VLAN的创建,不同VLAN和网段的互通等。
路由器、交换机基础配置
路由器、交换机基础配置路由器、交换机基础配置一、硬件接口1、Console口主机直接用COM线与设备上的Console口连接,可用软件“超级终端”对设备进行初始配置(第一次对设备进行配置只能用这种方式)。
2、Ethernet(以太网口,2个)设备进行初始配置(配置登录密码、IP地址等)之后,可用双绞线与设备上的以太网口连接,并用telnet方式登录设备,并进行相关配置。
二、三种模式1、用户模式(提示符:Ruijie>)权限:基本测试、显示系统信息输入Enable命令进入特权模式2、特权模式(提示符:Ruijie#)权限:验证设置命令的结果,有口令保护输入Configue T进入全局配置模式,输入Exit命令返回用户模式3、全局配置模式(提示符: Ruijie(config)#)权限:配置影响整个设备的全局参数,输入Exit命令返回特权模式三、路由器基础配置Router>enable (进入特权用户模式)Router#terminal history size 200 (设置能够保存命令的历史记录数)Router#conf t (进入全局配置模式)Router(config)#hostname R1 (定义设备名称为R1)R1(config)#line console 0 (进入Console口配置)R1(config-line)#password start (设置Console登录密码)R1(config-line)#login (使Console口的配置生效)R1(config-line)#exit (退出Console配置模式)R1(config)#service password-encryption (使全局配置模式密码不以明文显示)R1(config)#enable secret level 15 0 start (配置进入全局配置模式的密码,其中15为密码级别,start为密码)R1(config)#line vty 0 4 (进入telnet登录密码配置模式)R1(config-line)#password start (设置密码,密码为start)R1(config-line)#login (使telnet密码配置生效)R1(config-line)#exit (退出telnet密码配置模式)四、路由器接口配置1、fastEthernet 0/1R1(config)#interface fastEthernet 0/1 (进入0/1以太网口)R1(config-if)#ip address 192.168.1.1 255.255.255.0 (配置IP 地址)R1(config-if)#speed 100 (设置接口速度)R1(config-if)#duplex full (设置双模式为全双工)R1(config-if)#no shutdown (重启接口,使配置生效)2、fastEthernet 0/0 (同fastEthernet 0/1)R1(config)#interface fastEthernet 0/0R1(config-if)#ip address 61.175.229.236 255.255.255.248 (此处配置的公网IP地址和子网掩码)R1(config-if)#speed 100R1(config-if)#duplex fullR1(config-if)#no shutdown五、路由配置1、默认路由R1(config)#ip route 0.0.0.0 0.0.0.0 61.175.229.2290.0.0.0 0.0.0.0 表示所有内部IP地址和子网掩码61.175.229.229 为公网网关(配合0/0以太网口上的公网IP)2、动态路由R1(config)#router ospf 100 (动态路由协议和编号)R1(config-router)#network 0.0.0.0 0.0.0.0 area 0 (表示允许所有IP地址通过)R1(config-router)#default-information origi Nat e(不知)六、Nat地址转换配置R1(config)#access-list 120 permit ip any any (访问控制列表,表示允许任意IP地址通过)R1(config)#ip Nat inside source list 120 interface fastEthernet 0/0 overload (访问控制列表的应用,表示任意IP地址通过fastEthernet 0/0 接口)R1(config)#interface fastEthernet 0/0 (进入接口fastEthernet 0/0 )R1(config-if)#ip Nat outside (将该接口定义为外网接口)R1(config-if)#exit (退出接口)R1(config)#interface fastEthernet 0/1 (进入接口fastEthernet 0/1 )R1(config-if)#ip Nat inside (将该接口定义为内网接口)七、Serial(串行口的配置,用于连接两台同类设备或广域网)1、基本配置(与以太网口相同)2、PPP封装,CHAP验证(R1为服务器即验证方,R2为被验证方)R1(config)#interface s4/0 (R1路由器进入S口)R1(config-if)# en ca psulation ppp (PPP封装)R2 (config)#interface s4/0 (R2路由器进入S口)R2(config-if)# en ca psulation ppp (PPP封装)R1(config)#username R2 password start(R1向R2发送R2的主机名和密码)R1(config)#interface s4/0R1(config-if)#ppp authti ca tion chap (CHAP验证,在服务器即验证方设置)R2(config)#username R1 password start (R2向R1发送R1的主机名和密码)R2为被验证方上不需要CHAP验证。
交换机和路由器的配置

交换机和路由器的配置在网络中,交换机和路由器是两种常见的网络设备,它们发挥着不同的作用,有助于网络通信的顺畅进行。
为了实现高效的网络运行,正确地配置交换机和路由器至关重要。
本文将介绍交换机和路由器的配置方法,并探讨其对网络性能的影响。
一、交换机的配置1. VLAN设置虚拟局域网(Virtual Local Area Network,VLAN)的配置能够将一个物理网络划分为多个逻辑网络,在不同的VLAN之间实现隔离和流量控制。
在配置交换机时,首先需要创建VLAN,并将相应的端口分配给各个VLAN。
可以根据网络需求设置不同的VLAN,并为其配置相应的IP地址。
2. 端口速率和双工模式设置对于交换机的每个端口,我们需要根据实际需求设置其速率和双工模式。
一般情况下,可以选择自动协商模式,让交换机自动调整速率和双工模式。
但在某些情况下,可能需要手动设置端口速率和双工模式,以确保网络连接的稳定性和性能。
3. STP/RSTP配置生成树协议(Spanning Tree Protocol,STP)和快速生成树协议(Rapid Spanning Tree Protocol,RSTP)的配置能够避免网络中的环路,并提供冗余路径。
在配置交换机时,需要启用STP或RSTP,并设置相应的参数,以确保网络的稳定性和可靠性。
4. 端口安全策略设置为了保护网络免受未经授权的访问和攻击,可以配置交换机的端口安全策略。
可以设置允许连接到交换机的设备的数量、MAC地址过滤和端口安全认证等。
二、路由器的配置1. 接口配置在配置路由器之前,需要先设置接口的IP地址和子网掩码。
根据网络规划的需要,可以为每个接口分配一个唯一的IP地址,并设置相应的子网掩码。
2. 静态路由设置静态路由的配置可以手动指定不同网络之间的转发路径。
在路由器配置中,需要添加静态路由表项,并指定目标网络的下一跳地址。
这样路由器就能够正确地将数据包传输到目标网络。
3. 动态路由协议配置动态路由协议可以自动学习和更新路由表,并选择最佳的转发路径。
- 1、下载文档前请自行甄别文档内容的完整性,平台不提供额外的编辑、内容补充、找答案等附加服务。
- 2、"仅部分预览"的文档,不可在线预览部分如存在完整性等问题,可反馈申请退款(可完整预览的文档不适用该条件!)。
- 3、如文档侵犯您的权益,请联系客服反馈,我们会尽快为您处理(人工客服工作时间:9:00-18:30)。
交换机和路由器配置过程总结
作为网络中重要的硬件设备,随着网络融入我们的日常生活,交换机和路由器也逐渐被人们所熟悉。
关于交换机、路由器的配置,计算机和网络专业的学生理应能够操作熟练。
通过这次网络工程师培训,
借助Packet Tracer 5.0仿真软件学习网络配置、拓扑图设计等,我对交换机、路由器配置有了深刻的了解,现将配置过程小结如下。
第一部分交换机配置
一、概述
一层、二层交换机工作在数据链路层,三层交换机工作在网络层,最常见的是以太网交换机。
交换
机一般具有用户模式、配置模式、特权模式、全局配置模式等模式。
二、基本配置命令(CISCO)
Switch >enable 进入特权模式
Switch #config terminal 进入全局配置模式
Switch (config)#hostname 设置交换机的主机名
Switch(config)#enable password 进入特权模式的密码(明文形式保存)
Switch(config)#enable secret 加密密码(加密形式保存)(优先)
Switch(config)#ip default-gateway 配置交换机网关
Switch(config)#show mac-address-table 查看MAC地址
Switch(config)logging synchronous 阻止控制台信息覆盖命令行上的输入
Switch(config)no ip domain-lookup 关闭DNS查找功能
Switch(config)exec-timeout 0 0 阻止会话退出
使用Telnet远程式管理
Switch (config)#line vty 0 4 进入虚拟终端
Switch (config-line)# password 设置登录口令
Switch (config-line)# login 要求口令验证
控制台口令
switch(config)#line console 0 进入控制台口
switch(config-line)# password xx
switch(config-line)# 设置登录口令login 允许登录
<!--[if !supportLineBreakNewLine]-->
<!--[endif]-->
恢复出厂配置
Switch(config)#erase startup-config
Switch(config)delete vlan.dat
Vlan基本配置
Switch#vlan database 进去vlan配置模式
Switch(vlan)#vlan 号码name 名称创建vlan及vlan名
Switch(vlan)#vlan号码mtu数值修改MTU大小
Switch(vlan)#exit 更新vlan数据并推出
Switch#show vlan 查看\验证
Switch#copy running-config startup-config 保存配置
VLAN 中添加删除端口
Switch#config terminal 进入全局配置
Switch(config)#interface fastethernet0/1 进入要分配的端口
Switch(config-if)#Switchport mode access 定义二层端口
Switch(config-if)#Switchport acces vlan 号把端口分给一个vlan
Switch(config-if)#switchport mode trunk 设置为干线
Switch(config-if)#switchport trunk encapsulation dot1q 设置vlan 中继协议Switch(config-if)#no switchport mode 或 ( switchport mode access) 禁用干线Switch(config-if)#switchport trunk allowed vlan add 1,2 从
Trunk 中添加vlans Switch(config-if)#switchport trunk allowed vlan remove 1,2 从Trunk 中删除vlan Switch(config-if)#switchport trunk pruning vlan remove 1,2 ;从Trunk 中关闭局部修剪 查看vlan 信息 Switch#show vlan brief 所有vlan 信息 查看vlan 信息 Switch#show vlan id 某个vlan 信息注:Switch#show int trunk 查看trunk 协议
注:可以使用default interface interface-id 还原接口到默认配置状态Trunk
开启(no ) ——将端口设置为永久中继模式
关闭(off ) ——将端口设置为永久非中继模式, 并且将链路转变为非中继链路
企望(desirable )——让端口主动试图将链路转换成中继链路自动(auto ) ——使该端口愿意将链路变成中继链路交换机显示命令:
switch#show vtp status 查看vtp 配置信息switch#show running-config 查看当前配置信息switch#show vlan 查看vlan 配置信息switch#show interface 查看端口信息switch#show int f0/0 查看指定端口信息switch#dir flash: 查看闪存
switch#show version 查看当前版本信息
switch#show cdp cisco 设备发现协议 (可以查看聆接设备)switch#show cdp traffic 杳看接收和发送的cdp 包统计信息switch#show cdp neighbors 查看与该设备相邻的cisco 设备
switch#show interface f0/1 switchport 查看有关switchport 的配置switch#show cdp neighbors 查看与该设备相邻的cisco 设备
三、模拟配置(一个实例)
图一:PC 机IP 地址、子网掩码、默认网关配置截图
图二:模拟网络拓扑结构图
图三:全局模式下对交换机进行配置
第二部分路由器配置
一、环境搭建(借鉴网上的材料,通过自己配置也实现了同样的功能)
添加一个模块化的路由器,单击Packet Tracer 5.0的工作区中刚添加的路由器,在弹出的配置窗口上添加一些模块:
图五
默认情况下,路由器的电源是打开的,添加模块时需要关闭路由器的电源,单击图一箭头所指的电源开关,将其关闭,路由器的电源关闭后绿色的电源指示灯也将变暗。
图六 添加所需要的模块
在“MODULES”下寻找所需要的模块,选中某个模块时会在下方显示该模块的信息。
然后拖到路由器的空插槽上即可。
图八 添加一计算机,其RS-232与路由器的Console端口相连
图九 用计算机的终端连接路由器
图十 实验环境搭建完成
二、配置单个路由器
路由器的几种模式:User mode(用户模式)、Privileged mode (特权模式)、Global configuration mode(全局配置模式)、Interface mode(接口配置模式)、Subinterface mode(子接口配置模式)、Line mode 、Router configuration mode (路由配置模式)。
每种模式对应不同的提示符。
图十一
几种配置命令提示符和配置路由器的名字
图十二 通过Console
端口登录到路由器需要输入密码
图十三 显示信息的命令
通过模拟交换机和路由器的配置,进一步理解了它们的工作原理,对网络拓扑架构有了清晰的认识,为以后的网络知识学习打下了基础。
谢谢彭老师!。