CentOS7安装文档
centos7下ELK安装

wget https://download.elastic.co/elasticsearch/elasticsearch/elasticsearch-2.3.1.rpm
wget https://download.elastic.co/kibana/kibana/kibana-4.5.0-linux-x64.tar.gz
/etc/elasticsearch/elasticsearch.yml
/etc/elasticsearch/logging.yml
/etc/init.d/elasticsearch
/etc/sysconfig/elasticsearch
/usr/lib/sysctl.d/elasticsearch.conf
#vi logstash-es-test.conf
input { stdin { } }
output {
elasticsearch {hosts => "192.168.241.129" }
stdout { codec=> rubydebug }
}
测试配置文件是否正确
/opt/logstash/bin/logstash--configtest -f logstash-es-test.conf
systemctl daemon-reload
systemctl enable elasticsearch.service
systemctl start elasticsearch
systemctl status elasticsearch
查看Elasticsearch的配置文件
物理机安装Centos7

物理机安装Centos7物理机安装Centos7
1.设定bios,U盘启动,
2.进⼊ Install Centos 7界⾯,按e或者Tab进⼊编辑状态,
将inst.stage2=hd:xx改为inst.stage2=hd:linux dd
3.然后按Ctrl+x或者Enter
报警⼀会后,会进⼊到shell,
有的时候会⾃动列出挂载的硬盘和U盘,
如果没有就执⾏⼀下语句
ls /dev/sd*
如果不能区分出U盘,那么就现将U盘拔出,看那个消失了就是,⽐如我的是/dev/sda4
4.确定了U盘后,
reboot
重启,然后在进⼊到Install Centos 7界⾯后,
按e或者Tab进⼊编辑状态,
将inst.stage2=hd:xx改为inst.stage2=hd:/dev/sda4
然后按Ctrl+x或者Enter,这次就可以进⼊安装界⾯了。
5.⽹络配置
ip a
第⼀个是环回地址,lo,后⾯的4就是本机⽹卡(不同机器⽹卡名是不同的),但是只要有,
就证明系统识别了⽹卡,不需要单独打驱动。
有多张⽹卡,但是只插了⼀根⽹线,如何确定是哪张⽹卡,就⽤
ethtool enp5s0f0
Link detected yes就是插了⽹线的
那么配置相应的⽹卡信息。
vi /etc/sysconfig/network-scripts/ifcfg-enp5s0f1
重启服务
systemctl restart network。
Linux学习之CentOS(一)----在VMware虚拟机中安装CentOS7(图文教程)
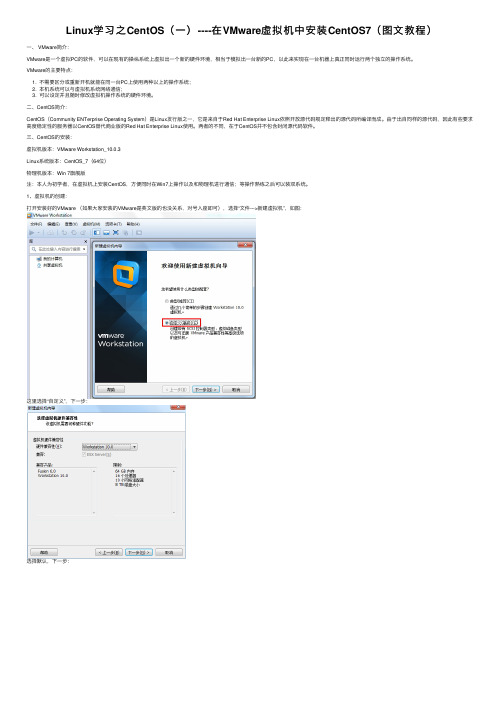
Linux学习之CentOS(⼀)----在VMware虚拟机中安装CentOS7(图⽂教程)⼀、 VMware简介:VMware是⼀个虚拟PC的软件,可以在现有的操纵系统上虚拟出⼀个新的硬件环境,相当于模拟出⼀台新的PC,以此来实现在⼀台机器上真正同时运⾏两个独⽴的操作系统。
VMware的主要特点:1. 不需要区分或重新开机就能在同⼀台PC上使⽤两种以上的操作系统;2. 本机系统可以与虚拟机系统⽹络通信;3. 可以设定并且随时修改虚拟机操作系统的硬件环境。
⼆、CentOS简介:CentOS(Community ENTerprise Operating System)是Linux发⾏版之⼀,它是来⾃于Red Hat Enterprise Linux依照开放源代码规定释出的源代码所编译⽽成。
由于出⾃同样的源代码,因此有些要求⾼度稳定性的服务器以CentOS替代商业版的Red Hat Enterprise Linux使⽤。
两者的不同,在于CentOS并不包含封闭源代码软件。
三、CentOS的安装:虚拟机版本:VMware Workstation_10.0.3Linux系统版本:CentOS_7(64位)物理机版本:Win 7旗舰版注:本⼈为初学者,在虚拟机上安装CentOS,⽅便同时在Win7上操作以及和物理机进⾏通信;等操作熟练之后可以装双系统。
1、虚拟机的创建:打开安装好的VMware (如果⼤家安装的VMware是英⽂版的也没关系,对号⼊座即可),选择“⽂件--->新建虚拟机”,如图:这⾥选择“⾃定义”,下⼀步:选择默认,下⼀步:选择“第三项“稍后安装操作系统”,以后安装,⽅便进⾏配置。
下⼀步:(注:上图中,第⼀项是⽤光盘安装,第⼆项是⽤硬盘⾥的ISO镜像安装)上图指的是,打算在虚拟机中模拟⼀个怎样的操作系统,这⾥选择Linux,Version⾥选择CentOS 64位,下⼀步:输⼊虚拟机名称(可以随便起),选择镜像⽂件存放的路径。
服务器安装centos 7系统教程
给服务器安装系统,因为没做过,一切都是从网上找的方法,遇到问题也不知道是什么问题,半天也搜不出解决方法,好在最后总算安装好了,这里就整理一下安装过程,并总结一下自己遇到的问题。
我们安装的是centos 7,其他Linux系统版本感觉也可以参照安装。
准备:机器、u盘(比要安装的系统大)、系统镜像、软碟通。
第一步,制作启动u盘1、打开软碟通,点击“文件”->“打开”找到自己下好的镜像,点击加载2、插入u盘,点击“启动”->“写入硬盘映像”这个位置显示你u盘的名称3、依次点击“写入”->”确定“,等写入完成,启动盘就制作好了。
第二步、安装1、服务器一般是不配备显示器、鼠标、键盘这些东西的,需自备2、插好u盘,启动服务器,进入BIOS(我安装的曙光机器是按delete键进入,具体按哪个键各位对应机器品牌去网上查)切到“boot”菜单,点击进入第一选项“boot device priority“,将usb项置顶。
然后保存退出。
3、之后机器自动选择usb启动,出现如下选择,点击“Install CentOS 7“选项,进入安装界面选择语言继续后,进入下面界面这里我们设置三个部分“软件选择“、”安装位置”和”网络和主机名“首先点击“软件选择“这是一个在虚拟机上安装的图,如果你的机器上除了u盘外,还有硬盘,那再“本地标准磁盘“下就会有硬盘信息,我们选择安装的硬盘。
”分区“选项我选的是”自动配置分区“,你们也可以按照自己的需要,选择”我要配置分区“然后自己选择分多少个区,每个区的大小。
点击完成。
“软件选择“我选的是”最小安装,你们可以根据需要选择其他部分图里“Base Environment”只有“Minimal Install”选项是因为下载的就是最简安装版,如果你下的是完整版的(4g多一点),还会有gnome等选项,按自己需求勾选。
点击“完成”,再进入“网络和主机名”配置网络。
点击“配置”,然后需要配置Mac地址、IP地址、子网掩码、网关、DNS,配置好后保存退出回到“网络和主机名”界面,点击右上角开启,显示网络连接成功。
Centos7安装cmake3

Centos7安装cmake3Centos7安装cmake3前期准备openssl-devel已安装cmake3.1以上已安装下载⽅式说明:wget安装cmake(编译环境云安装):由于版本低不适合yum下载安装包[root@localhost cmake]# yum install --downloadonly --downloaddir=/home/tmp cmakerpm安装[root@localhost cmake]# rpm -qa | grep cmake[root@localhost cmake]# rpm -ivh cmake-2.8.12.2-2.el7.x86_64.rpmwarning: cmake-2.8.12.2-2.el7.x86_64.rpm: Header V3 RSA/SHA256 Signature, key ID : NOKEYPreparing... ################################# [100%]Updating / installing...1:cmake-2.8.12.2-2.el7 ################################# [100%][root@localhost cmake]#查看安装版本[root@localhost cmake]# cmake --versioncmake version 2.8.12.2[root@localhost cmake]#安装openssl-devel(编译环境云安装)yum下载安装包[root@localhost openssl-devel]# rpm -qa | grep openssl-devel[root@localhost openssl-devel]# yum install --downloadonly --downloaddir=/home/tmp openssl-devel[root@localhost openssl-devel]# lse2fsprogs-1.42.9-19.el7.x86_64.rpm krb5-workstation-1.15.1-50.el7.x86_64.rpm libselinux-devel-2.5-15.el7.x86_64.rpm libss-1.42.9-19.el7.x86_64.rpm pcre-devel-8.32-17.el7.x86_64.rpme2fsprogs-libs-1.42.9-19.el7.x86_64.rpm libcom_err-1.42.9-19.el7.x86_64.rpm libselinux-python-2.5-15.el7.x86_64.rpm libverto-devel-0.2.5-4.el7.x86_64.rpm zlib-1.2.7-19.el7_9.x86_64.rpm keyutils-libs-devel-1.5.8-3.el7.x86_64.rpm libcom_err-devel-1.42.9-19.el7.x86_64.rpm libselinux-utils-2.5-15.el7.x86_64.rpm openssl-1.0.2k-21.el7_9.x86_64.rpm zlib-devel-1.2.7-19.el7_9.x86_64.rpm krb5-devel-1.15.1-50.el7.x86_64.rpm libkadm5-1.15.1-50.el7.x86_64.rpm libsepol-2.5-10.el7.x86_64.rpm openssl-devel-1.0.2k-21.el7_9.x86_64.rpmkrb5-libs-1.15.1-50.el7.x86_64.rpm libselinux-2.5-15.el7.x86_64.rpm libsepol-devel-2.5-10.el7.x86_64.rpm openssl-libs-1.0.2k-21.el7_9.x86_64.rpm[root@localhost openssl-devel]#rpm安装[root@localhost openssl-devel]# rpm -iUvh *warning: e2fsprogs-1.42.9-19.el7.x86_64.rpm: Header V3 RSA/SHA256 Signature, key ID : NOKEYPreparing... ################################# [100%]Updating / installing...1:libcom_err-1.42.9-19.el7 ################################# [ 3%]2:zlib-1.2.7-19.el7_9 ################################# [ 5%]3:libsepol-2.5-10.el7 ################################# [ 8%]4:libselinux-2.5-15.el7 ################################# [ 11%]5:openssl-libs-1:1.0.2k-21.el7_9 ################################# [ 14%]6:krb5-libs-1.15.1-50.el7 ################################# [ 16%]7:libkadm5-1.15.1-50.el7 ################################# [ 19%]8:libss-1.42.9-19.el7 ################################# [ 22%]9:libsepol-devel-2.5-10.el7 ################################# [ 24%]10:zlib-devel-1.2.7-19.el7_9 ################################# [ 27%]11:e2fsprogs-libs-1.42.9-19.el7 ################################# [ 30%]12:libcom_err-devel-1.42.9-19.el7 ################################# [ 32%]13:pcre-devel-8.32-17.el7 ################################# [ 35%]14:libselinux-devel-2.5-15.el7 ################################# [ 38%]15:libverto-devel-0.2.5-4.el7 ################################# [ 41%]16:keyutils-libs-devel-1.5.8-3.el7 ################################# [ 43%]17:krb5-devel-1.15.1-50.el7 ################################# [ 46%]18:openssl-devel-1:1.0.2k-21.el7_9 ################################# [ 49%]19:e2fsprogs-1.42.9-19.el7 ################################# [ 51%]20:krb5-workstation-1.15.1-50.el7 ################################# [ 54%]21:openssl-1:1.0.2k-21.el7_9 ################################# [ 57%]22:libselinux-python-2.5-15.el7 ################################# [ 59%]23:libselinux-utils-2.5-15.el7 ################################# [ 62%]Cleaning up / removing...24:krb5-workstation-1.15.1-8.el7 ################################# [ 65%]25:openssl-1:1.0.2k-8.el7 ################################# [ 68%]26:e2fsprogs-1.42.9-10.el7 ################################# [ 70%]27:libkadm5-1.15.1-8.el7 ################################# [ 73%]28:openssl-libs-1:1.0.2k-8.el7 ################################# [ 76%]29:krb5-libs-1.15.1-8.el7 ################################# [ 78%]30:libselinux-utils-2.5-11.el7 ################################# [ 81%]31:e2fsprogs-libs-1.42.9-10.el7 ################################# [ 84%]32:libss-1.42.9-10.el7 ################################# [ 86%]33:libselinux-python-2.5-11.el7 ################################# [ 89%]34:libselinux-2.5-11.el7 ################################# [ 92%]35:libsepol-2.5-6.el7 ################################# [ 95%]36:libcom_err-1.42.9-10.el7 ################################# [ 97%]37:zlib-1.2.7-17.el7 ################################# [100%][root@localhost openssl-devel]#[root@localhost openssl-devel]# rpm -qa | grep openssl-developenssl-devel-1.0.2k-21.el7_9.x86_64[root@localhost openssl-devel]#安装cmake(编译环境安装)解压[root@localhost cmake]# tar -xvf cmake-3.20.2.tar.gz指定安装路径默认安装在 /usr/local/bin 下⾯[root@localhost cmake]# cd cmake-3.20.2[root@localhost cmake]# ./bootstrap --prefix=/home/testuser/cmake/cmake若出现以下问题,需安装openssl-devel (Centos系统)或 libssl-dev(ubuntu系统)-- Could NOT find OpenSSL, try to set the path to OpenSSL root folder in the system variable OPENSSL_ROOT_DIR (missing: OPENSSL_CRYPTO_LIBRARY OPENSSL_INCLUDE_DIR) CMake Error at Utilities/cmcurl/CMakeLists.txt:511 (message):Could not find OpenSSL. Install an OpenSSL development package orconfigure CMake with -DCMAKE_USE_OPENSSL=OFF to build without OpenSSL.-- Configuring incomplete, errors occurred!See also "/home/testuser/cmake/cmake-3.20.2/CMakeFiles/CMakeOutput.log".See also "/home/testuser/cmake/cmake-3.20.2/CMakeFiles/CMakeError.log".---------------------------------------------Error when bootstrapping CMake:Problem while running initial CMake编译安装[root@localhost cmake]# gmake[root@localhost cmake]# gmake install建⽴软链接[root@localhost cmake]# ln -s /home/testuser/cmake/cmake/bin/cmake /usr/bin/cmake查看安装版本[root@localhost cmake-3.20.2]# cmake --versioncmake version 3.20.2CMake suite maintained and supported by Kitware (/cmake).[root@localhost cmake-3.20.2]#。
第1章CentOS Linux 7系统的安装与介绍
• 安装过程 • 设置虚拟机的详细参数
Date: 15 January 2022
1.1.3Linux系统的安装
• 安装过程 • 虚拟机配置的详细清单
Date: 15 January 2022
1.1.3Linux系统的安装
• 安装过程 • 确认了新建虚拟机的配置信息后,点击【完成】,然后就进入
统管理员的账号是系统统一设定的,账号为“root”。
Date: 15 January 2022
1.1.3Linux系统的安装
• 安装过程 • 设定系统管理员的密码。输入的【Root密码】和【确认】密码
要匹配。点击【完成】,进入到系统安装阶段。
Date: 15 January 2022
1.1.3Linux系统的安装
Date: 15 January 2022
1.1.2Linux系统的组成与版本
• Linux系统的组成 – 内核、Shell、文件系统和应用程序
• Linux系统版本 – 内核(Kernel)版本和发行版本 – 内核(Kernel)版本:数字由三部分“A.B.C”,A代表主版本 号,B代表次主版本号,C代表修订号。 – 发行版本:一些厂家或者组织者将Linux系统内核与应用软 件和文档包装起来,并增加软件的安装界面和系统维护工具 的一个软件包集合。
• 通常所指的Linux是指系统内核,而在内核基础之上增加开发一 些应用程序就可以作为软件产品来发行。
Date: 15 January 2022
1.1.1Linux系统的起源与发展 Nhomakorabea• CentOS • Red Hat Linux • SuSE Linux • Debian Linux • 红旗Linux • Ubuntu
centos7安装oracle11g

1.CentOs7环境安装Centos7的ISO文件,刻录U盘安装。
Step1 在BIOS中,设置光盘引导,开机后进入安装界面。
U盘安装要按tab键,输入引导选项:将vmlinuz initrd=initrd.img inst.stage2=hd:LABEL=CentOS\x207\x20x86_64 rd.live.check quiet 改为:vmlinuz initrd=initrd.img inst.stage2=hd:/dev/sdb4 quietsdb4是需要查的,每个机器不同(不修改直接进入,会出现一个dracut:/#,然后输命令 cd dev 命令 ls 然后找 sdb 几就是几)Step2选择安装语言,在列表的最下面,选择中文。
当然,你可以的话,也可以选择英文。
Step3在开始安装之前,必须做一些必要的配置。
图中带有开发感叹号的需要重新设置。
请根据自己的情况选择。
点选软件安装勾选【GNOME桌面】以及其附属项, 点击【完成】按钮点击【安装位置】,选择自动配置分区,点击【完成】按钮(如果使用手动配置分区,至少要分配根目录/分区以及swap内存交换分区)Step4 点击【开始安装】按钮,进入安装程序安装过程中至少需要设置root密码,如果密码强度不够,需要点击两次【完成】按钮安装完成后点击重启按钮重启完成后,接受许可证无需修改,点击前进选择对应的语言源,并创立本地账号,点击【前进】按钮全部配置完成后,就可以正常使用CentOs7系统了Step5配置网络配置静态路由/etc/sysconfig/static-routes :any net 192.168.3.0/24 gw 192.168.3.254any net 10.250.228.128 netmask 255.255.255.192 gw 10.250.228.129临时路由:route add –net 192.168.1.11 netmask 255.255.255.0 gw 192.168.1.1查看路由:route -n网络配置完毕后,如果有多余的配置,可以在/etc/sysconfig/network-scripts里删除,重启后就看不到了。
Uefi模式下安装centos7
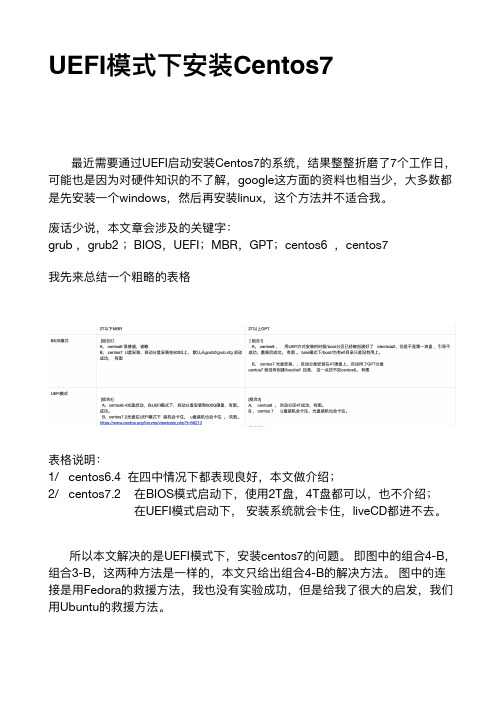
UEFI Centos7UEFI Centos7 7 google windows linuxgrub grub2 BIOS UEFI MBR GPT centos6 centos71/ centos6.42/ centos7.2 BIOS 2T 4T UEFI liveCDUEFI centos7 4-B 3-B 4-B Fedora Ubuntu1 T110 600G SAS BIOS centos2 F11 UEFI ubuntu143 sda5 centos4 Execute a shell in /dev/sda55 mount /dev/sda3 /boot/efi ( ESP )6 vi /etc/resolv.conf nameserver 114.114.114.1147 yum install efibootgmr shim grub2-efi8 /boot/efi EFI/centos/XXXXX grub.cfg grub2-mkconfig -o /boot/efi/EFI/centos/grub.cfg910 UEFIcentos UEFI1112 grub2 more /boot/efi/EFI/centos/grub.cfg### BEGIN /etc/grub.d/10_linux ###menuentry 'CentOS Linux (3.10.0-514.el7.x86_64) 7 (Core)' --class centos --class gnu-linux --class gnu --class os --unrestricted $menuentry_id_option 'gnulinux-3.10.0-514.el7.x86_64-advanced-24d2ee03-3580-44ea-8d57-95a4c1ea2dc3' {load_videoset gfxpayload=keepinsmod gzioinsmod part_msdosinsmod xfsset root='hd0,msdos1'if [ x$feature_platform_search_hint = xy ]; thensearch --no-floppy --fs-uuid --set=root --hint-bios=hd0,msdos1 --hint-efi=hd0,msdos1 --hint-baremetal=ahci0,msdos1 --hint='hd0,msdos1'f0a3ab93-ceea-4f84-ba19-7545ced00cccelsesearch --no-floppy --fs-uuid --set=root f0a3ab93-ceea-4f84-ba19-7545ced00cccfilinuxefi /vmlinuz-3.10.0-514.el7.x86_64root=UUID=24d2ee03-3580-44ea-8d57-95a4c1ea2dc3 ro crashkernel=auto rhgb quietinitrdefi /initramfs-3.10.0-514.el7.x86_64.img}menuentry 'CentOS Linux (0-rescue-5a39f276e8194f6bb7bd2f76714e373b) 7 (Core)' --class centos --class gnu-linux --class gnu --class os --unrestricted $menuentry_id_option 'gnulinux-0-rescue-5a39f276e8194f6bb7bd2f76714e373b-advanced-24d2ee03-3580-44ea-8d57-95a4c1ea2dc3' {load_videoinsmod gzioinsmod part_msdosinsmod xfsset root='hd0,msdos1'if [ x$feature_platform_search_hint = xy ]; thensearch --no-floppy --fs-uuid --set=root --hint-bios=hd0,msdos1 --hint-efi=hd0,msdos1 --hint-baremetal=ahci0,msdos1 --hint='hd0,msdos1'f0a3ab93-ceea-4f84-ba19-7545ced00cccelsesearch --no-floppy --fs-uuid --set=root f0a3ab93-ceea-4f84-ba19-7545ced00cccfilinuxefi /vmlinuz-0-rescue-5a39f276e8194f6bb7bd2f76714e373broot=UUID=24d2ee03-3580-44ea-8d57-95a4c1ea2dc3 ro crashkernel=auto rhgb quietinitrdefi /initramfs-0-rescue-5a39f276e8194f6bb7bd2f76714e373b.img }13[root@localhost ~]# more anaconda-ks.cfg#version=DEVEL# System authorization informationauth --enableshadow --passalgo=sha512# Use CDROM installation mediacdrom# Use graphical installgraphical# Run the Setup Agent on first bootfirstboot --enableignoredisk --only-use=sda# Keyboard layoutskeyboard --vckeymap=us --xlayouts='us'# System languagelang en_US.UTF-8# Network informationnetwork --bootproto=dhcp --device=em1 --onboot=off --ipv6=auto --no-activatenetwork --hostname=localhost.localdomain# Root passwordrootpw --iscrypted $6$kVNJXC22bbK.Uvxl$OHTDQGMGw/DEizFs4./kb6qxsL9hzsebhHeS7kkOW4FbzN5Y7bhr/121iueQvvl1bS6PsqUD3dVwcE1bKkUdL/# System servicesservices --enabled="chronyd"# System timezonetimezone America/New_York --isUtc# System bootloader configurationbootloader --append=" crashkernel=auto" --location=mbr --boot-drive=sda # Partition clearing informationclearpart --all --initlabel --drives=sda# Disk partitioning informationpart swap --fstype="swap" --ondisk=sda --size=8065part /boot --fstype="xfs" --ondisk=sda --size=1024part / --fstype="xfs" --ondisk=sda --size=51200part /boot/efi --fstype="efi" --ondisk=sda --size=200 --fsoptions="umask=0077,shortname=winnt"%packages@^minimal@corechronykexec-tools%end%addon com_redhat_kdump --enable --reserve-mb='auto'%end%anacondapwpolicy root --minlen=6 --minquality=50 --notstrict --nochanges --notemptypwpolicy user --minlen=6 --minquality=50 --notstrict --nochanges --notemptypwpolicy luks --minlen=6 --minquality=50 --notstrict --nochanges --notempty%end@ 413999317@。
- 1、下载文档前请自行甄别文档内容的完整性,平台不提供额外的编辑、内容补充、找答案等附加服务。
- 2、"仅部分预览"的文档,不可在线预览部分如存在完整性等问题,可反馈申请退款(可完整预览的文档不适用该条件!)。
- 3、如文档侵犯您的权益,请联系客服反馈,我们会尽快为您处理(人工客服工作时间:9:00-18:30)。
1.安装CentOS7.0
1.1服务器开机之后根据提示按del或者F11进入启动选择界面,
选择启动方式为光盘启动(optical DVD),启动之后进入
CentOS7.0安装界面。
1.2选择第一项:installCentOS7
1.3进入安装界面后,下拉选择安装语言:中文
1.4日期和时间:设置为亚洲,上海
1.5组建安装:选择左侧最下方:开发及工作站,右侧全选
1.6安装位置:点击之后左下方选择:我要配置分区,点击左上方完
成进入分区界面
点击左下方的+号添加分区:
/ 500G
Swap 16G
/boot 1G
添加错误可选择–号删去分区重新创建。
1.7选择完成,回到安装界面,选择右下角:开始安装。
1.8C entOS7开始安装,此时设置root密码,123456
1.9点击重启,安装完成。
2.安装CentOS7.0updates
在光驱中放入updates光盘之后,在弹出的对话框中选择打开文件,右键打开终端,在光盘目录下执行:./install-updates,输入y允许更新,安装完成之后reboot重启
3.安装RedHawk7.0 CentOS7
系统启动后,放入redhawk的光盘,打开终端,在光盘目录下执行:./install-redhawk,选择y,y,a等待安装完成,reboot重启。
4.安装RedHawk7.0updates
系统启动后,放入redhawkupdates光盘,打开终端,在光盘目录下执行:./install-updates,在弹出的对话框中全选,点击右下方应用,等待安装完成,reboot重启。
5.编译内核
重启系统,打开终端,进入/usr/src目录下以linux开头的目录,然后终端输入:
./ccur-config –s –k SimServer standard,执行之后在弹出的对话框中点击文件,保存,名字不做修改,保存,关闭。
等待完成。
终端执行:make bzImage等待完成,之后执行:make,完成后执行:make modules,完成后执行:make modules_install,完成后执行:make install,完成后执行:reboot,编译完成。