ldapadmin使用手册
ldap配置过程详解

ldap配置过程详解ldap常⽤名称解释1.环境搭建操作系统:centos6.5 x86_64关闭防⽕墙、selinux开启时间同步# crontab -e加⼊# time sync*/5 * * * * /usr/sbin/ntpdate 192.168.8.102 >/dev/null 2>&1# crontab -l*/5 * * * * /usr/sbin/ntpdate -u 192.168.8.102 >/dev/null 2>&1配置域名解析:# echo "192.168.8.43 " >> /etc/hosts解决依赖关系# yum grouplistBaseDebugging ToolsPerformance ToolsCompatibility librariesDevelopment toolsDial-up Networking SupportHardware monitoring utilities如果缺少组包,需要安装yum groupinstall -y "Compatibility libraries"2.安装openldap master# yum install -y openldap openldap-*# yum install -y nscd nss-pam-ldapd nss-* pcre pcre*# rpm -qa | grep openldap*compat-openldap-2.3.43-2.el6.x86_64openldap-2.4.40-12.el6.x86_64openldap-clients-2.4.40-12.el6.x86_64openldap-servers-sql-2.4.40-12.el6.x86_64openldap-servers-2.4.40-12.el6.x86_64openldap-devel-2.4.40-12.el6.x86_643.配置slapd.conf⽂件# cd /etc/openldap/[root@node5 openldap]# cp /usr/share/openldap-servers/slapd.conf.obsolete slapd.conf [root@node5 openldap]# cp slapd.conf slapd.conf.bak[root@node5 openldap]# slappasswd -s chinasoft|sed -e "s#{SSHA}#rootpw\t{SSHA}#g"rootpw {SSHA}D9+lqUJZVPobp0sZfXl37jE1aVvR2P9K[root@node5 openldap]# slappasswd -s chinasoft|sed -e "s#{SSHA}#rootpw\t{SSHA}#g">>/etc/openldap/slapd.conf[root@node5 openldap]# tail -1 slapd.confrootpw {SSHA}FvBRnIPqtIi0/u11O2gOfOCrRJr+xMAr# vim slapd.conf注释掉⼀下四⾏# database dbb#suffix "dc=my-domain,dc=com"#checkpoint 1024 15#rootdn "cn=Manager,dc=my-domain,dc=com"添加如下内容# add start by jack 2016/07/01database bdbsuffix "dc=chinasoft,dc=com"rootdn "cn=admin,dc=chinasoft,dc=com"对⽐修改是否成功:[plain]1. # diff slapd.conf.bak slapd.conf2. 114,117c114,1223. < database bdb4. < suffix "dc=my-domain,dc=com"5. < checkpoint 1024 156. < rootdn "cn=Manager,dc=my-domain,dc=com"7. ---8. > #database bdb9. > #suffix "dc=my-domain,dc=com"10. > #checkpoint 1024 1511. > #rootdn "cn=Manager,dc=my-domain,dc=com"12. > # add start by jack 2016/07/0113. > database dbd14. > suffix "dc=chinasoft,dc=com"15. > rootdn "cn=admin,dc=chinasoft,dc=com"16. >17. 140a14618. > rootpw {SSHA}FvBRnIPqtIi0/u11O2gOfOCrRJr+xMAr添加如下内容cat >> /etc/openldap/slapd.conf<<EOF# add start by jack 2016/07/01loglevel 296cachesize 1000checkpoint 2018 10EOF参数说明:# add start by jack 2016/07/01loglevel 296 # ⽇志级别,记录⽇志信息⽅便调试,296级别是由256(⽇志连接/操作/结果)、32(搜索过滤器处理)、8(连接管理)累加的结果cachesize 1000 # 设置ldap可以换成的记录数checkpoint 2018 10 # 可以设置把内存中的数据协会数据⽂件的操作上,上⾯设置表⽰每达到2048KB或者10分钟执⾏⼀次,checkpoint即写⼊数据⽂件的操作4.ldap授权及安全参数配置# vim /etc/openldap/slapd.conf删除如下内容:[plain]1. database config2. access to *3. by dn.exact="gidNumber=0+uidNumber=0,cn=peercred,cn=external,cn=auth" manage4. by * none5.6.7. # enable server status monitoring (cn=monitor)8. database monitor9. access to *10. by dn.exact="gidNumber=0+uidNumber=0,cn=peercred,cn=external,cn=auth" read11. by dn.exact="cn=Manager,dc=my-domain,dc=com" read12. by * none改为:access to *by self writeby anonymous authby * read5.加⼊⽇志记录# cp /etc/rsyslog.conf /etc/rsyslog.conf.bak.$(date +%F%T)# echo '#record ldap.log by jack 2016-07-01' >> /etc/rsyslog.conf# echo 'local4.* /var/log/ldap.log'>> /etc/rsyslog.conf# tail -1 /etc/rsyslog.conflocal4.* /var/log/ldap.log# service rsyslog restart6.配置ldap数据库路径# cp /usr/share/openldap-servers/DB_CONFIG.example /var/lib/ldap/DB_CONFIG[root@node5 openldap]# ll /var/lib/ldap/DB_CONFIG-rw-r--r-- 1 root root 845 Jul 1 17:29 /var/lib/ldap/DB_CONFIG[root@node5 openldap]# chown ldap:ldap /var/lib/ldap/DB_CONFIG[root@node5 openldap]# chmod 700 /var/lib/ldap/[root@node5 openldap]# ls -l /var/lib/ldap/total 4-rw-r--r-- 1 ldap ldap 845 Jul 1 17:29 DB_CONFIG验证配置是否Ok# slaptest -uconfig file testing succeeded7.启动服务:# /etc/init.d/slapd restart# lsof -i :389COMMAND PID USER FD TYPE DEVICE SIZE/OFF NODE NAMEslapd 50735 ldap 7u IPv4 75541 0t0 TCP *:ldap (LISTEN)slapd 50735 ldap 8u IPv6 75542 0t0 TCP *:ldap (LISTEN)[root@node5 openldap]# ps -ef |grep ldap|grep -v grepldap 50735 1 0 17:33 ? 00:00:00 /usr/sbin/slapd -h ldap:/// ldapi:/// -u ldap配置随机启动# chkconfig slapd on[root@node5 openldap]# chkconfig --list slapdslapd 0:off1:off2:on3:on4:on5:on6:off8.测试查找内容# ldapsearch -LLL -W -x -H ldap:// -D "cn=admin,dc=chinasoft,dc=com" -b "dc=chinasoft,dc=com" "(uid=*)" Enter LDAP Password:报错:ldap_bind: Invalid credentials (49)解决办法:[plain]1. # rm -rf /etc/openldap/slapd.d/*2. # slaptest -f /etc/openldap/slapd.conf -F /etc/openldap/slapd.d3. 57763ec6 bdb_monitor_db_open: monitoring disabled; configure monitor database to enable4. config file testing succeeded5. # ldapsearch -LLL -W -x -H ldap:// -D "cn=admin,dc=chinasoft,dc=com" -b "dc=chinasoft,dc=com" "(uid=*)"6. Enter LDAP Password:7. No such object (32)重启服务# service slapd restartStopping slapd: [FAILED]Checking configuration files for slapd: [FAILED]57763eee ldif_read_file: Permission denied for "/etc/openldap/slapd.d/cn=config.ldif"slaptest: bad configuration file![root@node5 openldap]# chown -R ldap.ldap /etc/openldap/slapd.d/[root@node5 openldap]# service slapd restartStopping slapd: [FAILED]Starting slapd: [ OK ]# lsof -i :389COMMAND PID USER FD TYPE DEVICE SIZE/OFF NODE NAMEslapd 51164 ldap 7u IPv4 77503 0t0 TCP *:ldap (LISTEN)slapd 51164 ldap 8u IPv6 77504 0t0 TCP *:ldap (LISTEN)9.为ldap master初始化数据(如果不初始化,后⾯⽆法通过web界⾯管理)增加初始的⼊⼝(entries)1) 创建LDIF⽂件编辑⼀个LDIF格式⽂件:# vim base.ldif[plain]1. dn: dc=chinasoft, dc=com2. objectClass: organization3. objectClass: dcObject4. dc: chinasoft5. o: chinasoft6.7.8. dn: ou=People, dc=chinasoft, dc=com9. objectClass: organizationalUnit10. ou: People11.12.13. dn: ou=group, dc=chinasoft, dc=com14. objectClass: organizationalUnit15. ou: group16.17.18. dn: cn=tech, ou=group, dc=chinasoft, dc=com19. objectClass: posixGroup20. description:: 5oqA5pyv6YOo21. gidNumber: 1000122. cn: tech# vim jack.ldif[plain]1. dn: uid=jack,ou=People,dc=chinasoft,dc=com2. objectClass: posixaccount3. objectClass: inetOrgPerson4. objectClass: organizationalPerson5. objectClass: person6. homeDirectory: /home/jack7. loginShell: /bin/bash8. uid: jack9. cn: jack10. userPassword:: 55G/ReqPKeOZ8SpgszwIQhaBXySNU4mw11. uidNumber: 1000512. gidNumber: 1000113. sn: jack[plain]1. # ldapadd -x -H ldap:// -D "cn=admin,dc=chinasoft,dc=com" -W -f base.ldif2. Enter LDAP Password:3. adding new entry "dc=chinasoft, dc=com"4.5.6. adding new entry "ou=People, dc=chinasoft, dc=com"7.8.9. adding new entry "ou=group, dc=chinasoft, dc=com"10.11.12. adding new entry "cn=tech, ou=group, dc=chinasoft, dc=com"2) 运⾏ldapadd# ldapadd -x -H ldap:// -D "cn=admin,dc=chinasoft,dc=com" -W -f base.ldifEnter LDAP Password:[plain]1. 报错:2. adding new entry "dc=chinasoft,dc=com"3. ldap_add: Invalid syntax (21)4. additional info: objectClass: value #0 invalid per syntax5. 原因:ldif⽂件中存在空格或者个别单词拼写错误6. 正确书写格式:7. (1空⾏)8. dn:(空格) dc=mail,dc=kaspersky,dc=com(结尾⽆空格)9. objectclass: (空格)dcObject(结尾⽆空格)10. objectclass: (空格)organization(结尾⽆空格)11. o: (空格)kaspersky(结尾⽆空格)12. dc:(空格) test(结尾⽆空格)13. (1空⾏)14. dn: (空格)cn=test,dc=mail,dc=kaspersky,dc=com(结尾⽆空格)15. objectclass: (空格)organizationalRole(结尾⽆空格)16. cn: (空格)test(结尾⽆空格)17. (结尾⽆空⾏)# ldapadd -x -H ldap:// -D "cn=admin,dc=chinasoft,dc=com" -W -f jack.ldifEnter LDAP Password:adding new entry "uid=jack,ou=People,dc=chinasoft,dc=com"3) 检查是否已经开始正常⼯作# ldapsearch -LLL -W -x -H ldap:// -D "cn=admin,dc=chinasoft,dc=com" -b "dc=chinasoft,dc=com" "(uid=*)" Enter LDAP Password:dn: uid=jack,ou=People,dc=chinasoft,dc=comobjectClass: posixAccountobjectClass: inetOrgPersonobjectClass: organizationalPersonobjectClass: personhomeDirectory: /home/jackloginShell: /bin/bashuid: jackcn: jackuserPassword:: 55G/ReqPKeOZ8SpgszwIQhaBXySNU4mwuidNumber: 10005gidNumber: 10001sn: jack10.为ldap master配置web管理接⼝安装lamp环境# yum install -y httpd php php-ldap php-gd# rpm -qa httpd php php-ldap php-gdphp-5.3.3-47.el6.x86_64httpd-2.2.15-53.el6.centos.x86_64php-gd-5.3.3-47.el6.x86_64php-ldap-5.3.3-47.el6.x86_64安装ldap-account-manager管理软件https:///lamcms/releases?page=3将ldap-account-manager-3.7.tar.gz安装包上传到/var/www/html⽬录# cd /var/www/html/[root@node5 html]# tar zxf ldap-account-manager-3.7.tar.gz[root@node5 html]# mv ldap-account-manager-3.7 ldap[root@node5 html]# cd ldap/config[root@node5 config]# cp config.cfg_sample config.cfg[root@node5 config]# cp lam.conf_sample lam.conf[root@node5 config]# sed -i 's#cn=Manager#cn=admin#g' lam.conf[root@node5 config]# sed -i 's#dc=my-domain#dc=chinasoft#g' lam.conf[plain]1. [root@node5 config]# diff lam.conf_sample lam.conf2. 13c133. < admins: cn=Manager,dc=my-domain,dc=com4. ---5. > admins: cn=admin,dc=chinasoft,dc=com6. 55c557. < types: suffix_user: ou=People,dc=my-domain,dc=com8. ---9. > types: suffix_user: ou=People,dc=chinasoft,dc=com10. 59c5911. < types: suffix_group: ou=group,dc=my-domain,dc=com12. ---13. > types: suffix_group: ou=group,dc=chinasoft,dc=com14. 63c6315. < types: suffix_host: ou=machines,dc=my-domain,dc=com16. ---17. > types: suffix_host: ou=machines,dc=chinasoft,dc=com18. 67c6719. < types: suffix_smbDomain: dc=my-domain,dc=com20. ---21. > types: suffix_smbDomain: dc=chinasoft,dc=com# chown -R apache.apache /var/www/html/ldap访问http://192.168.8.43/ldap/templates/login.php使⽤刚才配置的 admin 和密码chinasoft登陆即可添加⽤户、配置密码查看通过web界⾯添加的tom⽤户是否⽣效[plain]1. # ldapsearch -LLL -W -x -H ldap:// -D "cn=admin,dc=chinasoft,dc=com" -b "dc=chinasoft,dc=com" "(uid=lily)"2. Enter LDAP Password:3. dn: uid=lily,ou=People,dc=chinasoft,dc=com4. objectClass: posixAccount5. objectClass: inetOrgPerson6. objectClass: organizationalPerson7. objectClass: person8. homeDirectory: /home/lily9. loginShell: /bin/bash10. uid: lily11. cn: lily12. uidNumber: 1000713. gidNumber: 1000214. userPassword:: e1NTSEF9RkY1eHFNUk5JbGJHNFpCQWtBK0pwN1RmcmdIci9Mems=15. sn: lily16. givenName: lily17.。
通过LDAP在AD域控上进行添加、删除、修改、查询等各种操作。

通过LDAP在AD域控上进⾏添加、删除、修改、查询等各种操作。
LDAP操作代码样例初始化LDAP ⽬录服务上下⽂该例⼦中,我们使⽤uid=linly,ou=People,dc=jsoso,dc=net这个账号,链接位于本机8389端⼝的LDAP服务器(ldap://localhost:8389),认证⽅式采⽤simple类型,即⽤户名/密码⽅式。
private static void initialContext() throws NamingException{if(singleton == null){singleton = new LDAPConnection();/** 在实际编码中,这些环境变量应尽可能通过配置⽂件读取*///LDAP服务地址singleton.sLDAP_URL = "ldap://localhost:8389";//管理员账号singleton.sMANAGER_DN = "uid=linly,ou=People,dc=jsoso,dc=net";//管理员密码singleton.sMANAGER_PASSWORD = "coffee";//认证类型singleton.sAUTH_TYPE = "simple";//JNDI Context⼯⼚类singleton.sCONTEXT_FACTORY = "com.sun.jndi.ldap.LdapCtxFactory";singleton.envProps.setProperty(Context.INITIAL_CONTEXT_FACTORY, singleton.sCONTEXT_FACTORY);singleton.envProps.setProperty(Context.PROVIDER_URL, singleton.sLDAP_URL);singleton.envProps.setProperty(Context.SECURITY_AUTHENTICATION, singleton.sAUTH_TYPE);singleton.envProps.setProperty(Context.SECURITY_PRINCIPAL, singleton.sMANAGER_DN);singleton.envProps.setProperty(Context.SECURITY_CREDENTIALS, singleton.sMANAGER_PASSWORD);/** 绑定ldap服务器*/singleton.dirCtx = new InitialDirContext(singleton.envProps);}}通过⼀个Hashtable或者Properties对象为LDAP的Context设置参数,⽽后初始化InitialDirContext,即可绑定LDAP服务。
ldap常用命令 -回复

ldap常用命令-回复LDAP(Lightweight Directory Access Protocol)是一种用于访问和维护分布式目录服务的协议。
它旨在提高对目录服务的访问效率,并使其易于使用和管理。
LDAP常用命令是进行LDAP操作的关键工具,本文将详细介绍LDAP常用命令及其用途。
1. ldapsearchldapsearch命令用于搜索和检索LDAP目录中的条目。
它可以使用不同的选项和过滤器来指定搜索条件。
例如,要搜索名称为"John Smith"的所有用户,可以使用以下命令:ldapsearch -x -b "dc=example,dc=com" "(cn=John Smith)"-x:使用简单认证模式进行连接;-b:指定要进行搜索的基准DN;"(cn=John Smith)":指定搜索的过滤条件,这里搜索名称为"John Smith"的条目。
ldapsearch命令将返回与搜索条件匹配的所有条目的详细信息,包括DN、属性和属性值。
2. ldapaddldapadd命令用于向LDAP目录中添加新的条目。
它需要一个LDIF (LDAP Data Interchange Format)文件作为输入,该文件描述了要添加的条目的结构和属性。
以下是一个示例:ldapadd -x -D "cn=admin,dc=example,dc=com" -W -f entry.ldif-D:指定进行操作的用户DN;-W:提示输入密码;-f:指定要添加的条目的LDIF文件。
ldapadd命令将读取LDIF文件,并将其中描述的条目添加到LDAP目录中。
3. ldapmodifyldapmodify命令用于修改LDAP目录中的现有条目。
它也需要一个LDIF文件作为输入,并根据其中的描述对目录进行修改。
LDAP插件用户手册

LDAP插件用户手册(插件版本:标准版)2011年06月目录第一章产品及功能介绍31.1产品版本介绍: (3)1.LDAP插件版本(此文档主要针对标准版进行说明): (3)2.标准版和高级版本功能对比列表 (3)1.2新功能: (4)1.呈现整个域目录树,根据需求可选择指定部门同步;(新功能) (4)2.支持指定禁用某些用户(支持快速模糊匹配查找); (5)3.优化同步机制,大大提高同步性能和稳定性(500个部门、5k用户第一次导入只需3-5mins,第二次更新只需10秒左右); (5)1.3概述(应用场景): (5)1.4产品优势: (5)1.5成功案例: (6)第二章LDAPSyncTool插件的安装72.1安装所需的软硬件环境 (7)2.2LDAPSyncTool服务端插件的安装 (7)第三章功能使用说明73.1配置LDAPSyncTool (7)1.配置LDAP服务器信息 (8)2.配置RTX服务器信息 (9)3.选择需同步的部门 (10)4.配置同步管理信息 (11)3.2同步LDAP数据 (12)3.3禁止指定的AD用户导入 (13)3.4用户登录域(第三方认证) (14)3.5注册LDAPSyncTool (15)第四章附录154.1 名词解释 (15)第一章产品及功能介绍1.1产品版本介绍:1.LDAP插件版本(此文档主要针对标准版进行说明):a)标准版:拥有通用基础功能(适用中小企业);b)高级版本:拥有标准版功能,还具有更多强大的功能(适用大型企业);2.标准版和高级版本功能对比列表1.2新功能:1.呈现整个域目录树,根据需求可选择指定部门同步;(新功能)2.支持指定禁用某些用户(支持快速模糊匹配查找);3.优化同步机制,大大提高同步性能和稳定性(500个部门、5k用户第一次导入只需3-5mins,第二次更新只需10秒左右);1.3概述(应用场景):企业在使用RTX之前一般情况会有其它的办公IT系统(比如OA\ERP\CRM等);随着IT办公软件的增多,使企业IT管理员的工作量不断增加,而且不方便维护和管理众多的IT办公软件的用户或部门管理;而且由于IT系统由不同的供应商提供,企业IT系统安全性参差不齐,存在较大的安全隐患。
ldap第一天编译安装LDAP+ldapadmin

ldap第⼀天编译安装LDAP+ldapadmin⼀.环境Server:基于CentOS-7-x86_64-1511Server IP: 172.18.12.203⼆.软件获取OpenLDAPOpenLDAP 2.4.44:BDBberkeley-db-5.1.29 (OpenLDAP当前与6.x版本不兼容,READEME中明确写出兼容4.4~4.8或5.0~5.1):LDAP Administrtorldapadmin 2015.2:三.准备1. 关闭selinux;2. 打开防⽕墙tcp 389 / 636端⼝。
# tcp 389 是openldap 明⽂传输端⼝,tcp 636是ssl加密传输的端⼝。
# centos7默认⾃带firewalld服务,可以停⽤之后安装iptables。
四.安装OpenLDAP1.依赖包[root@localhost ~]# yum install *ltdl* -y# 涉及libtool-ltdl与libtool-ltdl-devel,如不安装,在编译时报错:configure: error: could not locate libtool ltdl.h2.安装BDB[root@localhost ~]# cd /usr/local/src/[root@localhost src]# tar -zxvf db-5.1.29.tar.gz[root@localhost src]# cd db-5.1.29/build_unix/[root@localhost build_unix]# ../dist/configure --prefix=/usr/local/berkeleydb-5.1.29[root@localhost build_unix]# make[root@localhost build_unix]# make install#必须在解压包的build_unix⽬录中编译安装,否则会报错。
AD域同步账号配置手册
3、修改url、base、principal、password.与真实域环境相对应。
4、用securityadmin账号登录系统,进入系统页面,选择系统设置——人员配置管理——同步用户源配置,在“同步用户数据源类型”和“同步用户认证源类型”分别选择AD。
AD
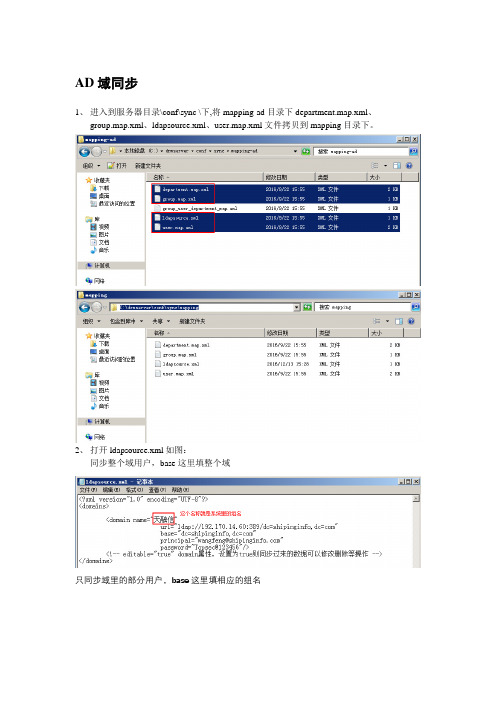
1、进入到服务器目录\conf\sync \下,将mapping-ad目录下department.map.xml、group.map.xml、ldapsource.xml、user.map.xml文件拷贝到mapping目录下。
2、打开ldapsource.xml如图:
同步整个域用户,base这里填整个域
点开一条概述,可以查看详细信息
7、用systemadmin账号登录系统,进入系统页面,选择系统设置——人员配置管理——组织机构管理,可以查看同步过来的账号信息
8、在PC终端,使用域账号登录,登录的账号必须带上域后缀,例如wangfeng@
5、选择系统设置——人员配置管理——用户同步。依下图所示选择。
同步用户数Байду номын сангаас源类型:AD
是否启用同步:是
同步方式:每日同步/时间间隔同步
每日同步时间:如在同步方式中选择每日同步,则在此选择同步时间。
间隔同步时间(单位/小时):如在同步方式中选择时间间隔同步,则在此选择间隔时间。
6、点击“保存”然后点击“立即同步”,可以在“同步结果列表”里查看同步状态
EAP-FAST for Windows Vista 管理员指南说明书

C H A P T E R 3-1EAP-FAST for Windows Vista Administrator GuideOL-16949-013Configuring EAP-FASTThis chapter explains how to configure EAP-FAST module settings, such as connection settings, user credentials, and authentication methods.The following topics are covered in this chapter:•Accessing EAP-FAST Properties for Configuration, page 3-2•Overview of the Connection Tab, page 3-4•Configuring Settings in the Connection Tab, page 3-4•Overview of the User Credentials Tab, page 3-7•Configuring User Credentials, page 3-8•Overview of the Authentication Tab, page 3-11•Configuring Authentication Methods, page 3-12•Finding the Version of the EAP-FAST Module, page 3-13Chapter3 Configuring EAP-FAST Accessing EAP-FAST Properties for ConfigurationAccessing EAP-FAST Properties for ConfigurationTo access the EAP-FAST Properties window, perform the following steps:Step1Click the Start button on the lower-left corner of the desktop.Step2From the right pane, right-click Network.Step3Select Properties.Step4From the left pane, select Manage wireless networks.Step5Double-click the wireless network.Step6From the Wireless Network properties window, select the Security tab (see Figure3-1).Figure3-1Wireless Network Properties WindowStep7Select Cisco EAP-FAST from the "Choose a network authentication method" drop down list.Step8Click the Settings button.EAP-FAST for Windows Vista Administrator GuideOL-16949-01Chapter3 Configuring EAP-FASTAccessing EAP-FAST Properties for Configuration Step9Click the Connection tab, the User Credentials tab, the Authentication tab, or the About tab. For more information about configuring settings in those tabs, see the “Configuring Settings in the ConnectionTab” section on page3-4, the “Configuring User Credentials” section on page3-8, and the “ConfiguringAuthentication Methods” section on page3-12. For information about finding the version of the moduleon the device, see the “Finding the Version of the EAP-FAST Module” section on page3-13.EAP-FAST for Windows Vista Administrator GuideOL-16949-01Chapter3 Configuring EAP-FAST Overview of the Connection TabOverview of the Connection TabThe EAP-FAST Connection tab includes settings for the establishment of an outer Transport LayerSecurity (TLS) tunnel. Settings include identity protection, the use of a Protected Access Credential(PAC), PAC provisioning, the use of authenticated server certificates to establish the tunnel, and the useof a Trusted Root Certificate Authority (CA) from a list of Trusted Root CA certificates.Configuring Settings in the Connection TabYou can configure connection settings from the Connection tab (see Figure3-2).Figure3-2Connection T ab in EAP-FAST Properties WindowEAP-FAST for Windows Vista Administrator GuideOL-16949-01EAP-FAST for Windows Vista Administrator Guide OL-16949-01Chapter 3 Configuring EAP-FASTConfiguring Settings in the Connection Tab Table 3-2 lists and describes all connection settings.T able 3-1Connection SettingsConnection SettingsDescription Use anonymous outer identityCheck this box to enable identity privacy protection.Default: On Outer identity field Enter an outer identity if the Use anonymous outer identity check boxis checked. Follow an administrator’s instructions, or followRFC 4282 for guidelines about what to enter in the outer identityfield.Default: anonymousNote The maximum number of characters allowed in this fieldis 256.Use Protected AccessCredential (PAC)Check this box to enable the use of a PAC to establish a tunnel. When this box is checked, PAC provisioning is requested. If this box is notchecked, EAP-FAST acts as PEAP and uses only the authenticatedserver certificate to establish the tunnel every time.The PAC is a unique shared credential used to mutually authenticatea client and a server. The PAC is associated with a specific clientusername and a server authority ID. A PAC removes the need for PKIand digital certificates. The PAC is distributed or imported to theclient automatically or manually.Manual PAC provisioning generates the PAC file locally on the AAAor EAP-FAST server. With manual provisioning, the user credentialsare supplied to the server to generate the PAC file for that user. ThisPAC must then be manually installed on the client device.Default: OnAllow automatic PACprovisioning Check this box to enable the automatic retrieval of a PAC during EAP-FAST authentication.Automatic PAC provisioning enables the automatic retrieval of a PACduring EAP-FAST authentication. Automatic PAC provisioning usesTLS with a Diffie-Hellman Key Agreement protocol to establish asecure tunnel. In addition, MSCHAPv2 is used to authenticate theclient and for early man-in-the-middle (MITM) attack detection.Default: OnPAC Authority Select a PAC authority from the drop-down list.Default: NoneNote The drop-down list contains the names of all of the PACauthorities from which you have previously provisioned atunnel PAC. If you have not provisioned a PAC, then "none"is the only option. You can also select "none" to force the hostto request provisioning a PAC.Chapter3 Configuring EAP-FAST Configuring Settings in the Connection TabT able3-1Connection Settings (continued)Connection Settings DescriptionImport Click the Import button to manually import a PAC file. When youclick on this button, the Import Protected Access Credentials (PAC)File window appears. If you need to enter a password for the PAC filethat you have selected, a password window will appear.After you have selected and imported a valid PAC file, the PACauthority is added to the PAC authority drop-down list.Default: EnabledValidate server certificate Check this box to use an authenticated server certificate to establisha tunnel. You can check both the Use Protected Access Credentials(PAC) box and the Validate Server Certificate box at the same time.If both are checked, you can select one or more Trusted Root CAcertificates from the list of trusted Certificate Authority certificatesthat are installed on the host system.The EAP-FAST module always tries to use the PAC first if both checkboxes are checked. The module uses the server certifcate if the PACis missing or rejected by the server.If both check boxes are unchecked, EAP-FAST functions as PEAPdoes without validating server certificate. We do not recommendleaving both boxes unchecked because the module bypassesfundamental trust validation.Default: OffConnect to only these servers Check this box to enter an optional server name that must match theserver certificate that is presented by the server. You can entermultiple server names; separate multiple server names withsemicolons. The EAP-FAST module only allows connections tocontinue without prompting if the subject field (CN) in the servercertificate matches the server names that you enter in this field.Default: OffNote You can use an asterisk (*) as a wildcard character in servernames only if the asterisk appears before the first period (.) inthe format. For example, “*”matches any server name that ends with “.” If youput an asterisk anywhere else in the server name, it is nottreated as a wildcard character.EAP-FAST for Windows Vista Administrator GuideOL-16949-01EAP-FAST for Windows Vista Administrator Guide OL-16949-01Chapter 3 Configuring EAP-FASTOverview of the User Credentials Tab Overview of the User Credentials TabThe EAP-FAST module supports the use of both a client certificate and a username and password as user credentials for authentication and provisioning.Client CertificatesIf a client certificate is used, the EAP-FAST module automatically obtains the client certificate from the Windows certificate store of the current user. The EAP-FAST module finds the user certificate that matches the username of the user who is logged on. The certificate cannot be expired.If multiple user certificates are available, the EAP-FAST module prompts the user to select one, and that selection is saved to the profile. By default, the user certificate is sent securely through TLSrenegotiation or through the EAP-TLS inner method in the protected TLS tunnel. If the EAP-FAST server does not start TLS renegotiation to request the client certificate after the tunnel is established, then the EAP-FAST module sends the certificate through the EAP-TLS inner method.The EAP-FAST module administrator can configure the EAP-FAST module XML schema to send the user certificate without using these security measures.Usernames and PasswordsIf a username and password are used, the user provide one of the following types of username and password:•Windows username and password—The Windows username and password are used as networkaccess credentials. The user is not prompted to enter the username and password unless the password is invalid or must be changed.Trusted Root CA Select one of more Trusted Root CA certificates from the list ofcertificates that are installed on the system. Only trusted CAcertificates that are installed on the host system are displayed in thedrop-down list.To view details about the selected Trusted Root CA certificate,double-click the certificate name. Double-clicking the certificatename opens the Windows certificate property screen, wherecertificate details are available.Default: NoneDo not prompt user to authorize new servers or trusted certificate authorities.Check this box if you do not want the user to be prompted to authorize a connection when the server name does not match or the server certificate is not signed by one of the Trusted Root CA certiticatesthat was selected. If this box is checked, the authentication fails.Default: OffT able 3-1Connection Settings (continued)Connection SettingsDescriptionChapter3 Configuring EAP-FAST Configuring User Credentials•Prompted user credentials—The user is prompted during authentication for credentials. These credentials are credentials that are separate from the Windows username and password, such asLightweight Directory Access Protocol (LDAP) credentials.•Saved user credentials—These are user credentials that are entered as part of the EAP-FASTconfiguration. The user is not prompted for credentials during authentication unless the savedcredentials fail or have expired. New credentials that the user enters after successful authenticationare saved automatically in the configuration. The user does not have to return to the configurationscreen to change the old saved credentials.•One-time password (OTP)—The user must manually enter a OTP. New PIN mode and next token mode for OTP are supported.Configuring User CredentialsThe user can configure user credentials from the User Credentials tab (see Figure3-3).Figure3-3User Credentials T ab in EAP-FAST Properties WindowEAP-FAST for Windows Vista Administrator GuideOL-16949-01EAP-FAST for Windows Vista Administrator Guide OL-16949-01Chapter 3 Configuring EAP-FASTConfiguring User Credentials Table 3-2 lists and describes all options for user credentials.T able 3-2User Credentials OptionsUser CredentialsDescription Use a certificate on thiscomputerClick this radio button to automatically obtain the client certificate from the Windows certificate store of the current user.Default: Off Use one-time password Click this radio button to use a one-time password (OTP). For moreinformation about OTP, see the “Understanding PIN Mode and TokenMode with OTP” section on page 3-10.Default: OffUse Windows username and password Click this radio button to use the Windows username and password asthe EAP-FAST username and password for network authentication.Default: OnPrompt automatically for username and password Click this radio button to require the user to enter a separateEAP-FAST username and password in addition to a Windowsusername and password with every authentication attempt. Thisoptions supports non-Windows passwords, such as LDAP.Default: OffUse saved username and password Click this radio button so that the user is not required to enter anEAP-FAST username and password each time. Authentication occursautomatically as needed using a saved user name and password,which are registered with the backend server.Default: OffWhen selecting this option, the user must enter the following:•Username—Enter the username and the domain name in one ofthese two formats:–Domain-qualified user name—domain\user–UserPrincipalName(UPN)****************•Password—Enter a password. This encrypted password is stored in the EAP-FAST configuration.•Confirm password—Enter the password again to verify that it was entered correctly.Note The maximum number of characters allowed for the usernameand password is 256.Chapter3 Configuring EAP-FAST Configuring User CredentialsUnderstanding PIN Mode and Token Mode with OTPNew PIN mode for OTP is supported. If a new PIN is needed, the backend server sends a text message(for example, “Enter New PIN”) to indicate that a new PIN is neeeded. The EAP-FAST module displaysa prompt window that includes the text message from the server (see Figure3-4). The backend servermight prompt the user twice to confirm the new PIN that the user entered.Figure3-4New PIN Prompt WindowNext Token mode for OTP is also supported. If the next token is needed, the backend server sends a textmessage (for example, “Enter Next PASSCODE:”) to indicate that the next token is needed. TheEAP-FAST module displays a prompt window that includes the text message sent from the server(see Figure3-5). The user must get the next token from the OTP device or from the software and enterit in the prompt field.Figure3-5Next T oken Prompt WindowEAP-FAST for Windows Vista Administrator GuideOL-16949-01Overview of the Authentication TabOverview of the Authentication TabThe EAP-FAST module supports three authentication methods: EAP-GTC, EAP-MSCHAPv2, andEAP-TLS.These three authentication methods use the following types of credentials:•EAP-GTC—Active Directory password, OTP, Token, LDAP•EAP-MSCHAPv2—Active Directory password•EAP-TLS—certificateThe EAP-GTC module is bundled with the EAP-FAST module. The EAP-GTC module is not registeredwith the EAPHost framework; it is not available to other applications.A modified version of the EAP-MSCHAPv2 module is also bundled with the EAP-FAST module. Thismodified version is used in anonymous TLS provisioning mode to support the modification ofEAP-MSCHAPv2 challenges. This same module also supports user authentication in authenticationmode without modification.The EAP-FAST module uses the standard EAP-TLS module that is shipped with Windows Vista.The user can select only one of these three inner authentication methods through the user interface.Although other third-party EAP methods are registered with the EAPHost framework and can be selectedin the administrator interface, these methods have not been officially tested.Configuring Authentication MethodsConfiguring Authentication MethodsYou can choose settings for authentication in the Authentication tab (see Figure3-6).Figure3-6Authentication T ab in EAP-FAST Properties WindowTable3-3 lists and describes options for authentication.Finding the Version of the EAP-FAST ModuleFinding the Version of the EAP-FAST ModuleFollow these steps to learn the current version of the EAP-FAST module on the device:T able 3-3Authentication SettingsAuthentication SettingsDescription Select an authenticationmethod Select the inner tunnel EAP method from the drop-down list. Available methods are EAP-GTC, EAP-MSCHAPv2, EAP-TLS, andAny Method.The Any Method option allows the EAP-FAST module to choose anyof the supported methods that the EAP server requests. The methodmust also be appropriate to the user credentials that are used.Default: Any MethodNote EAP-GTC is the only option available if you selected the Useone-time password radio button in the User Credentials tab.NoteEAP-TLS is the only option available if you selected the Usea certificate on this computer radio button in the UserCredentials tab.Note The use of the Any Method value to allow all methods isunsupported by Cisco or Microsoft and is not recommended.This configuration is used “as-is”; Cisco makes no guaranteethat there will not be adverse performance to the system ifunsupported methods are used. Unsupported methods shouldnever be used in a production environment.Configure Click the Configure button to configure EAP-TLS options. Thisoption is available only if EAP-TLS is the selected authenticationmethod. When you click this button, the standard Windows VistaEAP-TLS Properties Screen appears.Default: DisabledEnable fast reconnect Check this box to allow session resumption.The EAP-FAST module supports fast reconnect (also called sessionresumption) by using the User Authorization PAC. When you enablefast reconnect, you can roam or return from suspend mode withoutre-entering your credentials. Fast reconnect can be used acrossdifferent network access servers.Default: OnNote If you switch profiles, logs off, or reboot, fast reconnect is notattempted. You must be reauthenticated.Enable posture validation Check this box to allow the health information of the host machine tobe queried.Finding the Version of the EAP-FAST ModuleStep1Access the EAP-FAST Properties window. The procedure for accessing this window is detailed in the “Accessing EAP-FAST Properties for Configuration” section on page3-2.Step2Click the About tab (see Figure3-7). The version number, copyright information, and open-source software information are in this tab.Figure3-7About T ab in EAP-FAST Properties Window。
EKP管理员手册-admin.do配置

(下面此图可自行更换)蓝凌标准产品Admin.do配置系统管理员手册文档控制/Document Control文档修改记录日期作者版本备注2011年06月09日杨建宏 1.0 全文编写2014年2月13日涂橙 2.0 补充审阅记录日期审阅人版本备注分发日期分发人分发对象备注目录第一章引言 (3)1.1概述 (3)1.2配置简介 (3)第二章详细介绍 (4)2.1基础配置 (4)2.1.1数据库配置 (4)2.1.2全局参数配置 (5)2.1.3消息机制配置 (6)2.1.4附件配置 (7)2.1.5全文索引配置选项 (9)2.1.6地址本配置 (10)2.1.7启用JMX服务 (12)2.1.8日志参数设置 (12)2.2系统安全 (13)2.2.1本系统身份验证 (13)2.2.2系统安全 (14)2.3集团应用 (15)2.3.1多语言支持 (15)2.3.2启用EKP群集 (15)2.3.3启用集团分级授权 (16)2.3.4启用组织场所同步 (16)2.3.5多域名支持 (17)2.4集成配置 (17)2.4.1组织架构同步参数配置 (17)2.4.2集成Winmail (18)2.4.3集成RTX (18)2.4.4集成KK (18)2.4.5集成LDAP (18)2.4.6集成Coremail (19)2.4.7集成google日历 (19)2.4.8集成印象笔记 (19)2.5应用配置 (21)2.5.1流水号生成规则兼容配置 (21)2.5.2移动组件扩展配置 (21)2.5.3个人中心 (21)2.5.4表单配置 (22)第一章引言1.1 概述Admin.do的配置是ekp系统的初始配置。
1.2 配置简介Admin.do配置包括基础配置、系统安全、集团应用、集成配置和应用配置,五个部分。
基础配置为ekp自身系统的参数配置,集成配置则为与其它系统集成的参数配置。
基础配置●数据库配置:配置ekp系统使用的数据库参数。
- 1、下载文档前请自行甄别文档内容的完整性,平台不提供额外的编辑、内容补充、找答案等附加服务。
- 2、"仅部分预览"的文档,不可在线预览部分如存在完整性等问题,可反馈申请退款(可完整预览的文档不适用该条件!)。
- 3、如文档侵犯您的权益,请联系客服反馈,我们会尽快为您处理(人工客服工作时间:9:00-18:30)。
ldapadmin使用手册
一、简介
ldapadmin是一款功能强大的LDAP(轻量目录访问协议)管理工具,它提供了用户友好的界面,用于管理和维护LDAP服务器上的目录。
本手册将向您介绍如何使用ldapadmin进行LDAP目录的管理。
二、安装和配置
2.1 下载和安装ldapadmin
1.打开ldapadmin的官方网站。
2.在下载页面选择适用于您操作系统的版本,然后单击下载按钮。
3.下载完成后,按照安装向导进行安装。
2.2 配置ldap服务器连接
在首次启动ldapadmin之后,您需要配置与LDAP服务器的连接。
按照以下步骤进行配置: 1. 打开ldapadmin并选择“文件”>“设置”。
2. 在设置窗口中,选择“连接”选项卡。
3. 点击“添加”按钮,输入连接名称和LDAP服务器的主机名和端口号。
4. 输入管理员用户名和密码,并验证连接是否成功。
5. 单击“确定”保存配置。
三、目录管理
3.1 创建目录项
您可以使用ldapadmin创建新的目录项。
按照以下步骤进行操作: 1. 在ldapadmin的主界面上选择您要在其中创建目录项的上级目录。
2. 单击工具栏上的“新建目录项”按钮。
3. 在弹出的对话框中,输入新目录项的属性和值。
4. 单击“确定”按钮创建目录项。
3.2 编辑目录项
您可以通过ldapadmin编辑目录项的属性和值。
按照以下步骤进行操作: 1. 在ldapadmin的主界面上选择要编辑的目录项。
2. 单击工具栏上的“编辑目录项”
按钮。
3. 在弹出的对话框中,可以修改目录项的属性和值。
4. 单击“确定”按钮保存更改。
3.3 删除目录项
如果您需要删除一个目录项,可以按照以下步骤进行操作: 1. 在ldapadmin的主界面上选择要删除的目录项。
2. 单击工具栏上的“删除目录项”按钮。
3. 单击“确定”按钮确认删除操作。
四、搜索和过滤
4.1 执行搜索操作
ldapadmin提供了强大的搜索功能,您可以根据特定的条件搜索目录项。
按照以下
步骤进行操作: 1. 在ldapadmin的主界面上选择要搜索的上级目录。
2. 单击工具栏上的“搜索”按钮。
3. 在弹出的对话框中,输入搜索条件。
4. 单击“确定”按钮执行搜索操作。
4.2 过滤搜索结果
您可以使用ldapadmin的过滤功能来显示满足特定条件的搜索结果。
按照以下步骤进行操作: 1. 在搜索结果列表中选择要过滤的目录项。
2. 单击工具栏上的“过滤”按钮。
3. 在弹出的对话框中,输入过滤条件。
4. 单击“确定”按钮应用过滤条件。
4.3 导出搜索结果
ldapadmin允许您将搜索结果导出到文件中。
按照以下步骤进行操作: 1. 在搜索
结果列表中选择要导出的目录项。
2. 单击工具栏上的“导出”按钮。
3. 选择导出格式和目标文件路径。
4. 单击“确定”按钮导出搜索结果。
五、备份和恢复
5.1 备份LDAP目录
ldapadmin提供了备份LDAP目录的功能,您可以按照以下步骤进行操作: 1. 在ldapadmin的主界面上选择需要备份的上级目录。
2. 单击工具栏上的“备份”按钮。
3. 选择备份文件的存储位置和名称。
4. 单击“确定”按钮开始备份。
5.2 恢复LDAP目录
如果需要恢复LDAP目录,您可以按照以下步骤进行操作: 1. 在ldapadmin的主界面上选择要恢复的上级目录。
2. 单击工具栏上的“恢复”按钮。
3. 选择备份文件的路径和名称。
4. 单击“确定”按钮开始恢复。
六、总结
ldapadmin是一个功能强大且易于使用的LDAP目录管理工具。
本手册介绍了如何安装、配置和使用ldapadmin进行目录管理,包括创建、编辑和删除目录项,执行搜索和过滤操作,以及备份和恢复LDAP目录。
希望这个手册能够帮助您更好地使用ldapadmin管理和维护LDAP服务器上的目录。